
In This Chapter
Of all the improvements made in Mac OS X over Mac OS 9, one of the most important is the simplified printing process — no Chooser, no strange printer ports ...just a heap of Universal Serial Bus (USB) and network and Bluetooth printing goodness. As I discuss in Book II, Chapter 3, if your USB printer is recognized by Snow Leopard, you can print within seconds of plugging it in, with no muss or fuss. A USB printer is connected physically to your MacBook, but you can also send print jobs over the network to a network printer or even to a wireless printer. (Unfortunately, if that network printer is in another room, you do have to get out of your comfortable chair to retrieve your printed document ...not even Snow Leopard is that powerful.)
But what if you want to send documents to a printer over TCP/IP (Transmission Control Protocol/Internet Protocol)? To take care of tasks like that, you need to dig a little further — and I do so in this chapter. You also discover here how to use the features of the System Preferences Print & Fax pane and how to juggle print jobs like a circus performer.
The Printer Browser runs automatically whenever it's needed by Snow Leopard, but you can always summon it at any time by clicking the plus sign (or Add) button on the Print & Fax pane within System Preferences.
Note
If your USB printer is already natively supported (has a preloaded driver in Snow Leopard), you might not need to go through the trouble of clicking the Add button on the Print & Fax pane. Mac OS X can add a new USB printer automatically, so don't be surprised if your MacBook swoops in and does it for you as soon as you plug in a new printer. Also, the manufacturer's installation program for your printer might add the printer for you in a behind-the-scenes way, even if Mac OS X lies dormant.
Although the Printer Browser doesn't look like much (as shown in Figure 4-1), power lurks underneath.
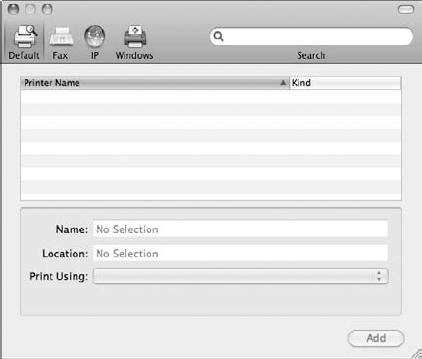
Along the top of the Printer Browser, you'll find four toolbar icons that will display the different types of printer categories possible in Snow Leopard. From the Browser, you can add these printers to your system. The four buttons are
Default: Click this button to add or display the entry for the default printer, which always appears in bold type.
Tip
To choose a printer you've already added as your default printer, click the Default Printer pop-up menu in the Print & Fax pane and choose that printer. You can also choose the Last Printer Used option, which automatically makes the default printer the last printer you used.
Fax: If you have an external USB fax device, click this button to add a fax connection as a printer selection. If you don't want to use Snow Leopard's built-in faxing system, you can print directly to a third-party fax program, such as FAXstf Pro (
www.smithmicro.com), which then dials, connects, and sends the document to a fax machine.IP: Click this button to add a remote printer to your Mac through an Internet connection or a local network connection. Sending a job to an Internet Protocol (IP) printer actually shoots the document across a network or Internet connection by using a target IP address or domain name. Generally, it's best to have a static (unchanging) IP address for a network printer; if the IP address changes often, for example, you have to reconfigure your connection to your IP printer each time it changes.
Windows: Click this button to add a shared printer that's connected to a PC on your local network. "Hey, I get to use the enemy's printers, too?" That's right, as long as a Windows user on your network has shared his printer (via the ubiquitous Windows File and Printer Sharing feature). Sweet.
Tip
Oh, and there's one additional important control on the toolbar that isn't actually a button: You can click in the Search field and type text to locate a particular printer in any of these dialog lists. (Personally, I don't have that many printers on my network, but in a larger company, this field can save you the trouble of scrolling through several pages of shared printers.)
"And what," you might ask, "is a funky printer?" Well, you have a number of possibilities, but they all add up to a non-USB connection. (Remember, I said that USB connections to a printer are generally automatic, or at least handled by the printer's installation software.) Some of the non-USB connections I mention in the previous section include Windows shared printers and IP printers.
No matter which type of funky printer you add, it needs a driver installed in the Printers folder, which resides inside your MacBook's Library folder. (A driver is a software program provided by the printer manufacturer that tells Mac OS X how to communicate with your printer.) Also, if the printer is PostScript compatible, it needs a Postscript Printer Description (PPD) file installed in your PPD folder, which also appears in the Printers folder. Luckily, Snow Leopard comes complete with a long list of drivers and PPD files already installed and available — bravo, Apple dudes and dudettes!
To add a funky printer, follow these steps:
Launch the manufacturer's installation application, which should copy the driver and PPD files for you.
If you have to do things the hard way, manually copy the driver file into the Library/Printers folder and then copy the PPD file (if required) into the Library/Printers/PPD folder.
If you're adding a physical printer — instead of an application printer driver — verify that the printer is turned on and accessible.
If you're printing to a shared printer connected to another Mac or PC, that computer has to be on. Luckily, most network printers (and their computer hosts) remain on all the time.
Display the Print & Fax pane within System Preferences and click the Add button (with the plus sign) on the Printing pane.
You see the familiar Printer Browser. Shared printers using Bonjour network technology should show up on the default list, so you can click the printer to select it.
To add an IP printer, click the IP Printer button on the browser toolbar.
Click the Protocol pop-up menu to choose the IP printing protocol (typically either IPP or the manufacturer-specific socket protocol). If you have a choice, it's always a good idea to use the manufacturer-specific socket.
Click in the Address box and type the printer's IP address or Domain Name System (DNS) name, which should be provided by your network administrator or the person running the print server. You can use the default queue on the server by leaving the Queue box blank — which I recommend — or select the Queue text box and type a valid queue name for the server.
Tip
If you don't know a valid queue name, you're up a creek — hence, my recommendation to use the default queue.
If you like, you can type a name and location for the remote printer; this is purely for identification purposes. Finally, click the Print Using pop-up menu, choose the brand and model of the remote printer, and then click Add.
To add a Windows printer, click the Windows button on the Printer Browser toolbar.
Click the correct Windows workgroup that includes the printer(s) that you want to use in the left column. After a scan of the specified workgroup, Printer Browser displays the list of printers that it can access. (Don't forget to thank His Billness later.)
After everything is tuned correctly, click the Print Using pop-up menu and choose the brand and model of the remote printer.
Click Add to complete the process and admire your new printer on the Print & Fax panel in System Preferences.
Tip
Heck, Snow Leopard even allows you to order supplies for many printers from the comfort of System Preferences! Sure, you'll pay a premium price, but think of the techno-nerd bragging rights you'll enjoy at your next Mac user group meeting! Click a printer in the Print & Fax pane and click the Options & Supplies button; then click the Supply Levels tab. When you click the Supplies button, System Preferences automatically launches Safari with the proper Web page from the Apple Store.
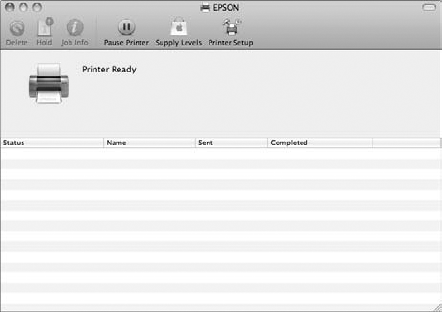
You can also exercise some control over the documents — or, in technoid, print jobs — that you send to your printer. To display the jobs that are active (in line and preparing to print), open the Print & Fax pane in System Preferences and click the Open Print Queue button. (Alternatively, click the printer's icon in the Dock to display the same window.)
The actions that you can perform from the Print Queue window (as shown in Figure 4-2) are
Where's the chapter on faxing?
Good question, and here's the answer: Snow Leopard handles faxing so seamlessly that you don't need a chapter's worth of instruction! As long as your MacBook has an external analog (dial-up) fax modem connected to a phone line, you're a lean faxing machine.
To fax any open document within an active application, just choose File
If you need a spiffy-looking cover page, select the Use Cover Page check box. Click in the Message box directly below it and type whatever you like. You can optionally type a subject as well. When all is ready, throw caution utterly to the wind and click the Fax button. The Printer Browser treats a fax just as it does any other printed document, so you can cancel it or monitor its progress, as I discuss in the section, "Managing Your Printing Jobs."
Your MacBook can also receive faxes. To enable this feature, open System Preferences and click the Print & Fax icon. Click the entry for your fax in the list, click the Receive Options button, and then select the Receive Faxes on This Computer check box. Set the number of rings Snow Leopard should wait before answering the call. You can save your incoming faxes as files within a folder you specify or e-mail the contents automatically to any e-mail address you like. (Perfect for vacations!) If you like, you can even take the mundane route and print them on your system printer.
Delete: When you click a print job in the list and then click the Delete icon, the print job is removed from the queue. You might need to delete a print job if you discover a mistake in the document while printing.
Tip
If the job is currently printing, several additional pages might be printed before the job is finally cancelled. In other words, information already sent to the printer might have to be printed before the cancel request can be processed.
Hold: Click the Hold toolbar icon to pause printing of the current print job. The status of the print job changes to Hold.
Resume: Click a print job in Hold status in the list and then click the Resume icon to resume printing.
Job Info: Click this button to display basic information about the selected print job, such as number of pages and page size.
Pause Printer: Click this icon to stop all printing to this printer. Note, however, that unlike using the Delete command, Pause Printer doesn't remove any print jobs from the list. When jobs are stopped, the Pause Printer icon morphs into Resume Printer — click it to restart all jobs in the queue list.
Tip
This is a good feature to use when your printer is about to run out of paper.
Supply Levels: If your printer supports remote supply monitoring, you can click this icon to display the current levels of ink and paper in your printer. (Thus saving your feet from the wear and tear of walking.)
Printer Setup: Click this icon and Snow Leopard displays the model-specific configuration settings and features (if any) that are available for the selected printer. Of course, these settings vary for every printer produced by the hand of Man — they're actually determined by the manufacturer's printer driver — but they usually include actions (such as cleaning and alignment) and settings (such as print quality).
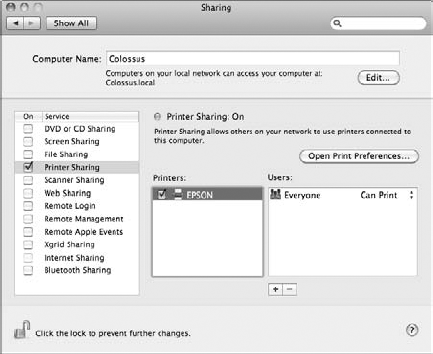
Before we leave the Island of Big X Printing, I'd like to show you how to share a printer with others on your local network, using Snow Leopard's super-easy Bonjour network sharing feature. (Earlier in this chapter, I show you how to connect to other shared printers around you. Here, you're going to share a printer that's connected directly to your MacBook, like a portable photo printer.)
Tip
If you decide to share your printers, don't be surprised if Mac OS X seems to slow down slightly from time to time. This is because of the processing time necessary for your MacBook to store queued documents from other computers. The hard drive activity on your laptop is likely to significantly increase as well.
Once again, turn to System Preferences! Click the Sharing icon; then click the Printer Sharing check box to select it. (When it comes to printing, Snow Leopard gives you more than one way to skin a ...well, you get the idea, even without the bad pun.) To share a printer, click the check box next to the desired printer (as shown in Figure 4-3) and click the Add button to select which users will have access to the shared printer. (By default, a shared printer can be accessed by everyone.) Voilà! You're the guru!
"Hey, what about my firewall?" Perhaps you would worry if you were using that Other Operating System — which shall remain nameless here — but you're using Snow Leopard, and everything is set automatically for you the moment you click the Printer Sharing check box! Snow Leopard automatically opens the correct port in your firewall to allow printer sharing. (And yes, if you decide not to share your printers and you deselect the Printer Sharing check box later, Snow Leopard cleans up after you. It closes the port in your firewall for you.) Super-flippin' sweet.
The printers that you specify are available to other computers within the same IP subnet. In other words, someone in your local network can use your printers, but no one outside your network has access.
Tip
If you haven't already assigned a printer a descriptive name, click the desired printer from the list in the Print & Fax pane and then click the Options & Supplies button. Click the General button on the sheet that appears and enter a descriptive name in the Name text field. You can also identify that printer's location in the Location text field. For example, in an office environment, I like to add the room number to a shared printer name (as well as the Location field).