
Chapter 14
Administering Networking
Connecting a single desktop system or laptop to a network, particularly one that connects to the Internet, has become so easy that I felt I could put off a full chapter on Linux networking until now. If you are trying to connect your Fedora, RHEL, Ubuntu, or other Linux desktop system to the Internet, here's what you can try, given an available wired or wireless network interface:
- Wired network—If your home or office has a wired Ethernet port that provides a path to the Internet and your computer has an Ethernet port, use an Ethernet cable to connect the two ports. After you turn on your computer, boot up Linux, and log in. Clicking on the NetworkManager icon on the desktop should show you that you are connected to the Internet.
- Wireless network—For a wireless computer running Linux, log in and click on the NetworkManager icon on the desktop. From the list of wireless networks that appear, select the one you want and, when prompted, enter the password required. Each time you log in from that computer from the same location, it will automatically connect to that wireless network.
If either of those types of network connections work for you, and you are not otherwise curious about how networking works in Linux, that may be all you need to know. However, what if your Linux system doesn't automatically connect to the Internet? What if you want to configure your desktop to talk to a private network at work (VPN)? What if you want to lock down network settings on your server or configure your Linux system to work as a router?
In this chapter, topics related to networking are divided into network for desktops, servers, and enterprise computing. The general approach to configuring networking in these three types of Linux systems is as follows:
- Desktop/laptop networking—On desktop systems, NetworkManager runs by default to manage network interfaces. With NetworkManager, you can automatically accept address and server information you need to connect to the Internet. However, you can also set address information manually. You can configure such things as proxy servers or virtual private network connections to allow your desktop to work from behind an organization's firewall or to connect through a firewall, respectively.
- Server networking—While NetworkManager is an excellent service for desktop and laptop network configuration, it does not work as well on servers. To configure networking on servers, I describe how to use the basic network service in Red Hat Enterprise Linux to configure server-related networking, including configuring aliases and Ethernet channel bonding, as well as how to use the underlying networking configuration files directly.
- Enterprise networking—Configuring networking in a large enterprise can fill several volumes itself. However, to give you a head start using Linux in an enterprise environment, I discuss basic networking technologies, such as DHCP and DNS, which make it possible for desktop systems to connect to the Internet automatically.
Configuring Networking for Desktops
Whether you connect to the Internet from Linux, Windows, a smartphone, or any other kind of network-enabled device, there are certain things that must be in place for that connection to work. The computer must have a network interface (wired or wireless), an IP address, an assigned DNS server, and a route to the Internet (identified by a gateway device).
Before I discuss how to change your networking configuration in Linux, let's look at the general activities that occur when Linux is set to automatically connect to the Internet with NetworkManager:
- Activate network interfaces—NetworkManager looks to see what network interfaces (wired or wireless) are set to start. By default, external interfaces are set to start automatically using DHCP.
- Request DHCP service—The Linux system acts as a DHCP client to send out a request for DHCP service on each enabled interface. It uses the MAC address of the network interface to identify itself in the request.
- Get response from DHCP server—A DHCP server, possibly running on the DSL modem, cable modem, or other device providing a route to the Internet from your location, responds to the DHCP request. It can provide lots of different types of information to the DHCP client. That information probably contains at least the following:
- IP address—The DHCP server typically has a range of Internet Protocol (IP) addresses it can hand out to any system on the network that requests an address. In more secure environments, or one in which you want to be sure that specific machines get specific addresses, the DHCP server provides a specific IP address to requests from specific MAC addresses. (MAC addresses are made to be unique among all network interface cards and are assigned by the manufacturer of each card.)
- Subnet mask—When the DHCP client is assigned an IP address, the accompanying subnet mask tells that client which part of the IP address identifies the subnetwork and which identifies the host. For example, an IP address of 192.168.0.100 and subnet mask of 255.255.255.0 tells the client that the network is 192.168.0 and the host part is 100.
- Lease time—When an IP address is dynamically allocated to the DHCP client (Linux system), that client is assigned a lease time. The client doesn't own that address, but must lease it again when the time expires and request it again when the network interface restarts. Usually, the DHCP server will remember the client and assign the same address when the system starts up again or asks to renew the lease. The default lease time is 86,400 seconds (24 hours).
- Domain name server—Because computers like to think in numbers (such as IP addresses like 192.168.0.100) and people tend to think in names (such as the hostname http://www.example.com), computers need a way to translate hostnames into IP addresses and sometimes the opposite as well. The domain name system (DNS) was designed to handle that problem by providing a hierarchy of servers to do name-to-address mapping on the Internet. The location of one or more DNS servers (usually two or three) is usually assigned to the DHCP client from the DHCP host.
- Default gateway—Although the Internet has one unique namespace, it is actually organized as a series of interconnected subnetworks. In order for a network request to leave your local network, it must know what node on your network provides a route to addresses outside of your local network. The DHCP server usually provides the “default gateway” IP address. By having network interfaces on both your subnetwork and the next network on the way to the ultimate destination of your communication, a gateway can route your packets to their destination.
- Other information—A DHCP server can be configured to provide all kinds of information to help the DHCP client. For example, it can provide the location of an NTP server (to sync time between clients), font server (to get fonts for your X display), IRC server (for online chats), or print server (to designate available printers).
- Update local network settings—Once the settings are received from the DHCP server, they are implemented as appropriate on the local Linux system. For example, the IP address is set on the network interface, the DNS server entries are added to the local /etc/resolv.conf file (by NetworkManager), and the lease time is stored by the local system, so it knows when to request that the lease be renewed.
All the steps just described typically happen without your having to do anything but turn on your Linux system and log in. Let's say that you want to be able to verify your network interfaces or change some of those settings. You can do that using tools described in the next sections.
Checking your network interfaces
There are both graphical and command-line tools for viewing information about your network interfaces in Linux. From the desktop, NetworkManager tools are a good place to start.
Checking your network from NetworkManager
The easiest way to check the basic setting for a network interface started by NetworkManager is to open the NetworkManager icon on your desktop. Figure 14.1 shows an example of the NetworkManager icon in the top panel of a GNOME 3 desktop in Fedora, along with the window that appears when you open the icon.
Figure 14.1 Checking network interfaces with NetworkManager
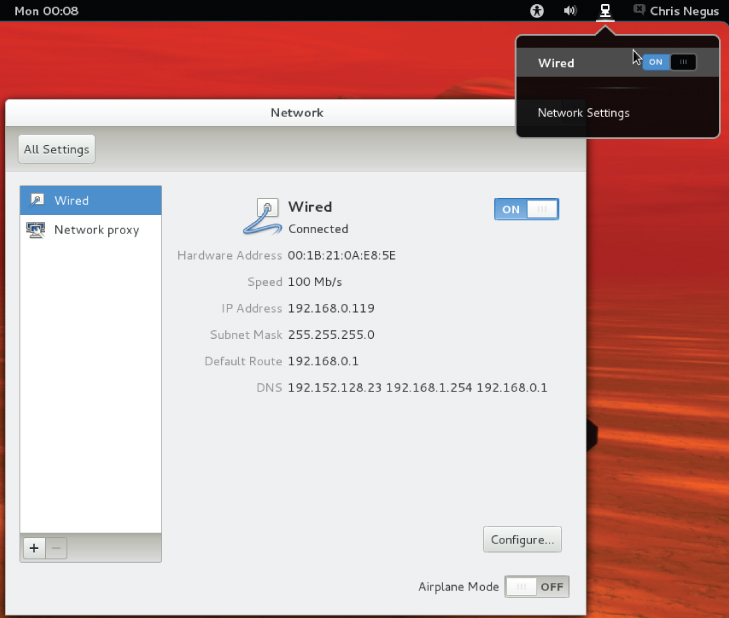
As you can see from Figure 14.1, the wired network connection is on. The network interface card has a Media Access Control (MAC) address of 00:1B21:0A:E8:5E. The interface was assigned an IP address of 192.168.0.119 and a subnet mask of 255.255.255.0.
Any packet not destined for the local network is sent to the router located at address 192.168.0.1 (although other routes can be defined as needed). Three DNS servers are available (192.152.128.23, 192.168.1.254, and 192.168.0.1), so if one is not available, requests for DNS service can be directed to the address of the next DNS server in the list.
To see more about how your Linux system is configured, click the Configure button in the NetworkManager window. Figure 14.2 shows an example of the window that appears.
Figure 14.2 Viewing network settings with NetworkManager
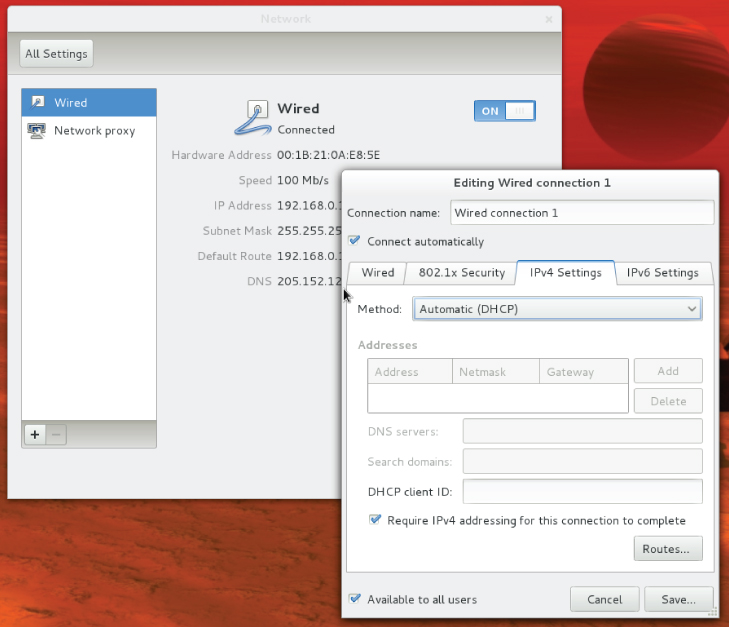
Figure 14.2 shows the IPv4 Settings tab, because that is the tab containing information you are most likely to want to change. The Automatic (DHCP) setting is what tells this interface to connect to DHCP at startup so you might want to change that to manually set IPv4 information. The IPv6 tab sets how connections to IPv6 networks are made from this Interface (also Automatic, by default). Later in this chapter, you learn how to manually configure IPv4 network interfaces.
The 802.1 Security tab lets you set up secure connections to remote systems using 802.1x specifications from the IEEE. By default, this feature is off, but you can enable it and then identify remote hosts that you want to connect to using secure protocols. The last tab on the window is Wired or Wireless. That tab lets you change the MAC address (usually not a good idea) and the MTU (which is set to automatic, but can be changed to modify the maximum packet size the connection can send).
Checking your network from the command line
To get more detailed information about your network interfaces, try running some commands. There are commands that can show you information about your network interfaces, routes, hosts, and traffic on the network.
Viewing network interfaces
To see information about each network interface on your local Linux system, type the following:
# ip addr show
1: lo: <LOOPBACK,UP,LOWER_UP> mtu 16436 qdisc noqueue state UNKNOWN
  link/loopback 00:00:00:00:00:00 brd 00:00:00:00:00:00
  inet 127.0.0.1/8 scope host lo
  inet6 ::1/128 scope host
     valid_lft forever preferred_lft forever
2: eth0: <NO-CARRIER,BROADCAST,MULTICAST,UP> mtu 1500 qdisc pfifo_fast
      state DOWN qlen 1000
  link/ether f0:de:f1:28:46:d9 brd ff:ff:ff:ff:ff:ff
3: wlan0: <BROADCAST,MULTICAST,UP,LOWER_UP> mtu 1500 qdisc mq state UP qlen 1000
  link/ether 00:24:d7:69:5b:2c brd ff:ff:ff:ff:ff:ff
  inet 192.168.0.105/24 brd 192.168.0.255 scope global wlan0
  inet6 fe80::224:d7ff:fe69:5b2c/64 scope link
     valid_lft forever preferred_lft forever
The ip addr show output displays information about your network interfaces, in this case from a laptop running RHEL. The names of the network interfaces are different in Fedora (more on that later), but should otherwise be similar. The lo entry in the first line of the output shows the loopback interface, which is used to allow network commands run on the local system to connect to the local system. The IP address for localhost is 127.0.0.1/8 (the /8 is CIDR notation, indicating that 127.0 is the network number and 0.1 is the host number).
In this case, the wired Ethernet interface (eth0) is down (no cable), but the wireless interface is up (wlan). The MAC address on the wireless interface (wlan0) is 00:24:d7:69:5b:2c and the Internet (IPv4) address is 192.168.0.105. An IPv6 address is also enabled.
In Fedora, instead of assigning network interface names such as eth0 and wlan0, interfaces are named by their locations on the computer's bus. For example, the first port on the network card seated in the third PCI bus for a Fedora system is named p3p1. The first embedded Ethernet port would be em1. Wireless interfaces sometimes appear using the name of the wireless network as the device name.
Another popular command for seeing network interface information is the ifconfig command. By default, ifconfig shows similar information to that of ip addr, but ifconfig also shows the number of packets received (RX) and transmitted (TX), as well as the amount of data and any errors or dropped packets:
# ifconfig wlan0
wlan0 Link encap:Ethernet  HWaddr 00:24:D7:69:5B:2C
      inet addr:192.168.0.105  Bcast:192.168.0.255  Mask:255.255.255.0
      inet6 addr: fe80::224:d7ff:fe69:5b2c/64 Scope:Link
      UP BROADCAST RUNNING MULTICAST  MTU:1500  Metric:1
      RX packets:22482 errors:0 dropped:0 overruns:0 frame:0
          TX packets:9699 errors:0 dropped:0 overruns:0 carrier:0
          collisions:0 txqueuelen:1000
          RX bytes:9456897 (9.0 MiB)  TX bytes:1232234 (1.1 MiB)
Checking connectivity to remote systems
To make sure you can reach systems that are available on the network, you can use the ping command. As long as the computer responds to ping requests (not all do), you can use ping to send packets to that system in a way that asks them to respond. Here is an example:
$ ping
pub1.kernel.org
PING pub1.kernel.org (149.20.20.133) 56(84) bytes of data.
64 bytes from pub1.kernel.org (149.20.20.133): icmp_seq=1 ttl=64 time=0.062 ms
64 bytes from pub1.kernel.org (149.20.20.133): icmp_seq=2 ttl=64 time=0.044 ms
ˆC
--- pub1.kernel.org ping statistics ---
2 packets transmitted, 2 received, 0% packet loss, time 1822ms
rtt min/avg/max/mdev = 0.044/0.053/0.062/0.009 ms
The ping command just shown continuously pings the host pub1.kernel.org. After a few pings, press Ctrl+C to end the pings, and the last few lines show you how many of the ping requests succeeded.
You could have used the IP address (192.168.0.15, in this case) to see that you could reach the system. However, using the hostname gives you the additional advantage of knowing that your name-to-IP-address translation (being done by your DNS server or local hosts file) is working properly as well.
Checking routing information
Routing is the next thing you can check with respect to your network interfaces. The following shows how to use the route command to do that:
# route
Kernel IP routing table
Destination     Gateway         Genmask         Flags Metric Ref    Use Iface
default         192.168.0.1     0.0.0.0         UG    0      0        0 p4p1
192.168.0.0     *               255.255.255.0   U     1      0        0 p4p1
The output from the kernel routing table is from a Fedora system with a single network interface card. The network interface card is on PCI slot 4, port 1 (p4p1). Any packets destined for the 192.168.0 network use the p4p1 NIC. Packets destined for any other location are forwarded to the gateway system at 192.168.0.1. That system represents my router to the Internet. Here's a more complex routing table:
# route
Kernel IP routing table
Destination     Gateway         Genmask         Flags Metric Ref    Use Iface
vpn-a.example.  192.168.0.1     255.255.255.255 UGH   0      0        0 wlan0
192.168.0.0     *               255.255.255.0   U     2      0        0 wlan0
10.99.8.0       *               255.255.255.0   U     0      0        0 tun0
172.1.0.0       *               255.255.0.0     U     0      0        0 tun0
10.0.0.0        *               255.0.0.0       U     0      0        0 tun0
192.168.99.0    192.168.0.2     255.255.255.0   UG    0      0        0 wlan0
default         192.168.0.1     0.0.0.0         UG    0      0        0 wlan0
In the route example just shown, there is a wireless interface (wlan0), as well as an interface representing a virtual private network (VPN) tunnel. A VPN provides a way to have encrypted, private communications between a client and a remote network over an insecure network (such as the Internet). Here, the tunnel goes from the local system over the wlan0 interface to a host named vpn-a.example.com (some of the name is truncated).
All communication to 192.168.0.0/24 network still goes directly over the wireless LAN. However, packets destined for the 10.99.8.0/24, 172.1.0.0/16, and 10.0.0.0/8 networks are routed directly to vpn-a.example.com for communication with hosts on the other side of the VPN connection over the tunneled interface (tun0).
A special route to the 192.168.99.0 network is accessible via the node (presumably a router) at IP address 192.168.0.2. All other packets will go to the default route via the address 192.168.0.1. As for the flags shown in the output, a U says the route is up, a G identifies the interface as a gateway, and an H says the target is a host (as is the case with the VPN connection).
So far, I have shown you the routes to leave the local system. If you want to follow the entire route to a host from beginning to end, you can use the traceroute command. For example, to trace the route a packet takes from your local system to the Google.com site, type the following traceroute command:
# traceroute google.com
traceroute to google.com (74.125.235.136), 30 hops max, 60 byte packets
...
 7  rrcs-70-62-95-197.midsouth.biz.rr.com (70.62.95.197)  ...
 8  ge-2-1-0.rlghncpop-rtr1.southeast.rr.com (24.93.73.62)  ...
 9  ae-3-0.cr0.dca10.tbone.rr.com (66.109.6.80) ...
10  107.14.19.133 (107.14.19.133)  13.662 ms  ...
11  74.125.49.181 (74.125.49.181)  13.912 ms ...
12  209.85.252.80 (209.85.252.80)  61.265 ms ...
13  66.249.95.149 (66.249.95.149)  18.308 ms ...
14  66.249.94.22 (66.249.94.22)  18.344 ms ...
15  72.14.239.83 (72.14.239.83)  85.342 ms ...
16  64.233.174.177 (64.233.174.177)  167.827 ms ...
17  209.85.255.35 (209.85.255.35)  169.995 ms  ...
18  209.85.241.129 (209.85.241.129)  170.322 ms  ...
19  nrt19s11-in-f8.1e100.net (74.125.235.136)  169.360 ms  ...
I truncated some of the output to drop off some of the initial routes and the amount of time (in milliseconds) that the packets were taking to traverse each route. Using traceroute, you can see where the bottlenecks are along the way if your network communication is stalling.
Viewing the host and domain names
To see the hostname assigned to the local system, type hostname. To just see the domain portion of that name, use the dnsdomainname command.
# hostname
spike.example.com
# dnsdomainname
example.com
Configuring network interfaces
If you don't want to have your network interfaces assigned automatically from a DHCP server (or if there is no DHCP server), you can assign IP addresses and related information using static IP addresses and other information needed for your computer to work properly on the network. Most of this basic information can be set up using NetworkManager.
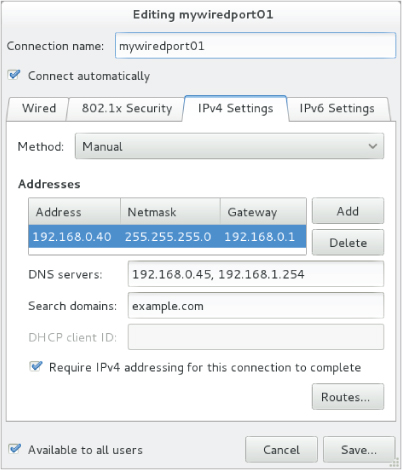
To change your network configuration through NetworkManager, do the following:
- Address—The IP address you want to assign to your local network interface. For example, 192.168.0.40.
- Netmask—The subnetwork mask that defines which part of the IP address represents the network and which the host. For example, a netmask of 255.255.255.0 would identify the network portion of the previous address as 192.168.0 and the host portion as 40.
- Gateway—The IP address of the computer or device on the network that acts as the default route. The default route will route packets from the local network to any address that is not available on the local network or via some other custom route.
- DNS servers—Fill in the IP addresses for the systems providing DNS service to your computer.
- Search domains—Fill in any domain names of domains you would like the system to search if you just enter a hostname when you run a command. For example, with a search domain of example.com, if you typed ping spike, the system would try to ping the system spike.example.com.
- Save—Click the Save button. The new information is saved and the network is restarted using the new information. Figure 14.3 shows an example of those network settings.
Figure 14.3 Changing network settings with NetworkManager
You can look in the NetworkManager window or run an ifconfig or ip addr command described in the “Viewing network interfaces” section earlier in the chapter to test that your new network settings have taken effect.
Configuring a network proxy connection
If your desktop system is running behind a corporate firewall, you might not have direct access to the Internet. Instead, you might have to reach the Internet via a proxy server. Instead of allowing you full access to the Internet, a proxy server lets you make requests only for certain services outside of the local network. The proxy server then passes those requests on to the Internet or other network.
Proxy servers typically provide access to web servers (http:// and https://) and FTP servers (ftp://). However, a proxy server that supports SOCKS can provide a proxy service for different protocols outside of the local network. (SOCKS is a network protocol made to allow client computers to access the Internet through a firewall.) You can identify a proxy server in NetworkManager and have communications for selected protocols go through that server (select Network proxy in the Network Settings window).
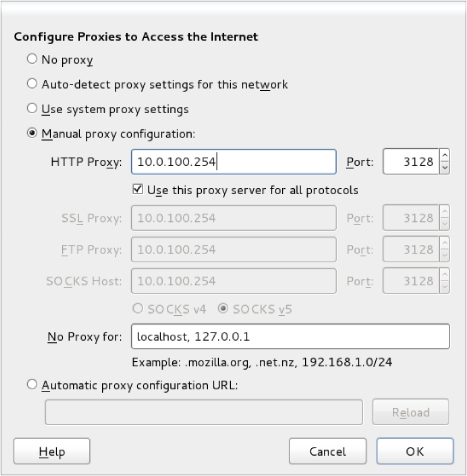
Instead of identifying a proxy server to your network interfaces (via NetworkManager), you can configure your browser to use a proxy server directly by changing your Firefox preferences to use a proxy server. Here's how to define a proxy server from the Firefox window:
- HTTP Proxy—The IP address of the computer providing the proxy service. This causes all requests for web pages (http:// protocol) to be forwarded to the proxy server.
- Port—The port associated with the proxy service. By default, the port number is 3128, but it can differ.
- Use this proxy server for all protocols—Select this box to use the same proxy server and port associated with the HTTP proxy for all other service requests. This causes other proxy settings to be grayed out. (Instead of selecting this box, you can set those proxy services separately.)
- No Proxy for—By leaving localhost and the local IP address (127.0.0.1) in this box, any requests to the local system that would otherwise be directed to the proxy server go directly to the local system.
Figure 14.4 shows an example of the Configure Proxies window filled in to configure a connection to a proxy server located at IP address 10.0.100.254 for all protocols. After you click OK, all requests from the Firefox browser to locations outside of the local system are directed to the proxy server, which forwards those requests on to the appropriate server.
Figure 14.4 Setting up Firefox to use a proxy server
Configuring Networking for Servers
While NetworkManager does a great job of auto-detecting wired networks or presenting you with lists of wireless networks for your laptop to connect to, it is less well suited for configuring networking on servers. So, in this section, you are going to disable NetworkManager, turn on the network service, and do the procedures in this section by working directly with networking commands and configuration files.
In particular, in this section, you are going to do the following:
- Basic configuration—See how to use system-config-network to configure basic networking with a menu-based interface.
- Configuration files—Understand configuration files associated with Linux networking and how to configure them directly.
- Aliases—Set up multiple addresses on the same interfaces, so one NIC can have multiple addresses assigned to it (aliases).
- Ethernet channel bonding—Set up Ethernet channel bonding (multiple network cards listening on the same IP address).
- Custom routes—Set up custom routes.
As mentioned earlier, I recommend you turn NetworkManager off in most cases when you are configuring networking on a server. To do this on a RHEL or older Fedora system, type the following as root (do this on a console since this procedure will stop your networking if you are logged in over the network):
# service NetworkManager stop
# service network restart
# chkconfig NetworkManager off
# chkconfig network on
For newer Fedora systems that use the systemctl command to start, stop, enable, and disable services, you could type the following:
# systemctl stop NetworkManager.service
# systemctl disable NetworkManager.service
# service network restart
# chkconfig network on
Using system-config-network
Many servers don't have graphical interfaces available. So if you want to configure networking, you must be able to do so from the shell. One way to do that is to edit networking configuration files directly. Another is to use system-config-network.
Before NetworkManager existed, the system-config-network command launched a graphical interface that was the primary way to configure networking in Fedora and Red Hat Enterprise Linux. In the latest versions of those Linux systems, system-config-network provides a menu-based interface that runs in the shell. As root, type system-config-network to see a screen similar to what is presented in Figure 14.5.
Figure 14.5 Configuring networking with system-config-network
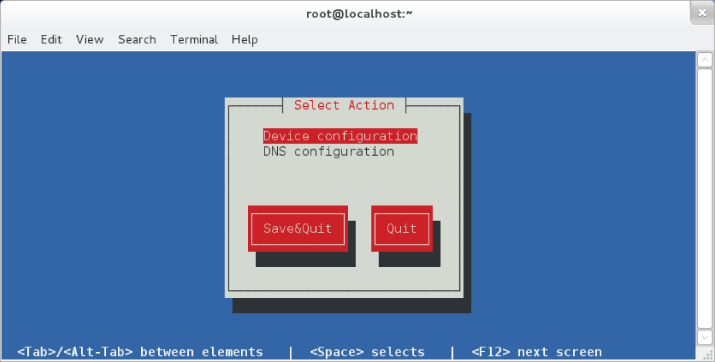
Use arrow keys and the Tab key to move around the interface. With the item you want to select highlighted, press Enter to select it. The interface is limited to modifying two kinds of information: Device configuration (network interface cards) and DNS configuration (name resolution).
Choosing device configuration
With Device configuration highlighted, press Enter. A list of network devices (usually wired or wireless Ethernet cards) is displayed. Highlight one of the network devices and press Enter. The Network Configuration window that appears lets you change information relating to the selected network device. Figure 14.6 shows an example.
Figure 14.6 Use DHCP or set static IP addresses.
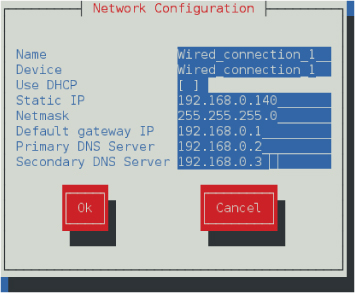
You can leave the Name and Device fields as they are. By default, an asterisk appears in the Use DHCP field. This is what allows the network to come up automatically on the network if a DHCP service is available. To enter address and other information yourself, use the Tab key to highlight the Use DHCP field, and then press the spacebar to turn off DHCP. The figure shows the screen after the asterisk has been removed.
Now fill in the address information (IP address and netmask). Type in the IP address for the computer or router that is supplying the route to the Internet. Then, you can type in the IP addresses of either one or two DNS servers, to tell the system where to go to translate hostnames you request into IP addresses. Tab to the OK button and press the spacebar. Then click Save and Save & Quit.
Choosing DNS configuration
With DNS configuration highlighted, press Enter. On the DNS configuration screen, you can set the system's hostname, DNS servers, and DNS search path. Figure 14.7 shows an example of that screen.
Figure 14.7 Setting the hostname and DNS information
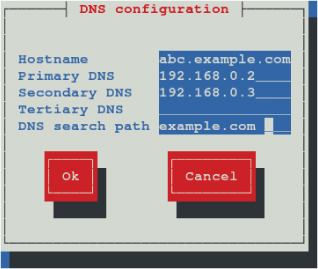
The hostname can be any name you like or the fully qualified hostname of the system. You can set the IP addresses of up to three DNS servers. When you enter a hostname (in a web browser or other application), the first DNS server is queried for the requested host's IP address. If that DNS server is down, the Secondary DNS server is checked (then, the Tertiary DNS is checked if the Secondary one is not found).
The last field contains the DNS search path. The DNS search path is used when you request a host from an application without using a fully qualified domain name. For example, if you type ping host1 with an example.com search path, the command would try to send ping packets to host1.example.com.
Click OK to save the information. Then click Save & Quit. The information is written to several different configuration files. You need to restart the network service for the new settings to take effect. If you are interested in which configuration files are updated, refer to the next section.
Understanding networking configuration files
Whether you change your network setup using NetworkManager or system-config-network, most of the same configuration files are updated. In Fedora and RHEL, network interfaces and custom routes are set in files in the /etc/sysconfig/network-scripts directory. Other network settings are stored in other files in the /etc directory.
Instead of using some of the tools just described, you can also configure networking in Linux by directly editing configuration files. The following sections describe network configuration files.
Network interface files
Configuration files for each wired, wireless, ISDN, dialup, or other type of network interface are represented by files in the /etc/sysconfig/network-scripts directory that begin with ifcfg-interface. The interface is replaced by the name of the network interface.
In Red Hat Enterprise Linux and older Fedora systems, network interfaces have names such as eth0, eth1, eth2 (for each wired network interface), wlan0 (for the first wireless interface), and ppp0 (for the first dial-up point-to-point interface). In RHEL, the configuration file for the first Ethernet interface would be ifcfg-eth0. Here's an example of an ifcfg-eth0 file for a wired DHCP connection:
DEVICE=eth0
HWADDR=F0:DE:F1:28:46:D9
TYPE=Ethernet
BOOTPROTO=dhcp
ONBOOT=yes
NM_CONTROLLED=no
USERCTL=no
In this ifcfg-eth0 example, the first three lines set the device name, MAC address, and the type of interface to Ethernet. The BOOTPROTO variable is set to dhcp, which causes it to request address information from a DHCP server. With ONBOOT=yes, the interface starts automatically at system boot time. Setting NM_CONTROLLED=no ensures that NetworkManager doesn't control the interface. Another setting in the ifcfg-eth0 example keeps regular users from being able to start and stop the interface (USERCTL=no).
Here's what an ifcfg-eth1 file might look like for a wired Ethernet interface that uses static IP addresses:
DEVICE=eth1
HWADDR=00:1B:21:0A:E8:5E
TYPE=Ethernet
BOOTPROTO=none
ONBOOT=yes
NM_CONTROLLED=no
USERCTL=no
IPADDR=192.168.0.140
NETMASK=255.255.255.0
GATEWAY=192.168.0.1
In this ifcfg-eth1 example, because this is setting address and other information statically, BOOTPROTO is set to none. Other differences are needed to set the address information that is normally gathered from a DHCP server. In this case, the IP address is set to 192.168.0.140, with a netmask of 255.255.255.0. The GATEWAY=192.168.0.1 identifies the address of the router to the Internet.
If you are interested in other settings you can use in ifcfg files, check the sysconfig.txt file in the /usr/share/doc/initscripts-* directory. Here are a couple of other settings that might interest you:
- PEERDNS—Setting PEERDNS=no prevents DHCP from overwriting the /etc/resolv.conf file. This allows you to set which DNS servers your system uses without fear of that information being erased by data that is provided by the DHCP server.
- DNS?—If an ifcfg file is being managed by NetworkManager, it sets the address of DNS servers using DNS? entries. For example, DNS1=192.168.0.2 causes that IP address to be written to /etc/resolv.conf as the first DNS server being used on the system. You can have multiple DNS? entries (DNS2=, DNS3=, and so on).
Once an ifcfg-* file is created, you can bring the interface up and down individually using the ifup and ifdown commands, instead of bringing all interfaces up or down together. For example, you can bring the lo (ifcfg-lo) interface up and down using the following commands:
# ifdown lo
# ifconfig
# ifup lo
# ifconfig
The commands just shown turn off the loopback network interface (ifdown lo), and then let you see that it is not active (ifconfig). After that, you turn it back on again (ifup lo), and check again to see that it is on (ifconfig).
In addition to configuring the primary network interfaces, you can also create files in the /etc/sysconfig/network-scripts directory that can be used to set aliases (multiple IP addresses for the same interface), bonded interfaces (multiple NICs listening on the same address), and custom routes. Those are described later in this section.
Other networking files
In addition to the network interface files, there are other network configuration files that you can edit directly to configure Linux networking. Here are some of those files.
/etc/sysconfig/network file
Systemwide settings associated with your local networking can be included in your /etc/sysconfig/network file. The system's hostname is most commonly set in this file, but other settings can be added to this file as well. Here is an example of the contents of a /etc/sysconfig/network file:
NETWORKING=yes
HOSTNAME=abc.example.com
GATEWAY=192.168.0.1
The previous example shows that networking is on by default. The hostname of the local system is set to abc.example.com. The HOSTNAME value is the correct place to put the system's hostname because it is read each time the system boots. Notice that you can also add the default GATEWAY (here 192.168.0.1). Different interfaces can use different GATEWAY addresses. For other settings that can appear in the network files, check the sysconfig.txt file in the /usr/share/doc/initscripts-* directory.
/etc/hosts file
Before DNS was created, translating hostnames to IP addresses was done by passing around a single hosts file. While there were only a few dozen, and then a few hundred, hosts on the Internet, this approach worked pretty well. But as the Internet grew, the single hosts file became unscalable and DNS was invented.
The /etc/hosts file still exists on Linux systems. It can still be used to map IP addresses to hostnames. The /etc/hosts file is a way to set up names and addresses for a small local network or just create aliases, to make it easier to access systems you use all the time.
Here's an example of an /etc/hosts file:
127.0.0.1    localhost.localdomain    localhost
::1          mycomputer     chris   localhost6.localdomain6  localhost6
192.168.0.201  node1.example.com node1 joe
192.168.0.202  node2.example.com node2 sally
The first two lines (127.0.0.1 and ::1) set addresses for the local system. The IPv4 address for the local host is 127.0.0.1; the IPv6 address for the local host is ::1. There are also entries for two IP addresses. You could reach the first IP address (192.168.0.201) by the names node1.example.com, node1, or joe. For example, typing ping joe results in packets being sent to 192.168.0.201.
/etc/resolv.conf file
DNS servers and search domains are set in the /etc/resolv.conf file. If NetworkManager is enabled and running, you should not edit this file directly. Using DNS?= entries from ifcfg-* files, NetworkManager overwrites the /etc/resolv.conf file so you would lose any entries you add to that file. Here's an example of the /etc/resolv.conf file that was modified by NetworkManager.
# Generated by NetworkManager
nameserver 192.168.0.2
nameserver 192.168.0.3
Each nameserver entry identifies the IP address of a DNS server. The order is the order in which the DNS servers are checked. It's normal to have two or three nameserver entries, in case the first is not available. More than that and it can take too long for an unresolvable hostname to get checked for each server.
Another type of entry you can add to this file is a search entry. A search entry lets you indicate domains to be searched when a hostname is requested by its base name instead of its entire fully qualified domain name. You can have multiple search entries by identifying one or more domain names after the search keyword. For example:
search example.com example.org example.net
The search options are separated by spaces or tabs.
/etc/nsswitch.conf
Settings in the /etc/nsswitch.conf file determine that hostname resolution is done by first searching the local /etc/hosts file and then DNS servers listed in the /etc/resolv.conf file. This is how the hosts entry in the /etc/resolv.conf file appears in Red Hat Enterprise Linux:
hosts: files dns
You can add other locations, such as Network Information Service (nis or nisplus) databases, for querying hostname to IP address resolution. You can also change the order in which the different services are queried. You can check that host-to-IP-address resolution is working properly using different commands.
If you want to check that your DNS servers are being queried properly, you can use the host or dig commands. For example:
$ host redhat.com
redhat.com has address 209.132.183.181
redhat.com mail is handled by 5 mx1.redhat.com.
redhat.com mail is handled by 10 mx2.redhat.com.
$ dig redhat.com
; <<>> DiG 9.7.3-P3-RedHat-9.7.3-8.P3.el6_2.2 <<>> redhat.com
;; global options: +cmd
;; Got answer:
;; ->>HEADER<<- opcode: QUERY, status: NOERROR, id: 54399
;; flags: qr rd ra; QUERY: 1, ANSWER: 1, AUTHORITY: 0, ADDITIONAL: 0
;; QUESTION SECTION:
;redhat.com.               IN     A
;; ANSWER SECTION:
redhat.com.          60     IN     A     209.132.183.181
;; Query time: 105 msec
;; SERVER: 8.8.128.23#53(8.8.128.23)
;; WHEN: Sun Apr 29 08:32:32 2012
;; MSG SIZE  rcvd: 44
By default, the host command produces simpler output for DNS queries. It shows the IP address for Redhat.com and the names of the mail servers (MX records) that serve Redhat.com. The dns command shows information similar to what appears in the files that hold DNS records. The QUESTION section of the output shows that the address section asked for the address of Redhat.com and the ANSWER section showed the answer (209.132.183.181). You can also see the address of the DNS server that was queried.
The host and dig commands are only used to query DNS servers. They don't check the nsswitch.conf file to find other places to query, such as the local hosts file. For that, you would have to use the getent command. For example:
# getent hosts node1
192.168.0.201  node1
This getent example finds a host named node1 that was entered into my local /etc/hosts file. (The getent command can be used to query any information setup in the nsswitch.conf file. For example, typing getent passwd root shows the entry for the root user account in the local file, but can also query a remote LDAP database for user information if you have configured that feature, as described in Chapter 11, “Managing User Accounts.”)
Setting alias network interfaces
There are times when you might want your network interface card listening on multiple IP addresses. For example, if you were setting up a web server that was serving secure content (https) for multiple domains (example.com, example.org, and so on), each domain would require a separate IP address (associated with a separate certificate). In that case, instead of adding multiple network interface cards to the computer, you could simply create multiple aliases on a single NIC.
To create an alias network interface, you just have to create another ifcfg- file. Following the example of an eth0 interface on a RHEL system, you could create an eth0:0 interface associated with the same network interface card. To do this, create a file in the /etc/sysconfig/network-scripts directory called ifcfg-eth0:0 that contains information such as the following:
DEVICE=eth0:0
ONPARENT=yes
IPADDR=192.168.0.141
NETMASK=255.255.255.0
The example code creates an alias for the network interface eth0 called eth0:0. Instead of ONBOOT, the ONPARENT entry says to bring up this interface if the parent (eth0) is started and listen on address 192.168.0.141. You can bring up that interface by typing ifup eth0:0. You can then check that the interface came up using the ip command:
$ ip addr show eth0
2: eth0: <BROADCAST,MULTICAST,UP,LOWER_UP> mtu 1500 qdisc
           pfifo_fast state UP qlen 1000
    link/ether f0:de:f1:28:46:d9 brd ff:ff:ff:ff:ff:ff
    inet 192.168.0.140/24 brd 192.168.0.255 scope global eth0
    inet 192.168.0.141/24 brd 192.168.0.255 scope global secondary eth0:0
    inet6 fe80::f2de:f1ff:fe28:46d9/64 scope link
       valid_lft forever preferred_lft forever
You can see that the network interface card represented by eth0 is listening on two addresses: 192.168.0.140 (eth0) and 192.168.0.141 (eth0:0). So, this system will respond to packets destined for either of those two addresses. You could add more IP addresses to that interface by creating more ifcfg-eth0:? files (ifcfg-eth0:1, ifcfg-eth0:2, and so on).
Setting up Ethernet channel bonding
Ethernet channel bonding allows you to have more than one network interface card on a computer associated with a single IP address. There are several reasons you might want to do this:
- High availability—Multiple NICs on the same IP address can ensure that if one subnet goes down or one NIC breaks, the address can still be reached on a NIC connected to another subnet.
- Performance—If there is too much network traffic to be handled by one NIC, you can spread that traffic across multiple NICs.
In Red Hat Enterprise Linux and Fedora on a computer with multiple NICs, you can set up Ethernet channel bonding by creating a few ifcfg files and loading the necessary module. You can start with one bonding file (for example, ifcfg-bond0), and then point multiple ifcfg-eth? files at that bond interface. Then you can load the bond module.
Depending on the type of bonding you want to do, you can set your bonding interface to different modes. Using the BONDING_OPTS variable, you define the mode and other bonding options (all of which are passed to the bonding module). You can read about the bonding module by typing modinfo bonding or by installing the kernel-docs package and reading the bonding.txt file from the /usr/share/doc/kernel-doc*/Documentation/networking/bonding.txt directory.
Here is an example of the file that defines a bonded interface. The file in this example is /etc/sysconfig/network-scripts/ifcfg-bond0:
DEVICE=bond0
ONBOOT=yes
IPADDR=192.168.0.50
NETMASK=255.255.255.0
BOOTPROTO=none
BONDING_OPTS="mode=active-backup"
The bond0 interface in this example uses the IP address 192.168.0.50. It starts up on boot. The BONDING_OPTS sets the bonding mode to active-backup. That means that only one NIC is active at a time and the next NIC only takes over when the previous one fails (failover). No network interface card is associated with the bond0 interface yet. For that, you must create separate ifcfg file options. For example, create an /etc/sysconfig/network-scripts/ifcfg-eth0 that looks like the following (then create eth1, eth2, eth3, and so on for each NIC you want to use in the bonding interface):
DEVICE=eth0
MASTER=bond0
SLAVE=yes
BOOTPROTO=none
ONBOOT=yes
With the eth0 interface used as part of the bond0 interface, there is no IP address assigned. That's because the eth0 interface uses the IP address from the bond0 interface by defining itself as a slave (SLAVE=yes) to bond0 (MASTER=bond0).
The last thing you want to do is make sure the bond0 interface is set to use the bonding module. To do that, create a /etc/modprobe.d/bonding.conf file that contains the following entry:
alias bond0 bonding
Because all the interfaces are set to ONBOOT=yes, the bond0 interface starts and all the eth? interfaces are available as they are needed.
Setting custom routes
On a simple network configuration, communications that are destined for the local network are directed to the appropriate interface on your LAN, while communications for hosts outside of your LAN go to a default gateway to be sent on to remote hosts. As an alternative, you can set custom routes to provide alternative paths to specific networks.
To set a custom route in Fedora and RHEL, you create a configuration file in the /etc/sysconfig/network-scripts directory. In that route, you define:
- GATEWAY?—The IP address of the node on the local network that provides the route to the subnetwork represented by the static route.
- ADDRESS?—The IP address representing the network that can be reached by the static route.
- NETMASK?—The netmask that determines which part of the ADDRESS? represents the network and which represents the hosts that can be reached on that network.
The name of each custom route file is route-interface. So, for example, a custom route that can be reached through your eth0 interface would be named route-eth0. You could have multiple custom routes in that file, with each route entry replacing the ? with the interface number. For example:
ADDRESS0=192.168.99.0
NETMASK0=255.255.255.0
GATEWAY0=192.168.0.5
In this example, any packet destined for a host on the 192.168.99 network would be sent through the local eth0 interface and directed to the gateway node at 192.168.0.5. Presumably, that node would provide a route to another network containing hosts in the 192.168.99 address range. This route would take effect when the eth0 network interface was restarted.
To check that the route is working after you restart the network interface, you could type the following:
# route
Kernel IP routing table
Destination     Gateway         Genmask         Flags Metric Ref    Use Iface
default         192.168.0.1     0.0.0.0         UG    0      0        0 eth0
192.168.0.0     *               255.255.255.0   U     1      0        0 eth0
192.168.99.0    192.168.0.5     255.255.255.0   UG    0      0        0 eth0
The output from the route -n command shows that the default route (anything not destined for the local network 192.168.0 or the 192.168.99 network) is via the 192.168.0.1 address. Any packets destined for the 192.168.99 network are directed through the address 192.168.0.5.
If you wanted to add more custom routes, you could add them to this same route-eth0 file. The next set of information would be named ADDRESS1, NETMASK1, GATEWAY1, and so on.
Configuring Networking in the Enterprise
So far, the network configuration described in this chapter has centered on setting up single systems to connect to a network. Features available in Linux can go well beyond that by providing software that supports the actual network infrastructure needed by host computers to communicate.
This section introduces you to a few of the network infrastructure types of services available in Linux. Full implementation of these features is beyond the scope of this book, but know that if you find yourself needing to manage network infrastructure features, this section will give you a sense of how those features are implemented in Linux.
Configuring Linux as a router
If you have more than one network interface on a computer (typically two or more NICs), you can configure Linux as a router. To make this happen, all that is needed is a change to one kernel parameter that allows packet forwarding. To turn on the ip_forward parameter immediately and temporarily, type the following as root:
# cat /proc/sys/net/ipv4/ip_forward
0
# echo 1 > /proc/sys/net/ipv4/ip_forward
# cat /proc/sys/net/ipv4/ip_forward
1
Packet forwarding (routing) is disabled by default, with the value of ip_forward set to 0. By setting it to 1, packet forwarding is immediately enabled. To make this change permanent, you must add that value to the /etc/sysctl.conf file, so it appears as follows:
net.ipv4.ip_forward = 1
With that file modified as shown, each time the system reboots, the value for ip_forward is reset to 1. (Notice that net.ipv4.ip_forward reflects the actual location of the ip_forward file, minus the /proc/sys and with dots replacing slashes. You can change any kernel parameters set in the /proc/sys directory structure in this way.)
When a Linux system is used as a router, it is often used as a firewall between a private network and a public network, such as the Internet, as well. If that is the case, you might also want to use that same system as a firewall that does network address translation (NAT) and provides DHCP service, so the systems on the private network can route through the Linux system using private IP addresses. (See Chapter 25, “Securing Linux on a Network,” for information on working with Linux firewall rules using the iptables facility.)
Configuring Linux as a DHCP server
Not only can a Linux system use a DHCP server to get its IP address and other information, it can also be configured to act as a DHCP server itself. In its most basic form, a DHCP server can hand out IP addresses from a pool of addresses to any system that requests it. Usually, however, the DHCP server will also distribute the locations of DNS servers and the default gateway.
Configuring a DHCP server is not something that should be done without some thought. Don't add a DHCP server on a network that is not under your control and that already has a working DHCP server. Many clients are set up to get address information from any DHCP server that will hand it out.
DHCP service is provided by the dhcp package in Fedora and RHEL. The service is named dhcpd in RHEL 6 and dhcpd.service in the latest Fedora release. The primary configuration file is /etc/dhcp/dhcpd.conf for IPv4 networks (there is a dhcpd6.conf file in the same directory to provide DHCP service for IPv6 networks). By default, the dhcpd daemon listens on UDP port 67, so remember to keep that port open on your firewall.
To configure a DHCP server, you could copy the dhcpd.conf.sample file from the /usr/share/doc/dhcp-4* directory and replace the /etc/dhcp/dhcpd.conf file. Then modify it as you like. Before using that file, you want to change the domain-name options to reflect your domain and IP address ranges to suit those you are using. The comments in the file will help you do this.
Configuring Linux as a DNS server
In Linux, most professional Domain Name System (DNS) servers are implemented using the Berkeley Internet Name Domain (BIND) service. This is implemented in Fedora and RHEL by installing the bind, bind-utils, and bind-libs packages. For added security, some people install the bind-chroot package.
By default, bind is configured by editing the /etc/named.conf file. Hostname-to-IP address mapping is done in zone files located in the /var/named directory. If you install the bind-chroot package, bind configuration files are moved under the /var/named/chroot directory, which attempts to replicate the files from /etc and /var that are needed to configure bind, so that the named daemon (which provides the service) is confined to the /etc/named/chroot directory structure.
If you are interested in trying out bind, I recommend you first try it out by configuring DNS for a small home network behind a firewall as a way to make it easier for the people in your household to communicate with each other. You can lock down the IP addresses of the machines in your home by attaching MAC addresses of each computer's network interface card to specific IP addresses on a DHCP server, and then mapping those names to addresses in a DNS server.
Configuring Linux as a proxy server
A proxy server provides a means of restricting network traffic from a private network to a public one, such as the Internet. Such servers provide an excellent way to lock down a computer lab at a school or restrict websites employees can visit from work.
By physically setting up Linux as a router, but configuring it as a proxy server, all the systems on your home or business network can be configured to access the Internet using only certain protocols and only after you filter the traffic.
Using the Squid Proxy Server, which comes with most Linux systems (squid package in Fedora and RHEL), you can enable the system to accept requests to web servers (HTTP and HTTPS), file servers (FTP), and other protocols. You can restrict which systems can use your proxy server (by hostname or IP address) and even limit which sites they can visit (by specific address, range of addresses, hostname, or domain names).
Configuring a squid proxy server can be as simple as installing the squid package, editing the /etc/squid/squid.conf file, and starting the squid service. The file comes with a recommended minimal configuration. However, you might want to define the hosts (based on IP address or name) you want to allow to use the service. There are blacklists available with squid that allow you to deny access to whole sets of sites that might be inappropriate for children to visit.
Configuring VLANs in Linux
Virtualization is a feature that lets an operating system, such as Linux, have other operating systems running on it. Linux acts as a virtual host on which multiple Linux, Windows, BSD, or other operating systems can run at the same time. Because each virtualized system believes itself to be running directly on computer hardware, it is up to the virtual host to provide interfaces that look like hardware. For networking, hosts provide virtual local area networks (or VLANs).
As its name implies, a VLAN is a virtual LAN that runs inside the Linux host computer. To the virtual systems running on the host, the VLAN looks like a physical network switch. Like the physical switch, the VLAN can be configured to do bridging or routing. In other words, the virtual systems can run on their own network, with packets routed outside that network to the host's NICs (routing) or simply passed through the computer's NICs as though the virtual systems existed on the physical network (bridging).
Configuring VLANs is beyond the scope of this book. However, I want you to be aware that, if you are running Linux as a virtual host, virtual LANS may be automatically configured and started for you. In recent Fedora and RHEL systems, virtualization is provided by the Kernel Virtualization Module (KVM) facility. Other Linux systems offer Xen as their virtualization technologies.
If you have installed virtualization on your system (yum groupinstall Virtualization), after you restart your system (or manually start the libvirtd service), you may be confused by new network interfaces that show up on your system. For example, you will see a new vibr0 interface. The following is the output from the ifconfig command on a system after installing the Virtualization package group and restarting RHEL:
# ifconfig vibr0
virbr0    Link encap:Ethernet  HWaddr 52:54:00:2F:54:85
          inet addr:192.168.122.1  Bcast:192.168.122.255  Mask:255.255.255.0
          UP BROADCAST RUNNING MULTICAST  MTU:1500  Metric:1
          RX packets:0 errors:0 dropped:0 overruns:0 frame:0
          TX packets:0 errors:0 dropped:0 overruns:0 carrier:0
          collisions:0 txqueuelen:0
          RX bytes:0 (0.0 b)  TX bytes:0 (0.0 b)
The output shows a VLAN set to do bridging on the 192.168.122 network. That VLAN provides a means for virtual systems installed on the host to be able to reach each other and the outside world using the networking interfaces provided by the host. For information on installing and configuring KVM virtualization hosts and virtual machines, refer to the Red Hat Virtualization Host Configuration and Guest Installation Guide (http://docs.redhat.com/docs/en-US/Red_Hat_Enterprise_Linux/6/html/ Virtualization_Host_Configuration_and_Guest_Installation_Guide/index.html).
Summary
Most network connections from a Linux desktop or laptop system can be made with little or no user intervention. If you use NetworkManager over a wired or wireless Ethernet connection, address and server information needed to start up can be automatically obtained from a DHCP server.
With NetworkManager's graphical interface, you can do some network configuration, if you like. You can set static IP addresses and select the name server and gateway computers to use. To do more manual and complex network configuration, consider turning off NetworkManager and working more directly with network configuration files.
Network configuration files in Linux can be used to set up more advanced features such as network aliases, Ethernet channel bonding, and custom routes. To use these more advanced services, you can enable the network service.
Beyond the basics of network connectivity in Linux, features are available that enable you to provide network infrastructure types of services. This chapter introduced services and features such as routing, DHCP, DNS, and VLANs that you need to know when working with more advanced networking features in Linux.
With your networking configured, you can now begin configuring services to run over your networks. Chapter 15 describes the tools you need to enable, disable, start, stop, and check the status of the services that are configured for your Linux system.
Exercises
The exercises in this section help you to examine and change the network interfaces on your Linux system, as well as understand how to configure more advanced networking features. Start these exercises on a Linux system that has an active network connection, but is not in the middle of some critical network activity.
I recommend you do these exercises directly from your computer console (in other words, don't ssh into the computer to do them). Some of the commands you run may interrupt your network connectivity, and some of the configuration you do, if you make a mistake, can result in your computer being temporarily unavailable from the network.
There are often multiple ways to complete the tasks described in these exercises. If you are stuck, refer to the task solutions that are shown in Appendix B.