
Chapter 9
Installing Linux
Installing Linux has become a fairly easy thing to do — if you are starting with a computer that is up to spec (hard disk, RAM, CPU, and so on) and you don't mind totally erasing your hard drive. Installation is more complex if you want to stray from a default installation. So this chapter starts off with a simple installation from a Live CD and progresses to more complex installation topics.
To ease you into the subject of installing Linux, I cover three different ways of installing Linux and step you through each process:
- Installing from a Live CD — A Linux Live CD is a single, read-only disk that contains everything you need to start a Linux operating system. With the Live CD, you can totally ignore your computer's hard disk; in fact, you can run a Live CD on a system with no hard disk. Once you are running the CD live, some Live CDs enable you to launch an application that permanently installs the contents of the Live CD to your hard disk. The first installation procedure in this chapter shows you how to permanently install Linux from a Fedora Live CD.
- Installing from an installation DVD — An installation DVD that is available with Fedora, RHEL, and other Linux distributions offers more flexible ways of installing Linux. In particular, instead of just copying the whole Live CD contents to your computer, with an installation DVD you can choose exactly which software package you want. The second installation procedure I show in this chapter steps you through an installation process from a Red Hat Enterprise Linux 6 installation DVD.
- Installing in the enterprise — Sitting in front of a computer and clicking through installation questions isn't too inconvenient if you are installing a single system. But what if you need to install dozens or hundreds of Linux systems? What if you want to install those systems in particular ways that need to be repeated over multiple installations? The last section of this chapter describes efficient ways of installing multiple Linux systems, using network installation features and kickstart files.
To try the procedures in this chapter along with me, you should have a computer in front of you that you don't mind totally erasing. As an alternative, you can use a computer that has another operating system installed (such as Windows), as long as there is enough unused disk space available. I describe the procedure, and risk of data loss, if you decide to set up one of these “dual boot” (Linux and Windows) arrangements.
Choosing a Computer
You can get a Linux distribution that runs on hand-held devices or an old PC in your closet with as little as 24MB of RAM and a 486 processor. To have a good desktop PC experience with Linux, however, you should consider what you want to be able to do with Linux when you are choosing your computer.
It's important to consider the basic specifications you need for a PC-type computer to run the Fedora and Red Hat Enterprise Linux distributions. Because Fedora is used as the basis for Red Hat Enterprise Linux releases, hardware requirements are similar for basic desktop and server hardware for those two distributions.
- Processor — A 400 MHz Pentium processor is the minimum for a GUI installation. For most applications, a 32-bit processor is fine (x86). However, if you want to set up the system to do virtualization, you need a 64-bit processor (x86_64).
- RAM — Fedora recommends at least 1GB of RAM, but at least 2GB or 3GB would be much better. On my RHEL desktop, I'm running a web browser, word processor, and mail reader, and I'm consuming over 2GB of RAM.
- DVD or CD drive — You need to be able to boot up the installation process from a DVD, CD, or USB drive. If you can't boot from a DVD or CD, there are ways to start the installation from a hard disk or USB drive or by using a PXE install. After the installation process is started, more software can sometimes be retrieved from different locations (over the network or from hard disk, for example).
- Network card — You need a wired or wireless networking hardware to be able to add more software or get software updates. Fedora offers free software repositories if you can connect to the Internet. For RHEL, updates are available as part of the subscription price.
- Disk space — Fedora recommends at least 10GB of disk space for an average desktop installation, although installations can range (depending on which packages you choose to install) from 600MB (for a minimal server with no GUI install) to 7GB (to install all packages from the installation media). Consider the amount of data you need to store. While documents can consume very little space, videos can consume massive amounts of space. (By comparison, you can install the Damn Small Linux Live CD to disk with only about 200MB of disk space.)
- Special hardware features — Some Linux features require special hardware features. For example, to use Fedora or RHEL as a virtualization host using KVM, the computer must have a processor that supports virtualization. These include AMD-V or Intel-VT chips.
If you're not sure about your computer hardware, there are a few ways to check what you have. If you are running Windows, the System Properties window can show you the processor you have, as well as the amount of RAM that's installed. As an alternative, with the Fedora Live CD booted, open a shell and type dmesg | less to see a listing of hardware as it is detected on your system.
With your hardware in place, you can choose to install Linux from a Live CD or from installation media, as described in the following sections.
Installing Fedora from a Live CD
In Chapter 1, you learned how to get and boot up a Linux Live CD. This chapter steps you through an installation process of a Fedora Live CD so it is permanently installed on your hard disk.
Simplicity is the main advantage of installing from a Live CD. Essentially, you are just copying the kernel, applications, and settings from the CD image to the hard disk. There are fewer decisions you have to make to do this kind of installation, but you also don't get to choose exactly which software packages to install. After the installation, you can add and remove packages as you please.
The first decisions you have to make about your Live CD installation include where you want to install the system and whether you want to keep existing operating systems around when your installation is done:
- Single-boot computer — The easiest way to install Linux is to not have to worry about other operating systems or data on the computer and have Linux replace everything. When you are done, the computer will boot up directly to Fedora.
- Multi-boot computer — If you already have Windows installed on a computer, and you don't want to erase it, you can install Fedora along with Windows on that system. Then at boot time, you can choose which operating system to start up. To be able to install Fedora on a system with another operating system installed, you must have either extra disk space available (outside the Windows partition) or be able to shrink the Windows system to gain enough free space to install Fedora.
- Bare metal or virtual system — The resulting Fedora installation can be installed to boot up directly from the computer hardware or from within an existing operating system on the computer. If you have a computer that is running as a virtual host, you can install Fedora on that system as a virtual guest. Virtualization host products include KVM, Xen, and VirtualBox (for Linux and UNIX systems, as well as Windows and the MAC), Hyper-V (for Microsoft systems), and VMWare (both Linux and Microsoft systems). You can use the Fedora Live CD ISO image from disk or burned to a CD to start an installation from your chosen hypervisor host.
The following procedure steps you through the process of installing the Fedora Live CD described in Chapter 1 to your local computer.
- Use All Space — If you are fine with your entire disk being erased, choose this option. It is the easiest and cleanest selection, but should only be selected if you don't mind losing everything currently installed on the computer.
- Replace Existing Linux Systems — All Linux partitions (containing Linux ext filesystems, swap partitions, and the like) are replaced with this selection. Partitions commonly used with Windows systems (VFAT, FAT32, or NTFS) are not removed. Use this selection if you want to keep, and potentially dual boot, a Windows system installed on your computer.
- Shrink Current System — To get some free space to do a new installation, you can try to shrink an existing partition before continuing with the installation.
- Use Free Space — If there is enough free space on your system disks that is outside of existing partitions, you can select to use that space for your installation. In this case, no existing partitions (Windows or Linux) are erased or reused.
- Create Custom Layout — Choose this selection if, instead of letting the installer partition your disk, you want to partition the disk yourself. If you like, instead of this selection, you can choose one of the other installation types and then select the Review and modify partitioning layout box. That lets you see what the installer recommends for disk partitioning, but lets you review it and change it if you like.
- Use LVM — Select this box (it is selected by default) if you want to use the Logical Volume Management (LVM) facility to create most of your disk partitions. It adds some complexity to your partitioning, but also adds greater flexibility. If you choose to use LVM, you have greater flexibility for growing and shrinking filesystems later than if you use standard disk partitions. I recommend you keep this box selected. See Chapter 12, “Managing Disks and Filesystems,” for information on creating LVM partitions.
- Encrypt system — If you choose this check box, your Linux filesystem will be encrypted, so you can only see the contents of those partitions if you can enter a password when the system attempts to mount them at boot time. You are prompted for that password, which must be at least eight characters long. Adding a password here protects the LVM partition but does not password-protect the /boot partition. You can select to encrypt the /boot partition or any of the LVM logical volumes if you choose to review the partitioning scheme.
- Review and modify partitioning layout — I recommend that you always select this box so you can see the partitioning scheme you are about to enable, and change it if you like.
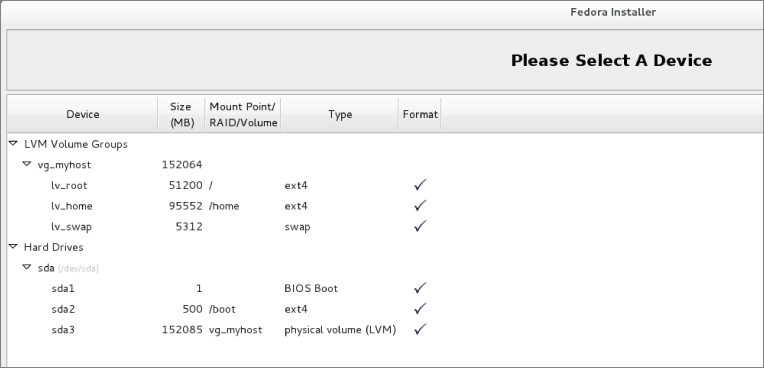
- Modify partitioning — You can modify the partitioning as you please. Details on how to modify partitioning from this screen, as well as how the GRUB boot loader works, are described later in this section. For the moment, look at Figure 9.2 and see that there is one 160MB hard drive (/dev/sda) that has three physical partitions (sda1, sda2, and sda3). Fedora uses GRUB 2, which incorporates two boot partitions: sda1 is a small partition containing raw stage2 boot data (GRUB 2 boot data is too large to all fit in the master boot record on the disk, as GRUB 1 does), and sda2 contains data such as the Linux kernel and configuration information that is mounted in /boot.
- Welcome — Click Forward at the Welcome screen.
- License — Read the License Information, and click Forward.
- Date and Time — Select the current date and time, and click Forward. If you want to connect to an NTP server to synchronize time with a time server instead of setting it manually, click the Synchronize date and time box and use the default Fedora servers or add network time servers of your own. Click Forward to proceed.
- Create User — It is good practice to have at least one regular (non-root) user on every system, because root should be used only for administrative tasks and not everyday computer use. Add the user's full name, short user name, and password. To allow this user to do administrative tasks without knowing the root password, select the Add to Administrators group box.
Figure 9.1 Starting the installation process from a Live CD
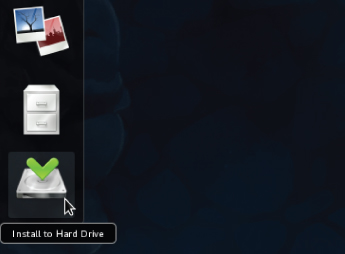
Figure 9.2 Partitioning your disk
At this point, you can begin using the desktop, as described in Chapter 2. You can also use the system to perform exercises from any of the chapters in this book.
Installing Red Hat Enterprise Linux from Installation Media
In addition to offering a live CD, most Linux distributions offer a single image or set of images that can be used to install the distribution. Instead of offering a single image on this media that is copied to hard disk, software is split up into packages that you can select to meet your exact needs. A full installation DVD, for example, can allow you to install anything from a minimal server to a full-featured desktop.
In this chapter, I use a Red Hat Enterprise Linux 6.2 installation DVD as the installation medium. Review the hardware information and descriptions of dual booting in the previous section before beginning your RHEL installation.
Follow this procedure to install Red Hat Enterprise Linux from an installation DVD.
- Welcome — Click Forward at the Welcome screen.
- License — Read and agree to the License Information, and click Forward.
- Set Up Software Updates — As described in Chapter 10, to get software downloads and updates, you must subscribe to Red Hat Enterprise Linux. This screen describes how to register for software updates.
- Create User — Create a regular user account and click Forward to continue. You also have the opportunity to use network authentication databases or refine the user account settings.
- Date and Time — Select the current date and time and click Forward. If you want to connect to an NTP server to synchronize time with a time server instead of setting it manually, select the Synchronize date and time box and use the default Fedora servers or add ones of your own. Click Forward to proceed.
- Kdump — You can choose to set aside some amount of RAM for the kdump feature. If kdump is enabled, the RAM set aside can be used in the event that your kernel crashes to have a place that the kernel dump can be stored. Without kdump, there would be no way to diagnose a crashed kernel.
Figure 9.3 Partitioning during RHEL installation
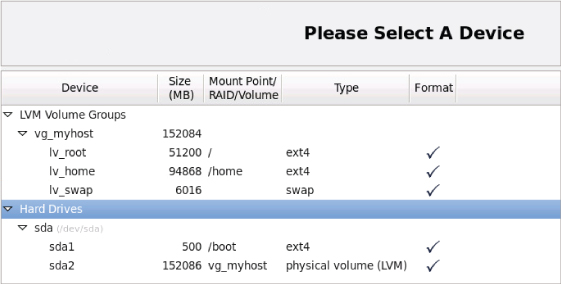
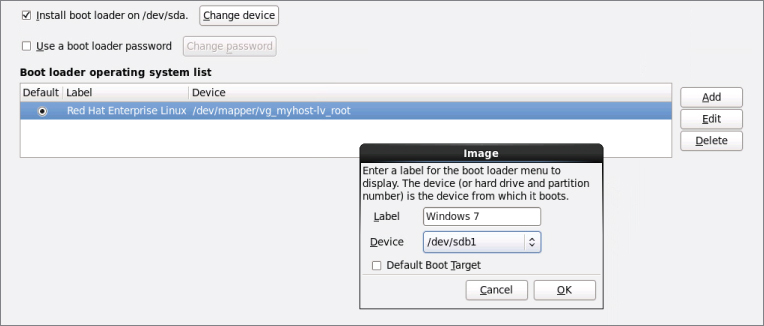
Figure 9.4 Adding Windows to the boot loader to enable dual booting
You should now be able to log in to your Red Hat Enterprise Linux system. One of the first things you should do is register your system with Red Hat Network and update your software. See Chapter 10 for information on how to get software updates.
Installing Linux in the Enterprise
If you were managing dozens, hundreds, even thousands of Linux systems in a large enterprise, it would be terribly inefficient to have to go to each computer to type and click through each installation. Fortunately, with Red Hat Enterprise Linux and other distributions, you can automate installation in such a way that all you need to do is turn on a computer and boot from the computer's network interface card to get your desired Linux installation.
Although we have focused on installing Linux from a CD or DVD, there are many other ways to launch a Linux installation and many ways to complete an installation. The following bullets step through the installation process and describe ways of changing that process along the way:
- Launch installation medium. You can launch an installation from any medium you can boot from a computer: CD, DVD, USB drive, hard disk, or network interface card with PXE support. The computer goes through its boot order and looks at the master boot record on the physical medium or looks for a PXE server on the network.
- Start the anaconda kernel. The job of the boot loader is to point to the special kernel (and possibly an initial RAM disk) that starts the Linux installer (called anaconda). So, any of the media just described simply needs to point to the location of the kernel and initial RAM disk to start the installation. If the software packages are not on the same medium, the installation process will prompt you for where to get those packages.
- Add kickstart or other boot options. Boot options (described later in this chapter) can be passed to the anaconda kernel to configure how it starts up. One option supported by Fedora and RHEL allows you to pass the location of a kickstart file to the installer. That kickstart can contain all the information needed to complete the installation: root password, partitioning, time zone, and so on to further configure the installed system. Once the installer starts, it either prompts for needed information or uses the answers provided in the kickstart file.
- Find software packages. Software packages don't have to be on the installation medium. This allows you to launch an installation from a boot medium that contains only a kernel and initial RAM disk. From the kickstart file or from an option you enter manually to the installer, you can identify the location of the repository holding the RPM software packages. That location can be a local CD (cdrom), website (http), FTP site (ftp), NFS share (nfs), NFS ISO (nfsiso), or local disk (hd).
- Modify installation with kickstart scripts. Scripts included in a kickstart can run commands you choose before or after the installation to further configure the Linux system. Those commands can add users, change permissions, create files and directories, grab files over the network, or otherwise configure the installed system exactly as you specify.
Although installing Linux in enterprise environments is beyond the scope of this book, I want you to understand the technologies that are available when you want to automate the Linux installation process. Here are some of those technologies available to use with Red Hat Enterprise Linux, along with links to where you can find more information about them:
- Install server — If you set up an installation server, you don't have to carry the software packages around to each machine where you install RHEL. Essentially, you copy all the software packages from the RHEL installation medium to a web server (http), FTP server (ftp), or NFS server (nfs), and then point to the location of that server when you boot the installer. The RHEL Installation Guide describes how to set up an installation server (http://docs.redhat.com/docs/en-US/Red_Hat_Enterprise_Linux/6/html-single/Installation_Guide/index.html#s1-steps-network-installs-x86).
- PXE server — If you have a computer with a network interface card that supports PXE booting (as most do), you can set your computer's BIOS to boot from that NIC. If you have set up a PXE server on that network, that server can present a menu to the computer containing entries to launch an installation process. The RHEL Installation Guide provides information on how to set up PXE servers for installation (http://docs.redhat.com/docs/en-US/Red_Hat_Enterprise_Linux/6/html-single/Installation_Guide/index.html#ap-install-server).
- Kickstart files — To fully automate an installation, you create what is called a kickstart file. By passing a kickstart file as a boot option to a Linux installer, you can provide answers to all the installation questions you would normally have to click through.
Exploring Common Installation Topics
Some of the installation topics touched upon earlier in this chapter require further explanation for you to be able to implement them fully. Read through the topics in this section to get a greater understanding of specific installation topics.
Upgrading or installing from scratch
If you have an earlier version of Linux already installed on your computer, Fedora, RHEL, Ubuntu, and other Linux distributions offer an upgrade option. This lets you upgrade all packages, for example, from version 1 of the distribution to version 2. Here are a few general rules before performing an upgrade:
- Remove extra packages. If you have software packages you don't need, remove them before you do an upgrade. Upgrade processes typically upgrade only those packages that are on your system. Upgrades generally do more checking and comparing than clean installs do, so any package you can remove saves time during the upgrade process.
- Check configuration files. A Linux upgrade procedure often leaves copies of old configuration files. You should check that the new configuration files still work for you.
Some Linux distributions, most notably Gentoo, have taken the approach of providing ongoing updates. Instead of taking a new release every few months, you simply continuously grab updated packages as they become available and install them on your system.
Dual booting
Having multiple, bootable operating systems on the same computer is possible. You can do this using multiple partitions on a hard disk and/or multiple hard disks, and then installing different operating systems on different partitions. As long as the boot loader contains boot information for each of the installed operating systems, you will be able to choose which one to run at boot time.
If the computer you are using already has a Windows system on it, quite possibly the entire hard disk is devoted to Windows. Although you can run a bootable Linux, such as KNOPPIX or Damn Small Linux, without touching the hard disk, to do a more permanent installation you'll want to find disk space outside of the Windows installation. There are a few ways to do this:
- Add a hard disk. Instead of messing with your Windows partition, you can simply add a hard disk and devote it to Linux.
- Resize your Windows partition. If you have available space on your Windows partition, you can shrink that partition so free space is available on the disk to devote to Linux. Commercial tools such as Partition Magic from Symantec (http://www.symantec.com) or Acronis Disk Director (http://www.acronis.com) are available to resize your disk partitions and set up a workable boot manager. Some Linux distributions (particularly bootable Linuxes used as rescue CDs) include a tool called GParted that is an open source clone of Partition Magic (which includes software from the Linux-NTFS project for resizing Windows NTFS partitions).
Before you try to resize your Windows partition, you might need to defragment it. To defragment your disk on some Windows systems, so that all of your used space is put in order on the disk, open My Computer, right-click your hard disk icon (typically C:), select Properties, click Tools, and select Defragment Now.
Defragmenting your disk can be a fairly long process. The result of defragmentation is that all the data on your disk are contiguous, creating a lot of contiguous free space at the end of the partition. There are cases where you will have to complete the following special tasks to make this true:
- If the Windows swap file is not moved during defragmentation, you must remove it. Then, after you defragment your disk again and resize it, you will need to restore the swap file. To remove the swap file, open the Control Panel, open the System icon, and then click the Performance tab and select Virtual Memory. To disable the swap file, click Disable Virtual Memory.
- If your DOS partition has hidden files that are on the space you are trying to free up, you need to find them. In some cases, you won't be able to delete them. In other cases, such as swap files created by a program, you can safely delete those files. This is a bit tricky because some files should not be deleted, such as DOS system files. You can use the attrib -s -h command from the root directory to deal with hidden files.
After your disk is defragmented, you can use commercial tools described earlier (Partition Magic or Acronis Disk Director) to repartition your hard disk to make space for Linux. Or use the open source alternative GParted.
After you have cleared enough disk space to install Linux (see the disk space requirements described earlier in this chapter), you can install Fedora, RHEL, or another Linux distribution. As you set up your boot loader during installation, you will be able to identify Windows, Linux, and any other bootable partitions so that you can select which one to boot when you start your computer.
Installing Linux to run virtually
Using virtualization technology, such as KVM, VMWare, VirtualBox, or Xen, you can configure your computer to run multiple operating systems simultaneously. Typically, you have a host operating system running (such as your Linux or Windows desktop), and then configure guest operating systems to run within that environment.
If you have a Windows system, you can use commercial VMWare products to run Linux on your Windows desktop. Get a trial of VMWare Workstation (http://www.vmware.com/tryvmware) to see if you like it. Then run your installed virtual guests with the free VMWare Player. With a full-blown version of VMWare Workstation, you can run multiple distributions at the same time.
Open source virtualization products that are available with Linux systems include VirtualBox (http://www.virtualbox.org), Xen (http://www.xen.org), and KVM (http://www.linux-kvm.org). VirtualBox was developed originally by Sun Microsystems. Xen has been popular with Red Hat systems, but Red Hat has recently begun moving toward KVM technology instead.
Using installation boot options
When the anaconda kernel launches at boot time for RHEL or Fedora, boot options provided on the kernel command line modify the behavior of the installation process. By interrupting the boot loader before the installation kernel boots, you can add your own boot options to direct how the installation behaves.
When you see the installation boot screen, depending on the boot loader, press Tab or some other key to be able to edit the anaconda kernel command line. The line identifying the kernel might look something like the following:
vmlinuz initrd=initrd.img
The vmlinuz is the compressed kernel and initrd.img is the initial RAM disk (containing modules and other tools needed to start the installer). To add more options, just type them at the end of that line and press Enter.
So, for example, if you have a kickstart file available from /root/ks.cfg on a CD, your anaconda boot prompt to start the installation using the kickstart file could look like the following:
vmlinuz initrd=initrd.img ks=cdrom:/root/ks.cfg
The following sections describe other installer boot options you might find useful.
Boot options for disabling features
Sometimes a Linux installation fails because the computer has some non-functioning or non-supported hardware. Often you can get around those issues by passing options to the installer that do such things as disable selected hardware when you need to select your own driver. Table 9.1 provides some examples:
Table 9.1 Boot Options for Disabling Features
| Installer Option | Tells System |
| nofirewire | Not to load support for firewire devices |
| nodma | Not to load DMA support for hard disks |
| noide | Not to load support for IDE devices |
| nompath | Not to enable support for multipath devices |
| noparport | Not to load support for parallel ports |
| nopcmcia | Not to load support for PCMCIA controllers |
| noprobe | Not to probe hardware, instead prompt user for drivers |
| noscsi | Not to load support for SCSI devices |
| nousb | Not to load support for USB devices |
| noipv6 | Not to enable IPV6 networking |
| nonet | Not to probe for network devices |
| numa-off | Disable the Non-Uniform Memory Access (NUMA) for AMD64 architecture |
| acpi=off | Disable the Advanced Configuration and Power Interface (ACPI) |
Boot options for video problems
If you are having trouble with your video display, you can specify video settings as noted in Table 9.2.
Table 9.2 Boot Options for Video Problems
| Boot Option | Tells System |
| xdriver=vesa | Use standard vesa video driver |
| resolution=1024x768 | Choose exact resolution to use |
| nofb | Don't use the VGA 16 framebuffer driver |
| skipddc | Don't probe DDC of the monitor (the probe can hang the installer) |
| graphical | Force a graphical installation |
Boot options for special installation types
By default, installation runs in graphical mode with you sitting at the console answering questions. If you have a text-only console, or if the GUI isn't working properly, you can run an installation in plain-text mode: By typing text, you cause the installation to run in text mode.
If you want to start installation on one computer, but you want to answer the installation questions from another computer, you can enable a vnc (virtual network computing) installation. Once you start this type of installation, you can go to another system and open a vnc viewer, giving the viewer the address of the installation machine (such as 192.168.0.99:1). Table 9.3 provides the necessary commands, along with what to tell the system to do.
Table 9.3 Boot Options for VNC Installations
| Boot Option | Tells System |
| vnc | Run installation as a VNC server. |
| vncconnect=hostname[:port] | Connect to VNC client hostname and optional port. |
| vncpassword=<password> | Client uses password (at least 8 characters) to connect to installer. |
Boot options for kickstarts and remote repositories
You can boot the installation process from an installation medium that contains little more than the kernel and initial RAM disk. If that is the case, you need to identify the repository where the software packages exist. You can do that by providing a kickstart file or by identifying the location of the repositories in some way. To force the installer to prompt for the repository location (CD/DVD, hard drive, NFS, or URL), add askmethod to the installation boot options.
Using repo= options, you can identify software repository locations. The following examples show the syntax to use for creating repo= entries:
repo=hd:/dev/sda1:/myrepo
Repository in /myrepo on disk 1 first partition
repo=http://abc.example.com/myrepo
  Repository available from /myrepo on Web server.
repo=ftp://ftp.example.com/myrepo
  Repository available from /myrepo on FTP server.
repo=cdrom
  Repository available from local CD or DVD
repo=nfs::mynfs.example.com:/myrepo/
  Repository available from /myrepo on NFS share.
repo=nfsiso::nfs.example.com:/mydir/rhel6.iso
Installation ISO image available from NFS server.
Instead of identifying the repository directly, you can specify it within a kickstart file. The following are examples of some ways to identify the location of a kickstart file.
ks=cdrom:/stuff/ks.cfg
Get kickstart from CD/DVD.
ks=hd:sda2:/test/ks.cfg
Get kickstart from test directory on hard disk (
sda2)
ks=http://www.example.com/ksfiles/ks.cfg
Get kickstart from a Web server.
ks=ftp://ftp.example.com/allks/ks.cfg
Get kickstart from a FTP server.
ks=nfs:mynfs.example.com:/someks/ks.cfg
Get kickstart from an NFS server.
Miscellaneous boot options
Here are a few other options you can pass to the installer that don't fit in a category.
Rescue
Instead of installing, run the kernel to open Linux rescue mode.
mediacheck
Check the installation CD/DVD for checksum errors.
For further information on using the anaconda installer in rescue mode (to rescue a broken Linux system), see Chapter 21, “Troubleshooting Linux.”
Using specialized storage
In large enterprise computing environments, it is common to store the operating system and data outside of the local computer. Instead, some special storage device beyond the local hard disk is identified to the installer, and that storage device (or devices) can be used during installation.
Once identified, the storage devices you indicate during installation can be used the same way that local disks are used. You can partition them and assign a structure (filesystem, swap space, and so on) or leave them alone and simply mount them where you want the data to be available.
The following types of specialized storage devices can be selected from the Specialized Storage Devices screen when you install Red Hat Enterprise Linux, Fedora, or other Linux distributions:
- Firmware RAID — A firmware RAID device is a type of device that has hooks in the BIOS, allowing it to be used to boot the operating system, if you choose.
- Multipath devices — As the name implies, multipath devices provide multiple paths between the computer and its storage devices. These paths are aggregated, so these devices look like a single device to the system using them, while the underlying technology provides improved performance, redundancy, or both. Connections can be provided by iSCSI or Fibre Channel over Ethernet (FCoE) devices.
- Other SAN devices — Any device representing a Storage Area Network (SAN).
While configuring these specialized storage devices is beyond the scope of this book, know that if you are working in an enterprise where iSCSI and FCoE devices are available, you can configure your Linux system to use them at installation time. The types of information you need to do this include:
- iSCSI devices — Have your storage administrator provide you with the target IP address of the iSCSI device and the type of discovery authentication needed to use the device. The iSCSI device may require credentials.
- Fibre Channel over Ethernet Devices (FCoE). For FCoE, you need to know the network interface that is connected to your FCoE switch. You can search that interface for available FCoE devices.
Partitioning hard drives
The hard disk (or disks) on your computer provide the permanent storage area for your data files, applications programs, and the operating system itself. Partitioning is the act of dividing a disk into logical areas that can be worked with separately. In Windows, you typically have one partition that consumes the whole hard disk. However, with Linux there are several reasons why you may want to have multiple partitions:
- Multiple operating systems — If you install Linux on a PC that already has a Windows operating system, you may want to keep both operating systems on the computer. For all practical purposes, each operating system must exist on a completely separate partition. When your computer boots, you can choose which system to run.
- Multiple partitions within an operating system — To protect their entire operating system from running out of disk space, people often assign separate partitions to different areas of the Linux filesystem. For example, if /home and /var were assigned to separate partitions, then a gluttonous user who fills up the /home partition wouldn't prevent logging daemons from continuing to write to log files in the /var/log directory.
- Different filesystem types — Different kinds of filesystems have different structures. Filesystems of different types must be on their own partitions. Also, you might need different filesystems to have different mount options for special features (such as read-only or user quotas). In most Linux systems, you need at least one filesystem type for the root of the filesystem (/) and one for your swap area. Filesystems on CD-ROM use the iso9660 filesystem type.
During installation, systems such as Fedora and RHEL let you partition your hard disk using graphical partitioning tools. The following sections describe how to partition your disk during a Fedora installation. See the section “Tips for creating partitions” for some ideas for creating disk partitions.
Understanding different partition types
Many Linux distributions give you the option of selecting different partition types when you partition your hard disk during installation. Partition types include:
- Linux partitions — Use this option to create a partition for an ext2, ext3, or ext4 filesystem type that is added directly to a partition on your hard disk (or other storage medium).
- LVM partitions — Create an LVM partition if you plan to create or add to an LVM volume group. LVMs give you more flexibility in growing, shrinking, and moving partitions later than regular partitions do.
- RAID partitions — Create two or more RAID partitions to create a RAID array. These partitions should be on separate disks to create an effective RAID array. RAID arrays can help improve performance, reliability, or both as those features relate to reading, writing, and storing your data.
- Swap partitions — Create a swap partition to extend the amount of virtual memory available on your system.
The following sections describe how to add regular Linux partitions, LVM, RAID, and swap partitions using the Fedora graphical installer. If you are still not sure when you should use these different partition types, refer to Chapter 12 for further information on configuring disk partitions.
Partitioning during Fedora installation
During installation, Fedora gives you the opportunity to change how your hard disk is partitioned. If you select to do a custom layout (or review and modify the current partitioning), you have the opportunity to customize your disk partitioning. From the hard drives that appear on the installer screen, either select Free (to create a new partition using available disk space) or delete one or more partitions, and then select Free to reuse that space.
The following sections describe how to create different partition types.
Linux or swap partitions
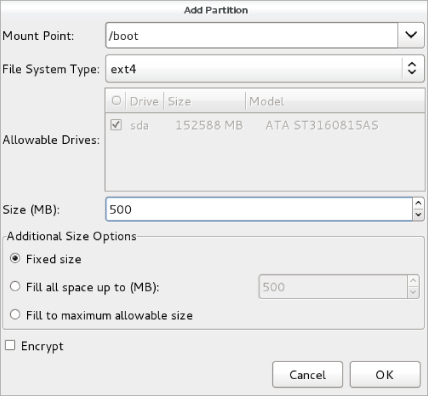
Creating a standard Linux partition enables you to create the partition and apply the filesystem directly to it. Select Create ⇒ Standard Partition and click the Create button. Figure 9.5 shows an example of the screen that appears. Choose the mount point for the partition (such as / or /boot), the filesystem type (ext4 is the default), and the size (in MB). The partition can be a fixed size or simply fill up all available space.
Figure 9.5 Partition a regular Linux partition in Fedora.
To create a swap partition, you can follow steps used to create a Linux partition. However, instead of selecting a filesystem type (ext3, ext4, and so on) you choose swap as the filesystem type. No mount point is needed.
LVM partitions
Logical Volume Manager (LVM) enables you to add a layer of abstraction and group disk space together that can be assigned to one or more logical volumes. Once logical volumes are created, you can add filesystems to those volumes and mount them as you would regular Linux partitions. However, if you run out of space, you have much more flexibility when it comes to managing those partitions.
The steps outlined here detail how to create an LVM partition (referred to as an LVM physical volume), apply one or more LVM partitions to an LVM volume group, and then create logical volumes from that volume group:
Figure 9.6 Create an LVM volume group and logical volume from an LVM physical volume.

RAID partitions
A RAID array lets you use multiple disks so that you can have multiple copies of your data or write data across multiple disks (to improve performance) or both. Execute the following steps to create the RAID partitions you need to create a RAID array:
Figure 9.7 Create a RAID device.

When you are finished partitioning your disk, select Next to save your partitioning and continue on through installation.
Reasons for different partitioning schemes
Different opinions exist as to how to divide up a hard disk. Here are some issues to consider:
- Do you want to install another operating system? If you want Windows on your computer along with Linux, you need at least one Windows (Win95, FAT16, VFAT, or NTFS type), one Linux (Linux ext4), and usually one Linux swap partition.
- Is it a multiuser system? If you are using the system yourself, you probably don't need many partitions. One reason for partitioning an operating system is to keep the entire system from running out of disk space at once. That also serves to put boundaries on what an individual can use up in his or her home directory (although disk quotas provide a more refined way of limiting disk use).
- Do you have multiple hard disks? You need at least one partition per hard disk. If your system has two hard disks, you may assign one to / and one to /home (if you have lots of users) or /var (if the computer is a server sharing lots of data). With a separate /home partition, you can install another Linux system in the future without disturbing your home directories (and presumably all or most of your user data).
Tips for creating partitions
Changing your disk partitions to handle multiple operating systems can be very tricky, in part because each operating system has its own ideas about how partitioning information should be handled, as well as different tools for doing it. Here are some tips to help you get it right:
- If you are creating a dual-boot system, particularly for a Windows system, try to install the Windows operating system first after partitioning your disk. Otherwise, the Windows installation may make the Linux partitions inaccessible. Choosing a VFAT instead of NTFS filesystem for Windows will also make sharing files between your Windows and Linux systems easier and more reliable. (Support for NTFS partitions from Linux has improved greatly in the past few years, but not all Linux systems include NTFS support.)
- The fdisk man page recommends that you use partitioning tools that come with an operating system to create partitions for that operating system. For example, the DOS fdisk knows how to create partitions that DOS will like, and the Linux fdisk will happily make your Linux partitions. After your hard disk is set up for dual boot, however, you should probably not go back to Windows-only partitioning tools. Use Linux fdisk or a product made for multi-boot systems (such as Partition Magic).
- You can have up to 63 partitions on an IDE hard disk. A SCSI hard disk can have up to 15 partitions. You typically won't need nearly that many partitions. If you need more partitions, use LVM and create as many logical volumes as you like.
If you are using Linux as a desktop system, you probably don't need a lot of different partitions. However, some very good reasons exist for having multiple partitions for Linux systems that are shared by a lot of users or are public web servers or file servers. Having multiple partitions within Fedora or RHEL, for example, offers the following advantages:
- Protection from attacks — Denial-of-service attacks sometimes take actions that try to fill up your hard disk. If public areas, such as /var, are on separate partitions, a successful attack can fill up a partition without shutting down the whole computer. Because /var is the default location for web and FTP servers, and is expected to hold a lot of data, entire hard disks often are assigned to the /var filesystem alone.
- Protection from corrupted filesystems — If you have only one filesystem (/), its corruption can cause the whole Linux system to be damaged. Corruption of a smaller partition can be easier to fix and often allows the computer to stay in service while the correction is made.
Table 9.4 lists some directories that you may want to consider making into separate filesystem partitions.
Table 9.4 Assigning Partitions to Particular Directories
| Directory | Explanation |
| /boot | Sometimes the BIOS in older PCs can access only the first 1,024 cylinders of your hard disk. To make sure that the information in your /boot directory is accessible to the BIOS, create a separate disk partition (of about 500MB) for /boot. Even with several kernels installed, there is rarely a reason for /boot to be larger than 500MB. |
| /usr | This directory structure contains most of the applications and utilities available to Linux users. The original theory was that if /usr were on a separate partition, you could mount that filesystem as read-only after the operating system had been installed. This would prevent attackers from replacing or removing important system applications with their own versions that may cause security problems. A separate /usr partition is also useful if you have diskless workstations on your local network. Using NFS, you can share /usr over the network with those workstations. |
| /var | Your FTP (/var/ftp) and web server (/var/www) directories are, by default in many Linux systems, stored under /var. Having a separate /var partition can prevent an attack on those facilities from corrupting or filling up your entire hard disk. |
| /home | Because your user account directories are located in this directory, having a separate /home account can prevent a reckless user from filling up the entire hard disk. It also conveniently separates user data from your operating system (for easy backups or new installs). Often, /home is created as an LVM logical volume, so it can grow in size as user demands increase. |
| /tmp | Protecting /tmp from the rest of the hard disk by placing it on a separate partition can ensure that applications that need to write to temporary files in /tmp are able to complete their processing, even if the rest of the disk fills up. |
Although people who use Linux systems casually rarely see a need for lots of partitions, those who maintain and occasionally have to recover large systems are thankful when the system they need to fix has several partitions. Multiple partitions can limit the effects of deliberate damage (such as denial-of-service attacks), problems from errant users, and accidental filesystem corruption.
Using the GRUB boot loader
A boot loader lets you choose when and how to boot the operating systems installed on your computer's hard disks. The GRand Unified Bootloader (GRUB) is the most popular boot loader used for installed Linux systems. There are two major versions of GRUB available today:
- GRUB Legacy (version 1) — As of this writing, this version of GRUB is used by default to boot Red Hat Enterprise Linux operating systems (at least through RHEL 6.3). It was also used with earlier versions of Fedora and Ubuntu.
- GRUB 2 — The current versions of Ubuntu and Fedora use GRUB 2 as the default boot loader.
The GRUB Legacy version is described in the following sections. After that, there is a description of GRUB 2.
Using GRUB Legacy (version 1)
With multiple operating systems installed and several partitions set up, how does your computer know which operating system to start? To select and manage which partition is booted and how it is booted, you need a boot loader. The boot loader that is installed by default with Red Hat Enterprise Linux systems is the GRand Unified Boot loader (GRUB).
GRUB Legacy is a GNU boot loader (http://www.gnu.org/software/grub) that offers the following features:
- Support for multiple executable formats.
- Support for multi-boot operating systems (such as Fedora, RHEL, FreeBSD, NetBSD, OpenBSD, and other Linux systems).
- Support for non–multi-boot operating systems (such as Windows 95, Windows 98, Windows NT, Windows ME, Windows XP, Windows Vista, Windows 7, and OS/2) via a chain-loading function. Chain-loading is the act of loading another boot loader (presumably one that is specific to the proprietary operating system) from GRUB to start the selected operating system.
- Support for multiple filesystem types.
- Support for automatic decompression of boot images.
- Support for downloading boot images from a network.
At the time of this writing, GRUB version 1 is used in Red Hat Enterprise Linux. GRUB version 2 is used in Fedora, Ubuntu, and other Linux distributions. This section describes how to use GRUB version 1.
For more information on how GRUB works, at the command line type man grub or info grub. The info grub command contains more details about GRUB.
Booting with GRUB Legacy
When you install Linux, you are typically given the option to configure the information needed to boot your computer (with one or more operating systems) into the default boot loader. GRUB is very flexible to configure, so it looks different in different Linux distributions.
With the GRUB boot loader that comes with Red Hat Enterprise Linux installed in the master boot record of your hard disk, when the BIOS starts up the boot loader one of several things can happen:
- Default — If you do nothing, the default operating system will boot automatically after five seconds. (The timeout is set by the timeout value, in seconds, in the grub.conf or menu.lst file.)
- Select an operating system — Press any key before the five seconds expires and you see a list of titles to select from. The titles can represent one or more kernels for the same Linux system. Or they may represent Windows, Ubuntu, or other operating systems. Use the up and down arrow keys to highlight any title, and then press Enter to boot that operating system.
- Edit the boot process — If you want to change any of the options used during the boot process, use the arrow keys to highlight the operating system you want and type e to select it. Follow the next procedure to change your boot options temporarily.
If you want to change your boot options so that they take effect every time you boot your computer, see the section on permanently changing boot options. Changing those options involves editing the /boot/grub/grub.conf file.
Temporarily changing boot options
From the GRUB Legacy boot screen, you can select to change or add boot options for the current boot session. On some Linux systems, the menu is hidden, so you have to press the Tab key or some other key (before a few seconds of timeout is exceeded) to see the menu. Then, select the operating system you want (using the arrow keys) and type e (as described earlier).
Three lines in the example of the GRUB Legacy editing screen identify the boot process for the operating system you chose. Here is an example of those lines (because of the length of the kernel line, it is represented here as three lines):
root (hd0,0)
kernel /vmlinuz-2.6.32-131.17.1.el6.x86_64 ro root=/dev/mapper/vg_myhost-lv_root
  rd_NO_MD rd_NO_DM LANG=en_US.UTF-8 SYSFONT=latarcyrheb-sun16 KEYBOARDTYPE=pc
  KEYTABLE=us rhgb quiet crashkernel=auto
initrd /initramfs-2.6.32-131.17.1.el6.x86_64.img
The first line (beginning with root) shows that the entry for the GRUB boot loader is on the first partition of the first hard disk (hd0,0). GRUB represents the hard disk as hd, regardless of whether it is a SCSI, IDE, or other type of disk. In GRUB Legacy, you just count the drive number and partition number, starting from zero (0).
The second line of the example (beginning with kernel) identifies the kernel boot image (/boot/vmlinuz-2.6.32-131.17.1.el6.x86_64) and several options. The options identify the partition as initially being loaded ro (read-only) and the location of the root filesystem on a partition with the label that begins root=/dev/mapper/vg_myhost-lv_root. The third line (starting with initrd) identifies the location of the initial RAM disk, which contains additional modules and tools needed during the boot process.
If you are going to change any of the lines related to the boot process, you will probably change only the second line to add or remove boot options. Follow these steps to do just that:
- Boot to a shell. If you forgot your root password or if your boot process hangs, you can boot directly to a shell by adding init=/bin/sh to the boot line.
- Select a run level. If you want to boot to a particular run level, you can add the run level you want to the end of the kernel line. For example, to have RHEL boot to run level 3 (multiuser plus networking mode), add 3 to the end of the kernel line. You can also boot to single-user mode (1), multiuser mode (2), or X GUI mode (5). Level 3 is a good choice if your GUI is temporarily broken. Level 1 is good if you have forgotten your root password.
- Watch boot messages. By default, you will see a splash screen as Linux boots. If you want to see messages showing activities happening as the system boots up, you can remove the option rhgb quiet from the kernel line. This lets you see messages as they scroll by. Pressing Esc during boot-up gets the same result.
Permanently changing boot options
You can change the options that take effect each time you boot your computer by changing the GRUB configuration file. In RHEL and other Linux systems, GRUB configuration centers on the /boot/grub/grub.conf or /boot/grub/menu.lst file.
The /boot/grub/grub.conf file is created when you install Linux. Here's an example of that file for RHEL:
# grub.conf generated by anaconda
#
# Note that you do not have to rerun grub after making changes to this file
# NOTICE:  You have a /boot partition.  This means that
#          all kernel and initrd paths are relative to /boot/, eg.
#          root (hd0,0)
#          kernel /vmlinuz-version ro root=/dev/mapper/vg_joke-lv_root
#          initrd /initrd-[generic-]version.img
#boot=/dev/sda
default=0
timeout=5
splashimage=(hd0,0)/grub/splash.xpm.gz
hiddenmenu
title Red Hat Enterprise Linux (2.6.32-131.17.1.el6.x86_64)
     root (hd0,0)
     kernel /vmlinuz-2.6.32-131.17.1.el6.x86_64 ro
            root=/dev/mapper/vg_myhost-lv_root rd_NO_MD rd_NO_DM
            LANG=en_US.UTF-8 SYSFONT=latarcyrheb-sun16 KEYBOARDTYPE=pc
            KEYTABLE=us rhgb quiet crashkernel=auto
     initrd /initramfs-2.6.32-131.17.1.el6.x86_64.img
title Windows XP
     rootnoverify (hd0,1)
     chainloader +1
The default=0 line indicates that the first partition in this list (in this case Red Hat Enterprise Linux) will be the one that is booted by default. The line timeout=5 causes GRUB to pause for five seconds before booting the default partition. (That's how much time you have to press e if you want to edit the boot line, or to press arrow keys to select a different operating system to boot.)
The splashimage line looks in the first partition on the first disk (hd0,0) for the boot partition (in this case /dev/sda1). GRUB loads splash.xpm.gz as the image on the splash screen (/boot/grub/splash.xpm.gz). The splash screen appears as the background of the boot screen.
The two bootable partitions in this example are Red Hat Enterprise Linux and Windows XP. The title lines for each of those partitions are followed by the name that appears on the boot screen to represent each partition.
For the RHEL system, the root line indicates the location of the boot partition as the second partition on the first disk. So, to find the bootable kernel (vmlinuz-*) and the initrd initial RAM disk boot image that is loaded (initrd-*), GRUB mounts hd0,0 as the root of the entire filesystem (which is represented by /dev/mapper/vg_myhost-lv_root and is mounted as /). There are other options on the kernel line as well.
For the Windows XP partition, the rootnoverify line indicates that GRUB should not try to mount the partition. In this case, Windows XP is on the first partition of the first hard disk (hd0,1) or /dev/sda2. Instead of mounting the partition and passing options to the new operating system, the chainloader +1 line tells GRUB to pass the booting of the operating system to another boot loader. The +1 indicates that the first sector of the partition is used as the boot loader. (You could similarly set up to boot a Windows Vista or Windows 7 operating system.)
If you make any changes to the /boot/grub/grub.conf file, you do not need to load those changes. GRUB automatically picks up those changes when you reboot your computer.
Adding a new GRUB boot image
You may have different boot images for kernels that include different features. In most cases, installing a new kernel package will automatically configure grub.conf to use that new kernel. However, if you want to manually add a kernel, here is the procedure for modifying the grub.conf file in Red Hat Enterprise Linux to be able to boot that kernel:
# cd /usr/src/Linux-2.6.25.11/arch/i386/boot
# cp bzImage /boot/bz-2.6.25-11
title Red Hat Enterprise Linux 6.3 (My own IPV6 build)
   root (hd0,4)
   kernel /bz-2.6.25-11 ro root=/dev/sda5
   initrd /initrd-2.6.25-11.img
The advantage to this approach, as opposed to copying the new boot image over the old one, is that if the kernel fails to boot, you can always go back and restart the old kernel. When you feel confident that the new kernel is working properly, you can use it to replace the old kernel or perhaps just make the new kernel the default boot definition.
Using GRUB 2
GRUB 2 represents a major rewrite of the GRUB Legacy project. It has been adopted as the default boot loader for Fedora and Ubuntu. While the major function of the GRUB 2 boot loader is still to find and start the operating system you want, there is now much more power and flexibility built into the tools and configuration files that get you there.
In GRUB 2, the configuration file is now named /boot/grub2/grub.cfg (in Fedora and other Linux system using GRUB 2). Everything from the contents of grub.cfg to the way grub.cfg is created is different from the GRUB Legacy grub.conf file. Here are some things you should know about the grub.cfg file:
- Instead of editing grub.cfg by hand or having kernel RPM packages add to it, grub.cfg is generated automatically from the contents of the /etc/default/grub file and the /etc/grub.d directory. You should modify or add to those files to configure GRUB 2 yourself.
- The grub.cfg file can contain scripting syntax, including such things as functions, loops, and variables.
- Device names needed to identify the location of kernels and initial RAM disks can be more reliably identified using labels or Universally Unique Identifiers (UUIDs). This prevents the possibility of a disk device such as /dev/sda being changed to /dev/sdb when you add a new disk (which would result in the kernel not being found).
Comments in the grub.cfg file indicate where the content came from. For example, information generated from the /etc/grub.d/00_header file comes right after this comment line:
### BEGIN /etc/grub.d/00_header ###
In the beginning of the 00_header section, there are some functions, such as those that load drivers to get your video display to work. After that, most of the sections in the grub.cfg file consist of menu entries. The following is an example of a menu item from the grub.cfg file that you could select to start Fedora 16 when the system boots up:
menuentry 'Fedora (3.4.2-1.fc16.i686)' --class fedora
     --class gnu-linux --class gnu --class os {
  load_video
  set gfxpayload=keep
  insmod gzio
  insmod part_msdos
  insmod ext2
  set root='(hd0,msdos4)'
  search --no-floppy --fs-uuid --set=root eb31517f-f404-410b-937e-a6093b5a5380
  echo 'Loading Fedora (3.4.2-1.fc16.i686)'
  linux  /boot/vmlinuz-3.4.2-1.fc16.i686
     root=UUID=eb31517f-f404-410b-937e-a6093b5a5380 ro rd.md=0
     rd.lvm=0 rd.dm=0  KEYTABLE=us quiet SYSFONT=latarcyrheb-sun16
     rhgb rd.luks=0 LANG=en_US.UTF-8
  echo 'Loading initial ramdisk ...'
  initrd /boot/initramfs-3.4.2-1.fc16.i686.img
}
The menu entry for this selection appears as Fedora (3.4.2-1.fc16.i686) on the GRUB 2 boot menu. The --class entries on that line allow GRUB 2 to group the menu entries into classes (in this case, it identifies it as a fedora, gnu-linux, gnu, os type of system). The next lines load video drivers and file system drivers. After that, lines identify the location of the root file system.
At this point, GRUB 2 displays a message Loading Fedora (3.4.2-1.fc16.i686). Now we have gotten to the information that is similar to what you would expect in a GRUB Legacy entry. The linux line identifies the location of the kernel (/boot/vmlinuz-3.4.2-1.fc16.i686), followed by options that are passed to the kernel. Then after a Loading initial ramdisk ... message, the location of the initial RAM disk is identified and that file is loaded.
There are many, many more features of GRUB 2 you can learn about if you want to dig deeper into your system's boot loader. The best documentation for GRUB 2 is available on the Fedora system; type info grub2 at the shell. The info entry for GRUB 2 provides lots of information for booting different operating systems, writing your own configuration files, working with GRUB image files, setting GRUB environment variables, and working with other GRUB features.
Summary
Although every Linux distribution includes a different installation method, you need to do many common activities, regardless of which Linux system you install. For every Linux system, you need to deal with issues of disk partitioning, boot options, and configuring boot loaders.
In this chapter, you stepped through installation procedures for Fedora (using a live CD installation) and Red Hat Enterprise (from installation media). The chapter also covered special installation topics, including using boot options and disk partitioning. With your Linux system now installed, Chapter 10 describes how to begin managing the software on your Linux system.
Exercises
Use these exercises to test your knowledge of installing Linux. I recommend you do these exercises on a computer that has no operating system or data on it that you would fear losing (in other words, one you don't mind erasing). If you have a computer that allows you to install virtual systems, that is a safe way to do these exercises as well. These exercises were tested using a Fedora 16 Live CD and an RHEL 6.2 Server Installation DVD.