
Chapter 8
Learning System Administration
Linux, like other UNIX-based systems, was intended for use by more than one person at a time. Multiuser features enable many people to have accounts on a single Linux system, with their data kept secure from others. Multitasking enables many people to run many programs on the computer at the same time, with each person able to run more than one program. Sophisticated networking protocols and applications make it possible for a Linux system to extend its capabilities to network users and computers around the world. The person assigned to manage all of a Linux system's resources is called the system administrator.
Even if you are the only person using a Linux system, system administration is still set up to be separate from other computer use. To do most administrative tasks, you need to be logged in as the root user (also called the superuser) or to temporarily get root permission. Regular users who don't have root permission cannot change, or in some cases even see, some of the configuration information for a Linux system. In particular, security features such as stored passwords are protected from general view.
Because Linux system administration is such a huge topic, this chapter focuses on the general principles of Linux system administration. In particular, it examines some of the basic tools you need to administer a Linux system for a personal desktop or on a small server. Beyond the basics, this chapter also teaches you how to work with file systems and monitor the setup and performance of your Linux system.
Understanding System Administration
Separating the role of system administrator from that of other users has several effects. For a system that has many people using it, limiting who can manage it enables you to keep a system more secure. A separate administrative role also prevents others from casually harming your system when they are just using it to write a document or browse the Internet.
If you are the system administrator of a Linux system, you generally log in as a regular user account and then ask for administrative privileges when you need them. This is often done with one of the following:
- su command — Often su is used to open a shell as root user. Once open, the administrator can run multiple commands and then exit to return to a shell as a regular user.
- sudo command — With sudo, a regular user is given root privileges, but only when that user runs the sudo command. After running that one command with sudo, the user is immediately returned to a shell, and will be acting as the regular user again.
- Graphical windows — Many graphical administration windows, which can be launched from the System or Applications menu, can be started by a regular user. When root privilege is needed, you are prompted for the root password.
Tasks that can be done by only the root user tend to be those that affect the system as a whole or impact the security or health of the system. The following is a list of common features that a system administrator is expected to manage:
- Filesystems — When you first install Linux, the directory structure is set up to make the system usable. However, if you later want to add extra storage or change the file system layout, you need administrative privileges to do that. Also, the root user has permission to access files owned by any user. As a result, the root user can copy, move, or change any other user's files — a privilege needed to make backup copies of the filesystem for safe keeping.
- Software installation — Because malicious software can harm your system or make it insecure, you need root privilege to install software so it is available to all users on your system. Regular users can still install some software in their own directories and can list information about installed system software.
- User accounts — Only the root user can add and remove user accounts and group accounts.
- Network interfaces — It used to be totally up to the root user to configure network interfaces as well as to start and stop those interfaces. Now, many Linux desktops allow regular users to start and stop network interfaces from their desktop using Network Manager.
- Servers — Configuring web servers, file servers, domain name servers, mail servers, and dozens of other servers requires root privilege, as does starting and stopping those services. Often, services run as non-root users, and content, such as web pages, can be added to servers by non-root users if you configure your system to allow that.
- Security features — Setting up security features, such as firewalls and user access lists, is usually done by the root user. It's also up to the root user to monitor how the services are being used and make sure that server resources are not exhausted or abused.
The easiest way to begin system administration is to use some graphical administration tools.
Using Graphical Administration Tools
Many Linux systems come with simplified graphical tools for administering Linux. If you are a casual user, these tools often let you do everything you need to administer your system without editing configuration files or running shell commands.
A set of graphical tools that comes with Fedora and Red Hat Enterprise Linux systems can be launched from the Administration submenu of the System menu or from the command line. Most of the Fedora and RHEL tools that launch from the command line begin with the system-config string (such as system-config-network).
These system-config tools require root permission. If you are logged in as a regular user, you must enter the root password before the Graphical User Interface (GUI) application's window opens or, in some cases, when you request to do some special activity.
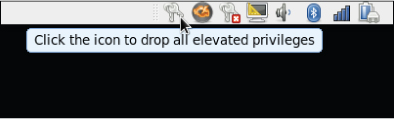
Once you have typed the password, look for a either a set of keys (RHEL 5), as illustrated in Figure 8.1, or a yellow badge icon (RHEL 6) in the upper-right side of the panel, indicating that you have root authorization. Click the icon to remove authorization. Otherwise, authorization goes away after a few minutes. While the keys icon or badge is displayed, you can open any administrative GUI application without having to enter the password again.
Figure 8.1 A keys icon appears on the top panel while privilege is open for administrative desktop tools
The following list describes many of the graphical tools you can use to administer a Fedora or Red Hat Enterprise Linux system (some are only in Fedora). Start these windows from the Administration submenu on the System menu. The name of the package that must be installed to get the feature is shown in parentheses. The following graphical tools are available in Fedora:
- Domain Name System (system-config-bind) — Create and configure zones if your computer is acting as a DNS server.
- HTTP (system-config-httpd) — Configure your computer as an Apache Web server.
- NFS (system-config-nfs) — Set up directories from your system to be shared with other computers on your network using the NFS service.
- Bootloader (system-config-boot) — If you have multiple operating systems on your computer, or multiple Linux kernels available to boot in Linux, you can use the Boot Configuration screen to choose which to boot by default. For example, you might have Fedora, SUSE, and Windows XP all on the same hard disk. You could choose which would start automatically (after a set number of seconds), if one wasn't selected explicitly.
- Root Password (system-config-rootpassword) — Change the root password.
- Display (system-config-display) — Change the settings for your X Window System desktop, including color depth and resolution for your display. You can also choose settings for your video card and monitor.
- Samba NFS (system-config-samba) — Configure Windows (SMB) file sharing. (To configure other Samba features, you can use the SWAT window.)
The following graphical tools are available in both Fedora and Red Hat Enterprise Linux:
- Services (system-config-services) — Display and change which services are running on your Fedora system at different run levels from the Service Configuration window.
- Add/Remove Software (PackageKit) — Launch the Add/Remove Software window for finding, adding, and removing software associated with software repositories configured for your system.
- Authentication (authconfig-gtk) — Change how users are authenticated on your system. Typically, Shadow Passwords and MD5 Passwords are selected. However, if your network supports LDAP, Kerberos, SMB, NIS, or Hesiod authentication, you can select to use any of those authentication types.
- Date & Time (system-config-date) — Set the date and time or choose to have an NTP server keep system time in sync.
- Firewall (system-config-firewall) — Configure your firewall to allow or deny services to computers from the network.
- Language (system-config-language) — Select the default language used for the system.
- Logical Volume Management (system-config-lvm) — Manage your LVM partitions.
- Network (system-config-network) — Manage your current network interfaces and add interfaces.
- Printing (system-config-printer) — Configure local and network printers.
- SELinux Management (policycoreutils-gui) — Set SELinux enforcing modes and default policy.
- Users & Groups (system-config-users) — Add, display, and change user and group accounts for your Fedora system.
Other administrative utilities are available from the Applications menu on the top panel. Select the System Tools submenu to see some of the following options:
- Configuration Editor (gconf-editor) — Directly edit the GNOME configuration database.
- Disk Usage Analyzer (gnome-utils) — Display detailed information about your hard disks and removable storage devices.
- Disk Utility (gnome-disk-utility) — Manage disk partitions and add file systems.
- Kickstart (system-config-kickstart) — Create a kickstart configuration file that can be used to install multiple Linux systems without user interaction.
As you go through the rest of this book to configure various Linux servers, I'll describe how to use many of these tools. When you want to go beyond a point-and-click administrative interface, you will need to learn how to gain root privilege from the shell, as described in the next section.
Using the root User Account
Every Linux system starts out with at least one administrative user account (the root user) and possibly one or more regular user accounts (given a name that you choose, or a name assigned by your Linux distribution). In most cases, you log in as a regular user and become the root user to do an administrative task.
The root user has complete control of the operation of your Linux system. That user can open any file or run any program. The root user also installs software packages and adds accounts for other people who use the system.
When you first install most Linux systems (although not all systems), you add a password for the root user. You must remember and protect this password — you need it to log in as root or to obtain root permission while you are logged in as some other user.
To become familiar with the root user account, you can simply log in as the root user. I recommend trying this from a virtual console. To do so, press Ctrl+Alt+F2. When you see the login prompt, type root (press Enter) and enter the password. It will open a login session for root. When you are done, type exit, and then press Ctrl+Alt+F1 to return to the regular desktop login.
After you have logged in as root, the home directory for the root user is typically /root. The home directory and other information associated with the root user account are located in the /etc/passwd file. Here's what the root entry looks like in the /etc/passwd file:
root:x:0:0:root:/root:/bin/bash
This shows that for the user named root, the user ID is set to 0 (root user), the group ID is set to 0 (root group), the home directory is /root, and the shell for that user is /bin/bash. (Linux uses the /etc/shadow file to store encrypted password data, so the password field here contains an x.) You can change the home directory or the shell used by editing the values in this file. A better way to change these values, however, is to use the usermod command (see the section “Modifying Users with usermod” in Chapter 11 for further information).
At this point, any command you run from your shell will be run with root privilege. So be careful. You have much more power to change (and damage) the system than you did as a regular user. Again, type exit when you are done and, if you are on a virtual console and have a desktop interface running on another console, press Ctrl+Alt+F1 to return to the graphical login screen, if you are using a Linux desktop system.
Becoming root from the shell (su command)
Although you can become the superuser by logging in as root, sometimes that is not convenient. For example, you may be logged in to a regular user account and just want to make a quick administrative change to your system without having to log out and log back in. Or, you may need to log in over the network to make a change to a Linux system but find that the system doesn't allow root users in from over the network (a common practice for highly secure Linux systems).
The solution is to use the su command. From any Terminal window or shell, you can simply type the following:
$ su
Password: ******
#
When you are prompted, type in the root user's password. The prompt for the regular user ($) changes to the superuser prompt (#). At this point, you have full permission to run any command and use any file on the system. However, one thing that the su command doesn't do when used this way is read in the root user's environment. As a result, you may type a command that you know is available and get the message Command Not Found. To fix this problem, use the su command with the dash (-) option instead, like this:
$ su -
Password: ******
#
You still need to type the password, but after that, everything that normally happens at login for the root user happens after the su command is completed. Your current directory will be root's home directory (probably /root), and things such as the root user's PATH variable will be used. If you become the root user by just typing su, rather than su -, you won't change directories or the environment of the current login session.
You can also use the su command to become a user other than root. This is useful for troubleshooting a problem that is being experienced by a particular user, but not by others on the computer (such as an inability to print or send e-mail). For example, to have the permissions of a user named jsmith, you'd type the following:
$ su - jsmith
Even if you were root user before you typed this command, afterward you would have only the permissions to open files and run programs that are available to jsmith. As root user, however, after you type the su command to become another user, you don't need a password to continue. If you type that command as a regular user, you must type the new user's password.
When you are finished using superuser permissions, return to the previous shell by exiting the current shell. Do this by pressing Ctrl+D or by typing exit. If you are the administrator for a computer that is accessible to multiple users, don't leave a root shell open on someone else's screen — unless you want to give that person freedom to do anything he or she wants to the computer!
Allowing administrative access via the GUI
As mentioned earlier, when you run GUI tools as a regular user (from Fedora, Red Hat Enterprise Linux, or some other Linux systems), you are prompted for the root password before you are able to access the tool. By entering the root password, you are given root privilege for that task. In the cases of Red Hat Enterprise Linux and Fedora, after you enter the password, a yellow badge icon appears in the top panel, indicating that root authorization is still available for other GUI tools to run from that desktop session.
Gaining administrative access with sudo
A particular user can also be given administrative permissions for particular tasks without being given the root password. The sudoers facility is the most common way to provide such privilege. Using sudoers, for any users or groups on the system you can:
- Assign root privilege for any command they run with sudo.
- Assign root privilege for a select set of commands.
- Give users root privilege without telling them the root password because they only have to provide their own user password to gain root privilege.
- Allow users, if you choose, to run sudo without entering a password at all.
- Track which users have run administrative commands on your system. (Using su, all you know is that someone with the root password logged in, whereas the sudo command logs which user runs an administrative command.)
With the sudoers facility, giving full or limited root privileges to any user simply entails adding the user to /etc/sudoers and defining what privilege you want that user to have. Then the user can run any command he or she is privileged to use by preceding that command with the sudo command.
Here's an example of how to use the sudo facility to cause the user named joe to have full root privilege.
# /usr/sbin/visudo
joe ALL=(ALL) ALL
joe ALL=(ALL) NOPASSWD: ALL
[joe]$ sudo touch /mnt/testfile.txt
  We trust you have received the usual lecture
  from the local System Administrator. It usually
  boils down to these two things:
    #1) Respect the privacy of others.
    #2) Think before you type.
Password: *********
[joe]$ ls -l /mnt/testfile.txt
-rw-r--r--. 1 root root 0 Jan  7 08:42 /mnt/testfile.txt
[jake]$ rm /mnt/testfile.txt
rm: cannot remove '/mnt/testfile.txt': Permission denied
[jake]$ sudo rm /mnt/textfile.txt
[jake]$
In this session, the user jake runs the sudo command to create a file (/mnt/textfile.txt) in a directory in which he doesn't have write permission. He is given a warning and asked to provide his password (this is jake's password, not the root password).
Even after jake has given the password, he must still use the sudo command to run subsequent administrative commands as root (the rm fails, but the sudo rm succeeds). Notice that he is not prompted for a password for the second sudo. That's because after entering his password successfully, he can enter as many sudo commands as he wants for the next 5 minutes without having to enter it again. (You can change the timeout value from 5 minutes to however long you want by setting the passwd_timeout value in the /etc/sudoers file.)
The preceding example grants a simple all-or-nothing administrative privilege to joe. However, the /etc/sudoers file gives you an incredible amount of flexibility in permitting individual users and groups to use individual applications or groups of applications. Refer to the sudoers and sudo man pages for information about how to tune your sudo facility.
Exploring Administrative Commands, Configuration Files, and Log Files
You can expect to find many commands, configuration files, and log files in the same places in the file system, regardless of which Linux distribution you are using. The following sections give you some pointers on where to look for these important elements.
Administrative commands
Only the root user is intended to use many administrative commands. When you log in as root (or use su - from the shell to become root), your $PATH variable is set to include some directories that contain commands for the root user. These include the following:
- /sbin — Contains commands needed to boot your system, including commands for checking file systems (fsck) and starting/stopping system services (service).
- /usr/sbin — Contains commands for such things as managing user accounts (such as useradd) and checking processes that are holding files open (such as lsof). Commands that run as daemon processes are also contained in this directory. Daemon processes are processes that run in the background, waiting for service requests such as those to access a printer or a web page. (Look for commands that end in d, such as sshd, pppd, and cupsd.)
Some administrative commands are contained in regular user directories (such as /bin and /usr/bin). This is especially true of commands that have some options available to everyone. An example is the /bin/mount command, which anyone can use to list mounted file systems, but only root can use to mount file systems. (Some desktops, however, are configured to let regular users use mount to mount CDs, DVDs, or other removable media)
To find commands intended primarily for the system administrator, check out the section 8 manual pages (usually in /usr/share/man/man8). They contain descriptions and options for most Linux administrative commands.
Some third-party applications add administrative commands to directories that are not in your PATH. For example, an application may put commands in /usr/local/bin, /opt/bin, or /usr/local/sbin. Some Linux distributions automatically add those directories to your PATH, usually before your standard bin and sbin directories. In that way, commands installed to those directories are not only accessible, but can also override commands of the same name in other directories.
Administrative configuration files
Configuration files are another mainstay of Linux administration. Almost everything you set up for your particular computer — user accounts, network addresses, or GUI preferences — is stored in plaintext files. This has some advantages and some disadvantages.
The advantage of plaintext files is that it's easy to read and change them. Any text editor will do. The downside, however, is that as you edit configuration files, no error checking is going on. You have to run the program that reads these files (such as a network daemon or the X desktop) to find out whether you set up the files correctly. While some configuration files use standard structures, such as XML, for storing information, many do not. So you need to learn the specific structure rules for each configuration file. A comma or a quote in the wrong place can sometimes cause an entire interface to fail.
Throughout this book, you'll find descriptions of the configuration files you need to set up the different features that make up Linux systems. The two major locations of configuration files are your home directory (where your personal configuration files are kept) and the /etc directory (which holds system-wide configuration files).
Following are descriptions of directories (and subdirectories) that contain useful configuration files. Those descriptions are followed by some individual configuration files in /etc that are of particular interest. Viewing the contents of Linux configuration files can teach you a lot about administering Linux systems.
- $HOME — All users store information in their home directories that directs how their login accounts behave. Many configuration files are directly in each user's user's home directory (such as /home/joe) and begin with a dot (.), so they don't appear in a user's directory when you use a standard ls command (you need to type ls -a to see them). Likewise, dot files and directories won't show up in most file manager windows by default. There are dot files that define the behavior of each user's shell, the desktop look-and-feel, and options used with your text editor. There are even files such as those in each user's $HOME/.ssh directory that configure network permissions for each user. (To see the name of your home directory, type echo $HOME from a shell.)
- /etc — This directory contains most of the basic Linux system configuration files. Table 8.1 shows some /etc configuration files of interest.
- /etc/cron* — Directories in this set contain files that define how the crond utility runs applications on a daily (cron.daily), hourly (cron.hourly), monthly (cron.monthly), or weekly (cron.weekly) schedule.
- /etc/cups — Contains files used to configure the CUPS printing service.
- /etc/default — Contains files that set default values for various utilities. For example, the file for the useradd command defines the default group number, home directory, password expiration date, shell, and skeleton directory (/etc/skel) that are used when creating a new user account.
- /etc/httpd — Contains a variety of files used to configure the behavior of your Apache web server (specifically, the httpd daemon process). (On some Linux systems, /etc/apache or /etc/apache2 is used instead.)
- /etc/init.d — Contains the permanent copies of System V–style run-level scripts. These scripts are often linked from the /etc/rc?.d directories to have each service associated with a script started or stopped for the particular run level. The ? is replaced by the run-level number (0 through 6).
- /etc/mail — Contains files used to configure your sendmail mail transport agent.
- /etc/pcmcia — Contains configuration files that allow you to have a variety of PCMCIA cards configured for your computer. (PCMCIA slots are those openings on your laptop that enable you to have credit-card–sized cards attached to your computer. You can attach devices such as modems and external CD-ROMs. With many devices now available as USB devices, PCMCIA slots are less common than they were.)
- /etc/postfix — Contains configuration files for the postfix mail transport agent.
- /etc/ppp — Contains several configuration files used to set up Point-to-Point Protocol (PPP) so that you can have your computer dial out to the Internet. (PPP was more commonly used when dial-up modems were popular.)
- /etc/rc?.d — There is a separate rc?.d directory for each valid system state: rc0.d (shutdown state), rc1.d (single-user state), rc2.d (multiuser state), rc3.d (multiuser plus networking state), rc4.d (user-defined state), rc5.d (multiuser, networking, plus GUI login state), and rc6.d (reboot state).
- /etc/security — Contains files that set a variety of default security conditions for your computer, basically defining how authentication is done. These files are part of the pam (pluggable authentication modules) package.
- /etc/skel — Any files contained in this directory are automatically copied to a user's home directory when that user is added to the system. By default, most of these files are dot (.) files, such as .kde (a directory for setting KDE desktop defaults) and .bashrc (for setting default values used with the bash shell).
- /etc/sysconfig — Contains important system configuration files that are created and maintained by various services (including iptables, samba, and most networking services). These files are critical for Linux distributions, such as Fedora and RHEL, that use GUI administration tools but are not used on other Linux systems at all.
- /etc/xinetd.d — Contains a set of files, each of which defines an on-demand network service that the xinetd daemon listens for on a particular port. When the xinetd daemon process receives a request for a service, it uses the information in these files to determine which daemon processes to start to handle the request.
The following are some interesting configuration files in /etc:
- aliases — Can contain distribution lists used by the Linux mail service. (This file may be located in /etc/mail.)
- bashrc — Sets system-wide defaults for bash shell users. (This may be called bash.bashrc on some Linux distributions.)
- crontab — Sets times for running automated tasks and variables associated with the cron facility (such as the SHELL and PATH associated with cron).
- csh.cshrc (or cshrc) — Sets system-wide defaults for csh (C shell) users.
- exports — Contains a list of local directories that are available to be shared by remote computers using the Network File System (NFS).
- fstab — Identifies the devices for common storage media (hard disk, floppy, CD-ROM, and so on) and locations where they are mounted in the Linux system. This is used by the mount command to choose which file systems to mount when the system first boots.
- group — Identifies group names and group IDs (GIDs) that are defined on the system. Group permissions in Linux are defined by the second of three sets of rwx (read, write, execute) bits associated with each file and directory.
- gshadow — Contains shadow passwords for groups.
- host.conf — Used by older applications to set the locations in which domain names (for example, redhat.com) are searched for on TCP/IP networks (such as the Internet). By default, the local hosts file is searched and then any name server entries in resolv.conf.
- hosts — Contains IP addresses and host names that you can reach from your computer. (Usually this file is used just to store names of computers on your LAN or small private network.)
- hosts.allow — Lists host computers that are allowed to use certain TCP/IP services from the local computer.
- hosts.deny — Lists host computers that are not allowed to use certain TCP/IP services from the local computer (although this file will be used if you create it, it doesn't exist by default).
- inittab — Contains information that defines which programs start and stop when Linux boots, shuts down, or goes into different states in between. This configuration file is the first one read when Linux starts the init process.
- mtab — Contains a list of file systems that are currently mounted.
- mtools.conf — Contains settings used by DOS tools in Linux.
- named.conf — Contains DNS settings if you are running your own DNS server.
- nsswitch.conf — Contains name service switch settings, for identifying where critical systems information (user accounts, host name-to-address mappings, and so on) comes from (local host or via network services).
- ntp.conf — Includes information needed to run the Network Time Protocol (NTP).
- passwd — Stores account information for all valid users for the system. Also includes other information, such as the home directory and default shell. (Rarely includes the user passwords themselves, which are typically stored in the /etc/shadow file.)
- printcap — Contains definitions for the printers configured for your computer. (If the printcap file doesn't exist, look for printer information in the /etc/cups directory.)
- profile — Sets system-wide environment and startup programs for all users. This file is read when the user logs in.
- protocols — Sets protocol numbers and names for a variety of Internet services.
- rpc — Defines remote procedure call names and numbers.
- services — Defines TCP/IP and UDP service names and their port assignments.
- shadow — Contains encrypted passwords for users who are defined in the passwd file. (This is viewed as a more secure way to store passwords than the original encrypted password in the passwd file. The passwd file needs to be publicly readable, whereas the shadow file can be unreadable by all but the root user.)
- shells — Lists the shell command-line interpreters (bash, sh, csh, and so on) that are available on the system, as well as their locations.
- sudoers — Sets commands that can be run by users, who may not otherwise have permission to run the command, using the sudo command. In particular, this file is used to provide selected users with root permission.
- rsyslog.conf — Defines what logging messages are gathered by the syslogd daemon and what files they are stored in. (Typically, log messages are stored in files contained in the /var/log directory.)
- termcap — Lists definitions for character terminals, so that character-based applications know what features are supported by a given terminal. Graphical terminals and applications have made this file obsolete to most people.
- xinetd.conf — Contains simple configuration information used by the xinetd daemon process. This file mostly points to the /etc/xinetd.d directory for information about individual services.
Another directory, /etc/X11, includes subdirectories that each contain system-wide configuration files used by X and different X window managers available for Linux. The xorg.conf file (configures your computer and monitor to make it usable with X) and configuration directories containing files used by xdm and xinit to start X are in here.
Directories relating to window managers contain files that include the default values that a user will get if that user starts one of these window managers on your system. Window managers that may have system-wide configuration files in these directories include twm (twm/) and xfce (xdg/).
Administrative log files
One of the things that Linux does well is keep track of itself. This is a good thing, when you consider how much is going on in a complex operating system. Sometimes you are trying to get a new facility to work and it fails without giving you the foggiest reason why. Other times, you want to monitor your system to see whether people are trying to access your computer illegally. In any of those cases, you can use log files to help track down the problem.
The main utility for logging error and debugging messages for Linux is the rsyslogd daemon. (Some older Linux systems use syslogd and syslogd daemons.)
Logging is done according to information in the /etc/rsyslog.conf file. Messages are typically directed to log files that are usually in the /var/log directory. Here are a few common log files:
- boot.log — Contains boot messages about services as they start up.
- messages — Contains many general informational messages about the system.
- secure — Contains security-related messages, such as login activity or any other act that authenticates users.
- XFree86.0.log or Xorg.0.log — Depending on which X server you are using, contains messages about your video card, mouse, and monitor configuration.
If you are using Fedora, the System Log Viewer utility is a good way to step through your system's log files. From the Applications menu, select System ⇒ Administration ⇒ Log File Viewer. Not only can you view boot, kernel, mail, security, and other system logs, but you can also use the viewing pane to select log messages from a particular date.
Refer to Chapter 13, “Understanding Server Administration,” for information on configuring the rsyslogd facility.
Using Other Administrative Accounts
You don't hear much about other administrative user accounts (besides root) being used with Linux. It was a fairly common practice in UNIX systems to have several different administrative logins that allowed administrative tasks to be split among several users. For example, people sitting near a printer could have lp permissions to move print jobs to another printer if they knew a printer wasn't working.
In any case, administrative logins are available with Linux; however, logging in directly as those users is disabled by default. The accounts are maintained primarily to provide ownership for files and processes associated with particular services. By running daemon processes under separate administrative logins, having one on those processes cracked does not give the cracker root permission and the ability to access other processes and files. Consider the following examples:
- lp — User owns such things as the /var/log/cups printing log file and various printing cache and spool files. The home directory for lp is /var/spool/lpd.
- apache — User can be used to set up content files and directories. It is primarily used to run the web server processes (httpd).
- postfix — User owns various mail server spool directories and files. The user runs the daemon processes used to provide the postfix service (master).
- uucp — User owns various uucp commands (once used as the primary method for dial-up serial communications) as well as log files in /var/log/uucp, spool files in /var/spool, administrative commands (such as uuchk, uucico, uuconv, and uuxqt) in /usr/sbin, and user commands (uucp, cu, uuname, uustat, and uux) in /usr/bin. The home directory for uucp is /var/spool/uucp. The uucp service is rarely used anymore.
- bin — User owns many commands in /bin in traditional UNIX systems. This is not the case in some Linux systems (such as Fedora and Gentoo) because root owns most executable files. The home directory of bin is /bin.
- news — User could do administration of Internet news services, depending on how you set permission for /var/spool/news and other news-related resources. The home directory for news is /etc/news.
By default, the administrative logins in the preceding list are disabled. You would need to change the default shell from its current setting (usually /sbin/nologin or /bin/false) to a real shell (typically /bin/bash) to be able to log in as these users.
Checking and Configuring Hardware
In a perfect world, after installing and booting Linux, all of your hardware is detected and available for access. Although Linux systems are rapidly moving closer to that world, there are times when you must take special steps to get your computer hardware working. Also, the growing use of removable USB and FireWire devices (CDs, DVDs, flash drives, digital cameras, and removable hard drives) has made it important for Linux to do the following:
- Efficiently manage hardware that comes and goes
- Look at the same piece of hardware in different ways (for example, be able to see a printer as a fax machine, scanner, and storage device, as well as a printer)
Linux kernel features added in the past few years have made it possible to change drastically the way hardware devices are detected and managed. Features in, or closely related to, the kernel include Udev (to dynamically name and create devices as hardware comes and goes) and HAL (to pass information about hardware changes to user space).
If all this sounds a bit confusing, don't worry. It's actually designed to make your life as a Linux user much easier. The end result of features built on the kernel is that device handling in Linux has become:
- More automatic — For most common hardware, when a hardware device is connected or disconnected, it is automatically detected and identified. Interfaces to access the hardware are added, so it is accessible to Linux. Then the fact that the hardware is present (or removed) is passed to the user level, where applications listening for hardware changes are ready to mount the hardware and/or launch an application (such as an image viewer or music player).
- More flexible — If you don't like what happens automatically when a hardware item is connected or disconnected, you can change it. For example, features built into GNOME and KDE desktops let you choose what happens when a music CD or data DVD is inserted, or when a digital camera is connected. If you prefer that a different program be launched to handle it, you can easily make that change.
This section covers several issues related to getting your hardware working properly in Linux. First, it describes how to check information about the hardware components of your system. It then covers how to configure Linux to deal with removable media. Finally, it describes how to use tools for manually loading and working with drivers for hardware that is not detected and loaded properly.
Checking your hardware
When your system boots, the kernel detects your hardware and loads drivers that allow Linux to work with that hardware. Because messages about hardware detection scroll quickly off the screen when you boot, to view potential problem messages you have to redisplay those messages after the system comes up.
There are a couple of ways to view kernel boot messages after Linux comes up. Any user can run the dmesg command to see what hardware was detected and which drivers were loaded by the kernel at boot time. As new messages are generated by the kernel, those messages are also made available to the dmesg command. A second way to see those messages on some Linux systems is by displaying the contents of the /var/log/dmesg file, if it exists.
The following is an example of some output from the dmesg command that was trimmed down to show some interesting information:
$ dmesg | less
 [    0.000000] Linux version 3.1.0-7.fc16.i686
              ([email protected])
      (gcc version 4.6.2 20111027 (Red Hat 4.6.2-1) (GCC) )
               #1 SMP Tue Nov 1 21:00:16 UTC 2011
[    0.000000] DMI: Dell Inc.      Precision WorkStation 490
              /0GU083, BIOS A06 08/20/2007
[0.000000] Kernel command line: initrd=initrd0.img
             root=live:CDLABEL=Fedora-16-i686-Live-Desktop.iso
         rootfstype=auto ro liveimg quiet rhgb rd.luks=0
             rd.md=0 rd.dm=0  BOOT_IMAGE=vmlinuz0
[    0.056934] CPU0: Intel(R) Xeon(R) CPU           E5320  @ 1.86GHz stepping 0b
[    0.272025] Brought up 4 CPUs
[    0.272029] Total of 4 processors activated (14895.38 BogoMIPS).
[    3.020618] Serial: 8250/16550 driver, 4 ports, IRQ sharing enabled
[    3.041185] serial8250: ttyS0 at I/O 0x3f8 (irq = 4) is a 16550A
[    3.061880] serial8250: ttyS1 at I/O 0x2f8 (irq = 3) is a 16550A
[    3.145982] mousedev: PS/2 mouse device common for all mice
[    3.538044] scsi 6:0:0:0: CD-ROM
             TSSTcorp DVD-ROM TS-H352C DE02 PQ: 0 ANSI: 5
[    3.870128] input: ImPS/2 Generic Wheel Mouse
             as /devices/platform/i8042/serio1/input/input3
[   26.964764] e1000: Intel(R) PRO/1000 Network Driver - version 7.3.21-k8-NAPI
[   26.964767] e1000: Copyright (c) 1999-2006 Intel Corporation.
[   26.964813] e1000 0000:0c:02.0: PCI INT A -> GSI 18 (level, low) -> IRQ 18
[   27.089109] parport_pc 00:08: reported by Plug and Play ACPI
[   27.089169] parport0: PC-style at 0x378 (0x778), irq 7 [PCSPP,TRISTATE]
[24179.176315] scsi 9:0:0:0: Direct-Access
             S31B1102 USB DISK         1100 PQ: 0 ANSI: 0 CCS
[24179.177466] sd 9:0:0:0: Attached scsi generic sg2 type 0
[24179.177854] sd 9:0:0:0: [sdb]
             8343552 512-byte logical blocks: (4.27 GB/3.97 GiB)
[24179.178593] sd 9:0:0:0: [sdb] Write Protect is off
From this output, you first see the Linux kernel version, followed by information about the computer (Dell Precision WorkStation), and kernel command line options. Next, you can see the type of processors (Intel Xeon) and the number of CPUs (4). After that, I've trimmed down to information about hardware connected to the computer: serial ports, mouse port, CD drive, network interface card (e1000), and parallel port. The last few lines reflect a 4GB USB drive being plugged into the computer.
If something goes wrong detecting your hardware or loading drivers, you can refer to this information to see the name and model number of hardware that's not working. Then you can search Linux forums or documentation to try to solve the problem.
Once your system is up and running, there are other commands that let you look at detailed information about your computer's hardware. The lspci command lists PCI buses on your computer and devices connected to them. Here's a snippet of output:
$ lspci
00:00.0 Host bridge: Intel Corporation 5000X Chipset Memory ControllerHub
00:02.0 PCI bridge: Intel Corporation 5000 Series Chipset PCI Express x4 Port 2
00:1b.0 Audio device: Intel Corporation 631xESB/632xESB
     High Definition Audio Controller (rev 09)
00:1d.0 USB controller: Intel Corporation 631xESB/632xESB/3100 Chipset UHCI
     USBController#1 (rev 09)
07:00.0 VGA compatible controller: nVidia Corporation NV44 [Quadro NVS 285]
0c:02.0 Ethernet controller: Intel Corporation 82541PI
     Gigabit Ethernet Controller (rev 05)
The host bridge connects the local bus to the other components on the PCI bridge. I cut down the output to show information about the different devices on the system that handle various features: sound (Audio device), flash drives and other USB devices (USB controller), the video display (VGA compatible controller), and wired network cards (Ethernet controller). If you are having trouble getting any of these devices to work, noting the model names and numbers gives you something to Google for.
To get more verbose output from lspci, add one or more -v options. For example, using lspci -vvv, I received information about my Ethernet controller, including latency, capabilities of the controller, and the Linux driver (e1000) being used for the device.
If you are specifically interested in USB devices, try the lsusb command. By default, lsusb lists information about the computer's USB hubs along with any USB devices connected to the computer's USB ports:
$ lsusb
Bus 001 Device 001: ID 1d6b:0002 Linux Foundation 2.0 root hub
Bus 002 Device 001: ID 1d6b:0001 Linux Foundation 1.1 root hub
Bus 003 Device 001: ID 1d6b:0001 Linux Foundation 1.1 root hub
Bus 004 Device 001: ID 1d6b:0001 Linux Foundation 1.1 root hub
Bus 005 Device 001: ID 1d6b:0001 Linux Foundation 1.1 root hub
Bus 002 Device 002: ID 413c:2105 Dell Computer Corp. Model L100 Keyboard
Bus 002 Device 004: ID 413c:3012 Dell Computer Corp. Optical Wheel Mouse
Bus 001 Device 005: ID 090c:1000 Silicon Motion, Inc. - Taiwan 64MB QDI U2 DISK
From the preceding output, you can see the model of a keyboard, mouse, and USB flash drive connected to the computer. As with lspci, you can add one or more -v options to see more details.
To see details about your processor, run the lscpu command. That command gives basic information about your computer's processors.
$ lscpu
Architecture:          x86_64
CPU op-mode(s):        32-bit, 64-bit
CPU(s):                4
On-line CPU(s) list:   0-3
Thread(s) per core:    1
Core(s) per socket:    4
...
From the sampling of output of lscpu, you can see that this is a 64-bit system (x86-64), it can operate in 32-bit or 64-bit modes, and there are four CPUs.
Managing removable hardware
Linux systems such as Red Hat Enterprise Linux, Fedora, and others that support full KDE and GNOME desktop environments include simple graphical tools for configuring what happens when you attach popular removable devices to the computer. So, with a KDE or GNOME desktop running, you simply plug in a USB device or insert a CD or DVD and a window may pop up to deal with that device.
Although different desktop environments share many of the same underlying mechanisms (in particular, Udev) to detect and name removable hardware, they offer different tools for configuring how they are mounted or used. Udev (using the udevd daemon) creates and removes devices (/dev directory) as hardware is added and removed from the computer. The Hardware Abstraction layer (HAL) provides the overall platform for discovering and configuring hardware. Settings that are of interest to someone using a desktop Linux system, however, can be configured with easy-to-use desktop tools.
The Nautilus file manager used with the GNOME desktop lets you define what happens when you attach removable devices or insert removable media into the computer from the File Management Preferences window. The descriptions in this section are based on GNOME 3.2 in Fedora 16.
From the GNOME 3.2 desktop, select Activities ⇒ Applications ⇒ System Tools ⇒ System Settings ⇒ Removable Media. Figure 8.2 shows an example of that window.
Figure 8.2 Change removable media settings in the Removable Media window.
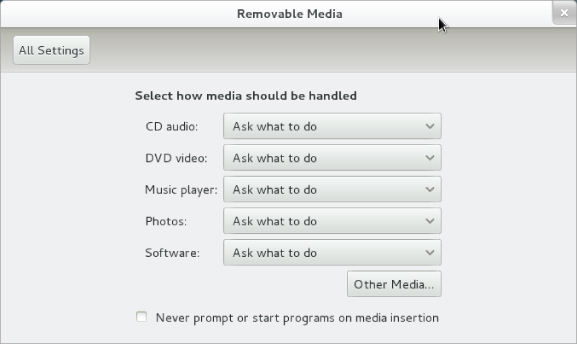
The following settings are available from the Removable Media window. These settings relate to how removable media are handled when they are inserted or plugged in. In most cases, you are prompted about how to handle a medium that is inserted or connected.
- CD audio — When an audio CD is inserted, you can choose to be prompted for what to do (default), do nothing, open the contents in a folder window, or select from various audio CD players to be launched to play the content. Rhythmbox (music player), Audio CD Extractor (CD burner), and Brassero (CD burner) are among the choices you have for handling an inserted audio CD.
- DVD video — When a commercial video DVD is inserted, you are prompted for what to do with that DVD. You can change that default to launch Movie Player (Totem), Brasero (DVD burner) or another media player you have installed (such as MPlayer).
- Music player — When inserted media contains audio files, you are asked what to do. You can select to have Rhythmbox or some other music player begin playing the files by selecting that player from this box.
- Photos — When inserted media (such as a memory card from a digital camera) contains digital images, you are asked what to do with those images. You can select to do nothing. Or you can select to have the images opened in the Shotwell image viewer (the default application for viewing images on the GNOME desktop) or another installed photo manager.
- Software — When inserted media contains an autorun application, an autorun prompt will open. To change that behavior (to do nothing or open the media contents in a folder), you can select that from this box.
- Other Media — Select the Type box under the Other Media heading to select how less commonly used media are handled. For example, you can select what actions are taken to handle Audio DVDs or blank Blu-ray discs, CDs, DVDs or HD DVD discs. You can select what applications to launch for Blu-ray video disc, E-book readers, HD DVD videos, Picture CDs, Super Video CDs, and video CDs.
Note that the settings described here are only in effect for the user who is currently logged in. If multiple users have login accounts, each can have his or her own way of handling removable media.
The options to connect regular USB flash drives or hard drives are not listed on this window. But if you connect one of those drives to your computer, devices are automatically created when you plug them in (named /dev/sda, /dev/sdb, and so on). Any file systems found on those devices are automatically mounted on /media, and you are prompted if you want to open a Nautilus window to view files on those devices. This is done automatically, so you don't have to do any special configuration to make this happen.
When you are done with a USB drive, right-click on the device's name in the Nautilus file manager window and select Safely Remove Drive. This action unmounts the drive and removes the mount point in the /media directory. After that, you can safely unplug the USB drive from your computer.
Working with loadable modules
If you have added hardware to your computer that isn't properly detected, you might need to manually load a module for that hardware. Linux comes with a set of commands for loading, unloading, and getting information about hardware modules.
Kernel modules are installed in /lib/modules/ subdirectories. The name of each subdirectory is based on the release number of the kernel. For example, if the kernel were 3.1.0-7.fc16.i686, the lib/modules/3.1.0-7.fc16.i686 directory would contain drivers for that kernel. Modules in those directories can then be loaded and unloaded as they are needed.
Commands for listing, loading, unloading, and getting information about modules are available with Linux. The following sections describe how to use those modules.
Listing loaded modules
To see which modules are currently loaded into the running kernel on your computer, use the lsmod command. Consider the following example:
# lsmod
Module                  Size  Used by
snd_seq_oss            38912  0
snd_seq_midi_event      9344  1 snd_seq_oss
snd_seq                67728  4
snd_seq_oss,snd_seq_midi_event
snd_seq_device          8328  2 snd_seq_oss,snd_seq
.
.
.
autofs                 16512  0
ne2k_pci                9056  0
8390                   13568  1 ne2k_pci
ohci1394               41860  0
ieee1394              284464  1 ohci1394
floppy                 65712  0
sg                     36120  0
scsi_mod              124600  1 sg
parport_pc             39724  0
parport                47336  1 parport_pc
ext3                  128424  2
jbd                    86040  1 ext3
This output shows a variety of modules that have been loaded on a Linux system, including several to support the ALSA sound system, some of which provide OSS compatibility (snd_seq_oss).
To find information about any of the loaded modules, use the modinfo command. For example, you could type the following:
# /sbin/modinfo -d snd-seq-oss
"OSS-compatible sequencer module"
Not all modules have descriptions available and, if nothing is available, no data will be returned. In this case, however, the snd-seq-oss module is described as an OSS-compatible sequencer module. You can also use the -a option to see the author of the module, or -n to see the object file representing the module. The author information often has the e-mail address of the driver's creator, so you can contact the author if you have problems or questions about it.
Loading modules
You can load any module (as root user) that has been compiled and installed (to a /lib/modules subdirectory) into your running kernel using the modprobe command. A common reason for loading a module is to use a feature temporarily (such as loading a module to support a special file system on a floppy you want to access). Another reason to load a module is to identify that module as one that will be used by a particular piece of hardware that could not be autodetected.
Here is an example of the modprobe command being used to load the parport module, which provides the core functions to share parallel ports with multiple devices:
# modprobe parport
After parport is loaded, you can load the parport_pc module to define the PC-style ports available through the interface. The parport_pc module lets you optionally define the addresses and IRQ numbers associated with each device sharing the parallel port. For example:
# modprobe parport_pc io=0x3bc irq=auto
In this example, a device is identified as having an address of 0x3bc, and the IRQ for the device is autodetected.
The modprobe command loads modules temporarily — they disappear at the next reboot. To permanently add the module to your system, add the modprobe command line to one of the startup scripts run at boot time.
Removing modules
Use the rmmod command to remove a module from a running kernel. For example, to remove the module parport_pc from the current kernel, type the following:
# rmmod parport_pc
If it is not currently busy, the parport_pc module is removed from the running kernel. If it is busy, try killing any process that might be using the device. Then run rmmod again. Sometimes, the module you are trying to remove depends on other modules that may be loaded. For instance, the usbcore module cannot be unloaded while the USB printer module (usblp) is loaded, as shown here:
# rmmod usbcore
ERROR: Module usbcore is in use by wacom,usblp,ehci_hcd,ohci_hcd
Instead of using rmmod to remove modules, you could use the modprobe -r command. With modprobe -r, instead of just removing the module you request, you can also remove dependent modules that are not being used by other modules.
Summary
Many features of Linux, especially those that can potentially damage the system or impact other users, require that you gain root privilege. This chapter describes different ways of obtaining root privilege: direct login, su command or sudo command. It also covers some of the key responsibilities of a system administrator and components (configuration files, graphical tools, and so on) that are critical to a system administrator's work.
The next chapter describes how to install a Linux system. Approaches to installing Linux that are covered in that chapter include how to install from a live CD and from installation media.
Exercises
Use these exercises to test your knowledge of system administration and allow you to explore information about your system hardware. These tasks assume you are running a Fedora or Red Hat Enterprise Linux system (although some tasks will work on other Linux systems as well). If you are stuck, solutions to the tasks are shown in Appendix B (although in Linux, there are often multiple ways to complete a task).