
Chapter 23
Understanding Advanced Linux Security
Due to ever changing and growing threats, implementing just basic computer security is no longer enough. As malicious users gain access to and knowledge of advanced tools, so must a Linux systems administrator. Understanding advanced computer security topics and tools needs to be part of your preparation.
In this chapter, you learn about cryptography basics, such as ciphers and encryption. You also learn how the authentication module utility can simplify your administrative duties, even though it is an advanced security topic.
Implementing Linux Security with Cryptography
Using cryptography enhances the security of your Linux system and its network communications. Cryptography is the science of concealing information. It has a long and rich history that goes back far before computers were around. Because of its heavy use of mathematical algorithms, cryptography has easily transitioned to the computer environment. Linux comes with many cryptographic tools ready for you to use.
To understand cryptographic concepts and the various Linux tools, it is important to know a few cryptography terms.
- Plaintext — Text that a human or machine can read and comprehend
- Cipher text — Text that a human or machine cannot read and comprehend
- Encryption — The process of converting plaintext into cipher text using an algorithm
- Decryption — The process of converting cipher text into plaintext using an algorithm
- Cipher — The algorithm used to encrypt plaintext into cipher text and decrypt cipher text into plaintext
- Block cipher — A cipher that breaks data into blocks before encrypting
- Stream cipher — A cipher that encrypts the data without breaking it up
- Key — A piece of data required by the cipher to successfully encrypt or decrypt data
Parents often use a form of cryptography. They spell words instead of speaking them. A parent may take the plaintext word “candy” and turn it into cipher text by saying to the other parent “C-A-N-D-Y.” The other parent decrypts the word by using the same spelling cipher, and recognizes the word is “candy.” Unfortunately, it does not take children long to learn how to decrypt via the spelling cipher.
You may have noticed that hashing was not included in the preceding cryptography definition list. Hashing needs some special attention because it is often confused with encryption.
Understanding hashing
Hashing is not encryption, but it is a form of cryptography. Remember from Chapter 22 that hashing is a one-way mathematical process used to create cipher text. However, unlike encryption, once you create a hash, you cannot de-hash it back to its original plaintext.
In order for a hashing algorithm to be used in computer security, it needs to be collision-free, which means that the hashing algorithm does not output the same hash for two totally different inputs. Each input must have a unique hashed output. Thus, cryptographic hashing is a one-way mathematical process that is collision-free.
By default, cryptography is already in use on a Linux system. For example, the /etc/shadow file contains hashed passwords. Hashing is used on Linux systems for:
- Passwords (Chapter 22)
- Verifying files
- Digital signatures
- Virus signatures (Chapter 22)
A hash is also called a message digest, checksum, fingerprint, or signature. A Linux utility to produce message digests is the md5sum utility. In Chapter 10, “Getting and Managing Software,” you learned about getting software for your Linux system. When you download a software file, you can make sure the file was not corrupted on download. Figure 23.1 shows the website for downloading the Linux Mint distribution software (also called an ISO). The web page contains a Message Digest 5 (MD5) number you can use to ensure the ISO image you download was not corrupted during the download.
Figure 23.1 The Linux Mint ISO download web page provides an MD5 number.
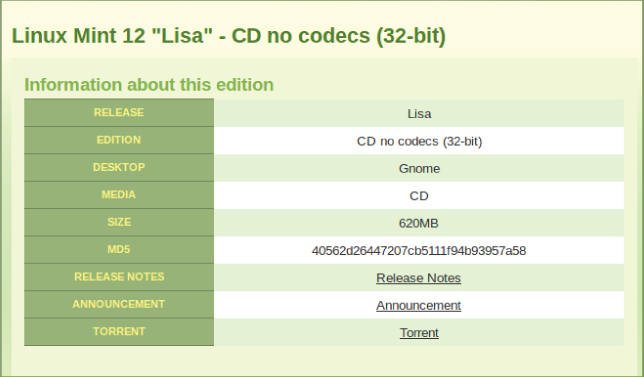
A hash is made of a software file at its original location, using the MD5 hash algorithm. The hash results can be posted in public, as was done in Figure 23.1. To ensure the integrity of your downloaded software file, you create an MD5 hash of the software file at your location. You then compare the results of your hash to the posted hash results. If they match, the software file was not corrupted upon download.
To create your hash, run the hashing algorithm on your system, using md5sum. The md5sum hash results for the downloaded software file are shown in the code that follows.
$ md5sum linuxmint-12-gnome-cd-nocodecs-32bit.iso
40562d26447207cb5111f94b93957a58
  linuxmint-12-gnome-cd-nocodecs-32bit.iso
You can see that the resulting hash does match the one posted on the website in Figure 23.1. This means the downloaded ISO file has not been corrupted and is ready for use.
You can implement even more cryptography besides hashing on your Linux system. The Linux utilities to do so are very easy to use. However, first you need to understand a few more underlying cryptography concepts.
Understanding encryption/decryption
The primary use of cryptography on a Linux system is to encode data to hide it (encryption) from unauthorized eyes and then decode the data (decryption) for authorized eyes. On a Linux system, you can encrypt:
- Individual files
- Partitions and volumes
- Web page connections
- Network connections
- Backups
- Zip files
These encryption/decryption processes use special math algorithms to accomplish their task. The algorithms are called cryptographic ciphers.
Understanding cryptographic ciphers
One of the original ciphers, called the Caesar Cipher, was created and used by Julius Caesar. However, it was terribly easy to crack. Today, many more secure ciphers are available. Understanding how each cipher works is important because the strength of the cipher you choose should directly relate to the security needs of your data. Table 23.1 lists a few modern ciphers.
Table 23.1 Cryptography Ciphers
| Method | Description |
| AES (Advanced Encryption Standard) also called Rijndael | Symmetric cryptography.
Block cipher, encrypting data in 128-, 192-, or 256-bit blocks using a 128-, 192-, or 256-bit key for encrypting/decrypting. |
| Blowfish | Symmetric cryptography.
Block cipher, encrypting data in 64-bit blocks using the same 32-bit to 448-bit keys for encrypting/decrypting. |
| CAST5 | Symmetric cryptography.
Block cipher, encrypting data in 64-bit blocks using the same up to 128-bit key for encrypting/decrypting. |
| DES (Data Encryption Standard) | No longer considered secure.
Symmetric cryptography. Block cipher, encrypting data in 64-bit blocks using the same 56-bit key for encrypting/decrypting. |
| 3DES | Improved DES cipher.
Symmetric cryptography. Data is encrypted up to 48 times with 3 different 56-bit keys before the encryption process is completed. |
| El Gamal | Asymmetric cryptography.
Uses two keys derived from a logarithm algorithm. |
| Elliptic Curve Cryptosystems | Asymmetric cryptography.
Uses two keys derived from an algorithm containing two randomly chosen points on an elliptic curve. |
| IDEA | Symmetric cryptography.
Block cipher, encrypting data in 64-bit blocks using the same 128-bit key for encrypting/decrypting. |
| RC4 also called ArcFour or ARC4 | Stream cipher, encrypting data in 64-bit blocks using a variable key size for encrypting/decrypting. |
| RC5 | Symmetric cryptography.
Block cipher, encrypting data in 32-, 64-, or 128-bit blocks using the same up to 2,048-bit keys for encrypting/decrypting. |
| RC6 | Symmetric cryptography.
Same as RC5, but slightly faster. |
| Rijndael also called AES | Symmetric cryptography.
Block cipher, encrypting data in 128-, 192-, or 256-bit blocks using a 128-, 192-, or 256-bit key for encrypting/decrypting. |
| RSA | Most popular asymmetric cryptography.
Uses two keys derived from an algorithm containing a multiple of two randomly generated prime numbers. |
Understanding cryptographic cipher keys
Cryptographic ciphers require a piece of data, called a key, to complete their mathematical process of encryption/decryption. The key can be either a single key or a pair of keys.
Notice the different cipher key sizes listed in Table 23.1. The key size is directly related to how easily the cipher is cracked. The bigger the key size, the less the chance of cracking the cipher. For example, DES is no longer considered secure because of its small 56-bit key size. However, a cipher with a key size of 256 bits is considered secure because it would take trillions of years to brute-force crack such a keyed cipher.
Symmetric key cryptography
Symmetric cryptography, also called secret key or private key cryptography, encrypts plaintext using a single keyed cipher. The same key is needed in order to decrypt the data. The advantage of symmetric key cryptography is speed. The disadvantage is the need to share the single key if the encrypted data is to be decrypted by another person.
An example of symmetric key cryptography on a Linux system is accomplished using the OpenPGP utility, GNU Privacy Guard, gpg. The example that follows shows the gpg utility used to encrypt the file Secret.File. With the -c option, gpg encrypts the file with a symmetric key. The original file is kept and a new encrypted file, Secret.File.gpg, is created.
$ cat Secret.File
This is my secret message.
$
$ gpg -c Secret.File
Enter passphrase:
Repeat passphrase:
$
$ ls Secret.File.gpg
Secret.File.gpg
$
$ ls Secret.File
Secret.File
The single key used to encrypt the file is protected by a passphrase. This passphrase is simply a password or phrase chosen by the user at the time of encryption.
To decrypt the file, the gpg utility is used again. The user must use the -d option and provide the passphrase for the secret key.
$ gpg -d Secret.File.gpg
gpg: CAST5 encrypted data
gpg: encrypted with 1 passphrase
This is my secret message.
...
Symmetric key cryptography is rather simple and easy to understand. Asymmetric cryptography is much more complicated and often is a point of confusion in cryptography.
Asymmetric key cryptography
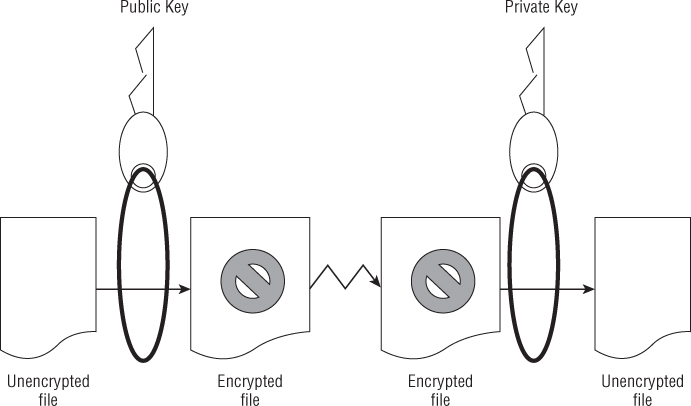
Asymmetric cryptography, also called private/public key cryptography, uses two keys, called a key pair. A key pair consists of a public key and a private key. The public key is just that, public. There is no need to keep it secret. The private key needs to be kept secret.
The general idea of asymmetric key cryptography is shown in Figure 23.2. A plaintext file is encrypted using a public key of a key pair. The encrypted file then can be securely transmitted to another person. To decrypt the file, the private key is used. This private key must be from the public/private key pair. Thus, data that has been encrypted with the public key can only be decrypted with its private key. The advantage of asymmetric cryptography is heightened security. The disadvantage is speed and key management.
Figure 23.2 Basic asymmetric key cryptography.
You can perform asymmetric encryption on your Linux system using gpg. It is a very versatile cryptographic utility. Before you can encrypt a file, you must first create your key pair and a “key ring.” In the example that follows, the gpg --gen-key command was used. This command will create a public/private key pair for the user johndoe, according to his desired specifications. It also will generate a key ring to store his keys.
$ gpg --gen-key
gpg (GnuPG) 1.4.12; Copyright (C)
 2012 Free Software Foundation, Inc.
...
gpg: directory '/home/johndoe/.gnupg' created
gpg: new configuration file
 '/home/johndoe/.gnupg/gpg.conf' created
...
gpg: keyring '/home/johndoe/.gnupg/secring.gpg' created
gpg: keyring '/home/johndoe/.gnupg/pubring.gpg' created
Please select what kind of key you want:
   (1) RSA and RSA (default)
   (2) DSA and Elgamal
   (3) DSA (sign only)
   (4) RSA (sign only)
Your selection? 1
RSA keys may be between 1024 and 4096 bits long.
What keysize do you want? (2048)
Requested keysize is 2048 bits
Please specify how long the key should be valid.
         0 = key does not expire
      <n>  = key expires in n days
      <n>w = key expires in n weeks
      <n>m = key expires in n months
      <n>y = key expires in n years
Key is valid for? (0) 7
Key expires at Mon 05 Mar 2015 03:55:29 AM EST
Is this correct? (y/N) y
You need a user ID to identify your key;
 the software constructs the user ID
from the Real Name, Comment and Email Address in this form:
  "Heinrich Heine (Der Dichter) <[email protected]>"
Real name: John Doe
Email address: [email protected]
Comment: The User
You selected this USER-ID:
    "John Doe (The User) <[email protected]>"
Change (N)ame, (C)omment, (E)mail or (O)kay/(Q)uit? O
You need a Passphrase to protect your secret key.
Enter passphrase:
Repeat passphrase:
...
gpg: /home/johndoe/.gnupg/trustdb.gpg: trustdb created
gpg: key 3B2E46D5 marked as ultimately trusted
upublic and secret key created and signed.
...
pub   2048R/3B2E46D5 2015-02-27 [expires: 2015-03-05]
      Key fingerprint = E202 8E43 3784 69EF 118B
  275C BA45 7DBF 3B2E 46D5
uid                  John Doe (The User) <[email protected]>
sub   2048R/0F0E0672 2015-02-27 [expires: 2015-03-05]
In the preceding example, the gpg utility asks for several specifications to generate the desired private/public keys:
- Cryptography cipher — RSA was chosen in the example.
- Bit size — A longer key size provides higher security.
- Validity period — Seven days was chosen in the example.
- User ID — Identifies the public key portion of the public/private key pair.
- Passphrase — Used to identify and protect the private key portion of the public/private key pair.
The user johndoe can check his key ring by using the gpg --list-keys command, as shown in the code that follows. Notice the User ID (UID) of the public key is displayed just as it was created, containing johndoe's real name, comment, and e-mail address.
$ gpg --list-keys
/home/johndoe/.gnupg/pubring.gpg
--------------------------------
pub   2048R/3B2E46D5 2015-02-27 [expires: 2015-03-05]
uid                  John Doe (The User) <[email protected]>
sub   2048R/0F0E0672 2015-02-27 [expires: 2015-03-05]
Once the key pair and key ring are generated, files can be encrypted and decrypted. First, the public key must be extracted from the key ring so it can be shared. In the example that follows, the gpg utility is used to extract the public key from johndoe's key ring. The extracted key is put into a file to be shared. The filename can be any name you wish it to be. In this case, the user johndoe chose the filename JohnDoe.pub.
$ gpg --export John Doe > JohnDoe.pub
$ ls *.pub
JohnDoe.pub
The file containing the public key can be shared any number of ways. It can be sent as an attachment via e-mail or even posted on a web page. The public key is considered public, so there is no need to hide it. In the example that follows, johndoe has given the file containing his public key to the user christineb. She adds johndoe's public key to her key ring, using the gpg --import command. The user christineb verifies that johndoe's public key is added using the gpg --list-keys command to view her key ring.
$ ls *.pub
JohnDoe.pub
$
$ gpg --import JohnDoe.pub
gpg: directory '/home/christineb/.gnupg' created
...
gpg: key 3B2E46D5:
 public key "John Doe (The User) <[email protected]>" imported
gpg: Total number processed: 1
gpg:               imported: 1  (RSA: 1)
$
$ gpg --list-keys
/home/christineb/.gnupg/pubring.gpg
-----------------------------------
pub   2048R/3B2E46D5 2015-02-27 [expires: 2015-03-05]
uid                  John Doe (The User) <[email protected]>
sub   2048R/0F0E0672 2015-02-27 [expires: 2015-03-05]
Once the key is added to the key ring, that public key can be used to encrypt data for the public key's original owner. In the example code that follows, note the following:
- christineb has created a text file, MessageForJohn.txt, for user johndoe.
- She encrypts the file using his public key.
- The encrypted file, MessageForJohn, is created by the --out option.
- The option --recipient identifies johndoe's public key using only the real name portion of his public key's UID in quotation marks, "John Doe".
$ gpg --out MessageForJohn --recipient "John Doe"
 --encrypt MessageForJohn.txt
...
$ ls
JohnDoe.pub  MessageForJohn  MessageForJohn.txt
The encrypted message file, MessageForJohn, created from the plaintext file, MessageForJohn.txt, can be securely sent to the user johndoe. In order to decrypt this message, johndoe will use his private key, identified and protected by the secret passphrase used to originally create the key. Once johndoe provides the proper passphrase, gpg will decrypt the message file and put it into the file, ChristinesMessage, designated by the --out option. Once decrypted, he can read the plaintext message.
$ ls MessageForJohn
MessageForJohn
$
$ gpg --out ChristinesMessage --decrypt MessageForJohn
You need a passphrase to unlock the secret key for
user: "John Doe (The User) <[email protected]>"
2048-bit RSA key, ID 0F0E0672, created 2015-02-27
 (main key ID 3B2E46D5)
gpg: encrypted with 2048-bit RSA key, ID 0F0E0672,
 created 2015-02-27
      "John Doe (The User) <[email protected]>"
$
$ cat ChristinesMessage
I know you are not the real John Doe.
To review, the steps needed for encryption/decryption of files using asymmetric keys include the following:
You can see why asymmetric keys can cause confusion! Remember that in asymmetric cryptography, each public and private key is a paired set that works together.
Understanding digital signatures
A digital signature is an electronic originator used for authentication and data verification. A digital signature is not a scan of your physical signature. Instead, it is a cryptographic token sent with a file, so the file's receiver can be assured that the file came from you and has not been modified in any way.
When you create a digital signature, the following steps occur:
Notice in Step 3 that the private key is used first. In the description of asymmetric key cryptography, the public key was used first. Asymmetric key cryptography is flexible enough to allow you to use your private key to encrypt and the receiver to use your public key to decrypt.
As you can see, a digital signature contains both cryptographic hashing and asymmetric key cryptography. This complicated process is often handled by an application that has been configured to do so, instead of directly handled by Linux system users. However, you can manually add your own digital signatures to documents.
Let's say that user johndoe is going to send a message to the user christineb, along with his digital signature. He has created a file containing the plaintext message to send. He uses the gpg utility to create the signature file and encrypt the message file. The --sign option tells the gpg utility that MessageForChristine.txt is the file to encrypt and use to create the digital signature. In response, the gpg utility:
- Creates a message digest (aka hash) of the message file
- Encrypts the message digest, which creates the digital signature
- Encrypts the message file
- Places the encrypted contents into the file specified by the --output option, JohnDoe.DS
The file JohnDoe.DS now contains an encrypted and digitally signed message. The following code demonstrates this process:
$ gpg --output JohnDoe.DS --sign MessageForChristine.txt
You need a passphrase to unlock the secret key for
user: "John Doe (The User) <[email protected]>"
2048-bit RSA key, ID 3B2E46D5, created 2015-02-27
Once the user christineb receives the signed and encrypted file, she can use the gpg utility to check the digital signature and decrypt the file in one step. In the code that follows, the --decrypt option is used along with the name of the digitally signed file, JohnDoe.DS. The file's message is decrypted and shown. The digital signature of the file is checked and found to be valid.
$ gpg --decrypt JohnDoe.DS
I am the real John Doe!
gpg: Signature made Mon 27 Feb 2015 09:42:36 AM EST
 using RSA key ID 3B2E46D5
gpg: Good signature from "John Doe (The User) <[email protected]>"
...
Without johndoe's public key on her key ring, christineb would not be able to decrypt this message and check the digital signature.
Understanding a few cryptography basics will help you get started on securing your Linux system with encryption. Keep in mind that we've covered just the basics in this chapter. There are many more cryptography topics, such as digital certificates and public key infrastructure, that would be worth your time to learn.
Implementing Linux cryptography
Many cryptography tools are available on your Linux system. Which ones you choose to use depend upon your organization's security requirements. The following is a brief review of some of the Linux cryptography tools available.
Ensuring file integrity
Earlier in this chapter, an ISO's file integrity was checked using the message digest utility md5sum. The other most popular message digest tool is one that uses the SHA-1 hash, sha1sum. It works identically at the command line to the md5sum utility, as shown in the code that follows. If an ISO file has an SHA-1 hash listed, instead of an MD5 checksum, you can use the following to check the hash.
$ sha1sum Fedora-16-i686-Live-Desktop.iso
791f2677c7ac03ccacde3e26df50a36a277d3bf0
  Fedora-16-i686-Live-Desktop.iso
Unfortunately, as of 2005, the SHA-1 hash standard was no longer considered to be a cryptographic hash due to some “mathematical weaknesses.” However, as with the MD5, that has not diminished its popularity for checking file integrity.
If your particular organization requires a true cryptographic hash utility, you will need to use one of the SHA-2 cryptographic hash tools. On Linux, these include:
- sha224sum
- sha256sum
- sha384sum
- sha512sum
These tools work just like the sha1sum command, except, of course, they use the SHA-2 cryptographic hash standard. The only difference between the various SHA-2 tools is the key length they use. The sha224sum command uses a key length of 224 bits, the sha256sum command uses a key length of 256 bits, and so on. Remember that the longer the key length, the less the chance of cracking the cipher.
The SHA-2 cryptographic hash standard was created by the National Security Agency (NSA). They have another cryptographic hash standard to be released soon, SHA-3.
Encrypting a Linux filesystem
You may need to encrypt an entire filesystem on your Linux server. This can be done a number of different ways, including using a Free and Open Source Software (FOSS) third-party tool such as TrueCrypt, www.truecrypt.org.
One of your options in Linux is to encrypt your root partition upon installation (see Chapter 9, “Installing Linux”). Many Linux distributions include an encryption option during their installation process. Figure 23.1 shows the encryption option during a Fedora installation.
Figure 23.3 Linux Fedora installation encryption option.

Once you select this option during installation, you will be asked for a password. This is symmetric key cryptography with a password protecting the single key. Figure 23.2 shows the installation asking for the key's password. The password must be at least eight characters long.
Figure 23.4 Linux Fedora encryption symmetric key password.
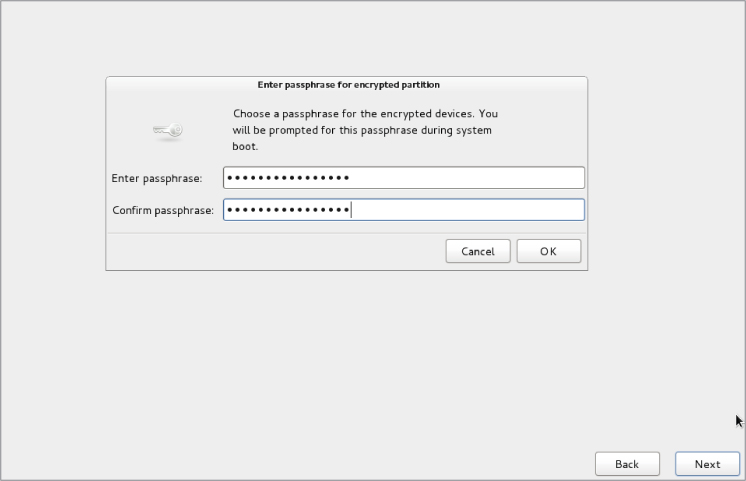
If you select this encryption option, whenever you boot the system, you will be asked for the symmetric key password. Figure 23.3 shows what this looks like. This protects the root partition, should the disk it resides on be stolen.
Figure 23.5 Asking for the encryption symmetric key password at boot.

If you inherit a system with an encrypted disk, using root privileges, you can use the lvs and cryptsetup commands and the /etc/crypttab file to help. In the following, the lvs command shows all the logical volumes current on the system and their underlying device names. See Chapter 12, “Managing Disks and Filesystems,” for a review of the lvs command.
# lvs -o devices
  Devices
  /dev/mapper/luks-b099fbbe-0e56-425f-91a6-44f129db9f4b(56)
  /dev/mapper/luks-b099fbbe-0e56-425f-91a6-44f129db9f4b(0)
On this system, notice that the underlying device names start with luks. This indicates that the Linux Unified Key Setup (LUKS) standard for hard disk encryption has been used. To get more information on LUKS, see the LUKS homepage at http://code.google.com/p/cryptsetup.
The encrypted logical volumes are mounted at boot time using the information from the /etc/crypttab file, as shown in the following code. Notice that the luks names are the same as those listed by the lvs command in the previous example.
# cat /etc/crypttab
luks-b099fbbe-0e56-425f-91a6-44f129db9f4b
 UUID=b099fbbe-0e56-425f-91a6-44f129db9f4b none
You can also use the cryptsetup command to help you uncover more information about your Linux system's encrypted volumes. In the example that follows, the status option is used along with the luks device name to determine further information.
# cryptsetup status luks-b099fbbe-0e56-425f-91a6-44f129db9f4b
/dev/mapper/luks-b099fbbe-0e56-425f-91a6-44f129db9f4b
 is active and is in use.
  type:    LUKS1
  cipher:  aes-xts-plain64
  keysize: 512 bits
  device:  /dev/sda3
  offset:  4096 sectors
  size:    15742976 sectors
  mode:    read/write
Encrypting a Linux directory
You can also use the ecryptfs utility to encrypt on a Linux system. The ecryptfs utility is not a filesystem type as the name would imply. Instead, it is a POSIX-compliant utility that allows you to create an encryption layer on top of any filesystem.
The ecryptfs utility is not installed by default on a Fedora or RHEL Linux system. You need to use the command yum install ecryptfs-utils. If it is not installed on a Debian system, use the command sudo apt-get install ecrypt-utils.
In the example that follows, the user johndoe will have a subdirectory encrypted using the ecryptfs utility. First, there should be no files currently residing in the directory before it is encrypted. If there are files located there, move them to a safe place until after the encryption has been completed. If you do not move them, you will not be able to access them while the directory is encrypted.
Now, to encrypt the directory /home/johndoe/Secret, use the mount command. Look at the mount command used in the example that follows. It is somewhat similar to the regular mount command, except the partition type used is ecryptfs. The item to mount and its mount point are the same directory! You are literally encrypting the directory and mounting it upon itself. The other unusual item about this mount command is that it kicks off the ecryptfs utility, which asks a few interactive questions.
# mount -t ecryptfs /home/johndoe/Secret /home/johndoe/Secret
Select key type to use for newly created files:
 1) tspi
 2) passphrase
 3) pkcs11-helper
 4) openssl
Selection: 2
Passphrase:
Select cipher:
 1) aes: blocksize = 16;
 min keysize = 16; max keysize = 32 (loaded)
 2) blowfish: blocksize = 16;
 min keysize = 16; max keysize = 56 (not loaded)
 3) des3_ede: blocksize = 8;
 min keysize = 24; max keysize = 24 (not loaded)
 4) twofish: blocksize = 16;
 min keysize = 16; max keysize = 32 (not loaded)
 5) cast6: blocksize = 16;
 min keysize = 16; max keysize = 32 (not loaded)
 6) cast5: blocksize = 8;
 min keysize = 5; max keysize = 16 (not loaded)
Selection [aes]: 1
Select key bytes:
 1) 16
 2) 32
 3) 24
Selection [16]:
Enable plaintext passthrough (y/n) [n]:
Enable filename encryption (y/n) [n]:
Attempting to mount with the following options:
  ecryptfs_unlink_sigs
  ecryptfs_key_bytes=16
  ecryptfs_cipher=aes
  ecryptfs_sig=70993b8d49610e67
WARNING: Based on the contents of [/root/.ecryptfs/sig-cache.txt]
it looks like you have never mounted with this key
before. This could mean that you have typed your
passphrase wrong.
Would you like to proceed with the mount (yes/no)? : yes
Would you like to append sig [70993b8d49610e67] to
[/root/.ecryptfs/sig-cache.txt]
in order to avoid this warning in the future (yes/no)? : yes
Successfully appended new sig to user sig cache file
Mounted eCryptfs
The ecryptfs utility allows you to choose the following:
- Key type
- Passphrase
- Cipher
- Key size (in bytes)
- To enable or disable plaintext to pass through
- To enable or disable filename encryption
It also will warn you when you are first mounting this encrypted directory because the key has not been used before. The utility will allow you to apply a digital signature to the mounted directory so that if you mount it again, it will just mount the directory and not require a passphrase.
To verify that the encrypted directory is now mounted, you can use the mount command again. In the example that follows, the mount command is used and then piped into grep to search for the /home/johndoe/Secret directory. As you can see, the directory is mounted with an ecryptfs type.
# mount | grep /home/johndoe/Secret
/home/johndoe/Secret on /home/johndoe/Secret type ecryptfs
(rw,relatime,ecryptfs_sig=70993b8d49610e67,ecryptfs_cipher=aes,
ecryptfs_key_bytes=16,ecryptfs_unlink_sigs)
So far, you have not seen the effects of this mounted and encrypted directory. In the text that follows, the file my_secret_file is copied to the encrypted directory. User johndoe can still use the cat command to display the file in plaintext. The file is automatically decrypted by the ecryptfs layer.
$ cp my_secret_file Secret
$ cat /home/johndoe/Secret/my_secret_file
Shh... It's a secret.
The root user also can use the cat command to display the file in plaintext.
# cat /home/johndoe/Secret/my_secret_file
Shh... It's a secret.
However, once the encrypted directory is unmounted using the umount command, the files are no longer automatically decrypted. The file my_secret_file is now gibberish and is not able to be read, even by the root user.
# umount /home/johndoe/Secret # # cat /home/johndoe/Secret/my_secret_file #d6
Thus, the ecryptfs utility will allow you to create a location on the file system to quickly encrypt and decrypt files. However, once that directory is no longer mounted as an ecryptfs type, the files are secure and cannot be decrypted.
Encrypting a Linux file
The most popular tool for file encryption on a Linux system is the OpenPGP utility GNU Privacy Guard, gpg. Its flexibility and variety of options, along with the fact that it is installed by default on most Linux distributions, add to its appeal.
However, there are several other cryptography tools you can use on a Linux system to encrypt files. And just like gpg, many of these tools allow you to do much more than just file encryption. The following are some of the popular Linux cryptography tools you can use to encrypt files:
- aescrypt — It uses the symmetric key cipher Rijndael, also called AES. This third-party FOSS tool is available for download from www.aescript.com.
- bcrypt — This tool uses the symmetric key cipher blowfish. It is not installed by default. Once bcrypt is installed, man pages are available.
- For Fedora and RHEL: yum install bcrypt.
- For Ubuntu: sudo apt-get install bcrypt.
- ccrypt — This tool uses the symmetric key cipher Rijndael, also called AES. It was created to replace the standard Unix crypt utility and is not installed by default. Once ccrypt is installed, man pages are available.
- For Fedora and RHEL: yum install ccrypt.
- For Ubuntu: sudo apt-get install ccrypt.
- gpg — This utility can use either asymmetric key pairs or a symmetric key. It is installed by default and is the cryptography tool of choice for Linux servers. The default cipher to use is set in the gpg.conf file. There are man pages available as well as info gnupg.
- gpg2 — Similar to gpg, but targeted for the desktop environment, the gpg2 tool is not installed by default. Once gpg2 is installed, man pages are available.
- For Fedora and RHEL: yum install ccrypt.
- Not available on Ubuntu.
Keep in mind that this list just covers the more popular tools. Also, remember that many of these file cryptography tools can be used for more than just file cryptography.
Encrypting Linux miscellaneous
You can apply cryptology to just about everything in Linux. Besides filesystems, directories, and files, you can also encrypt backups, Zip files, network connections and more.
Table 23.2 lists some of the miscellaneous Linux cryptology tools and what they do. If you want to see a full list of installed cryptography tools on your current Linux distribution, type man -k crypt at the command line.
Table 23.2 Linux Miscellaneous Cryptography Tools
| Tool | Description |
| duplicity | Encrypts backups. Installed by default on Fedora and RHEL. To install on Ubuntu, type sudo apt-get install duplicity at the command line. |
| gpg-zip | Uses GNU Privacy Guard to encrypt or sign files into an archive. Installed by default. |
| openssl | A toolkit that implements Secure Socket Layer (SSL) and Transport Layer Security (TLS) protocols. These protocols require encryption. Installed by default. |
| seahorse | A GNU Privacy Guard encryption key manager. Installed by default on Ubuntu. To install on Fedora and RHEL, type yum install seahorse at the command line. |
| ssh | Encrypts remote access across a network. Installed by default. |
| zipcloak | Encrypts entries in a Zip file. Installed by default. |
Like many other items on a Linux system, the cryptography tools available are rich and plentiful. This gives you the flexibility and variety you need in order to implement the cryptology standards your particular organization requires.
Another extremely powerful security tool available on Linux is PAM. The next section in this chapter covers basic PAM concepts and how you can use this tool to even further enhance your Linux system's security.
Implementing Linux Security with PAM
Pluggable Authentication Modules (PAM) was invented by Sun Microsystems and originally implemented in the Solaris operating system. The Linux-PAM project began in 1997. Today, most Linux distributions use PAM.
PAM simplifies the authentication management process. Remember that authentication (see Chapter 22, “Understanding Basic Linux Security”) is the process of determining that a subject (aka user or process) is who he says he is. This process is sometimes called “identification and authentication.” PAM is a centralized method of providing authentication for the Linux system and applications.
Applications can be written to use PAM and are called “PAM-aware.” A PAM-aware application does not have to be rewritten and recompiled to have its authentication settings changed. Any needed changes are made within a PAM configuration file for the PAM-aware applications. Thus, authentication management for these applications is centralized and simplified.
You can see if a particular Linux application or utility is PAM-aware. Check if it is compiled with the PAM library, libpam.so. In the example that follows, the crontab application is being checked for PAM awareness. The ldd command will check a file's shared library dependencies. To keep it simple, grep is used to search for the PAM library. As you can see, crontab on this particular Linux system is PAM-aware.
# ldd /usr/bin/crontab | grep pam
libpam.so.0 => /lib/libpam.so.0 (0x44d12000)
The benefits of using PAM on your Linux system include the following:
- Simplified and centralized authentication management from the administrator viewpoint.
- Simplified application development, because developers can write applications using the documented PAM library, instead of writing their own authentication routines.
- Flexibility in authentication:
- Allow or deny access to resources based on traditional criteria, such as identification.
- Allow or deny access based on additional criteria, such as time of day restrictions.
- Set subject limitations, such as resource usage.
Although the benefits of PAM simplify authentication management, the way PAM actually works is not so simple.
Understanding the PAM authentication process
When a subject (user or process) requests access to a PAM-aware application or utility, two primary components are used to complete the subject authentication process:
- The PAM-aware application's configuration file
- The PAM modules the configuration file uses
Each PAM-aware application configuration file is at the center of the process. The PAM configuration files call upon particular PAM modules to perform the needed authentication. PAM modules authenticate subjects from system authorization data, such as a centralized user account using LDAP (see Chapter 11, “Managing User Accounts”).
Linux comes with many applications that are PAM-aware, their needed configuration files, and PAM modules already installed. If you have any special authentication needs, you can most likely find a PAM module that has already been written for that need. However, before you start tweaking PAM, you need to understand more about how PAM operates.
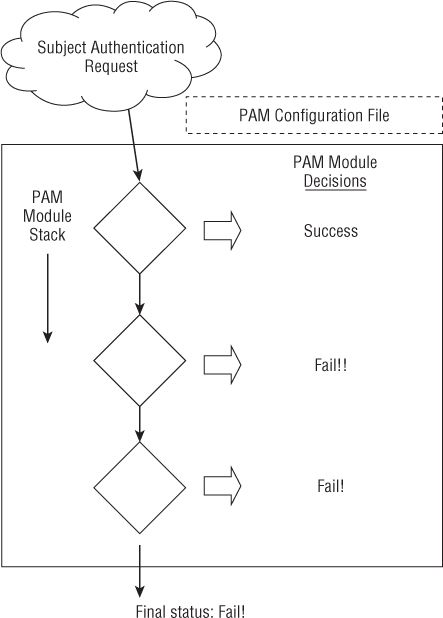
A series of steps is taken by PAM using the modules and configuration files to ensure that proper application authentication occurs:
Typically, if a single PAM module returns a failure status, access to the application is denied. However, this is dependent upon the configuration file settings. Figure 23.4 shows an example of an authentication request being denied by PAM.
Figure 23.6 PAM authentication process.
All PAM configuration files are located in /etc/pam.d. The general format of a PAM configuration file is: context control flag PAM module module options
The following shows the PAM configuration file for the poweroff command. Notice that the file starts with a comment line. Every line starting with a # character is ignored.
$ cat /etc/pam.d/poweroff
#%PAM-1.0
auth       sufficient   pam_rootok.so
auth       required     pam_console.so
#auth       include      system-auth
account    required     pam_permit.so
Remember that all the PAM modules listed in the configuration file's stack will be called, in order, and asked to return a status. In the preceding PAM configuration file, there will be three statuses returned to determine whether the subject may access the poweroff command. To better understand how these configuration files are used, you need to review each piece of the general format.
Understanding PAM contexts
PAM modules have standard functions that provide different authentication services. These standard functions within a PAM module can be broken down into function types, called contexts. Contexts can also be called module interfaces or types. In Table 23.3, the different PAM contexts are listed along with what type of authentication service they provide.
Table 23.3 PAM Contexts
| Context | Service Description |
| auth | Provides authentication management services, such as verifying account passwords |
| account | Provides account validation services, such as time of day access restrictions |
| password | Manages account passwords, such as password length restrictions |
| session | Manages the beginning and end of an authenticated session, such as sending information to security logs |
In the poweroff configuration file, shown again here, only two PAM contexts are used, auth and account. Thus, there is no need for this application to have PAM password or session management services. Notice that one of the auth contexts will be ignored, because its line starts with a # character:
$ cat /etc/pam.d/poweroff
#%PAM-1.0
auth       sufficient   pam_rootok.so
auth       required     pam_console.so
#auth       include      system-auth
account    required     pam_permit.so
The auth context is listed two times in the configuration file shown in the preceding code. However, for each auth context, a different control flag and PAM module are used. Control flags each have their own special meaning and function.
Understanding PAM control flags
In a PAM configuration file, control flags are used to determine the overall status, which will be returned to the application. A control flag is either of the following:
- Simple keyword — The only concern here is if the corresponding PAM module returns a response of either “failed” or “success.” See Table 23.4 for how these statuses are handled.
- Series of actions — The returned module status is handled through the series of actions listed in the file.
Table 23.4 shows the various keyword control flags and their responses to the returned module status. Notice that a few of the control flags need to be carefully placed within the configuration file's stack. Some control flags will cause the authentication process to stop immediately and the rest of the PAM modules are not called. The control flags simply control how the PAM module status results are combined into a single overall result. Table 23.4 demonstrates how the status results are combined.
Table 23.4 PAM Configuration Control Flags and Response Handling
| Control Flag | Response Handling Description |
| required | If failed, returns a failure status to the application, after all the rest of the contexts have been run in the stack. |
| requisite | If failed, returns a failure status to the application immediately without running the rest of the stack. (Be careful where you place this control in the stack.) |
| sufficient | If failed, the module status is basically ignored. If success, then a success status is immediately returned to the application without running the rest of the stack. (Be careful where you place this control in the stack.) |
| optional | This control flag is important only for the final overall return status of success or failure. Think of it as a tie-breaker. When the other modules in the configuration file stack return statuses that are not clear-cut failure or success statuses, this optional module's status is used to determine the final status or break the tie. In cases where the other modules in the stack are returning a clear-cut path of failure or success, this status is ignored. |
| include | Get all the return statuses from this particular PAM configuration file's stack to include in this stack's overall return status. It's as if the entire stack from the named configuration file is now in this configuration file. |
| substack | Similar to the include control flag, except for how certain errors and evaluations affect the main stack. This forces the included configuration file stack to act as a substack to the main stack. Thus, certain errors and evaluations affect only the substack and not the main stack. |
You should know that that the PAM modules return many more status result codes than just “success” or “failure.” For example, a module may return the status code of PAM_ACCT_EXPIRED, which means the user account has expired. This would be deemed a “failure.”
Understanding PAM modules
A PAM module is actually a suite of shared library modules (DLL files) stored in /lib/security. You can see a list of the various installed PAM modules on your system by typing ls /lib/security/pam*.so at the command line.
Your Linux system comes with many of the PAM modules needed already installed. There is no need to write any PAM modules yourself. If you do need a module not already installed, most likely someone else has already written it. Check out sources such as:
Understanding PAM system event configuration files
So far, the focus has been on PAM-aware applications and their configuration files. However, other system events, such as logging into the Linux system, also use PAM. Thus, these events also have configuration files.
The following is a partial directory listing of the PAM configuration file directory. Notice that there are PAM-aware application configuration files, such as cond, and system event configuration files, such as postlogin-ac.
# ls -l /etc/pam.d
total 204
-rw-r--r--. 1 root root  272 Nov 15 10:06 atd
...
-rw-r--r--. 1 root root  232 Jan 31 12:35 config-util
-rw-r--r--. 1 root root  293 Oct 26 23:10 crond
...
-rw-r--r--. 1 root root  109 Feb 28 01:33 postlogin-ac
-rw-r--r--. 1 root root  147 Oct  3 11:51 poweroff
...
-rw-r--r--. 1 root root  981 Feb 28 01:33 system-auth-ac
...
You can modify these system event configuration files to implement your organization's specific security needs. For example, the system-auth-ac file can be modified to force certain password restrictions.
These PAM system event configuration files operate in exactly the same way as the PAM-aware application configuration files. They have the same format, use the same syntax, and call upon PAM modules. However, many of these files are symbolically linked (see Chapter 4, “Moving Around the Filesystem”). Therefore, these configuration files require a few extra steps when changes are made to them. The “how-to's” are covered later in this chapter.
Even though Linux comes with many PAM-aware applications, various configuration files, and PAM modules already installed, you cannot just hope PAM will take care of herself. Certain administrative steps are needed to manage PAM.
Administering PAM on your Linux system
The task of administering PAM on your Linux system is rather minimal. You will need to verify PAM is properly implemented and make adjustments to meet your particular organization's security needs.
Also, PAM does a little more than just the application authentication steps described previously. PAM can also limit resources, restrict access times, enforce good password selection, and so on.
Managing PAM-aware application configuration files
You should review PAM configuration files for your PAM-aware applications and utilities to ensure their authentication process matches your organization's desired authentication process. Your Access Control Matrix (see Chapter 22, “Understanding Basic Linux Security”) and the information on understanding PAM provided in this chapter should help you conduct an audit of the PAM configuration files.
Each PAM-aware application should have its very own PAM configuration file. Each configuration file defines what particular PAM modules will be used for that application. If no configuration file exists, a security hole may be created for that application. This hole could be used for malicious intent. As a safety precaution, PAM comes with the “other” configuration file. If a PAM-aware application does not have a PAM configuration file, it defaults to using the “other” PAM configuration file.
You can verify whether your Linux system has the /etc/pam.d/other configuration file, by using the ls command. The example that follows shows that the /etc/pam.d/other PAM configuration file does exist on this system.
$ ls /etc/pam.d/other
/etc/pam.d/other
The PAM /etc/pam.d/other configuration file should deny all access, which in terms of security is referred to as Implicit Deny. In computer security access control, Implicit Deny means that if certain criteria are not clearly met, access must be denied. In this case, if no configuration file exists for a PAM-aware application, all access to it will be denied. The following shows a /etc/pam.d/other file's contents:
$ cat /etc/pam.d/other
#%PAM-1.0
auth     required       pam_deny.so
account  required       pam_deny.so
password required       pam_deny.so
session  required       pam_deny.so
Notice that all four PAM contexts — auth, account, password, and session — are listed. Each context uses the required control flag and the pam_deny.so module. The pam_deny.so PAM module is used to deny access.
Even with the “other” configuration file in place, if a PAM configuration file for a PAM-aware application is not there, it needs to be created. Add this item to your PAM audit checklist. You should also review your PAM “other” configuration file on your Linux system to ensure it enforces Implicit Deny.
Managing PAM system event configuration files
Similar to PAM-aware application and utility configuration files, your PAM system event configuration files will need to be audited with your organization's Access Control Matrix. However, for any needed modifications to these files, there are extra steps that need to be taken.
In the material that follows, you learn how to set up special security requirements via PAM on your Linux system, such as account login time restrictions. Many of the special requirements will require you to make a change to PAM system event configuration files, such as /etc/pam.d/system-auth-ac.
The problem with making changes to some of these PAM system event configuration files is that the utility authconfig can rewrite these files and remove any locally made changes. Fortunately, each PAM configuration file that runs this risk has it documented in a comment line within. Using grep, you can quickly find which PAM configuration files have this potential problem.
# grep "authconfig" /etc/pam.d/*
/etc/pam.d/fingerprint-auth:# User changes will be destroyed
 the next time authconfig is run.
/etc/pam.d/fingerprint-auth-ac:# User changes will be destroyed
 the next time authconfig is run.
...
/etc/pam.d/system-auth:# User changes will be destroyed
 the next time authconfig is run.
/etc/pam.d/system-auth-ac:# User changes will be destroyed
 the next time authconfig is run.
...
These PAM system event configuration files use symbolic links (see Chapter 4, “Moving Around the Filesystem”). For example, you can see that the file system-auth is actually a symbolic link pointing to the file system-auth-ac. The first character in the file's security is an l. This indicates that the file is linked. The -> symbol shows that the file is symbolically linked.
# ls -l system-auth
lrwxrwxrwx. 1 root root 14 Feb 28 01:36
 system-auth -> system-auth-ac
The authconfig utility does not use the symbolic links, nor will it modify them. Thus, you can create a new local PAM system event configuration file and point the symbolic link to it. This will allow your system to have the needed security modifications implemented and enable you to avoid having the configuration files be overwritten by the authconfig utility. The basic steps are as follows, including an example of performing these steps for the system-auth-ac file:
# cp system-auth-ac system-auth-local
# vi system-auth-local
# ls -l system-auth
lrwxrwxrwx. 1 root root 14 Feb 28 01:36
 system-auth -> system-auth-ac
#
# rm -i system-auth
rm: remove symbolic link 'system-auth'? y
# ln -s system-auth-local system-auth
#
# ls -l system-auth
lrwxrwxrwx. 1 root root 17 Feb 28 01:37
 system-auth -> system-auth-local
Once these changes have been made, you can make any needed changes to the “local” PAM system event configuration files without worrying about the authconfig utility overwriting the files.
Implementing resources limits with PAM
Managing resources is not just a system administrative task. It is also a security administrative task. Setting resource limitations helps you avoid many adverse problems on your Linux system. Problems such as fork bombs can be averted by limiting the number of processes a single user can create. A fork bomb occurs when a process spawns process after process in a recursive manner until system resources are consumed. Fork bombs can be malicious or just accidental — such as those created by poor program code development.
The PAM module pam-limits uses a special configuration file to set these resources limits, /etc/security/limits.conf. By default, this file has no resource limits set within it. Therefore, you will need to review the file and set resources limits to match your organization's security needs.
The following code snippet shows the /etc/security/limits.conf file. As you can see, the file is well documented, including thorough format descriptions and examples of limits that can be set.
$ cat /etc/security/limits.conf
# /etc/security/limits.conf
#
#Each line describes a limit for a user in the form:
#
#<domain>        <type>  <item>  <value>
#
#Where:
#<domain> can be:
#        - an user name
#        - a group name, with @group syntax
#        - the wildcard *, for default entry
#        - the wildcard %, can be also used with %group syntax,
#                 for maxlogin limit
#
#<type> can have the two values:
#        - "soft" for enforcing the soft limits
#        - "hard" for enforcing hard limits
#
#<item> can be one of the following:
#        - core - limits the core file size (KB)
#        - data - max data size (KB)
#        - fsize - maximum filesize (KB)
#        - memlock - max locked-in-memory address space (KB)
#        - nofile - max number of open files
#        - rss - max resident set size (KB)
#        - stack - max stack size (KB)
#        - cpu - max CPU time (MIN)
#        - nproc - max number of processes
#        - as - address space limit (KB)
#        - maxlogins - max number of logins for this user
#        - maxsyslogins - max number of logins on the system
#        - priority - the priority to run user process with
#        - locks - max number of file locks the user can hold
#        - sigpending - max number of pending signals
#        - msgqueue - max memory used by POSIX
 message queues (bytes)
#        - nice - max nice priority allowed to
 raise to values: [-20, 19]
#        - rtprio - max realtime priority
#
#<domain>      <type>  <item>         <value>
#
#*               soft    core            0
#*               hard    rss             10000
#@student        hard    nproc           20
#@faculty        soft    nproc           20
#@faculty        hard    nproc           50
#ftp             hard    nproc           0
#@student        -       maxlogins       4
# End of file
The format items domain and type need some further explanation than what is documented in the configuration file:
- domain — The limit applies to the listed user or group. If the domain is “*” it applies to all users.
- type — A hard limit cannot be exceeded. A soft limit can be exceeded, but only temporarily.
Take a look at the limits.conf file setting example that follows. The group faculty is listed, but what you should notice is nproc. The nproc limit sets the maximum number of processes a user can start. This setting is what prevents a fork bomb. Notice that the type select is hard; thus, the limit of 50 processes cannot be exceeded. Of course, this limit is not enforced because the line is commented out with a # symbol.
#@faculty hard nproc 50
Limit settings are set per login and only last for the duration of the login session. A malicious user could log in several times to create a fork bomb. Thus, setting the maximum number of logins for these user accounts is a good idea, too.
Limiting the maximum number of logins may have to be done on a per-user basis. For example, johndoe needs to log in to the Linux system only once. To prevent others from using johndoe's account, set his account's maxlogins to 1.
johndoe hard maxlogins 1
The final step in limiting this resource is to ensure that the PAM module using limits.conf is included in one of the PAM system event configuration files. The PAM module using limits.conf is pam_limits. In the partial listing that follows, grep is used to verify that the PAM module is used within the system event configuration files.
# grep "pam_limits" /etc/pam.d/*
...
system-auth:session     required      pam_limits.so
system-auth-ac:session     required      pam_limits.so
system-auth-local:session     required      pam_limits.so
Time limits for access to services and accounts are not handled by the PAM /etc/security/limits.conf configuration file. Instead, it is handled by the time.conf file.
Implementing time restrictions with PAM
PAM can make your entire Linux system operate on “PAM time.” Time restrictions such as access to particular applications during certain times of the day or allowing logins only during specified days of the week are all handled by PAM.
The PAM configuration file that handles these restrictions is located in the /etc/security directory. The following code shows the well-documented /etc/security/time.conf PAM configuration file.
$ cat /etc/security/time.conf
# this is an example configuration file for the pam_time module
...
# the syntax of the lines is as follows:
#
#       services;ttys;users;times
...
# services
# is a logic list of PAM service names that the rule applies to.
#
# ttys
# is a logic list of terminal names that this rule applies to.
#
# users
# is a logic list of users or a netgroup of users to whom this
# rule applies.
#
# NB. For these items the simple wildcard '*' may be used
 only once.
#
# times
# the format here is a logic list of day/time-range
# entries the days are specified by a sequence of two character
# entries, MoTuSa for example is Monday Tuesday and
 Saturday. Note
# that repeated days are unset MoMo = no day, and
 MoWk = all weekdays
# bar Monday. The two character combinations accepted are
#
#     Mo Tu We Th Fr Sa Su Wk Wd Al
#
# the last two being week-end days and all 7 days of the week
# respectively. As a final example, AlFr means all
 days except Friday.
#
# each day/time-range can be prefixed with a '!' to
 indicate "anything
# but"
#
# The time-range part is two 24-hour times HHMM separated
 by a hyphen
# indicating the start and finish time (if the finish time
 is smaller
# than the start time it is deemed to apply on the following
 day).
#
# for a rule to be active, ALL of service+ttys+users must be
 satisfied
# by the applying process.
...
# End of example file.
Note that the format for each valid entry follows the following syntax: services;ttys;users;times. Each field is separated by a semicolon. The valid field values are documented in the time.conf configuration file.
While time.conf is well-documented, an example is always helpful. For instance, you have decided that regular users should be allowed to log in on terminals on weekdays only (Monday through Friday). They can log in from 7 a.m. to 7 p.m. on these weekdays. The following list describes what elements need to be set:
- services — Login
- ttys — * (Designating all terminals are to be included)
- users — Everyone but root (!root)
- times — Allowed on weekdays (Wd) from 7 a.m. (0700) to 7 p.m. (1900)
The entry in time.conf would look like the following:
login; * ; !root ; Wd0700-1900
The final step in implementing this example time restriction is to ensure that the PAM module using time.conf is included in one of the PAM system event configuration files. The PAM module using time.conf is pam_time. In the partial listing that follows, grep shows the PAM module; pam_time is not used within any of the system event configuration files.
# grep "pam_time" /etc/pam.d/*
config-util:auth             sufficient     pam_timestamp.so
config-util:session          optional       pam_timestamp.so
selinux-polgengui:auth       sufficient   pam_timestamp.so
selinux-polgengui:session    optional     pam_timestamp.so
system-config-selinux:auth       sufficient   pam_timestamp.so
system-config-selinux:session    optional     pam_timestamp.so
Because pam_time is not listed above, you must modify the /etc/pam.d/system-auth file in order for PAM to enforce it the time restrictions. The PAM configuration file system-auth is used by PAM at system login and during password modifications. This configuration file checks many items, such as time restrictions.
Add the following near the top of the “account” section of the configuration file. Now the pam_time module will check login restrictions you set within the /etc/security/time.conf file.
account required pam_time.so
Remember that system-auth is a symbolically linked file. If you modify this file, you need to take extra steps to preserve the modifications from the authconfig utility. Review the section, “Managing PAM system event configuration files” earlier in this chapter.
There are additional PAM modules and configuration files you can employ to set even more restrictions on subjects. One important security module is pam_cracklib.
Enforcing good passwords with PAM
When a password is modified, the PAM module pam_cracklib is involved in the process. The module prompts the user for a password and checks its strength against a system dictionary and a set of rules for identifying poor choices.
Using pam_cracklib, you can check a newly chosen password for the following:
- Is it a dictionary word?
- Is it a palindrome?
- Is it the old password with the case changed?
- Is it too much like the old password?
- Is it too short?
- Is it a rotated version of the old password?
- Does it use the same consecutive characters?
- Does it contain the username in some form?
You can change the rules pam_cracklib uses for checking new passwords by making modifications to the /etc/pam.d/system-auth file. You may think that the changes should be made in the PAM-aware passwd configuration file. However, the /etc/pam.d/passwd includes the system-auth file in its stack.
# cat /etc/pam.d/passwd
#%PAM-1.0
auth       include     system-auth
account    include     system-auth
password   substack     system-auth
-password   optional     pam_gnome_keyring.so use_authtok
password   substack     postlogin
The current settings of the system-auth file are shown here. You can see that there is currently one entry that calls the pam_cracklib PAM module.
# cat /etc/pam.d/system-auth
#%PAM-1.0
# This file is auto-generated.
# User changes will be destroyed the next time authconfig is run.
auth        required      pam_env.so
auth        sufficient    pam_fprintd.so
auth        sufficient    pam_unix.so nullok try_first_pass
auth        requisite     pam_succeed_if.so uid >= 1000 quiet
auth        required      pam_deny.so
account     required      pam_unix.so
account     sufficient    pam_localuser.so
account     sufficient    pam_succeed_if.so uid < 1000 quiet
account     required      pam_permit.so
password    requisite     pam_cracklib.so try_first_pass retry=3
...
The pam_cracklib entry in the preceding listing uses the keyword retry. Below is a list of the various keywords available for cracklib.
- retry=N
- Default = 1
- Prompt user at most N times before returning with an error.
- difok=N
- Default = 5
- The number of characters in the new password that must not be present in the old password.
- Exception 1: If half of the characters in the new password are different, then the new password will be accepted.
- Exception 2: See difignore.
- difignore=N
- Default = 23
- The number of characters the password has before the difok setting will be ignored.
- minlen=N
- Default = 9
- The minimum acceptable size for the new password.
- See dcredit, ucredit, lcredit, and ocredit for how their settings affect minlen.
- dcredit=N
- Default =1
- If (N >= 0): The maximum credit for having digits in the new password. If you have less than or N digits, each digit will count +1 toward meeting the current minlen value.
- If (N < 0): The minimum number of digits that must be met for a new password.
- ucredit=N
- Default = 1
- If (N >= 0): The maximum credit for having uppercase letters in the new password. If you have less than or N uppercase letters, each letter will count +1 toward meeting the current minlen value.
- If (N < 0): The minimum number of uppercase letters that must be met for a new password.
- lcredit=N
- Default = 1
- If (N >= 0): The maximum credit for having lowercase letters in the new password. If you have less than or N lowercase letters, each letter will count +1 toward meeting the current minlen value.
- If (N < 0): The minimum number of lowercase letters that must be met for a new password.
- ocredit=N
- Default = 1
- If (N >= 0): The maximum credit for having other characters in the new password. If you have less than or N other characters, each character will count +1 toward meeting the current minlen value.
- If (N < 0): The minimum number of other characters that must be met for a new password.
- minclass=N
- Default = 0
- N out of four character classes is required for the new password. The four classes are digits, upper- and lowercase letters, and other characters.
- maxrepeat=N
- Default = 0
- Reject passwords which contain more than N same consecutive characters.
- reject_username
- try_first_pass
- use_authtok
- dictpath=/path
For example, if your organization requires passwords to be ten characters long and they must contain two digits, you would add a line similar to the following to the /etc/pam.d/system-auth file:
password required pam_cracklib.so minlen=10 dcredit=-2
The keywords used in this example with pam_cracklib are:
- minlen=10 — The new password must be at least ten characters.
- dcredit=-2 — The new password must contain two numbers.
Encouraging sudo use with PAM
To allow tracking of root-account use by individuals and avoid a repudiation situation (see Chapter 22, “Understanding Basic Linux Security”), it is best to restrict the use of the su command and encourage the use of sudo. If your organization has such a policy, you can accomplish this with PAM in just a few steps.
The su command is PAM-aware, which greatly simplifies things. It uses the PAM module pam_wheel to check for users in the wheel group. The /etc/pam.d/su configuration file is shown here:
# cat /etc/pam.d/su
#%PAM-1.0
auth        sufficient    pam_rootok.so
# Uncomment the following line to implicitly trust users
 in the "wheel" group.
#auth        sufficient  pam_wheel.so trust use_uid
# Uncomment the following line to require a user to be
 in the "wheel" group.
#auth        required    pam_wheel.so use_uid
auth        include       system-auth
auth        include       postlogin
account     sufficient    pam_succeed_if.so uid = 0 use_uid quiet
account     include       system-auth
password    include       system-auth
session     include       system-auth
session     include       postlogin
session     optional      pam_xauth.so
First, to restrict the use of su, if you are using the wheel group as your administrative group, you need to reassign your administrative group to a new group (see Chapter 11, “Managing User Accounts”). If you are not using the wheel group, just be sure not to assign anyone in the future to this group.
Next, you need to edit the /etc/pam.d/su configuration file. Remove the comment mark, #, from the following line:
#auth required pam_wheel.so use_uid
With these modifications, PAM will disable the use of the su command. Administrative users will now have to use sudo, which the system tracks and provides a desired non-repudiation environment (see Chapter 22, “Understanding Basic Linux Security”).
Locking accounts with PAM
Your organization's specific security requirements may call for locking a user account after a certain number of failed login attempts. The typical standard is to lock an account after three failed attempts. This is to thwart a brute-force password attack against an account.
The PAM module used to manage login attempts is pam_tally2. The PAM configuration file to edit is /etc/pam.d/system-auth.
Once again, you should make these changes to your local system-auth-local file instead of system-auth-ac because authconfig will overwrite your modifications the next time it is run. The two lines you will need to add to system-auth-local are highlighted in the code that follows. Their placement in this file is extremely important.
# cat system-auth-local
#%PAM-1.0
# Local system-auth file.
# Changes will not be destroyed by authconfig
auth        required      pam_tally2.so deny=3 quiet
auth        required      pam_env.so
auth        sufficient    pam_fprintd.so
auth        sufficient    pam_unix.so nullok try_first_pass
auth        requisite     pam_succeed_if.so uid >= 1000 quiet
auth        required      pam_deny.so
account     required      pam_tally2.so
account     required      pam_unix.so
account     sufficient    pam_localuser.so
account     sufficient    pam_succeed_if.so uid < 1000 quiet
account     required      pam_permit.so
...
On the first auth context line involving pam_tally.so in the preceding code, notice that two options have been added, deny=3 and quiet. The deny=3 option will allow a user only three failed attempts to log in before the account is locked.
The quiet option will not tell the user the account is locked if it becomes locked. It will just keep giving “incorrect password” messages to the user. Keeping a user ignorant of what has happened to an account is helpful if you are being attacked maliciously. The malicious attacker will not know the account has been locked and think he has just entered another incorrect password. This can allow you time to track down what is happening.
Using the quiet option can, however, cause a lot of problems for your users. For example, a user may not realize that he or she has entered the wrong password enough times to lock the account. This may cause a delay in seeking help. You can remove the quiet option from the configuration file setting so that when a user has had too many failed attempts to log in, he or she will receive a message such as “Account locked due to 4 failed logins.”
The pam_tally2 module also includes a command line interface you can use to monitor login failure attempts. If the pam_tally2 module is included in one of your PAM system event configuration files, it will keep a tally of how many failed login attempts have occurred on your system. To see these failures, you enter the pam_tally2 command, as shown in the following code:
# pam_tally2
Login           Failures Latest failure     From
Samantha            2    03/10/15 06:24:01  pts/1
The username, number of failures, and latest attempt are all listed along with the terminal where the latest failure occurred. You can also use the pam_tally2 command to unlock a user account once it has been locked by the PAM pam_tally2 module.
When an account is locked by PAM, it is not listed as locked in the /etc/shadow file, and you cannot unlock it by using the usermod -U username command. To unlock it, you need to use the pam_tally2 command.
In the example that follows, the user account Samantha has had too many failed login attempts. However, the account is not listed as locked in the /etc/shadow file, shown by the passwd command. Locking the account using the usermod -L command will cause the account to be locked via the /etc/shadow file, not via PAM.
# pam_tally2
Login           Failures Latest failure     From
Samantha            5    03/10/15 06:32:24  pts/1
# passwd -S Samantha
Samantha PS 2015-03-09 0 99999 7 -1 (Password set, SHA512 crypt.)
#
# usermod -L Samantha
# passwd -S Samantha
Samantha LK 2015-03-09 0 99999 7 -1 (Password locked.)
#
# usermod -U Samantha
# passwd -S Samantha
Samantha PS 2015-03-09 0 99999 7 -1 (Password set, SHA512 crypt.)
In the code that follows, the command pam_tally2 -r -u Samantha is issued to unlock the user account Samantha. Notice that the pam_tally2 command again lists the number of failed login attempts as it removes the “lock.” When the pam_tally2 command is issued again, the user Samantha's failed attempt records have been removed because the lock was removed.
# pam_tally2 -r -u Samantha
Login           Failures Latest failure     From
Samantha            5    03/10/15 06:34:09  pts/1
# pam_tally2
#
There are many more options you can use with pam_tally2. To explore this PAM module further, issue the command man pam_tally2 at the command line.
Obtaining more information on PAM
PAM is another rich and versatile security tool available to you on the Linux system. In your own Linux system's man pages, you can read about managing the PAM configuration files and about the modules in your /lib/security directory.
- To get more information on PAM configuration files, use the command man pam.conf.
- You can see all the PAM modules available on your system by typing ls /lib/security/pam*.so at the command line. To get more information on each PAM module, type man pam_module_name. Be sure to leave off the file extension of “so” for the pam_module_name. For example, type man pam_lastlog to learn more about the pam_lastlog.so module.
There are also several websites that can provide you with additional information on PAM:
- The Official Linux-PAM website: http://linux-pam.org
- The Linux-PAM System Administrator's Guide: http://linux-pam.org/Linux-PAM-html/Linux-PAM_SAG.html
- PAM Module reference: http://linux-pam.org/Linux-PAM-html/sag-module-reference.html
Summary
Both the cryptography tools and PAM should be handled with care as you learn about Linux. Be sure to test any modifications you make on a test Linux system or a virtualized Linux system before you implement them on a production machine.
Before you add these advanced tools of cryptography and PAM to your organization's Security Process Lifecycle's Implementation phase, review the various options they provide. Once you determine which features of these advanced tools your organization needs, add them to your Implementation phase.
The next chapter covers SELinux. While cryptography and PAM are tools you can use on your Linux system, SELinux is an entire security enhancement layer.
Exercises
Use these exercises to test your knowledge of using cryptography tools and PAM. These tasks assume you are running a Fedora or Red Hat Enterprise Linux system (although some tasks will work on other Linux systems as well). If you are stuck, solutions to the tasks are shown in Appendix B (although in Linux, there are often multiple ways to complete a task).