
Chapter 20
Configuring an NFS File Server
Instead of representing storage devices as drive letters (A, B, C, and so on), as they are in Microsoft operating systems, Linux systems invisibly connect filesystems from multiple hard disks, floppy disks, CD-ROMs, and other local devices to form a single Linux filesystem. The Network File System (NFS) facility enables you to extend your Linux filesystem to connect filesystems on other computers to your local directory structure.
An NFS file server provides an easy way to share large amounts of data among the users and computers in an organization. An administrator of a Linux system that is configured to share its filesystems using NFS has to perform the following tasks to set up NFS:
Figure 20.1 illustrates a Linux file server using NFS to share (export) a filesystem and a client computer mounting the filesystem to make it available to its local users.
Figure 20.1 NFS can make selected filesystems available to other computers.
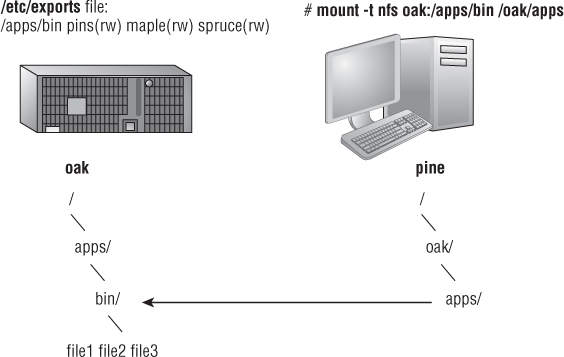
In this example, a computer named oak makes its /apps/bin directory available to clients on the network (pine, maple, and spruce) by adding an entry to the /etc/exports file. The client computer (pine) sees that the resource is available and mounts the resource on its local filesystem at the mount point /oak/apps, after which any files, directories, or subdirectories from /apps/bin on oak are available to users on pine (given proper permissions).
Although it is often used as a file server (or other type of server), Linux is a general-purpose operating system, so any Linux system can share filesystems (export) as a server or use another computer's filesystems (mount) as a client.
Installing an NFS Server
To run an NFS server, you need a set of kernel modules (which are delivered with the kernel itself) plus some user-level tools to configure the service, run daemon processes, and query the service in various ways. All the components you need that are not already in the kernel can be added by installing the nfs-utils package:
# yum install nfs-utils
Besides a few documents in the /usr/share/doc/nfs-utils* directory, most documentation in the nfs-utils package includes man pages for its various components. To see the list of documentation, type the following:
# rpm -qd nfs-utils | less
There are tools and man pages for both the NFS server side (for sharing a directory with others) and the client side (for mounting a remote NFS directory locally). To configure a server, you can refer to the exports man page (to set up the /etc/exports file to share your directories). The man page for the exportfs command describes how to share and view the list of directories you share from the /etc/exports file. The nfsd man page describes options you can pass to the rpc.nfsd server daemon, which lets you do such things as run the server in debugging mode.
Man pages on the client side include the mount.nfs man page (to see what mount options you can use when mounting remote NFS directories on your local system). There is also an nfsmount.conf man page, which describes how to use the /etc/nfsmount.conf file to configure how your system behaves when you mount remote resources locally. The showmount man page describes how to use the showmount command to see what shared directories are available from NFS servers.
To find out more about the nfs-utils package, you can run the following commands to see information about the package, configuration files, and commands, respectively:
# rpm -qi nfs-utils
# rpm -qc nfs-utils
# rpm -ql nfs-utils | grep bin
Starting the NFS service
Starting the NFS server involves launching several service daemons. The service is started in different ways for different Linux distributions. The basic NFS service in Fedora is called nfs-server. To start that service, enable it (so it starts each time your system boots) and check the status by running the following three commands:
# systemctl start nfs-server.service
# systemctl enable nfs-server.service
# systemctl status nfs-server.service
systemctl status nfs-server.service
nfs-server.service - NFS Server
     Loaded: loaded (/lib/systemd/system/nfs-server.service; enabled)
     Active: active (running) since Sat, 2 Jun 2012 08:40:25 -0400;
             1h 28min ago
   Main PID: 7767 (rpc.mountd)
     CGroup: name=systemd:/system/nfs-server.service
              7767 /usr/sbin/rpc.mountd
You can see from the status that the nfs-server service is enabled and active. The NFS service also requires that the RPC service be running (rpcbind). The nfs-server service will automatically start the rpcbind service, if it is not already running.
In Red Hat Enterprise Linux 6, you need the service and chkconfig commands to check, start, and enable the NFS service (nfs). The following commands show the nfs service not running currently and disabled:
# service nfs status
rpc.svcgssd is stopped
rpc.mountd is stopped
nfsd is stopped
# chkconfig --list nfs
nfs  0:off  1:off  2:off  3:off  4:off  5:off  6:off
As mentioned earlier, the rpcbind service must be running for NFS to work. So you could use the following commands to start and permanently enable both the rpcbind and nfs services.
# service rcpbind start
Starting rpcbind:                    [  OK  ]
# service nfs start
Starting NFS services:               [  OK  ]
Starting NFS quotas:                 [  OK  ]
Starting NFS daemon:                 [  OK  ]
Starting NFS mountd:                 [  OK  ]
# chkconfig nfs on
Once the service is running, the commands (mount, exportfs, and so on) and files (/etc/exports, /etc/fstab, and so on) for actually configuring NFS are basically the same on every Linux system. So after you have NFS installed and running, just follow the instructions in this chapter to start using NFS.
Sharing NFS Filesystems
To share an NFS filesystem from your Linux system, you need to export it from the server system. Exporting is done in Linux by adding entries into the /etc/exports file. Each entry identifies a directory in your local filesystem that you want to share with other computers. The entry also identifies the other computers that can share the resource (or opens it to all computers) and includes other options that reflect permissions associated with the directory.
Remember that when you share a directory, you are sharing all files and subdirectories below that directory as well (by default). So, you need to be sure that you want to share everything in that directory structure. There are still ways to restrict access within that directory structure; those are discussed later in this chapter.
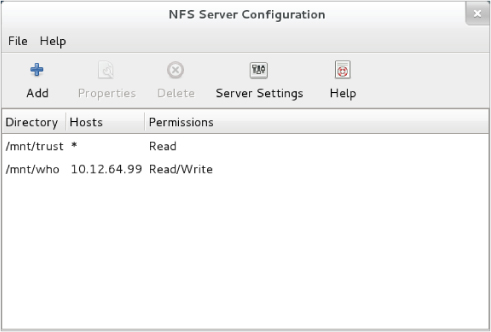
Figure 20.2 The NFS Server Configuration window (system-config-nfs) provides a graphical way of configuring NFS services.
Configuring the /etc/exports file
To make a directory from your Linux system available to other systems, you need to export that directory. Exporting is done on a permanent basis by adding information about an exported directory to the /etc/exports file.
The format of the /etc/exports file is
Directory Host(Options...) Host(Options...) # Comments
where Directory is the name of the directory that you want to share and Host indicates the client computer to which the sharing of this directory is restricted. Options can include a variety of options to define the security measures attached to the shared directory for the host. (You can repeat Host/Option pairs.) Comments are any optional comments you want to add (following the # sign).
The exports man page (man exports) contains details about the syntax of the /etc/exports file. In particular, you can see the options you can use to limit access and secure each shared directory.
As root user, you can use any text editor to configure /etc/exports to modify shared directory entries or add new ones. Here's an example of an /etc/exports file:
/cal    *.linuxtoys.net(rw)              # Company events
/pub    *(ro,insecure,all_squash)        # Public dir
/home   maple(rw,root_squash) spruce(rw,root_squash)
The /cal entry represents a directory that contains information about events related to the company. Any computer in the company's domain (*.linuxtoys.net) can mount that NFS share. Users can write files to the directory as well as read them (indicated by the rw option). The comment (# Company events) simply serves to remind you of what the directory contains.
The /pub entry represents a public directory. It allows any computer and user to read files from the directory (indicated by the ro option) but not to write files. The insecure option enables any computer, even one that doesn't use a secure NFS port, to access the directory. The all_squash option causes all users (UIDs) and groups (GIDs) to be mapped to the user ID 65534 (which is the nfsnobody user in Fedora and the nobody user in Ubuntu), giving them minimal permission to files and directories.
The /home entry enables a set of users to have the same /home directory on different computers. Say, for example, that you are sharing /home from a computer named oak. The computers named maple and spruce could each mount that directory on their own /home directories. If you gave all users the same username/UID on all machines, you could have the same /home/user directory available for each user, regardless of which computer he or she is logged into. The root_squash is used to exclude the root user from another computer from having root privilege to the shared directory.
These are just examples; you can share any directories that you choose, including the entire filesystem (/). Of course, there are security implications of sharing the whole filesystem or sensitive parts of it (such as /etc). Security options that you can add to your /etc/exports file are described throughout the sections that follow.
Hostnames in /etc/exports
You can indicate in the /etc/exports file which host computers can have access to your shared directory. If you want to associate multiple hostnames or IP addresses with a particular shared directory, be sure to have a space before each hostname. However, add no spaces between a hostname and its options. For example:
/usr/local maple(rw) spruce(ro,root_squash)
Notice that there is a space after (rw) but none after maple. You can identify hosts in several ways:
- Individual host — Enter one or more TCP/IP hostnames or IP addresses. If the host is in your local domain, you can simply indicate the hostname. Otherwise, use the full host.domain format. These are valid ways to indicate individual host computers:
maple
maple.handsonhistory.com
10.0.0.11
- IP network — Allow access to all hosts from a particular network address by indicating a network number and its netmask, separated by a slash (/). Here are valid ways to designate network numbers:
10.0.0.0/255.0.0.0 172.16.0.0/255.255.0.0
192.168.18.0/255.255.255.0
192.168.18.0/24
- TCP/IP domain — Using wildcards, you can include all or some host computers from a particular domain level. Here are some valid uses of the asterisk and question mark wildcards:
*.handsonhistory.com
*craft.handsonhistory.com
???.handsonhistory.com
- NIS groups — You can allow access to hosts contained in an NIS group. To indicate an NIS group, precede the group name with an at (@) sign (for example, @group).
Access options in /etc/exports
You don't have to just give away your files and directories when you export a directory with NFS. In the options part of each entry in /etc/exports, you can add options that allow or limit access by setting read/write permission. These options, which are passed to NFS, are as follows:
- ro — Client can mount this exported filesystem read-only. The default is to mount the filesystem read/write.
- rw — Explicitly asks that a shared directory be shared with read/write permissions. (If the client chooses, it can still mount the directory as read-only.)
User mapping options in /etc/exports
In addition to options that define how permissions are handled generally, you can use options to set the permissions that specific users have to NFS shared filesystems.
One method that simplifies this process is to have each user with multiple user accounts have the same username and UID on each machine. This makes it easier to map users so that they have the same permissions on a mounted filesystem that they do on files stored on their local hard disks. If that method is not convenient, user IDs can be mapped in many other ways. Here are some methods of setting user permissions and the /etc/exports option that you use for each method:
- root user — The client's root user is mapped by default into the nfsnobody username (UID 65534). This prevents a client computer's root user from being able to change all files and directories in the shared filesystem. If you want the client's root user to have root permission on the server, use the no_root_squash option.
- nfsnobody or nobody user/group — By using the 65534 user ID and group ID, you essentially create a user/group with permissions that do not allow access to files that belong to any real users on the server, unless those users open permission to everyone. However, files created by the 65534 user or group are available to anyone assigned as the 65534 user or group. To set all remote users to the 65534 user/group, use the all_squash option.
- User mapping — If a user has login accounts for a set of computers (and has the same ID), NFS, by default, maps that ID. This means that if the user named mike (UID 110) on maple has an account on pine (mike, UID 110), he can use his own remotely mounted files on either computer from either computer.
Exporting the shared filesystems
After you have added entries to your /etc/exports file, run the exportfs command to have those directories exported (made available to other computers on the network). Reboot your computer or restart the NFS service, and the exportfs command runs automatically to export your directories. If you want to export them immediately, run exportfs from the command line (as root).
Here's an example of the exportfs command:
# /usr/sbin/exportfs -a -r -v
exporting maple:/pub
exporting spruce:/pub
exporting maple:/home
exporting spruce:/home
exporting *:/mnt/win
The -a option indicates that all directories listed in /etc/exports should be exported. The -r resyncs all exports with the current /etc/exports file (disabling those exports no longer listed in the file). The -v option says to print verbose output. In this example, the /pub and /home directories from the local server are immediately available for mounting by those client computers that are named (maple and spruce). The /mnt/win directory is available to all client computers.
Securing Your NFS Server
The NFS facility was created at a time when encryption and other security measures were not routinely built into network services (such as remote login, file sharing, and remote execution). Therefore, NFS (even up through version 3) suffers from some rather glaring security issues.
NFS security issues made it an inappropriate facility to use over public networks and even made it difficult to use securely within an organization. Some of those issues included:
- Remote root users — Even with the default root_squash (which prevents root users from having root access to remote shares), the root user on any machine to which you share NFS directories can gain access to any other user account. Therefore, if you are doing something like sharing home directories with read/write permission, the root user on any box you are sharing to will have complete access to the contents of those home directories.
- Unencrypted communications — Because NFS traffic is unencrypted, anyone sniffing your network will be able to see the data that is being transferred.
- User mapping — Default permissions to NFS shares are mapped by user ID. So, for example, a user with UID 500 on an NFS client will have access to files owned by UID 500 on the NFS server. This is regardless of the usernames used.
- Filesystem structure exposed — Up to NFSv3, if you shared a directory over NFS, you exposed the location of that directory on the server's filesystem. (In other words, if you shared the /var/stuff directory, clients would know that /var/stuff was its exact location on your server).
That's the bad news. The good news is that most of these issues are addressed in NFSv4 but require some extra configuration. By integrating Kerberos support, NFSv4 lets you configure user access based on each user obtaining a Kerberos ticket. For you, the extra work is configuring a Kerberos server. As for exposing NFS share locations, with NFSv4 you can bind shared directories to a /exports directory, so when they are shared, the exact location of those directories is not exposed.
Visit https://help.ubuntu.com/community/NFSv4Howto for details on NFSv4 features in Ubuntu.
As for standard Linux security features associated with NFS, iptables firewalls, TCP wrappers, and SELinux can all play a role in securing and providing access to your NFS server from remote clients. In particular, getting iptables firewall features working with NFS can be particularly challenging. These security features are described in the sections that follow.
Opening up your firewall for NFS
The NFS service relies on several different service daemons for normal operation, with most of these daemons listening on different ports for access. For the default NFSv4 used in Fedora, TCP and UDP ports 2049 (nfs) and 111 (rpcbind) must be open for an NFS server to perform properly. The server must also open TCP and UDP ports 20048 for the showmount command to be able to query available NFS shared directories from the server.
To open those ports on the NFS server's firewall, make sure iptables is enabled and started with firewall rules similar to the following added to the /etc/sysconfig/iptables file :
-A INPUT -m state --state NEW -m tcp -p tcp --dport 111 -j ACCEPT
-A INPUT -m state --state NEW -m udp -p udp --dport 111 -j ACCEPT
-A INPUT -m state --state NEW -m tcp -p tcp --dport 2049 -j ACCEPT
-A INPUT -m state --state NEW -m udp -p udp --dport 2049 -j ACCEPT
-A INPUT -m state --state NEW -m tcp -p tcp --dport 20048 -j ACCEPT
-A INPUT -m state --state NEW -m udp -p udp --dport 20048 -j ACCEPT
In Red Hat Enterprise Linux 6.x and earlier, the firewall issue is a bit more complex. The problem, as it relates to firewalls, is that there are several different services associated with NFS that listen on different ports, and those ports are assigned randomly. To get around that problem, you need to lock down the port numbers those services use and open the firewall so those ports are accessible.
To make the process of locking down NFS server ports easier, entries in the /etc/sysconfig/nfs file can be added to assign specific port numbers to services. The following are examples of options in the /etc/sysconfig/nfs file with static port numbers set:
RQUOTAD_PORT=49001
LOCKD_TCPPORT=49002
LOCKD_UDPPORT=49003
MOUNTD_PORT=49004
STATD_PORT=49005
STATD_OUTGOING_PORT=49006
With those ports set, I restarted the nfs service (service nfs restart). Using the netstat command, you can see the resulting processes that are listening on those assigned ports:
tcp  0  0 0.0.0.0:49001   0.0.0.0:*    LISTEN    4682/rpc.rquotad
tcp  0  0 0.0.0.0:49002   0.0.0.0:*    LISTEN    -
tcp  0  0 0.0.0.0:49004   0.0.0.0:*    LISTEN    4698/rpc.mountd
tcp  0  0 :::49002        :::*         LISTEN    -
tcp  0  0 :::49004        :::*         LISTEN    4698/rpc.mountd
udp  0  0 0.0.0.0:49001   0.0.0.0:*              4682/rpc.rquotad
udp  0  0 0.0.0.0:49003   0.0.0.0:*              -
udp  0  0 0.0.0.0:49004   0.0.0.0:*              4698/rpc.mountd
udp  0  0 :::49003        :::*                   -
udp  0  0 :::49004        :::*                   4698/rpc.mountd
With those port numbers set and being used by the various services, you can now add iptables rules, as you did with ports 2049 and 111 for the basic NFS service.
Allowing NFS access in TCP wrappers
For services such as vsftpd and sshd, TCP wrappers in Linux enable you to add information to /etc/hosts.allow and /etc/hosts.deny files to indicate which hosts can or cannot access the service. Although the nfsd server daemon itself is not enabled for TCP wrappers, the rpcbind service is.
For NFSv3 and earlier versions, simply adding a line such as the following to the /etc/hosts.deny file would deny access to the rpcbind service, but would also deny access to your NFS service:
rpcbind: ALL
For servers running NFSv4 by default, however, the rpcbind: ALL line just shown prevents outside hosts from getting information about RPC services (such as NFS) using commands like showmount. However, it will not prevent you from mounting an NFS shared directory.
Configuring SELinux for your NFS server
With SELinux set to Permissive or Disabled, it will not block access to the NFS service. In Enforcing mode, however, there are a few SELinux Booleans you should understand. To check the state of SELinux on your system, type the following:
# getenforce
Enforcing
# grep ˆSELINUX= /etc/sysconfig/selinux
SELINUX=enforcing
If your system is in Enforcing mode, as it is here, check the nfs_selinux man page for information about SELinux settings that can impact the operation of your vsftpd service. The following are a few SELinux file contexts associated with NFS that you might need to know about:
- nfs_export_all_ro — With this Boolean set to on, SELinux will allow you to share files with read-only permission using NFS. NFS read-only file sharing is allowed with this on, regardless of the SELinux file context set on the shared files and directories.
- nfs_export_all_rw — With this Boolean set to on, SELinux will allow you to share files with read/write permission using NFS. As with the previous Boolean, this will work regardless of the file context set on the shared files and directories.
- use_nfs_home_dirs — To allow the NFS server to share your home directories via NFS, set this Boolean to on.
Of the Booleans just described, the first two are on by default. The use_nfs_home_dirs Boolean is off. To turn on the use_nfs_home_dirs directory, you could type the following:
# setsebool -P use_nfs_home_dirs on
You can ignore all of the Booleans related to NFS file sharing, however, by changing the file contexts on the files and directories you want to share via NFS. The public_content_t and public_content_rw_t file contexts can be set on any directory you want to share via NFS (or other file share protocols, such as HTTP, FTP, and others, for that matter). For example, to set the rule to allow the /whatever directory and its subdirectories to be shared read/write via NFS, and then apply that rule, type the following:
# semanage fcontext -a -t public_content_rw_t "/whatever(/.*)?"
# restorecon -F -R -v /whatever
If you wanted to allow users to just be able to read files from a directory, but not write to it, you could assign the public_content_t file context to the directory instead.
Using NFS Filesystems
After a server exports a directory over the network using NFS, a client computer connects that directory to its own filesystem using the mount command. That's the same command used to mount filesystems from local hard disks, CDs, and USB drives, but with slightly different options.
The mount command enables a client to automatically mount NFS directories added to the /etc/fstab file, just as it does with local disks. NFS directories can also be added to the /etc/fstab file in such a way that they are not automatically mounted (so you can mount them manually when you choose). With a noauto option, an NFS directory listed in /etc/fstab is inactive until the mount command is used, after the system is up and running, to mount the filesystem.
In addition to the /etc/fstab file, you can also set mount options using the /etc/nfsmount.conf file. Within that file, you can set mount options that apply to any NFS directory you mount or only those associated with specific mount points or NFS servers.
Before you set about mounting NFS shared directories, however, you probably want to check out what shared directories are available via NFS using the showmount command.
Viewing NFS shares
From a client Linux system, you can use the showmount command to see what shared directories are available from a selected computer. For example:
$ /usr/sbin/showmount -e server.example.com
/export/myshare client.example.com
/mnt/public     *
The showmount output shows that the shared directory named /export/myshare is available only to the host client.example.com. The /mnt/public shared directory, however, is available to anyone.
Manually mounting an NFS filesystem
Once you know that the directory from a computer on your network has been exported (that is, made available for mounting), you can mount that directory manually using the mount command. This is a good way to make sure that it is available and working before you set it up to mount permanently. The following is an example of mounting the /stuff directory from a computer named maple on your local computer:
# mkdir /mnt/maple
# mount maple:/stuff /mnt/maple
The first command (mkdir) creates the mount point directory. (/mnt is a common place to put temporarily mounted disks and NFS filesystems.) The mount command identifies the remote computer and shared filesystem, separated by a colon (maple:/stuff), and the local mount point directory (/mnt/maple) follows.
To ensure that the NFS mount occurred, type mount -t nfs. This command lists all mounted NFS filesystems. Here is an example of the mount command and its output (with filesystems not pertinent to this discussion edited out):
# mount -t nfs
maple:/stuff on /mnt/maple type nfs (rw,relatime,vers=3,rsize=65536,
  wsize=65536,namlen=255,hard,proto=tcp,timeo=600,retrans=2,sec=sys,
  mountaddr=192.168.0.122,mountvers=3,mountport=892,mountproto=udp,
  local_lock=none,addr=192.168.0.122)
The output from the mount -t nfs command shows only those filesystems mounted from NFS file servers. The just-mounted NFS filesystem is the /stuff directory from maple (maple:/stuff). It is mounted on /mnt/maple and its mount type is nfs. The filesystem was mounted read/write (rw), and the IP address of maple is 192.168.0.122 (addr=192.168.0.122). Many other settings related to the mount are shown as well, such as the read and write sizes of packets and the NFS version number.
The mount operation just shown temporarily mounts an NFS filesystem on the local system. The next section describes how to make the mount more permanent (using the /etc/fstab file) and how to select various options for NFS mounts.
Mounting an NFS filesystem at boot time
To set up an NFS filesystem to mount automatically on a specified mount point each time you start your Linux system, you need to add an entry for that NFS filesystem to the /etc/fstab file. That file contains information about all different kinds of mounted (and available to be mounted) filesystems for your system.
Here's the format for adding an NFS filesystem to your local system:
host:directory mountpoint nfs options 0 0
The first item (host:directory) identifies the NFS server computer and shared directory. mountpoint is the local mount point on which the NFS directory is mounted. It is followed by the filesystem type (nfs). Any options related to the mount appear next in a comma-separated list. (The last two zeros configure the system to not dump the contents of the filesystem and to not run fsck on the filesystem.)
The following are examples of NFS entries in /etc/fstab:
maple:/stuff   /mnt/maple nfs   bg,rsize=8192,wsize=8192  0 0
oak:/apps      /oak/apps  nfs   noauto,ro                 0 0
In the first example, the remote directory /stuff from the computer named maple (maple:/stuff) is mounted on the local directory /mnt/maple (the local directory must already exist). If the mount fails because the share is unavailable, the bg causes the mount attempt to go into the background and retry again later.
The filesystem type is nfs, and read (rsize) and write (wsize) buffer sizes (discussed in the “Using mount options” section later in this chapter) are set at 8192 to speed data transfer associated with this connection. In the second example, the remote directory is /apps on the computer named oak. It is set up as an NFS filesystem (nfs) that can be mounted on the /oak/apps directory locally. This filesystem is not mounted automatically (noauto), however, and can be mounted only as read-only (ro) using the mount command after the system is already running.
Mounting noauto filesystems
Your /etc/fstab file may also contain devices for other filesystems that are not mounted automatically. For example, you might have multiple disk partitions on your hard disk or an NFS shared filesystem that you want to mount only occasionally. A noauto filesystem can be mounted manually. The advantage is that when you type the mount command, you can type less information and have the rest filled in by the contents of the /etc/fstab file. So, for example, you could type:
# mount /oak/apps
With this command, mount knows to check the /etc/fstab file to get the filesystem to mount (oak:/apps), the filesystem type (nfs), and the options to use with the mount (in this case ro, for read-only). Instead of typing the local mount point (/oak/apps), you could have typed the remote filesystem name (oak:/apps) and had other information filled in.
Using mount options
You can add several mount options to the /etc/fstab file (or to a mount command line itself) to influence how the filesystem is mounted. When you add options to /etc/fstab, they must be separated by commas. For example, here, the noauto, ro, and hard options are used when oak:/apps is mounted:
oak:/apps /oak/apps nfs noauto,ro,hard 0 0
The following are some options that are valuable for mounting NFS filesystems. You can read about these and other NFS mount options you can put in the /etc/fstab file from the nfs man page (man 5 nfs):
- hard — If this option is used and the NFS server disconnects or goes down while a process is waiting to access it, the process will hang until the server comes back up. This is helpful if it is critical that the data you are working with stay in sync with the programs that are accessing it. (This is the default behavior.)
- soft — If the NFS server disconnects or goes down, a process trying to access data from the server will time out after a set period of time when this option is on. An input/output error is delivered to the process trying to access the NFS server.
- rsize — The size of the blocks of data (in bytes) that the NFS client will request be used when it is reading data from an NFS server. The default is 1024. Using a larger number (such as 8192) will get you better performance on a network that is fast (such as a LAN) and is relatively error-free (that is, one that doesn't have a lot of noise or collisions).
- wsize — The size of the blocks of data (in bytes) that the NFS client will request be used when it is writing data to an NFS server. The default is 1024. Performance issues are the same as with the rsize option.
- timeo=# — Sets the time after an RPC timeout occurs that a second transmission is made, where # represents a number in tenths of a second. The default value is seven-tenths of a second. Each successive timeout causes the timeout value to be doubled (up to 60 seconds maximum). Increase this value if you believe that timeouts are occurring because of slow response from the server or a slow network.
- retrans=# — Sets the number of minor timeouts and retransmissions that need to happen before a major timeout occurs.
- retry=# — Sets how many minutes to continue to retry failed mount requests, where # is replaced by the number of minutes to retry. The default is 10,000 minutes (which is about one week).
- bg — If the first mount attempt times out, try all subsequent mounts in the background. This option is very valuable if you are mounting a slow or sporadically available NFS filesystem. By placing mount requests in the background, your system can continue to mount other filesystems instead of waiting for the current one to complete.
- fg — If the first mount attempt times out, try subsequent mounts in the foreground. This is the default behavior. Use this option if it is imperative that the mount be successful before continuing (for example, if you were mounting /usr).
Not all NFS mount options need to go into the /etc/fstab file. On the client side, the /etc/nfsmount.conf file can be configured for Mount, Server, and Global sections. In the Mount section, you can indicate which mount options are used when an NFS filesystem is mounted to a particular mount point. The Server section lets you add options to any NFS filesystem mounted from a particular NFS server. Global options apply to all NFS mounts from this client.
The following entry in the /etc/nfsmount.conf file sets a 32KB read and write block size for any NFS directories mounted from the system named thunder.example.com:
 [ Server "thunder.example.com" ]
rsize=32k
wsize=32k
To set default options for all NFS mounts for your systems, you can uncomment the NFSMount_Global_Options block. In that block, you can set such things as protocols and NFS versions, as well as transmission rates and retry settings. Here is an example of an NFSMount_Global_Options block:
[ NFSMount_Global_Options ]
# This sets the default version to NFS 4
Defaultvers=4
# Sets the number of times a request will be retried before
# generating a timeout
Retrans=2
# Sets the number of minutes before retrying a failed
# mount to 2 minutes
# Retry=2
In the example just shown, the default NFS version is 4. Data is retransmitted twice (2) before generating a timeout. The wait time is 2 minutes before retrying a failed transmission. You can override any of these default values by adding mount options to the /etc/fstab or to the mount command line when the NFS directory is mounted.
Using autofs to mount NFS filesystems on demand
Recent improvements to auto-detecting and mounting removable devices have meant that you can simply insert or plug in those devices to have them detected, mounted, and displayed. However, to make the process of detecting and mounting remote NFS filesystems more automatic, you still need to use a facility such as autofs (short for automatically mounted filesystems).
The autofs facility will mount network filesystems on demand when someone tries to use the filesystems. With the autofs facility configured and turned on, you can cause any available NFS shared directories to mount on demand. To use the autofs facility, you need to have the autofs package installed. (For Fedora and RHEL, you can type yum install autofs or for Ubuntu or Debian apt-get install autofs to install the package from the network.)
Automounting to the /net directory
With autofs enabled, if you know the hostname and directory being shared by another host computer, simply change (cd) to the autofs mount directory (/net or /var/autofs by default). This causes the shared resource to be automatically mounted and made accessible to you.
The following steps explain how to turn on the autofs facility in Fedora:
/net -hosts
# systemctl start autofs.service
# chkconfig autofs on
Believe it or not, that's all you have to do. If you have a network connection to the NFS servers from which you want to share directories, try to access a shared NFS directory. For example, if you know that the /usr/local/share directory is being shared from the computer on your network named shuttle, you can do the following:
$ cd /net/shuttle
If that computer has any shared directories that are available to you, you can successfully change to that directory.
You also can type the following:
$ ls
usr
You should be able to see that the usr directory is part of the path to a shared directory. If there were shared directories from other top-level directories (such as /var or /tmp), you would see those as well. Of course, seeing any of those directories depends on how security is set up on the server.
Try going straight to the shared directory as well. For example:
$ cd /net/shuttle/usr/local/share
$ ls
info man music television
At this point, the ls should reveal the contents of the /usr/local/share directory on the computer named shuttle. What you can do with that content depends on how it was configured for sharing by the server.
This can be a bit disconcerting because you won't see any files or directories until you actually try to use them, such as changing to a network-mounted directory. The ls command, for example, won't show anything under a network-mounted directory until the directory is mounted, which may lead to a sometimes-it's-there-and-sometimes-it's-not impression. Just change to a network-mounted directory, or access a file on such a directory, and autofs will take care of the rest.
In the example shown, the hostname shuttle is used. However, you can use any name or IP address that identifies the location of the NFS server computer. For example, instead of shuttle, you might have used shuttle.example.com or an IP address such as 192.168.0.122.
Automounting home directories
Instead of just mounting an NFS filesystem under the /net directory, you might want to configure autofs to mount a specific NFS directory in a specific location. For example, you could configure a user's home directory from a centralized server that could be automounted from a different machine when a user logs in. Likewise, you could use a central authentication mechanism, such as LDAP (as described in Chapter 11, “Managing User Accounts”), to offer centralized user accounts as well.
The following procedure illustrates how to set up a user account on an NFS server and share the home directory of a user named joe from that server so it can be automounted when joe logs into a different computer. In this example, instead of using a central authentication server, matching accounts are created on each system.
# mkdir /home/shared
# useradd -c "Joe Smith" -d /home/shared/joe joe
# grep joe /etc/passwd
joe:x:507:507:Joe Smith:/home/shared/joe:/bin/bash
# /etc/exports file to share directories under /home/shared
# only to other systems on the 192.168.0.0/24 network:
/home/shared 192.168.0.*(rw,insecure)
# exportfs -a -r -v
/home/remote /etc/auto.joe
joe -rw mynfs.example.com:/home/shared/joe
# systemctl restart autofs.service
# useradd -u 507 -c "Joe Smith" -d /home/remote/joe joe
# passwd joe
Changing password for user joe.
New password: ********
Retype new password: ********
After joe logs off (actually, when he stops accessing the directory) for a timeout period (10 minutes, by default), the directory is unmounted.
Unmounting NFS filesystems
After an NFS filesystem is mounted, unmounting it is simple. You use the umount command with either the local mount point or the remote filesystem name. For example, here are two ways you could unmount maple:/stuff from the local directory /mnt/maple:
# umount maple:/stuff
# umount /mnt/maple
Either form works. If maple:/stuff is mounted automatically (from a listing in /etc/fstab), the directory will be remounted the next time you boot Linux. If it was a temporary mount (or listed as noauto in /etc/fstab), it won't be remounted at boot time.
If you get the message device is busy when you try to unmount a filesystem, it means the unmount failed because the filesystem is being accessed. Most likely, one of the directories in the NFS filesystem is the current directory for your shell (or the shell of someone else on your system). The other possibility is that a command is holding a file open in the NFS filesystem (such as a text editor). Check your Terminal windows and other shells, and then cd out of the directory if you are in it, or just close the Terminal windows.
If an NFS filesystem won't unmount, you can force it (umount -f /mnt/maple) or unmount and clean up later (umount -l /mnt/maple). The -l option is usually the better choice because a forced unmount can disrupt a file modification that is in progress. Another alternative is to run fuser -v mountpoint to see what users are holding your mounted NFS share open, and then fuser -k mountpoint to kill all of those processes.
Summary
Network File System (NFS) is one of the oldest computer file sharing products in existence today. It is still the one that is most popular for sharing directories of files between UNIX and Linux systems. NFS allows servers to designate specific directories to make available to designated hosts and then allows client systems to connect to those directories by mounting them locally.
NFS can be secured using firewall (iptables) rules, TCP wrappers (to allow and deny host access), and SELinux (to confine how file sharing protocols can share NFS resources). Although NFS was inherently insecure when it was created (data is shared unencrypted and user access is fairly open), new features in NFS version 4 have helped improve the overall security of NFS.
This NFS chapter is the last of the book's server chapters. Chapter 21 covers a wide range of desktop and server topics as it helps you understand techniques for troubleshooting your Linux system.
Exercises
Exercises in this section take you through tasks related to configuring and using an NFS server in Linux. If possible, have two Linux systems available that are connected on a local network. One of those Linux systems will act as an NFS server while the other will be an NFS client.
To get the most from these exercises, I recommend that you don't use a Linux server that has NFS already up and running. You can't do all the exercises here without disrupting an NFS service that is already running and sharing resources.
See Appendix B for suggested solutions.