Now that you have an understanding of how paths are represented in bash, it is time to learn how to manipulate them.
There are many commands that you can use to manipulate files in bash, which include the commands in the following table:
|
|
|
|
|
|
|
|
|
|
|
|
|
|
|
|
|
|
ls is perhaps the most common basic function, and is used regularly to see which files are present in the directory that you are in. This is done using the list (ls) command. By default, this is the current folder that you are in. If you want to see the contents of another folder, simply append the path to the end of the ls command.

The contents of the home directory
The ls command has many different options that change the output on your screen. Some common ls parameters are as follows:
The Linux filesystem is made up of many different files and folders. When using bash, it is really important to be able to move around the filesystem. This is done using the cd (change directory) command.
cd is easy to use. All you need to do in order to change the current directory is to run cd followed by the path of the folder you want to move into. This can either be an absolute directory or a relative directory.

Changing between directories
The directory that you are in after you run cd is called the current working directory. Unless you specify, a directory bash will look for any commands that you run and any files that you are using in the current working directory. If the command is not in the current folder, bash will look in several other predefined folders for the command. These folders are specified in the PATH environment variable in bash.
Sometimes, when navigating the Linux filesystem, you might need to find out which directory you are in. You can do this using the pwd (print working directory) command.

The pwd command
When you are working with files, sometimes it's very handy to quickly view the contents of a file. The
cat command does exactly this. When you run the cat command followed by a filename, it will display the contents of that file on the screen.

The cat command
cat has several options that you can use to customize the format of the file on the screen. Some of the cat command's parameters are as follows:
Another handy set of commands that you can use to see the contents of a file are head and tail. The head and tail commands go together and show the start of the end of a file. The
head command is extremely useful if you want to see whether a big file is the file that you are looking for and it is too big to be shown using cat. The tail command is extremely handy if you want to look at the last few entries in a log file.

The head and tail commands
The head and tail commands have many different options that you can use in order to customize the output format of the file on the screen. The most important is the –n option. The –n option followed by a number will display n lines of the file. You can find the other options by running man head or man tail.
cp is another important command in bash. cp copies a file or folder from one folder to another. By default, cp will overwrite a file in the destination folder if it already exists, so beware!
To use cp, you first need to specify the file or folder that you want to copy followed by the destination folder. If you select a directory, it will copy just this directory. If you want to make an exact copy of the directory, you need to use the –r command. The –r command recursively copies the folder.
Basically, what this command does is it makes an exact copy of the folder you are copying, so you will most likely want to use this option whenever you are copying a directory.

Copying a file and a folder
The cp command has many different options that change how it copies a file or directory, as shown in the following table:
Sometimes, you don't want to copy a file or directory, but instead you want to move it around. The mv command does exactly that. Its syntax is exactly the same as the syntax of cp. To move a file or folder, it is simply a matter of doing as shown in the following screenshot:
Moving a file
Unlike cp, mv automatically moves the whole file or folder and it doesn't have an –r option. There are several other options available in mv, shown as follows:
Sometimes, a file or directory is no longer required and needs to be deleted. To do this, the rm command is used.
To delete a file or folder, simply run the rm command followed by the file or directory that you want to delete. Raspbian and most other Linux distributions don't contain any sort of recycle bin functionality. This means that when you delete something, it is permanently deleted.
Removing a file
Tip
There are very few things that you can do to destroy a Linux distribution. The sudo rm –rf / command is one of them. This command will start at the root directory and delete every file on your device, including any files on any removable and network drives attached to your Raspberry Pi. Needless to say, be very careful when using the –r and–f flags.
By default, when removing a directory, rm will stop if there are any files in the directory. To delete the directory, you will need to use the –f flag in order to force the deletion of the folder. Some of the rm command's parameters are as follows:
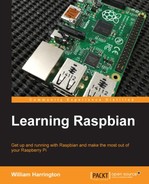
You will often need to create a new folder in order to keep your files organized. The purpose of using mkdir (make directory) is exactly that. To use mkdir, all you need to do is run mkdir followed by the name of the directory that you want to create.
Using mkdir
Once you have created the directory, it is immediately ready for use. You can use it to keep your files organized. Some of the mkdir parameters of are as follows:
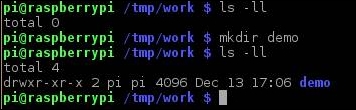
touch is a simple command that creates an empty file if a file doesn't exist. If the file exists, it updates the access time to when the command is run.
touch is often used when a file needs to exist. Some examples of this include creating empty log files. In order to use touch, run touch followed by the filename that you want to create or update the access time of.
Using touch
Every file in Linux is owned by a user. This helps to keep everything secure. By default, everything in the /home/pi directory is owned by the Pi user. All users also belong to a group. You can allocate permissions depending on the owner and group of the user who owns the file.
You can add users to your Raspbian installation using the adduser command. To do this, run adduser followed by the username of the user that you want to create. Because adduser is a system command, you will need to add sudo before it.

Creating a user
You will be asked a couple of questions by adduser, including the username and password. If you don't want to provide your name or phone number, simply press the Enter key. The adduser command will also create a new group with the same name as your new user.
You can easily see which users you have in your Raspbian system by running the following command:
cat /etc/passwd
The /etc/passwd file contains all the users that are in Raspbian.
Sometimes, you need to create a new group in order to organize your file permissions as required. To do this, use the addgroup command.

Creating a new group
The addgroup command is simple to use. All you need to do is to add the name of the group after the addgroup command.
The new group will be created along with a new ID. To see the groups that are there in Raspbian, run the following command:
cat /etc/group
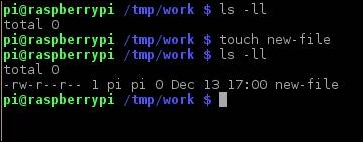
As the system administrator of your very own Linux system, you have a lot of power. You can use this power to change users' passwords using the passwd command. There are a couple of different ways in which you can use passwd. One of them is to change your own password. Another way in which you can use passwd is to change the password of another user on your system.
To change your own password, run the passwd command as shown in the following screenshot:
Changing your password
This will ask you to enter your current password. After you enter this, you will need to enter the new password twice.
Changing another user's password is just as easy as changing your password. To do this, add the username of the user after the passwd command. This command needs to be run as root, so add sudo before it.

Changing another user's password
This is really useful if you need to change someone else's password. By default, there is no root password set in Raspbian. To set it, run sudo passwd.
As mentioned previously, Linux is a multiuser system and all the files have an owner. Sometimes, the owner needs to be changed. To do this, use the chown command. chown can change the user of a file or directory.
A good example of permissions in use is the Apache web server. All the configuration files in the /etc/apache2 directory are owned by the Apache2 user, along with the files located in the /var/www directory where the website that Apache2 is serving.
Sometimes, when you add a file to this directory, you need to change the owner to be the Apache2 web server. If you don't do this, Apache2 won't be able to serve the file to anyone who wants to take a look at it.
chown needs several parameters. They are the new owner and the group of the file or directory that you want to change the owner of.
Changing the owner of all the files in Apache2's web root
The owner and group need to be separated by a (:). In the preceding example, the user and group are both Apache2.
There are several different options that you can add to the chown command, as follows:
|
Option |
Description |
|---|---|
|
|
This changes the owner of all the files and folders in the folder recursively |
|
|
Some of the chown command's parameters
The other part of a file's properties in Linux are its permissions. These permissions describe who can do what to files and directories. The following permissions are available:
|
Owner (o) |
Read |
Write |
Execute |
|
Group (g) |
Read |
Write |
Execute |
|
All users (a) |
Read |
Write |
Execute |
Linux file permissions
Each of these permissions is represented by a letter, as shown in the following table:
|
Read |
|
|
Write |
|
|
Execute |
|
If you run the ls –ll command, you will be able to see what the permissions are for the file and directory that you are in:
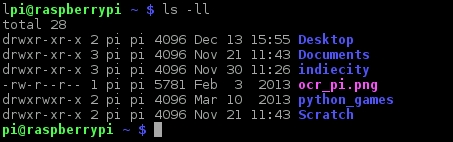
The default permissions of the /home/pi directory
Permissions are grouped together in groups of three. The first three describe the users' permission for the file, the next three describe the group's permissions, and the last three describe permissions of all users.
The rw-r—r— permissions of the ocr_pi.png file are as follows:
|
Permissions | |
|---|---|
|
Owner |
Read and write |
|
Group |
Read |
|
All users |
Read |
Permissions for ocr_pi.png
Permissions can also be described using an octal representation. This is a little more complicated but very flexible.
|
Octal notation |
Permissions |
|---|---|
|
0 |
No permissions |
|
1 |
Execute |
|
2 |
Write |
|
3 |
Write and execute |
|
4 |
Read |
|
5 |
Read and execute |
|
6 |
Read and write |
|
7 |
Read, write, and execute |
To describe the permissions of a file, simply work out what permissions you want to give. In the following example, we want the demo.txt file to have the following permissions:
|
Permissions | |
|---|---|
|
Owner |
Read and write |
|
Group |
Read only |
|
All Users |
No permissions |
A demo of the permissions
To work out the permissions, we start with the owner and find the read and write permissions. We then do the same for the group and all users' permissions. These permissions work out as follows:
|
Permissions | |
|---|---|
|
Owner |
6 |
|
Group |
4 |
|
All Users |
0 |
Octal permissions for the file
These permissions are put together to be 640. The chmod command uses this representation to set the permissions of the file or folder.

Changing the permissions of the demo.txt file
It is also possible to individually add and remove permissions from a file or folder. To do this, the user can use the notations described in the previous two tables.
We have the demo.txt file with the permissions as shown in the screenshot (The default permissions of the /home/pi directory) given earlier in this chapter. The permissions are as follows:
|
Permissions | |
|---|---|
|
Owner |
Read and write |
|
Group |
Read |
|
All Users |
No permissions |
If we want to add the write permission to members of the same group, we do as shown in the following screenshot:
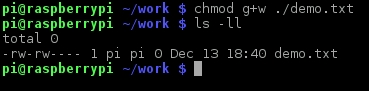
Changing the permissions of the demo.txt file
The + symbol adds permissions and the – symbol removes permissions from files.
We can see that the file now has group permissions to read and write. The disadvantage of using this method is that you need to separately set the permissions of the file for the owner, group, and all users.
There are several other command-line parameters for chmod, as follows:
|
Parameter |
Description |
|---|---|
|
|
This changes all the permissions for all the directories and files |
|
| |
|
|
This only displays files that have their permissions changed |
Command-line parameters for chmod