
To make the most of your Raspberry Pi, it needs to be connected to the Internet. You can do this in two ways: using an Ethernet cable or by Wi-Fi. Raspbian does a good job of automatically configuring its network settings for you, but sometimes you need to give it a helping hand.
Unfortunately, Raspbian doesn't include a graphical interface that lets you configure your network connections. You are able to configure your network interfaces manually using a text editor, or you can install a graphical interface to do this.
The Raspberry Pi Model B and Model B+ have an onboard Ethernet port. By default, Raspbian is configured to automatically get an IP address from a DHCP server on your network.
Sometimes, you might want to manually assign an IP address to your Raspberry Pi. This is done by editing a file called interfaces. To edit this file, you need to open up a console. The exact steps to do this are given in Chapter 6, The Console The command you need to run is as follows:
sudo nano /etc/network/interfaces
This will launch the nano text editor. The interfaces file, by default, will contain the following:
auto lo
iface lo inet loopback
iface eth0 inet dhcp

allow-hotplug wlan0
iface wlan0 inet manual
wpa-roam /etc/wpa_supplicant/wpa_supplicant.conf
iface default inet dhcp
An Ethernet port in Linux is identified by the eth prefix. The Ethernet port in your Raspberry Pi is called eth0. The interfaces file contains a section that configures the IP address. You will see that it is set by default to DHCP. This is where you can assign your IP address. To do this, change the iface line to the following lines:
auto eth0
iface eth0 inet static
address 192.168.2.6
netmask 255.255.255.0
gateway 192.168.2.1
You can see where you are able to enter your own network configuration. Once you have made the changes, press CTRL + x to exit nano, followed by y to save your changes.
To apply the changes you have made, run the following command:
sudo service networking restart
If there are any problems with your configuration, you will be notified so that you can correct them.
Raspbian supports many wireless dongles out of the box. This makes it really easy to access the Internet wirelessly from your Raspberry Pi.
You can find a list of Wi-Fi dongles that are tested and will definitely work with your Raspberry Pi at http://elinux.org/RPi_VerifiedPeripherals.
It is a good idea to plug in a Wi-Fi dongle into your Raspberry Pi; this should be done when the Raspberry Pi is off. The reason for this is that the power supply in the Raspberry Pi can sometimes have problems when USB devices are plugged in.

A Raspberry Pi B with a USB Wi-Fi dongle
After you plug in your supported Wi-Fi dongle, it will be automatically detected and ready for use. Before you can go any further, you need to open the WiFi Config tool. The tool can be found on the Raspberry Pi desktop. After opening the tool, you will see the following window:
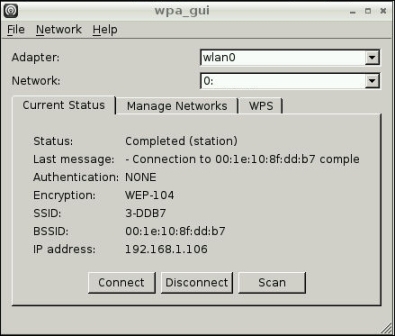
The WiFi Config tool
The WiFi Config tool is an easy-to-use program to connect your Raspberry Pi to your wireless network.
To connect to your wireless network, perform the following steps:
- Click on Scan as shown in the following screenshot. This will list all the wireless networks within range of your Raspberry Pi. Simply double-click on your network in the list.
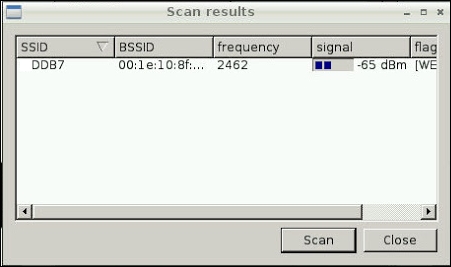
Scan results in the WiFi Config tool
- If you have security enabled on your Wi-Fi network (it is highly recommended that you do), you will be asked to enter your wireless key.
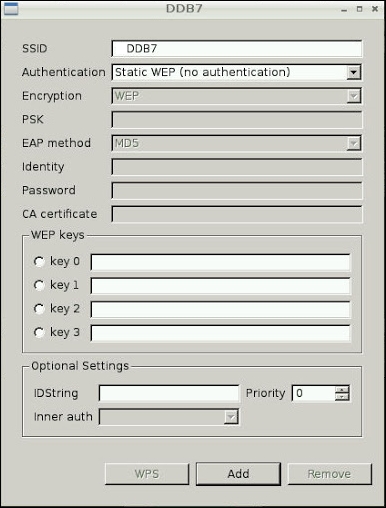
The wireless network configuration settings
- After entering your key, click on Add. You will return to the main Wireless Config Window. Simply click on your Wi-Fi network and select Connect.