
IN THIS CHAPTER
Advanced Java concepts
Advanced Flex concepts
In the previous chapters, I discussed a number of topics and concepts that you can use to create Web applications by using Java and Flex. These were all stand-alone applications with a singular purpose, such as a storefront for Internet shopping.
Another domain of applications involves those that serve the needs of a business or organization. These applications often serve multiple types of users with different needs, and data often needs to be shared among these applications. In this chapter, I discuss some of the more advanced needs of these applications and a number of libraries that can help you implement these solutions by using Java and Flex.
Writing the types of applications mentioned above is typically a large undertaking. In addition to the main business logic of these applications, the development team must address global concerns that encompass the set of applications as a whole, such as authentication, security, and reporting. Fortunately, Java libraries exist to help with all these concerns. Let's take a closer look at enterprise application development in Java and some of the libraries available to help you in developing these types of applications.
Enterprise can mean many things in terms of software. Some consider enterprise software to be applications used in the management and internal processes of businesses. This definition encompasses things such as customer relationship management (CRM), sales force automation, and workflow. Others refer to any large-scale software application as an enterprise application. Whatever the definition, there are a few things that most enterprise applications need to concern themselves with:
Security. An enterprise application typically involves some type of networked functionality, be it HTTPS requests in Web applications or pure socket connections in intranet applications. It's important to allow access to an application to only those users who are meant to have access. Furthermore, users may be assigned one or more user roles, each of which may grant some level of access to the user.
Interoperability. Enterprise applications rarely live in a vacuum. Often, an organization deploys multiple related applications, such as a sales application for end users and an inventory application for internal users. The inventory application should be able to inform the sales application when inventory levels are low. Communication and interoperability between Web applications are vital to ensuring that systems such as these run smoothly.
Scalability. As the number of users of an application grows and the amount of data handled by the application grows with it, it's critical to ensure that the application can handle the increased load. Careful upfront planning about the expected application load and data amounts is vital in making sure that your application can scale as needed to meet demand.
Although dedicated hardware and load-balancing solutions are typically used to handle scalability issues, Java libraries are available that help address each of the other two concerns. Let's look at each one in more detail.
Security in an enterprise application focuses on two basic questions: "Who are you?" and "What are you allowed to do?" In each of these cases, the "you" in question is known as the principal. The principal doesn't necessarily need to be a user sitting at a computer terminal. It could just as easily be another application calling into a Web service or some hardware device that receives data from the Web application.
The "Who are you?" question is answered through authentication. Authentication is the process of providing a set of credentials to the application to establish identity within that application. The combination of username and password is a typical means of user authentication for an application. Supplying such credentials may be required for any access to the application or may be required only for user-specific areas of the application, such as profile information or payment method details. Spring Security supports many of the most widely used authentication mechanisms, such as basic HTTP authentication, LDAP (Lightweight Directory Access Protocol, a directory querying protocol used by many organizations for resource access across a network), and others.
Once a user is authenticated (that is, the application knows who the principal is), the question of what the user is allowed to do comes into play. When a user attempts to access some piece of an application, the application determines whether the user has authorization to do what he or she is trying to do. If so, the application allows the user to access that functionality. If not, the user is presented with an error page or message stating that he or she isn't authorized to access that functionality. Authorization can also be used to completely hide areas of an application from a user. For example, a view can be presented with one or more links omitted based on the currently authenticated user's authorization.
The Spring Framework provides its own security framework called Spring Security. Spring Security was formerly known as Acegi Security but was rebranded to better identify its ties with the core Spring Framework.
Spring Security's chief advantage is that it allows you to keep your main application code and business logic separate from any security code needed to perform the authentication and authorization necessary for your application. Spring Security handles authentication and authorization through a series of interceptors and filters. An interceptor matches requests to an application that match a provided URL pattern and hands the request off to a filter chain to deal with the authentication and authorization requirements of the application.
Adding Spring Security to your application can be as simple as adding some configuration details to your web.xml configuration file and the Spring application context configuration XML file. As a simple example, let's look at the configuration for an application that contains one Spring controller that can be accessed by anyone and one that requires a user to be authenticated as an administrator user.
Note
For more on the configuration found in web.xml and Spring application context configuration files, see Chapter 6.
The configuration in web.xml involves adding a servlet filter that sends requests through a Spring FilterToBeanProxy filter class:
<filter>
   <filter-name>springSecurityFilterChain</filter-name>
   <filter-class>
          org.springframework.web.filter.DelegatingFilterProxy
   </filter-class>
</filter>
<filter-mapping>
   <filter-name>springSecurityFilterChain</filter-name>
   <url-pattern>/*</url-pattern>
</filter-mapping>
The DelegatingFilterProxy class is the entry point into the Spring Security filter chain. The DelegatingFilterProxy is defined with the Spring application context. The configuration looks like this:
<?xml version="1.0" encoding="UTF-8"?>
<beans:beans xmlns="http://www.springframework.org/schema/security"
    xmlns:beans="http://www.springframework.org/schema/beans"
    xmlns:xsi="http://www.w3.org/2001/XMLSchema-instance"
    xsi:schemaLocation="http://www.springframework.org/schema/beans
http://www.springframework.org/schema/beans/spring-beans-2.0.xsd
http://www.springframework.org/schema/security
http://www.springframework.org/schema/security/spring-security-2.0.1.xsd">
<http auto-config="true">
<intercept-url pattern="/generalResource.html"
access="ROLE_USER" />
<intercept-url pattern="/adminResource.html"
access="ROLE_ADMIN" />
<intercept-url pattern="/**"
access="IS_AUTHENTICATED_ANONYMOUSLY" />
</http>
<authentication-provider>
<password-encoder hash="md5"/>
<user-service>
<user name="appadmin"
password="2740231e18bd5c7bebb98628ab83c79f"
authorities="ROLE_ADMIN,ROLE_USER" />
<user name="chuck"
password="9bd97baef2b853ec00cc3cffd269f679"
authorities="ROLE_USER" />
<user name="matt"
password="b312ba4ffd5245fa2a1ab819ec0d0347"
authorities="ROLE_USER" />
</user-service>
</authentication-provider>
</beans:beans>This configuration file defines a few URL interceptors that will intercept requests for those URLs and then pass them through the Spring Security filter chain. The /generalResource.html URL is authorized to be accessed by principals granted the ROLE_USER authority. The /adminResource.html URL is authorized to be accessed by principals granted the ROLE_ADMIN authority. The last interceptor uses the pattern /**, which matches any URL. It's marked as IS_AUTHENTICATED_ANONYMOUSLY, meaning that no authentication or authorization is needed to access this resource. It's important to note that the interceptors will match more specific entries first, so the two specific URLs will match and check for the proper authority before the wildcard URL pattern is checked. This prevents those specific URLs from inadvertently matching the wildcard URL pattern and being authenticated anonymously.
The authentication provider at the end of the configuration file provides the means of authenticating the credentials passed into the application when a login is attempted. In this case, the usernames and passwords are contained in the configuration file, but authentication providers can be configured that check the credentials against a database table, an LDAP database, or even a plain text property file. The passwords in this file are MD5-hashed for added security, as noted by the <password-encoder> tag. It's possible to use plain text passwords here — this configuration file is located in the WEB-INF directory of the Web application, so the user can't access it through a browser. However, using plain text passwords in general isn't a good security practice.
When a user successfully logs into this application, an Authentication object is created that contains a UserDetails object with the user's credentials and granted authorities. When the appadmin user logs in, he or she has both the ROLE_ADMIN and ROLE_USER authorities, so he or she can access both of the secured pages. The chuck and matt users have only the ROLE_USER authority, so they can access the /generalResource.html page but not the /adminResource.html page. If a user without the proper authority tries to access /adminResource.html, he or she is presented with an access denied page.
Spring Security allows you to quickly set up basic authentication and authorization services for your application. It's also flexible enough to meet far more complex needs, such as integration with an LDAP server, making it a great choice for any Spring-based Web application.
Applications within an enterprise often need to communicate with one another. For example, an inventory control system might keep track of what supplies an enterprise has in stock. When any supplies fall below a certain level, the inventory control system sends a message to the ordering system to let it know that supplies need to be ordered.
The Java Messaging System (JMS) API is the Java standard for allowing different applications or components of the same application to send and receive messages to and from one another. JMS provides a simple but highly configurable set of interfaces to facilitate this communication. JMS can be used to send messages directly to a single known location with high reliability or to send messages to multiple unknown subscribers.
JMS can be used in either of two messaging domains. A messaging domain is a specific set of rules defined by the JMS specification for each of the two messaging types. These two types are:
Point-to-point. In point-to-point messaging, messages sent by a message producer are received by a single consumer. Messages sent by each producer are held in a message queue until the message consumer is ready to receive them. Thus, the message consumer doesn't need to be running at the time a message is sent by the producer in order to receive it. Messages are held in the message queue until they're received by the consumer or until they expire. When a consumer does receive a message, it must acknowledge successful receipt of the message to the producer. This messaging domain is most useful when high-reliability messaging between two specific components is necessary.
Publish/subscribe. In the publish/subscribe messaging model, the producer sends each of its messages to a messaging topic. A topic is somewhat akin to a chat room in a chat application. Consumers in this model subscribe to one or more topics, and each message sent to a topic is received by all of the consumers subscribed to that topic. Typically, each of the consumers registers a message listener, which constantly listens for new messages and passes them along to the consumer as they arrive. The publish/subscribe messaging domain is useful when unknown types and numbers of components or applications might be listening for a certain message.
The publish/subscribe messaging domain should look familiar to you from the chat application in Chapter 14. That application uses Blaze DS to configure messaging channels and destinations, and includes producers and consumers in the Flex code. The Blaze DS messaging channels and destinations are roughly equivalent to topics in the JMS publish/subscribe messaging domain. The Flex <mx:Producer> and <mx:Consumer> components are analogous to the producers and consumers in the JMS API.
Note
For more on Blaze DS and the Flex chat application, see Chapter 14.
Let's take a look at some JMS code. The following two code listings show a message producer and consumer class, respectively. These classes use the point-to-point JMS domain, meaning that the producer places messages in a message queue and the consumer retrieves messages from the message queue. This example doesn't go into detail about how to set up the JMS queue. Setting up JMS queues and topics varies from server to server. The documentation for the application server you're using explains how to configure JMS. These examples use a JMS queue named "queue/testQueue" — JBoss comes preconfigured with a JMS queue using this name, so no extra configuration is required to use this queue.
Here's the code listing for the JMS message producer:
import javax.jms.*;
import javax.naming.InitialContext;
import javax.naming.NamingException;

public class JMSPointToPointProducer
{
    QueueConnection queueConnection;
    QueueSession queueSession;
    Queue queue;

    public void sendTextMessageToQueue(String message) throws
   JMSException, NamingException
    {
        InitialContext context = new InitialContext();
        Object resource = context.lookup("ConnectionFactory");
        QueueConnectionFactory queueConnectionFactory =
   (QueueConnectionFactory) resource;
        queueConnection = queueConnectionFactory.
   createQueueConnection();
        queueSession = queueConnection.createQueueSession(false,
   QueueSession.AUTO_ACKNOWLEDGE);
        queueConnection.start();

        queue = (Queue) context.lookup("queue/testQueue");
        QueueSender queueSender = queueSession.createSender(queue);
TextMessage textMessage = queueSession.
createTextMessage(message);
queueSender.send(textMessage);
queueSender.close();
}
public void cleanup() throws JMSException
{
queueConnection.stop();
queueSession.close();
queueConnection.close();
}
public static void main(String args[])
throws Exception
{
System.out.println("Starting message producer . . .");
JMSPointToPointProducer producer =
new JMSPointToPointProducer();
producer.sendTextMessageToQueue("Hello, Consumer!");
producer.cleanup();
System.out.println("Ending message producer . . .");
System.exit(0);
}
}The interesting method in this class is the sendTextMessageToQueue() method. The first couple of lines get the InitialContext, which is used in enterprise Java applications as a starting point for retrieving named resources configured in the application server by using the Java Naming and Directory Interface (JNDI). JNDI provides a standard Java API for looking up objects by name in a directory-like structure. The first thing that gets retrieved is a JMS QueueConnectionFactory object. JBoss places both the point-to-point and publish/subscribe connection factories under the same JNDI name, "ConnectionFactory", so it's necessary to cast the object received from the InitialContext to the proper type — QueueConnectionFactory, in this case.
The QueueConnectionFactory is used to create a QueueConnection, which in turn is used to create a QueueSession. The QueueSession is used to manage the queue that this producer deals with. Next, the start() method of the QueueConnection is called, which starts up the connection's message delivery operations. The specific queue that messages are sent to is also retrieved from JNDI by using the name "queue/testQueue". A QueueSender object is retrieved from the QueueSession by using this queue. The session is also used to create a TextMessage object. TextMessage is a subinterface of the JMS message interface, which all messages sent using JMS must implement. Finally, the QueueSender sends the text message, which is placed in the queue, waiting to be retrieved.
Here's the code listing for the JMS message consumer:
import javax.jms.*;
import javax.naming.InitialContext;
import javax.naming.NamingException;

public class JMSPointToPointConsumer
{
    QueueConnection queueConnection;
    QueueSession queueSession;
    Queue queue;

    public static class MessageListenerImpl implements
   MessageListener
    {
         public boolean messageReceived = false;

       public void onMessage(Message msg)
       {
           TextMessage textMessage = (TextMessage) msg;
           try
           {
                System.out.println("Got A Message:  "
                       + textMessage.getText());
                messageReceived = true;
           }

           catch(Exception ex)
           {
                ex.printStackTrace();
           }
       }
    }

    public void listenToQueue() throws JMSException, NamingException
    {
          InitialContext context = new InitialContext();
          Object resource = context.lookup("ConnectionFactory");
          QueueConnectionFactory queueConnectionFactory =
                 (QueueConnectionFactory) resource;
          queueConnection = queueConnectionFactory
                 .createQueueConnection();
          queue = (Queue) context.lookup("queue/testQueue");
          queueSession = queueConnection.createQueueSession(false,
                 QueueSession.AUTO_ACKNOWLEDGE);
          queueConnection.start();
          QueueReceiver queueReceiver = queueSession
                 .createReceiver(queue);
MessageListenerImpl listener = new MessageListenerImpl();
queueReceiver.setMessageListener(listener);
}
public static void main(String args[])
throws Exception
{
System.out.println("Starting message consumer . . .");
JMSPointToPointConsumer consumer =
new JMSPointToPointConsumer();
consumer.listenToQueue();
}
}The consumer class contains an internal class called MessageListenerImpl, which implements the JMS MessageListener interface. This interface contains a single method, onMessage(), which is executed upon receipt of a message from a queue. The message receiver is set up in the listenToQueue() method. A great deal of the setup in this method is the same as the setup in the sendTextMessageToQueue() method in the JMS producer example — the JMS QueueConnectionFactory and other queue objects are created in exactly the same way. Rather than creating a QueueSender object, the QueueSession is used to create a QueueReceiver. The MessageListenerImpl class is registered with the QueueReceiver, and at this point, it's ready for messages to come into the queue.
In these examples, simple text messages are being sent and received, but JMS allows more complex messages to be sent using serializable objects, collections of objects, or maps of name-value pairs. In this way, JMS provides great flexibility to share important data between modules and applications.
Many of the Java libraries and frameworks that I discuss in this book are general-purpose libraries that you will find yourself using in many or all of your Java Web applications. In addition to these libraries, there are a number of libraries for just about any specific piece of functionality that you might need in a Java Web application. In this section, I highlight a few that have proved especially useful in meeting some specific needs.
Many applications have some sort of reporting requirements. Administrator applications for online stores might need reports for inventory, product sales, customer purchasing trends, and other data that helps an organization's decision-makers know how the business is performing. For applications written in Java, reporting can be added through the use of the Jasper Reports framework. Jasper Reports is an open-source Java reporting engine that adds reporting functionality to enterprise Java applications. Jasper Reports can output reports in many formats that can be viewed onscreen or printed, including PDF, HTML, and CSV (comma-separated values). You can find more information and a download link for Jasper Reports at http://jasperforge.org/plugins/project/project_home.php?group_id=102.
The design of a Jasper Report is defined in a JRXML file. JRXML is a dialect of XML specific to Jasper Reports, defining the report structure, data source, and layout. These JRXML files are compiled, either at runtime or during the application build process, into binary files with a .jasper extension. The .jasper file is populated with data from a specified data source. The data can be retrieved by using a query specified in the JRXML file and run against a java.sql.Connection object that wraps an active database connection, or it can come from a Java class that implements the Jasper Reports net.sf.jasperreports.engine.JRDataSource interface. This interface defines methods for retrieving the data for a given field and advancing to the next record in the data set used by the report.
The following two code listings show a very simple Jasper Report implementation. It doesn't use any dynamic data, but it does create two parameters to pass into the report structure definition.
First, here's the JRXML report definition:
<?xml version="1.0"?>
<!DOCTYPE jasperReport
  PUBLIC "-//JasperReports//DTD Report Design//EN"
  "http://jasperreports.sourceforge.net/dtds/jasperreport.dtd">

<jasperReport name="Simple Jasper Reports Example">
<parameter name="name" class="java.lang.String"/>
<parameter name="age" class="java.lang.String"/>
 <detail>
    <band height="40">
   <staticText>
   <reportElement x="100" y="0" width="200" height="20"/>
   <text><![CDATA[Hello. My name is ]]></text>
   </staticText>
   <textField evaluationTime="Report">
   <reportElement x="183" y="0" width="75" height="20"/>
   <textFieldExpression class="java.lang.String">
   <![CDATA[$P{name}]]>
   </textFieldExpression>
   </textField>
   <staticText>
   <reportElement x="211" y="0" width="200" height="20"/>
   <text><![CDATA[, and I am ]]></text>
   </staticText>
   <textField evaluationTime="Report">
   <reportElement x="257" y="0" width="75" height="20"/>
   <textFieldExpression class="java.lang.String">
   <![CDATA[$P{age}]]>
   </textFieldExpression>
   </textField>
   <staticText>
   <reportElement x="268" y="0" width="200" height="20"/>
   <text><![CDATA[ years old.]]></text>
   </staticText>
    </band>
  </detail>
</jasperReport>
In this JRXML file, two parameters called name and age are set up to be received by the report. There are a few static text elements that form a sentence. Because this is XML, the static text is enclosed in CDATA tags. The parameters are referenced by using the notation $P (such as $P{name}). Each of these elements is positioned by using x and y coordinates. It's possible to set up more complex layouts with Jasper Reports, including tables and even subreports.
Here's the Java class that populates this report:
import net.sf.jasperreports.engine.*;
import java.util.*;

public class SimpleJasperReportsExample
{
   public static final String JRXML_FILE = "simpleJasperReport.
   jrxml";
   public static final String PDF_FILE = "simpleJasperReport.pdf";

   public static void main(String[] args)
   {
           JasperReport report;
           JasperPrint pdf;

           try
           {
                Map<String,String> hm =
                   new HashMap<String,String>();
                hm.put("name","Chuck");
                hm.put("age","36");
                report = JasperCompileManager
                   .compileReport(JRXML_FILE);
                pdf = JasperFillManager
                   .fillReport(report, hm,
                          new JREmptyDataSource());
                JasperExportManager.exportReportToPdfFile(pdf,
                   PDF_FILE);
          }
           catch (JRException jrex)
           {
               jrex.printStackTrace();
           }
     }
}
This Java application creates a HashMap and adds two String name-value pairs to it. These HashMap values correspond to the names of the parameters defined in the JRXML file. A JasperReport instance is created by compiling the JRXML file. The report is then filled with data by using the JasperFillManager class. The JREmptyDataSource class implements the JRDataSource interface and basically hands the report an empty data source. Any implementation of JRDataSource could be passed in here. There are implementations provided with the Jasper Reports package that can retrieve data from JDBC result sets, Java collections, and more. The HashMap containing the two parameters to the report is also passed in here. Finally, the JasperExportManager class is used to write the report data out to a PDF file. The final PDF is shown in Figure 16.1.

Figure 16.1. This PDF was produced by the JasperExportManager using the report created by compiling the JRXML file and filling it with data.
Jasper Reports uses another library to export its reports to PDF. This library is called iText, and it's also available as a free, open-source library. iText is useful when you need to output PDFs from your application but don't need the full reporting framework provided by Jasper Reports. For example, if you'd like to create a printable view of a page in your application, iText can make that task much easier. The iText JAR file is included with Jasper Reports, which uses iText for PDF generation. iText can also be downloaded separately at www.lowagie.com/iText/.
Spring Framework has support for creating PDF views by using iText. Spring provides an AbstractPdfView class that does the work of setting up an iText document for you. Your application's PDF view class simply needs to extend AbstractPdfView, implement the buildPdfDocument() method to work with the iText document, and then add data to it as needed. This is very powerful because it means you can use the same Spring controller to retrieve the data needed by the client for both the HTML version and the PDF version simply by using different views in each case.
This code sample shows how to create a simple PDF using iText:
import java.io.FileOutputStream;
import java.io.IOException;

import com.lowagie.text.Document;
import com.lowagie.text.DocumentException;
import com.lowagie.text.Paragraph;
import com.lowagie.text.Font;
import java.awt.Color;
import com.lowagie.text.PageSize;
import com.lowagie.text.pdf.PdfWriter;

public class SimpleITextExample
{
   public static void main(String[] args)
   {
         Document document = new Document(PageSize.LETTER);
         try
         {
                PdfWriter.getInstance(document,
                 new FileOutputStream("simpleITextExample.pdf"));
                document.open();
                document.add(new Paragraph(
                       "Hello. My name is Chuck, " +
                       "and I am 36 years old!",
                       new Font(Font.COURIER, 18,
                             Font.BOLD, new Color(0,0,0))));
         }

         catch (DocumentException dex)
         {
                dex.printStackTrace();
         }

         catch (IOException ioex)
         {
                ioex.printStackTrace();
         }

         finally
         {
                document.close();
         }
    }
}
iText was developed in Europe, so its default page size is A4, the European standard. iText documents can be constructed by using a number of convenient page size constants, such as PageSize.LETTER for standard U.S. letter-size pages. PDFs are built in iText by adding elements such as paragraphs to the PDF document. iText gives you a fair bit of control over font faces and styles in your paragraphs. The PDF is written out to a file by using a FileOutputStream. The PDF output from this application is shown in Figure 16.2.

Some applications may have requirements that call for a task to be performed at specific intervals or at set times each day or week. For example, an online store application might feed data into a data warehouse for reporting on a nightly basis. Rather than have someone log into an administration site and run this job manually, it would be beneficial to have the job run automatically on a set schedule. Quartz is an open-source Java job scheduling library that can be used to schedule jobs like these. Quartz can be downloaded at www.opensymphony.com/quartz/.
Quartz schedules tasks by using jobsand triggers. A job is a class that implements the Quartz scheduler's org.quartz.Job interface. The Job interface contains a single execute() method, which is run at a scheduled time. The scheduled time is determined by a trigger that's a subclass of the org.quartz.Trigger abstract class. The trigger contains the start time and end time for the job and the interval at which it fires. The job and the trigger are passed into an instance of the org.quartz.Scheduler interface that ties the job to the trigger.
Here's an example of a simple Job implementation class:
import java.util.Calendar;
import org.quartz.*;

public class CalendarOutputJob implements Job
{

    public CalendarOutputJob()
    {
    }

    public void execute(JobExecutionContext context)
      throws JobExecutionException
    {
         Calendar now = Calendar.getInstance();
         String currentDateAndTime = (now.get(Calendar.MONTH) + 1) +
                              "/" + now.get(Calendar.DAY_OF_MONTH) +
                              "/" + now.get(Calendar.YEAR) +
" " + now.get(Calendar.HOUR_OF_DAY) +
":" + now.get(Calendar.MINUTE);
System.out.println("Current Date/Time = "
+ currentDateAndTime);
}
}This Job class's execute() method simply gets the current date and time and then prints them out to the console. The JobExecutionContext object passed into the execute() method isn't used here, but it contains information about the trigger that has the schedule information for this Job and the Scheduler object that the job and trigger are registered with.
To see this job used on a schedule, look at this code sample:
SchedulerFactory factory = new StdSchedulerFactory();
Scheduler scheduler = factory.getScheduler();
scheduler.start();
JobDetail detail = new JobDetail("calendarOutputJob",null,
                                       CalendarOutputJob.class);

Trigger trigger = TriggerUtils.makeHourlyTrigger(6);
trigger.setStartTime(TriggerUtils.getDateOf(23,59,59));
trigger.setName("calendarOutputTrigger");

scheduler.scheduleJob(detail, trigger);
This code instantiates and starts a Quartz scheduler, which runs as long as the application is running and keeps track of the scheduled jobs for the application. The code then creates a new JobDetail object, which names the job and identifies the Job class that's executed. The trigger is instantiated next. This code creates a trigger that runs every six hours. There are also methods in the TriggerUtils class that can set up triggers to run at other intervals, such as certain days of the week, and optionally limit the execution to a specific number of times. The trigger's start time is set to one second until midnight (23:59:59 in 24-hour time notation) on the current date. Any other date in the future can also be specified if desired. Finally, the job detail and trigger are passed in to the scheduler, which associates the two and makes sure that the job represented by the job detail is executed.
Although this example is very simple, it demonstrates the power and flexibility of Quartz. Jobs can contain business logic of any level of complexity, make use of other classes in your application, and be tied to any number of schedules. Triggers can be created for practically any interval by using the TriggerUtils convenience class or using the concrete CronTrigger class by using standard UNIX cron job notation for those developers already familiar with cron, a UNIX command-line job scheduling utility. Spring also makes integrating Quartz into your Web applications easier. Spring provides a JobDetailBean class that can be configured by using standard Spring XML configuration. It has an jobClass property that can be set to a specific implementation of the org.quartz.Job interface in the configuration to enable that Job in your Web application. Anyone developing an application in need of scheduling functionality will find Quartz worth using.
Flex offers a wide array of components for display and interaction, and even some utility-based components. Another set of components that Flex offers is for reporting. These components are located under the Charts section of the Components panel. You can use the Flex data visualization components to build a more interactive experience with very little additional code required.
The charting components are available in both versions of Flex Builder, either the stand-alone or the Eclipse plug-in. The standard versions of both the stand-alone and the Eclipse plug-in place a watermark over each component during runtime. This allows you to develop your application and get everything working; then, if you decide to use the components, you can purchase a professional license.
The professional version of Flex Builder needs to be purchased only once and offers the ability to use the charting components as well as the AdvancedDataGrid component.
Note
The professional version of Flex Builder isn't required for component use but is for distribution without the watermark.
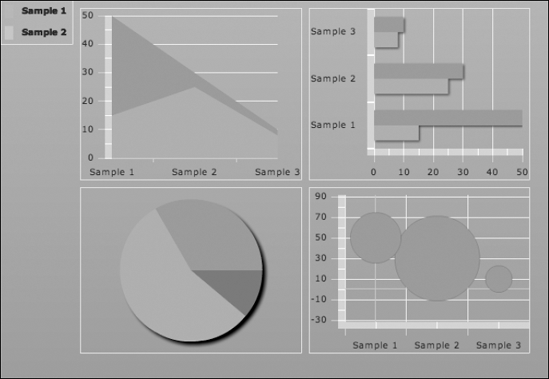
Before developing the sample application, let's take a look at each of the charting component options. All of the charting components have similar syntax, which is covered later in this chapter. To start, here's the list of components:
AreaChartBarChartBubbleChartCandlestickChartColumnChartHLOCChartLegendLineChartPieChartPlotChart
All the components listed above, with the exception of Legend, are various shapes and formats for a charting application. A few of these components are shown in Figure 16.3. Let's look at how to configure one.
To create a charting component, start by creating a new Flex project. Follow these steps:
Right-click in the Flex Navigator and then choose New
Flex Project from the popup menu. The Flex Project editor opens.
In the Project Name text field, type ChartingSample.
Click Finish to build the project with all the default options set.
Now that you have a project set up, the next step is to start writing the MXML code.
You should see the default code shown here:
<?xml version="1.0"?>
<mx:Application xmlns:mx="http://www.adobe.com/2006/mxml"
  layout="absolute">
.
.
.
</mx:Application>
You can use any of the charting components in your applications. For this example, I use the BarChart to display sample sales data that are static in the Flex application.
Start by adding the <mx:Script> block, importing the ArrayCollection class, and defining a Bindable variable that will be attached to the BarChart component:
<mx:Script>
<![CDATA[

     import mx.collections.ArrayCollection;

     [Bindable]
     public var monthlySalesReport:ArrayCollection =
     new ArrayCollection([
          {Month:"Jan", Profit:2000, Expenses:1500},
          {Month:"Feb", Profit:1000, Expenses:200},
          {Month:"March", Profit:4000, Expenses:100}
    ]);

  ]]>
</mx:Script>
The monthlySalesReport is an ArrayCollection with objects placed inside. These individual objects are placed in the component dynamically and result in the view's being drawn.
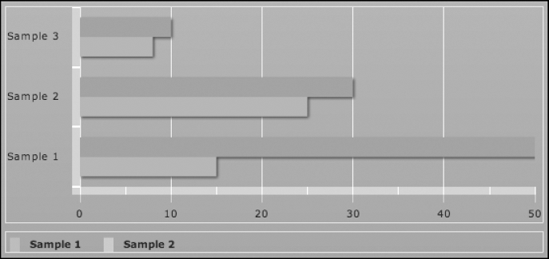
The next step is to add the MXML that displays the charting component, as shown in Figure 16.4. This component has an id of barChart and a dataProvider of monthlySalesReport. The data provider is filled by the variable that you previously defined at runtime:
<mx:BarChartid="barChart"dataProvider="{monthlySalesReport}"showDataTips="true" x="10" y="10" width="546" height="220" > . . . </mx:BarChart>
The other specific parameter that's found within the charting component is showDataTips. This parameter tells the component to display information in a tooltip-style box when the user moves the mouse over the chart.
The chart is defined by MXML tags that are placed within the BarChart tag. The first portion defines the vertical placement and data viewing within the vertical axis:
<mx:verticalAxis>
     <mx:CategoryAxis
          categoryField="Month"
          dataProvider="{monthlySalesReport}"
     />
</mx:verticalAxis>
The following code, which is also placed within the main BarChart tags, contains the BarSeries sections. These tags define each of the individual bars in the BarChart:
<mx:series>
       <mx:BarSeries
            yField="Month"
            xField="Profit"
            displayName="Profit"
       />
       <mx:BarSeries
yField="Month"
xField="Expenses"
displayName="Expenses"
/>
</mx:series>The labels for the component are defined by the xField and yField parameters. The displayName is to tell the viewer which portion of the chart belongs to each value group, defined in the Bindable variable.
The last portion of the code is the Legend. This component displays each item's category in the chart. Usually, this component is placed below the chart; it doesn't need to be, but it's the optimal location within the MXML file.
<mx:Legend
dataProvider="{barChart}"
x="10"
y="238"
width="546"
height="22"
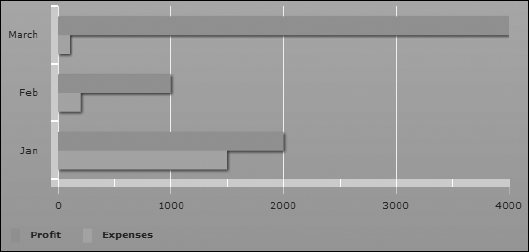
/>At this point, you've completed the sample BarChart application. You can now save and view the application in your browser, which should show the component with the data being displayed, as shown in Figure 16.5.
Note
You may see a watermark on your version of the charting components if you don't have a professional license for Flex Builder.
You have now completed the simple BarChart application; the following code block is the completed code for this application. You can expand your projects with this knowledge and begin adding Flex charting to your applications for a richer user experience:
<?xml version="1.0"?>
<mx:Application
xmlns:mx="http://www.adobe.com/2006/mxml"
layout="absolute"
>
<mx:Script>
<![CDATA[
import mx.collections.ArrayCollection;
[Bindable]
public var monthlySalesReport:ArrayCollection =
new ArrayCollection([
{Month:"Jan", Profit:2000, Expenses:1500},
{Month:"Feb", Profit:1000, Expenses:200},
{Month:"March", Profit:4000, Expenses:100}
]);
]]>
</mx:Script>
<mx:BarChart
id="barChart"
dataProvider="{monthlySalesReport}"
showDataTips="true"
x="10"
y="10"
width="546"
height="220"
>
<mx:verticalAxis>
<mx:CategoryAxis
categoryField="Month"
dataProvider="{monthlySalesReport}"
/>
</mx:verticalAxis>
<mx:series>
<mx:BarSeries
yField="Month"
xField="Profit"
displayName="Profit"
/><mx:BarSeries
yField="Month"
            xField="Expenses"
            displayName="Expenses"
       />
    </mx:series>
</mx:BarChart>
<mx:Legend
    dataProvider="{barChart}"
    x="10"
    y="238"
    width="546"
    height="22"
/>
</mx:Application>In this chapter, you learned more about enterprise development with Java and Flex. First, you learned about a few key concepts surrounding enterprise applications: security, interoperability, and scalability. You learned about the Spring Security framework for adding security to Web applications. Next, you learned how JMS allows different modules or applications to communicate with one another by using point-to-point or publish/subscribe domains. After that, you learned about other Java libraries that can be useful in many applications.
You also learned about Flex data visualization components. You first learned which components are available and then learned how to configure them for your own projects. Now that you know about these components and how to use them, you can include them in your own projects.