
IN THIS CHAPTER
Working with JUnit
Working with FlexUnit
As you begin to develop an application, you need to make sure that everything within the application is working properly before getting in too deep. For a small project, you can trace some commands to the Output panel and then check the results, but that approach simply doesn't work for larger-scale applications.
In this chapter, you look at unit testing tools for Java and Flex. These tools give you the ability to examine elements of a larger application and ensure that your code is well-built.
Primarily, you look at JUnit for Java and FlexUnit for Flex because they're the standard testing kits for their respective programming languages.
JUnit is a unit testing library for Java applications and is written in Java itself. It supports the creation of individual test cases and the grouping of those test cases into a test suite that can run all the unit tests together.
The unit in unit testing is meant to refer to the smallest possible testable piece of code. In the Java world, this typically means a single method in a class. Some methods, such as those whose only function is to set and retrieve properties of a Java bean class (getter and setter methods), are considered too simple to break and are typically not tested. Any method that does more than that should be tested.
Note
For more on Java bean classes and getter and setter methods, see Chapter 9.
Eclipse has built-in support for creating and running JUnit tests. This makes it easy to write tests and then run them as you develop your applications. Because of this built-in support, there's nothing you need to download or install to run JUnit tests with Eclipse.
Note
For more on installing and configuring Eclipse, see Chapter 1.
As an example of a class you would want to test, consider the case of a transfer between two different bank accounts. A bank account has, among other things, an account number and a balance. To transfer funds from one account to the other, the funds must be debited from one account (provided that the amount to be transferred doesn't exceed the balance!) and credited to the other. Testing this functionality is prudent because if something goes wrong, someone might end up with more or less money than he or she should have.
If it's not currently running, launch Eclipse by navigating to your Eclipse install directory and double-clicking eclipse.exe. First, you create a project and Java classes to represent a bank account and a system for processing a transfer. After that, you import the JUnit libraries into the project so that you can create some unit tests for the bank account transfer code.
To create the project and the two Java classes, follow these steps:
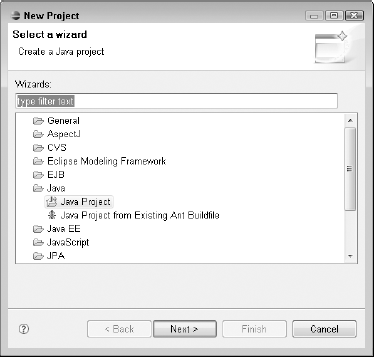
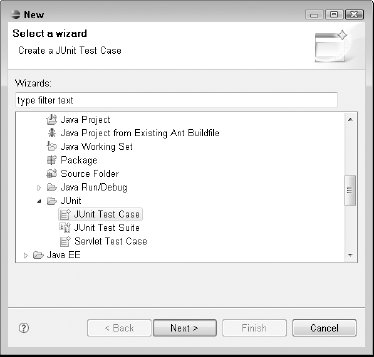
Right-click inside the Project Explorer view and then choose New
Project from the popup menu. The Select a wizard dialog box, as shown in Figure 7.1, opens.
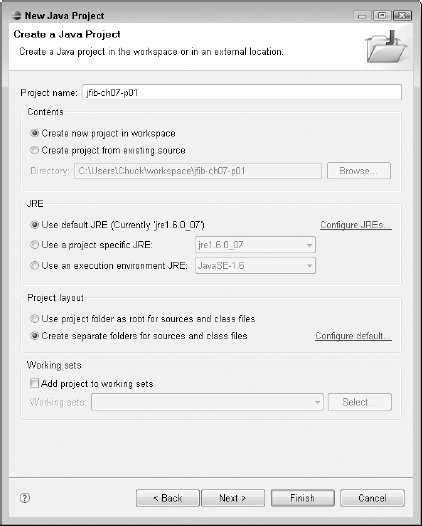
Click the arrow next to Java to expand it, select Java Project, and then click Next. The Create a Java Project wizard, as shown in Figure 7.2, opens.
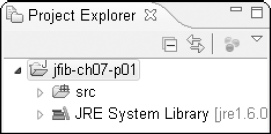
Type a name for your project and then click Finish. The wizard closes, and the new project appears in the Project Explorer view, as shown in Figure 7.3.
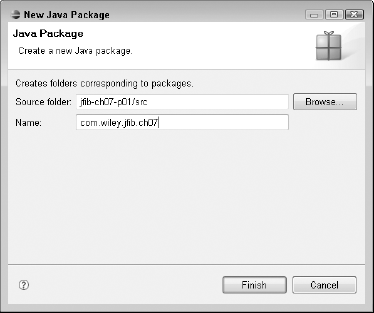
Right-click the
srcfolder under the new project in the Project Explorer view and then choose NewPackage from the popup menu. The New Java Package dialog box, as shown in Figure 7.4, opens.Type com.wiley.jfib.ch07 for the package name and then click Finish. The default value for the Source folder text field is appropriate. The new package appears in the
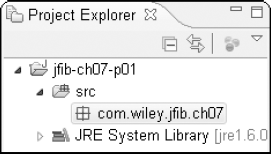
srcfolder under the project, as shown in Figure 7.5.Right-click the
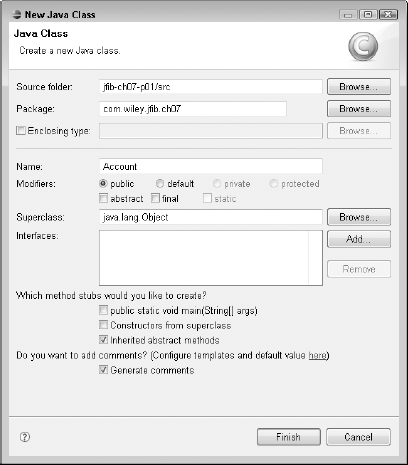
com.wiley.jfib.ch07package in the Project Explorer view and then choose NewClass from the popup menu. The New Java Class dialog box, as shown in Figure 7.6, opens.Type Account in the Name text field, click the Generate comments box, and then click Finish. The new Java class is created and opens in the editor, as shown in Figure 7.7.
Right-click the
com.wiley.jfib.ch07package in the Project Explorer view and then choose NewClass from the popup menu. The New Java Class dialog box opens.Type AccountManager in the Name text field, click the Generate comments box, and then click Finish. The new Java class is created and opens in the editor.
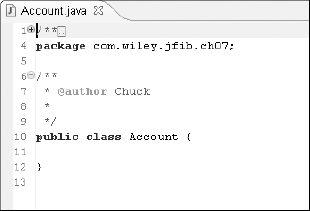
Edit the Account class to match this code listing:
/**
 *
 */
package com.wiley.jfib.ch07;

/**
 * @author Chuck
 * The Account class represents a simple bank account
 */
public class Account
{
   private long accountNumber;
   private double balance;

   /**
    * Constructor
    * @param accountNumber
    * @param balance
    */
   public Account(long accountNumber, double balance)
   {
         this.accountNumber = accountNumber;
         this.balance = balance;
   }

   /**
    * Withdraw an amount from the account
    * @param amount the amount to withdraw
    * @return the balance after the withdrawal
    * @throws Exception if the available balance is less than
* the attempted withdrawal.
*/
public double debit(double amount) throws Exception
{
if(amount > balance)
throw new Exception(
"Not enough available funds to withdraw $"
+ amount
+ " from account #" + accountNumber
+ ". Current balance: $" + balance);
balance -= amount;
return balance;
}
/**
* Deposit an amount into the account
* @param amount the amount to deposit
* @return the balance after the deposit
*/
public double credit(double amount)
{
balance += amount;
return balance;
}
/**
* Get the account number
* @return the account number
*/
public long getAccountNumber()
{
return accountNumber;
}
/**
* Get the balance
* @return the balance
*/
public double getBalance()
{
return this.balance;
}
}The Account class contains properties for account number and balance, methods to retrieve those properties, and methods to debit and credit the account. The getAccountNumber() and getBalance() methods do nothing but retrieve variables, which puts them into the too-simple-to-test category. However, the debit() and credit() methods also perform mathematical operations. Furthermore, the debit() method throws an exception if an attempt is made to withdraw too much money. That makes the debit() and credit() methods candidates for testing.
Now edit the AccountManager class to match this code listing:
/**
 *
 */
package com.wiley.jfib.ch07;

/**
 * @author Chuck
 * The AccountManager class represents a system for handling transfers
 * between accounts.
 */
public class AccountManager
{
   /**
    * Transfer money from one account to another
    * @param fromAccount the account to transfer money from
    * @param toAccount the account to transfer money to
    * @param amount the amount to transfer
    */
   public void transfer(Account fromAccount, Account toAccount,
      double amount) throws Exception
   {
         System.out.println("Starting Balances:");
         System.out.println("From Account #"
                + fromAccount.getAccountNumber() + ": $"
                + fromAccount.getBalance());
         System.out.println("To Account #"
                + fromAccount.getAccountNumber() + ": $"
                + toAccount.getBalance());
         System.out.println("--------------------------------------");
         fromAccount.debit(amount);
         toAccount.debit(amount);
         System.out.println("Ending Balances:");
         System.out.println("From Account #"
                + fromAccount.getAccountNumber() + ": $"
                + fromAccount.getBalance());
         System.out.println("To Account #"
     + fromAccount.getAccountNumber()
     + ": $" + toAccount.getBalance());
   }
}
The AccountManager class has a single method called transfer(). It takes two Account objects and an amount of money to transfer money from the first account to the second. It prints out the balances of each account before and after the transfer, something like a receipt for the person initiating the transfer. The transfer() method clearly does much more than simply set or return a value, so it's also a candidate for testing.
With the code in place, you can test it. First, you need to add the JUnit testing library to the project's build path. To add JUnit to the project's build path, follow these steps:
Right-click the project in the Project Explorer view and then choose Build Path
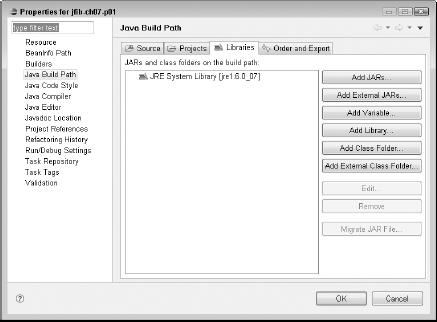
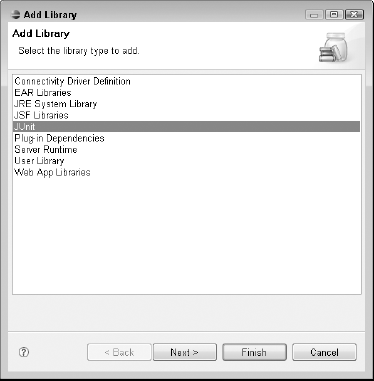
Configure Build Path from the popup menu. The Properties dialog box opens with the Java Build Path's Libraries tab selected, as shown in Figure 7.8.Click Add Library. The Add Library wizard, as shown in Figure 7.9, opens. This wizard allows you to add a number of libraries bundled with Eclipse, including JUnit, to your projects.
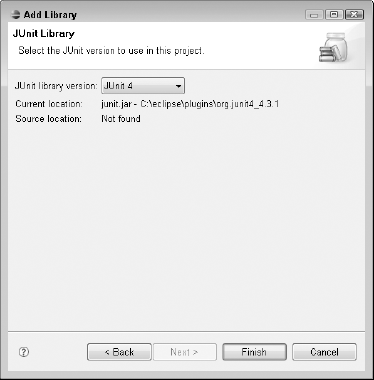
Click JUnit in the Add Library list box and then click Next. The JUnit Library screen, as shown in Figure 7.10, opens.
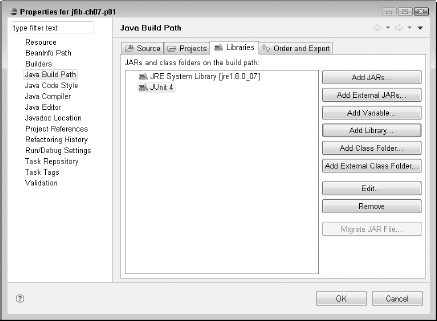
Choose JUnit 4 from the JUnit library version dropdown list and then click Finish. The Add Library wizard closes, and the JUnit 4 library is added to the Libraries tab of the Properties dialog box, as shown in Figure 7.11.
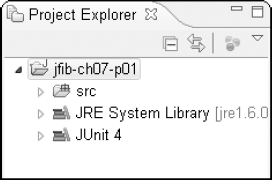
Click OK. The Properties dialog box closes, and the JUnit 4 library appears in the Project Explorer view, as shown in Figure 7.12.
With JUnit 4 added to the project, you can begin writing tests. An examination of the methods in each class determines that the following methods need to be tested:
The
debit()andcredit()methods in theAccountclassThe
transfer()method in theAccountManagerclass
One important thing to remember when writing unit tests is that you should strive to test all possible scenarios. For the credit() method, only one scenario exists: The deposit is either correctly added or not added to the balance. For the debit() method, there are multiple scenarios.
First, the withdrawal can either be correctly deducted or not deducted from the balance. Second, the method can throw an exception if the withdrawal amount is more than the balance. Both of these cases need to be tested. Similarly, the transfer method can correctly perform the transfer or not perform the transfer at all, but it can also throw an exception. Again, both of these scenarios must be tested.
When writing JUnit tests, it's customary to keep all the tests that test methods of the same class in a single JUnit test case. A test case in JUnit is a Java class containing one or more unit tests plus any configuration required for the tests. To test this balance transfer system, you need two test cases: one for the Account class and one for the AccountManager class.
To create the test case for the Account class, follow these steps:
Right-click the
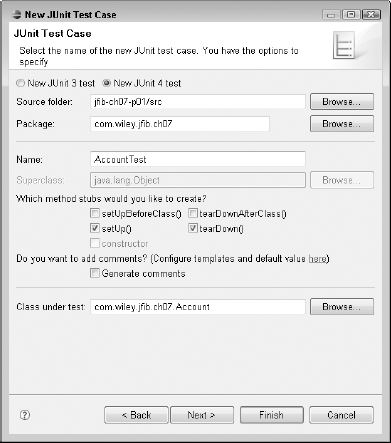
Accountclass in the Project Explorer and then choose NewOther from the popup menu. The Select a wizard dialog box, as shown in Figure 7.13, opens.Click the arrow next to the JUnit item below Java to expand it, select JUnit Test Case, and then click Next. The New JUnit Test Case wizard, as shown in Figure 7.14, opens.
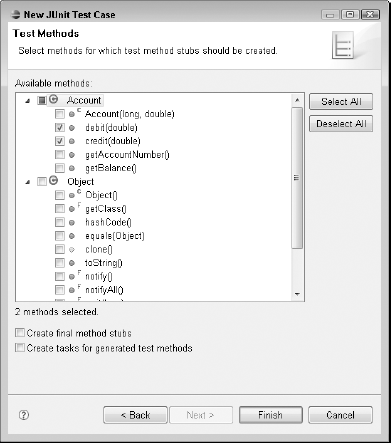
Click the setUp() and tearDown() check boxes and then click Next. The Test Methods screen, as shown in Figure 7.15, appears.
Click the check boxes next to
debit(double)andcredit(double)and then click Finish. The New JUnit Test Case wizard closes, and the new test case opens in the editor, as shown in Figure 7.16.
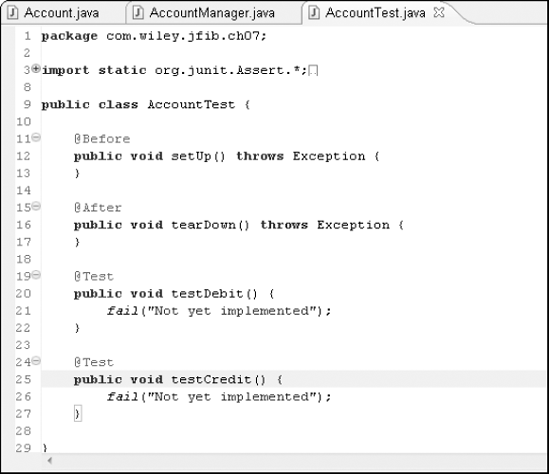
The test case that Eclipse generates for you contains methods named testCredit() and testDebit(), marked with the @Test annotation. An annotation in a Java class is a special piece of metadata that provides additional information about a method or class. In this case, the @Test annotation is recognized by JUnit to mean that the method contains a unit test for JUnit to run. The testCredit() and testDebit() methods are where you implement the unit tests for the credit() and debit() methods of the Account class. Eclipse adds only one unit test method per Account class method. Remember that the debit() method has two scenarios you want to test. Add the following method to the test case:
@Test
public void testDebitWithAmountGreaterThanBalance() {
     fail("Not yet implemented");
}
The name of the method is long, but it does an adequate job of describing what the test is supposed to assess.
The setUp() and tearDown() methods are marked with the @Before and @After annotations, respectively. The setUp() method is run before each unit test method is run. The tearDown() method is run after each unit test method is run. These methods can be used to set data used by the tests in the test case to a known state before each test is run.
When Eclipse generates a JUnit test case, each unit test method contains the line fail("Not yet implemented") by default. The fail() method is provided by the import static org.junit.Assert.* import statement and, as you might expect, causes the unit test to fail. Having your tests fail by default is a good strategy for testing because it ensures that you remember to implement every test. Any test that you forget to implement in a unit test method would fail, and you would notice immediately.
To run these unit tests and see them fail, you can right-click the AccountTest class in the Project Explorer and then choose Run As
Now that you've seen the unit tests run and fail, you can start implementing them and getting them to pass. First, it's helpful to have a consistent set of data to use in each test. Add the following lines of code to the AccountTest class just before the setUp() method:
private final double startingBalance = 100.00;

private final double creditAmount = 20.00;
private final double postCreditBalance = 120.00;
private final double debitAmount = 20.00;
private final double postDebitBalance = 80.00;
private final double debitAmountGreaterThanBalance = 200.00;

private final long accountNumber = 123456789;

private Account account;
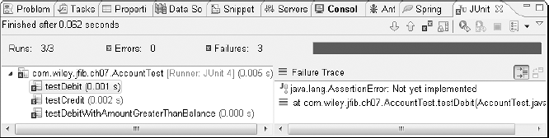
Figure 7.17. The JUnit view shows you the results of the unit tests that were run. Here, three unit tests were run, and they all failed. When Eclipse generates a JUnit test case, it sets up the unit test methods to fail by default.
These variables set up some known amounts to work with. The starting balance of the account is 100.00. The test is working with a credit amount of 20.00, which should result in a post-credit amount of 120.00. The debit that's expected to work is also 20.00, which should result in a post-debit balance of 80.00. Finally, a test is run with an attempted debit of 200.00, which should throw an exception. All these variables, along with a made-up account number, are marked final, meaning that their values can't be modified. This ensures that the values are well-known throughout testing. An Account object is also set up to be used by all the unit tests.
Because the Account object is going to be used by all three tests, you need to reset it to its original state before each test is run. Edit the setUp() method so that it matches this code listing:
@Before
public void setUp() throws Exception {
   // start with a clean account with a $100.00 balance every time
   account = new Account(accountNumber, startingBalance);
}
The setUp() method runs before every test, which means that every test can safely assume that it's using an Account object with a starting balance of 100.00.
Now implement the testCredit() method. Edit the method so that it matches this code listing:
@Test
public void testCredit() {
   double newBalance = account.credit(creditAmount);
   assertEquals(postCreditBalance, newBalance);
}
This unit test is straightforward. Using the account that was initialized in the setUp() method to have a balance of 100.00, credit the account with the value of creditAmount (20.00). If the credit() method works correctly, this should return a new balance of 120.00, which is the value of postCreditBalance. Now the test asserts that the value that was expected (postCreditBalance) is equal to the actual value (newBalance). The expected value is always the first one in the assertEquals() method. If the two values are equal, the test passes. If not, it fails.
Save the test case and then run it again. You should still see the red bar because the other two tests still fail, but the failure count in the status bar is now two instead of three. Also, notice the green check mark next to the testCredit() method in the list of unit test methods. That indicates that the test passed and that the credit() method you tested works as expected.
Next, implement the testDebit() method. It should match this code listing when you're finished:
@Test
public void testDebit() {
   try
   {
         double newBalance = account.debit(debitAmount);
         assertEquals(postDebitBalance, newBalance);
   }
   catch(Exception e)
   {
         fail("Unexpected Exception encountered: " + e.getMessage());
   }
}
The test for debit() requires a little extra code. Because the debit() method throws an exception if the balance is less than the debit amount, that exception must be handled by the code. Because this test uses well-known values, it can assume that it should never encounter this exception. If it does, the test should fail because the debit method isn't working properly. If the debit() method runs as expected, then the try block completes as expected, and the assertEquals() statement determines whether the test passes.
Finally, implement the testDebitWithAmountGreaterThanBalance() method. It should match this code listing when you're finished:
@Test(expected = Exception.class)
public void testDebitWithAmountGreaterThanBalance() throws Exception
{
   double newBalance = account.debit(debitAmountGreaterThanBalance);
}
The big change here is that the annotation has changed from simply @Test to @Test(expected = Exception.class). This addition to the annotation tells JUnit that this method expects an exception to be thrown. If it's not, the test fails. The method also adds a throws Exception clause. This eliminates the need for a try/catch block; you don't want a try/catch block here because you expect the exception to be thrown.
Save and run the test case again. This time, with all three tests passing, the colored bar on the status bar turns green, and there are no failures, as shown in Figure 7.18, indicating that all tests in this test case have run successfully.
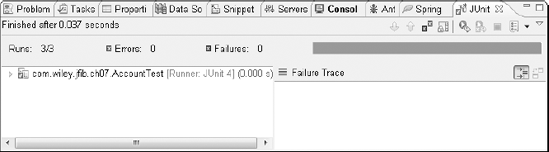
Figure 7.18. When all the unit tests in a test case run successfully, the status bar changes from red to green.
Now create the test case for the AccountManager class. To create the test case, follow these steps:
Right-click the
AccountManagerclass in the Project Explorer and then choose NewOther from the popup menu. The Select a wizard dialog box opens.Click the arrow next to Java to expand it.
Click the arrow next to the JUnit item below Java to expand it, select JUnit Test Case, and then click Next. The New JUnit Test Case wizard appears.
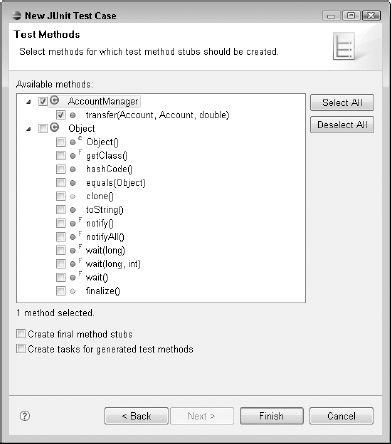
Click Next. The Test Methods screen, as shown in Figure 7.19, appears.
Click the check box next to
transfer(Account, Account, double)and then click Finish. The New JUnit Test Case wizard closes, and the new test case opens in the editor.
This test case is set up similarly to the one for Account. You add another unit test method to test for the case when an exception is expected, add some known values to use in the tests, and then initialize those objects in the setUp() method. Edit the AccountManagerTest class so that it matches this code listing:
package com.wiley.jfib.ch07;

import static org.junit.Assert.*;

import org.junit.After;
import org.junit.Before;
import org.junit.Test;

public class AccountManagerTest {
   private final long fromAccountNumber = 123456789;
   private final double fromAccountOriginalBalance = 100.00;
   private final long toAccountNumber = 987654321;
   private final double toAccountOriginalBalance = 100.00;
   private final double transferAmount = 20.00;
   private final double fromAccountNewBalance = 80.00;
private final double toAccountNewBalance = 120.00;
private final double tooLargeAmount = 200.00;
private AccountManager accountManager;
private Account fromAccount;
private Account toAccount;
@Before
public void setUp() throws Exception {
accountManager = new AccountManager();
fromAccount = new Account(fromAccountNumber,
fromAccountOriginalBalance);
toAccount = new Account(toAccountNumber,
toAccountOriginalBalance);
}
@After
public void tearDown() throws Exception {
}
@Test
public void testTransfer() {
try
{
accountManager.transfer(fromAccount, toAccount,
transferAmount);
assertEquals(fromAccountNewBalance,
fromAccount.getBalance());
assertEquals(toAccountNewBalance,
toAccount.getBalance());
}
catch(Exception e)
{
fail("Unexpected Exception encountered: " +
e.getMessage());
}
}
@Test(expected = Exception.class)
public void testTransferWithAmountGreaterThanFromBalance() throws
Exception
{
accountManager.transfer(fromAccount, toAccount,
tooLargeAmount);
}
}Save this test case and then run it. Because the AccountManager class outputs some information, the Console view opens to show that output, as shown in Figure 7.20. Click the JUnit tab to switch back to the JUnit view. You see that the second test passed, but the first test failed. Click testTransfer() in the JUnit view. An error message appears below the red failure bar on the right that says java.lang.AssertionError: expected:<120.0> but was:<80.0>. If you study the output, you may notice why the test has failed: After the transfer, both accounts have $20.00 less than before. The account the money was being transferred to should have $120.00, but it seems that both accounts were debited by mistake.
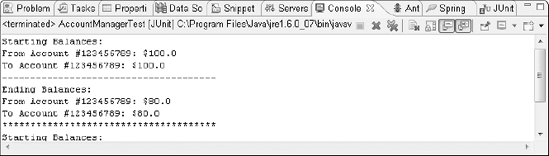
Figure 7.20. When the AccountManagerTest class invokes the transfer method on the AccountManager class, Eclipse switches to the Console view to display the method's output.
The mistake is in this line in the AccountManager class:
toAccount.debit(amount);
Change this line so that the toAccount is credited, not debited:
toAccount.credit(amount);
Save AccountManager and then run the AccountManagerTest test case again. This time, both tests pass.
To run all the tests at the same time, you can create a class that acts as a test suite. A test suite is a JUnit class that contains annotations that mark it as a test suite and tell JUnit which tests to run when the suite is run.
To create a test suite for the two test cases, follow these steps:
Right-click the
com.wiley.jfib.ch07package in the Project Explorer view and then choose NewClass from the popup menu. The New Java Class dialog box opens.Type AccountTestSuite in the Name text field and then click Finish. The new Java class is created and opens in the editor.
Now edit the AccountTestSuite class so that it matches this code listing:
package com.wiley.jfib.ch07;

import org.junit.runner.RunWith;
import org.junit.runners.Suite;

@RunWith(Suite.class)
@Suite.SuiteClasses({
  AccountTest.class,
  AccountManagerTest.class
})

public class AccountTestSuite {

}
The AccountTestSuite class contains no methods itself. It's simply a place to hold a couple of JUnit annotations. The @RunWith annotation tells JUnit that this class is for use by its Suite class. The @Suite.SuiteClasses annotation provides a list of all the test cases that should be run with this test suite. In this case, the AccountTest test case runs first, followed by the AccountManagerTest.
Save this class and then run it just like you run a regular JUnit test: Right-click the AccountTestSuite class and then choose Run As
In this section, you learn how to integrate and work with FlexUnit alongside your Flex development.
FlexUnit is an open-source framework created by Adobe for unit testing in Adobe Flex. This framework is based on JUnit, the popular Java unit testing framework.
FlexUnit allows you to develop an automated testing kit to easily debug advanced applications that have been developed in Flex. As you begin developing larger applications, you realize the need for more robust testing systems. Let's take a look at how FlexUnit can help you.
A unit test is a portion of code that's meant to test the smallest piece of a class or package. A unit is this small piece of code — usually, a function or method.
You find unit testing in many of the popular programming languages because it allows developers to test their code without waiting until the entire application is developed. This is achieved by testing individual units of an application.
When a developer uses a unit test, the smallest portion of the project is tested. This is called low-level testing. It allows the developer to easily ensure that an application is functioning properly without a lot of setup and checking required.
Now that you know what FlexUnit is and how it can help you, let's look at how to configure it to be used in your development process.
There are four steps to building a unit test:
Download and add FlexUnit to your library.
Create the classes that are the unit tests.
Create a testing suite, which is a package of the required tests.
Create a test runner, which is the application to execute the tests.
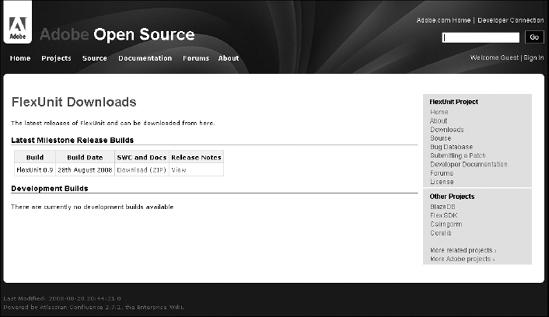
The first step is to download the FlexUnit framework from Adobe's open-source Web site. Adobe has created a very robust library of open-source tools and frameworks. Two of these tools covered in this book are BlazeDS and FlexUnit.
Note
For more on BlazeDS, see Chapter 11.
Go to opensource.adobe.com/wiki/display/flexunit/Downloads to download version 0.9 of the FlexUnit framework, as shown in Figure 7.21. Once the file is downloaded, locate it to unzip the archive to reveal the FlexUnit framework files.
Note
The FlexUnit framework is constantly being updated by Adobe and other developers. This section has been written using version 0.9 of the framework.
Now that you have the FlexUnit framework downloaded, you need to add flexunit.swc, which is located in the bin/ directory, to the libs/ directory of your Flex project. This allows Flex to use the framework that's located within the SWC file.
Flex 3 has made the process of adding new libraries a lot easier with the addition of the libs/ directory to every new project. This also ensures that other developers on your team have all the necessary files.
You can drag the SWC file into the libs/ directory, located in Flex, or you can locate the project directory on your machine to add the SWC file to that.
Tip
You can find the location of a project in Flex by right-clicking the project in the Project Navigator and then choosing Properties from the popup menu.
Once the framework is added to your project, you're ready to start building the unit test. However, before you start developing the unit test, let's take a look at the class the test will work with.
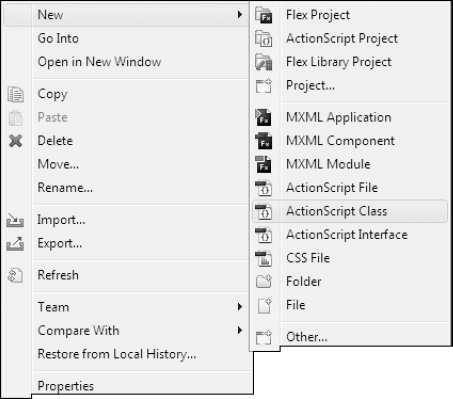
The sample class is named School and contains methods to manage students and then return the current total of students in the School. Create the class by right-clicking the src/ directory of the project in Flex (see Figure 7.22), choose New
Here's the code for the School class:
Package com.example
{
     public class School
     {

          private var _students:Array;

          public function School()
          {
               _students = ['Tim', 'Susan', 'Nicole', 'Alex'];
          }

          public function addStudent(name:String):void
          {
               _students.push(name); // Add new student
          }

          public function removeStudent():void
          {
_students.pop(); // Remove last student added
}
public function getStudents():Array
{
return _students;
}
}
}Now that the sample class is written, the next step is developing the unit test class. The method names of the testing class need to start with test in order for the FlexUnit framework to automatically run the methods. If any of the methods in the unit test class don't begin with test, those methods aren't run. This is a quick way to hide a method from the testing suite without actually removing it from the unit test class.
A unit test is made up of assertions, which determine the result of the test. If an assertion is true, the test passes; if it's false, the test fails. FlexUnit offers various assertions depending on the test you need to perform. Table 7.1 shows the assertions that are available in FlexUnit.
Table 7.1. Assertion Methods Available in FlexUnit
| Asserts that two values are equal |
| Asserts that the first string is contained in the second one |
| Asserts that a condition is false |
| Asserts that a string matches a regexp |
| Asserts that a string doesn't match a regexp |
| Asserts that the first string isn't contained in the second one |
| Asserts that two objects are strictly identical |
| Asserts that an object isn't null |
| Asserts that an object isn't undefined |
| Asserts that an object is null |
| Asserts that a condition is true |
| Asserts that an object is undefined |
The next step is to develop the test class. The complexity of this class is based on the amount of tests you need to run. In this example, you have only two tests. The first test is to add a student to the list of students, and the second test is to remove that student. You should have success as a result on both of these tests.
If you don't have success on both of the tests, you will know which method has a problem because the FlexUnit test tool displays the failed class/method name.
Create the class by right-clicking the src/ directory of the project in Flex and then choosing New
This code is the example package to be used in this lesson:
package
{
     import flexunit.framework.TestCase;

     public class SchoolTest extends TestCase
     {
          .
          .
          .
     }
}
The first method adds a student to the list of students and then checks to see whether the total number of students has increased properly:
package
{
     import flexunit.framework.TestCase;

     public class SchoolTest extends TestCase
     {
          public function testAddStudent():void
          {
                 var school:School = new School();
                 school.addStudent('Julie'),
                 assertTrue("Student total should be 7",
                        school.getStudents().length == 7);
          }
          .
          .
          .
     }
}
The second method is testing that when a student is removed from the list of students, the total is modified properly. This is achieved by accessing the students array and then removing the last entry in the array. If you've recently added a student, the total is different from the example:
package
{
     import flexunit.framework.TestCase;

     public class SchoolTest extends TestCase
     {
          public function testAddStudent():void
          {
                 var school:School = new School();
                 school.addStudent('Julie'),
                 assertEquals("Student total should be 5", 5,
                        school.getStudents().length);
          }

          public function testRemoveStudent():void
          {
                 var school:School = new School();
                 school.removeStudent();
                 assertEquals("Children count after remove should be 3",
                    3, school.getStudents().length );
          }
     }
}
That's the completed testing class. Now that you have completed the test, the next step is developing the test suite. You can develop the test suite entirely in ActionScript or by using MXML. For this example, you develop it in MXML (Flex) to better understand how everything goes together.
The FlexUnit framework ships with a few visual components that make testing a lot easier. One of these components is the TestRunnerBase, shown in Figure 7.23. In order to use the components, you need to ensure that the FlexUnit namespace is required. This is added to the Application tag at the top of the file:
<mx:Application ... xmlns="*" xmlns:flexunit="flexunit.flexui.*">The next step is adding an event listener to the Application tag, which is called once the application has fully loaded. This event calls a method that's responsible for initializing the testing suite:
<mx:Application ... creationComplete="init()">Now that the event is set up properly, let's add the visual component, which displays the results of the unit test. This component has been provided by the flexunit library. The component is set to take up the entire screen by setting the width and height properties. You could, of course, modify this if you want to place the test runner in your existing project:
<flexunit:TestRunnerBase id="test" width="100%" height="100%" />
That completes the visual portion of this application; the next portion is the code used to actually make the tests work. This example uses embedded ActionScript, but you could, of course, write it entirely in ActionScript if you preferred.
Start by importing the necessary classes. In this case, these are the TestSuite class provided by the FlexUnit framework and the SchoolTest that you developed earlier in this chapter:
<mx:Script>
          <![CDATA[
               import flexunit.framework.TestSuite;
          ]]>
     </mx:Script>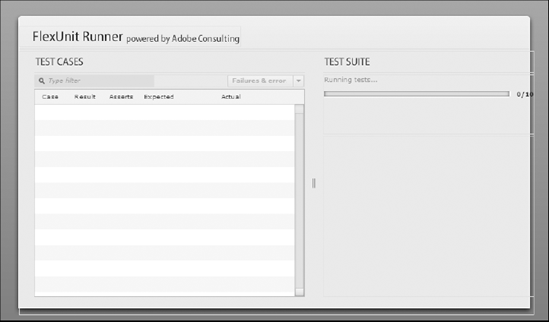
Once you have the classes and packages imported, the next step is creating the initialization method that's called by the event you added before. This method makes a call to the initSuite() method and assigns the result to the test property of the TestRunner. Then, once the new test suite is created, a call to startTest() is made to start the test:
<mx:Script>
          <![CDATA[
               import flexunit.framework.TestSuite;

               private function init():void
               {
                      test.test = initSuite();
                      test.startTest();
               }
          ]]>
     </mx:Script>
In the previous method, you added a reference to a new method, initSuite(). This method is responsible for creating the testing suite based on the SchoolTest class. The testing suite is built dynamically by going through the SchoolTest class and looking for the methods that are assigned with the prefix test. The result of the initSuite() method is returned to the caller for reference:
<mx:Script>
          <![CDATA[

               import flexunit.framework.TestSuite;


               private function init():void
               {
                     test.test = initSuite();
                     test.startTest();
               }

               private function initSuite():TestSuite
               {
                      var suite:TestSuite = new TestSuite();
                      suite.addTestSuite(SchoolTest);

                      return suite;
               }

          ]]>
     </mx:Script>
That's the complete test runner application. You can test it by clicking the Debug icon in the toolbar of Flex or by choosing Run
The application should open in your default browser with the unit test running, as shown in Figure 7.24. It's running automatically because the init() method was assigned to the creationComplete event, which is called automatically once the application has fully loaded and initialized.
The FlexUnit Runner GUI is provided by Adobe as part of the FlexUnit framework. This tool allows you to quickly and visually see how your tests performed. Because this example is such a small application, by the time the GUI has loaded, the test has already been completed.
In a more advanced application, you would see the test running live. When the tests are running, the right panel displays a progress bar indicating how long it will be before the tests are complete.
The FlexUnit Runner allows you to search within the test results, which comes in handy if you have a long list of tests running.
Simply start typing in the search box, and the FlexUnit Runner automatically begins filtering the results. If you want to revert to the original list of tests, click the Close button that appears to the right of the search box.
The dropdown list to the far right of the search box is used to switch the view that's being displayed. The options contained in the dropdown list are:
All Results. Display all the tests, whether they passed or failed
Empty Results. Display only results that contained no data
Failures and Errors. Display only results that failed or contained some type of error
You can simulate a long test by placing your testing code in a large loop.
Note
This is processor-intensive, but for demonstration purposes, it's fine.
Modify the initSuite() method to include a for loop that runs 100 times. On each pass through the loop, the addTestSuite() method is called. This creates a new test each time:
private function initSuite():TestSuite
{
var suite:TestSuite = new TestSuite();
for(var i:uint=0; i < 100; i++)
{
suite.addTestSuite(SchoolTest);
}
return suite;
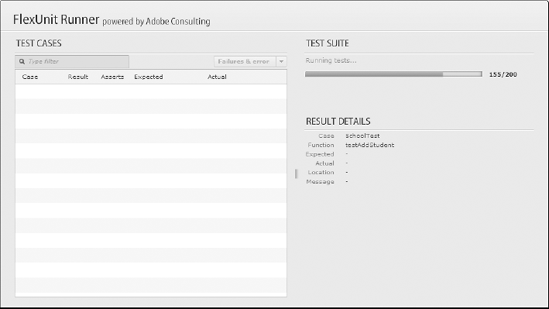
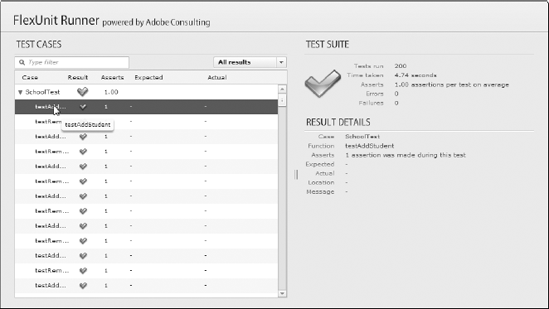
}Now when you run the test again, you have a chance to see the progress bar and the list of tests become populated. Once the tests are completed, the progress bar disappears, and the results are displayed, as shown in Figure 7.25.
Note
The previous code listing is for demonstration purposes only. It's not a good idea to place a test within a loop unless the application requires that type of testing.
You can now type various search terms to see the list update immediately based on what you type.
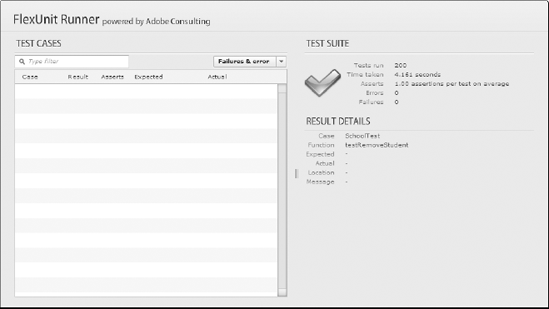
The FlexUnit Runner provides information specific to each test. If you expand the test category and then choose one of the test names, the results displayed to the right now display specific information for that test, as shown in Figure 7.26.
Each test has a message assigned to it in the class you developed. This message is displayed when you drill down into the individual test.
Sometimes during development, you may want to force a test to fail to ensure that your code handles it properly. You can do this by modifying the test case code to fail. One way to cause the test to fail is to modify the assertion test. For example, changing the addStudent() method to something like the following always creates an error because 1==2 will never be true:
public function testAddStudent():void
{
     var school:School = new School();
     school.addStudent('Julie'),
     fail("Automatically Fail");
}
When you run the test suite once again, it fails instantly. However, the loop you placed in the previous section forces the tests to continue. At this point, you can remove that loop, as it's not needed anymore.
The FlexUnit Runner application displays the stack trace of the last error. This is a formatted trace that shows where the application failed and where it was called from.
Here's an example of a stack trace output:
. . .SchoolTest/testAddStudent()[/Library/WebServer/Documents/clients/Book/Java-Flex-Bible/source_code/ch07/src/SchoolTest.as:17]at SchoolApp/__SchoolApp_Application1_creationComplete() [/Library/ WebServer/Documents/clients/Book/Java-Flex-Bible/source_code/ ch07/src/SchoolApp.mxml:4] at flash.events::EventDispatcher/dispatchEventFunction() at flash.events::EventDispatcher/dispatchEvent() at mx.core::UIComponent/dispatchEvent()[E:dev3.0.xframeworks projectsframeworksrcmxcoreUIComponent.as:9051] at mx.core::UIComponent/set initialized()[E:dev3.0.xframeworks projectsframeworksrcmxcoreUIComponent.as:1167]
That output has been abbreviated, but you can basically see where the call fails. At this point, you can roll back the change you made to the SchoolTest class.
You should now understand how to work with the FlexUnit Runner and how to build a test suite to test your own code. You work with this framework later in this book, but feel free to refer to this chapter for a refresher.
In this chapter, you learned how to download and configure FlexUnit. You also learned how to do the same with JUnit for Java. Once you had the frameworks installed, you learned how to add them to your workflow.
While working with the FlexUnit framework, you learned how to use the FlexUnit Runner application to visually work with your test suites. This allowed you to dig deeper into the reasons why tests may have failed and allowed you to filter results by using the tools provided in the FlexUnit Runner application.
You should now have an understanding of unit testing and how it can help in your development process. Now take this information and start working with it during real-world development projects, and you will quickly create more robust, less error-prone code.