
IN THIS CHAPTER
Building mashups
Overview of developing custom Flex interfaces
The combination of Java and Flex can create some very powerful Web applications. Data coming from a Java back end can be given life with the dynamic visuals that a Flex front end can provide. Similarly, a rich Flex user interface can become even more engaging by receiving live data from a Java back end.
Often, data that might be useful for your applications resides outside your control. Data such as mapping coordinates, product ratings from online stores, etc., can add another dimension to your Web application that sets it apart from other similar applications. In this chapter, you learn how to combine data from multiple locations and then use it to deliver something entirely new.
In the world of Web applications, a mashup is an application that uses data or functionality from two or more disparate services and then combines it into a new service that's different from any of the original data sources or functions. For example, a Web application might pull in a list of open houses within 10 miles of a certain ZIP code within a certain date range from a real estate listing site and then use a mapping API (application programming interface) from another site to display those open houses on a map. The mapping site alone doesn't show open houses, and the real estate site doesn't have a mapping feature, but the combination of data from the real estate site and the functionality of the mapping site creates something new: an open house mapping site.
There are multiple approaches to creating a mashup. First, the mashup can be created on the client side. This typically involves using an XmlHttpRequest in JavaScript to retrieve XML or JavaScript Object Notation (JSON) data from multiple Web services and then combining that data on the client side. Second, the mashup can be created on the server side. This involves requests being made to the various Web services from the server. The server receives all the necessary data, combines it in a format expected by the client application, and then sends that data back in response. Finally, a mashup can be created by using one of a variety of online mashup builder tools, such as:
Yahoo! Pipes (
http://pipes.yahoo.com)Google Mashup Editor (
http://editor.googlemashups.com)Microsoft PopFly (
www.popfly.com)
Most mashups make use of publicly accessible Web services provided by Web sites to allow access to their data. The mashup requests data by using HTTP calls and then receives the requested data back. Most of these public APIs require that developers register with the site owners in order to receive an application ID that must be sent with each Web service request. This is so that abuse of their services can be prevented and use of the services by each application can be measured. In most cases, application IDs are free for personal or noncommercial use.
In addition to simply using plain HTTP requests to access data and functionality from other sites, you can use third-party libraries made specifically for the purpose of accessing Web service APIs. These libraries make it easier to work with a Web application's Web services API in a language more familiar to the developer. For example, the flickrj library is a Java implementation of the Web service API for the online photo-sharing service Flickr. It contains Java object implementations of a number of Flickr API calls and presents the data returned from those calls in an object model that's easy to use and understand.
This example mashup uses both standard HTTP requests and a third-party library, both on the server side, to create a Web application called ArtWeather. The application asks the user to input a five-digit ZIP code. When the ZIP code is submitted to the server, an HTTP request is first made to the Yahoo! Weather RSS service to retrieve the forecast for the next two days for that ZIP code. The XML for this RSS feed is parsed to extract the city and state along with the conditions and high and low temperatures for each day. The text of the conditions (for example, Sunny or Showers) is then used as search criteria in the Flickr photo-sharing service's public API. The XML returned from the photo search is then used to build a URL pointing to each image on the Flickr servers. Finally, the city, state, forecast details, and image URLs are placed into a HashMap and then delivered to a JSP view. The JSP view renders the data. The end result can be seen in Figure 15.1.
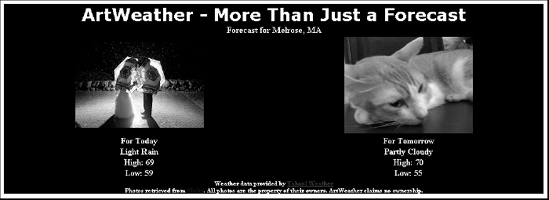
Figure 15.1. The JSP rendering of the ArtWeather mashup. The weather data on this page comes from Yahoo! Weather; the images are retrieved from Flickr based on the text of the weather forecast. For example, the image on the right was retrieved from Flickr by using the search term PM Thunderstorms.
Before you can access the Flickr API from your Java code, you need to register for a Flickr API key. Requests for data to the Flickr API require you to pass your API key as a parameter. The Flickr development team uses these API keys to keep track of how often their APIs are being used and for what purposes. Flickr API keys are provided free for noncommercial use, including internal development and testing. If you plan to use your Flickr API key for a commercial project, the Flickr team provides you a key after reviewing your application's intended functionality and use of their data, usually within a few weeks of your application.
Along with the API Key, you receive a key known as the Shared Secret. This key is typically used for Flickr services that require some sort of authentication.
To obtain a Flickr API key, follow these steps:
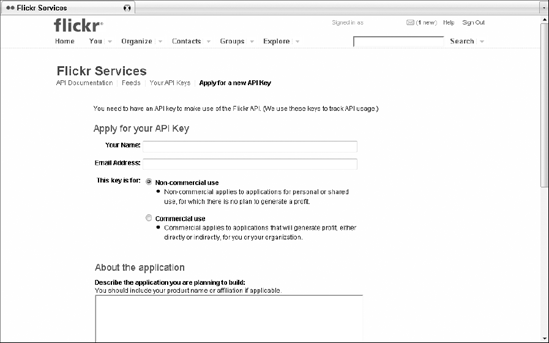
Open your Web browser, type
www.flickr.com/services/api/keys/apply/in the address bar, and then press Enter. The Flickr API Key application page, as shown in Figure 15.2, opens.Type the information required by the registration form. Be sure to fill in a description of your application or just a general description of what you plan to do with the API key (for example, build mashups by using the Flickr API) if you don't have a specific application in mind. Be sure that you click the Non-commercial use radio button and that you click the check boxes to acknowledge the ownership rights of photos from Flickr and to agree to the Flickr Terms of Service.
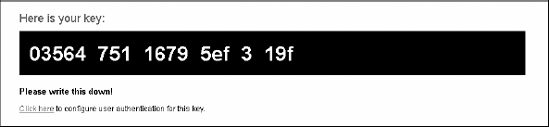
Click Apply. The next screen, as shown in Figure 15.3, opens, showing you your API key.
Highlight this API key and then press Ctrl+C to copy it to the Clipboard.
Open Notepad by choosing Start
All Programs AccessoriesNotepad.
Press Ctrl+V. Your API key is pasted into Notepad. Add some text, such as Flickr API key, to help you remember that this is your Flickr API key.
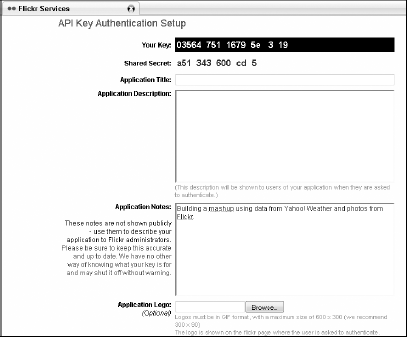
On the API key page in your browser, click the Click here link below your API key. The API Key Authentication Setup page, as shown in Figure 15.4, opens.
Highlight the string of letters and numbers next to Shared Secret and then press Ctrl+C to copy the string to the Clipboard.
In the Notepad file where you pasted your API key, press Ctrl+V. The Shared Secret string is pasted into the document. Add some text, such as Flickr API Shared Secret, to help you remember that this is the Shared Secret.
In Notepad, choose File
Save and then save the file to a location you can easily find again. Consider giving it a meaningful name, such asflickr-api-key-and-shared-secret.txt.
As mentioned previously, the flickrj Java library contains a set of Java classes that map to the Flickr API. The ArtWeather mashup uses this API to search for photos on the Flickr Web site.
You can download flickrj at http://sourceforge.net/projects/flickrj/. As of this writing, the most recent version of flickrj is 1.1. To download flickrj, follow these steps:
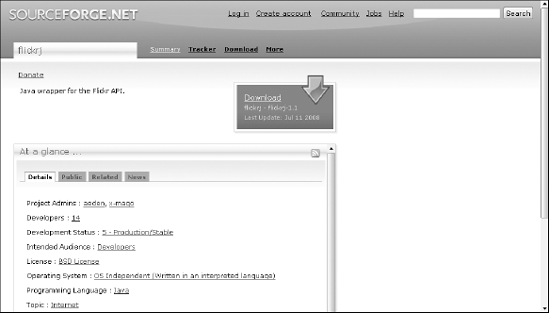
Open your Web browser, type sourceforge.net/projects/flickrj/ in the address bar, and then press Enter. The flickrj project page, as shown in Figure 15.5, opens.
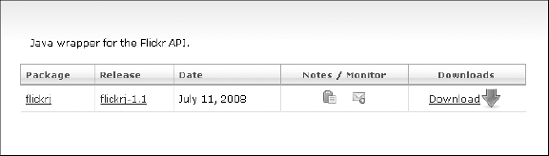
Click the green arrow. The screen showing versions available for download, as shown in Figure 15.6, opens. As of this writing, only one version of flickrj is available for download.
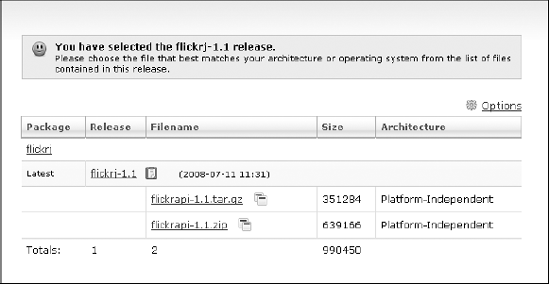
Click the download link for flickrj-1.1. The file download screen, as shown in Figure 15.7, opens.
Click the
flickrapi-1.1.ziplink. The Download File dialog box opens.Click Save to save the file to your desktop.
Extract the contents of the
flickrapi-1.1.zipfile to a location of your choice (for example,c:flickrapi-1.1). The flickrj library is now available to include in your Eclipse projects and applications.
The weather mashup is configured as a typical Spring Web MVC project in Eclipse. You create all the source code as well as the configuration files and Ant build files used to build and deploy the application to JBoss within this Eclipse project. In the weather mashup application, a single Spring controller receives the ZIP code parameter from the client, retrieves the Yahoo! Weather RSS data and the Flickr photo data, packages it all up, and then returns the needed information to the client in a JSP view.
To create the Eclipse project, follow these steps:
Open Windows Explorer by choosing Start
All ProgramsAccessoriesWindows Explorer.Navigate to the Eclipse install directory and then double-click
eclipse.exe. Eclipse starts. If you didn't click the Use this as the default and don't ask again check box the first time you ran Eclipse, Eclipse again asks you to choose a workspace directory. Leave the default value in place and then click the OK button.Create a new project by choosing File
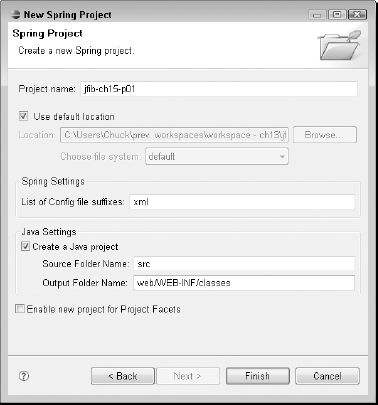
NewProject or right-clicking within the Project Explorer view and then choosing NewProject from the popup menu. The New Project selection screen, as shown in Figure 15.8, opens.Click the arrow next to Spring to expand it, choose Spring Project, and then click the Next button. The New Spring Project dialog box, as shown in Figure 15.9, opens.
Type
jfib-ch15-p01for the project name, change the output folder toweb/WEB-INF/classes, and then click Finish. The dialog box closes, and the newly created project appears in the Project Explorer view.
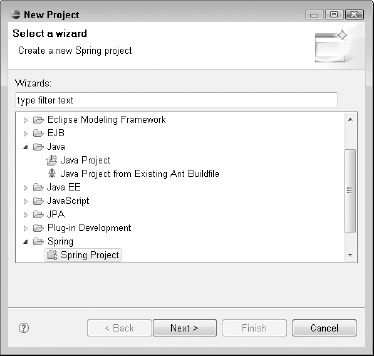
Figure 15.8. The New Project selection screen in Eclipse is the first step in creating a new project.
Note
For more on the folder structure of a Java Web application, see Chapter 6.
The libraries needed by this Web application need to be placed in a lib folder below the web/WEB-INF folder. There are five library JAR files that need to be added to the lib folder by using Eclipse's Import from File system dialog box:
The Spring Core and Spring Web MVC modules from the Spring Framework distribution
The JSTL and Jakarta tag libraries, also found in the Spring Framework distribution
The Flickr API JAR file
You will open the Import from File system dialog box several times. Each time, the steps are the same. To open the Import from File system dialog box, follow these steps:
Right-click the
web/WEB-INFfolder under thejfib-ch15-p01project in the Project Explorer view and then choose NewFolder from the popup menu. The New Folder dialog box, as shown in Figure 15.10, opens.Type lib in the Folder name text field and then click Finish. The New Folder dialog box closes, and the newly created folder is added to the project.
Right-click the lib folder and then choose Import from the popup menu. The Import Select dialog box, as shown in Figure 15.11, opens.
Click the arrow next to the General item to expand it, choose File System from the list, and then click the Next button. The Import from File system dialog box, as shown in Figure 15.12, opens.
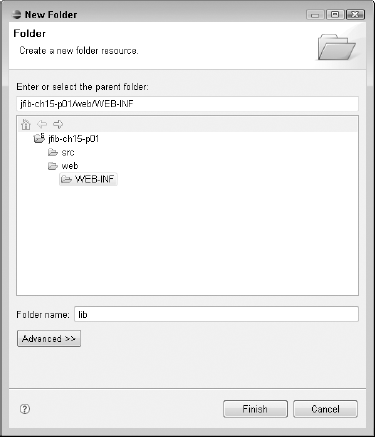
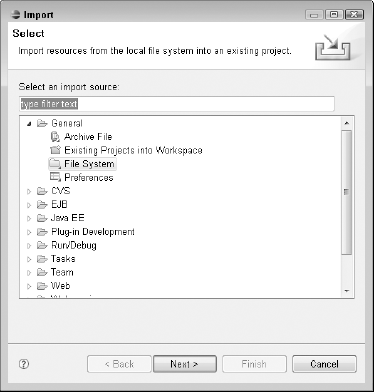
Figure 15.11. The Import Select dialog box allows you to import resources for your project from a variety of sources.
Use the previous steps whenever you need to open the Import File system dialog box to add libraries to the web/WEB-INF/lib folder. First, add the Spring Framework core library and the Spring Web MVC library by following these steps:
Click the Browse button next to the From directory text field. The Import from directory dialog box opens.
Navigate to the
distdirectory below your extracted Spring Framework directory, select it, and then click OK. The directory appears in the left pane of the Import from directory dialog box. Clicking thedistdirectory displays its contents in the right pane of the dialog box. Clicking the arrow next to the directory name on the left expands it to display its subfolders.Click the
distfolder in the left pane and then click the check box next tospring.jarin the right pane.Click Finish. The
spring.jarfile you just added appears beneath theweb/WEB-INF/libfolder.Open the Import from File system dialog box.
Click the Browse button next to the From directory text field. The Import from directory dialog box opens.
Navigate to the
dist/modulesdirectory below your extracted Spring Framework directory, select it, and then click OK. The directory appears in the left pane of the Import from directory dialog box. Clicking themodulesdirectory displays its contents in the right pane of the dialog box.Click the
modulesfolder in the left pane and then click the check box next tospring-webmvc.jarin the right pane.Click Finish. The
spring-webmvc.jarfile you just added appears beneath theweb/WEB-INF/libfolder.
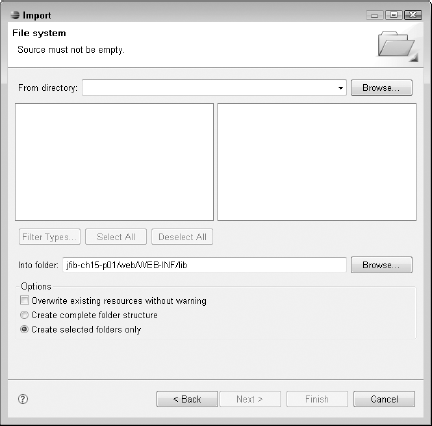
Figure 15.12. The Import File system dialog box lets you bring resources located on your computer into your project. Resources are copied from their original locations into your project's directory structure.
Next, add the JSTL and Jakarta tag library JAR files by following these steps:
Open the Import from File system dialog box.
Click the Browse button next to the From directory text field. The Import from directory dialog box opens.
Navigate to the
lib/j2eedirectory below your extracted Spring Framework directory, select it, and then click OK. The directory appears in the left pane of the Import from directory dialog box. Clicking thej2eedirectory displays its contents in the right pane of the dialog box. Clicking the arrow next to the directory name on the left expands it to display its subfolders.Click the
j2eefolder in the left pane and then click the check box next tojstl.jarin the right pane.Click Finish. The
jstl.jarfile you just added appears beneath theweb/WEB-INF/libfolder.Open the Import from File system dialog box.
Click the Browse button next to the From directory text field. The Import from directory dialog box opens.
Navigate to the
lib/jakarta-taglibsdirectory below your extracted Spring Framework directory, select it, and then click OK. The directory appears in the left pane of the Import from directory dialog box. Clicking thejakarta-taglibsdirectory displays its contents in the right pane of the dialog box.Click the
jakarta-taglibsfolder in the left pane and then click the check box next tostandard.jarin the right pane.Click Finish. The
standard.jarfile you just added appears beneath theweb/WEB-INF/libfolder.
Finally, add the Flickr API JAR file by following these steps:
Open the Import from File system dialog box.
Click the Browse button next to the From directory text field. The Import from directory dialog box opens.
Navigate to your extracted Flickr API directory, select it, and then click OK. The directory appears in the left pane of the Import from directory dialog box. Clicking the
flickrapi-1.1directory displays its contents in the right pane of the dialog box. Clicking the arrow next to the directory name on the left expands it to display its subfolders.Click the
flickrapi-1.1folder in the left pane and then click the check box next toflickrapi-1.1.jarin the right pane.Click Finish. The
flickrapi-1.1.jarfile you just added appears beneath theweb/WEB-INF/libfolder.
The libraries used by the Web application are now in place. Eclipse also needs to have some of these libraries and one other library on the project's build path to compile the code for the application. To add the required libraries to the build path, follow these steps:
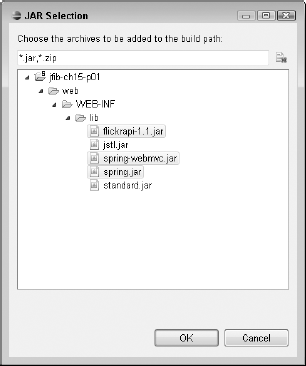
Right-click the
jfib-ch15-p01project in the Project Explorer view and then choose Build PathConfigure Build Path from the popup menu. The Java Build Properties dialog box opens with the Libraries tab selected.Click the Add JARs button. The JAR Selection dialog box, as shown in Figure 15.13, opens.
Click the arrow next to the
jfib-ch15-p01project to expand it.Click the arrow next to
webto expand it.Click the arrow next to
WEB-INFto expand it and then click the arrow next tolibto expand it.Click
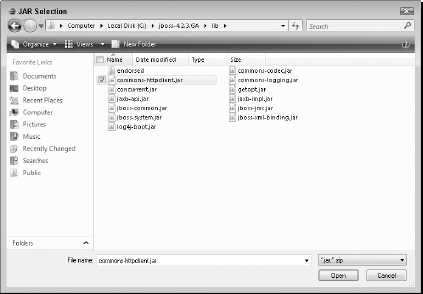
flickrapi-1.1.jar, spring.jar, andspring-webmvc.jarand then click OK. The JAR Selection dialog box closes, and the three JAR files are added to the list in the Library tab.Click the Add External JARs button. The JAR Selection dialog box, as shown in Figure 15.14, opens.
Navigate to the
jboss-4.2.3.GA/libdirectory, click thecommons-httpclient.jarfile, and then click Open. Thecommons-httpclient.jarfile is added to the list in the Library tab.Click the Add External JARs button. The JAR Selection dialog box opens.
Navigate to the
jboss-4.2.3.GA/clientdirectory, click theservlet-api.jarfile, and then click Open. Theservlet-api.jarfile is added to the list in the Library tab.Click OK. The Java Build Properties dialog box closes.
The commons-httpclient.jar file contains the HttpClient Java class, which the controller uses to call the Yahoo! Weather RSS service to retrieve the weather data. Because this JAR file is part of the JBoss distribution, it's not necessary to bundle it in the web/WEB-INF/lib directory of your Web application, but Eclipse does need to reference it on the project's build path.
The application consists of a single service and a utility class. The utility class is used in parsing the XML retrieved from the Yahoo! Weather RSS feed. The service receives an XML block from this Web service. You can find the XML format of the Yahoo! Weather RSS feed on the Yahoo! developers' site at http://developer.yahoo.com/weather/. This XML structure contains a number of tags, but this application uses information from only a few of them.
To traverse the XML block returned from the RSS call, the application uses XPath expressions. XPath expressions are a way of traversing an XML block by using a language that looks much like a directory path in Windows. The JDK includes classes that allow you to construct XML documents and then construct XPath expressions to find values in those documents. Because the structure of the XML returned from the RSS request has a known structure, XPath expressions are a great way to get to specific values in the XML.
The first class needed by the application is a class that implements one of the XML interfaces in the JDK: NamespaceContext. One of the tags in the RSS XML that contains information needed by the application is <yweather:forecast>. The yweather portion of this tag is known as the prefix that stands for an XML namespace. A namespace is a way of grouping XML that belongs to a specific area of functionality. You've already seen examples of namespaces in use in some of the JSP views in this book. The JSTL core tag library uses the namespace prefix c. When you see the tag <c:out> in a JSP page, it means the out tag of the c namespace. Namespaces are defined by uniform resource identifiers, or URIs, in the XML file — typically, by using another XML namespace prefix, xmlns, as an attribute of the opening XML tag. A URI is used to specify a location or name for some resource on the Internet. A URL used to navigate to a Web page is one example of a URI. For example, in the Yahoo! Weather RSS feed, the yweather namespace is defined by using the attribute xmlns:yweather=http://xml.weather.yahoo.com/ns/rss/1.0 in the outermost tag in the file, <rss>.
By default, the XPath classes in the JDK use the default empty namespace when evaluating XPath expressions. If you want the XPath classes in the JDK to know about other namespaces, you need to provide them a class that implements the NamespaceContext interface, which provides methods for the retrieval of XML namespace prefixes and URIs. The XPath classes search all the namespaces they're aware of when evaluating XPath expressions.
To create a YWeatherNamespaceContext class that implements the NamespaceContext controller, follow these steps:
Right-click the
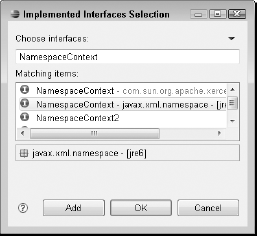
srcfolder in the Project Explorer view and then choose NewClass from the popup menu. The New Java Class dialog box, as shown in Figure 15.15, opens.Click the Add button next to the Interfaces list box. The Implemented Interfaces Selection dialog box, as shown in Figure 15.16, opens.
Type NamespaceContext in the Choose interfaces text field, choose
NamespaceContext – javax.xml.namespace [jre6]from the Matching items list box, and then click OK. The Implemented Interfaces Selection dialog box closes, and theNamespaceContextinterface appears in the Interfaces list box.Type com.wiley.jfib.ch15.mashup.util in the Package text field, type YWeatherNamespaceContext in the Name text field, click the Constructors from superclass and Inherited abstract methods check boxes, and then click Finish. The New Java Class dialog box closes, and the newly created class appears in the Project Explorer view.
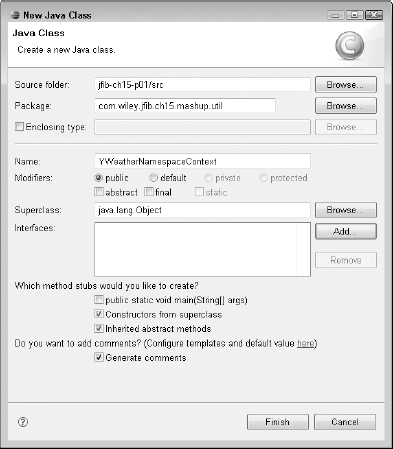
Figure 15.15. The New Java Class dialog box walks you through the creation of a new Java class that implements the NamespaceContext interface.
Here's the code listing for the YWeatherNamespaceContext class:
package com.wiley.jfib.ch15.mashup.util;
import java.util.Iterator;

import javax.xml.XMLConstants;
import javax.xml.namespace.NamespaceContext;

/**
 *
 */

/**
 * @author Chuck
 *
 */
public class YWeatherNamespaceContext implements NamespaceContext {

   private String namespaceUri;
   private String prefix;

   /**
    *
    */
   public YWeatherNamespaceContext(String namespaceUri, String
   prefix) {
           this.namespaceUri = namespaceUri;
           this.prefix = prefix;
     }

     /* (non-Javadoc)
      * @see javax.xml.namespace.NamespaceContext#getNamespaceURI(jav
    a.lang.String)
      */
     @Override
     public String getNamespaceURI(String prefix) {
             if(this.prefix.equals(prefix))
                     return namespaceUri;
             else
                     return XMLConstants.NULL_NS_URI;
     }

     /* (non-Javadoc)
      * @see javax.xml.namespace.NamespaceContext#getPrefix(java.lang.
    String)
      */
     @Override
     public String getPrefix(String namespaceURI) {
            if(this.namespaceUri.equals(namespaceURI))
return prefix;
else
return XMLConstants.DEFAULT_NS_PREFIX;
}
/* (non-Javadoc)
* @see javax.xml.namespace.NamespaceContext#getPrefixes(java.
lang.String)
*/
@Override
public Iterator getPrefixes(String namespaceURI) {
// Useful to implement if you have more
// than one namespace prefix
return null;
}
}The YWeatherNamespaceContext class defines a URI field and a prefix field that are set in the constructor when the class is instantiated. These are set in the service class at the time when the XPath classes are created.
To create the ArtWeatherService class, follow these steps:
Right-click the
srcfolder in the Project Explorer view and then choose NewClass from the popup menu. The New Java Class dialog box opens.Click the Add button next to the Interfaces list box. The Implemented Interfaces Selection dialog box opens.
Type Controller in the Choose interfaces text field, choose
Controller – org.springframework.web.servlet.mvcin the Matching items list box, and then click OK. The Implemented Interfaces Selection dialog box closes, and the Controller interface appears in the Interfaces list box.Type com.wiley.jfib.ch15.mashup.service in the Package text field, type ArtWeatherService in the Name text field, click the Constructors from superclass and Inherited abstract methods check boxes, and then click Finish. The New Java Class dialog box closes, and the newly created class appears in the Project Explorer view.
Here's the code listing for the ArtWeatherService class:
/**
 *
 */
package com.wiley.jfib.ch15.mashup.service;

import java.io.InputStream;
import java.util.HashMap;
import java.util.Map;
import javax.servlet.http.HttpServletRequest;
import javax.servlet.http.HttpServletResponse;

import javax.xml.parsers.DocumentBuilderFactory;
import javax.xml.xpath.XPath;
import javax.xml.xpath.XPathConstants;
import javax.xml.xpath.XPathFactory;

import org.apache.commons.httpclient.HttpClient;
import org.apache.commons.httpclient.HttpStatus;
import org.apache.commons.httpclient.methods.GetMethod;
import org.springframework.web.servlet.ModelAndView;
import org.springframework.web.servlet.mvc.Controller;
import org.w3c.dom.Document;

import com.aetrion.flickr.Flickr;
import com.aetrion.flickr.photos.Photo;
import com.aetrion.flickr.photos.PhotoList;
import com.aetrion.flickr.photos.SearchParameters;
import com.wiley.jfib.ch15.mashup.util.YWeatherNamespaceContext;

/**
 * @author Chuck
 *
 */
public class ArtWeatherService implements Controller {
     private String apiKey = "abcdefghijkl";
     private String sharedSecret = "mnopqrst";
     private Flickr flickr;
     private final static String YAHOO_STRING = "Yahoo! Weather - ";

     @Override
     public ModelAndView handleRequest(HttpServletRequest arg0,
                       HttpServletResponse arg1) throws Exception {
              String zipCode = arg0.getParameter("zip");
               // if a zip code is not given, send this back to the view
               // so that it knows not to display the non-existent forecast
               if(zipCode == null || zipCode.length() != 5)
                       return new ModelAndView(
                               "WEB-INF/jsp/artweather.jsp",
                               "entry",
                               "true");
               else
              {
                       Map<String,String> model = buildModelForZipCode(zipCode);
                         return new ModelAndView("WEB-INF/jsp/artweather.jsp",
                                 "model",model);
              }
}
public Map<String,String> buildModelForZipCode(String zipCode)
throws Exception {
Map<String,String> model = new HashMap<String,String>();
String request = "http://weather.yahooapis.com/forecastrss?p=" + zipCode;
HttpClient client = new HttpClient();
GetMethod method = new GetMethod(request);
// Send GET request
int statusCode = client.executeMethod(method);
if (statusCode != HttpStatus.SC_OK) {
System.err.println("Method failed: " + method.getStatusLine());
}
InputStream rstream = null;
// Get the response body
rstream = method.getResponseBodyAsStream();
//Process response
Document response = DocumentBuilderFactory.newInstance()
.newDocumentBuilder().parse(rstream);
XPathFactory factory = XPathFactory.newInstance();
XPath xPath=factory.newXPath();
xPath.setNamespaceContext(
new YWeatherNamespaceContext(
"http://xml.weather.yahoo.com/ns/rss/1.0" ,"yweather"));
//Get each xpath expression as a string
String cityState = (String)xPath.evaluate("/rss/channel/title",
response, XPathConstants.STRING);
if(cityState != null && cityState.indexOf(YAHOO_STRING) == 0)
{
cityState = cityState.replaceAll(YAHOO_STRING, "");
}
String todayCondition = (String)xPath.evaluate(
"/rss/channel/item/forecast[1]/@text",
response, XPathConstants.STRING);
String todayHigh = (String)xPath.evaluate(
"/rss/channel/item/forecast[1]/@high",
response, XPathConstants.STRING);
String todayLow = (String)xPath.evaluate(
"/rss/channel/item/forecast[1]/@low",
response, XPathConstants.STRING);String tomorrowCondition = (String)xPath.evaluate(
"/rss/channel/item/forecast[2]/@text",
response, XPathConstants.STRING);
String tomorrowHigh = (String)xPath.evaluate(
"/rss/channel/item/forecast[2]/@high",
response, XPathConstants.STRING);
String tomorrowLow = (String)xPath.evaluate(
"/rss/channel/item/forecast[2]/@low",
response, XPathConstants.STRING);
model.put("cityState", cityState);
model.put("todayCondition", todayCondition);
model.put("todayHigh", todayHigh);
model.put("todayLow", todayLow);
model.put("todayPhotoUrl", getFlickrPhotoUrl(todayCondition));
model.put("tomorrowCondition", tomorrowCondition);
model.put("tomorrowHigh", tomorrowHigh);
model.put("tomorrowLow", tomorrowLow);
model.put("tomorrowPhotoUrl", getFlickrPhotoUrl(tomorrowCondition));
return model;
}
/**
*
* @param weatherCondition
* @return
* @throws Exception
*/
private String getFlickrPhotoUrl(String weatherCondition) throws Exception
{
// now get a Flickr image for each of the condition strings
String photoUrl = "";
flickr = new Flickr(apiKey);
flickr.setSharedSecret(sharedSecret);
SearchParameters params = new SearchParameters();
params.setText(weatherCondition);
PhotoList photos = flickr.getPhotosInterface().search(params, 10, 1);
for(Object p : photos)
{
Photo photo = (Photo)p;
if(photo.isPublicFlag())
{
photoUrl = "http://farm"
+ photo.getFarm()
+ ".static.flickr.com/"
+ photo.getServer()
+ "/"+ photo.getId() + "_"
+ photo.getSecret()
+ "_m.jpg";
break;
}
}
return photoUrl;
}
}In this class, the handleRequest() method receives the zip parameter from the client request. It passes off the zip parameter to a method called buildModelForZipCode(). This method does a few things:
It creates an
HttpClientobject and gives it the URL to the Yahoo! Weather RSS service. The request is sent, and anInputStreamis returned that contains the XML result of the request.The
InputStreamis parsed into an XML document.An XPath object is created by using the
YWeatherNamespaceContextobject to register theyweathernamespace with the XPath object so that it's used in expression lookups.The XML document is parsed by using XPath expressions, and the values relevant to the application are put into a
Mapobject as name-value pairs of strings.When all the values are retrieved, the map is returned to the
handleRequest()method, which in turn adds it to theModelAndViewobject that's returned to the client.
The view for the ArtWeatherService is a JSP file named artweather.jsp. This JSP file extracts the values from the model map and then uses them to construct the application interface. To create the artweather.jsp file, follow these steps:
Right-click the
web/WEB-INFfolder in the Project Explorer view and then choose NewOther from the popup menu. The Select a wizard dialog box opens.Click the arrow next to General to expand it, click File, and then click Next. The New File dialog box opens.
Type/jsp at the end of the parent folder text field, type artweather.jsp in the File name text field, and then click Finish. The New File dialog box closes, and the new folder and JSP file appear in the Project Explorer view.
Here's the code listing for the artweather.jsp file:
<?xml version="1.0" encoding="ISO-8859-1" ?>
<%@ page language="java" contentType="text/html; charset=ISO-8859-1"
    pageEncoding="ISO-8859-1"%>
<%@ taglib prefix="c" uri="http://java.sun.com/jsp/jstl/core" %>
<!DOCTYPE html PUBLIC "-//W3C//DTD XHTML 1.0 Transitional//EN"
    "http://www.w3.org/TR/xhtml1/DTD/xhtml1-transitional.dtd">
<html xmlns="http://www.w3.org/1999/xhtml">
<head>
<meta http-equiv="Content-Type" content="text/html;
charset=ISO-8859-1" />
<title>ArtWeather - More Than Just a Forecast</title>
</head>
<body>
<div style="text-align: center; font-family: Verdana; font-
weight: bold; font-size: 24pt; width: 100%; background-color:
black; color: white">
ArtWeather - More Than Just a Forecast
<br/>
<img src="blank.png" height="100px"/>
</div>
<div style="text-align: center; cwidth: 100%; background-
color: black; color: white">
<c:if test="${empty param.entry}">
<span style="font-weight: bold">Forecast for <c:out
value='${model["cityState"]}'/></span><br/>
<table border="0" width="100%">
<tr>
<td>
<img src="<c:out value='${model["todayPhotoUrl"]}'/>"/>
</td>
<td>
<img src="<c:out value='${model["tomorrowPhotoUrl"]}'/>"/>
</td>
</tr>
<tr>
<td>For Today<br/>
<c:out value='${model["todayCondition"]}'/><br/>
High: <c:out value='${model["todayHigh"]}'/><br/>
Low: <c:out value='${model["todayLow"]}'/>
</td>
<td>For Tomorrow<br/>
<c:out value='${model["tomorrowCondition"]}'/><br/>
High: <c:out value='${model["tomorrowHigh"]}'/><br/>
Low: <c:out value='${model["tomorrowLow"]}'/>
</td>
</tr>
</table>
</c:if>
<form method="post"
action="/artweather/artweather.htm">
<input type="text" size="5" maxlength="5"
name="zip" id="zip"
style="font-family: Verdana;
font-weight: bold; font-size: 18pt"/>
<br/>
<input type="submit"
style="font-family: Verdana;
font-weight: bold; font-size: 12pt"/></form>
<span style="font-size: 8pt">
Weather data provided by
<a href="http://weather.yahoo.com">
Yahoo! Weather
</a><br/>
Photos retrieved from
<a href="http://flickr.com">Flickr</a>.
All photos are the property of their
owners. ArtWeather claims no ownership.
</span>
</div>
</body>
</html>This JSP page first checks for the existence of an entry parameter, which the controller places in the model in the case where no ZIP code is passed in; that means this is the initial visit to the application. If the entry parameter exists, the JSP page displays only the text field for typing the ZIP code and the button to submit it to the server. If the entry parameter isn't present, the JSP page renders the images and labels for the weather forecast and then uses JSTL <c:out> tags to retrieve the values from the model map to populate them with data.
The final development pieces are the two Web application configuration files: web.xml and spring-dispatcher-servlet.xml. These two files are a standard part of all Spring Web MVC applications.
First, create spring-dispatcher-servlet.xml by following these steps:
Right-click the
web/WEB-INFfolder in the Project Explorer view and then choose NewOther from the popup menu. The Select a wizard dialog box opens.Click the arrow next to General to expand it, click File, and then click Next. The New File dialog box opens.
Type spring-dispatcher-servlet.xml in the File name text field and then click Finish. The New File dialog box closes, and the new Spring configuration file appears in the Project Explorer view.
Here's the code listing for the spring-dispatcher-servlet.xml file:
<?xml version="1.0" encoding="UTF-8"?>
<beans xmlns="http://www.springframework.org/schema/beans"
        xmlns:xsi="http://www.w3.org/2001/XMLSchema-instance"
        xsi:schemaLocation="http://www.springframework.org/schema/beans
        http://www.springframework.org/schema/beans/spring-beans-2.5.xsd">
   <bean name="/artweather.htm"
   class="com.wiley.jfib.ch15.mashup.service.ArtWeatherService"/>
</beans>
This configuration file simply creates the Spring bean definition for the ArtWeatherService class and then maps a URL to it.
Now create the web.xml configuration file by following these steps:
Right-click the
web/WEB-INFfolder in the Project Explorer view and then choose NewOther from the popup menu. The Select a wizard dialog box opens.Click the arrow next to General to expand it, click File, and then click Next. The New File dialog box opens.
Type web.xml in the File name text field and then click Finish. The New File dialog box closes, and the new
web.xmlconfiguration file appears in the Project Explorer view.
Here's the code listing for web.xml:
<?xml version="1.0" encoding="UTF-8"?>
<web-app version="2.4"
          xmlns="http://java.sun.com/xml/ns/j2ee"
          xmlns:xsi="http://www.w3.org/2001/XMLSchema-instance"
          xsi:schemaLocation="http://java.sun.com/xml/ns/j2ee
          http://java.sun.com/xml/ns/j2ee/web-app_2_4.xsd" >
  <servlet>
    <servlet-name>spring-dispatcher</servlet-name>
    <servlet-class>
          org.springframework.web.servletDispatcherServlet
    </servlet-class>
    <load-on-startup>1</load-on-startup>
  </servlet>

  <servlet-mapping>
    <servlet-name>spring-dispatcher</servlet-name>
    <url-pattern>*.htm</url-pattern>
  </servlet-mapping>
</web-app>
This configuration file defines the Spring DispatcherServlet and then maps it to a URL pattern that says that any URL ending in .htm is handled by this servlet.
Note
For more on these Web application configuration files, see Chapter 6.
The application code is complete. Now you need to create the Ant build script and build properties files to build and deploy the application. To create these two files, follow these steps:
Right-click the
jfib-ch15-p01project in the Project Explorer view and then choose NewFile from the popup menu. The New File dialog box opens.Type artweather-build.properties in the File name text field and then click Finish. The New File dialog box closes, and the newly created
artweather-build.propertiesfile appears below thejfib-ch15-p01project in the Project Explorer view.Right-click the
jfib-ch15-p01project in the Project Explorer view and then choose NewFile from the popup menu. The New File dialog box opens.Type build.xml in the File name text field and then click Finish. The New File dialog box closes, and the newly created
build.xmlfile appears below thejfib-ch15-p01project in the Project Explorer view.
The properties contained in the artweather-build.properties file are used by the build.xml build file, so first edit the artweather-build.properties file to match this code listing:
# Ant build properties for artweather
src.dir=src
web.dir=web
build.dir=${web.dir}/WEB-INF/classes

name=artweather

appserver.home=${env.JBOSS_HOME}/server/default
appserver.lib=${appserver.home}/lib
deploy.path=${appserver.home}/deploy
Note
For more on Ant build properties files, see Chapter 6.
This properties file contains properties for the Java source and Web file directories in the project, the build output directory, the application name, the JBoss home, and the application deployment path.
Now edit the build.xml file to match this code listing:
<?xml version="1.0" encoding="UTF-8"?>
<project name="artweather" basedir="." default="usage">
   <property environment="env"/>
    <property file="artweather-build.properties"/>

   <path id="cp">
       <fileset dir="${web.dir}/WEB-INF/lib">
            <include name="*.jar"/>
        </fileset>
        <fileset dir="${appserver.lib}">
            <include name="servlet*.jar"/>
        </fileset>
        <pathelement path="${build.dir}"/>
    </path>

    <taskdef resource="flexTasks.tasks"
           classpath="${FLEX_HOME}/ant/lib/flexTasks.jar"/>

     <target name="usage">
       <echo message=""/>
<echo message="${name} build file"/>
<echo message="-----------------------------------"/>
<echo message=""/>
<echo message="Available targets are:"/>
<echo message=""/>
<echo message="build --> Build the Java code and the Flex app"/>
<echo message="build-and-deploy --> Deploy application as a WAR file"/>
<echo message=""/>
</target>
<target name="build" description="Compile main source tree java files">
<mkdir dir="${build.dir}"/>
<javac destdir="${build.dir}" source="1.5" target="1.5"
debug="true" deprecation="false" optimize="false"
failonerror="true">
<src path="${src.dir}"/>
<classpath refid="cp"/>
</javac>
<mxmlc file="${APP_ROOT}/ArtWeather.mxml"
keep-generated-actionscript="false">
<load-config
filename="${FLEX_HOME}/frameworks/flex-config.xml"/>
<source-path path-element="${FLEX_HOME}/frameworks"/>
<services>web/WEB-INF/services-config.xml</services>
</mxmlc>
</target>
<target name="build-and-deploy" depends="build"
description="Deploy application as a WAR file">
<war destfile="${name}.war"
webxml="${web.dir}/WEB-INF/web.xml">
<fileset dir="${web.dir}">
<include name="**/*.*"/>
</fileset>
</war>
<copy todir="${deploy.path}" preservelastmodified="true">
<fileset dir=".">
<include name="*.war"/>
</fileset>
</copy>
</target>
</project>Note
For more on the structure and functions of Ant build.xml files, see Chapter 6.
The Ant build script builds the application and then deploys it to the JBoss server. You need to add the build script to the Ant view to run it. To add the build script to the Ant view, follow these steps:
Choose Window
Show ViewOther. The Show View dialog box opens.Click the arrow next to Ant to expand it, click Ant in the expanded menu, and then click OK. The Ant view opens.
Click the Add Buildfiles button in the Ant view. The Buildfile Selection dialog box opens.
Click the arrow next to the project name to expand it, click the
build.xmlfile, and then click OK. The Buildfile Selection dialog box closes, and the build file is added to the Ant view.
Click the arrow next to the build file entry in the Ant view to expand it to see the available build targets. The three targets you saw in the build.xml file appear here. Now double-click the build-and-deploy target to run it. The build-and-deploy target first launches the build target to compile the code, packages the application into a WAR file, and then deploys it to the JBoss server.
Once the application has been deployed successfully, you can start up JBoss to see the application in action. To start JBoss and test your application, follow these steps:
Switch to the Servers view by clicking the Servers tab.
Click the Start the Server button. Eclipse switches to the Console view while JBoss starts up. Once the server startup has completed, Eclipse switches back to the Servers view and shows the state of the JBoss server as Started.
Open your Web browser, type
http://localhost:8080/artweather/artweather.htmin the address bar, and press Enter. The application opens and displays the screen shown in Figure 15.17.Type your ZIP code in the text field and then click the Submit button. The application loads the weather forecast for your area, accompanied by two photos from Flickr whose metadata (name, tag, or description) matches the weather conditions for that day (see Figure 15.1).
In the next section, you learn how to create a Flex version of this application. Not much changes about the Java code, but the front end is completely different. Leave this project open in Eclipse, as you will add to it in the next section.

The standard look of Flex components can be changed by using graphics or ActionScript code to provide a different look. The process of changing the look and feel of the standard Flex components to create a custom interface is known as skinning. I discuss two methods of skinning a Flex application: CSS and ActionScript.
CSS is a standard language for describing the presentation properties of a document. CSS is most widely used when writing HTML documents to keep the presentation details of the document separate from the layout and data. However, CSS can also be applied to other XML-based user interfaces, including Flex.
CSS styles can be applied to all UI components of a specific type or can be used explicitly by name to style components individually. Each UI component can use a styleName attribute to select a specific style from the CSS available in the application.
If you're used to working with CSS in HTML applications, you find that the CSS support in Flex isn't as robust as it is in HTML. For example, Flex CSS doesn't support nesting element styles, such as using div p to style a paragraph inside a div in an HTML document. It's also worth noting that although styles in CSS used in HTML typically use dashes between words (for example, font-family), Flex CSS styles use camel case notation. Camel case means that the style is given as a single compound word made up of one or more distinct words, with the first in lowercase and the remaining words capitalized (for example, fontFamily).
CSS styles are defined in an MXML file by using the <mx:Style> tag. The CSS styles can be placed inline within this tag directly inside the MXML file, or they can be placed in an external CSS file and referenced by using the source attribute of the <mx:Style> tag.
In addition to changing things like colors, fonts, and text decoration as you would using CSS with HTML, Flex allows you to embed resources, such as image files or SWF files, and use them as parts of a custom skin. This allows you to do more advanced skinning of your applications without needing to do any advanced ActionScript programming. The following CSS code styles the scroll bars in an application by using image files for each of the scroll bar pieces:
ScrollBar {
    downArrowUpSkin: Embed(source="/images/sbDownArrowStd.png");
    downArrowOverSkin: Embed(source="/images/sbDownArrowHover.png");
    downArrowDownSkin: Embed(source="/images/sbDownArrowClick.png");
    upArrowUpSkin: Embed(source="/images/sbUpArrowStd.png");
    upArrowOverSkin: Embed(source="/images/sbUpArrowHover.png");
    upArrowDownSkin: Embed(source="/images/sbUpArrowClick.png");
    thumbUpSkin: Embed(source="/images/sbThumbStd.png");
    thumbOverSkin: Embed(source="/images/sbThumbHover.png");
    thumbDownSkin: Embed(source="/images/sbThumbClick.png");
    trackSkin: Embed(source="/images/sbTrack.png");
}
Notice the level of control you have over the images used to skin the various pieces of the scroll bar. The up and down arrows, the scroll bar thumb (the part that does the scrolling), and the scroll bar track are all skinnable. Furthermore, you can embed different images to use when the scroll bar part is clicked, hovered over with the mouse pointer, or used for the normal mouse "up" state. The Embed keyword here is important. It means that these image resources are compiled into the SWF file rather than being referenced externally from the application server.
Using embedded resources requires more work than simply changing colors and fonts by using CSS styles because there's work involved in creating the resources to be embedded. However, using embedded resources is a great way to ensure that you get exactly the look you want in your Flex application.
In addition to simple styling by using CSS style and embedded resources, Flex allows you to perform a more detailed level of skinning by creating custom ActionScript classes that extend one of a number of skin classes provided by the Flex SDK and then applying these custom classes to your Flex components.
The skins provided by the Flex SDK can be found in the mx.skins package. They include the following:
ProgrammaticSkinis the base class for skin classes that draw themselves entirely programmatically.BorderextendsProgrammaticSkinand is the base class for skin classes that draw borders.RectangularBorderextendsBorderand is specifically used as a base class for skin classes that draw rectangular borders.
To skin a UI component by using ActionScript, you first create an ActionScript class that extends one of these ActionScript skin base classes. These classes have an updateDisplayList() method that must be overridden by the extending skin class to perform the drawing necessary to implement the skin.
Note
For more on ActionScript class structure and extending another ActionScript class, see Chapter 3.
In terms of complexity, CSS styles are much less difficult to implement. Programmatic style by using ActionScript requires a fairly deep understanding of the Drawing API of the Flash Player — specifically, the Graphics object. The upside of using ActionScript to skin your components is that it offers a much higher degree of control and flexibility to customizing your interfaces. The trade-off between ease of implementation and fine-grained control is something you must take into consideration when deciding which skinning method to use in your applications.
To demonstrate each of these skinning techniques, you can create a Flex UI for the ArtWeather mashup application. You use the same BlazeDS messaging technique used in the chat application to send a message to the server and receive the mashup data back. Only a small addition to the ArtWeatherService class and some additions to the Eclipse project build path are required on the Java side. Some configuration files need to be added to the Web side in addition to the new MXML application and HTML container for the SWF file. Finally, a few additions to the Ant build and build properties files are needed.
Note
For more on using BlazeDS and step-by-step instructions on building the chat application, see Chapter 14.
First, import the Blaze DS libraries into your WEB-INF/lib directory. These libraries need to be deployed with the application to use BlazeDS. To import the BlazeDS libraries, follow these steps:
Right-click the
libfolder in the Project Explorer view and then choose Import from the popup menu. The Import Select dialog box opens.Click the arrow next to the General item to expand it, choose File System from the list, and then click the Next button. The Import from File system dialog box opens.
Click the Browse button next to the From directory text field. The Import from directory dialog box opens.
Navigate to the
libdirectory below your extractedBlazeDSdirectory, select it, and then click OK. The directory appears in the left pane of the Import from directory dialog box. Clicking thelibdirectory displays its contents in the right pane of the dialog box.Click the
libfolder in the left pane and then click the check box next to each JAR file in the right pane.Click Finish. The
BlazeDSlibrary JAR files you just added appear beneath theweb/WEB-INF/libfolder.
Next, you want to add these JAR files to the build path of your Eclipse project. To add the BlazeDS JAR files to the build path, follow these steps:
Right-click the
jfib-ch15-p01project in the Project Explorer view and then choose Build PathConfigure Build Path from the popup menu. The Java Build Properties dialog box opens with the Libraries tab selected.Click the Add JARs button. The JAR Selection dialog box opens.
Click the arrow next to the
jfib-ch15-p01project to expand it.Click the arrow next to
webto expand it.Click the arrow next to
WEB-INFto expand it and then click the arrow next tolibto expand it.Click all the JARs in the list and then click OK. The JAR Selection dialog box closes, and the JAR files are added to the list in the Library tab.
Click OK.
The Java Build Properties dialog box closes.
Now all the libraries you need are in place. Next, you need to import some Flex classes into the ArtWeatherService class. Open the ArtWeatherService class in the editor by double-clicking it in the Project Explorer view. Add these import statements below the rest of the import statements at the top of the file:
import flex.messaging.messages.AsyncMessage;
import flex.messaging.messages.Message;
import flex.messaging.services.MessageService;
import flex.messaging.services.ServiceAdapter;
Next, change the class declaration statement (the statement that begins with public class ArtWeatherService) so that the ArtWeatherService extends the BlazeDS ServiceAdapter class. When you have done so, the class declaration should look like this:
public class ArtWeatherService extends ServiceAdapter implements Controller
Once you've made this change, Eclipse adds a squiggly red line beneath ArtWeatherService. If you mouse over ArtWeatherService, you see that ServiceAdapter is an abstract class with an abstract method called invoke() that you must implement when extending it. Add the invoke() method below the existing handleRequest() method. Here's the code listing for the invoke() method:
/* (non-Javadoc)
      * @see flex.messaging.services.ServiceAdapter#invoke(flex.
     messaging.messages.Message)
      */
     @Override
  public Object invoke(Message arg0) {
     AsyncMessage zipMsg = (AsyncMessage)arg0;
     String zip = (String)zipMsg.getBody();
     try {
        Map<String,String> model =
           buildModelForZipCode(zip);
        zipMsg.setBody(model);
        MessageService messageService =
           (MessageService)getDestination().getService();
        messageService.pushMessageToClients(zipMsg, false);
     }
     catch(Exception e) {
        e.printStackTrace();
     }

     return null;
}
The invoke() method in this class is much like the one in the chat application's ChatService class. In this application, however, instead of just returning a simple string value, invoke() returns a Map object that contains name-value pairs. Much like in the JSP view, the Flex application extracts the values from this object and then uses them to populate the UI components of the application.
That finishes the changes required on the Java side. Now you can move on to the changes required for the Web configuration. The first thing that's needed is the Flex services-config.xml file. Remember that this file defines the BlazeDS channels and services available to the Flex client for communicating with the code on the Java side. To create this file, follow these steps:
Right-click the
web/WEB-INFfolder in the Project Explorer view and then choose NewOther from the popup menu. The Select a wizard dialog box opens.Click the arrow next to General to expand it, click File, and then click Next. The New File dialog box opens.
Type services-config.xml in the File name text field and then click Finish. The New File dialog box closes, and the new BlazeDS configuration file appears in the Project Explorer view.
Here's the code listing for the services-config.xml file:
<?xml version="1.0" encoding="UTF-8"?>
<services-config>
   <services>
       <default-channels>
         <channel ref="my-http"/>
       </default-channels>
   <service id="message_hyphen_service"
       class="flex.messaging.services.MessageService">
       <adapters>
          <adapter-definition id="ch15awadapter"
            class="com.wiley.jfib.ch15.mashup.service.ArtWeatherService"/>
          </adapters>
          <destination id="artweatheradapter">
            <adapter ref="Ch15AWAdapter"/>
          </destination>
   </service>
   </services>
   <channels>
      <!-- Simple HTTP -->
      <channel-definition id="my_hyphen_http"
           class="mx.messaging.channels.HTTPChannel">
           <endpoint
              uri="http://localhost:8080/artweather/messagebroker/http"
              class="flex.messaging.endpoints.HTTPEndpoint"/>
     </channel-definition>
   </channels>
</services-config>
This is a standard BlazeDS configuration file. The thing to note here is the destination ID: ArtWeatherAdapter. You use this destination later when you create the MXML file for the application. The messages sent to this destination use the HTTP channel created here, which directs them to the endpoint in the Java code by using the MessageBrokerServlet.
Note
For more on the structure of the services-config.xml file, see Chapter 14.
The MessageBrokerServlet definition, as well as some other Flex configuration details, must now be added to the web.xml configuration file for the Web application. Double-click web.xml to open it in the Eclipse editor. There are two blocks of XML that need to be added. First, add this block of XML to the file between the opening <web-app> tag and the <servlet> tag for the SpringDispatcherServlet:
<!-- Http Flex Session attribute and binding listener support -->
    <listener>
<listener-class>
flex.messaging.HttpFlexSession
</listener-class>
</listener>
<!-- MessageBroker Servlet -->
<servlet>
<servlet-name>MessageBrokerServlet</servlet-name>
<servlet-class>
flex.messaging.MessageBrokerServlet</servlet-class>
<init-param>
<param-name>services.configuration.file</param-name>
<param-value>/WEB-INF/services-config.xml</param-value>
</init-param>
<load-on-startup>1</load-on-startup>
</servlet>Next, add this block of XML just above the existing <servlet-mapping> tag:
<servlet-mapping>
    <servlet-name>MessageBrokerServlet</servlet-name>
    <url-pattern>/messagebroker/*</url-pattern>
 </servlet-mapping>
The Flex MessageBrokerServlet is now set up to receive channel requests from subscribers. The MessageBrokerServlet reads in the configuration from services-config.xml and uses that information to set up the destination endpoints and channels needed by the Flex client.
Everything is configured now, so create the Flex application MXML file by following these steps:
Right-click the
Webfolder in the Project Explorer view and then choose NewOther from the popup menu. The Select a wizard dialog box opens.Click the arrow next to General to expand it, click File, and then click Next. The New File dialog box opens.
Type ArtWeather.mxml in the File name text field and then click Finish. The New File dialog box closes, and the
ArtWeather.mxmlfile appears in the Project Explorer view.
Edit the ArtWeather.mxml file so that it matches this code listing:
<?xml version="1.0" encoding="utf-8"?>
<mx:Application
     xmlns:mx="http://www.adobe.com/2006/mxml"
     creationComplete="subscribeToWeather();"
     verticalGap="15">
     <mx:Script>
            <![CDATA[
import mx.controls.Alert;
import mx.messaging.events.MessageAckEvent;
import mx.messaging.messages.AsyncMessage;
import mx.messaging.events.MessageEvent;
import mx.messaging.events.MessageFaultEvent;
import mx.managers.CursorManager;
private function subscribeToWeather():void
{
consumer.subscribe();
}
public function getWeather():void
{
if(zip.text.length != 5 || isNaN(zip.text as Number))
{
Alert.show("Please enter a 5 digit zip code");
return;
}
var msg:AsyncMessage = new AsyncMessage();
msg.body = zip.text;
producer.send(msg);
zip.text = "";
CursorManager.setBusyCursor();
}
public function resultHandler(re:MessageEvent):void
{
var model:Object = re.message.body;
cityStateLabel.text = "Forecast for" +
model["cityState"];
todayPhoto.source = model["todayPhotoUrl"];
tomorrowPhoto.source = model["tomorrowPhotoUrl"];
todayForecast.text = "Today: " +
model["todayCondition"];
todayHigh.text = "High: " + model["todayHigh"];
todayLow.text = "Low: " + model["todayLow"];
tomorrowForecast.text = "Tomorrow: " +
model["tomorrowCondition"];
tomorrowHigh.text = "High: " + model["tomorrowHigh"];
tomorrowLow.text = "Low: " + model["tomorrowLow"];
CursorManager.removeBusyCursor();
}public function faultHandler(fe:MessageFaultEvent):void
{
Alert.show("FAULT: " + fe.faultString);
CursorManager.removeBusyCursor();
}
public function acknowledge(event:MessageAckEvent):void
{
}
]]>
</mx:Script>
<mx:Producer id="producer"
destination="ArtWeatherAdapter"
acknowledge="acknowledge(event);"
fault="faultHandler(event);"
/>
<mx:Consumer id="consumer"
destination="ArtWeatherAdapter"
message="resultHandler(event);"
acknowledge="acknowledge(event);"
fault="faultHandler(event);"
/>
<mx:Label id="headerlabel" horizontalCenter="0"
text="ArtWeather - More Than Just A Forecast"
width="453" height="60"/>
<mx:Label id="citystatelabel" horizontalCenter="0" text="" width="453"/>
<mx:HBox horizontalGap="50">
<mx:Image left="10" id="todayphoto"/>
<mx:Image right="10" id="tomorrowphoto"/>
</mx:HBox>
<mx:HBox horizontalGap="50">
<mx:Label left="10" id="todayforecast" text=""/>
<mx:Label right="10" id="tomorrowforecast" text=""/>
</mx:HBox>
<mx:HBox horizontalGap="50">
<mx:Label left="10" id="todayhigh" text=""/>
<mx:Label right="10" id="tomorrowhigh" text=""/>
</mx:HBox>
<mx:HBox horizontalGap="50">
<mx:Label left="10" id="todaylow" text=""/>
<mx:Label right="10" id="tomorrowlow" text=""/>
</mx:HBox>
<mx:TextInput id="zip" horizontalCenter="0"/><mx:Button id="submit" horizontalCenter="0" click="getWeather()" label="Submit"/> <mx:Label id="yahoocredit" text="Weather data provided by Yahoo! Weather." horizontalCenter="0"/> <mx:Label id="flickrcredit" text="Photos retrieved from Flickr. All photos are the property of their owners. ArtWeather claims no ownership." horizontalCenter="0"/> </mx:Application>
Note
For more on the MXML tags in this example and the structure of a Flex application in general, see Chapter 4.
The <mx:Producer> and <mx:Consumer> tags are set up to send and receive data by using the ArtWeatherAdapter destination. In the getWeather() function, the ZIP code is taken from the text field and then sent to the Java server by using the producer. The result handler function defined in the producer tag is invoked when the data from the Java server is returned. The Map object from the Java side is returned as a plain object in Flex. The values are retrieved from the object by using the names used when they were put in the Map on the Java side. These values populate the UI elements.
Create another new file by using the same steps you used to create the ArtWeather.mxml file. Name the file ArtWeather.html. This is the HTML wrapper for the compiled SWF file. Edit the file so that it matches this code listing:
<html>
<head>
<title>ArtWeather - More Than Just A Forecast</title>
</head>
<body>
<object classid="clsid:D27CDB6E-AE6D-11cf-96B8-444553540000" codebase="http://
  download.macromedia.com/pub/shockwave/cabs/flash/swflash.
  cab#version=9,0,124,0" width="100%" height="100%"
id="ArtWeather.swf">
  <param name="flashvars" value="versionChecked=true">
  <param name="src" value="ArtWeather.swf">
  <embed pluginspage="http://www.macromedia.com/go/getflashplayer" width="100%" height="100%"
    flashvars="versionChecked=true"
    src="ArtWeather.swf"
    name="Art Weather"
  />
</object>
</body>
</html>
Finally, to build this application and deploy it to the JBoss server, you need to add a couple of things to the artweather-build.properties file and the build.xml build script file. First, add these lines to the end of the artweather-build.properties file:
APP_ROOT=web
FLEX_HOME=c:/flex/sdk
Next, add a couple of items to the build.xml file. First, add this XML code between the end </path> tag and the <target name="usage"> tag:
<taskdef resource="flexTasks.tasks"
        classpath="${FLEX_HOME}/ant/lib/flexTasks.jar"/>
Finally, add the following <mxmlc> task tag after the ending </javac> tag inside the <target name="build"> tag:
<mxmlc file="${APP_ROOT}/ArtWeather.mxml"
  keep-generated-actionscript="false">
     <load-config filename="${FLEX_HOME}/frameworks/flex-config.xml"/>
     <source-path path-element="${FLEX_HOME}/frameworks"/>
     <services>web/WEB-INF/services-config.xml</services>
</mxmlc>
Make sure that all your files have been saved and then click the Ant view tab to switch to the Ant view. Double-click the build-and-deploy target. The Java code and MXML code compile, and then the application is packaged up into a WAR file and deployed to the JBoss server.
Follow these steps to test the ArtWeather application:
Click the Servers tab to switch to the Servers view.
Click the green Start button to start up JBoss.
Once JBoss has started, open your Web browser, type
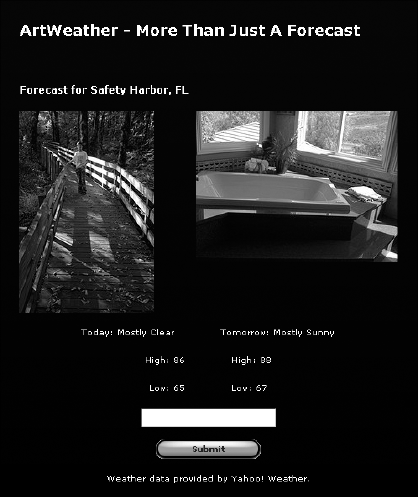
http://localhost:8080/artweather/ArtWeather.htmlin the address bar, and then press Enter. The application opens and displays the text entry field for the ZIP code.Type your ZIP code and then click the Submit button. After a short time, the application displays your two-day forecast and a photo for each day. See Figure 15.18 for an example.
This application currently uses the default Flex styles for all the UI elements. You skin the fonts and colors of the application by using CSS and then replace the default Flex button with one of your own. You need three buttons: bn-down.png, bn-up.png, and bn-over.png. They should be approximately 125 × 25. Place them in the Web directory along with your MXML and HTML files.
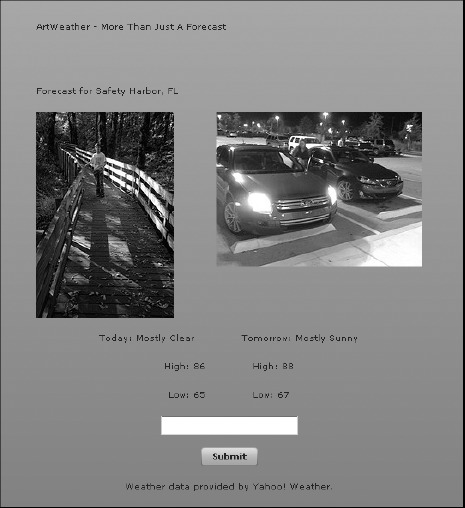
Figure 15.18. The Flex version of the ArtWeather application. This application uses the default Flex properties for all the UI elements.
Create the CSS file for your application in Eclipse by following these steps:
Right-click the
Webfolder in the Project Explorer view and then choose NewOther from the popup menu. The Select a wizard dialog box opens.Click the arrow next to General to expand it, click File, and then click Next. The New File dialog box opens.
Type ArtWeather.css in the File name text field and then click Finish. The New File dialog box closes, and the
ArtWeather.cssfile appears in the Project Explorer view.
Edit the ArtWeather.css file so that it matches this code listing:
Application {
     backgroundColor: #000000;
}
Button {
upSkin: Embed("bn-up.png");
downSkin: Embed("bn-down.png");
overSkin: Embed("bn-over.png");
}
.headerLabel {
fontFamily: Verdana;
fontSize: 18pt;
fontWeight: bold;
color: #FFFFFF;
}
.cityStateLabel {
fontFamily: Verdana;
fontSize: 12pt;
fontWeight: bold;
color: #FFFFFF;
}
.dataLabel {
fontFamily: Verdana;
fontSize: 10pt;
color: #FFFFFF;
}In this CSS file, a single style is being applied to the Application and Button types. The Button CSS style is a good example of CSS skinning. In this case, the actual graphics used to display the buttons are being swapped out; this happens instead of new colors and fonts being applied to the application. Remember that Embed means that the graphics files are compiled into the final SWF file and don't need to be referenced from or even exist in the Web application. The resulting SWF file is larger and thus takes longer to load initially, but the images load more quickly. While this may not make a big difference for an application with one button, it's important to know that the option exists.
The three remaining styles are named with a leading dot. They're not applied to any UI component type globally. Instead, individual components apply them by using the styleName attribute.
To import this style sheet into the MXML file, add this <mx:Style> tag directly after the <mx:Application> tag:
<mx:Style source="ArtWeather.css"/>
Finally, add styleName attributes to each of the <mx:Label> tags. The headerLabel and cityStateLabel styles should be used in the labels with those IDs. The dataLabel style should be used for the rest of the labels.
Save the files. Go to the Servers view and then stop JBoss. Switch back to the Ant view and then run the build-and-deploy target once again. When the build has finished, restart JBoss and then load the application in your browser again. The look and feel of the application have changed, and the button graphic has been swapped out with your bn-up.png file. Fill in your ZIP code and then click the button, noticing the mouse over and mouse down states of the button changing as you do. The final application should look something like Figure 15.19.
In this chapter, you learned about Web application mashups, which retrieve data from multiple data sources and combine that data into new services. You learned about third-party libraries, such as flickrj, a Java implementation of the Flickr API. You created a mashup by using data from a Yahoo! Weather RSS feed and Flickr, as well as using the Apache commons-httpclient library, XPath, and the Flickr API. Finally, you learned how to enhance the default look and feel of a Flex application by using skinning with both CSS and ActionScript code.