
IN THIS CHAPTER
In this chapter, you write a basic Web store back-end application by using Java. The Java Web application accepts incoming requests for data, communicates with a MySQL database by using Hibernate to save and retrieve data, and finally presents the data to the Flex client as blocks of XML. The Flex client application you develop in Chapter 13 takes that XML, parses it, and then renders the information into a user interface that presents the store to the user. Users can then see a set of products filtered by category and click to add products to their shopping cart.
Note
For the complete Flex front end for the Web store application, see Chapter 13.
Application development doesn't end when the first version is released to the world. There are bugs that need to be fixed and features that your users will clamor for. In the world of Web applications, users have come to expect that exciting new features, performance improvements, and bug fixes will continuously roll out throughout the life of the application.
Following a few development best practices can make all these things easier for you to provide to your users. Code modularity makes it easier to fix or upgrade portions of your applications with minimal impact on other parts. Separation of interface and implementation makes your code reusable by allowing you to write your application logic by using interfaces and then use different implementations for different program modules.
Making your code modular means separating it into units of code that provide distinct functionality with little or no overlap between modules. Separating your code into distinct modules means that if changes need to be made to one area of functionality in your application, they can be made with little or no impact on other areas of your application.
In a storefront, one of the functions used frequently is calculating shipping for an order. Shipping costs are typically based on the carrier used, the location of the purchaser, and the type of delivery desired.
One way to approach calculating shipping is to have the shopping cart code tally the shipping costs along the way. The cart knows what products are being shipped and has information about the user, so it should be able to use that information to calculate shipping. However, this approach isn't modular because the shopping cart code now contains code for two unrelated functions: storing products from a user's shopping session and managing shipping information. If, in the future, the store switches to another shipping company, the shopping cart code would need to be updated to accommodate this change. Thus, the chances that some of the shopping cart functionality is inadvertently changed and bugs are introduced into your application increase.
A better approach would be to separate the shipping code into its own module. The shopping cart code would provide the shipping module information about the products being shipped and the customer's address, and the shipping module would return shipping costs for the various delivery types offered. Now, if the store were to change shipping companies, the shopping cart code wouldn't need to change. Instead, the shipping code would change, and the shopping cart code could continue to use it as though nothing had changed.
One of the most important development practices, especially for those building large or complex applications, is to write code that's reusable across many areas of an application or even across different applications.
Consider this example: The application you build in this chapter is a storefront, which allows customers to view products, add them to a shopping cart, and purchase them. The data about the products is stored in a database. Suppose that this store is just one of many owned by a parent company. Each store has its own database, and a scheduled nightly job collects data about the products and sales for each day into a data warehouse so that the sales and marketing departments at the parent company can determine which products are selling well, which prices may need to be adjusted, etc.
The sales department might ask you to build a Web application to help it visualize and work with the data in the data warehouse. Many of the operations and objects, such as lists of products and contents of shopping carts, used by the storefront are relevant to the data the sales department would want to analyze. By writing these modules of code in a way that's reusable, you can create a set of objects that's useable in both the storefront and the data warehouse applications.
Part of the process of writing modular code, and one way to write reusable code, is to separate the interface from the implementation. In simple terms, the interface is what something does, and the implementation is how it does that something. The interface defines what methods are available, what parameters they require, and what values they return. It's the contract between code that calls into your application and the implementation code within your application. Code that calls into the application rarely cares about how something is done; it just wants to receive some value based on parameters it provides.
The code that talks to the database when writing the storefront has an interface that defines methods to obtain a list of products, see details of a specific product, and retrieve a user's shopping cart. The implementation contains code that performs these functions. In the previous example, if the store front application had been written without interfaces, much of it would not be reusable. The service code that requests information from the database access module would need to be changed to request information from a different module that works with the data warehouse instead of the store database. By using interfaces, the service would just be calling a function on the interface, and the code would work the same way for both the store application and the data warehouse. When deploying the data warehouse application, you would only need to swap out the implementation of the database access code with the correct version for the data warehouse. Application code dealing with the interface wouldn't need to change.
The back end of the storefront application is a standard Spring MVC Web application that uses Hibernate to access data in a MySQL database. The service layer exposes the following services by using Spring controllers and URL mappings to the Flex user interface:
LogInServiceprovides aUserobject based on the username and password provided.ProductListServiceprovides a collection ofProductobjects. The Flex client can optionally provide a category parameter to filter the product list by category.ProductDetailsServiceprovides aProductobject based on the product ID provided.AddProductToCartServiceadds some number of a given product to the given user's shopping cart and returns the updated cart.RetrieveCartServiceretrieves the current shopping cart for a given user.
Note
For more on Hibernate, see Chapter 9. For more on Spring MVC, controllers, and URL mappings, see Chapter 6.
The model contains the value objects needed by this application. These objects are:
A
Userobject to represent the customer user of this Web storefront applicationA
Productobject to represent the products offered for saleA
CartItemobject to represent products in a specific shopping cartA
Cartobject to represent the shopping cart of a specific user
Finally, the data access layer contains a single interface and a data access object (DAO) class that extends that interface. It communicates with the MySQL database to save and retrieve the value objects. The DAO class contains one method for each of the five services exposed to the Flex client. The MySQL database contains one table for each of the four value objects.
The MySQL database consists of four tables, one for each of the value objects in the application. These tables are related to one another through foreign key relationships. The cart table contains a user_id field that maps to the user table so that each cart is owned by a user. The cart_item table contains a product_id field that maps to the product table and a cart_id field that maps to the cart table.
Note
For more on MySQL, foreign keys, and the MySQL Query Browser tool, see Chapter 8.
To create the MySQL database and the product table for the storefront application, follow these steps:
Launch the MySQL Query Browser tool by choosing Start
All Programs MySQLMySQL Query Browser. The MySQL Query Browser connection dialog box, as shown in Figure 12.1, opens.
Type localhost in the Server Host text field, type 3306 in the Port text field, type root in the Username text field, type toor in the Password text field, and then click OK. Some of these values may have already been filled in for you. The MySQL Query Browser application, as shown in Figure 12.2, opens.
Right-click inside the Schemata tab and then choose Create New Schema from the popup menu. The Create New Schema dialog box opens.
Type store in the schema name text field and then click OK. The store schema appears in the Schemata tab.
Right-click the store schema in the Schemata tab and then choose Create New Table from the popup menu. The MySQL Table Editor dialog box, as shown in Figure 12.3, opens.
Type product in the Table Name text field.
Double-click below the Column Name header in the Columns and Indices tab. A text field appears.
Type id in the text field and then press the Tab key. The rest of the columns in this row fill in with acceptable default values, as shown in Figure 12.4. This text field is the primary key of the
producttable, which is referenced by a foreign key in thecart_itemtable. The MySQL Table Editor fills in a value of INTEGER for Datatype and checks the NOT NULL, AUTO INC, and UNSIGNED check boxes. This means that the field is populated with positive integer values that are automatically incremented by the database. The id column is added to the Index Columns box in the bottom-right corner, and PRIMARY appears in the Indices tab in the bottom-left corner, indicating that the id column is the primary key.Add the information for the rest of the columns in the table as specified below. Start by double-clicking below the column name for the previous column and then typing the column name in the text field that appears. Press the Tab key to move from field to field in the row. When you're finished, the MySQL Table Editor dialog box should look like Figure 12.5.
Column Name: name; Datatype: VARCHAR(100); NOT NULL checked
Column Name: description; Datatype: VARCHAR(4000); NOT NULL checked
Column Name: category; Datatype: VARCHAR(100); NOT NULL checked
Column Name: price; Datatype: DOUBLE; NOT NULL and UNSIGNED checked
Click Apply Changes. The Confirm Table Edit dialog box, as shown in Figure 12.6, opens. This dialog box displays the SQL statement that's executed to create the
producttable.Click Execute. The Confirm Table Edit dialog box closes, and you return to the MySQL Table Editor dialog box.
Click Close. The MySQL Table Editor dialog box closes.
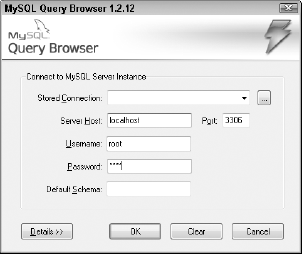

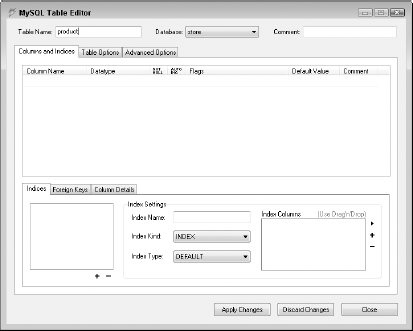

Figure 12.4. Once you type id as the name of the first column and press the Tab key, the rest of the columns in this row of the Columns and Indices tab are populated with appropriate default values, and the column is set as the primary key of the table.
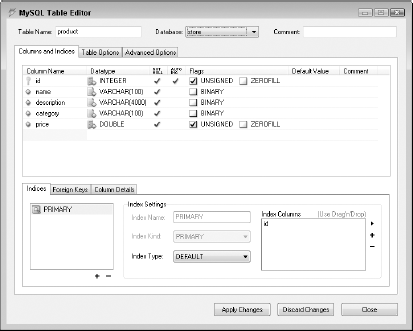
Figure 12.5. The MySQL Table Editor dialog box should look like this once all the columns have been added to the product table.
You can see the newly created table by clicking the arrow next to the store database to expand it in the Schemata tab. Clicking the arrow next to the product table expands it to display the set of columns that make up the table.
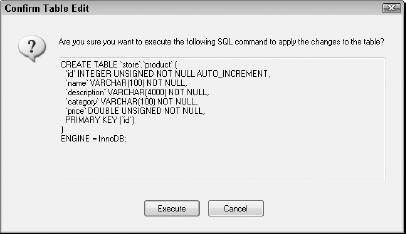
Figure 12.6. The Confirm Table Edit dialog box shows the SQL statement that's used to create the product table.
Now create the user table by following these steps:
Right-click the store schema in the Schemata tab and then choose Create New Table from the popup menu. The MySQL Table Editor dialog box opens.
Type user in the Table Name text field.
Double-click below the Column Name header in the Columns and Indices tab. A text field appears.
Type id in the text field and then press the Tab key. The rest of the columns in this row fill in with acceptable default values. This text field is the primary key of the
usertable, which is referenced by a foreign key in thecarttable. As with theproducttable, the MySQL Table Editor fills in a value of INTEGER for Datatype and checks the NOT NULL, AUTO INC, and UNSIGNED check boxes; the id column is added to the Index Columns box in the bottom-right corner, and PRIMARY appears in the Indices tab in the bottom-left corner, indicating that the id column is the primary key.Add the information for the rest of the columns in the table as specified below. Start by double-clicking below the column name for the previous column and then typing the column name in the text field that appears. Press the Tab key to move from field to field in the row. When you're finished, the MySQL Table Editor dialog box should look like Figure 12.7.
Column Name: first_name; Datatype: VARCHAR(45); NOT NULL checked
Column Name: last_name; Datatype: VARCHAR(45); NOT NULL checked
Column Name: user_name; Datatype: VARCHAR(45); NOT NULL checked
Column Name: password; Datatype: VARCHAR(45); NOT NULL checked
Click Apply Changes. The Confirm Table Edit dialog box opens. This dialog box displays the SQL statement that's executed to create the
producttable.Click Execute. The Confirm Table Edit dialog box closes, and you return to the MySQL Table Editor dialog box.
Click Close. The MySQL Table Editor dialog box closes.
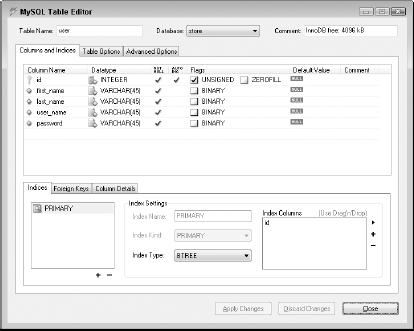
Figure 12.7. The MySQL Table Editor dialog box should look like this once all the columns have been added to the user table.
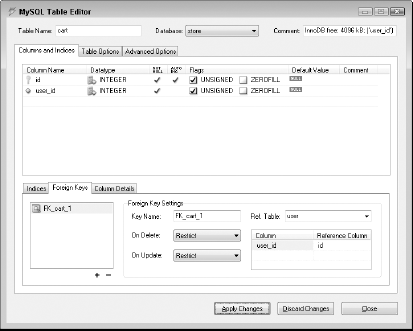
Next is the cart table. A couple of extra steps are required for this table to create the foreign key from the cart table to the user table. Follow these steps to create the cart table:
Right-click the store schema in the Schemata tab and then choose Create New Table. The MySQL Table Editor dialog box opens.
Type cart in the Table Name text field.
Double-click below the Column Name header in the Columns and Indices tab. A text field appears.
Type id in the text field and then press the Tab key. The rest of the columns in this row fill in with acceptable default values. This text field is the primary key of the
carttable, which is referenced by a foreign key in thecart_itemtable you create next. As with theproducttable, the MySQL Table Editor fills in a value of INTEGER for Datatype and checks the NOT NULL, AUTO INC, and UNSIGNED check boxes; the id column is added to the Index Columns box in the bottom-right corner; and PRIMARY appears in the Indices tab in the bottom-left corner, indicating that the id column is the primary key.Add the information for the user_id column as specified below. Start by double-clicking below the column name for the previous column and then typing the column name in the text field that appears. Press the Tab key to move from field to field in the row.
Column Name: user_id; Datatype: INTEGER; NOT NULL and UNSIGNED checked
Click the Foreign Keys tab in the bottom-left corner and then click the + button below the Foreign Keys box. The Add Foreign Key dialog box opens.
Type FK_cart_1 in the Foreign Key Name text field and then click OK. The FK_cart_1 foreign key is added to the Foreign Keys box.
Choose user from the Ref. Table dropdown list, double-click id in the Column column, and then choose user_id from the dropdown list. When you're finished, the MySQL Table Editor dialog box should look like Figure 12.8.
Click Apply Changes. The Confirm Table Edit dialog box opens. This dialog box displays the SQL statement that's executed to create the
producttable.Click Execute. The Confirm Table Edit dialog box closes, and you return to the MySQL Table Editor dialog box.
Click Close. The MySQL Table Editor dialog box closes.
Finally, the cart_item table contains foreign keys to both the cart table and the product table. Follow these steps to create the cart_item table:
Right-click the store schema in the Schemata tab and then choose Create New Table from the popup menu. The MySQL Table Editor dialog box opens.
Type cart_item in the Table Name text field.
Double-click below the Column Name header in the Columns and Indices tab. A text field appears.
Type id in the text field and then press the Tab key. The rest of the columns in this row fill in with acceptable default values. This text field is the primary key of the
cart_itemtable. As with theproducttable, the MySQL Table Editor fills in a value of INTEGER for Datatype and checks the NOT NULL, AUTO INC, and UNSIGNED check boxes; the id column is added to the Index Columns box in the bottom-right corner; and PRIMARY appears in the Indices tab in the bottom-left corner, indicating that the id column is the primary key.Add the information for the rest of the columns in the table as specified below. Start by double-clicking below the column name for the previous column and then typing the column name in the text field that appears. Press the Tab key to move from field to field in the row.
Column Name: product_id; Datatype: INTEGER; NOT NULL and UNSIGNED checked
Column Name: quantity; Datatype: INTEGER; NOT NULL and UNSIGNED checked
Column Name: cart_id; Datatype: INTEGER; NOT NULL and UNSIGNED checked
Click the Foreign Keys tab in the bottom-left corner and then click the + button below the Foreign Keys box. The Add Foreign Key dialog box opens.
Type FK_cart_item_1 in the Foreign Key Name text field and then click OK. The FK_cart_item_1 foreign key is added to the Foreign Keys box.
Choose product from the Ref. Table dropdown list, double-click id in the Column column, and then choose product_id from the dropdown list.
Click the Foreign Keys tab in the bottom-left corner and then click the + button below the Foreign Keys box. The Add Foreign Key dialog box opens.
Type FK_cart_item_2 in the Foreign Key Name text field and then click OK. The FK_cart_item_2 foreign key is added to the Foreign Keys box.
Click the FK_cart_item_2 foreign key.
Choose cart from the Ref. Table dropdown list, double-click id in the Column column, and then choose cart_id from the dropdown list. When you're finished, the MySQL Table Editor dialog box should look like Figure 12.9.
Click Apply Changes. The Confirm Table Edit dialog box opens. This dialog box displays the SQL statement that's executed to create the
producttable.Click Execute. The Confirm Table Edit dialog box closes, and you return to the MySQL Table Editor dialog box.
Click Close. The MySQL Table Editor dialog box closes.
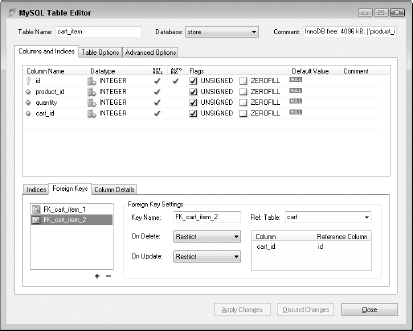
Figure 12.9. After the columns have been added and the foreign keys to the cart and product tables have been created, the MySQL Table Editor dialog box should look like this.
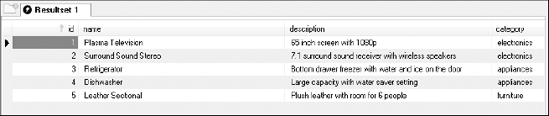
The database is now ready to be used by the application, but it won't be of much use without any data in it. You can use the MySQL Query Browser tool to write a SQL script to add some data to the database. Choose File
INSERT INTO store.USER(first_name, last_name, user_name, password)
VALUES('Charles','Christiansen','charles','selrahc'),

INSERT INTO store.USER(first_name, last_name, user_name, password)
VALUES('Matthew','Keefe','matthew','wehttam'),

INSERT INTO store.PRODUCT(name, description, category, price)
VALUES('Plasma Television','65 inch screen with
1080p','electronics',3000.00);
INSERT INTO store.PRODUCT(name, description, category, price)
VALUES('Surround Sound Stereo','7.1 surround sound receiver with
wireless speakers','electronics',1000.00);
INSERT INTO store.PRODUCT(name, description, category, price)
VALUES('Refrigerator','Bottom drawer freezer with water and ice on
the door','appliances',1200.00);
INSERT INTO store.PRODUCT(name, description, category, price)
VALUES('Dishwasher','Large capacity with water saver
setting','appliances',500.00);
INSERT INTO store.PRODUCT(name, description, category, price)
VALUES('Leather Sectional','Plush leather with room for 6
people','furniture',1500.00);Click the green Execute button in the top-right corner of the MySQL Query Browser. The script runs, and the sample data is added to the database. No sample data is added to the cart or cart_item tables. These tables don't need sample data because they're populated by adding items to the cart by using the application. You can verify that the data was inserted by clicking the X on the Script tab to close it and then dragging the user and product tables onto the Resultset tab. Dragging these tables onto the Resultset tab displays all the data in the table, as shown for the product table in Figure 12.10.
Before starting to develop the application, you need to set up a new project in Eclipse that contains the code, configuration files, and build scripts for the Web application. The project contains the standard folder structure for a Java Web application. After creating the project, you must add all the libraries that the project depends on to compile and run. These libraries are:
Hibernate and all its required libraries
The MySQL Connector/J JDBC driver
The SLF4J and log4j logging libraries used by Hibernate
Spring Framework's Web MVC and ORM modules
JSTL and Jakarta standard tag libraries
Note
For more on Hibernate, MySQL Connector/J, and SLF4J, see Chapter 9. For more on the Spring Framework and tag libraries, see Chapter 6.
Finally, once the libraries have been added to the project, you must configure the project's build path to use some of those libraries when compiling the code for the project.
Open Eclipse, and create a new Spring project. When entering the project properties in the New Spring Project dialog box, change the output folder for the project to web/WEB-INF/classes. When you change the output directory to web/WEB-INF/classes, Eclipse outputs the compiled Java class files to that directory. This directory is where Web applications typically look for the Java files they need to run. When the application is bundled up as a WAR file, the class files are already in the correct location.
Note
For more on creating a Spring project in Eclipse, see Chapter 6.
Once the project is created, you need to add all the libraries that the Web application needs to run to a lib folder beneath the WEB-INF folder. There are a number of steps below, but the same pattern of steps is repeated throughout. Use the Eclipse Import from File system dialog box to navigate to a folder containing some library JAR files, select them, and then repeat for other library locations.
You will open the Import from File system dialog box several times. Each time, the steps are the same. To open the Import from File system dialog box, follow these steps:
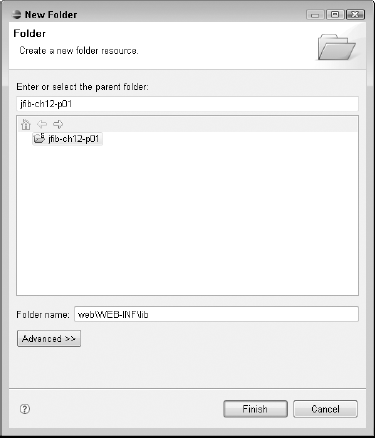
Right-click the
jfib-ch12-p01project in the Project Explorer view and then choose NewFolder from the popup menu. The New Folder dialog box, as shown in Figure 12.11, opens.Type webWEB-INFlib in the Folder name text field and then click Finish. The New Folder dialog box closes, and the newly created folder structure is added to the project.
Right-click the
libfolder and then choose Import from the popup menu. The Import Select dialog box, as shown in Figure 12.12, opens.Click the arrow next to the General item to expand it, choose File System from the list, and then click the Next button. The Import from File system dialog box, as shown in Figure 12.13, opens.
Use these steps any time you need to open the Import from File system dialog box to add libraries to the web/WEB-INF/lib folder.

Figure 12.12. The Import Select dialog box allows you to import resources for your project from a variety of sources.
Six sets of libraries need to be added to the project. First, add the Spring Framework core library and the Spring ORM and Spring Web MVC libraries by following these steps:
Open the Import from File system dialog box as previously described.
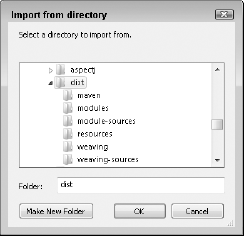
Click the Browse button next to the From directory text field. The Import from directory dialog box, as shown in Figure 12.14, opens.
Navigate to the
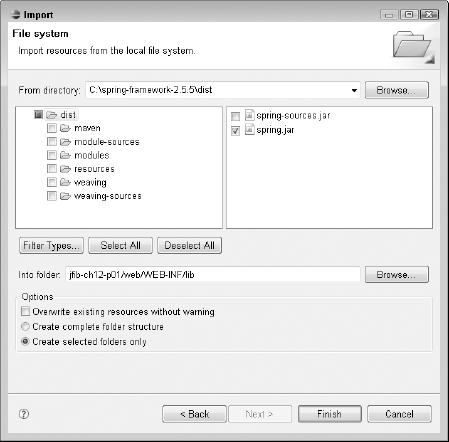
distdirectory below your extracted Spring Framework directory, select it, and then click OK. The directory appears in the left pane of the Import from File system dialog box, as shown in Figure 12.15. Clicking thedistdirectory displays its contents in the right pane of the dialog box. Clicking the arrow next to the directory name on the left expands it to displays its subfolders.Click the
distfolder in the left pane and then click the check box next tospring.jarin the right pane.Click Finish. The
spring.jarfile you just added appears beneath thewebWEB-INFlibfolder.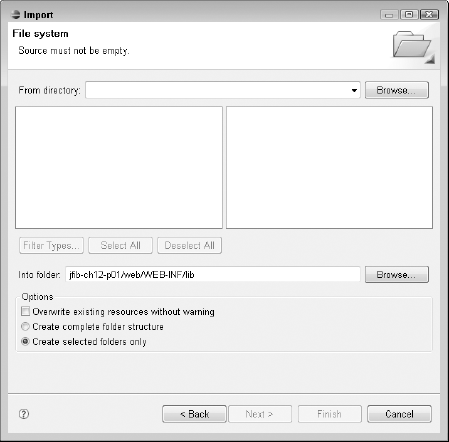
Figure 12.13. The Import from File system dialog box lets you bring resources located on your computer's file system into your project. Resources are copied from their original locations into your project's directory structure.
Click the Browse button next to the From directory text field. The Import from directory dialog box opens.
Navigate to the
distmodulesdirectory below your extracted Spring Framework directory, select it, and then click OK. The directory appears in the left pane of the Import from directory dialog box. Clicking themodulesdirectory displays its contents in the right pane of the dialog box.Click the
modulesfolder in the left pane and then click the check boxes next tospring-orm.jarandspring-webmvc.jarin the right pane.Click Finish. The
spring-orm.jarandspring-webmvc.jarfiles you just added appear beneath thewebWEB-INFlibfolder.
Next, import the MySQL Connector/J JDBC Driver JAR file by following these steps:
Open the Import from File system dialog box.
Click the Browse button next to the From directory text field. The Import from directory dialog box opens.
Navigate to your extracted
mysql-connector-java-5.1.6directory, select it, and then click OK. The directory appears in the left pane of the Import from directory dialog box. Clicking themysql-connector-java-5.1.6directory displays its contents in the right pane of the dialog box.Click the
mysql-connector-java-5.1.6folder in the left pane and then click the check box next tomysql-connector-java-5.1.6-bin.jarin the right pane.Click Finish. The
mysql-connector-java-5.1.6-bin.jarfile you just added appears beneath thewebWEB-INFlibfolder.
Next, import the Hibernate JAR file and the libraries required by Hibernate:
Open the Import from File system dialog box.
Click the Browse button next to the From directory text field. The Import from directory dialog box opens.
Navigate to your extracted Hibernate distribution directory, select it, and then click OK. The directory appears in the left pane of the Import from directory dialog box. Clicking the
hibernate-distribution-3.3.0.SP1directory displays its contents in the right pane of the dialog box.Click the
hibernate-distribution-3.3.0.SP1folder in the left pane and then click the check box next tohibernate3.jarin the right pane.Click Finish. The
hibernate3.jarfile you just added appears beneath thewebWEB-INFlibfolder.Open the Import from File system dialog box.
Click the Browse button next to the From directory text field. The Import from directory dialog box opens.
Navigate to the
lib/requireddirectory below your extracted Hibernate distribution directory, select it, and then click OK. The directory appears in the left pane of the Import from directory dialog box. Clicking the required directory displays its contents in the right pane of the dialog box.Click the
requiredfolder in the left pane and then click the check boxes next to each of the six JAR files in the right pane.Click Finish. The six files you just added appear beneath the
webWEB-INFlibfolder.
Next, import the Jakarta standard and JSTL tag library files by following these steps:
Open the Import from File system dialog box.
Click the Browse button next to the From directory text field. The Import from directory dialog box opens.
Navigate to the
lib/jakarta-taglibsdirectory below your extracted Spring Framework distribution directory, select it, and then click OK. The directory appears in the left pane of the Import from directory dialog box. Clicking thejakarta-taglibsdirectory displays its contents in the right pane of the dialog box.Click the
jakarta-taglibsfolder in the left pane and then click the check box next tostandard.jarin the right pane.Click Finish. The
standard.jarfile you just added appears beneath thewebWEB-INFlibfolder.Open the Import from File system dialog box.
Click the Browse button next to the From directory text field. The Import from directory dialog box opens.
Navigate to the
lib/j2eedirectory below your extracted Spring Framework distribution directory, select it, and then click OK. The directory appears in the left pane of the Import from directory dialog box. Clicking thej2eedirectory displays its contents in the right pane of the dialog box.Click the
j2eefolder in the left pane and then click the check box next to thejstl.jarfile in the right pane.Click Finish. The
jstl.jarfile you just added appears beneath thewebWEB-INFlibfolder.
Finally, import the SLF4J libraries:
Open the Import from File system dialog box.
Click the Browse button next to the From directory text field. The Import from directory dialog box opens.
Navigate to your extracted SLF4J distribution directory, select it, and then click OK. The directory appears in the left pane of the Import from directory dialog box. Clicking the
slf4j-1.5.2directory displays its contents in the right pane of the dialog box.Click the
slf4j-1.5.2folder in the left pane and then click the check box next toslf4j-log4j12-1.5.2.jarin the right pane.Click Finish. The
slf4j-log4j12-1.5.2.jarfile you just added appears beneath thewebWEB-INFlibfolder.
When you have finished importing all the libraries, the Project Explorer view should look like Figure 12.16.
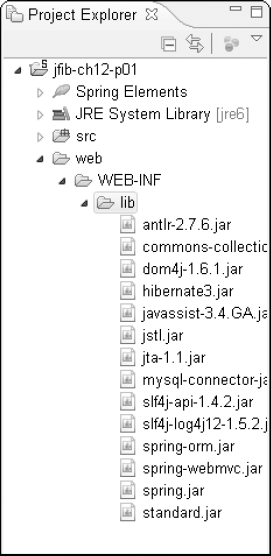
Figure 12.16. Once all the required libraries have been added to the web/WEB-INF/lib folder, the Project Explorer view should look like this.
These libraries are now available to the Web application at runtime, but Eclipse can't use them to compile your Java classes until you add them to the build path for the project. Once they're added to the build path, the Eclipse project configuration is complete.
To configure the Java build path for your project, follow these steps:
Right-click the project in the Project Explorer view and then choose Properties from the popup menu. The Properties dialog box opens.
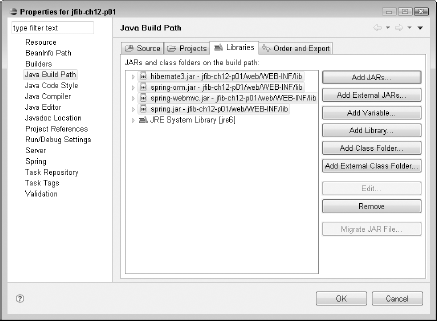
Choose Java Build Path from the left navigation pane of the Properties dialog box. The Java Build Path tabbed dialog box opens in the right pane, as shown in Figure 12.17.
Click the Libraries tab. The list of library JAR files and class folders appears. The JRE System Library from the installed JDK is already included in this list.
Click the Add JARs button. The JAR Selection dialog box opens.
Click
spring.jar, spring-webmvc.jar, spring-orm.jar, andhibernate3.jarunderweb/WEB-INF/liband then click OK. The JARs are added to the library list, as shown in Figure 12.18.Click the Add External JARs button. The JAR Selection dialog box opens.
Navigate to the client folder within your JBoss installation, click the
servlet-api.jarfile, and then click OK. Theservlet-api.jarlibrary is added to the library list.Click OK. The Properties dialog box closes. The build path libraries appear in the Project Explorer view.

The model is the part of the Model-View-Controller (MVC) application that contains the value objects and business logic that compose the application. For this Web application, there are four objects that correspond to the four tables in the MySQL database previously created.
Because the Flex client is expecting XML from the Web application, each of these objects should provide a method that returns an XML representation of the object. Because this functionality is common to all the objects and is required, you can create an interface that each object implements. The interface has a single toXml() method. Classes that implement this interface provide an implementation for the toXml() method that returns the XML representation of that object.
Note
For more on interfaces in Java, see Chapter 6.
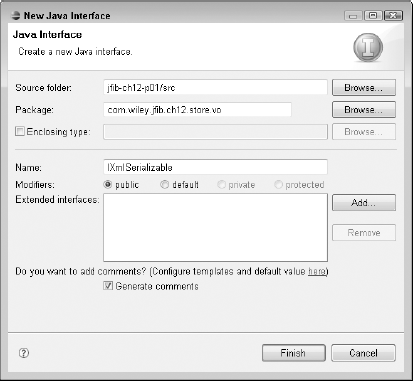
To create the IXmlSerializable interface, follow these steps:
Right-click the
srcfolder under thejfib-ch12-p01project in the Project Explorer view and then choose NewInterface from the popup menu. The New Java Interface dialog box, as shown in Figure 12.19, opens.Click the Add button next to the Extended interfaces list box. The Extended Interfaces Selection dialog box, as shown in Figure 12.20, opens.
Type Serializable in the Choose interfaces text field, choose
Serializable-java.io- [jre6]from the Matching items list box, and then click OK. The Extended Interfaces Selection dialog box closes, and theSerializableinterface appears in the Extended interfaces list box.Type com.wiley.jfib.ch12.store.vo in the Package text field, type IXmlSerializable in the Name text field, and then click Finish. The newly created package and interface appear in the Project Explorer view.
Remember that implementing the Serializable interface is a best practice when using Hibernate to store and retrieve objects from a database. Because the IXmlSerializable interface extends the Serializable interface, any class that implements IXmlSerializable is also considered to have implemented Serializable. Therefore, the value object classes you create only need to implement IXmlSerializable.
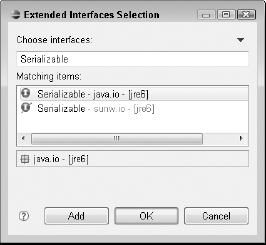
Figure 12.20. The Extended Interfaces Selection dialog box allows you to choose an interface to extend.
Edit the IXmlSerializable interface to match this code listing:
/**
 *
 */
package com.wiley.jfib.ch12.store.vo;

import java.io.Serializable;

/**
 * @author Chuck
 *
 */
public interface IXmlSerializable extends Serializable {

   /**
     * Return this object as an XML string
     * @return an XML string representing this object
     */
   public String toXml();

}
Now you can create the four value object classes that implement the IXmlSerializable interface. Use the New Java Class dialog box to create each of the four value object classes used by this application: User, Product, Cart, and CartItem. The same steps are used to create each of these classes. To create the value objects, follow these steps for each of the four classes:
Right-click the
com.wiley.jfib.ch12.store.vopackage below thesrcfolder under thejfib-ch12-p01project in the Project Explorer view and then choose NewClass from the popup menu. The New Java Class dialog box, as shown in Figure 12.21, opens.Click the Add button next to the Interfaces list box. The Implemented Interfaces Selection dialog box, as shown in Figure 12.22, opens.
Type IXmlSerializable in the Choose interfaces text field, choose
IXmlSerializable-com.wiley.jfib.ch12.store.vofrom the Matching items list box, and then click OK. The Implemented Interfaces Selection dialog box closes, and theIXmlSerializableinterface appears in the Interfaces list box.Type
com.wiley.jfib.ch12.store.voin the Package text field, type the class name ( User, Product, Cart, or CartItem ) in the Name text field, click the Constructors from superclass and Inherited abstract methods check boxes, and then click Finish. The newly created class appears in the Project Explorer view.Repeat steps 1–4 for each of the remaining classes.
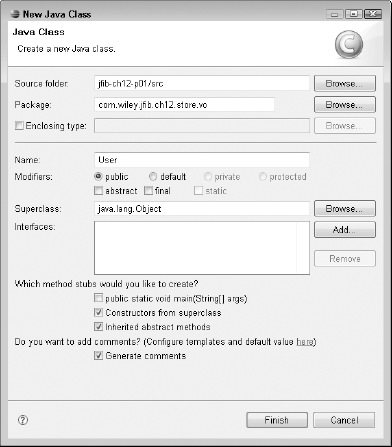
Figure 12.21. In the New Java Class dialog box, type the name for the value object class you're creating. The package name is filled in for you.
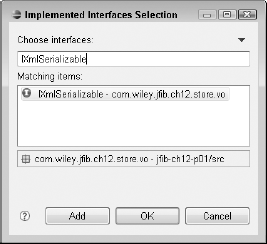
Figure 12.22. The Implemented Interfaces Selection dialog box allows you to choose an interface to implement.
Here are the code listings for each of these objects:
User.java
/**
  *
  */
 package com.wiley.jfib.ch12.store.vo;


 /**
  * @author Chuck
  *
  */
 public class User implements IXmlSerializable {

     private static final long serialVersionUID = 1L;
     private int id;
     private String firstName;
     private String lastName;
     private String userName;
     private String password;

     /**
      *
      */
     public User() {
     }

     /**
* @return the userId
*/
public int getId() {
return id;
}
/**
* @param userId the userId to set
*/
public void setId(int id) {
this.id = id;
}
/**
* @return the firstName
*/
public String getFirstName() {
return firstName;
}
/**
* @param firstName the firstName to set
*/
public void setFirstName(String firstName) {
this.firstName = firstName;
}
/**
* @return the lastName
*/
public String getLastName() {
return lastName;
}
/**
* @param lastName the lastName to set
*/
public void setLastName(String lastName) {
this.lastName = lastName;
}
/**
* @return the userName
*/
public String getUserName() {
return userName;
}
/*** @param userName the userName to set
*/
public void setUserName(String userName) {
this.userName = userName;
}
/**
* @return the password
*/
public String getPassword() {
return password;
}
/**
* @param password the password to set
*/
public void setPassword(String password) {
this.password = password;
}
/* (non-Javadoc)
* @see com.wiley.jfib.ch12.store.vo.IXmlSerializable#toXml()
*/
@Override
public String toXml() {
String xml = "<user>";
xml += "<id>" + id + "</id>";
xml += "<firstname>" + firstName + "</firstname>";
xml += "<lastname>" + lastName + "</lastname>";
xml += "</user>";
return xml;
}
}Product.java
/**
 *
 */
package com.wiley.jfib.ch12.store.vo;


/**
 * @author Chuck
 *
 */
public class Product implements IXmlSerializable {
private static final long serialVersionUID = 1L;
private int id;
private String category;
private String name;
private String description;
private double price;
public Product() {
}
/**
* @return the id
*/
public int getId() {
return id;
}
/**
* @param id the id to set
*/
public void setId(int id) {
this.id = id;
}
/**
* @return the category
*/
public String getCategory() {
return category;
}
/**
* @param category the category to set
*/
public void setCategory(String category) {
this.category = category;
}
/**
* @return the name
*/
public String getName() {
return name;
}
/**
* @param name the name to set
*/
public void setName(String name) {this.name = name;
}
/**
* @return the description
*/
public String getDescription() {
return description;
}
/**
* @param description the description to set
*/
public void setDescription(String description) {
this.description = description;
}
/**
* @return the price
*/
public double getPrice() {
return price;
}
/**
* @param price the price to set
*/
public void setPrice(double price) {
this.price = price;
}
/* (non-Javadoc)
* @see java.lang.Object#equals(java.lang.Object)
*/
@Override
public boolean equals(Object arg0) {
return this.id == ((Product)arg0).getId();
}
/* (non-Javadoc)
* @see com.wiley.jfib.ch12.store.vo.IXmlSerializable#toXml()
*/
@Override
public String toXml() {
String xml = "<product>";
xml += "<id>" + id + "</id>";
xml += "<cat>" + category + "</cat>";
xml += "<name>" + name + "</name>";
xml += "<desc>" + description + "</desc>";xml += "<price>$" + price + "</price>";
xml += "</product>";
return xml;
}
}CartItem.java
/**
  *
  */
 package com.wiley.jfib.ch12.store.vo;

 /**
  * @author Chuck
  *
  */
 public class CartItem implements IXmlSerializable {

     private static final long serialVersionUID = 1L;
     private int id;
     private int cartId;
     private Product product;
     private int quantity;

     /**
      *
      */
     public CartItem() {
     }

     /**
      * @return the id
      */
     public int getId() {
            return id;
     }

     /**
      * @param id the id to set
      */
     public void setId(int id) {
            this.id = id;
     }

     /**
      * @return the cartId
      */
     public int getCartId() {
return cartId;
}
/**
* @param cartId the cartId to set
*/
public void setCartId(int cartId) {
this.cartId = cartId;
}
/**
* @return the product
*/
public Product getProduct() {
return product;
}
/**
* @param product the product to set
*/
public void setProduct(Product product) {
this.product = product;
}
/**
* @return the quantity
*/
public int getQuantity() {
return quantity;
}
/**
* @param quantity the quantity to set
*/
public void setQuantity(int quantity) {
this.quantity = quantity;
}
/**
* Retrieve the total cost for this cart item
* @return
*/
public double getItemTotal()
{
return product.getPrice() * quantity;
}
/***
*/
public boolean equals(Object obj)
{
CartItem item2 = (CartItem)obj;
return cartId == item2.cartId
&& product.getId() ==
item2.getProduct().getId();
}
/* (non-Javadoc)
* @see com.wiley.jfib.ch12.store.vo.IXmlSerializable#toXml()
*/
@Override
public String toXml() {
String xml = "<item>";
xml += product.toXml();
xml += "<quantity>" + quantity + "</quantity>";
xml += "<item_total>$"
+ this.getItemTotal()
+ "</item_total>";
xml += "</item>";
return xml;
}
}Cart.java
/**
  *
  */
 package com.wiley.jfib.ch12.store.vo;

 import java.util.Collection;
 import java.util.HashSet;

 /**
  * @author Chuck
  *
  */
 public class Cart implements IXmlSerializable {
     private static final long serialVersionUID = 1L;
     private int id;
     private int userId;
     private Collection<CartItem> items;

     /**
      *
      */
     public Cart() {
items = new HashSet<CartItem>();
}
/**
* @return the id
*/
public int getId() {
return id;
}
/**
* @param id the id to set
*/
public void setId(int id) {
this.id = id;
}
/**
* @return the userId
*/
public int getUserId() {
return userId;
}
/**
* @param userId the userId to set
*/
public void setUserId(int userId) {
this.userId = userId;
}
/**
* @return the items
*/
public Collection<CartItem> getItems() {
return items;
}
/**
* @param items the items to set
*/
public void setItems(Collection<CartItem> items) {
this.items = items;
}
/**
*
* @param item
*/public void addItem(CartItem item) {
boolean itemExists = false;
for(CartItem existingItem : items)
{
if(item.equals(existingItem))
{
existingItem.setQuantity
(existingItem.getQuantity()
+ item.getQuantity());
itemExists = true;
break;
}
}
if(!itemExists)
items.add(item);
}
/* (non-Javadoc)
* @see com.wiley.jfib.ch12.store.vo.IXmlSerializable#toXml()
*/
@Override
public String toXml() {
double cartTotal = 0.0;
String xml = "<cart>";
xml += "<userid>" + userId + "</userid>";
xml += "<items>";
for (CartItem item : items)
{
xml += item.toXml();
cartTotal += item.getItemTotal();
}
xml += "</items>";
xml += "<total>$" + cartTotal + "</total>";
xml += "</cart>";
return xml;
}
}As you can see, each of these four value objects has properties and getter and setter methods corresponding to the columns in each of the database tables. They also all implement the toXml() method from the IXmlSerializable interface. Each of the implementations of toXml() returns a string of XML representing that object. The CartItem class has one additional method, getItemTotal(), that calculates the total cost of the item by multiplying the unit price by the quantity. This value is returned to the Flex client in the XML created by the toXml() method.
To store and retrieve these objects by using Hibernate, you need to create a Hibernate mapping file for each of them. Remember that Hibernate mapping files are XML files that by convention have an .hbm.xml suffix and contain information mapping the properties of the object to columns in the database. The process for creating the Hibernate mapping file is the same for all four classes, aside from the filename. To create the Hibernate mapping files, follow these steps:
Right-click the
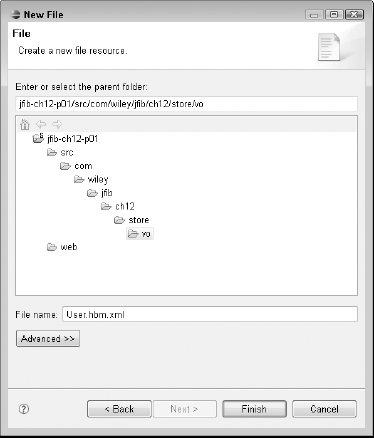
com.wiley.jfib.ch12.store.vopackage in the Project Explorer view and then choose NewOther from the popup menu. The Select a wizard dialog box, as shown in Figure 12.23, opens.Click the arrow next to General to expand it, click File, and then click Next. The New File dialog box, as shown in Figure 12.24, opens.
Type the name of the Hibernate mapping file to create in the File name text field and then click Finish. The filename should be the name of the class followed by the suffix
.hbm.xml(for example,User.hbm.xml). The New File dialog box closes, and the new Hibernate mapping file appears in the Project Explorer view.Repeat steps 1–3 for each of the Hibernate mapping files you need to create.
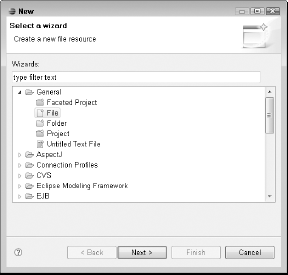
Figure 12.23. The Select a wizard dialog box lets you choose the kind of object you want to create. Select File from below General in the list.
Here are the code listings for each of the Hibernate mapping files:
Cart.hbm.xml
<?xml version="1.0" encoding="UTF-8"?>
<!DOCTYPE hibernate-mapping PUBLIC "-//Hibernate/Hibernate Mapping
   DTD 3.0//EN" "http://hibernate.sourceforge.net/hibernate-mapping-
   3.0.dtd" >
<hibernate-mapping>
   <class name="com.wiley.jfib.ch12.store.vo.Cart" table="CART">
         <id name="id" column="id" type="java.lang.Integer">
               <generator class="increment"/>
         </id>
         <property name="userId" column="user_id"
               type="java.lang.Integer" />
         <set name="items" lazy="false" cascade="all-delete-orphan">
               <key column="cart_id" not-null="true"/>
               <one-to-many
                      class="com.wiley.jfib.ch12.store.vo.CartItem"/>
</set>
</class>
</hibernate-mapping>CartItem.hbm.xml
<?xml version="1.0" encoding="UTF-8"?>
<!DOCTYPE hibernate-mapping PUBLIC "-//Hibernate/Hibernate Mapping
   DTD 3.0//EN" "http://hibernate.sourceforge.net/hibernate-mapping-3.0.dtd" >
<hibernate-mapping>
   <class name="com.wiley.jfib.ch12.store.vo.CartItem"
         table="CART_ITEM">
         <id name="id" column="id" type="java.lang.Integer">
               <generator class="increment"/>
         </id>
         <property name="cartId" insert="false" update="false"
   column="cart_id" type="java.lang.Integer" />
         <many-to-one lazy="false" name="product"
                class="com.wiley.jfib.ch12.store.vo.Product"
                column="product_id"/>
         <property name="quantity" column="quantity"
                type="java.lang.Integer" />
   </class>
</hibernate-mapping>
Product.hbm.xml
<?xml version="1.0" encoding="UTF-8"?>
<!DOCTYPE hibernate-mapping PUBLIC "-//Hibernate/Hibernate Mapping
   DTD 3.0//EN" "http://hibernate.sourceforge.net/hibernate-mapping-
   3.0.dtd" >
<hibernate-mapping>
   <class name="com.wiley.jfib.ch12.store.vo.Product"
   table="PRODUCT">
         <id name="id" column="id" type="java.lang.Integer">
                 <generator class="increment"/>
         </id>
         <property name="category" column="category"
                type="java.lang.String" />
         <property name="name" column="name"
                type="java.lang.String" />
         <property name="description" column="description"
                type="java.lang.String" />
         <property name="price" column="price"
                type="java.lang.Double" />
   </class>
</hibernate-mapping>
User.hbm.xml
<?xml version="1.0" encoding="UTF-8"?>
<!DOCTYPE hibernate-mapping PUBLIC "-//Hibernate/Hibernate Mapping
   DTD 3.0//EN" "http://hibernate.sourceforge.net/hibernate-mapping-
   3.0.dtd" >
<hibernate-mapping>
   <class name="com.wiley.jfib.ch12.store.vo.User" table="USER">
         <id name="id" column="id" type="java.lang.Integer">
               <generator class="increment"/>
         </id>
         <property name="firstName" column="first_name"
                type="java.lang.String" />
         <property name="lastName" column="last_name"
                type="java.lang.String" />
         <property name="userName" column="user_name"
                type="java.lang.String" />
         <property name="password" column="password"
                type="java.lang.String" />
   </class>
</hibernate-mapping>
The Hibernate mapping files contain <property> tags for each property in the object, mapping them to columns in the database table. The mapping file for the Cart class contains a <set> tag that establishes that a single Cart can contain a set of one or more CartItem objects. The mapping file for the CartItem class contains a <many-to-one> tag that establishes that many CartItem objects can contain the same Product class.
Note
For more on Hibernate mapping files, see Chapter 9.
Hibernate also needs a log4j.properties file to configure the logging that it does. To create the log4j.properties file, follow these steps:
Right-click the
web/WEB-INFfolder in the Project Explorer view and then choose NewOther from the popup menu. The Select a wizard dialog box opens.Click the arrow next to General to expand it, click File, and then click Next. The New File dialog box opens.
Type log4j.properties in the File name text field and then click Finish. The New File dialog box closes, and the new
log4j.propertiesfile appears in the Project Explorer view.
Here's the code listing for the log4j.properties file:
log4j.appender.stdout=org.apache.log4j.ConsoleAppender
log4j.appender.stdout.layout=org.apache.log4j.PatternLayout

log4j.rootLogger=debug, stdout
log4j.logger.org.hibernate=error
log4j.logger.org.hibernate.SQL=error
log4j.logger.org.hibernate.type=error
log4j.logger.org.hibernate.cache=error
In this properties file, log4j is configured to output any logging messages to the JBoss console view, which is referred to as stdout, for standard output. Logging for Hibernate is set to output to the console only when an error occurs. This setting results in a minimal amount of information output to the console. To display more information, the logging level can be changed from error to warn, which displays both errors and warnings; debug, which displays errors, warnings, and any debugging information from Hibernate; and info, which is the most verbose level of output.
Note
For more on the log4j.properties file, see Chapter 9.
Finally, the application needs a Hibernate configuration file to allow it to set up communication between Hibernate and the database. The Hibernate configuration file should be named hibernate.cfg.xml. You create it in the root of the src folder. When the project is built, it's placed in the root of the web/WEB-INF/classes folder, where it's accessible on the classpath along with the compiled class files. The configuration is read in when JBoss is started, and the communication with the database is set up at that time.
To create the hibernate.cfg.xml configuration file, follow these steps:
Right-click the
srcfolder in the Project Explorer view and then choose NewOther from the popup menu. The Select a wizard dialog box opens.Click the arrow next to General to expand it, click File, and then click Next. The New File dialog box opens.
Type hibernate.cfg.xml in the File name text field and then click Finish. The New File dialog box closes, and the new Hibernate configuration file appears in the Project Explorer view.
Here's the code listing for the hibernate.cfg.xml file:
<?xml version='1.0' encoding='utf-8'?>
<!DOCTYPE hibernate-configuration PUBLIC
"-//Hibernate/Hibernate Configuration DTD 3.0//EN"
"http://hibernate.sourceforge.net/hibernate-configuration-3.0.dtd">

<hibernate-configuration>
   <session-factory>

       <!-- Database connection settings -->
<property name="connection.driver_class"> com.mysql.jdbc.Driver </property> <property name="connection.url"> jdbc:mysql://localhost:3306/store </property> <property name="connection.username">root</property> <property name="connection.password">toor</property> <property name="connection.autocommit">true</property> <!-- SQL dialect --> <property name="dialect"> org.hibernate.dialect.MySQLDialect </property> <!-- Enable Hibernate's automatic session context management --> <property name="current_session_context_class">jta</property> <!-- Echo all executed SQL to stdout --> <property name="show_sql">true </property> <mapping resource="com/wiley/jfib/ch12/store/vo/Cart.hbm.xml"/> <mapping resource="com/wiley/jfib/ch12/store/vo/CartItem.hbm.xml"/> <mapping resource="com/wiley/jfib/ch12/store/vo/Product.hbm.xml"/> <mapping resource="com/wiley/jfib/ch12/store/vo/User.hbm.xml"/> </session-factory> </hibernate-configuration>
Note
Make sure to use the correct root password for your MySQL database for the value of the "connection.password" property.
Note
For more on the structure and properties of the hibernate.cfg.xml file, see Chapter 9.
The data access layer is the part of the application that communicates with the database. For this application, an interface called IStoreDao defines the data access functions available to the service layer of the application. A class called StoreDao implements this interface and provides the implementations of these data access functions. Remember, when you separate the interface from the implementation, if the need ever arises to change the way the data for the application is accessed, the StoreDao implementation can be changed without needing to change any of the service layer code, which uses the interface and isn't dependent on the implementation of the interface behind the scenes.
The IStoreDao interface contains one method for each of the services in the application. To create the IStoreDao interface, follow these steps:
Right-click the
srcfolder under thejfib-ch12-p01project in the Project Explorer view and then choose NewInterface from the popup menu. The New Java Interface dialog box opens.Type com.wiley.jfib.ch12.store.dao in the Package text field, type IStoreDao in the Name text field, and then click Finish. The newly created package and interface appear in the Project Explorer view.
Edit the IStoreDao interface so that it matches the following code listing:
/**
  *
  */
 package com.wiley.jfib.ch12.store.dao;

 import java.util.Collection;

 import com.wiley.jfib.ch12.store.vo.Cart;
 import com.wiley.jfib.ch12.store.vo.Product;
 import com.wiley.jfib.ch12.store.vo.User;

 /**
  * @author Chuck
  *
  */
 public interface IStoreDao {
     /**
      *
      * @param category
      * @return
      */
     public Collection<Product> getProductList(String category);

     /**
      *
      * @param productId
      * @return
      */
     public Product getProductDetails(String productId);

     /**
      *
      * @param username
      * @param password
      * @return
      */
public User logIn(String username, String password);
/**
*
* @param userId
* @return
*/
public Cart retrieveCart(String userId);
/**
*
* @param userId
* @param product
*/
public Cart addProductToCart(String userId, Product product,
String quantity);
/**
*
* @param userId
* @param product
*/
public Cart addProductToCart(String userId, String productId,
String quantity);
/**
*
* @param product
* @return
*/
public Product saveOrUpdateProduct(Product product);
/**
*
* @param productId
* @return
*/
public void deleteProduct(int productId);
}To create the StoreDao class, follow these steps:
Right-click the
com.wiley.jfib.ch12.store.daopackage in the Project Explorer view and then choose NewClass from the popup menu. The New Java Class dialog box opens.Click the Add button next to the Interfaces list box. The Implemented Interfaces Selection dialog box opens.
Type IStoreDao in the Choose interfaces text field, choose
IStoreDao-com.wiley.jfib.ch12.store.daofrom the Matching items list box, and then click OK. The Implemented Interfaces Selection dialog box closes, and theIStoreDaointerface appears in the Interfaces list box.Click the Browse button next to the Superclass text field. The Superclass Selection dialog box, as shown in Figure 12.25, opens.
Type HibernateDaoSupport in the Choose a type text field, choose
HibernateDaoSupport-org.springframework.orm.hibernate3.supportfrom the Matching items list box, and then click OK. The Superclass Selection dialog box closes, and theHibernateDaoSupportclass appears in the Superclass text field.Type StoreDao in the Name text field, click the Constructors from superclass and Inherited abstract methods check boxes, and then click Finish. The New Java Class dialog box closes, and the newly created class appears in the Project Explorer view.
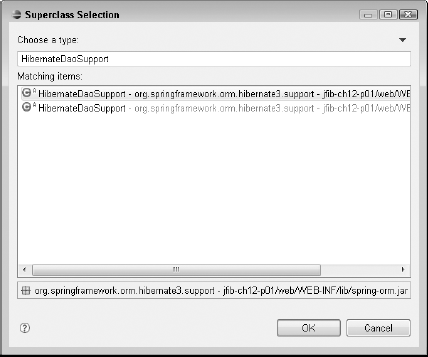
Figure 12.25. The Superclass Selection dialog box lets you choose a superclass for your Java classes. The superclass for the StoreDao class is the HibernateDaoSupport class found in the Spring ORM library.
Edit the StoreDao class so that it matches this code listing:
/**
 *
 */
package com.wiley.jfib.ch12.store.dao;

import java.util.Collection;

import org.hibernate.criterion.DetachedCriteria;
import org.hibernate.criterion.Restrictions;
import org.springframework.orm.hibernate3.support.
   HibernateDaoSupport;

import com.wiley.jfib.ch12.store.vo.Cart;
import com.wiley.jfib.ch12.store.vo.CartItem;
import com.wiley.jfib.ch12.store.vo.Product;
import com.wiley.jfib.ch12.store.vo.User;

/**
 * @author Chuck
 *
 */
public class StoreDao extends HibernateDaoSupport implements
  IStoreDao {

  /**
   *
   */
  public StoreDao() {
  }

  /* (non-Javadoc)
   * @see com.wiley.jfib.ch12.store.dao.
  IStoreDao#addProductToCart(java.lang.String, com.wiley.jfib.ch12.
  store.vo.Product)
   */
  @Override
  @SuppressWarnings("unchecked")
  public Cart addProductToCart(String userId, Product product,
        String quantity) {
          DetachedCriteria criteria =
               DetachedCriteria.forClass(Cart.class)
               .add(Restrictions.eq("userId",
                      Integer.parseInt(userId)));
          Collection<Cart> carts = getHibernateTemplate().
               findByCriteria(criteria, 0, 1);
          Cart cart = new Cart();
          cart.setUserId(Integer.parseInt(userId));
          if(carts.size() > 0)
               cart = carts.iterator().next();
          CartItem item = new CartItem();
          item.setCartId(cart.getId());
          item.setProduct(product);
item.setQuantity(Integer.parseInt(quantity));
cart.addItem(item);
getHibernateTemplate().saveOrUpdate(cart);
return cart;
}
/* (non-Javadoc)
* @see com.wiley.jfib.ch12.store.dao.
IStoreDao#addProductToCart(java.lang.String, com.wiley.jfib.ch12.
store.vo.Product)
*/
@Override
public Cart addProductToCart(String userId, String productId,
String quantity) {
Product product = getProductDetails(productId);
return addProductToCart(userId,product,quantity);
}
/* (non-Javadoc)
* @see com.wiley.jfib.ch12.store.dao.IStoreDao#getProductDetails
(java.lang.String)
*/
@Override
public Product getProductDetails(String productId) {
return (Product)getHibernateTemplate()
.get(Product.class, Integer.parseInt(productId));
}
/* (non-Javadoc)
* @see com.wiley.jfib.ch12.store.dao.
IStoreDao#getProductList(java.lang.String)
*/
@Override
@SuppressWarnings("unchecked")
public Collection<Product> getProductList(String category) {
DetachedCriteria criteria =
DetachedCriteria.forClass(Product.class);
if(category != null)
criteria = criteria.add(Restrictions.eq("category", category));
return getHibernateTemplate().findByCriteria(criteria);
}
/* (non-Javadoc)
* @see com.wiley.jfib.ch12.store.dao.IStoreDao#logIn(java.lang.
String, java.lang.String)
*/
@Override
@SuppressWarnings("unchecked")public User logIn(String username, String password) {
DetachedCriteria criteria =
DetachedCriteria.forClass(User.class)
.add(Restrictions.eq("userName", username))
.add(Restrictions.eq("password", password));
Collection<User> user = getHibernateTemplate().
findByCriteria(criteria, 0, 1);
if(user.size() == 0)
return null;
else
return user.iterator().next();
}
/* (non-Javadoc)
* @see com.wiley.jfib.ch12.store.dao.IStoreDao#retrieveCart(java.
lang.String)
*/
@Override
@SuppressWarnings("unchecked")
public Cart retrieveCart(String userId) {
DetachedCriteria criteria =
DetachedCriteria.forClass(Cart.class)
.add(Restrictions.eq("userId",
Integer.parseInt(userId)));
Collection<Cart> carts =
getHibernateTemplate().findByCriteria(criteria, 0, 1);
Cart cart = new Cart();
cart.setUserId(Integer.parseInt(userId));
if(carts.size() > 0)
cart = carts.iterator().next();
return cart;
}
@Override
public Product saveOrUpdateProduct(Product product) {
getHibernateTemplate().saveOrUpdate(product);
return product;
}
/* (non-Javadoc)
* @see com.wiley.jfib.ch12.store.dao.IStoreDao#deleteProduct(int)
*/
@Override
public void deleteProduct(int productId) {
// TODO Auto-generated method stub
Product product = (Product) getHibernateTemplate().
get(Product.class, productId);if(product != null)
getHibernateTemplate().delete(product);
}
}The methods in the StoreDao class use Hibernate's DetachedCriteria class to define the criteria to be used when retrieving objects. For example, in the getProductList() method, first the DetachedCriteria is created by using the Product class. Then the category passed in is selected, and if it's not null, a restriction is added to the DetachedCriteria to retrieve only the Products in the given category. Finally, the Hibernate template is retrieved, and its findByCriteria method is called by using the DetachedCriteria object to retrieve the Products that fit the criteria. The rest of the methods in the StoreDao class follow this same general pattern.
The service layer contains five service classes that handle requests from the Flex client and return XML data that fits into a well-defined structure. The outermost tag is a <result> tag that contains a type attribute that indicates success or failure. Inside the <result> tag is the XML for the actual result of the operation. For successful operations, this is the XML representation of the object being retrieved. For failure, some well-defined error XML containing the error message is returned.
Because much of the XML structure is the same for all the services, you can separate that code out into its own class and then let each of the services extend that class. This base class is responsible for creating the <result> tag and the standard error XML. Each of the service classes that extend it is responsible for providing the XML from the objects it retrieves. The base class will be abstract, meaning that it can't be instantiated directly. An abstract class typically contains one or more abstract methods, which extending classes are required to provide implementations for. In this way, an abstract class acts much like an interface that provides some implementation code itself.
To create the abstract StoreBaseService class, follow these steps:
Right-click the
com.wiley.jfib.ch12.store.daopackage in the Project Explorer view and then choose NewClass from the popup menu. The New Java Class dialog box opens.Click the Add button next to the Interfaces list box. The Implemented Interfaces Selection dialog box opens.
Type Controller in the Choose interfaces text field, choose
Controller – org.springframework.web.servlet.mvcfrom the Matching items list box, and then click OK. The Implemented Interfaces Selection dialog box closes, and theControllerinterface appears in the Interfaces list box.Type StoreBaseService in the Name text field, click the Abstract and Constructors from superclass check boxes, and then click Finish. The New Java Class dialog box closes, and the newly created class appears in the Project Explorer view.
Edit the StoreBaseService class so that it matches the following code listing:
/**
  *
  */
 package com.wiley.jfib.ch12.store.service;

 import javax.servlet.http.HttpServletRequest;
 import javax.servlet.http.HttpServletResponse;

 import org.springframework.web.servlet.ModelAndView;
 import org.springframework.web.servlet.mvc.Controller;

 import com.wiley.jfib.ch12.store.dao.IStoreDao;

 /**
  * @author Chuck
  *
  */
 public abstract class StoreBaseService implements Controller {
     private IStoreDao storeDao;

     @Override
     public ModelAndView handleRequest(HttpServletRequest arg0,
                  HttpServletResponse arg1) throws Exception
     {
           String xmlString = "";
           try {
                  xmlString = getResultXmlHeader();
                  xmlString += getXmlFromOperation(arg0,arg1);
                  xmlString += getResultXmlFooter();
           } catch (Exception e) {
                  xmlString = getErrorXml(e.getMessage());
           }
           return new ModelAndView("WEB-INF/jsp/xml.jsp",
                  "xmlString",xmlString);
     }

     protected String getErrorXml(String message)
     {
          String errorXml = "<?xml version="1.0"
     encoding="ISO-8859-1"?>";
          errorXml += "<result type="error">";
          errorXml += "<message>";
          errorXml += message;
          errorXml += "</message>";
          errorXml += "</result>";
          return errorXml;
     }
protected String getResultXmlHeader()
{
String resultXml = "<?xml version="1.0"
+ encoding="ISO-8859-1"?>";
resultXml += "<result type="success">";
return resultXml;
}
protected abstract String getXmlFromOperation
(HttpServletRequest request,
HttpServletResponse response) throws Exception;
protected String getResultXmlFooter()
{
return "</result>";
}
/**
* @return the storeDao
*/
public IStoreDao getStoreDao() {
return storeDao;
}
/**
* @param storeDao the storeDao to set
*/
public void setStoreDao(IStoreDao storeDao) {
this.storeDao = storeDao;
}
}The StoreBaseService class implements the Spring Framework's Controller interface, which is part of the Spring Web MVC module. Classes that implement the Controller interface handle requests dispatched to them from the Spring Dispatcher servlet. This class constructs some header XML and then calls an abstract method called getXmlFromOperation(). No implementation is provided for this method. The service classes that extend StoreBaseService are required to provide an implementation for it. This is where the services return the XML representations of the objects they retrieve.
You use the New Java Class dialog box to create each of the five service classes used by this application. These service classes are as follows:
AddProductToCartServiceLogInServiceProductDetailsServiceProductListServiceRetrieveCartService
The same steps are used to create each of these classes. To create the services, follow these steps for each of the five classes:
Right-click the
com.wiley.jfib.ch12.store.servicepackage below thesrcfolder under thejfib-ch12-p01project in the Project Explorer view and then choose NewClass from the popup menu. The New Java Class dialog box opens.Click the Add button next to the Interfaces list box. The Implemented Interfaces Selection dialog box opens.
Type IXmlSerializable in the Choose interfaces text field, choose
IXmlSerializable-com.wiley.jfib.ch12.store.vofrom the Matching items list box, and then click OK. The Implemented Interfaces Selection dialog box closes, and theIXmlSerializableinterface appears in the Interfaces list box.Click the Browse button next to the Superclass text field. The Superclass Selection dialog box opens.
Type StoreBaseService in the Choose a type text field, choose
StoreBaseService-com.wiley.jfib.ch12.store.servicefrom the Matching items list box, and then click OK. The Superclass Selection dialog box closes, and theStoreBaseServiceclass appears in the Superclass text field.Type the class name of the service in the Name text field, click the Constructors from superclass and Inherited abstract methods check boxes, and then click Finish. The newly created class appears in the Project Explorer view.
Repeat steps 1–6 for each of the remaining classes.
Here are the code listings for each of these services:
AddProductToCartService.java
/**
  *
  */
 package com.wiley.jfib.ch12.store.service;

 import javax.servlet.http.HttpServletRequest;
 import javax.servlet.http.HttpServletResponse;

 import com.wiley.jfib.ch12.store.vo.Cart;

 /**
  * @author Chuck
  *
  */
 public class AddProductToCartService extends StoreBaseService {

    /* (non-Javadoc)
     * @see com.wiley.jfib.ch12.store.service.StoreBaseService#getXml
    FromOperation(javax.servlet.http.HttpServletRequest, javax.
    servlet.http.HttpServletResponse)
*/
@Override
protected String getXmlFromOperation(HttpServletRequest request,
HttpServletResponse response) throws Exception {
String productId = request.getParameter("productid");
String userId = request.getParameter("userid");
String quantity = request.getParameter("quantity");
Cart cart = getStoreDao().addProductToCart(userId,
productId, quantity);
return cart.toXml();
}
}LogInService.java
/**
  *
  */
 package com.wiley.jfib.ch12.store.service;

 import javax.servlet.http.HttpServletRequest;
 import javax.servlet.http.HttpServletResponse;

 import com.wiley.jfib.ch12.store.vo.User;

 /**
  * @author Chuck
  *
  */
 public class LogInService extends StoreBaseService {

    /* (non-Javadoc)
     * @see com.wiley.jfib.ch12.store.service.StoreBaseService#getXml
    FromOperation(javax.servlet.http.HttpServletRequest, javax.
    servlet.http.HttpServletResponse)
     */
    @Override
    protected String getXmlFromOperation(HttpServletRequest request,
                 HttpServletResponse response) throws Exception {
          String username = request.getParameter("username");
          String password = request.getParameter("password");
          User user = getStoreDao().logIn(username, password);
          if(user == null)
                 throw new Exception
                        ("Invalid credentials - login failed.");
          return user.toXml();
     }
}
ProductDetailsService.java
/**
  *
  */
 package com.wiley.jfib.ch12.store.service;

 import javax.servlet.http.HttpServletRequest;
 import javax.servlet.http.HttpServletResponse;

 import com.wiley.jfib.ch12.store.vo.Product;

 /**
  * @author Chuck
  *
  */
 public class ProductDetailsService extends StoreBaseService {
    /* (non-Javadoc)
     * @see com.wiley.jfib.ch12.store.service.StoreBaseService#getXml
    FromOperation(javax.servlet.http.HttpServletRequest, javax.
    servlet.http.HttpServletResponse)
     */
    @Override
    protected String getXmlFromOperation(HttpServletRequest request,
                 HttpServletResponse response) throws Exception {
          String productId = request.getParameter("id");
          Product product = getStoreDao().
                 getProductDetails(productId);
          return product.toXml();
    }
}
ProductListService.java
/**
  *
  */
 package com.wiley.jfib.ch12.store.service;

 import java.util.Collection;

 import javax.servlet.http.HttpServletRequest;
 import javax.servlet.http.HttpServletResponse;

 import com.wiley.jfib.ch12.store.vo.Product;

 /**
  * @author Chuck
  *
  */
 public class ProductListService extends StoreBaseService {
/* (non-Javadoc)
* @see com.wiley.jfib.ch12.store.service.StoreBaseService#getXml
FromOperation(javax.servlet.http.HttpServletRequest, javax.
servlet.http.HttpServletResponse)
*/
@Override
protected String getXmlFromOperation(HttpServletRequest request,
HttpServletResponse response) throws Exception {
String xmlString = "";
String category = request.getParameter("cat");
Collection<Product> products = getStoreDao().
getProductList(category);
xmlString += "<products>";
for(Product product : products)
xmlString += product.toXml();
xmlString += "</products>";
return xmlString;
}
}RetrieveCartService.java
/**
  *
  */
 package com.wiley.jfib.ch12.store.service;

 import javax.servlet.http.HttpServletRequest;
 import javax.servlet.http.HttpServletResponse;

 import com.wiley.jfib.ch12.store.vo.Cart;

 /**
  * @author Chuck
  *
  */
 public class RetrieveCartService extends StoreBaseService {
    /* (non-Javadoc)
     * @see com.wiley.jfib.ch12.store.service.StoreBaseService#getXml
    FromOperation(javax.servlet.http.HttpServletRequest, javax.
    servlet.http.HttpServletResponse)
     */
    @Override
    protected String getXmlFromOperation(HttpServletRequest request,
                 HttpServletResponse response) throws Exception {
          String userId = request.getParameter("userid");
          Cart cart = getStoreDao().retrieveCart(userId);
          return cart.toXml();
    }
}
The only method implemented by the service classes is the abstract getXmlFromOperation() method in the StoreBaseService base class. Each service uses the IStoreDao interface provided by the base class to retrieve the data it needs and then calls the toXml() method on the returned object to get the XML representation of the object. The StoreBaseService class then places this XML inside the <result> tags, and this XML block is returned to the client.
As you saw in the StoreBaseService class, the view for all these services is a JSP file named xml.jsp. This JSP file simply outputs the XML string so that the Flex client can use it. To create the xml.jsp file, follow these steps:
Right-click the
web/WEB-INFfolder in the Project Explorer view and then choose NewOther from the popup menu. The Select a wizard dialog box opens.Click the arrow next to General to expand it, click File, and then click Next. The New File dialog box opens.
Type /jsp at the end of the path in the Enter or select the parent folder text field, type xml.jsp in the File name text field, and then click Finish. The New File dialog box closes, and the new JSP file appears in the Project Explorer view.
The code listing for the xml.jsp file follows. The code should be entered on a single line and without breaks:
<?xml version="1.0" encoding="ISO-8859-1" ?><%@ page language="java"
    contentType="text/html; charset=ISO-8859-1"
    pageEncoding="ISO-8859-1"%><%@ taglib prefix="c" uri="http://
    java.sun.com/jsp/jstl/core" %><c:out value="${xmlString}"/>
The JSP page uses the JSTL tag library to output the value of the variable xmlString passed in from the Controller. The Flex client receives this block of XML, parses it, and displays the data to the user.
Note
For more on the JSTL tag library and JSP views, see Chapter 6.
There are two configuration files needed for a Spring Web MVC Web application. The first is web.xml, which is the standard configuration file for all Web applications. In the web.xml file, you set up a servlet registration and mapping for the Spring dispatcher servlet. This servlet handles all incoming requests to the Web application and delegates them to the appropriate service class based on the URL of the request. The mapping for each of the service classes as well as the Hibernate template configuration is handled in the second configuration file: spring-dispatcher-servlet.xml. In this file, each URL is mapped to a specific controller, and the Hibernate configuration for the Hibernate session and template is defined.
First, create spring-dispatcher-servlet.xml by following these steps:
Right-click the
web/WEB-INFfolder in the Project Explorer view and then choose NewOther from the popup menu. The Select a wizard dialog box opens.Click the arrow next to General to expand it, click File, and then click Next. The New File dialog box opens.
Type spring-dispatcher-servlet.xml in the File name text field and then click Finish. The New File dialog box closes, and the new Spring configuration file appears in the Project Explorer view.
Here's the code listing for the spring-dispatcher-servlet.xml file:
<?xml version="1.0" encoding="UTF-8"?>
<beans xmlns="http://www.springframework.org/schema/beans"
       xmlns:xsi="http://www.w3.org/2001/XMLSchema-instance"
       xsi:schemaLocation="http://www.springframework.org/schema/beans
          http://www.springframework.org/schema/beans/spring-beans-2.5.xsd">
    <bean id="sessionfactory"
          class="org.springframework.orm.hibernate3.LocalSessionFactoryBean">
         <property name="configLocation">
            <value>classpath:/hibernate.cfg.xml</value>
       </property>
    </bean>
    <bean id="hibernatetemplate"
          class="org.springframework.orm.hibernate3.HibernateTemplate">
          <property name="sessionFactory" ref="sessionFactory"/>
    </bean>
    <bean name="storeDao"
          class="com.wiley.jfib.ch12.store.dao.StoreDao">
          <property name="hibernateTemplate"
                 ref="hibernateTemplate"/>
    </bean>
    <bean name="/add-product.htm"
          class="com.wiley.jfib.ch12.store.service.AddProductToCartService">
          <property name="storeDao" ref="storeDao"/>
    </bean>
    <bean name="/cart.htm"
          class="com.wiley.jfib.ch12.store.service.RetrieveCartService">
          <property name="storeDao" ref="storeDao"/>
    </bean>
    <bean name="/product-list.htm"
          class="com.wiley.jfib.ch12.store.service.ProductListService">
          <property name="storeDao" ref="storeDao"/>
    </bean>
<bean name="/product-details.htm" class="com.wiley.jfib.ch12.store.service.ProductDetailsService">
<property name="storeDao" ref="storeDao"/>
</bean>
<bean name="/login.htm"
class="com.wiley.jfib.ch12.store.service.LogInService">
<property name="storeDao" ref="storeDao"/>
</bean>
</beans>This configuration file defines the Spring beans for the Hibernate template and session by using the hibernate.cfg.xml file to provide them with the Hibernate configuration. It also maps a URL to each service class and then sets up the StoreDao property each service uses to retrieve the data it needs.
Now create the web.xml configuration file by following the same steps you used to create spring-dispatcher-servlet.xml. The code listing for web.xml follows:
<?xml version="1.0" encoding="UTF-8"?>
<web-app version="2.4"
         xmlns="http://java.sun.com/xml/ns/j2ee"
         xmlns:xsi="http://www.w3.org/2001/XMLSchema-instance"
         xsi:schemaLocation="http://java.sun.com/xml/ns/j2ee
         http://java.sun.com/xml/ns/j2ee/web-app_2_4.xsd" >
 <servlet>
   <servlet-name>spring-dispatcher</servlet-name>
   <servlet-class>
         org.springframework.web.servlet.DispatcherServlet
   </servlet-class>
   <load-on-startup>1</load-on-startup>
</servlet>

<servlet-mapping>
   <servlet-name>spring-dispatcher</servlet-name>
   <url-pattern>*.htm</url-pattern>
</servlet-mapping>
</web-app>
This configuration file defines the Spring DispatcherServlet and maps it to a URL pattern that says that any URL ending in .htm is handled by this servlet.
Note
For more on these Web application configuration files, see Chapter 6.
Now that the setup is finished, you can create the Ant build properties file and the build.xml file. To create these two files, follow these steps:
Right-click the
jfib-ch12-p01project in the Project Explorer view and then choose NewFile from the popup menu. The New File dialog box opens.Type store-build.properties in the File name text field and then click Finish. The New File dialog box closes, and the newly created
store-build.propertiesfile appears below thejfib-ch12-p01project in the Project Explorer view.Right-click the
jfib-ch12-p01project in the Project Explorer view and then choose NewFile from the popup menu. The New File dialog box opens.Type build.xml in the File name text field and then click Finish. The New File dialog box closes, and the newly created
build.xmlfile appears below thejfib-ch12-p01project in the Project Explorer view.
The properties contained in the store-build.properties file are used by the build.xml build file, so first edit the store-build.properties file to match this code listing:
# Ant build properties for store
src.dir=src
web.dir=web
build.dir=${web.dir}/WEB-INF/classes

name=store

appserver.home=${env.JBOSS_HOME}/server/default
appserver.lib=${appserver.home}/lib
deploy.path=${appserver.home}/deploy
Note
For more on Ant build properties files, see Chapter 6.
This properties file contains properties for the Java source and Web file directories in the project, the build output directory, the application name, the JBoss home, and the application deployment path.
Now edit the build.xml file to match this code listing:
<?xml version="1.0" encoding="UTF-8"?>
<project name="store" basedir="." default="usage">
    <property environment="env"/>
     <property file="store-build.properties"/>

     <path id="cp">
<fileset dir="${web.dir}/WEB-INF/lib">
<include name="*.jar"/>
</fileset>
<fileset dir="${appserver.lib}">
<include name="servlet*.jar"/>
</fileset>
<pathelement path="${build.dir}"/>
</path>
<target name="usage">
<echo message=""/>
<echo message="${name} build file"/>
<echo message="-----------------------------------"/>
<echo message=""/>
<echo message="Available targets are:"/>
<echo message=""/>
<echo message="build --> Build the application"/>
<echo message="deploy --> Deploy application as a WAR
file"/>
<echo message=""/>
</target>
<target name="build" description="Compile main source tree java
files">
<mkdir dir="${build.dir}"/>
<javac destdir="${build.dir}" source="1.5" target="1.5"
debug="true" deprecation="false" optimize="false"
failonerror="true">
<src path="${src.dir}"/>
<classpath refid="cp"/>
</javac>
</target>
<target name="deploy" depends="build" description="Deploy
application as a WAR file">
<war destfile="${name}.war"
webxml="${web.dir}/WEB-INF/web.xml">
<fileset dir="${web.dir}">
<include name="**/*.*"/>
</fileset>
</war>
<copy todir="${deploy.path}" preservelastmodified="true">
<fileset dir=".">
<include name="*.war"/>
</fileset>
</copy>
</target>
</project>Note
For more on the structure and functions of Ant build.xml files, see Chapter 6.
To run the Ant build script from within Eclipse, you need to add it to the Ant view in your project. To add the build script to the Ant view, follow these steps:
Choose Window
Show ViewOther. The Show View dialog box, as shown in Figure 12.26, opens.Click the arrow next to Ant to expand it, click Ant in the expanded menu, and then click OK. The Ant view opens.
Click the Add Buildfiles button (the leftmost button in the Ant view, containing a plus sign next to an ant icon) in the Ant view. The Buildfile Selection dialog box opens.
Click the arrow next to the project name to expand it, click the
build.xmlfile, as shown in Figure 12.27, and then click OK. The Buildfile Selection dialog box closes, and the build file is added to the Ant view, as shown in Figure 12.28.
Figure 12.27. Choose the build.xml file for your project in the Buildfile Selection dialog box to add it to the Ant view.
Figure 12.28. The build file appears in the Ant view using the name of the project as defined in build.xml.
Click the arrow next to the build file entry in the Ant view to expand it and see the available build targets. The three targets you saw in the build.xml file appear here. Now double-click the deploy target to run it. Because the build target has never been run, the deploy target first launches the build target to compile the code, runs the deploy target to package the application into a WAR file, and then deploys the WAR file to the JBoss server.
Once the application has been successfully deployed, you can start up JBoss to see the application in action. To start JBoss and test your application, follow these steps:
Switch to the Servers view by clicking the Servers tab.
Click the Start the Server button (the green button with the white arrow in the Servers view). Eclipse switches to the Console view while JBoss starts up. Once the server startup has completed, Eclipse switches back to the Servers view and then shows the state of the JBoss server as Started, as shown in Figure 12.29.
Open your Web browser, type
http://localhost:8080/store/product-list.htmin the address bar, and then press Enter. You should see the screen shown in Figure 12.30.


Figure 12.30. This screen indicates that the Java storefront application has been successfully deployed to JBoss.
In a browser, this data is returned as an unformatted block of XML and is fairly unreadable. This Web application's data is meant to be parsed and displayed in the Flex client. For testing purposes, however, it can be useful to access each of the services directly in a Web browser to examine the XML that's returned for any mistakes that might cause problems for the Flex client.
In this chapter, you wrote the Java back end for a Web storefront application. First, you created a database to hold the data for the store. Next, you created the Java code, including all the objects to represent the store data, the data access code to communicate with the database, and the Spring controllers to receive requests from the front end. Finally, you wrote an Ant build script to build the application and then deployed it to the JBoss server.
The Java Web application is now finished and ready to provide data to a Flex client. In Chapter 13, you design and develop the Flex client, learn how to communicate with the Java server by using Flex, and parse the XML data returned from the Java server.