
5. Control Statements: Part 2
Objectives
In this chapter you’ll learn:
• To use the for and do...while repetition statements to execute statements in a program repeatedly.
• To understand multiple selection using the switch selection statement.
• To use the break and continue program control statements to alter the flow of control.
• To use the logical operators to form complex conditional expressions in control statements.
Not everything that can be counted counts, and not every thing that counts can be counted.
—Albert Einstein
Who can control his fate?
—William Shakespeare
The used key is always bright.
—Benjamin Franklin
Intelligence ... is the faculty of making artificial objects, especially tools to make tools.
—Henri Bergson
Every advantage in the past is judged in the light of the final issue.
—Demosthenes
Outline
5.1 Introduction
5.2 Essentials of Counter-Controlled Repetition
5.3 for Repetition Statement
5.4 Examples Using the for Statement
5.5 do...while Repetition Statement
5.6 switch Multiple-Selection Statement
5.7 break and continue Statements
5.8 Logical Operators
5.9 (Optional) Software Engineering Case Study: Identifying Objects’ States and Activities
5.10 Wrap-Up
5.1 Introduction
Chapter 4 began our introduction to the types of building blocks that are available for problem solving. This chapter introduces Java’s remaining control statements. The control statements we study here and in Chapter 4 are helpful in building and manipulating objects.
In this chapter, we demonstrate Java’s for, do...while and switch statements. Through a series of short examples using while and for, we explore the essentials of counter-controlled repetition. We devote a portion of the chapter (and Chapter 7) to expanding the GradeBook class presented in Chapters 3–4. In particular, we create a version of class GradeBook that uses a switch statement to count the number of A, B, C, D and F grade equivalents in a set of numeric grades entered by the user. We introduce the break and continue program control statements. We discuss Java’s logical operators, which enable you to use more complex conditional expressions in control statements.
5.2 Essentials of Counter-Controlled Repetition
This section uses the while repetition statement introduced in Chapter 4 to formalize the elements required to perform counter-controlled repetition. Counter-controlled repetition requires
1. a control variable (or loop counter)
2. the initial value of the control variable
3. the increment (or decrement) by which the control variable is modified each time through the loop (also known as each iteration of the loop)
4. the loop-continuation condition that determines whether looping should continue.
To see these elements of counter-controlled repetition, consider the application of Fig. 5.1, which uses a loop to display the numbers from 1 through 10. Note that Fig. 5.1 contains only one method, main, which does all of the class’s work. For most applications in Chapters 3–4 we have encouraged the use of two separate files—one that declares a reusable class (e.g., Account) and one that instantiates one or more objects of that class (e.g., AccountTest) and demonstrates its (their) functionality. Occasionally, however, it is more appropriate simply to create one class whose main method concisely illustrates a basic concept. Throughout this chapter, we use several one-class examples like Fig. 5.1 to demonstrate the mechanics of Java’s control statements.
Fig. 5.1. Counter-controlled repetition with the while repetition statement.

In Fig. 5.1, the elements of counter-controlled repetition are defined in lines 8, 10 and 13. Line 8 declares the control variable (counter) as an int, reserves space for it in memory and sets its initial value to 1. Variable counter could also have been declared and initialized with the following local-variable declaration and assignment statements:
int counter; // declare counter
counter = 1; // initialize counter to 1
Line 12 displays control variable counter’s value during each iteration of the loop. Line 13 increments the control variable by 1 for each iteration of the loop. The loop-continuation condition in the while (line 10) tests whether the value of the control variable is less than or equal to 10 (the final value for which the condition is true). Note that the program performs the body of this while even when the control variable is 10. The loop terminates when the control variable exceeds 10 (i.e., counter becomes 11).
Common Programming Error 5.1
![]()
Because floating-point values may be approximate, controlling loops with floating-point variables may result in imprecise counter values and inaccurate termination tests.
Error-Prevention Tip 5.1
![]()
Control counting loops with integers.
Good Programming Practice 5.1
![]()
Place blank lines above and below repetition and selection control statements, and indent the statement bodies to enhance readability.
The program in Fig. 5.1 can be made more concise by initializing counter to 0 in line 8 and preincrementing counter in the while condition as follows:
![]()
This code saves a statement (and eliminates the need for braces around the loop’s body), because the while condition performs the increment before testing the condition. (Recall from Section 4.10 that the precedence of ++ is higher than that of <=.) Coding in such a condensed fashion takes practice, might make code more difficult to read, debug, modify and maintain, and typically should be avoided.
5.3 for Repetition Statement
Section 5.2 presented the essentials of counter-controlled repetition. The while statement can be used to implement any counter-controlled loop. Java also provides the for repetition statement, which specifies the counter-controlled-repetition details in a single line of code. Figure 5.2 reimplements the application of Fig. 5.1 using for.
Fig. 5.2. Counter-controlled repetition with the for repetition statement.

The application’s main method operates as follows: When the for statement (lines 10–11) begins executing, the control variable counter is declared and initialized to 1. (Recall from Section 5.2 that the first two elements of counter-controlled repetition are the control variable and its initial value.) Next, the program checks the loop-continuation condition, counter <= 10, which is between the two required semicolons. Because the initial value of counter is 1, the condition initially is true. Therefore, the body statement (line 11) displays control variable counter’s value, namely 1. After executing the loop’s body, the program increments counter in the expression counter++, which appears to the right of the second semicolon. Then the loop-continuation test is performed again to determine whether the program should continue with the next iteration of the loop. At this point, the control variable value is 2, so the condition is still true (the final value is not exceeded)—thus, the program performs the body statement again (i.e., the next iteration of the loop). This process continues until the numbers 1 through 10 have been displayed and the counter’s value becomes 11, causing the loop-continuation test to fail and repetition to terminate (after 10 repetitions of the loop body at line 11). Then the program performs the first statement after the for—in this case, line 13.
Note that Fig. 5.2 uses (in line 10) the loop-continuation condition counter <= 10. If you incorrectly specified counter < 10 as the condition, the loop would iterate only nine times. This mistake is a common logic error called an off-by-one error.
Figure 5.3 takes a closer look at the for statement in Fig. 5.2. The for’s first line (including the keyword for and everything in parentheses after for)—line 10 in Fig. 5.2—is sometimes called the for statement header, or simply the for header. Note that the for header “does it all”—it specifies each item needed for counter-controlled repetition with a control variable. If there is more than one statement in the body of the for, braces ({ and }) are required to define the body of the loop.
Fig. 5.3. for statement header components.

The general format of the for statement is
for ( initialization; loopContinuationCondition; increment )
statement
where the initialization expression names the loop’s control variable and optionally provides its initial value, loopContinuationCondition is the condition that determines whether the loop should continue executing and increment modifies the control variable’s value (possibly an increment or decrement), so that the loop-continuation condition eventually becomes false. The two semicolons in the for header are required.
Common Programming Error 5.2
![]()
Using commas instead of the two required semicolons in a for header is a syntax error.
In most cases, the for statement can be represented with an equivalent while statement as follows:

In Section 5.7, we show a case in which a for statement cannot be represented with an equivalent while statement.
Typically, for statements are used for counter-controlled repetition and while statements for sentinel-controlled repetition. However, while and for can each be used for either repetition type.
If the initialization expression in the for header declares the control variable (i.e., the control variable’s type is specified before the variable name, as in Fig. 5.2), the control variable can be used only in that for statement—it will not exist outside the for statement. This restricted use of the name of the control variable is known as the variable’s scope. The scope of a variable defines where it can be used in a program. For example, a local variable can be used only in the method that declares the variable and only from the point of declaration through the end of the method. Scope is discussed in detail in Chapter 6, Methods: A Deeper Look.
Common Programming Error 5.3
![]()
When a for statement’s control variable is declared in the initialization section of the for’s header, using the control variable after the for's body is a compilation error.
All three expressions in a for header are optional. If the loopContinuationCondition is omitted, Java assumes that the loop-continuation condition is always true, thus creating an infinite loop. You might omit the initialization expression if the program initializes the control variable before the loop. You might omit the increment expression if the program calculates the increment with statements in the loop’s body or if no increment is needed. The increment expression in a for acts as if it were a standalone statement at the end of the for’s body. Therefore, the expressions
counter = counter + 1
counter += 1
++counter
counter++
are equivalent increment expressions in a for statement. Many programmers prefer counter++ because it is concise and because a for loop evaluates its increment expression after its body executes. Therefore, the postfix increment form seems more natural. In this case, the variable being incremented does not appear in a larger expression, so preincrementing and postincrementing actually have the same effect.
Performance Tip 5.1
![]()
There is a slight performance advantage to preincrementing, but if you choose to postincrement because it seems more natural (as in a for header), optimizing compilers will generate Java bytecode that uses the more efficient form anyway.
Good Programming Practice 5.2
![]()
In most cases, preincrementing and postincrementing are both used to add 1 to a variable in a statement by itself. In these cases, the effect is exactly the same, except that preincrementing has a slight performance advantage. Given that the compiler typically optimizes your code to help you get the best performance, use the idiom with which you feel most comfortable in these situations.
![]()
Placing a semicolon immediately to the right of the right parenthesis of a for header makes that for’s body an empty statement. This is normally a logic error.
Error-Prevention Tip 5.2
![]()
Infinite loops occur when the loop-continuation condition in a repetition statement never becomes false. To prevent this situation in a counter-controlled loop, ensure that the control variable is incremented (or decremented) during each iteration of the loop. In a sentinel-controlled loop, ensure that the sentinel value is eventually input.
The initialization, loop-continuation condition and increment portions of a for statement can contain arithmetic expressions. For example, assume that x= 2 and y= 10. If x and y are not modified in the body of the loop, the statement
for ( int j = x; j <= 4 * x * y; j += y / x )
is equivalent to the statement
for ( int j = 2; j <= 80; j += 5 )
The increment of a for statement may also be negative, in which case it is really a decrement, and the loop counts downward.
If the loop-continuation condition is initially false, the program does not execute the for statement’s body. Instead, execution proceeds with the statement following the for.
Programs frequently display the control variable value or use it in calculations in the loop body, but this use is not required. The control variable is commonly used to control repetition without mentioning the control variable in the body of the for.
Error-Prevention Tip 5.3
![]()
Although the value of the control variable can be changed in the body of a for loop, avoid doing so, because this practice can lead to subtle errors.
The for statement’s UML activity diagram is similar to that of the while statement (Fig. 4.4). Figure 5.4 shows the activity diagram of the for statement in Fig. 5.2. The diagram makes it clear that initialization occurs once before the loop-continuation test is evaluated the first time, and that incrementing occurs each time through the loop after the body statement executes.
Fig. 5.4. UML activity diagram for the for statement in Fig. 5.2.

5.4 Examples Using the for Statement
The following examples show techniques for varying the control variable in a for statement. In each case, we write the appropriate for header. Note the change in the relational operator for loops that decrement the control variable.
a. Vary the control variable from 1 to 100 in increments of 1.
for ( int i = 1; i <= 100; i++ )
b. Vary the control variable from 100 to 1 in decrements of 1.
for ( int i = 100; i >= 1; i-- )
c. Vary the control variable from 7 to 77 in increments of 7.
for ( int i = 7; i <= 77; i += 7 )
d. Vary the control variable from 20 to 2 in decrements of 2.
for ( int i = 20; i >= 2; i -= 2 )
e. Vary the control variable over the following sequence of values: 2, 5, 8, 11, 14, 17, 20.
for ( int i = 2; i <= 20; i += 3 )
f. Vary the control variable over the following sequence of values: 99, 88, 77, 66, 55, 44, 33, 22, 11, 0.
for ( int i = 99; i >= 0; i -= 11 )
Common Programming Error 5.5
![]()
Not using the proper relational operator in the loop-continuation condition of a loop that counts downward (e.g., using i<= 1 instead of i>= 1 in a loop counting down to 1) is usually a logic error.
Application: Summing the Even Integers from 2 to 20
We now consider two sample applications that demonstrate simple uses of for. The application in Fig. 5.5 uses a for statement to sum the even integers from 2 to 20 and store the result in an int variable called total.
Fig. 5.5. Summing integers with the for statement.

The initialization and increment expressions can be comma-separated lists of expressions that enable you to use multiple initialization expressions or multiple increment expressions. For example, although this is discouraged, the body of the for statement in lines 11–12 of Fig. 5.5 could be merged into the increment portion of the for header by using a comma as follows:
for ( int number = 2; number <= 20; total += number, number += 2 )
; // empty statement
Good Programming Practice 5.3
![]()
Limit the size of control statement headers to a single line if possible.
Application: Compound-Interest Calculations
The next application uses the for statement to compute compound interest. Consider the following problem:
A person invests $1000 in a savings account yielding 5% interest. Assuming that all the interest is left on deposit, calculate and print the amount of money in the account at the end of each year for 10 years. Use the following formula to determine the amounts:
a = p(1 + r)n
where
p is the original amount invested (i.e., the principal)
r is the annual interest rate (e.g., use 0.05 for 5%)
n is the number of years
a is the amount on deposit at the end of the nth year.
This problem involves a loop that performs the indicated calculation for each of the 10 years the money remains on deposit. The solution is the application shown in Fig. 5.6. Lines 8–10 in method main declare double variables amount, principal and rate, and initialize principal to 1000.0 and rate to 0.05. Java treats floating-point constants like 1000.0 and 0.05 as type double. Similarly, Java treats whole-number constants like 7 and -22 as type int.
Fig. 5.6. Compound-interest calculations with for.

Line 13 outputs the headers for this application’s two columns of output. The first column displays the year, and the second column the amount on deposit at the end of that year. Note that we use the format specifier %20s to output the String "Amount on Deposit". The integer 20 between the % and the conversion character s indicates that the value output should be displayed with a field width of 20—that is, printf displays the value with at least 20 character positions. If the value to be output is less than 20 character positions wide (17 characters in this example), the value is right justified in the field by default. If the year value to be output were more than four character positions wide, the field width would be extended to the right to accommodate the entire value—this would push the amount field to the right, upsetting the neat columns of our tabular output. To indicate that values should be output left justified, simply precede the field width with the minus sign (–) formatting flag.
The for statement (lines 16–23) executes its body 10 times, varying control variable year from 1 to 10 in increments of 1. This loop terminates when control variable year becomes 11. (Note that year represents n in the problem statement.)
Classes provide methods that perform common tasks on objects. In fact, most methods must be called on a specific object. For example, to output text in Fig. 5.6, line 13 calls method printf on the System.out object. Many classes also provide methods that perform common tasks and do not require objects. Recall from Section 3.3 that these are called static methods. For example, Java does not include an exponentiation operator, so the designers of Java’s Math class defined static method pow for raising a value to a power. You can call a static method by specifying the class name followed by a dot (.) and the method name, as in
ClassName.methodName( arguments )
In Chapter 6, you’ll learn how to implement static methods in your own classes.
We use static method pow of class Math to perform the compound-interest calculation in Fig. 5.6. Math.pow(x, y) calculates the value of x raised to the yth power. The method receives two double arguments and returns a double value. Line 19 performs the calculation a = p (1 + r)n, where a is amount, p is principal, r is rate and n is year.
After each calculation, line 22 outputs the year and the amount on deposit at the end of that year. The year is output in a field width of four characters (as specified by %4d). The amount is output as a floating-point number with the format specifier %,20.2f. The comma (,) formatting flag indicates that the floating-point value should be output with a grouping separator. The actual separator used is specific to the user’s locale (i.e., country). For example, in the United States, the number will be output using commas to separate every three digits and a decimal point to separate the fractional part of the number, as in 1,234.45. The number 20 in the format specification indicates that the value should be output right justified in a field width of 20 characters. The .2 specifies the formatted number’s precision—in this case, the number is rounded to the nearest hundredth and output with two digits to the right of the decimal point.
We declared variables amount, principal and rate to be of type double in this example. We are dealing with fractional parts of dollars and thus need a type that allows decimal points in its values. Unfortunately, floating-point numbers can cause trouble. Here is a simple explanation of what can go wrong when using double (or float) to represent dollar amounts (assuming that dollar amounts are displayed with two digits to the right of the decimal point): Two double dollar amounts stored in the machine could be 14.234 (which would normally be rounded to 14.23 for display purposes) and 18.673 (which would normally be rounded to 18.67 for display purposes). When these amounts are added, they produce the internal sum 32.907, which would normally be rounded to 32.91 for display purposes. Thus, your output could appear as

but a person adding the individual numbers as displayed would expect the sum to be 32.90. You have been warned!
Good Programming Practice 5.4
![]()
Do not use variables of type double (or float) to perform precise monetary calculations. The imprecision of floating-point numbers can cause errors.
Note that some third-party vendors provide for-sale class libraries that perform precise monetary calculations. In addition, the Java API provides class java.math.BigDecimal for performing calculations with arbitrary precision floating-point values.
Note that the body of the for statement contains the calculation 1.0 + rate, which appears as an argument to the Math.pow method. In fact, this calculation produces the same result each time through the loop, so repeating the calculation every iteration of the loop is wasteful.
Performance Tip 5.2
![]()
In loops, avoid calculations for which the result never changes—such calculations should typically be placed before the loop. [Note: Optimizing compilers may place such calculations outside loops in the compiled code.]
5.5 do...while Repetition Statement
The do...while repetition statement is similar to the while statement. In the while, the program tests the loop-continuation condition at the beginning of the loop, before executing the loop’s body; if the condition is false, the body never executes. The do...while statement tests the loop-continuation condition after executing the loop’s body; therefore, the body always executes at least once. When a do...while statement terminates, execution continues with the next statement in sequence. Figure 5.7 uses a do...while (lines 10–14) to output the numbers 1–10.
Fig. 5.7. do...while repetition statement.
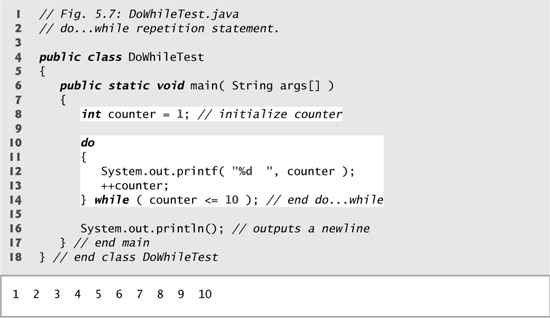
Line 8 declares and initializes control variable counter. Upon entering the do...while statement, line 12 outputs counter’s value and line 13 increments counter. Then the program evaluates the loop-continuation test at the bottom of the loop (line 14). If the condition is true, the loop continues from the first body statement in the do...while (line 12). If the condition is false, the loop terminates and the program continues with the next statement after the loop.
Figure 5.8 contains the UML activity diagram for the do...while statement. This diagram makes it clear that the loop-continuation condition is not evaluated until after the loop performs the action state at least once. Compare this activity diagram with that of the while statement (Fig. 4.4).
Fig. 5.8. do...while repetition statement UML activity diagram.

It is not necessary to use braces in the do...while repetition statement if there is only one statement in the body. However, most programmers include the braces, to avoid confusion between the while and do...while statements. For example,
while ( condition )
is normally the first line of a while statement. A do...while statement with no braces around a single-statement body appears as:
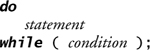
which can be confusing. A reader may misinterpret the last line—while( condition );—as a while statement containing an empty statement (the semicolon by itself). Thus, the do...while statement with one body statement is usually written as follows:

Good Programming Practice 5.5
![]()
Always include braces in a do...while statement, even if they are not necessary. This helps eliminate ambiguity between the while statement and a do...while statement.
5.6 switch Multiple-Selection Statement
We discussed the if single-selection statement and the if...else double-selection statement in Chapter 4. Java provides the switch multiple-selection statement to perform different actions based on the possible values of an integer variable or expression. Each action is associated with the value of a constant integral expression (i.e., a constant value of type byte, short, int or char, but not long) that the variable or expression on which the switch is based may assume.
GradeBook Class with switch Statement to Count A, B, C, D and F Grades
Figure 5.9 contains an enhanced version of the GradeBook class introduced in Chapter 3 and further developed in Chapter 4. The version of the class we now present not only calculates the average of a set of numeric grades entered by the user, but uses a switch statement to determine whether each grade is the equivalent of an A, B, C, D or F and to increment the appropriate grade counter. The class also displays a summary of the number of students who received each grade. Refer to Fig. 5.10 for sample input and output of the GradeBookTest application that uses class GradeBook to process a set of grades.
Fig. 5.9. GradeBook class uses switch statement to count A, B, C, D and F grades.
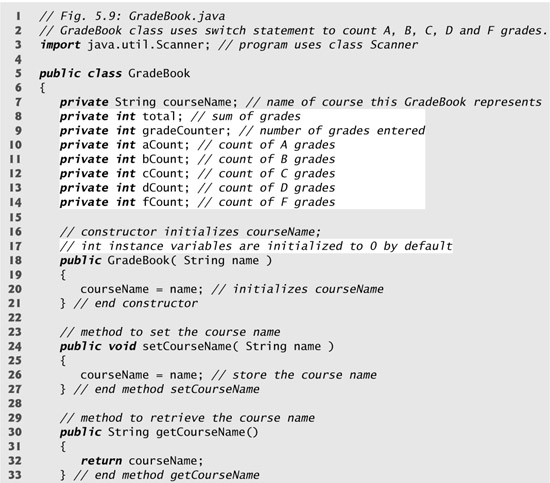
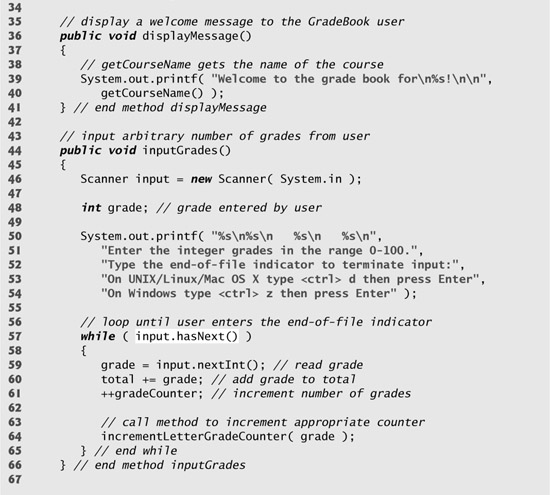

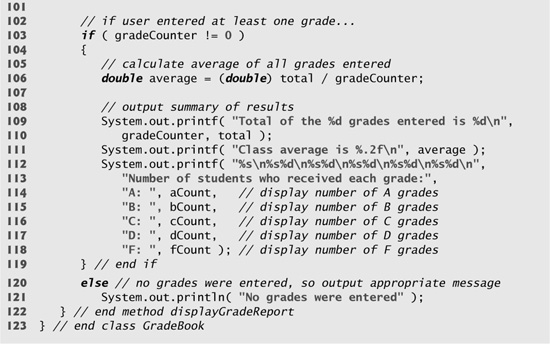
Fig. 5.10. GradeBookTest creates a GradeBook object and invokes its methods.

Like earlier versions of the class, class GradeBook (Fig. 5.9) declares instance variable courseName (line 7) and contains methods setCourseName (lines 24–27), getCourseName (lines 30–33) and displayMessage (lines 36–41), which set the course name, store the course name and display a welcome message to the user, respectively. The class also contains a constructor (lines 18–21) that initializes the course name.
Class GradeBook also declares instance variables total (line 8) and gradeCounter (line 9), which keep track of the sum of the grades entered by the user and the number of grades entered, respectively. Lines 10–14 declare counter variables for each grade category. Class GradeBook maintains total, gradeCounter and the five letter-grade counters as instance variables so that these variables can be used or modified in any of the class’s methods. Note that the class’s constructor (lines 18–21) sets only the course name, because the remaining seven instance variables are ints and are initialized to 0 by default.
Class GradeBook (Fig. 5.9) contains three additional methods—inputGrades, incrementLetterGradeCounter and displayGradeReport. Method inputGrades (lines 44–66) reads an arbitrary number of integer grades from the user using sentinel-controlled repetition and updates instance variables total and gradeCounter. Method inputGrades calls method incrementLetterGradeCounter (lines 69–95) to update the appropriate letter-grade counter for each grade entered. Class GradeBook also contains method displayGradeReport (lines 98–122), which outputs a report containing the total of all grades entered, the average of the grades and the number of students who received each letter grade. Let’s examine these methods in more detail.
Line 48 in method inputGrades declares variable grade, which will store the user’s input. Lines 50–54 prompt the user to enter integer grades and to type the end-of-file indicator to terminate the input. The end-of-file indicator is a system-dependent keystroke combination which the user enters to indicate that there is no more data to input. In Chapter 14, Files and Streams, we’ll see how the end-of-file indicator is used when a program reads its input from a file.
On UNIX/Linux/Mac OS X systems, end-of-file is entered by typing the sequence
<Ctrl> d
on a line by itself. This notation means to simultaneously press both the Ctrl key and the d key. On Windows systems, end-of-file can be entered by typing
<Ctrl> z
[Note: On some systems, you must press Enter after typing the end-of-file key sequence. Windows typically displays ^Z on the screen when the end-of-file indicator is typed.]
Portability Tip 5.1
![]()
The keystroke combinations for entering end-of-file are system dependent.
The while statement (lines 57–65) obtains the user input. The condition at line 57 calls Scanner method hasNext to determine whether there is more data to input. This method returns the boolean value true if there is more data; otherwise, it returns false. The returned value is then used as the value of the condition in the while statement. As long as the end-of-file indicator has not been typed, method hasNext will return true.
Line 59 inputs a grade value from the user. Line 60 uses the += operator to add grade to total. Line 61 increments gradeCounter. The class’s displayGradeReport method uses these variables to compute the average of the grades. Line 64 calls the class’s incrementLetterGradeCounter method (declared in lines 69–95) to increment the appropriate letter-grade counter based on the numeric grade entered.
Method incrementLetterGradeCounter contains a switch statement (lines 72–94) that determines which counter to increment. In this example, we assume that the user enters a valid grade in the range 0–100. A grade in the range 90–100 represents A, 80–89 represents B, 70–79 represents C, 60–69 represents D and 0–59 represents F. The switch statement consists of a block that contains a sequence of case labels and an optional default case. These are used in this example to determine which counter to increment based on the grade.
When the flow of control reaches the switch, the program evaluates the expression in the parentheses (grade / 10) following keyword switch. This is called the controlling expression of the switch. The program compares the value of the controlling expression (which must evaluate to an integral value of type byte, char, short or int) with each case label. The controlling expression in line 72 performs integer division, which truncates the fractional part of the result. Thus, when we divide any value for 0–100 by 10, the result is always a value from 0 to 10. We use several of these values in our case labels. For example, if the user enters the integer 85, the controlling expression evaluates to the int value 8. The switch compares 8 with each case label. If a match occurs (case 8: at line 79), the program executes the statements for that case. For the integer 8, line 80 increments bCount, because a grade in the 80s is a B. The break statement (line 81) causes program control to proceed with the first statement after the switch—in this program, we reach the end of method incrementLetterGradeCounter’s body, so control returns to line 65 in method inputGrades (the first line after the call to incrementLetterGradeCounter). This line marks the end of the body of the while loop that inputs grades (lines 57–65), so control flows to the while’s condition (line 57) to determine whether the loop should continue executing.
The cases in our switch explicitly test for the values 10, 9, 8, 7 and 6. Note the cases at lines 74–75 that test for the values 9 and 10 (both of which represent the grade A). Listing cases consecutively in this manner with no statements between them enables the cases to perform the same set of statements—when the controlling expression evaluates to 9 or 10, the statements in lines 76–77 will execute. The switch statement does not provide a mechanism for testing ranges of values, so every value that must be tested should be listed in a separate case label. Note that each case can have multiple statements. The switch statement differs from other control statements in that it does not require braces around multiple statements in a case.
Without break statements, each time a match occurs in the switch, the statements for that case and subsequent cases execute until a break statement or the end of the switch is encountered. This is often referred to as “falling through” to the statements in subsequent cases.
![]()
Forgetting a break statement when one is needed in a switch is a logic error.
If no match occurs between the controlling expression’s value and a case label, the default case (lines 91–93) executes. We use the default case in this example to process all controlling-expression values that are less than 6—that is, all failing grades. If no match occurs and the switch does not contain a default case, program control simply continues with the first statement after the switch.
GradeBookTest Class That Demonstrates Class GradeBook
Class GradeBookTest (Fig. 5.10) creates a GradeBook object (lines 10–11). Line 13 invokes the object’s displayMessage method to output a welcome message to the user. Line 14 invokes the object’s inputGrades method to read a set of grades from the user and keep track of the sum of all the grades entered and the number of grades. Recall that method inputGrades also calls method incrementLetterGradeCounter to keep track of the number of students who received each letter grade. Line 15 invokes method displayGradeReport of class GradeBook, which outputs a report based on the grades entered (as in the input/output window in Fig. 5.10). Line 103 of class GradeBook (Fig. 5.9) determines whether the user entered at least one grade—this helps us avoid dividing by zero. If so, line 106 calculates the average of the grades. Lines 109–118 then output the total of all the grades, the class average and the number of students who received each letter grade. If no grades were entered, line 121 outputs an appropriate message. The output in Fig. 5.10 shows a sample grade report based on 10 grades.
Note that class GradeBookTest (Fig. 5.10) does not directly call GradeBook method incrementLetterGradeCounter (lines 69–95 of Fig. 5.9). This method is used exclusively by method inputGrades of class GradeBook to update the appropriate letter-grade counter as each new grade is entered by the user. Method incrementLetterGradeCounter exists solely to support the operations of class GradeBook’s other methods and thus could be declared private. Recall from Chapter 3 that methods declared with access modifier private can be called only by other methods of the class in which the private methods are declared. Such methods are commonly referred to as utility methods or helper methods because they can be called only by other methods of that class and are used to support the operation of those methods.
switch Statement UML Activity Diagram
Figure 5.11 shows the UML activity diagram for the general switch statement. Most switch statements use a break in each case to terminate the switch statement after processing the case. Figure 5.11 emphasizes this by including break statements in the activity diagram. The diagram makes it clear that the break statement at the end of a case causes control to exit the switch statement immediately.
Fig. 5.11. switch multiple-selection statement UML activity diagram with break statements.

The break statement is not required for the switch’s last case (or the optional default case, when it appears last), because execution continues with the next statement after the switch.
Software Engineering Observation 5.1
![]()
Provide a default case in switch statements. Including a default case focuses you on the need to process exceptional conditions.
When using the switch statement, remember that the expression after each case must be a constant integral expression—that is, any combination of integer constants that evaluates to a constant integer value (e.g., –7, 0 or 221). An integer constant is simply an integer value. In addition, you can use character constants—specific characters in single quotes, such as 'A', '7' or '$'—which represent the integer values of characters. (Appendix B, shows the integer values of the characters in the ASCII character set, which is a subset of the Unicode character set used by Java.)
The expression in each case also can be a constant variable—a variable that contains a value which does not change for the entire program. Such a variable is declared with keyword final (discussed in Chapter 6, Methods: A Deeper Look). Java has a feature called enumerations, which we also present in Chapter 6. Enumeration constants can also be used in case labels. In Chapter 10, Object-Oriented Programming: Polymorphism, we present a more elegant way to implement switch logic—we use a technique called polymorphism to create programs that are often clearer, easier to maintain and easier to extend than programs using switch logic.
5.7 break and continue Statements
In addition to selection and repetition statements, Java provides statements break and continue to alter the flow of control. The preceding section showed how break can be used to terminate a switch statement’s execution. This section discusses how to use break in repetition statements.
Java also provides the labeled break and continue statements for use in cases in which you need to conveniently alter the flow of control in nested control statements.
break Statement
The break statement, when executed in a while, for, do...while or switch, causes immediate exit from that statement. Execution continues with the first statement after the control statement. Common uses of the break statement are to escape early from a loop or to skip the remainder of a switch (as in Fig. 5.9). Figure 5.12 demonstrates a break statement exiting a for.
Fig. 5.12. break statement exiting a for statement.
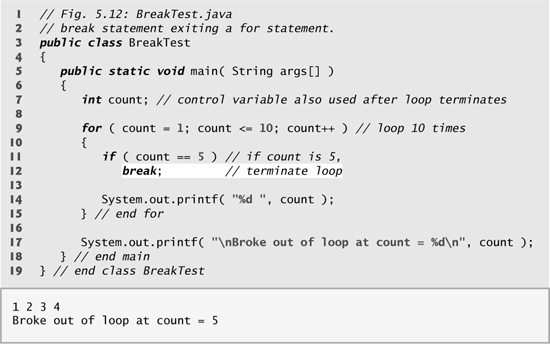
When the if statement nested at line 11 in the for statement (lines 9–15) detects that count is 5, the break statement at line 12 executes. This terminates the for statement, and the program proceeds to line 17 (immediately after the for statement), which displays a message indicating the value of the control variable when the loop terminated. The loop fully executes its body only four times instead of 10.
continue Statement
The continue statement, when executed in a while, for or do...while, skips the remaining statements in the loop body and proceeds with the next iteration of the loop. In while and do...while statements, the program evaluates the loop-continuation test immediately after the continue statement executes. In a for statement, the increment expression executes, then the program evaluates the loop-continuation test.
Figure 5.13 uses the continue statement in a for to skip the statement at line 12 when the nested if (line 9) determines that the value of count is 5. When the continue statement executes, program control continues with the increment of the control variable in the for statement (line 7).
Fig. 5.13. continue statement terminating an iteration of a for statement.

In Section 5.3, we stated that while could be used in most cases in place of for. The one exception occurs when the increment expression in the while follows a continue statement. In this case, the increment does not execute before the program evaluates the repetition-continuation condition, so the while does not execute in the same manner as the for.
Software Engineering Observation 5.2
![]()
Some programmers feel that break and continue violate structured programming. Since the same effects are achievable with structured programming techniques, these programmers do not use break or continue.
Software Engineering Observation 5.3
![]()
There is a tension between achieving quality software engineering and achieving the best-performing software. Often, one of these goals is achieved at the expense of the other. For all but the most performance-intensive situations, apply the following rule of thumb: First, make your code simple and correct; then make it fast and small, but only if necessary.
5.8 Logical Operators
The if, if...else, while, do...while and for statements each require a condition to determine how to continue a program’s flow of control. So far, we have studied only simple conditions, such as count <= 10, number != sentinelValue and total > 1000. Simple conditions are expressed in terms of the relational operators >, <, >= and <= and the equality operators == and !=, and each expression tests only one condition. To test multiple conditions in the process of making a decision, we performed these tests in separate statements or in nested if or if...else statements. Sometimes, control statements require more complex conditions to determine a program’s flow of control.
Java provides logical operators to enable you to form more complex conditions by combining simple conditions. The logical operators are && (conditional AND), || (conditional OR), & (boolean logical AND), | (boolean logical inclusive OR), ^ (boolean logical exclusive OR) and ! (logical NOT).
Conditional AND (&&) Operator
Suppose that we wish to ensure at some point in a program that two conditions are both true before we choose a certain path of execution. In this case, we can use the && (conditional AND) operator, as follows:
![]()
This if statement contains two simple conditions. The condition gender == FEMALE compares variable gender to the constant FEMALE. This might be evaluated, for example, to determine whether a person is female. The condition age >= 65 might be evaluated to determine whether a person is a senior citizen. The if statement considers the combined condition
gender == FEMALE && age >= 65
which is true if and only if both simple conditions are true. If the combined condition is true, the if statement’s body increments seniorFemales by 1. If either or both of the simple conditions are false, the program skips the increment. Some programmers find that the preceding combined condition is more readable when redundant parentheses are added, as in:
( gender == FEMALE ) && ( age >= 65 )
The table in Fig. 5.14 summarizes the && operator. The table shows all four possible combinations of false and true values for expression1 and expression2. Such tables are called truth tables. Java evaluates to false or true all expressions that include relational operators, equality operators or logical operators.
Fig. 5.14. && (conditional AND) operator truth table.

Conditional OR (||) Operator
Now suppose that we wish to ensure that either or both of two conditions are true before we choose a certain path of execution. In this case, we use the || (conditional OR) operator, as in the following program segment:
![]()
This statement also contains two simple conditions. The condition semesterAverage >= 90 evaluates to determine whether the student deserves an A in the course because of a solid performance throughout the semester. The condition finalExam >= 90 evaluates to determine whether the student deserves an A in the course because of an outstanding performance on the final exam. The if statement then considers the combined condition
( semesterAverage >= 90 ) || ( finalExam >= 90 )
and awards the student an A if either or both of the simple conditions are true. The only time the message "Student grade is A" is not printed is when both of the simple conditions are false. Figure 5.15 is a truth table for operator conditional OR (||). Operator && has a higher precedence than operator ||. Both operators associate from left to right.
Fig. 5.15. || (conditional OR) operator truth table.

Short-Circuit Evaluation of Complex Conditions
The parts of an expression containing && or || operators are evaluated only until it is known whether the condition is true or false. Thus, evaluation of the expression
( gender == FEMALE ) && ( age >= 65)
stops immediately if gender is not equal to FEMALE (i.e., the entire expression is false) and continues if gender is equal to FEMALE (i.e., the entire expression could still be true if the condition age >= 65 is true). This feature of conditional AND and conditional OR expressions is called short-circuit evaluation.
Common Programming Error 5.7
![]()
In expressions using operator &&, a condition—we’ll call this the dependent condition—may require another condition to be true for the evaluation of the dependent condition to be meaningful. In this case, the dependent condition should be placed after the other condition, or an error might occur. For example, in the expression (i !=0) &&(10/i==2 ), the second condition must appear after the first condition, or a divide-by-zero error might occur.
Boolean Logical AND (&) and Boolean Logical Inclusive OR (|) Operators
The boolean logical AND (&) and boolean logical inclusive OR (|) operators work identically to the && (conditional AND) and || (conditional OR) operators, with one exception: The boolean logical operators always evaluate both of their operands (i.e., they do not perform short-circuit evaluation). Therefore, the expression
( gender == 1 ) & ( age >= 65 )
evaluates age>=65 regardless of whether gender is equal to 1. This is useful if the right operand of the boolean logical AND or boolean logical inclusive OR operator has a required side effect—a modification of a variable’s value. For example, the expression
( birthday == true ) | ( ++age >= 65 )
guarantees that the condition ++age >= 65 will be evaluated. Thus, the variable age is incremented in the preceding expression, regardless of whether the overall expression is true or false.
Error-Prevention Tip 5.4
![]()
For clarity, avoid expressions with side effects in conditions. The side effects may look clever, but they can make it harder to understand code and can lead to subtle logic errors.
Boolean Logical Exclusive OR (^)
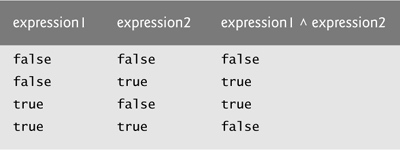
A simple condition containing the boolean logical exclusive OR (^) operator is true if and only if one of its operands is true and the other is false. If both operands are true or both are false, the entire condition is false. Figure 5.16 is a truth table for the boolean logical exclusive OR operator (^). This operator is also guaranteed to evaluate both of its operands.
Fig. 5.16. ^ (boolean logical exclusive OR) operator truth table.
Logical Negation (!) Operator
The ! (logical NOT, also called logical negation or logical complement) operator “reverses” the meaning of a condition. Unlike the logical operators &&, ||, &, | and ^, which are binary operators that combine two conditions, the logical negation operator is a unary operator that has only a single condition as an operand. The logical negation operator is placed before a condition to choose a path of execution if the original condition (without the logical negation operator) is false, as in the program segment
if ( ! ( grade == sentinelValue ) )
System.out.printf( "The next grade is %d
", grade );
which executes the printf call only if grade is not equal to sentinelValue. The parentheses around the condition grade == sentinelValue are needed because the logical negation operator has a higher precedence than the equality operator.
In most cases, you can avoid using logical negation by expressing the condition differently with an appropriate relational or equality operator. For example, the previous statement may also be written as follows:
if ( grade != sentinelValue )
System.out.printf( "The next grade is %d
", grade );
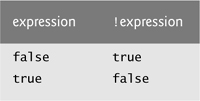
This flexibility can help you express a condition in a more convenient manner. Figure 5.17 is a truth table for the logical negation operator.
Fig. 5.17. ! (logical negation, or logical NOT) operator truth table.
Logical Operators Example
Figure 5.18 demonstrates the logical operators and boolean logical operators by producing their truth tables. The output shows the expression that was evaluated and the boolean result of that expression. The values of the boolean expressions are displayed with printf using the %b format specifier, which outputs the word “true” or the word “false” based on the expression’s value. Lines 9–13 produce the truth table for &&. Lines 16–20 produce the truth table for ||. Lines 23–27 produce the truth table for &. Lines 30–35 produce the truth table for |. Lines 38–43 produce the truth table for ^. Lines 46–47 produce the truth table for !.
Fig. 5.18. Logical operators.


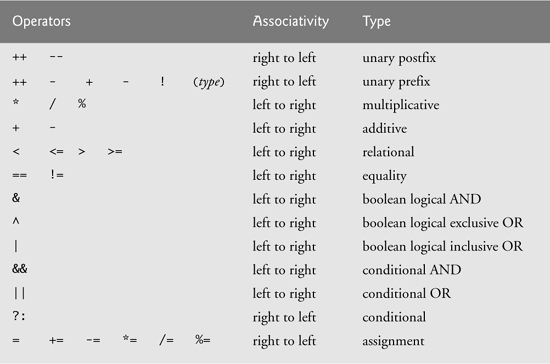
Figure 5.19 shows the precedence and associativity of the Java operators introduced so far. The operators are shown from top to bottom in decreasing order of precedence.
Fig. 5.19. Precedence/associativity of the operators discussed so far.
5.9 (Optional) Software Engineering Case Study: Identifying Objects’ States and Activities
In Section 4.12, we identified many of the class attributes needed to implement the ATM system and added them to the class diagram in Fig. 4.16. Next, we show how these attributes represent an object’s state. We identify some key states that our objects may occupy and discuss how objects change state in response to events occurring in the system. We also discuss the workflow, or activities, that objects perform in the ATM system. We present the activities of BalanceInquiry and Withdrawal transaction objects in this section.
State Machine Diagrams
Each object in a system goes through a series of states. An object’s current state is indicated by the values of the object’s attributes at a given time. State machine diagrams (commonly called state diagrams) model several states of an object and show under what circumstances the object changes state. Unlike the class diagrams presented in earlier case study sections, which focused primarily on the structure of the system, state diagrams model some of the behavior of the system.
Figure 5.20 is a simple state diagram that models some of the states of an object of class ATM. The UML represents each state in a state diagram as a rounded rectangle with the name of the state placed inside it. A solid circle with an attached stick arrowhead designates the initial state. Recall that we modeled this state information as the Boolean attribute userAuthenticated in the class diagram of Fig. 4.16. This attribute is initialized to false, or the “User not authenticated” state, according to the state diagram.
Fig. 5.20. State diagram for the ATM object.

The arrows with stick arrowheads indicate transitions between states. An object can transition from one state to another in response to various events that occur in the system. The name or description of the event that causes a transition is written near the line that corresponds to the transition. For example, the ATM object changes from the “User not authenticated” to the “User authenticated” state after the database authenticates the user. Recall from the requirements document that the database authenticates a user by comparing the account number and PIN entered by the user with those of an account in the database. If the database indicates that the user has entered a valid account number and the correct PIN, the ATM object transitions to the “User authenticated” state and changes its userAuthenticated attribute to a value of true. When the user exits the system by choosing the “exit” option from the main menu, the ATM object returns to the “User not authenticated” state.
Software Engineering Observation 5.4
![]()
Software designers do not generally create state diagrams showing every possible state and state transition for all attributes—there are simply too many of them. State diagrams typically show only key states and state transitions.
Activity Diagrams
Like a state diagram, an activity diagram models aspects of system behavior. Unlike a state diagram, an activity diagram models an object’s workflow (sequence of events) during program execution. An activity diagram models the actions the object will perform and in what order. The activity diagram in Fig. 5.21 models the actions involved in executing a balance-inquiry transaction. We assume that a BalanceInquiry object has already been initialized and assigned a valid account number (that of the current user), so the object knows which balance to retrieve. The diagram includes the actions that occur after the user selects a balance inquiry from the main menu and before the ATM returns the user to the main menu—a BalanceInquiry object does not perform or initiate these actions, so we do not model them here. The diagram begins with retrieving the balance of the account from the database. Next, the BalanceInquiry displays the balance on the screen. This action completes the execution of the transaction. Recall that we have chosen to represent an account balance as both the availableBalance and totalBalance attributes of class Account, so the actions modeled in Fig. 5.21 refer to the retrieval and display of both balance attributes.
The UML represents an action in an activity diagram as an action state modeled by a rectangle with its left and right sides replaced by arcs curving outward. Each action state contains an action expression—for example, “get balance of account from database”—that specifies an action to be performed. An arrow with a stick arrowhead connects two action states, indicating the order in which the actions represented by the action states occur. The solid circle (at the top of Fig. 5.21) represents the activity’s initial state—the beginning of the workflow before the object performs the modeled actions. In this case, the transaction first executes the “get balance of account from database” action expression. The transaction then displays both balances on the screen. The solid circle enclosed in an open circle (at the bottom of Fig. 5.21) represents the final state—the end of the workflow after the object performs the modeled actions. We used UML activity diagrams to illustrate the flow of control for the control statements presented in Chapters 4–5.
Fig. 5.21. Activity diagram for a BalanceInquiry object.

Figure 5.22 shows an activity diagram for a withdrawal transaction. We assume that a Withdrawal object has been assigned a valid account number. We do not model the user selecting a withdrawal from the main menu or the ATM returning the user to the main menu because these are not actions performed by a Withdrawal object. The transaction first displays a menu of standard withdrawal amounts (shown in Fig. 2.15) and an option to cancel the transaction. The transaction then receives a menu selection from the user. The activity flow now arrives at a decision (a fork indicated by the small diamond symbol). [Note: A decision was known as a branch in earlier versions of the UML.] This point determines the next action based on the associated guard condition (in square brackets next to the transition), which states that the transition occurs if this guard condition is met. If the user cancels the transaction by choosing the “cancel” option from the menu, the activity flow immediately skips to the final state. Note the merge (indicated by the small diamond symbol) where the cancellation flow of activity joins the main flow of activity before reaching the activity’s final state. If the user selects a withdrawal amount from the menu, Withdrawal sets amount (an attribute originally modeled in Fig. 4.16) to the value chosen by the user.
Fig. 5.22. Activity diagram for a withdrawal transaction.
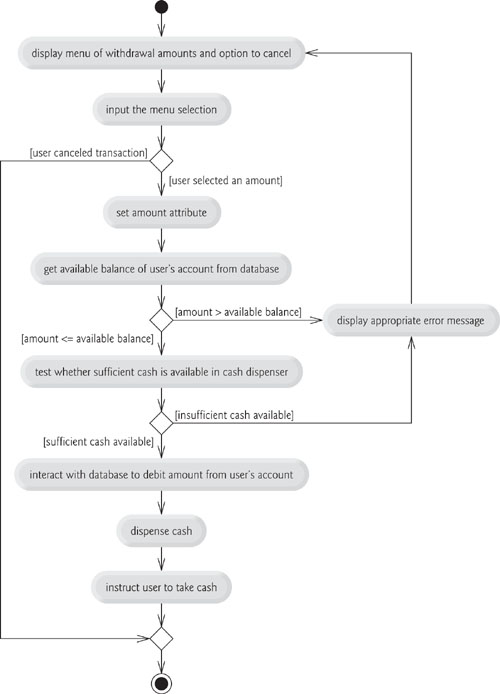
After setting the withdrawal amount, the transaction retrieves the available balance of the user’s account (i.e., the availableBalance attribute of the user’s Account object) from the database. The activity flow then arrives at another decision. If the requested withdrawal amount exceeds the user’s available balance, the system displays an appropriate error message informing the user of the problem, then returns to the beginning of the activity diagram and prompts the user to input a new amount. If the requested withdrawal amount is less than or equal to the user’s available balance, the transaction proceeds. The transaction next tests whether the cash dispenser has enough cash remaining to satisfy the withdrawal request. If it does not, the transaction displays an appropriate error message, then returns to the beginning of the activity diagram and prompts the user to choose a new amount. If sufficient cash is available, the transaction interacts with the database to debit the withdrawal amount from the user’s account (i.e., subtract the amount from both the availableBalance and totalBalance attributes of the user’s Account object). The transaction then dispenses the desired amount of cash and instructs the user to take the cash that is dispensed. Finally, the main flow of activity merges with the cancellation flow of activity before reaching the final state.
We’ve taken the first steps in modeling the ATM system’s behavior and have shown how an object’s attributes participate in performing the object’s activities. In Section 6.19, we investigate the behaviors for all classes to give a more accurate interpretation of the system behavior by “filling in” the third compartments of the classes in our class diagram.
Software Engineering Case Study Self-Review Exercises
5.1 State whether the following statement is true or false, and if false, explain why: State diagrams model structural aspects of a system.
5.2 An activity diagram models the __________ that an object performs and the order in which it performs them.
a. actions
b. attributes
c. states
d. state transitions
5.3 Based on the requirements document, create an activity diagram for a deposit transaction.
Answers to Software Engineering Case Study Self-Review Exercises
5.1 False. State diagrams model some of the behavior of a system.
5.2 a.
5.3 Figure 5.23 presents an activity diagram for a deposit transaction. The diagram models the actions that occur after the user chooses the deposit option from the main menu and before the ATM returns the user to the main menu. Recall that part of receiving a deposit amount from the user involves converting an integer number of cents to a dollar amount. Also recall that crediting a deposit amount to an account involves increasing only the totalBalance attribute of the user’s Account object. The bank updates the availableBalance attribute of the user’s Account object only after confirming the amount of cash in the deposit envelope and after the enclosed checks clear—this occurs independently of the ATM system.
Fig. 5.23. Activity diagram for a deposit transaction.

5.10 Wrap-Up
We’ve now completed our introduction to Java’s control statements. Chapter 4 discussed the if, if...else and while statements. This chapter demonstrated the for, do...while and switch statements. We showed that any algorithm can be developed using combinations of the sequence structure, the three types of selection statements—if, if...else and switch—and the three types of repetition statements—while, do...while and for. This chapter also introduced Java’s logical operators, which enable you to use more complex conditional expressions in control statements.
In Chapter 3, we introduced the basic concepts of objects, classes and methods. Chapter 4 and Chapter 5 introduced the types of control statements that you can use to specify program logic in methods. In Chapter 6, we examine methods in greater depth.