
2. Introduction to Java Applications
Objectives
In this chapter you’ll learn:
• To write simple Java applications.
• Input and output statements.
• Java’s primitive types.
• Arithmetic operators.
• The precedence of arithmetic operators.
• Decision-making statements.
• Relational and equality operators.
What’s in a name?
That which we call a rose By any other name would smell as sweet.
—William Shakespeare
When faced with a decision, I always ask, “What would be the most fun?”
—Peggy Walker
“Take some more tea,” the March Hare said to Alice, very earnestly. “I’ve had nothing yet,” Alice replied in an offended tone: “so I can’t take more.” “You mean you can’t take less,” said the Hatter: “it’s very easy to take more than nothing.”
—Lewis Carroll
Outline
2.1 Introduction
2.2 A First Program in Java: Printing a Line of Text
2.3 Modifying Our First Java Program
2.4 Displaying Text with printf
2.5 Another Java Application: Adding Integers
2.6 Arithmetic
2.7 Decision Making: Equality and Relational Operators
2.8 (Optional) Software Engineering Case Study: Examining the Requirements Document
2.9 Wrap-Up
2.1 Introduction
We now introduce Java application programming. We begin with several examples that simply display messages on the screen. We then demonstrate a program that obtains two numbers from a user, calculates their sum and displays the result. You’ll learn how to perform various arithmetic calculations and save their results for later use. The last example demonstrates decision-making fundamentals by showing you how to compare numbers, then display messages based on the comparison results.
2.2 A First Program in Java: Printing a Line of Text
A Java application is a program that executes when you use the java command to launch the Java Virtual Machine (JVM). Let us consider a simple application that displays a line of text. (Later in this section we’ll discuss how to compile and run an application.) The program and its output are shown in Fig. 2.1. The output appears in the gray box at the end of the program. The program illustrates several important Java language features. For your convenience, each program we present in this book includes line numbers, which are not part of actual Java programs. We’ll soon see that line 9 does the real work of the program—namely, displaying the phrase Welcome to Java Programming! on the screen. We now consider each line of the program in order.
Fig. 2.1. Text-printing program.
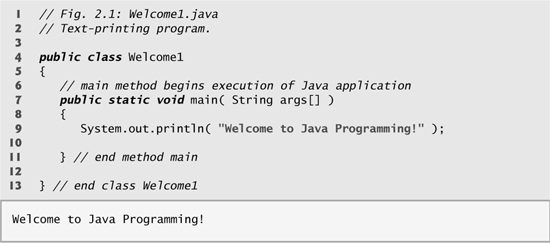
// Fig. 2.1: Welcome1.java
begins with //, indicating that the remainder of the line is a comment. The Java compiler ignores comments. By convention, we begin every program with a comment indicating the figure number and file name.
A comment that begins with // is called an end-of-line (or single-line) comment, because the comment terminates at the end of the line on which it appears. A // comment also can begin in the middle of a line and continue until the end of that line (as in lines 11 and 13).
Traditional comments (also called multiple-line comments), such as
![]()
can be spread over several lines. This type of comment begins with the delimiter /* and ends with */. All text between the delimiters is ignored by the compiler. Java incorporated traditional comments and end-of-line comments from the C and C++ programming languages, respectively. In this book, we use end-of-line comments.
Java also provides Javadoc comments that are delimited by /** and */. As with traditional comments, all text between the Javadoc comment delimiters is ignored by the compiler. Javadoc comments enable programmers to embed program documentation directly in their programs. Such comments are the preferred Java documenting format in industry. The javadoc utility program (part of the Java SE Development Kit) reads Javadoc comments and uses them to prepare your program’s documentation in HTML format. For more information on Javadoc comments and the javadoc utility, visit Sun’s javadoc Tool Home Page at java.sun.com/javase/6/docs/technotes/guides/javadoc/index.html.
Common Programming Error 2.1
![]()
Forgetting one of the delimiters of a traditional or Javadoc comment is a syntax error. The syntax of a programming language specifies the rules for creating a proper program in that language. A syntax error occurs when the compiler encounters code that violates Java’s language rules (i.e., its syntax). In this case, the compiler issues an error message to help the programmer identify and fix the incorrect code. Syntax errors are also called compiler errors, compile-time errors or compilation errors, because the compiler detects them during the compilation phase. You’ll be unable to execute your program until you correct all the syntax errors in it.
Line 2
// Text-printing program.
is an end-of-line comment that describes the purpose of the program.
![]()
Every program should begin with a comment that explains the purpose of the program, the author and the date and time the program was last modified. (We are not showing the author, date and time in this book’s programs because this information would be redundant.)
Line 3 is a blank line. Together, blank lines, space characters and tab characters are known as white space. (Space characters and tabs are known specifically as white-space characters.) In this chapter and the next several chapters, we discuss conventions for using white space to enhance program readability.
Line 4
public class Welcome1
begins a class declaration for class Welcome1. Every program in Java consists of at least one class declaration that is defined by you—the programmer. These are known as programmer-defined classes or user-defined classes. The class keyword introduces a class declaration in Java and is immediately followed by the class name (Welcome1). Keywords are reserved for use by Java and are always spelled with all lowercase letters. The complete list of Java keywords is shown in Appendix C.
By convention, all class names in Java begin with a capital letter and capitalize the first letter of each word they include (e.g., SampleClassName). A Java class name is an identifier—a series of characters consisting of letters, digits, underscores ( _ ) and dollar signs ($) that does not begin with a digit and does not contain spaces. Some valid identifiers are Welcome1, $value, _value, m_inputField1 and button7. The name 7button is not a valid identifier because it begins with a digit, and the name input field is not a valid identifier because it contains a space. Normally, an identifier that does not begin with a capital letter is not the name of a Java class. Java is case sensitive—that is, uppercase and lowercase letters are distinct, so a1 and A1 are different (but both valid) identifiers.
Good Programming Practice 2.2
![]()
By convention, always begin a class name’s identifier with a capital letter and start each subsequent word in the identifier with a capital letter. Java programmers know that such identifiers normally represent Java classes, so naming your classes in this manner makes your programs more readable.
Common Programming Error 2.2
![]()
Java is case sensitive. Not using the proper uppercase and lowercase letters for an identifier normally causes a compilation error.
In Chapters 2–7, every class we define begins with the public keyword. For now, we’ll simply require this keyword. When you save your public class declaration in a file, the file name must be the class name followed by the .java file-name extension. For our application, the file name is Welcome1.java. You’ll learn more about public and non-public classes in Chapter 8.
Common Programming Error 2.3
![]()
A public class must be placed in a file that has the same name as the class (in terms of both spelling and capitalization) plus the .java extension; otherwise, a compilation error occurs.
![]()
It is an error not to end a file name with the .java extension for a file containing a class declaration. The Java compiler compiles only files with the .java extension.
A left brace (at line 5 in this program), {, begins the body of every class declaration. A corresponding right brace (at line 13), }, must end each class declaration. Note that lines 6–11 are indented. This indentation is one of the spacing conventions mentioned earlier. We define each spacing convention as a Good Programming Practice.
Error-Prevention Tip 2.1
![]()
Whenever you type an opening left brace, {, in your program, immediately type the closing right brace, }, then reposition the cursor between the braces and indent to begin typing the body. This practice helps prevent errors due to missing braces.
Good Programming Practice 2.3
![]()
Indent the entire body of each class declaration one “level” of indentation between the left brace, {, and the right brace, }, that delimit the body of the class. This format emphasizes the class declaration’s structure and makes it easier to read.
Common Programming Error 2.5
![]()
It is a syntax error if braces do not occur in matching pairs.
Line 6
// main method begins execution of Java application
is an end-of-line comment indicating the purpose of lines 7–11 of the program. Line 7
public static void main( String args[] )
is the starting point of every Java application. The parentheses after the identifier main indicate that it is a program building block called a method. Java class declarations normally contain one or more methods. For a Java application, exactly one of the methods must be called main and must be defined as shown in line 7; otherwise, the JVM will not execute the application. Methods are able to perform tasks and return information when they complete their tasks. Keyword void indicates that this method will perform a task but will not return any information when it completes its task. Later, we’ll see that many methods return information when they complete their task. You’ll learn more about methods in Chapters 3 and 6. For now, simply mimic main’s first line in your Java applications. In line 7, the String args[] in parentheses is a required part of the method main’s declaration. We discuss this in Chapter 7, Arrays.
The left brace, {, in line 8 begins the body of the method declaration. A corresponding right brace, }, must end the method declaration’s body (line 11 of the program). Note that line 9 in the body of the method is indented between the braces.
Good Programming Practice 2.4
![]()
Indent the entire body of each method declaration one “level” of indentation between the left brace, {, and the right brace, }, that define the body of the method. This format makes the structure of the method stand out and makes the method declaration easier to read.
System.out.println( "Welcome to Java Programming!" );
instructs the computer to perform an action—namely, to print the string of characters contained between the double quotation marks (but not the quotation marks themselves). White-space characters in strings are not ignored by the compiler.
System.out is known as the standard output object. System.out allows Java applications to display sets of characters in the command window from which the Java application executes. In Microsoft Windows 95/98/ME, the command window is the MS-DOS prompt. In more recent versions of Microsoft Windows, the command window is the Command Prompt. In UNIX/Linux/Mac OS X, the command window is called a terminal window or a shell. Many programmers refer to the command window simply as the command line.
Method System.out.println displays (or prints) a line of text in the command window. The string in the parentheses in line 9 is the argument to the method. Method System.out.println performs its task by displaying (also called outputting) its argument in the command window. When System.out.println completes its task, it positions the output cursor (the location where the next character will be displayed) to the beginning of the next line in the command window.
The entire line 9, including System.out.println, the argument "Welcome to Java Programming!" in the parentheses and the semicolon (;), is called a statement. Each statement ends with a semicolon. When the statement in line 9 of our program executes, it displays the message Welcome to Java Programming! in the command window. As we’ll see in subsequent programs, a method is typically composed of one or more statements that perform the method’s task.
Common Programming Error 2.6
![]()
Omitting the semicolon at the end of a statement is a syntax error.
Some programmers find it difficult when reading or writing a program to match the left and right braces ({ and }) that delimit the body of a class declaration or a method declaration. For this reason, some programmers include an end-of-line comment after a closing right brace (}) that ends a method declaration and after a closing right brace that ends a class declaration. For example, line 11
} // end method main
specifies the closing right brace (}) of method main, and line 13
} // end class Welcome1
specifies the closing right brace (}) of class Welcome1. Each comment indicates the method or class that the right brace terminates.
Good Programming Practice 2.5
![]()
Following the closing right brace (}) of a method body or class declaration with an end-of-line comment indicating the method or class declaration to which the brace belongs improves program readability.
Compiling and Executing Your First Java Application
We are now ready to compile and execute our program. For this purpose, we assume you are using the Sun Microsystems’ Java SE Development Kit 6.0 (JDK 6.0). In our Java Resource Centers at www.deitel.com/ResourceCenters.html, we provide links to tutorials that help you get started with several popular Java development tools.
To prepare to compile the program, open a command window and change to the directory where the program is stored. Most operating systems use the command cd to change directories. For example,
cd c:examplesch02fig02_01
changes to the fig02_01 directory on Windows. The command
cd ~/examples/ch02/fig02_01
changes to the fig02_01 directory on UNIX/Linux/Max OS X.
To compile the program, type
javac Welcome1.java
If the program contains no syntax errors, the preceding command creates a new file called Welcome1.class (known as the class file for Welcome1) containing the Java bytecodes that represent our application. When we use the java command to execute the application, these bytecodes will be executed by the JVM.
Error-Prevention Tip 2.2
![]()
When attempting to compile a program, if you receive a message such as “bad command or filename,” “javac: command not found” or “'javac' is not recognized as an internal or external command, operable program or batch file,” then your Java software installation was not completed properly. If you are using the JDK, this indicates that the system’s PATH environment variable was not set properly. Please review the installation instructions in the Before You Begin section of this book carefully. On some systems, after correcting the PATH, you may need to reboot your computer or open a new command window for these settings to take effect.
Error-Prevention Tip 2.3
![]()
The Java compiler generates syntax-error messages when the syntax of a program is incorrect. Each error message contains the file name and line number where the error occurred. For example, Welcome1.java:6 indicates that an error occurred in the file Welcome1.java at line 6. The remainder of the error message provides information about the syntax error.
Error-Prevention Tip 2.4
![]()
The compiler error message “Public class ClassName must be defined in a file called ClassName.java” indicates that the file name does not exactly match the name of the public class in the file or that you typed the class name incorrectly when compiling the class.
Figure 2.2 shows the program of Fig. 2.1 executing in a Microsoft® Windows® XP Command Prompt window. To execute the program, type java Welcome1. This launches the JVM, which loads the “.class” file for class Welcome1. Note that the “.class” filename extension is omitted from the preceding command; otherwise, the JVM will not execute the program. The JVM calls method main. Next, the statement at line 9 of main displays "Welcome to Java Programming!" [Note: Many environments show command prompts with black backgrounds and white text. We adjusted these settings in our environment to make our screen captures more readable.]
Fig. 2.2. Executing Welcome1 in a Microsoft Windows XP Command Prompt window.

Error-Prevention Tip 2.5
![]()
When attempting to run a Java program, if you receive a message such as “Exception in thread "main" java.lang.NoClassDefFoundError: Welcome1,” your CLASSPATH environment variable has not been set properly. Please review the installation instructions in the Before You Begin section of this book carefully. On some systems, you may need to reboot your computer or open a new command window after configuring the CLASSPATH.
2.3 Modifying Our First Java Program
This section continues our introduction to Java programming with two examples that modify the example in Fig. 2.1 to print text on one line by using multiple statements and to print text on several lines by using a single statement.
Displaying a Single Line of Text with Multiple Statements
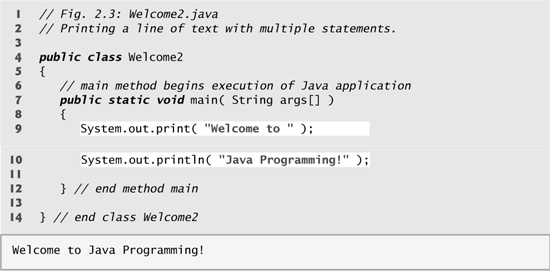
Welcome to Java Programming! can be displayed several ways. Class Welcome2, shown in Fig. 2.3, uses two statements to produce the same output as that shown in Fig. 2.1. From this point forward, we highlight the new and key features in each code listing, as shown in lines 9–10 of this program.
Fig. 2.3. Printing a line of text with multiple statements.
The program is similar to Fig. 2.1, so we discuss only the changes here. Line 2
// Printing a line of text with multiple statements.
is an end-of-line comment stating the purpose of this program. Line 4 begins the Welcome2 class declaration.
Lines 9–10 of method main
System.out.print( "Welcome to " );
System.out.println( "Java Programming!" );
display one line of text in the command window. The first statement uses System.out’s method print to display a string. Unlike println, after displaying its argument, print does not position the output cursor at the beginning of the next line in the command window—the next character the program displays will appear immediately after the last character that print displays. Thus, line 10 positions the first character in its argument (the letter “J”) immediately after the last character that line 9 displays (the space character before the string’s closing double-quote character). Each print or println statement resumes displaying characters from where the last print or println statement stopped displaying characters.
Displaying Multiple Lines of Text with a Single Statement
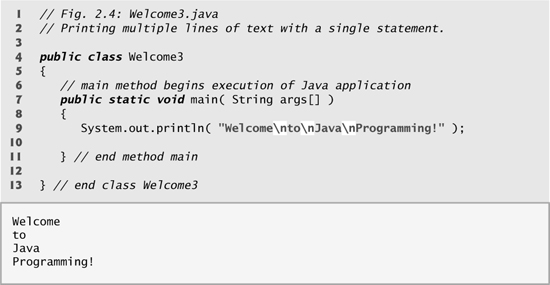
A single statement can display multiple lines by using newline characters, which indicate to System.out’s print and println methods when they should position the output cursor at the beginning of the next line in the command window. Like blank lines, space characters and tab characters, newline characters are white-space characters. Figure 2.4 outputs four lines of text, using newline characters to determine when to begin each new line. Most of the program is identical to those in Fig. 2.1 and Fig. 2.3, so we discuss only the changes here.
Fig. 2.4. Printing multiple lines of text with a single statement.
Line 2
// Printing multiple lines of text with a single statement.
is a comment stating the program’s purpose. Line 4 begins the Welcome3 class declaration.
Line 9
System.out.println( "Welcome to Java Programming!" );
displays four separate lines of text in the command window. Normally, the characters in a string are displayed exactly as they appear in the double quotes. Note, however, that the two characters and n (repeated three times in the statement) do not appear on the screen. The backslash () is called an escape character. It indicates to System.out’s print and println methods that a “special character” is to be output. When a backslash appears in a string of characters, Java combines the next character with the backslash to form an escape sequence. The escape sequence
represents the newline character. When a newline character appears in a string being output with System.out, the newline character causes the screen’s output cursor to move to the beginning of the next line in the command window. Figure 2.5 lists several common escape sequences and describes how they affect the display of characters in the command window. For the complete list of escape sequences, visit java.sun.com/docs/books/jls/third_edition/html/lexical.html#3.10.6.
Fig. 2.5. Some common escape sequences.

2.4 Displaying Text with printf
Java SE 5.0 added the System.out.printf method for displaying formatted data—the f in the name printf stands for “formatted.” Figure 2.6 outputs the strings "Welcome to" and "Java Programming!" with System.out.printf.
Fig. 2.6. Displaying multiple lines with method System.out.printf.

Lines 9–10
System.out.printf( "%s
%s
",
"Welcome to", "Java Programming!" );
call method System.out.printf to display the program’s output. The method call specifies three arguments. When a method requires multiple arguments, the arguments are separated with commas (,)—this is known as a comma-separated list.
Good Programming Practice 2.6
![]()
Place a space after each comma (,) in an argument list to make programs more readable.
Remember that all statements in Java end with a semicolon (;). Therefore, lines 9–10 represent only one statement. Java allows large statements to be split over many lines. However, you cannot split a statement in the middle of an identifier or in the middle of a string.
Common Programming Error 2.7
![]()
Splitting a statement in the middle of an identifier or a string is a syntax error.
Method printf’s first argument is a format string that may consist of fixed text and format specifiers. Fixed text is output by printf just as it would be output by print or println. Each format specifier is a placeholder for a value and specifies the type of data to output. Format specifiers also may include optional formatting information.
Format specifiers begin with a percent sign (%) and are followed by a character that represents the data type. For example, the format specifier %s is a placeholder for a string. The format string in line 9 specifies that printf should output two strings and that each string should be followed by a newline character. At the first format specifier’s position, printf substitutes the value of the first argument after the format string. At each subsequent format specifier’s position, printf substitutes the value of the next argument in the argument list. So this example substitutes "Welcome to" for the first %s and "Java Programming!" for the second %s. The output shows that two lines of text were displayed.
We introduce various formatting features as they are needed in our examples. Chapter 24 presents the details of formatting output with printf.
2.5 Another Java Application: Adding Integers
Our next application reads (or inputs) two integers (whole numbers, like –22, 7, 0 and 1024) typed by a user at the keyboard, computes the sum of the values and displays the result. This program must keep track of the numbers supplied by the user for the calculation later in the program. Programs remember numbers and other data in the computer’s memory and access that data through program elements called variables. The program of Fig. 2.7 demonstrates these concepts. In the sample output, we use highlighting to differentiate between the user’s input and the program’s output.
Fig. 2.7. Addition program that displays the sum of two numbers.

// Fig. 2.7: Addition.java
// Addition program that displays the sum of two numbers.
state the figure number, file name and purpose of the program. Line 3
import java.util.Scanner; // program uses class Scanner
is an import declaration that helps the compiler locate a class that is used in this program. A great strength of Java is its rich set of predefined classes that you can reuse rather than “reinventing the wheel.” These classes are grouped into packages—named collections of related classes—and are collectively referred to as the Java class library, or the Java Application Programming Interface (Java API). Programmers use import declarations to identify the predefined classes used in a Java program. The import declaration in line 3 indicates that this example uses Java’s predefined Scanner class (discussed shortly) from package java.util. Then the compiler attempts to ensure that you use class Scanner correctly.
Common Programming Error 2.8
![]()
All import declarations must appear before the first class declaration in the file. Placing an import declaration inside a class declaration’s body or after a class declaration is a syntax error.
Error-Prevention Tip 2.6
![]()
Forgetting to include an import declaration for a class used in your program typically results in a compilation error containing a message such as “cannot resolve symbol.” When this occurs, check that you provided the proper import declarations and that the names in the import declarations are spelled correctly, including proper use of uppercase and lowercase letters.
Line 5
public class Addition
begins the declaration of class Addition. The file name for this public class must be Addition.java. Remember that the body of each class declaration starts with an opening left brace (line 6), {, and ends with a closing right brace (line 29), }.
The application begins execution with method main (lines 8–27). The left brace (line 9) marks the beginning of main’s body, and the corresponding right brace (line 27) marks the end of main’s body. Note that method main is indented one level in the body of class Addition and that the code in the body of main is indented another level for readability.
Line 11
Scanner input = new Scanner( System.in );
is a variable declaration statement (also called a declaration) that specifies the name (input) and type (Scanner) of a variable that is used in this program. A variable is a location in the computer’s memory where a value can be stored for use later in a program. All variables must be declared with a name and a type before they can be used. A variable’s name enables the program to access the value of the variable in memory. A variable’s name can be any valid identifier. (See Section 2.2 for identifier naming requirements.) A variable’s type specifies what kind of information is stored at that location in memory. Like other statements, declaration statements end with a semicolon (;).
The declaration in line 11 specifies that the variable named input is of type Scanner. A Scanner enables a program to read data (e.g., numbers) for use in a program. The data can come from many sources, such as a file on disk or the user at the keyboard. Before using a Scanner, the program must create it and specify the source of the data.
The equal sign (=) in line 11 indicates that Scanner variable input should be initialized (i.e., prepared for use in the program) in its declaration with the result of the expression new Scanner( System.in ) to the right of the equal sign. This expression creates a Scanner object that reads data typed by the user at the keyboard. Recall that the standard output object, System.out, allows Java applications to display characters in the command window. Similarly, the standard input object, System.in, enables Java applications to read information typed by the user. So, line 11 creates a Scanner that enables the application to read information typed by the user at the keyboard.
The variable declaration statements at lines 13–15
int number1; // first number to add
int number2; // second number to add
int sum; // sum of number1 and number2
declare that variables number1, number2 and sum hold data of type int—these variables can hold integer values (whole numbers such as 7, –11, 0 and 31,914). These variables are not yet initialized. The range of values for an int is –2,147,483,648 to +2,147,483,647. We’ll soon discuss types float and double, for holding real numbers, and type char, for holding character data. Real numbers are numbers that contain decimal points, such as 3.4, 0.0 and –11.19. Variables of type char represent individual characters, such as an uppercase letter (e.g., A), a digit (e.g., 7), a special character (e.g., * or %) or an escape sequence (e.g., the newline character,
). Types such as int, float, double and char are called primitive types or built-in types. Primitive-type names are keywords and therefore must appear in all lowercase letters. Appendix D, summarizes the characteristics of the eight primitive types (boolean, byte, char, short, int, long, float and double).
Variable declaration statements can be split over several lines, with the variable names separated by commas (i.e., a comma-separated list of variable names). Several variables of the same type may be declared in one declaration or in multiple declarations. For example, lines 13–15 can also be written as a single statement as follows:
int number1, // first number to add
number2, // second number to add
sum; // sum of number1 and number2
Note that we used end-of-line comments in lines 13–15. This use of comments is a common programming practice for indicating the purpose of each variable in the program.
Good Programming Practice 2.7
![]()
Declare each variable on a separate line. This format allows a descriptive comment to be easily inserted next to each declaration.
![]()
Choosing meaningful variable names helps a program to be self-documenting (i.e., one can understand the program simply by reading it rather than by reading manuals or viewing an excessive number of comments).
Good Programming Practice 2.9
![]()
By convention, variable-name identifiers begin with a lowercase letter, and every word in the name after the first word begins with a capital letter. For example, variable-name identifier firstNumber has a capital N in its second word, Number.
Line 17
System.out.print( "Enter first integer: " ); // prompt
uses System.out.print to display the message "Enter first integer:". This message is called a prompt because it directs the user to take a specific action. Recall from Section 2.2 that identifiers starting with capital letters represent class names. So, System is a class. Class System is part of package java.lang. Notice that class System is not imported with an import declaration at the beginning of the program.
Software Engineering Observation 2.1
![]()
By default, package java.lang is imported in every Java program; thus, classes in java.lang are the only ones in the Java API that do not require an import declaration.
Line 18
number1 = input.nextInt(); // read first number from user
uses Scanner object input’s nextInt method to obtain an integer from the user at the keyboard. At this point the program waits for the user to type the number and press the Enter key to submit the number to the program.
Technically, the user can type anything as the input value. Our program assumes that the user enters a valid integer value as requested. In this program, if the user types a non-integer value, a runtime logic error will occur and the program will terminate. Chapter 13, Exception Handling, discusses how to make your programs more robust by enabling them to handle such errors. This is also known as making your program fault tolerant.
In line 18, the result of the call to method nextInt (an int value) is placed in variable number1 by using the assignment operator, =. The statement is read as “number1 gets the value of input.nextInt().” Operator = is called a binary operator because it has two operands—number1 and the result of the method call input.nextInt(). Everything to the right of the assignment operator, =, is always evaluated before the assignment is performed.
Line 20
System.out.print( "Enter second integer: " ); // prompt
prompts the user to input the second integer.
Line 21
number2 = input.nextInt(); // read second number from user
reads the second integer and assigns it to variable number2.
sum = number1 + number2; // add numbers
is an assignment statement that calculates the sum of the variables number1 and number2 and assigns the result to variable sum by using the assignment operator, =. The statement is read as “sum gets the value of number1 + number2.” Most calculations are performed in assignment statements. When the program encounters the addition operation, it uses the values stored in the variables number1 and number2 to perform the calculation. In the preceding statement, the addition operator is a binary operator—its two operands are number1 and number2. Portions of statements that contain calculations are called expressions. In fact, an expression is any portion of a statement that has a value associated with it. For example, the value of the expression number1 + number2 is the sum of the numbers. Similarly, the value of the expression input.nextInt() is an integer typed by the user.
After the calculation has been performed, line 25
System.out.printf( "Sum is %d ", sum ); // display sum
uses method System.out.printf to display the sum. The format specifier %d is a placeholder for an int value (in this case the value of sum)—the letter d stands for “decimal integer.” Note that other than the %d format specifier, the remaining characters in the format string are all fixed text. So method printf displays "Sum is ", followed by the value of sum (in the position of the %d format specifier) and a newline.
Note that calculations can also be performed inside printf statements. We could have combined the statements at lines 23 and 25 into the statement
System.out.printf( "Sum is %d ", ( number1 + number2 ) );
The parentheses around the expression number1 + number2 are not required—they are included to emphasize that the value of the expression is output in the position of the %d format specifier.
Java API Documentation
For each new Java API class we use, we indicate the package in which it is located. This package information is important because it helps you locate descriptions of each package and class in the Java API documentation. A web-based version of this documentation can be found at
java.sun.com/javase/6/docs/api/
Also, you can download this documentation to your own computer from
java.sun.com/javase/downloads/index.jsp
The download is approximately 53 megabytes (MB). Appendix G, describes how to use the Java API documentation.
2.6 Arithmetic
The arithmetic operators are summarized in Fig. 2.8. Note the use of various special symbols not used in algebra. The asterisk (*) indicates multiplication, and the percent sign (%) is the remainder operator (called modulus in some languages), which we’ll discuss shortly. The arithmetic operators in Fig. 2.8 are binary operators because they each operate on two operands. For example, the expression f+ 7 contains the binary operator + and the two operands f and 7.
Fig. 2.8. Arithmetic operators.

Integer division yields an integer quotient—for example, the expression 7/4 evaluates to 1, and the expression 17/5 evaluates to 3. Any fractional part in integer division is simply discarded (i.e., truncated)—no rounding occurs. Java provides the remainder operator, %, which yields the remainder after division. The expression x% y yields the remainder after x is divided by y. Thus, 7%4 yields 3, and 17 % 5 yields 2. This operator is most commonly used with integer operands but can also be used with other arithmetic types.
Arithmetic Expressions in Straight-Line Form
Arithmetic expressions in Java must be written in straight-line form to facilitate entering programs into the computer. Thus, expressions such as “a divided by b” must be written as a/b, so that all constants, variables and operators appear in a straight line. The following algebraic notation is generally not acceptable to compilers:
![]()
Parentheses for Grouping Subexpressions
Parentheses are used to group terms in Java expressions in the same manner as in algebraic expressions. For example, to multiply a times the quantity b+c, we write
a * ( b + c )
If an expression contains nested parentheses, such as
( ( a + b ) * c )
the expression in the innermost set of parentheses (a+ b in this case) is evaluated first. [Note: As in algebra, it is acceptable to place unnecessary parentheses in an expression to make the expression clearer. These are called redundant parentheses.]
Rules of Operator Precedence
Java applies the operators in arithmetic expressions in a precise sequence determined by the following rules of operator precedence, which are generally the same as those followed in algebra (Fig. 2.9):
1. Multiplication, division and remainder operations are applied first. If an expression contains several such operations, the operators are applied from left to right. Multiplication, division and remainder operators have the same level of precedence.
2. Addition and subtraction operations are applied next. If an expression contains several such operations, the operators are applied from left to right. Addition and subtraction operators have the same level of precedence.
Fig. 2.9. Precedence of arithmetic operators.

These rules enable Java to apply operators in the correct order. When we say that operators are applied from left to right, we are referring to their associativity. You’ll see that some operators associate from right to left. Figure 2.9 summarizes these rules of operator precedence. The table will be expanded as additional Java operators are introduced. A complete precedence chart is included in Appendix A.
2.7 Decision Making: Equality and Relational Operators
A condition is an expression that can be either true or false. This section introduces Java’s if statement that allows a program to make a decision based on a condition’s value. For example, the condition “grade is greater than or equal to 60” determines whether a student passed a test. If the condition in an if statement is true, the body of the if statement executes. If the condition is false, the body does not execute. We’ll see an example shortly.
Conditions in if statements can be formed by using the equality operators (== and !=) and relational operators (>, <, >= and <=) summarized in Fig. 2.10. Both equality operators have the same level of precedence, which is lower than that of the relational operators. The equality operators associate from left to right. The relational operators all have the same level of precedence and also associate from left to right.
Fig. 2.10. Equality and relational operators.

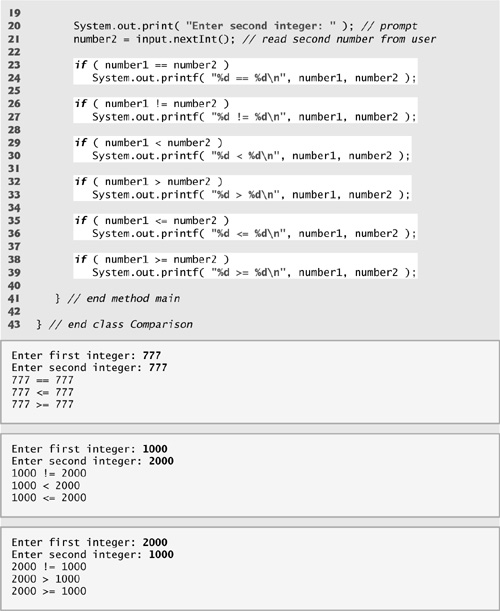
The application of Fig. 2.11 uses six if statements to compare two integers input by the user. If the condition in any of these if statements is true, the assignment statement associated with that if statement executes. The program uses a Scanner to input the two integers from the user and store them in variables number1 and number2. Then the program compares the numbers and displays the results of the comparisons that are true.
Fig. 2.11. Equality and relational operators.

The declaration of class Comparison begins at line 6
public class Comparison
The class’s main method (lines 9–41) begins the execution of the program. Line 12
Scanner input = new Scanner( System.in );
declares Scanner variable input and assigns it a Scanner that inputs data from the standard input (i.e., the keyboard).
int number1; // first number to compare
int number2; // second number to compare
declare the int variables used to store the values input from the user.
System.out.print( "Enter first integer: " ); // prompt
number1 = input.nextInt(); // read first number from user
prompt the user to enter the first integer and input the value, respectively. The input value is stored in variable number1.
Lines 20–21
System.out.print( "Enter second integer: " ); // prompt
number2 = input.nextInt(); // read second number from user
prompt the user to enter the second integer and input the value, respectively. The input value is stored in variable number2.
Lines 23–24
if ( number1 == number2 )
System.out.printf( "%d == %d
", number1, number2 );
declare an if statement that compares the values of the variables number1 and number2 to determine whether they are equal. An if statement always begins with keyword if, followed by a condition in parentheses. An if statement expects one statement in its body. The indentation of the body statement shown here is not required, but it improves the program’s readability by emphasizing that the statement in line 24 is part of the if statement that begins at line 23. Line 24 executes only if the numbers stored in variables number1 and number2 are equal (i.e., the condition is true). The if statements at lines 26–27, 29–30, 32–33, 35–36 and 38–39 compare number1 and number2 with the operators !=, <, >, <= and >=, respectively. If the condition in any of the if statements is true, the corresponding body statement executes.
Common Programming Error 2.9
![]()
Forgetting the left and/or right parentheses for the condition in an if statement is a syntax error—the parentheses are required.
Common Programming Error 2.10
![]()
Confusing the equality operator, ==, with the assignment operator, =, can cause a logic error or a syntax error.
Good Programming Practice 2.10
![]()
Indent an if statement’s body to make it stand out and to enhance program readability.
Note that there is no semicolon (;) at the end of the first line of each if statement. Such a semicolon would result in a logic error at execution time. For example,
if ( number1 == number2 ); // logic error
System.out.printf( "%d == %d
", number1, number2 );
would actually be interpreted by Java as
if ( number1 == number2 )
; // empty statement
System.out.printf( "%d == %d
", number1, number2 );
where the semicolon on the line by itself—called the empty statement—is the statement to execute if the condition in the if statement is true. When the empty statement executes, no task is performed in the program. The program then continues with the output statement, which always executes, regardless of whether the condition is true or false, because the output statement is not part of the if statement.
Common Programming Error 2.11
![]()
Placing a semicolon immediately after the right parenthesis of the condition in an if statement is normally a logic error.
Note the use of white space in Fig. 2.11. Recall that white-space characters, such as tabs, newlines and spaces, are normally ignored by the compiler. So statements may be split over several lines and may be spaced according to the programmer’s preferences without affecting the meaning of a program. It is incorrect to split identifiers and strings. Ideally, statements should be kept small, but this is not always possible.
Good Programming Practice 2.11
![]()
A lengthy statement can be spread over several lines. If a single statement must be split across lines, choose breaking points that make sense, such as after a comma in a comma-separated list, or after an operator in a lengthy expression. If a statement is split across two or more lines, indent all subsequent lines until the end of the statement.
Figure 2.12 shows the precedence of the operators introduced in this chapter. The operators are shown from top to bottom in decreasing order of precedence. All these operators, with the exception of the assignment operator, =, associate from left to right. Addition is left associative, so an expression like x+y+z is evaluated as if it had been written as (x+y)+z. The assignment operator, =, associates from right to left, so an expression like x = y = 0 is evaluated as if it had been written as x = (y = 0), which, as we’ll soon see, first assigns the value 0 to variable y and then assigns the result of that assignment, 0, to x.
Fig. 2.12. Precedence and associativity of operations discussed.

Error-Prevention Tip 2.7
![]()
Refer to the operator precedence chart (Appendix A) when writing expressions containing many operators. Confirm that the operations in the expression are performed in the order you expect. If you are uncertain about the order of evaluation in a complex expression, use parentheses to force the order, exactly as you would do in algebraic expressions.
2.8 (Optional) Software Engineering Case Study: Examining the Requirements Document
Now we begin our optional object-oriented design and implementation case study. The Software Engineering Case Study sections at the ends of this and the next several chapters will ease you into object orientation by examining an automated teller machine (ATM) case study. This case study will provide you with a concise, carefully paced, complete design and implementation experience. In Chapters 3–8 and 10, we’ll perform the various steps of an object-oriented design (OOD) process using the UML while relating these steps to the object-oriented concepts discussed in the chapters. Appendix H implements the ATM using the techniques of object-oriented programming (OOP) in Java. We present the complete case-study solution. This is not an exercise; rather, it is an end-to-end learning experience that concludes with a detailed walkthrough of the Java code that implements our design.
We begin our design process by presenting a requirements document that specifies the overall purpose of the ATM system and what it must do. Throughout the case study, we refer to the requirements document to determine precisely what functionality the system must include.
Requirements Document
A local bank intends to install a new automated teller machine (ATM) to allow users (i.e., bank customers) to perform basic financial transactions (Fig. 2.13). Each user can have only one account at the bank. ATM users should be able to view their account balance, withdraw cash (i.e., take money out of an account) and deposit funds (i.e., place money into an account). The user interface of the automated teller machine contains the following components:
• a screen that displays messages to the user
• a keypad that receives numeric input from the user
• a cash dispenser that dispenses cash to the user and
• a deposit slot that receives deposit envelopes from the user.
Fig. 2.13. Automated teller machine user interface.

The cash dispenser begins each day loaded with 500 $20 bills. [Note: Due to the limited scope of this case study, certain elements of the ATM described here do not accurately mimic those of a real ATM. For example, a real ATM typically contains a device that reads a user’s account number from an ATM card, whereas this ATM asks the user to type the account number on the keypad. A real ATM also usually prints a receipt at the end of a session, but all output from this ATM appears on the screen.]
The bank wants you to develop software to perform the financial transactions initiated by bank customers through the ATM. The bank will integrate the software with the ATM’s hardware at a later time. The software should encapsulate the functionality of the hardware devices (e.g., cash dispenser, deposit slot) within software components, but it need not concern itself with how these devices perform their duties. The ATM hardware has not been developed yet, so instead of writing your software to run on the ATM, you should develop a first version of the software to run on a personal computer. This version should use the computer’s monitor to simulate the ATM’s screen, and the computer’s keyboard to simulate the ATM’s keypad.
An ATM session consists of authenticating a user (i.e., proving the user’s identity) based on an account number and personal identification number (PIN), followed by creating and executing financial transactions. To authenticate a user and perform transactions, the ATM must interact with the bank’s account information database (i.e., an organized collection of data stored on a computer). For each bank account, the database stores an account number, a PIN and a balance indicating the amount of money in the account. [Note: We assume that the bank plans to build only one ATM, so we do not need to worry about multiple ATMs accessing this database at the same time. Furthermore, we assume that the bank does not make any changes to the information in the database while a user is accessing the ATM. Also, any business system like an ATM faces reasonably complicated security issues that are beyond the scope of this book. We make the simplifying assumption, however, that the bank trusts the ATM to access and manipulate the information in the database without significant security measures.]
Upon first approaching the ATM (assuming no one is currently using it), the user should experience the following sequence of events (shown in Fig. 2.13):
1. The screen displays a welcome message and prompts the user to enter an account number.
2. The user enters a five-digit account number using the keypad.
3. The screen prompts the user to enter the PIN (personal identification number) associated with the specified account number.
4. The user enters a five-digit PIN using the keypad.
5. If the user enters a valid account number and the correct PIN for that account, the screen displays the main menu (Fig. 2.14). If the user enters an invalid account number or an incorrect PIN, the screen displays an appropriate message, then the ATM returns to Step 1 to restart the authentication process.
Fig. 2.14. ATM main menu.

After the ATM authenticates the user, the main menu (Fig. 2.14) should contain a numbered option for each of the three types of transactions: balance inquiry (option 1), withdrawal (option 2) and deposit (option 3). The main menu also should contain an option to allow the user to exit the system (option 4). The user then chooses either to perform a transaction (by entering 1, 2 or 3) or to exit the system (by entering 4).
If the user enters 1 to make a balance inquiry, the screen displays the user’s account balance. To do so, the ATM must retrieve the balance from the bank’s database.
The following steps describe the actions that occur when the user enters 2 to make a withdrawal:
1. The screen displays a menu (shown in Fig. 2.15) containing standard withdrawal amounts: $20 (option 1), $40 (option 2), $60 (option 3), $100 (option 4) and $200 (option 5). The menu also contains an option to allow the user to cancel the transaction (option 6).
Fig. 2.15. ATM withdrawal menu.

2. The user enters a menu selection using the keypad.
3. If the withdrawal amount chosen is greater than the user’s account balance, the screen displays a message stating this and telling the user to choose a smaller amount. The ATM then returns to Step 1. If the withdrawal amount chosen is less than or equal to the user’s account balance (i.e., an acceptable amount), the ATM proceeds to Step 4. If the user chooses to cancel the transaction (option 6), the ATM displays the main menu and waits for user input.
4. If the cash dispenser contains enough cash to satisfy the request, the ATM proceeds to Step 5. Otherwise, the screen displays a message indicating the problem and telling the user to choose a smaller withdrawal amount. The ATM then returns to Step 1.
5. The ATM debits the withdrawal amount from the user’s account in the bank’s database (i.e., subtracts the withdrawal amount from the user’s account balance).
6. The cash dispenser dispenses the desired amount of money to the user.
7. The screen displays a message reminding the user to take the money.
The following steps describe the actions that occur when the user enters 3 to make a deposit:
1. The screen prompts the user to enter a deposit amount or type 0 (zero) to cancel the transaction.
2. The user enters a deposit amount or 0 using the keypad. [Note: The keypad does not contain a decimal point or a dollar sign, so the user cannot type a real dollar amount (e.g., $1.25). Instead, the user must enter a deposit amount as a number of cents (e.g., 125). The ATM then divides this number by 100 to obtain a number representing a dollar amount (e.g., 125 ÷ 100 = 1.25).]
3. If the user specifies a deposit amount, the ATM proceeds to Step 4. If the user chooses to cancel the transaction (by entering 0), the ATM displays the main menu and waits for user input.
4. The screen displays a message telling the user to insert a deposit envelope into the deposit slot.
5. If the deposit slot receives a deposit envelope within two minutes, the ATM credits the deposit amount to the user’s account in the bank’s database (i.e., adds the deposit amount to the user’s account balance). [Note: This money is not immediately available for withdrawal. The bank first must physically verify the amount of cash in the deposit envelope, and any checks in the envelope must clear (i.e., money must be transferred from the check writer’s account to the check recipient’s account). When either of these events occurs, the bank appropriately updates the user’s balance stored in its database. This occurs independently of the ATM system.] If the deposit slot does not receive a deposit envelope within this time period, the screen displays a message that the system has canceled the transaction due to inactivity. The ATM then displays the main menu and waits for user input.
After the system successfully executes a transaction, it should return to the main menu so that the user can perform additional transactions. If the user chooses to exit the system, the screen should display a thank you message, then display the welcome message for the next user.
Analyzing the ATM System
The preceding statement is a simplified example of a requirements document. Typically, such a document is the result of a detailed process of requirements gathering that might include interviews with possible users of the system and specialists in fields related to the system. For example, a systems analyst who is hired to prepare a requirements document for banking software (e.g., the ATM system described here) might interview financial experts to gain a better understanding of what the software must do. The analyst would use the information gained to compile a list of system requirements to guide systems designers as they design the system.
The process of requirements gathering is a key task of the first stage of the software life cycle. The software life cycle specifies the stages through which software goes from the time it is first conceived to the time it is retired from use. These stages typically include: analysis, design, implementation, testing and debugging, deployment, maintenance and retirement. Several software life-cycle models exist, each with its own preferences and specifications for when and how often software engineers should perform each of these stages. Waterfall models perform each stage once in succession, whereas iterative models may repeat one or more stages several times throughout a product’s life cycle.
The analysis stage of the software life cycle focuses on defining the problem to be solved. When designing any system, one must solve the problem right, but of equal importance, one must solve the right problem. Systems analysts collect the requirements that indicate the specific problem to solve. Our requirements document describes the requirements of our ATM system in sufficient detail that you do not need to go through an extensive analysis stage—it has been done for you.
To capture what a proposed system should do, developers often employ a technique known as use case modeling. This process identifies the use cases of the system, each of which represents a different capability that the system provides to its clients. For example, ATMs typically have several use cases, such as “View Account Balance,” “Withdraw Cash,” “Deposit Funds,” “Transfer Funds Between Accounts” and “Buy Postage Stamps.” The simplified ATM system we build in this case study allows only the first three use cases.
Each use case describes a typical scenario for which the user uses the system. You have already read descriptions of the ATM system’s use cases in the requirements document; the lists of steps required to perform each transaction type (i.e., balance inquiry, withdrawal and deposit) actually described the three use cases of our ATM—“View Account Balance,” “Withdraw Cash” and “Deposit Funds,” respectively.
Use Case Diagrams
We now introduce the first of several UML diagrams in the case study. We create a use case diagram to model the interactions between a system’s clients (in this case study, bank customers) and its use cases. The goal is to show the kinds of interactions users have with a system without providing the details—these are provided in other UML diagrams (which we present throughout this case study). Use case diagrams are often accompanied by informal text that describes the use cases in more detail—like the text that appears in the requirements document. Use case diagrams are produced during the analysis stage of the software life cycle. In larger systems, use case diagrams are indispensable tools that help system designers remain focused on satisfying the users’ needs.
Figure 2.16 shows the use case diagram for our ATM system. The stick figure represents an actor, which defines the roles that an external entity—such as a person or another system—plays when interacting with the system. For our automated teller machine, the actor is a User who can view an account balance, withdraw cash and deposit funds from the ATM. The User is not an actual person, but instead comprises the roles that a real person—when playing the part of a User—can play while interacting with the ATM. Note that a use case diagram can include multiple actors. For example, the use case diagram for a real bank’s ATM system might also include an actor named Administrator who refills the cash dispenser each day.
Fig. 2.16. Use case diagram for the ATM system from the User’s perspective.

Our requirements document supplies the actors—“ATM users should be able to view their account balance, withdraw cash and deposit funds.” Therefore, the actor in each of the three use cases is the user who interacts with the ATM. An external entity—a real person—plays the part of the user to perform financial transactions. Figure 2.16 shows one actor, whose name, User, appears below the actor in the diagram. The UML models each use case as an oval connected to an actor with a solid line.
Software engineers (more precisely, systems designers) must analyze the requirements document or a set of use cases and design the system before programmers implement it in a particular programming language. During the analysis stage, systems designers focus on understanding the requirements document to produce a high-level specification that describes what the system is supposed to do. The output of the design stage—a design specification—should specify clearly how the system should be constructed to satisfy these requirements. In the next several Software Engineering Case Study sections, we perform the steps of a simple object-oriented design (OOD) process on the ATM system to produce a design specification containing a collection of UML diagrams and supporting text. The UML is designed for use with any OOD process. Many such processes exist, the most well-known of which is the Rational Unified Process™ (RUP) developed by Rational Software Corporation. RUP is a rich process intended for designing “industrial strength” applications. For this case study, we present our own simplified design process.
Designing the ATM System
We now begin the design stage of our ATM system. A system is a set of components that interact to solve a problem. For example, to perform the ATM system’s designated tasks, our ATM system has a user interface (Fig. 2.13), contains software that executes financial transactions and interacts with a database of bank account information. System structure describes the system’s objects and their interrelationships. System behavior describes how the system changes as its objects interact with one another. Every system has both structure and behavior—designers must specify both. There are several distinct types of system structures and behaviors. For example, the interactions among objects in the system differ from those between the user and the system, yet both constitute a portion of the system behavior.
The UML 2 standard specifies 13 diagram types for documenting the system models. Each models a distinct characteristic of a system’s structure or behavior—six diagrams relate to system structure; the remaining seven relate to system behavior. We list here only the six types used in our case study—one of these (class diagrams) models system structure, whereas the remaining five model system behavior. We overview the remaining seven UML diagram types in y.
1. Use case diagrams, such as the one in Fig. 2.16, model the interactions between a system and its external entities (actors) in terms of use cases (system capabilities, such as “View Account Balance,” “Withdraw Cash” and “Deposit Funds”).
2. Class diagrams, which you’ll study in Section 3.9, model the classes, or “building blocks,” used in a system. Each noun or “thing” described in the requirements document is a candidate to be a class in the system (e.g., Account, Keypad). Class diagrams help us specify the structural relationships between parts of the system. For example, the ATM system class diagram will specify that the ATM is physically composed of a screen, a keypad, a cash dispenser and a deposit slot.
3. State machine diagrams, which you’ll study in Section 5.9, model the ways in which an object changes state. An object’s state is indicated by the values of all the object’s attributes at a given time. When an object changes state, that object may behave differently in the system. For example, after validating a user’s PIN, the ATM transitions from the “user not authenticated” state to the “user authenticated” state, at which point the ATM allows the user to perform financial transactions (e.g., view account balance, withdraw cash, deposit funds).
4. Activity diagrams, which you’ll also study in Section 5.9, model an object’s activity—the object’s workflow (sequence of events) during program execution. An activity diagram models the actions the object performs and specifies the order in which the object performs these actions. For example, an activity diagram shows that the ATM must obtain the balance of the user’s account (from the bank’s account information database) before the screen can display the balance to the user.
5. Communication diagrams (called collaboration diagrams in earlier versions of the UML) model the interactions among objects in a system, with an emphasis on what interactions occur. You’ll learn in Section 7.13 that these diagrams show which objects must interact to perform an ATM transaction. For example, the ATM must communicate with the bank’s account information database to retrieve an account balance.
6. Sequence diagrams also model the interactions among the objects in a system, but unlike communication diagrams, they emphasize when interactions occur. You’ll learn in Section 7.13 that these diagrams help show the order in which interactions occur in executing a financial transaction. For example, the screen prompts the user to enter a withdrawal amount before cash is dispensed.
In Section 3.9, we continue designing our ATM system by identifying the classes from the requirements document. We accomplish this by extracting key nouns and noun phrases from the requirements document. Using these classes, we develop our first draft of the class diagram that models the structure of our ATM system.
Internet and Web Resources
The following URLs provide information on object-oriented design with the UML.
www-306.ibm.com/software/rational/offerings/design.html
Provides information about IBM Rational software available for designing systems. Provides downloads of 30-day trial versions of several products, such as IBM Rational Application Developer.
www.borland.com/us/products/together/index.html
Provides a free 30-day license to download a trial version of Borland® Together® ControlCenter™—a software-development tool that supports the UML.
Contains information and downloads for ArgoUML, a free open-source UML tool written in Java.
www.objectsbydesign.com/books/booklist.html
Lists books on the UML and object-oriented design.
www.objectsbydesign.com/tools/umltools_byCompany.html
Lists software tools that use the UML, such as IBM Rational Rose, Embarcadero Describe, Sparx Systems Enterprise Architect, I-Logix Rhapsody and Gentleware Poseidon for UML.
www.ootips.org/ood-principles.html
Provides answers to the question, “What Makes a Good Object-Oriented Design?”
parlezuml.com/tutorials/umlforjava.htm
Provides a UML tutorial for Java developers that presents UML diagrams side by side with the Java code that implements them.
www.cetus-links.org/oo_uml.html
Introduces the UML and provides links to numerous UML resources.
www.agilemodeling.com/essays/umlDiagrams.htm
Provides in-depth descriptions and tutorials on each of the 13 UML-2 diagram types.
Recommended Readings
The following books provide information on object-oriented design with the UML.
Booch, G. Object-Oriented Analysis and Design with Applications. 3rd ed. Boston: Addison-Wesley, 2004.
Eriksson, H., et al. UML 2 Toolkit. Hoboken, NJ: John Wiley & Sons, 2003.
Fowler, M. UML Distilled. 3rd ed. Boston: Addison-Wesley Professional, 2004.
Kruchten, P. The Rational Unified Process: An Introduction. Boston: Addison-Wesley, 2004.
Larman, C. Applying UML and Patterns: An Introduction to Object-Oriented Analysis and Design. 2nd ed. Upper Saddle River, NJ: Prentice Hall, 2002.
Roques, P. UML in Practice: The Art of Modeling Software Systems Demonstrated Through Worked Examples and Solutions. Hoboken, NJ: John Wiley & Sons, 2004.
Rosenberg, D., and K. Scott. Applying Use Case Driven Object Modeling with UML: An Annotated e-Commerce Example. Reading, MA: Addison-Wesley, 2001.
Rumbaugh, J., I. Jacobson and G. Booch. The Complete UML Training Course. Upper Saddle River, NJ: Prentice Hall, 2000.
Rumbaugh, J., I. Jacobson and G. Booch. The Unified Modeling Language Reference Manual. Reading, MA: Addison-Wesley, 1999.
Rumbaugh, J., I. Jacobson and G. Booch. The Unified Software Development Process. Reading, MA: Addison-Wesley, 1999.
Schneider, G. and J. Winters. Applying Use Cases: A Practical Guide. 2nd ed. Boston: Addison-Wesley Professional, 2002.
Software Engineering Case Study Self-Review Exercises
2.1 Suppose we enabled a user of our ATM system to transfer money between two bank accounts. Modify the use case diagram of Fig. 2.16 to reflect this change.
2.2 __________ model the interactions among objects in a system with an emphasis on when these interactions occur.
a) Class diagrams
b) Sequence diagrams
c) Communication diagrams
d) Activity diagrams
2.3 Which of the following choices lists stages of a typical software life cycle in sequential order?
a) design, analysis, implementation, testing
b) design, analysis, testing, implementation
c) analysis, design, testing, implementation
d) analysis, design, implementation, testing
Answers to Software Engineering Case Study Self-Review Exercises
2.1 Figure 2.17 contains a use case diagram for a modified version of our ATM system that also allows users to transfer money between accounts.
Fig. 2.17. Use case diagram for a modified version of our ATM system that also allows users to transfer money between accounts.

2.2 b.
2.3 d.
2.9 Wrap-Up
You learned many important features of Java in this chapter, including displaying data on the screen in a Command Prompt, inputting data from the keyboard, performing calculations and making decisions. As you’ll see in Chapter 3, Java applications typically contain just a few lines of code in method main—these statements normally create the objects that perform the work of the application. In Chapter 3, you’ll see how to implement your own classes and use objects of those classes in applications.