
The notification scheme is a reusable entity that links events with notifications. In other words, it contains the associations between events and their respective e-mail recipients:
- Log in to JIRA as a JIRA administrator.
- Click on Administration in the top menu bar.
- Select Notification Schemes at the bottom to bring up the Notification Schemes page:
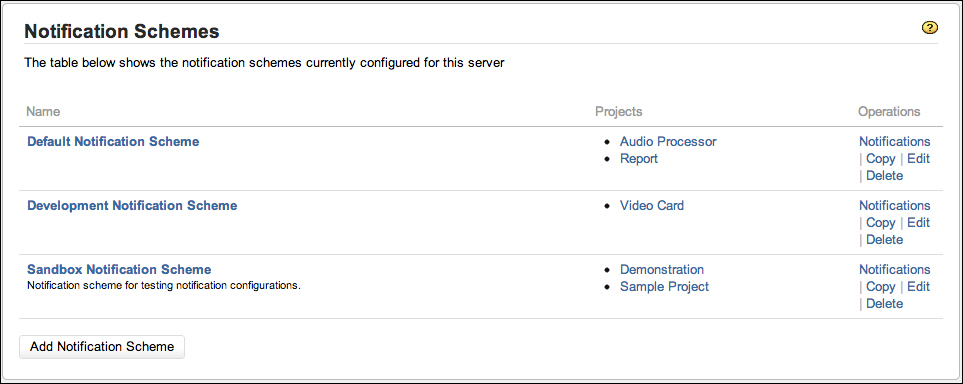
From this screen, you can see a list of all the notification schemes and what projects are currently using them.
JIRA comes with a generic default notification scheme. The default scheme is set up with notifications set for all the system events. This allows you to quickly enable notification in JIRA. The default setup has the following notifications:
- Current Assignee
- Reporter
- All Watchers
You can modify the default notification scheme to add your own notification rules, but it is a better idea to create a new scheme from scratch or copy the default scheme and make your modifications.
As with all other aspects in JIRA, you are not forced to use the default configurations provided. JIRA allows you to create your own custom notification schemes to set up customized notification rules that can be applied to your projects.
Perform the following steps to create a new notification scheme:
- Browse to the Notification Schemes page.
- Click on the Add Notification Scheme link. This will bring you to the Add Notification Scheme page.
- Provide a meaningful name for the new notification scheme.
- Provide an optional description that will help explain the purpose and usage of the new scheme.
- Click on the Add button to create the notification scheme.
When you create a new notification scheme, you create a blank scheme that can be configured later to add your own notification rules in. It is important that after you have created a new notification scheme, you configure its notification rules before applying the scheme to projects, otherwise no notifications will be sent out. You will look at how to configure notification rules later in this chapter.
You can keep your notification scheme's name and description up to date editing it. Do not confuse this with updating the scheme's configuration. Just like other schemes, a notification scheme's name and description details are kept and managed separately from its configuration contents.
Perform the following steps to edit a notification scheme:
You can make updates to the notification scheme at any time, regardless of whether it is being used by projects.
Unlike most other schemes, such as workflow, JIRA allows you to delete notifications schemes even when they are being used by projects. However, JIRA does prompt you with a warning when you attempt to delete a notification scheme that is in use.
Perform the following steps to delete a notification scheme:
- Browse to the Notification Schemes page.
- Click on the Delete link for the notification scheme you wish to remove. This will bring up the Delete Notification Scheme page.
- Click on the Delete button to remove the notification scheme.
Once you have deleted a notification scheme, the projects that were previously using the scheme will have no notification schemes, so you will have to reapply schemes individually.
When you delete a notification scheme, you remove all the notifications you set up in the scheme.
It is always a good idea to make a backup copy of your notification schemes before making changes or deleting them. This allows you to quickly roll back your changes if problems are detected. Another benefit of copying an existing notification scheme is the amount of time it can save. As you have seen, when you create a new notification scheme from scratch, it will contain no notifications. Most of the time, it will be more efficient to use the default notification scheme provided by JIRA as a base and modify the notification rules accordingly.
Whatever the reason may be, you will find the ability to make copies of existing notification schemes to be handy from time to time. Perform the following steps to copy a notification scheme:
- Browse to the Notification Schemes page.
- Click on the Copy link for the notification scheme you wish to copy. A copy of the notification scheme will be made immediately with the name Copy of appended to the original notification scheme.
Once you have copied a notification scheme, you can edit its name and description to better describe its purpose, and configure its notifications as explained in the next sections.
Notification schemes contain notifications that are set on events in JIRA.
Perform the following steps to configure a notification scheme:
- Browse to the Notification Schemes page.
- Click on the Notifications link for the notification scheme you wish to configure. This will bring you to the Edit Notifications page.
This page lists all the existing events in JIRA and their corresponding notification recipients. If you configure a new notification scheme, there will be no notifications set for the events.
There are two ways you can add a new notification. You can add a notification for a specific event, or you can add a notification for multiple events.
Perform the following steps to add a new notification:
- Browse to the Edit Notifications page for the notification scheme you wish to configure.
- Click on the Add notification link or the Add link for the event you wish to add a notification for. This will bring you to the Add Notification page. If you click on the Add link, the Events selection list will preselect the event for you.
- Select the notification type from the available options.
- Click on the Add button:

Once added, the notification will be listed against the events selected. You can continue adding notifications for the events by repeating the same steps.
When notifications are no longer required for certain events, you can also have them removed. To remove notifications, you will need to do it one by one, per event:
- Browse to the Edit Notifications page for the notification scheme you wish to configure.
- Click on the Delete link for the notification you wish to remove. This will bring you to the Delete Notification page.
- Click on the Delete button to remove the notification for the event.
After you have removed a notification, users affected by that notification will stop receiving e-mails from JIRA. However, you need to pay attention to your configurations, as there might be other notifications for the same event that will continue to send e-mails to the same user. For example, if you have created two notifications for the event Issue Created—one set to the Single User admin (who belongs to the jira-administrator group), and another set to Group (jira-administrator). If your goal to is prevent e-mails being sent to the user admin, you will need to remove both the notifications from the event instead of simply the
Single User option.
When new projects are created, they are automatically assigned to use the default notification scheme. If you want your project to use a different scheme, you will need to go to the Notifications section of your project's administration console:
- Go to the target project's administration console.
- Select the Notifications tab. In the Notifications section, you will be able to see the current notification scheme and its configurations.
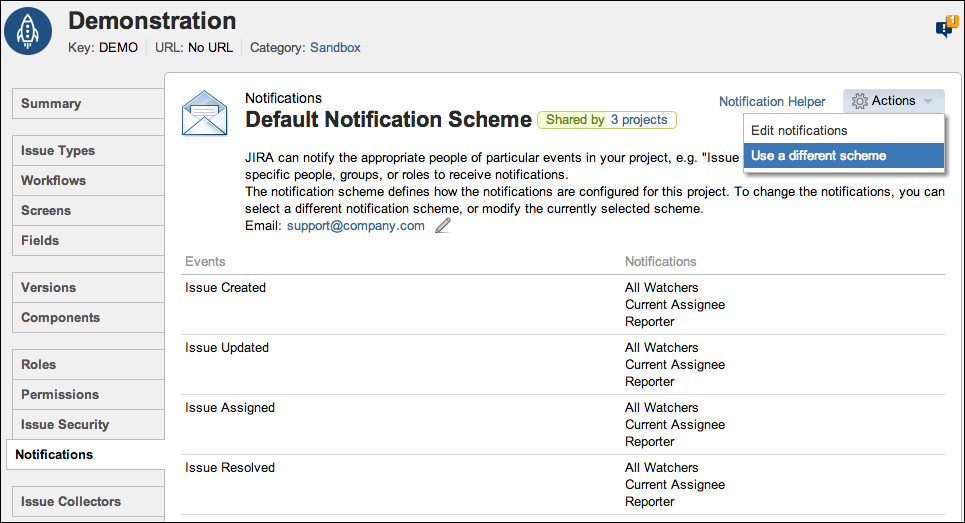
- Select Use a different scheme in the Actions menu. This will bring up the Associate Notification Scheme to Project page.
- Select the notification scheme to use.
- Click on the Associate button.
As soon as a notification scheme is applied to the project, it will take effect immediately and you will see e-mails being sent out for the events that have been configured in the scheme. Like any other schemes in JIRA, notification schemes can be assigned to multiple projects to share the same notification behavior.