
JIRA will only let you set up one outgoing mail server that will be used as the primary mail server to send out e-mails.
Unlike many settings in JIRA, you need to be a JIRA system administrator (the user created during the initial setup is a system administrator) to configure mail server details. Perform the following steps to manage the outgoing mail server:
- Log in to JIRA as a JIRA administrator.
- Click on Administration in the top menu bar.
- Select Outgoing Mail under the Mail section:
There are two ways of adding an outgoing mail server in JIRA, but before you get to that, regardless of which option you take, there are some common configuration parameters that you will need to fill in. The following table shows those parameters:
|
Field |
Description |
|---|---|
|
This specifies a name for the mail server. | |
|
This specifies a brief description for the mail server. | |
|
This specifies an e-mail address that outgoing e-mails will appear to have come from. | |
|
This specifies a prefix that will appear with all the e-mails sent from JIRA. This allows your users to set up filter rules in their mail clients. The prefix will be added to the beginning of the e-mail subject. | |
|
This specifies the host name of your mail server (for example, | |
|
This specifies the port number your mail server will be running on. This is optional; if left blank, the default port number 25 will be used. | |
|
This is used to authenticate against the mail server if required. Note that mail servers may require authentication to relay e-mails to non-local users. | |
|
This is used to authenticate the user against the mail server, if required. | |
|
This is the JNDI lookup name if you already have a mail server configured for your application server. Please refer to the following section for details. |
For the rest of the parameters, depending on which option you take to set up your mail server, you only need to fill in the ones that are appropriate.
The first option is to specify the mail server's details, such as its host name and port number directly in JIRA. This is the approach that most people will use, as it is simple and straightforward. With this approach, the administrator fills in the mail server's host information, such as the host name and port number:
- Browse to the Mail section and select the Outgoing Mail tab.
- Click on the Configure new SMTP mail server button. This will bring you to the Add SMTP Mail Server page.
- Fill in the details of your mail server, including the host name, port number, username, and password.
- Click on the Add button to register to the mail server:

The second option is to use JNDI. This approach is slightly more complicated as it requires configuration on the application server itself (which is different per-application server), and sometimes requires a restart of the application server.
If you are using the standalone distribution, which uses Tomcat, the JNDI location will be java:comp/env/mail/JiraMailServer. You will also need to specify the mail server details as a JNDI resource in the server.xml file in the JIRA_INSTALL/conf directory.
A sample declaration for Apache Tomcat is shown in the following code snippet. You will need to substitute in your mail server's details:
<Resource name="mail/JiraMailServer"
  auth="Container"
  type="javax.mail.Session"
  mail.smtp.host="mail.server.host"
  mail.smtp.port="25"
  mail.transport.protocol="smtp"
  mail.smtp.auth="true"
  mail.smtp.user="username"
  password="password"
/>
You will need to restart JIRA after you have saved your changes.
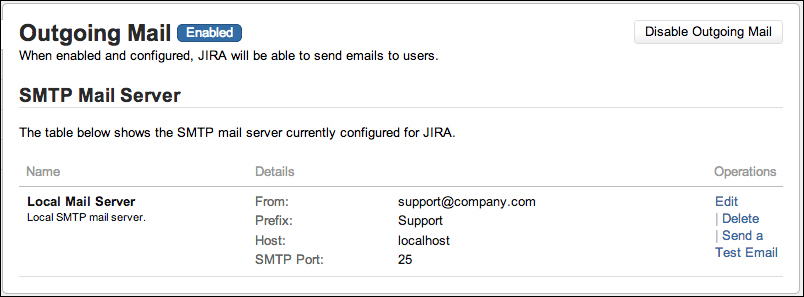
In the older versions of JIRA, there is no easy way of disabling outgoing e-mails from JIRA. Administrators often had to delete the SMTP server and add it back again. In JIRA 5, you can disable all outgoing e-mails by just clicking on the Disable Outgoing Mail button in the Outgoing Mail page.
To increase security, you can encrypt the communication between JIRA and your mail server, if your mail server supports SSL. There are two steps involved in enabling SMTP over SSL in JIRA.
The first step is to import your mail server's SSL certificate into Java's trust store. You can do this with Java's keytool utility. On a Windows machine, run the following command in a command prompt:
Keytool –import –alias mail.yourcompany.com –keystore $JAVA_HOME/jre/lib/security/cacerts –file yourcertificate
The second step is to configure your application server to use SSL for mail communication. The following declaration is for Apache Tomcat that is used by JIRA Standalone. We use the same configuration file and only need to add two additional parameters:
<Resource name="mail/JiraMailServer"
  auth="Container"
  type="javax.mail.Session"
  mail.smtp.host="mail.server.host"
  mail.smtp.port="25"
  mail.transport.protocol="smtp"
  mail.smtp.auth="true"
  mail.smtp.user="username"
  password="password"
  mail.smtp.atarttls.enabled="true"
  mail.smtp.socketFactory.class="javax.net.ssl.SSLSocketFactory"
/>
Once you have imported your certificate and configured your mail server, you will have to restart JIRA.
It is always a good idea to send a test e-mail after you have configured your SMTP mail server, to make sure the server is running and you have set it correctly in JIRA:
- Browse to the Outgoing Mail page.
- Click on the Send a Test Email link for your SMTP mail server. This will take you to the Send Mail page.
- Click on the Send button to send the e-mail. JIRA should auto-fill the To address based on your user profile.
If everything is correct, you should see a confirmation message in the Mail log section and receive the e-mail in your inbox. If there are errors, such as mail server connection, then the Mail log section will display the problems. This is very useful to troubleshoot any problems with JIRA's connectivity with the SMTP server:
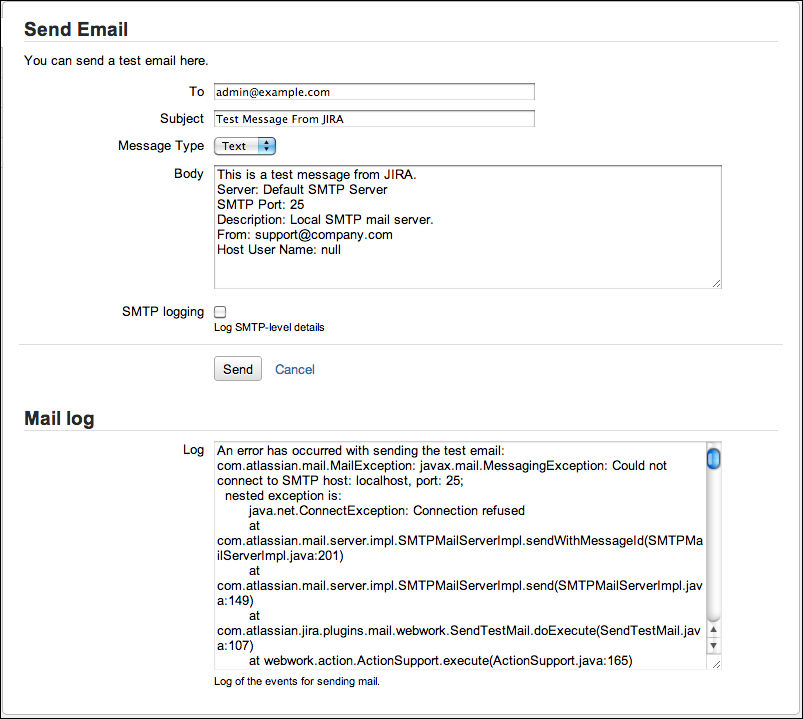
In the preceding screenshot, you can see that the test e-mail delivery has failed and the error is because JIRA was unable to connect to the configured SMTP server.