
Since issues often represent a single unit of work that can be worked upon, it is logical for users to log the time they have spent working on it. You can specify an estimated effort required to complete an issue, and JIRA will be able to help you track the progress. JIRA displays the time tracking information of an issue in the Time Tracking panel at the right-hand side:
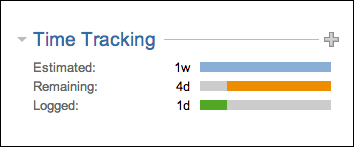
- Estimated: This represents the original estimated effort required to complete the issue.
- Remaining: This represents the remaining time for the issue to be completed. It is calculated automatically by JIRA based on the original estimate and total time logged by users. However, the user logging work on the issue, as described in the following section, can also override this value.
- Logged: This represents the total time logged by all users on this issue.
Time tracking is enabled by default when you install JIRA. However, if it is disabled on your system, for example, if you have upgraded from an older version of JIRA, which has time tracking disabled by default, you can re-enable it. Perform the following steps to enable time tracking:

You can set several parameters on the Time Tracking page. As we will see in later sections, these parameters will determine the time tracking behavior for JIRA:
|
Parameter |
Description |
|---|---|
|
This is the number of working hours per day in JIRA. For example, if this is set to eight hours per day, when the user puts in 16 hours, JIRA will automatically convert it to two days. | |
|
This is the number of working days per week in JIRA. For example, if this is set to five days per week, when the user puts in 10 days, JIRA will automatically convert it to two weeks. | |
|
This is the format in which JIRA will display time in the Time Spent field. | |
|
This is the default time tracking unit if the user does not supply one. | |
|
This will make JIRA use the old time tracking behavior. | |
|
This is a very handy feature, where JIRA will automatically copy comments made during a workflow transition (workflow will be discussed in Chapter 6, Workflows and Business Processes) that allows time logging. |
Original estimate represents the anticipated time required to complete the work represented by the issue. It is shown as the blue bar under the Time Tracking section.
In order for you to specify an original estimate value, you need to make sure that time tracking is enabled and the Time Tracking field is added to the issue's create and/or edit screen. We will discuss fields and screens in Chapter 4, Field Management and Chapter 5, Screen Management, respectively.
To specify an original estimate value, provide a value for the Original Estimate field on the create issue and/or edit issue screen.
Logging work in JIRA allows you to specify the amount of time (work) you have spent working on an issue. You can log work against any of the issues, provided that Time Tracking is enabled and you have permission to do so. We will cover permissions in Chapter 9, Searching, Reporting, and Analysis.
Perform the following steps to log work against an issue:
- Browse to the issue you wish to log work against.
- Select Log Work from the More Actions menu. This will bring up the Log Work page.
- Enter the amount of time you wish to log. Use
w,d,h, andmto specify week, day, hour, and minute respectively. - Select the date you wish to log your work against.
- Optionally, select how the remaining estimate should be adjusted.
- Optionally, add a description to the work you have done.
- Optionally, select who can view the work log entry.
- Click on the Log button:
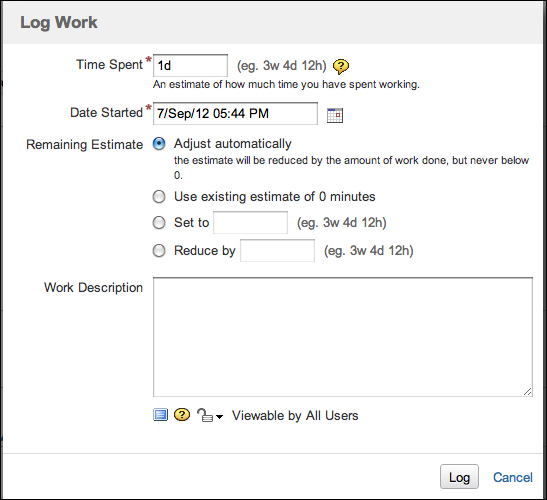
When you log work on an issue, you have the option to choose how the Remaining Estimate value will be affected. By default, this value will be automatically calculated by subtracting the amount logged from the original estimate. You can, however, choose other options available, such as setting the remaining estimate to a specific value or reducing it by an amount that is different to the amount of work being logged.