
Now that we have seen all the key aspects that make up a project, let's revisit what we have learned so far and put them to practice. In this exercise, we will be setting up a project for our support teams:
- A new project category for all support teams
- A new project for our help desk support team
- Components for the systems supported by the team
- Versions to better manage issues created by users
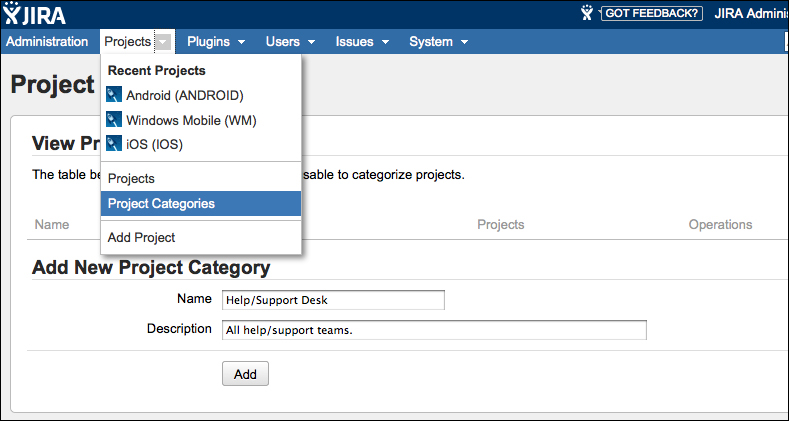
Let's start by creating a project category. We will create a category for all of our internal support teams and their respective support JIRA projects.
Please note that this step is optional, as JIRA does not require any project to belong to a project category:
- Log in to JIRA with a user who has JIRA Administrator's permission.
- Click on the Administration link at the top-right corner.
- Bring down the Projects menu and select Project Categories.
- Fill in the fields as shown in the next screenshot.
- Click on Add to create the new project category:
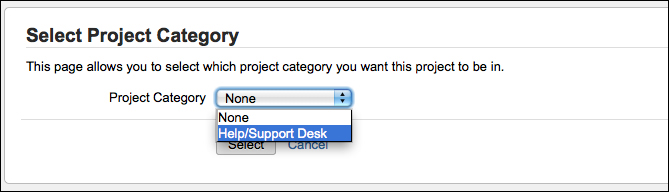
Now that we have a project category created, let's create a project for our help desk support team. To create a new project, perform the following steps:
- Browse to the JIRA Administration interface.
- Bring up the Add a new project dialog box by either selecting Add Project from the Projects menu or by clicking on the little plus icon at the top-right corner.
- Name our new project
Support Desk – Global, and accept the other default values for Key and Project Lead. - Click on Add to create the new project.
You should now be taken to the Project Administration interface of your new project.
Having your project created, you need to assign the new project to your project category, and you can do this directly from the Project Administration interface:
As discussed in the earlier sections, components are subsections of a project. This makes logical sense for a software development project, where each component will represent a software deliverable module. For other types of project, components may first appear useless or inappropriate.
It is true that components are not for every type of projects out there, and this is the reason why you are not required to have them by default. Just like everything else in JIRA, all the features come from how you can best map them to your business needs.
The power of component is more than just a flag field for an issue. For example, let's imagine that the company you are working for has a range of systems that need to be supported. These may range from phone systems and desktop computers to other business applications. Let's also assume that our support team needs to support all of the systems. Now, that is a lot of systems to support. To help manage and delegate, we will create a component for each of the systems the help desk team supports. We will also assign a lead for each of the components. This setup allows us to establish a structure where the Help Desk project is led by the support team lead, and each component is led by their respective system expert (who may or may not be the same as the team lead). As we will see in the later chapters, this allows for a very flexible management process when we start wiring in other JIRA features, such as notification schemes:
- Browse to the Project Administration interface for the
Support Desk – Globalproject. - Select the Components tab.
- Type
Internal Phone Systemfor the new component's name. - Provide a short description for the new component.
- Select a user to be the lead of the component. Since you only have one user in your system at the moment, we will put
adminas the component lead. - Click on Add to create the new component.
As we discussed earlier, while versions are most applicable for projects with deliverables, they can still be helpful for tracking and reporting purposes. For our Support Desk project, we can use versions to represent different calendar months, and each ticket or incident raised by users will have a version number attached. This way, it will be very easy for the management to pull up a report to see how many issues are being raised for any given month:
- Select the Versions tab.
- Type
Augustfor Version Name. - Provide a short description for the new version.
- Click on the calendar icon and select the last day for Release Date.
- Click on Add to create the new version.
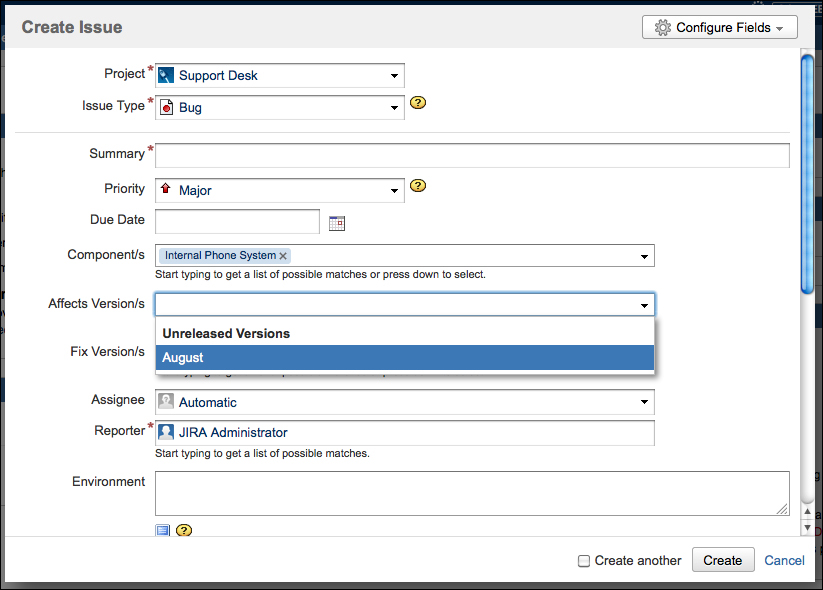
Now that you have fully prepared your project, let's see how everything comes together by creating an issue. If everything is done correctly, you should see a dialog box similar to the next screenshot, where you can choose your new project to create the issue in, and also the new components and versions should be available for selection too:
- Leave the JIRA Administration interface by clicking on the Exit Administration link.
- Click on Create Issue near the top-right corner. This will bring up the Create Issue dialog box.
- Select Support Desk – Global for Project.
- Select Bug for Issue Type.
- Click on the drop-down arrow for Component/s, Affects Version/s, and Fix Version/s; the components and versions we have created earlier should be available for selection.
- Fill in the other fields with some dummy data.
- Click on the Create button to create the issue:
We will be exploring issues in more details in the next chapter.
If everything goes well, the issue will be created in the new project.