


Configuring
This chapter provides an overview of the main configuration topics of the Hardware Management Console (HMC).
This chapter describes the following topics:
4.1 Network configuration
This section provides an overview of the types of network configurations for the HMC and explains how to configure HMC network settings. It also describes how to test network connections and obtain network diagnostic information.
4.1.1 Types of HMC network configurations
The HMC supports several network configurations:
•HMC to managed system connection performs most of the hardware management functions in which the HMC issues control function request through the service processor of the managed system.
•HMC to logical partition connection collects platform-related information such as hardware inventory, from the operating system running in the logical partitions. This communication also coordinates certain platform activities, such as dynamic logical partition (DLPAR) or concurrent maintenance with those operating systems.
•HMC to remote users connection provides remote users with access to HMC function. Remote users can access the HMC by using one of the following methods:
– The remote operation to access all the HMC graphical user interface (GUI) functions remotely.
– SSH to access the HMC command-line functions remotely.
– A virtual terminal server for remote access to a virtual logical partition console.
•HMC to service and support connection transmits data such as hardware error reports, inventory data, and microcode updates, to and from your service provider. You can use this communication path to make automatic service calls.
All network configuration functions are available under HMC Management → Console Settings.
There you have three options listed under the Change Network Settings topic:
•View Network Topology
•Test Network Connectivity
•Change Network Settings
4.1.2 Configuring the HMC network settings
This section describes how you view or change the network configuration for the HMC. Select Change Network Settings under HMC Management → Console Settings. There are four tabs (see Figure 4-1 on page 261):
•Identification
•LAN Adapters
•Name Services
•Routing
Identification tab
The Identification tab provides information that is needed to identify the HMC in the network (Figure 4-1). It includes the following information:
•Console name
HMC name that identifies the console to other consoles in the network. This name is the short host name.
•Domain name
An alphabetic name that the Domain Name Server (DNS) can translate to the Internet Protocol (IP) address.
•Console description
Short description for the HMC (for example the intended purpose).

Figure 4-1 HMC Identification tab on Customize Network Settings pane
LAN Adapters tab
The LAN Adapters tab (Figure 4-2) lists all local area network (LAN) adapters that are installed on the HMC. You can view details of each LAN adapter by clicking Details, which starts a window where you can change LAN adapter configuration and firewall settings.

Figure 4-2 LAN adapters tab on Customize Network Settings pane
LAN Adapters Details - Basic Settings
If you click Details on the LAN Adapter tab (shown in Figure 4-2 on page 262), the LAN Adapters Details pane opens to the Basic Settings tab (Figure 4-3). The basic settings describe the LAN adapter configuration of Ethernet eth0 on the LAN Adapters tab.

Figure 4-3 Basic Settings tab on LAN Adapter Details pane
The Basic Settings tab of the LAN Adapter Details pane includes the following information:
•Local Area Network Information
The LAN interface address shows the Media Access Control (MAC) address on the card and the adapter name. These values uniquely identify the LAN adapter. The private network is used by the HMC to communicate with a managed system, and an open network is used to connect the HMC outside the managed system.
•Media Speed
Media Speed specifies the speed in duplex mode of an Ethernet adapter. The options are Autodetection, 10 Mbps Half Duplex, 10 Mbps Full duplex, 100 Mbps Half Duplex, 100 Mbps Full duplex, or 1000 Mbps Full duplex.
•DHCP Server
Choose Enable DHCP Server only if this adapter is defined as a private network, then choose one range of addresses for the DHCP server to assign to its clients.
•Address Range
The selectable address ranges include segments from the standard non-routable IP address ranges. Based on the range that is selected, the HMC network interface on the private network is automatically assigned the first IP address of that range, and the service processors are then assigned addresses from the rest of the range.
The DHCP server in the HMC uses automatic allocation, which means that each unique service processor Ethernet interface is reassigned the same IP address each time it is started. This is done over a unique identifier built from the MAC address for each Ethernet interface, which allows the DHCP server to reassign the same IP parameters.
•IPv4 Address
Three options are offered:
– No IPv4 address: Select if you want to use IPv6.
– Obtain an IP address automatically: Select if you want the HMC to obtain an available IP address automatically from another DHCP server.
– Specify an IP address: Select if you want to specify an IP address, and then provide a TCP/IP interface address and TCP/IP interface network mask.
LAN Adapter Details: IPv6 Settings
The IPv6 Settings tab on the LAN Adapter Details pane (Figure 4-4) describes the IPv6 configuration of Ethernet eth0 on the LAN Adapters tab.

Figure 4-4 IPv6 Settings tab on LAN Adapter Details pane
The IPv6 Settings tab includes the following information:
•Autoconfig Options:
– Autoconfigure IP addresses
Select this option if you want the HMC to automatically configure IPv6 addresses. If this option is selected, the autoconfiguration process includes creating a link-local address and verifying its uniqueness on a link, determining what information should be autoconfigured (addresses, other information, or both).
– Use DHCPv6 to configure IP settings
Select this option if you want to enable stateful autoconfiguration of IPv6 addresses using the DHCPv6 protocol if you have a DHCPv6 server.
– Autoconfigured IP Addresses
This table lists the automatically configured IP addresses for this adapter.
•Static IP Addresses
The table lists the statically configured IPv6 addresses for this adapter. Addresses can be added, selectively changed, or removed from this table through the Add, Edit, and Remove buttons.
LAN Adapters Details - Firewall Settings
The Firewall Settings tab on the LAN Adapters Details pane (Figure 4-5) describes the firewall configuration of Ethernet eth0. Use this tab to view and change current firewall adapter settings for the specified LAN interface address. Select an entry and click Allow Incoming to allow access to incoming network traffic from this address or click Allow Incoming by IP Address to allow access by incoming network traffic from hosts you specify by an IP Address and network mask.

Figure 4-5 Firewall Settings Tab on LAN Adapter Details pane
Name Services tab
On the Name Services tab, you can specify DNS for configuring the console network settings (Figure 4-6). DNS is a distributed database system for managing host names and their associated IP addresses.

Figure 4-6 Name Services tab on Customize Network Settings pane
The Name Services tab shows the following information:
•DNS Configuration
– Use DHCP DNS Settings
Select this option if you have a DHCP server and want the DNS settings be configured by the DHCP server.
– DNS enabled
Select this to enable or deselect to disable the DNS.
•DNS Server Search Order
Use this area to add IP addresses to or remove them from the search list for mapping the host names to IP addresses. The top suffix will always be searched first.
•Domain Suffix Search Order
Use this area to add a domain suffix to or remove it from the list to be searched. The top suffix will always be searched first.
Routing tab
Use the Routing tab to specify routing information by configuring the console network settings (Figure 4-7). You can add, delete, or change routing entries and specify routing options for the HMC.

Figure 4-7 Routing tab on Customize Network Settings pane
The Routing Tab has the following details:
•Routing Information
This item displays the current static routing information of the HMC. Click New, Change, or Delete, to add, edit, or remove routing entries and specify routing options for the HMC.
The Routing Information table displays:
– Net
Specifies a network-specific route. With a net route, the destination address is the TCP/IP address of a particular network. All TCP/IP communications destined for the network are routed using the TCP/IP address of the router, unless a host route also applies for the communication to the destination host address. When a conflict occurs between a host and net route, the host route is used.
– Host
Specifies a host-specific destination. With a host route, the destination address is the TCP/IP address of a particular host. All TCP/IP communications destined for that host are routed through the router using the router address as the TCP/IP address.
– Default
Specifies all destinations not defined with another routing table entry. With a default route, the destination address is all zero. If no host or net route applies when communicating with a destination host address, the communications are routed through the default router using the TCP/IP address given by the router address.
– Destination
Displays the TCP/IP address of the destination host, network, or subnet.
– Gateway
Displays the TCP/IP address of the next hop in the path to the destination.
– Subnet Mask
Displays the subnet mask used by the network interfaces to add routes.
– Interface
Displays the name of the network interface which is associated with the table entry.
•Default Gateway Information:
– Gateway Address
This area displays the current gateway address. To change it, type a new gateway address in the field.
– Gateway Device
This area displays the current gateway device. To change it, you can choose another Gateway device from the drop-down list.
4.1.3 Test network connectivity
When you click Test Network Connectivity on HMC Management → Console Settings, the Network Diagnostic Information pane opens (Figure 4-8). Ten Network Diagnostic Information tabs are available. Most of the tabs only display information, which can help you trace connection problems.
•Ping
Use the Ping function on this tab (Figure 4-8) to send an echo request (ping) to a remote host to check whether the host is reachable and to receive information about that TCP/IP address or name. Specify any TCP/IP address or name (if you have DNS configured) in the TCP/IP Address or Name to Ping field, then click Ping.

Figure 4-8 Ping Tab on Network Diagnostic Information pane
•Interfaces
This tab displays the statistics for the network interfaces currently configured.
•Ethernet Settings
This tab displays the settings for the Ethernet cards currently configured.
•Address
This tab displays the TCP/IP addresses for the configured network interfaces. It also displays information and statistics such as the MAC address, dropped packets, packet overruns, and framing errors. This tab is useful for debugging network issues for the HMC.
•Routes
This tab displays the Kernel IP and IPv6 routing tables and corresponding network interfaces.
•ARP (Address Resolution Protocol)
This tab displays the contents of the Address Resolution Protocol (ARP) connections.
•Sockets
This tab displays information about TCP/IP sockets.
•TCP (Transmission Control Protocol)
This tab displays information about TCP connections.
•IP tables
This tab displays information (in table format) about the IP packet filter rules.
•UDP (User Datagram Protocol)
This tab displays information about User Datagram Protocol (UDP) statistics.
4.1.4 View network topology
Click View Network Topology on the HMC Management → Console Settings to open the View Network Topology pane (Figure 4-9). This pane shows a tree view of the network nodes known to this HMC. Examples of nodes are managed systems, logical partitions, storage, and other HMCs. You can view attributes of a node by selecting the node in the tree view, under Current Topology. Attributes vary according to the type of node. Some examples are IP address, host name, location code, and status. Click Refresh to rediscover the topology and to query the nodes again for status and other attributes.

Figure 4-9 View Network Topology pane
Table 4-1 lists the possible status for each node.
|
Note: Unknown is a possible status for any node where the node has been discovered, but for some reason, the status cannot be determined.
|
Table 4-1 Possible status for each node
|
Node
|
Possible status
|
|
Local HMC
|
All nodes OK; Some nodes failed; All nodes failed
|
|
Remote HMC
|
Online, Offline
|
|
Interface
|
No link; Half duplex link; Full duplex link
|
|
Storage Facility
|
Status not reported.
|
|
Managed system
|
Managed system status reported by the lssyscfg command (for example Operating, Running).
|
|
Service processor
|
Online, Offline
|
|
LPAR
|
LPAR status reported by the lssyscfg command. LPARs can also carry a “Connection status” to report their current network status as one of the following: Active, On, Off, Offline.
|
|
BPA (Bulk Power Assembly)
|
BPA status reported by the lssyscfg command
|
|
BPC (Bulk Power Controller)
|
Online, Offline
|
Each status has its meaning that is evaluated when the cumulative status for the Local HMC node is determined, as shown in Table 4-2.
Table 4-2 Meaning of node status
|
Status
|
Evaluation for cumulative status
|
Meaning
|
|
All nodes OK
|
OK
|
Child node states are OK.
|
|
Some nodes failed
|
Fail
|
One or more child node states failed.
|
|
All nodes failed
|
Fail
|
All child nodes states failed.
|
|
No link
|
Fail
|
No link detected on interface.
|
|
Half duplex link
|
OK
|
Half duplex link detected on interface.
|
|
Full duplex link
|
OK
|
Full duplex link detected on interface.
|
|
Active
|
OK
|
LPAR is pingable and known to RMC.
|
|
On
|
Fail
|
LPAR is pingable but not known to RMC.
|
|
Off
|
Fail
|
LPAR is neither pingable nor known to RMC.
|
|
Offline
|
Fail
|
•For LPARs: LPAR is not “pingable” but is known to RMC.
•For remote HMCs: Remote HMC is not pingable but is known to this HMC.
•For service processors, BPCs: service processor or BPC are not pingable.
|
|
Online
|
OK
|
Remote HMC is pingable.
Service processor is pingable.
BPC is pingable.
|
|
Unknown
|
Fail
|
Status cannot be determined.
|
|
Operating, Running, or any other text from lssyscfg
|
N/A
|
Not evaluated when determining cumulative status.
|
This task also allows you to save a snapshot of the current topology and to view that saved reference topology. You can view attributes of a node in those saved topology by selecting the node in the tree view, listed under Saved Topology.
To test network connectivity on a node, select the node in either the current or the saved topology and click Ping current Node or Ping Saved Node, which is available only for nodes that include an IP address or a host name.
4.2 User management
On an HMC, a user can be a member of various task roles. Each task role allows the user to access different parts of the HMC and to perform different tasks on the managed system. HMC task roles are either predefined or customized. When you create an HMC user, you must assign a task role to that user. Each task role allows the user varying levels of access to tasks that are available on the HMC interface.
You can assign managed systems and logical partitions to individual HMC users, allowing you to create a user that has access to managed system A but not to managed system B. Each grouping of managed resource access is called a managed resource role.
Table 4-3 lists the predefined HMC task roles, which are the default on the HMC.
Table 4-3 Predefined HMC task roles
|
Task role
|
Description
|
|
hmcservicerep
|
A service representative is an employee who is at your location to install, configure, or repair the system.
|
|
hmcviewer
|
A viewer can view HMC information, but cannot change any configuration information.
|
|
hmcoperator
|
The operator is responsible for daily system operation.
|
|
hmcpe
|
A product engineer assists in support situations, but cannot access HMC user management functions. To provide support access for your system, you must create and administer user IDs with the product engineer role.
|
|
hmcsuperadmin
|
The super administrator acts as the root user or manager of the HMC system. The super administrator has unrestricted authority to access and modify most of the HMC system.
|
You can create customized HMC task roles by modifying predefined HMC task roles. Creating customized HMC Task Roles is useful for restricting or granting specific task privileges to a certain user.
To reach the user management tasks, select Users and Security → Users and Roles. The Users and Roles section (Figure 4-10 on page 273) has these options:
•Users: Change User Password
•Users: Manage User Profiles and Access
•Users: Manage Users and Tasks
•Roles: Manage Task and Resource Roles

Figure 4-10 Users and Roles options
4.2.1 Change User Password option
Use this option to change the password of the current user (Figure 4-11). The current password is needed for this option; the new password must differ from the current password.

Figure 4-11 Change Password window
4.2.2 Manage User Profiles and Access option
Use this option to add, copy, remove, and modify user profiles. Except for the Add User task, you must first select a User ID in the User Profiles pane (Figure 4-12). From the User menu you can then select one of the actions:
•Add
•Copy
•Remove
•Modify/View

Figure 4-12 User Profiles pane

Figure 4-13 Add User window
The Add User window is where you can set the following properties:
•User Information:
– User ID
The User ID for the user profiles you are creating. The user name must start with an alphabetic character and consist of 1 to 32 characters.
– Description
Here you can type a meaningful description for your own records.
•Authentication
Here you can define the authentication method used for the user ID. These are the valid authentication methods:
– Local Authentication
If you select Local Authentication, then in the Details fields, specify a password, confirm the password by specifying it again, and indicate the number of days before that the password is valid before it expires.
– LDAP Authentication
If you select LDAP Authentication, no additional information is required.
|
Note: Use of LDAP authentication requires configuration of an LDAP server (see 4.3.2, “Manage LDAP option” on page 285).
|
– Kerberos Authentication
If you select Kerberos Authentication, specify a Kerberos remote user ID.
|
Note: Use of Kerberos authentication requires configuration of a KDC server (see 4.3.3, “Manage KDC option” on page 286).
|
•Managed Resource Roles
Lists the Managed Resource Roles currently available. Select one or more Managed Resource Roles to define access permissions for this user ID.
•Task Roles
Lists the task roles currently available. Select one Task role for this user ID.
If you click User Properties, more choices are available for setting the properties of a user (Figure 4-14).

Figure 4-14 User Properties window
The User Properties window has the following properties that you can set:
•Timeout Values:
– Session timeout minutes
Specifies the number of minutes, during a logon session, that a user is prompted for identity verification. If a password is not re-entered within the amount of time that was specified in the Verify timeout minutes field, then the session is disconnected. A zero (0) is the default and indicates no expiration. You can specify up to a maximum value of 525600 minutes (equivalent to one year).
– Verify timeout minutes
Specifies the amount of time that is required for the user to re-enter a password when prompted, if a value was specified in the Session timeout minutes field. If the password is not re-entered within the specified time, the session will be disconnected. A zero (0) indicates there is no expiration. The default is 15 minutes. You can specify up to a maximum value of 525600 minutes (equivalent to one year).
– Idle timeout minutes
Specifies the number of minutes the user’s session can be idle. If the user does not interact with the session in the specified amount of time, the session becomes disconnected. A zero (0) is the default and indicates no expiration. You can specify up to a maximum value of 525600 minutes (equivalent to one year).
– Minimum time in days between password changes
Specifies the minimum amount of time in days that must elapse between changes for the user’s password. A zero (0) indicates that a user’s password can be changed immediately after it was just changed.
|
Note: This field is not applicable to an LDAP user ID.
|
•Inactivity Values:
– Disable for inactivity in days
Specifies the amount of time in days a user is temporarily disabled after reaching the maximum amount of days of inactivity. A zero (0) indicates that the user is not disabled after reaching the maximum number of days of inactivity.
– Never disable for inactivity
To not disable user access based on inactivity, select Never disable for inactivity.
– Allow remote access using the web
To enable remote web server access for the user you are managing, select Allow remote access via web. Otherwise the user has access to the HMC only locally or over the command-line using an SSH session.
4.2.3 Manage Users and Tasks option
This option allows you to display a list of users who are currently logged on to the HMC in the Users and Tasks window (Figure 4-15). This window also lists tasks that are running.

Figure 4-15 Users and Tasks
The Users and Tasks window has the following sections:
•Users Logged On:
– Session Id
Specifies the session identification number associated with the user who is logged on to the HMC.
– User Name
Specifies the name of the user who is logged on to the HMC.
– Logon Time
Specifies the time that the user logged on to the HMC.
– Running Tasks
Specifies the number of tasks currently running for the user.
– Access Location
Specifies the location from which the user is accessing the HMC.
– Notes
Contains additional and useful information pertaining to the session.
A user who has the assigned role of Access Administrator can select a user from the list and click Logoff or Disconnect.
•Running Tasks:
– Task ID
Specifies a task identification number associated to the task that is running.
– Task Name
Specifies the name of the task that is running.
– Targets
Specifies (if any) the object name or names that are targeted for that task.
– Session Id
Specifies the identification number associated with the user running the task.
– Start Time
Specifies the time the task was started.
Under the Running Tasks, two buttons are available to use after you select a task from the Running Tasks list:
– Switch To: Click this button to switch to another task that is running in your session.
– Terminate: Click this button to end a task that is running in your session. If your user ID has the assigned role of Access Administrator, you can end tasks that are in other sessions.
4.2.4 Manage Task and Resource Roles option
You can add, copy, remove, and change managed resources and task roles.
Select Manage Task and Resource Roles; the Customize User Controls window opens (Figure 4-16). It offers two options:
•Select Managed Resource Roles and select a role from the list of currently defined managed resource roles. Use click the Edit menu to add, copy, remove, or modify a managed resource role.
•Select Task Roles and select a role from the list of currently defined task roles. Click the Edit menu to add, copy, remove, or modify a task role.
|
Note: Predefined roles (default roles) cannot be modified, but you can create a role that is based on a system defined role or on existing roles.
|

Figure 4-16 Customize User Controls window
Managed resource role tasks
A managed resource role assigns permissions for a managed object or group of objects, such as a managed system or a logical partition. In a managed resource role, you can define access to a specific managed systems rather than all managed systems controlled by the HMC.
You can create a managed resource role, copy an existing managed resource role, modify existing managed resource roles, or delete an existing managed resource role from the Customize User Controls window. By default, only one managed resource role is available: AllSystemResources. Select Managed Resource Roles, then select an option from the Edit menu.
To create a managed resource role, use the following steps:
1. Click Edit → Add; the Add Role window opens.
2. Enter the name for the new managed resource role, and choose the resource role on which the new managed resource role objects will be based.
3. Select the objects that should be available for the new managed resource role, then click Add to add them to the new managed resource role current objects.
4. Click OK to create the managed resource role.
Figure 4-17 shows an example of creating a new managed resource role.

Figure 4-17 Add a new managed resource role
To copy a managed resource role, select a managed resource role and select Edit → Copy. You cannot copy a user defined managed system role that is created from the Add menu, but you can copy system-defined managed resource roles, which are AllSystemRoles. From the Copy Role window, you can also customize the object configurations for a new copy of a managed resource role.
To modify existing managed resource roles, select a managed resource role that you want to change, and select Edit → Modify. You can change the configuration of the objects, then click OK to save the changes.
To delete a managed resource role, select the wanted managed resource role and select Edit → Remove. A message is displayed asking for a Yes/No verification.
Task roles
A task role defines the access level for a user to do tasks on the managed object or group of objects, such as managed system or logical partition. Five system-defined task roles exist:
•hmcservicerep
•hmcviewer
•hmcoperator
•hmcpe
•hmcsuperadmin
You can create a task role, and copy, modify, or delete an existing task role from the Customized User Controls window. You cannot modify or remove system-defined task roles. Select Task Roles, then select a task from the Edit menu.
To create a user task role, use the following steps:
1. Click Edit → Add; the Add Role window opens.
2. Enter the name for the new managed resource role, and choose the task role on which the new task role objects will be based.
3. Select the objects that should be available for the new task role, and click Add to add them to the new task role current objects.
4. Click OK to create a task role.
Figure 4-18 shows an example of creating a task role.

Figure 4-18 Add a new task role
To copy a task role, select a task role and then select Edit → Copy. From the Copy Role window, you can also customize the object configurations for a copy of the task role.
To delete a task role, select a task role and then select Edit → Remove. A message box displays asking for a Yes or No verification.
To modify existing task roles, select a task role and then select Edit → Modify. You can change the configuration of the objects, and then click OK to save the changes.
4.2.5 User Password Policy
By default, no password policy is active on an HMC. Although a password policy cannot be enforced by using the GUI, command-line options are available that can enforce a password policy. These four commands are available:
•chpwdpolicy
Activates, disables, or modifies a password policy.
•lspwpolicy
Lists the available password policies.
•mkpwdpolicy
Creates a new password policy. The password policy must be activated with the chpwdpolicy command.
•rmpwdpolicy
Removes a password policy. Only user-defined password policies can be removed. The active password policy cannot be removed.
For a password policy, the following attributes are available:
•name
The name of the password policy.
•description
A meaningful description of the password policy.
•min_pwage
The number of days that must elapse before a password can be changed.
•pwage
The number of days that can elapse before a password expires and must be changed. A value of 99999 indicates no password expiration.
•warn_pwaged
The number of days prior to password expiration when a warning message will begin to be displayed.
•min_length
The minimum password length.
•hist_size
The number of times a password must be changed before a password can be reused. This value cannot exceed 50.
•min_digits
The minimum number of digits that a password must contain.
•min_uppercase_chars
The minimum number of uppercase characters that a password must contain.
•min_lowercase_chars
The minimum number of lowercase characters that a password must contain.
•min_special_chars
The minimum number of special characters that a password must contain. Special characters include symbols, punctuation, and white space characters.
For a password policy you do not have to use this attributes all at once. You can make a password policy with a subset of the available attributes.
The HMC Medium Security Password Policy is defined by default but not activated. It has the following settings:
•min_pwage=1
•pwage=180
•min_length=8
•hist_size=10
•warn_pwage=7
•min_digits=0
•min_uppercase_chars=1
•min_lowercase_chars=6
•min_special_chars=0
The policy can be activated with the chpwpolicy command:
chpwdpolicy -o -n “HMC Medium Security Password Policy”
And deactivated as follows:
chpwdpolicy -o d
4.3 Systems and Console Security options
This section describes the security authentication mechanism available on the HMC and the remote control options. To reach the Systems and Console Security options menu (Figure 4-19) from the main window, select Users and Security → Systems and Console Security.

Figure 4-19 Systems and Console Security menu
4.3.1 Manage Certificates option
If you select Manage Certificates on the Systems and Console Security menu, the Certificate Management window opens (Figure 4-20 on page 283). Use this window to create, modify, import, or remove certificates.
Security certificates ensure that the HMC can operate securely in the client/server mode. The managed machines are servers and the managed users are clients. Server and client communicate over the Secure Sockets Layer (SSL) protocol, which provides server authentication, data encryption, and data integrity.
When a user wants remote access to the HMC user interface through a web browser, the user requests the secure page by using https://hmc_hostname. The HMC then presents its certificate to the remote client (web browser) when establishing connection with the HMC. The browser verifies that the certificate was issued by a trusted party, checks that the dates are still valid, and ensures that the certificate was created for that specific HMC.

Figure 4-20 Certificate Management window
Create a certificate
You can create a self-signed certificate or a certificate that is signed by a trusted third party. By default the HMC includes a self-signed certificate. Follow these steps to create a certificate that is signed by a certificate authority:
1. Select Create → New Certificate in the Certificate Management window.
2. You are given the option of creating a self-signed certificate or a certificate that is signed by a certificate authority. So select that the certificate is Signed by a Certificate Authority.
3. The New Certificate window opens. Complete the New Certificate form and click OK.
4. At the window prompt, choose a location in which to store the certificate:
– Removable media on the console
– The file system on the system running the browser
5. A message box asks for save verification. Click OK to save the Certificate Signing Request as a file. You are then prompted if you want to use a temporary self-signed certificate until your certificate is signed and returned. Clicking Yes creates a self-signed certificate. You are returned to the Certificate Management window (Figure 4-20). Many of the values will display as Not available until changes applied.
6. Click Apply to apply the new self signed certificate. The values are updated after the certificate is applied and the console is restarted. The next window asks for verification to replace the current certificate.
7. Click Yes to proceed. You are then presented with a message box asking if the certificate was replaced successfully or if any errors occurred.
8. Click OK. The console restarts.
9. After your certificate request is signed and returned, you have to import the certificate and apply by clicking Advanced → Import Certificate on the Certificate Management window that is shown in Figure 4-20. After the certificate is imported, apply it and restart the console.
Modifying existing certificates
You can modify certain properties of an existing certificate. To modify a certificate, select the radio button of the entry that you want to modify on the Certificate Management window, then click Selected → Modify. Modifiable properties include the following components:
•Valid Until
•Subject
•Subject Alternative Name
Advanced options for modifying existing certificates
Several advanced options are available for working with certificates under the Advanced menu on the Certificate Management window. You can do the following actions:
•Delete and Archive Certificate
Remove the current certificate. After deleted, the certificate is archived on the HMC.
•Work with Archive Certificate
View and restore archived certificates. To restore an archived certificate, select Actions → Install. A window displays asking for verification for restoring the certificate. Click Yes to proceed. The console will be restarted, if the installation is successful.
•Import certificate
Import a certificate from media or a remote file system. Select the location of the certificate to import. After the certificate is uploaded, you must apply and restart the console.
•View Issuer certificate
Display the available information about the issuer of the certificate.
•Import Repository
Import a keystore containing one or more certificates into the HMC keystore. You can import a keystore from media or a remote file system. Select the location of the keystore to import. When the keystore is imported, you must apply and restart the console.
4.3.2 Manage LDAP option
If you select Manage LDAP on the Systems and Console Security menu, the Lightweight Directory Access Protocol (LDAP) Server Definition window opens (Figure 4-21). Use this window to enable LDAP authentication on this HMC, to view LDAP servers that are used by this HMC for LDAP remote authentication, to add LDAP servers, or to remove LDAP servers from this HMC.

Figure 4-21 LDAP Server definition window
To use LDAP remote authentication for this HMC, complete the following prerequisites:
•Enable LDAP authentication from this window.
•Define an LDAP server to use for authentication by suppling at least a primary Uniform Resource Identifier (URI) for the LDAP server you want.
•Define the search base (distinguished name tree) for the LDAP server.
•For each remote person who will use LDAP authentication, set the user profile to use LDAP remote authentication instead of local authentication, even when the user logs on to the HMC locally. For changing user profiles, see 4.2.2, “Manage User Profiles and Access option” on page 273.
•Ensure that a working network connection exists between the HMC and the LDAP server.
The HMC authenticates with the LDAP server by means of an anonymous connection by default. You can use the chhmcldap command on the command line to set the bind distinguished name (DN) and bind password for non-anonymous binding with the LDAP server. You can use the ldapsearch command to verify the LDAP setup on the HMC.
4.3.3 Manage KDC option
If you select Manage KDC (Key Distribution Center) on the Systems and Console Security menu, the Key Distribution Center Configuration window opens (Figure 4-22). Use this window to view the KDC servers that are used by this HMC for Kerberos authentication, and to add KDC servers or remove KDC servers from this HMC. Kerberos is a network authentication protocol that provides strong authentication for client/server applications by using secret-key cryptography.
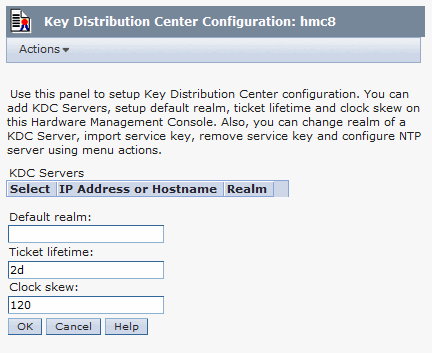
Figure 4-22 Key Distribution Center Configuration window
To use Kerberos authentication for this HMC, complete the following prerequisites:
•Enable NTP service on the HMC and set the KDC servers to synchronize time with the same NTP server. For enabling NTP, see “NTP Configuration tab” on page 290.
•Set the user profile of each remote user, which shall authenticate with Kerberos, to use Kerberos authentication instead of local authentication. For changing user profile see 4.2.2, “Manage User Profiles and Access option” on page 273.
•Ensure that a working network connection exists between the HMC and the KDC server.
You can optionally import a service-key file into the HMC. The service-key file contains the host principal that identifies the HMC to the KDC server. Service-key files are also known as keytabs.
To add a new KDC server to this HMC, click Actions → Add KDC Server, and enter the realm and the host name or IP address of the KDC server.
To remove a KDC server from this HMC, select the KDC server that you want to remove in the KDC Servers table, click Actions → Remove KDC Server.
To import a service-key file into this HMC, click Actions → Import Service Key. After importing a service-key file into the HMC, reboot the HMC for the change to take effect.
To delete a service-key file from this HMC, click Actions → Remove Service Key. Reboot the HMC after deleting a service-key file from the HMC.
4.3.4 Enable Remote Command Execution option
If you select Enable Remote Command Execution on the Systems and Console Security menu, the Remote Command Execution window opens (Figure 4-23). To enable command-line access to the HMC through SSH, select Enable remote command execution using the ssh facility.

Figure 4-23 Enable remote command execution
4.3.5 Enable Remote Operation option
If you select Enable Remote Operation on the Systems and Console Security menu, the Remote Operation window opens (Figure 4-24). Use this window to control whether the HMC can be operated by using a web browser from a remote workstation. By default, remote browser access to the HMC is disabled.

Figure 4-24 Enable remote operation
|
Note: If you access the HMC remotely, you cannot change the status in this task.
|
4.3.6 Enable Remote Virtual Terminal option
If you select Enable Remote Virtual Terminal on the Systems and Console Security menu, the Enable Remote Virtual Terminal window opens (Figure 4-25). Use this window to enable remote virtual terminal access for remote clients. A remote virtual terminal connection is a terminal connection to a logical partition from another remote HMC. To enable remote virtual terminal access, select Enable remote virtual terminal connections.

Figure 4-25 Enable remote virtual terminal
4.4 Miscellaneous configurations
This section describes further configuration topics for the HMC.
4.4.1 Launch Guided Setup Wizard selection
From the main window, select HMC Management → Console Settings → Launch Guided Setup Wizard. The Launch Guided Setup Wizard welcome window opens (Figure 4-26). Use the wizard to create additional users, change passwords, change date and time, and configure customer notifications for problem events.

Figure 4-26 Launch Guided Setup Wizard welcome page
You must have certain information available before you can complete the wizard. To see what you need, click Prerequisite to view the list of prerequisites.
The panels of the wizard are explained in 3.3, “HMC Install Wizard” on page 223. However, the wizard follows this chronological list of the panels:
•Change Management Console Date and Time
•Change hscroot Password
•Change root Password
•Create Additional management console users
•Configure HMC network settings (not from a remote session available)
•Configure Notification of Problem Events
•Summary
If you are satisfied with the changes you made, click Finish. A window opens from which you can launch the Call-Home Setup Wizard (see 6.4, “Connectivity” on page 434).
4.4.2 Change Performance Monitoring Settings selection
From the main window select HMC Management → Console Settings → Change Performance Monitoring Settings to view or change performance monitoring settings. For more information, see 7.2, “Enabling Performance and Capacity Monitor data collection” on page 512.
4.4.3 Change Date and Time selection
From the main window select HMC Management → Console Settings → Change Date and Time to set the date and time of the battery-operated clock on the HMC, and to add or remove time servers for the Network Time Protocol (NTP) service. The Change Date and Time window opens (Figure 4-27).

Figure 4-27 Change Date and Time window
The window has two tabs:
•Customize Console Date and Time
•NTP Configuration
Customize Date and Time tab
Use the Customize Date and Time tab to change the date, time, and time zone settings for the battery-operated clock on the HMC. The time setting adjusts automatically for daylight savings time in the time zone you select.
You generally use this tab in the following situations:
•The battery is replaced in the HMC.
•Your system is physically moved to a different time zone.
NTP Configuration tab
Use the NTP Configuration tab (Figure 4-28) to enable or disable NTP service for this HMC and to add or remove defined time servers in the NTP configuration file.

Figure 4-28 NTP Configuration tab
NTP was developed as an Internet protocol to synchronize the clocks of computers to some time reference. NTP synchronizes time between systems to ensure various items, for example that transactions and recovery procedures have the same time reference.
To enable NTP, select the Enable NTP on this HMC check box; if you do not select this option, NTP is disabled on this HMC.
The currently defined time servers in the NTP configuration file are listed in the tab’s table.
•To add a time server host name or IP address to the NTP configuration file, click Add NTP Server and specify the host name or IP address.
•To delete an NTP server from the configuration file and from the list, select a server from the list and click Remove NTP Server.
4.4.4 Change Language and Locale selection
From the main window, select HMC Management → Console Settings → Change Language and Locale to set the language and locale for the HMC. The Change Language and Locale window opens (Figure 4-29). First, select a language, and then select a locale associated with that language. The language and local settings determine the language, the character set, and other settings specific to the country or region (such as formats for date, time, numbers, and monetary units). The settings are effective after a reboot of the HMC.

Figure 4-29 Change Language and Locale window
|
Note: Changes made in this window affect only the language and locale for the HMC. If you access the HMC remotely, the language and locale settings on your browser determine the settings that the browser uses to display the HMC interface.
|
..................Content has been hidden....................
You can't read the all page of ebook, please click here login for view all page.