
Chapter 2: Setting Up Unity
In this chapter, we will learn why Unity is a good game engine to start out with. There are lots of ways to begin a game development career, so choosing the proper tool to do so is a huge first step. Then, we will see how to install Unity and create a project with Unity Hub, a tool that manages different Unity installations and projects, helping us to deal with a whole host of them.
Specifically, we will examine the following concepts in this chapter:
- Why use a game engine such as Unity?
- Installing Unity
- Creating projects
Let's start by talking about why you should choose Unity to start your game development career.
Why use a game engine such as Unity?
When you want to create a game, you have several ways to do so, each with their pros and cons. So, why choose Unity? In this section, we will discuss the reasons for this, providing an overview of the previous and the current industry state, and specifically seeing the following concepts:
- Past and present industry insight
- Game engines
- Positives of Unity
Past and present industry insight
At the beginning, users struggled with devices with limited resources but simple game designs. As the industry evolved, the hardware became more powerful and the games more complex than before. A big AAA game title requires almost 200 developers, working on different areas of the game. Each one of those roles requires years of experience, making games an expensive and risky task: you never know whether a game is going to be a success or a big waste of money. For these reasons, it was very difficult for a single person to make an entire game.
Important Note:
AAA games are created by lots of people working in big companies, and this usually costs millions of dollars. There are also AA games, which denote the difference in team size and budget.
In the past, a programmer needed to learn how to use lots of tools in order to solve different game development problems. Some tools stopped receiving support from their creators, leaving them with unresolved bugs and features. Because of that, big companies started to hire highly skilled developers to create all those tools, resulting in what is called a game engine. Let's review what this is.
Game engines
A game engine is a set of different pieces of software that solve game development problems, such as audio, graphics, and physics issues, but that are designed to work together, all operating on the same philosophy. This is important because every team and company has its own way of working. Creating a game engine from scratch is a great task, and only a few big companies are able to do this. The game engines that companies create are usually private, so only the company is allowed to use them. Some companies sell their engine, but the cost is too high. But another way of getting game engines became available a few years ago.
You have probably heard about indie games created by between 1 and 10 developers, but how can such a small team create games? The answer is general-purpose game engines. These are game engines just like the ones that companies create, but they are designed to be a good foundation for every game and provide a toolset ready to be used by anyone in any game. These kinds of engines created a whole generation of enthusiast developers who are now able to develop their own games more easily than before. There were lots of game-engine companies in the past but only a few of these survive today, Unity being one of the most influential ones. But why is that? Let's discuss this further.
Important Note:
Other examples of general-purpose engines are Unreal Engine, Godot, Torque, and CryEngine.
Positives of Unity
Well, there are lots of potential reasons why Unity is so popular. Let's enumerate a few of them, as follows:
- Unity was designed with simplicity in mind, featuring a very simple and polished interface, and tools with few—but powerful—settings. This helps newcomers to not immediately feel lost the very second they start the engine.
- The programming language of Unity, C#, is very well known to both beginner and advanced programmers, and the Unity way of coding with C# is sleek and easy to understand. Unity and C# handle most of the programming problems you may encounter in other languages, decreasing your production time greatly.
- Unity was there when the mobile-gaming market era started, and its creators just put all their efforts into creating all the features any mobile engine needed. In my opinion, this is one of the most important reasons why Unity became what it is today.
- With other new technologies such as augmented reality (AR) and virtual reality (VR), Unity has expanded their use not only to gaming, but also to applications, training simulations, architecture visualization the, automotive industry, films, and so on. Using Unity, you can create applications for a wide spectrum of industries, and their use out there is increasing year on year.
- Unity has a big community of developers using it, creating bibliographies and tutorials, asking and answering questions, and creating plugins for the engine. All this helps a lot when you start using Unity because the answer to your problem is just a Google search away (and, sometimes, just a few dollars away).
- Because of its growth, there are lots of Unity jobs worldwide, more than for other game engines, and some of those jobs are looking for junior developers, so there's a big chance for a newcomer to enter the industry.
Unity is not all good—it has its cons, and there are other engines out there (such as Unreal Engine 4 or Godot) that compete with Unity over several of those limitations, having some better features than Unity but also having their own caveats. In my opinion, picking Unity or another engine depends on what you are intending to do, and what the technologies are that you are used to using, but at the end of the day, you can do everything you need just with Unity and deal with any weaknesses with the help of their big community. Now that we know about Unity, let's see how to install the engine.
Installing Unity
Okay; after all of that, you've decided to go with Unity—great decision! Now, where do we start? Let's start with a simple but necessary first step: installing Unity. It seems like a straightforward first step, but we can discuss a little bit about the proper ways to install it. In this section, we will be looking at the following concepts:
- Unity technical requirements
- Unity versions
- Installing Unity
To run Unity 2020, your computer will need to met the next requirements:
- If you use Windows, you need Windows 7 SP1 or higher, 8 or 10. Unity will run only on 64-bit versions of those systems; there is no 32-bit support.
- For Mac you need macOS High Sierra 10.13 or higher.
- For Linux you need exactly Ubuntu 16.04 or 18.04 or CentOS 7.
- Your CPU needs to support 64 bits and SSE2 (most CPUs support it).
- A graphics card with DirectX 10 support (most modern GPUs support it) on Windows, Metal support on Mac and Open GL 3.2+ or Vulkan support on Linux.
Now that we know the requirements, let's discuss the Unity versioning system.
Unity versions
In previous versions of Unity, we used to simply download the installer of a specific Unity version and hit Next until it was installed. But when you use Unity professionally, you need to have several versions of Unity installed because you will be working on different projects made with different versions. You may be wondering why you can't just use the latest Unity version for every project, but there are some problems with that.
In new versions of Unity, there are usually lots of changes about how the engine works, so you may need to rework lots of pieces of the game to upgrade it. Also, you may be using plugins that just haven't adapted to updates yet, so those will stop working. In my personal projects, I am used to doing project upgrades; but just for learning purposes, in a project that has a specific release date, it can take lots of time to upgrade the whole project, and that can push the release date back a lot. Maybe you need a specific feature that comes with an update that will help you a lot. In such a case, the cost of upgrading may be worthwhile, but take into account that most of the time, this doesn't happen.
Managing different projects made with different Unity versions, installing and updating new Unity releases, and so on used to be a huge hassle, but Unity Hub was created just to help us with this, and it has become the default way to install Unity. Let's see more about it.
Installing Unity with Unity Hub
Unity Hub is a small piece of software you install before installing Unity. It centralizes the management of all your Unity projects and installations. You can get it from the Unity official site. The steps to download it change frequently, but at the time of writing this book, you need to do the following:
- Go to unity.com.
- Click on the Get started blue button, as shown in the following screenshot:

Figure 2.1 – The Get started button on the Unity site
- Click on the Individual tab and on the Get started button under the Personal section, as illustrated in the following screenshot:

Figure 2.2 – Choosing an individual/free license
- Click on the Start here button in the New Users section, as illustrated in the following screenshot:

Figure 2.3 – Starting the download
- Accept the terms and conditions, as illustrated in the following screenshot:

Figure 2.4 – Agreeing to the privacy policy
- Execute the downloaded installer.
Consider that we are using Unity Hub 2.3.2, the latest version at the moment of writing this book. If you use a newer one some steps might change, but the main concepts usually remain. Now that we have Unity Hub installed, we must use it to install a specific Unity version. You can do this with the following steps:
- Start Unity Hub.
- It may ask you to create a Unity account. If so, just create one and log in with that account. If not, click the person icon at the top-right part of the window and select Sign in to have the option to log in or create an account, as illustrated in the following screenshot:

Figure 2.5 – Logging in to Unity Hub
- Follow the steps on the installer and then, you should see the following screen:

Figure 2.6 – Unity Hub window
- Newer versions of Unity guides you through the Unity Installation and first project creation. In that case skip the next steps, but if you already have Unity installed, please follow them
- Click on the Installs button and check if you have Unity 2020 listed there. If not press the ADD button. Make sure the latest Unity 2020 release (in my case Unity 2020.1.0f1) is selected, and then click on the NEXT button. Your screen may show a newer version than mine, so don't worry about that. The process is illustrated in the following screenshot:
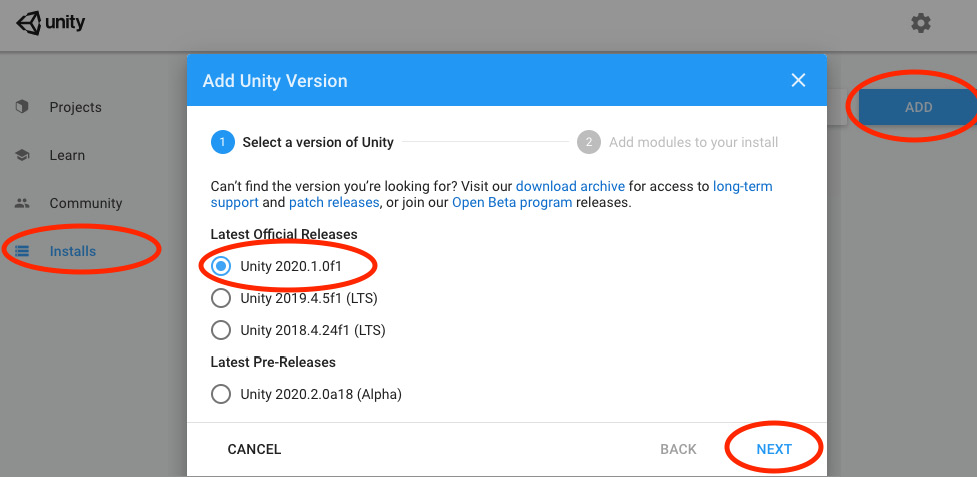
Figure 2.7 – Picking the Unity version to install
Important Note:
This is the program we will use in Chapter 13, Introduction to Scripting with C#, to create our code. We do not need the other Unity features right now, but you can go back later and install them if you need them.
- A feature selection window will show up. Make sure Microsoft Visual Studio Community is checked. At the time of writing this book, the latest version is 2019, but a newer one could work just as well. Now, click the NEXT button. The process is illustrated in the following screenshot:

Figure 2.8 – Selecting Visual Studio
- Accept Visual Studios terms and conditions, as illustrated in the following screenshot:

Figure 2.9 – Accepting Visual Studio's terms and conditions
- You will see the selected Unity version downloading and installing in the list. Wait for this to finish. In the following screenshot, you will see that I have other Unity versions installed, but you will only be seeing one version, which is fine:

Figure 2.10 – All Unity installations I currently have on my machine
- After Unity has finished installing, Visual Studio Installer will automatically execute. It will download an installer that will download and install Visual Studio Community 2019, as illustrated in the following screenshot:

Figure 2.11 – Installing Visual Studio
Remember that the preceding steps may be different in new Unity versions, so just try to follow the flow that Unity designed—most of the time, it is intuitive. Now is the time to create a project using Unity.
Creating projects
Now that we have Unity installed, we can start creating our game. To do so, we first need to create a project, which is basically a folder containing all the files that your game will be composed of. These files are called assets and there are different types of them, such as images, audio, 3D models, script files, and so on. In this section, we will see how to manage a project, addressing the following concepts:
- Creating a project
- Project structure
Creating a project
As with Unity installations, we will use Unity Hub to manage projects. We need to follow these steps to create one:
- Open Unity Hub and click on the Projects button, and then click on NEW, as illustrated in the following screenshot:

Figure 2.12 – Creating a new project in Unity Hub
- Pick the Universal Render Pipeline template, then a project name and a location, and hit Create. We will be creating a 3D game with simple graphics, prepared to run on every device Unity can be executed on, so the Universal Render Pipeline (or URP) is the better choice for that. In Chapter 6, Materials and Effects with URP and Shader Graph, we will be discussing exactly why. The process can be seen in the following screenshot:

Figure 2.13 – Selecting the Universal Render Pipeline template
Important Note:
Try to put the project in Dropbox, Google Drive, or any cloud-synchronized folder to make sure you always have the project at hand. This project will grow, so make sure you have enough space in that folder. If you don't have enough space in your hosting service, just skip this. If you know how to use Git, that would be a better option.
- Unity will create and automatically open the project. This can take a while, but after that, you will see a screen similar to the one shown in the following screenshot:

Figure 2.14 – The Unity Editor window
- Try closing the window and opening it again, then going back to Unity Hub and picking the project from the list, as follows:

Figure 2.15 – Reopening the project
Now that we have created the project, let's explore its structure.
Project structure
We have just opened Unity but we won't start using it until the next chapter. Now, it's time to see how the project folder structure is composed. To do so, we need to open the folder in which we created the project. If you don't remember where this is, you can do the following:
- Right-click the Assets folder in the Project panel, located in the bottom part of the editor.
- Click the Show in Explorer option. If you are using a Mac, the option is called Reveal in Finder. The following screenshot illustrates this:

Figure 2.16 – Opening the project folder in Explorer
Then, you will see the following folder structure:

Figure 2.17 – Unity project folder structure
If anytime you want to move this project to another PC or send it to a colleague, you can just compress all those files and send it to them as a ZIP file, but not all the folders are necessary all of the time. The important folders are Assets, Packages, and ProjectSettings. The Assets folder will hold all the files we will create and use for our game, so this is a must. We will also configure different Unity systems to tailor the engine to our game. All the settings related to this are in the ProjectSettings folder. Finally, we will install different Unity modules or packages to expand its functionality, so the Packages folder will hold which ones we are using, for Unity to be aware of that. It's not necessary to copy the rest of the folders if you need to move the project elsewhere, but let's at least discuss what the Library folder is.
Unity needs to convert the files we will use into its own format in order to operate, and an example would be audio and graphics. Unity supports MPEG Audio Layer 3 (MP3), Waveform Audio File Format (WAV), Portable Network Graphics (PNG), and Joint Photographic Experts Group (JPG) files (and much more), but prior to using them, they need to be converted into Unity's internal formats. Those converted files will be in the Library folder. If you copy the project without that folder, Unity will simply take the original files in the Assets folder and recreate the Library folder entirely. This process can take time, and the bigger the project, the more time involved.
Take into account that you want to have all the folders Unity created while you are working on the project, so don't delete any of them while doing so, but if you need to move an entire project, you now know exactly what you need to take with you.
Summary
In this chapter, we discussed why Unity is a great tool for creating games, comparing it with other engines in the market. This analysis has the intention of helping you choose Unity as your first game development tool. After that, we also reviewed how to install and manage different Unity versions using Unity Hub, and, finally, we saw how to create and manage multiple projects with the same tool. We will use Unity Hub a lot, so it is important to know how to use it initially. Now, we are prepared to dive into the Unity Editor.
In the next chapter, we will start learning the basic Unity tools to author our first-level prototype.