
In Chapter 3, Basic Linux Administration, some basic Linux commands were covered, and you learned how to find your way in the Linux environment. After that, in Chapter 4, Managing Azure, we took a deep dive into the Azure architecture.
With the knowledge gained from these two chapters, we're now ready to continue our journey in Linux. Let's go ahead and explore the following topics:
- Software management, where we will see how new packages can be added to a Linux machine and how to update existing ones.
- Storage management. In the previous chapter, we discussed attaching data disks to your virtual machine (VM) from Azure, but now we will discuss the management of these disks in Linux.
- Network management. Previously, we talked about adding a network interface card (NIC) to a VM and how networking resources are managed in Azure. In this chapter, we'll discuss how these resources are managed in Linux.
- System management, where we'll discuss how to manage services and system essentials.
Technical Requirements
For the purpose of this chapter, you'll need to deploy a Linux VM in Azure, with the distribution of your choice.
In terms of sizing, you'll need at least 2 GB of temporary storage, and the ability to add a minimum of three extra disks. For instance, the B2S VM size is a good starting point. In this chapter, I have shared the steps for Ubuntu, Red Hat, and SUSE systems; you can choose which distribution to follow.
Software Management
In any operating system, we need to install some software that will help us to do our day-to-day work. For example, if you are writing scripts, the stock software or application that comes with the operating system might not be enough. In that case, you need to install software such as Visual Studio Code to make your work easier. Likewise, in a corporate environment, you might need to add new software or even update existing software to meet your business requirements.
In the old days, installing software was a matter of extracting an archive to a filesystem. There were several problems associated with this approach, however:
- It was difficult to remove the software if the files were copied into directories also used by other software.
- It was difficult to upgrade software; maybe the files were still in use, or they were renamed for whatever reason.
- It was difficult to handle shared libraries.
That's why Linux distributions invented software managers. Using these software managers, we can install the packages and applications that are required to complete our tasks. Here are a few software managers:
- RPM
- YUM
- DNF
- DPKG
- APT
- ZYpp
Let's take a closer look at each of these and understand how they can be used to manage the software in your Linux system.
The RPM Software Manager
In 1997, Red Hat released the first version of their package manager, RPM. Other distributions, such as SUSE, adopted this package manager. RPM is the name of the rpm utility, as well as the name of the format and the filename extension.
The RPM package contains the following:
- A CPIO (Copy In, Copy Out) archive of packaged binaries and configuration files. CPIO is a utility used to combine multiple files and create an archive.
- Metadata with information about the software, such as a description and dependencies.
- Scriptlets for pre- and post-installation scripts.
In the past, Linux administrators used the rpm utility to install, update, and remove software on a Linux system. If there was a dependency, the rpm command could tell you exactly what other packages you'd need to install. The rpm utility is not able to fix dependencies or possible conflicts between packages.
Nowadays, we no longer use the rpm utility to install or remove software even though it's available; instead, we use more advanced software installers. Following the installation of software with yum (in Red Hat/CentOS) or zypper (in SUSE), all the metadata goes into a database. Querying this rpm database with the rpm command can be very handy.
Here is a list of the most common rpm query parameters:

Figure 5.1: Common rpm query parameters
The following screenshot is an example of getting information about the installed SSH server package:

Figure 5.2: SSH server package information
The output of the -V parameter can tell us about the changes that are made to installed software. Let's make a change to the sshd_config file:
sudo cp /etc/ssh/sshd_config /tmp
sudo sed -i 's/#Port 22/Port 22/' /etc/ssh/sshd_config
If you verify the installed package, there is an S and a T added to the output, indicating that the timestamp is changed and the file size is different:

Figure 5.3: S and T indicating change in timestamp and file size
Other possible characters in the output are as follows:
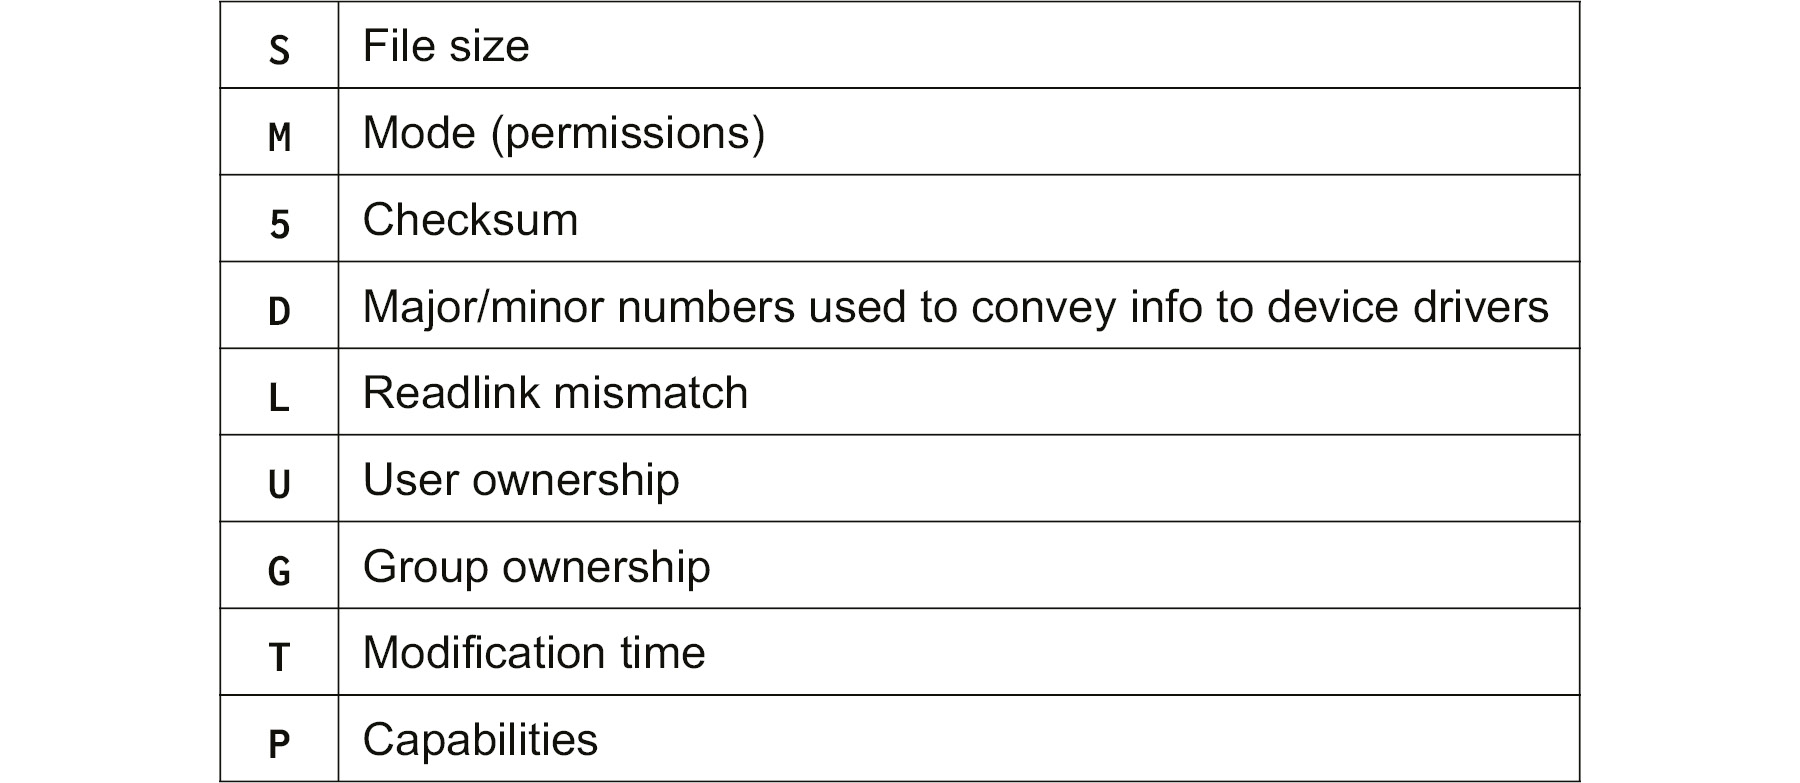
Figure 5.4: Possible output characters and their description
For text files, the diff command can help show the differences between the backup in the /tmp directory and the configuration in the /etc/ssh directory:
sudo diff /etc/ssh/sshd_config /tmp/sshd_config
Restore the original file as follows:
sudo cp /tmp/sshd_config /etc/ssh/sshd_config
Software Management with YUM
Yellowdog Updater Modified (YUM) is a modern software management tool that was introduced by Red Hat in Enterprise Linux version 5, replacing the up2date utility. It is currently in use in all Red Hat-based distributions but will be replaced with dnf, which is used by Fedora. The good news is that dnf is syntax-compatible with yum.
YUM is responsible for the following:
- Installing software, including dependencies
- Updating software
- Removing software
- Listing and searching for software
The important basic parameters are as follows:

Figure 5.5: Basic YUM parameters
You can also install patterns of software; for instance, the File and Print Server pattern or group is a very convenient way to install the Network File Share (NFS) and Samba file servers together with the Cups print server instead of installing the packages one by one:

Figure 5.6: YUM group commands and their description
Another nice feature of yum is working with history:

Figure 5.7: YUM history commands and their description
The yum command uses repositories to be able to do all the software management. To list the currently configured repositories, use the following command:
yum repolist
To add another repository, you'll need the yum-config-manager tool, which creates and modifies the configuration files in /etc/yum.repos.d. For instance, if you want to add a repository to install Microsoft SQL Server, use the following command:
yum-config-manager --add-repo
https://packages.microsoft.com/config/rhel/7/
mssql-server-2017.repo
The yum functionality can be extended with plugins, for instance, to select the fastest mirror, enabling the filesystem / LVM snapshots, and running yum as a scheduled task (cron).
Software Management with DNF
In Red Hat Enterprise Linux 8, and all the distributions based on this distribution and also on Fedora, the yum command is replaced by DNF. The syntax is the same, so you only need to replace three characters. Regarding the yum-config-manager command, it is replaced with dnf config-manager.
Instead of a separate utility, it is integrated with the dnf command itself.
There is also new functionality. RHEL 8 comes with software modularity, also known as AppStreams. As a packaging concept, it allows system administrators to select the desired software version from multiple available versions. By the way, it is possible that at this moment, only one version is available, but newer versions will come! For example, one of the available AppStreams is the Ruby programming interpreter. Let's take a look at the module:
sudo dnf module list ruby

Figure 5.8: Ruby programming interpreter module
From the preceding output, you can observe that at the time of writing this book, only version 2.5 is available; more versions will be added in time. This is the default version, but is not enabled and not installed.
To enable and install AppStreams, execute the following commands:
sudo dnf module enable ruby:2.5
sudo dnf module install ruby
If you list AppStreams again, the output is changed:

Figure 5.9: Ruby 2.5 installed and enabled
Tip: to know what packages are installed by AppStreams, you can use the following command:
sudo dnf module info ruby
Note
To find out more about Subscription Manager, please visit https://access.redhat.com/ecosystem/ccsp/microsoft-azure.
The DPKG Software Manager
The Debian distribution doesn't use the RPM format; instead, it uses the DEB format, invented in 1995. The format is in use on all Debian- and Ubuntu-based distributions.
A DEB package contains the following:
- A file, debian-binary, with the version of the package.
- An archive file, control.tar, with metadata (package name, version, dependencies, and maintainer).
- An archive file, data.tar, containing the actual software.
Management of DEB packages can be done with the dpkg utility. Like rpm, the dpkg utility is no longer in use for installing software even though that functionality is available. Instead, the more advanced apt command is used. Nevertheless, it's good to know the basics of dpkg commands.
All the metadata goes into a database that can be queried with dpkg or dpkg-query.
The important parameters of dpkg-query are as follows:
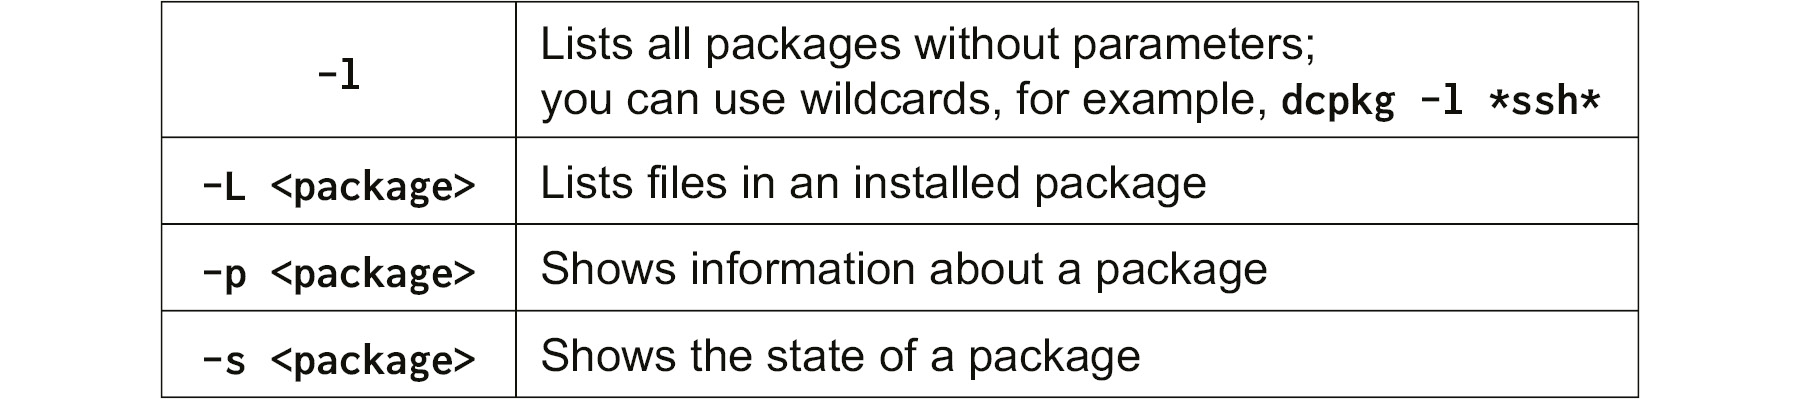
Figure 5.10: Important dpkg-query parametres
The first column from the output of dpkg -l also shows whether the package is installed or not, or unpacked, or half-installed, and so on:
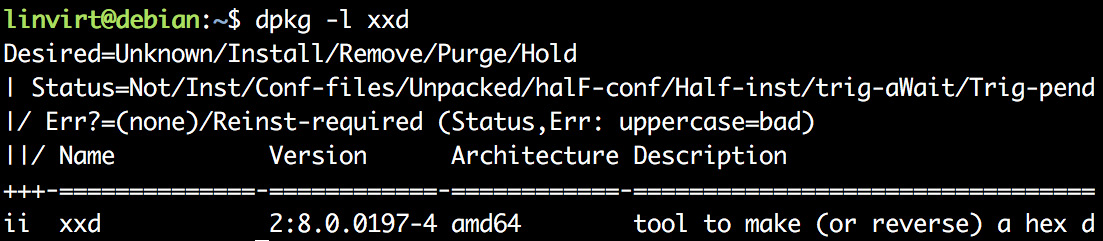
Figure 5.11: Output of dpkg -l command
The first character in the first column is the desired action, the second is the actual state of the package, and a possible third character indicates an error flag (R). ii means that the package is installed.
Possible desired states are as follows:
- u: Unknown
- i: Install
- h: Hold
- r: Remove
- p: Purge
Important package states are as follows:
- n: Not—the package is not installed.
- i: Inst—the package is successfully installed.
- c: Cfg-files—the configuration files are present.
- u: Unpacked—the package is still unpacked.
- f: Failed-cfg—failed to remove the configuration files.
- h: Half-inst—the package is only partially installed.
Software Management with apt
In Debian-/Ubuntu-based distributions, software management is done via the apt utility, which is a recent replacement for the apt-get and apt-cache utilities.
The most frequently used commands include the following:

Figure 5.12: Common apt commands and their description
Repositories are configured in the /etc/apt/sources.list directory and files in the /etc/apt/sources.list.d/ directory. Alternatively, the apt-add-repository command is available:
apt-add-repository
'deb http://myserver/path/to/repo stable'
The apt repositories have the concept of release classes, some of which are listed here:
- oldstable: The software was tested in the previous version of a distribution, but has not been tested again for the current one.
- stable: The software is officially released.
- testing: The software is not yet stable, but it's in the pipeline.
- unstable: The software development is happening and is mainly run by developers.
The repositories also have the concept of components, which are also known as main repositories:
- main: Tested and provided with support and updates
- contrib: Tested and provided with support and updates, but there are dependencies that are not in main and are instead, for instance, in non-free
- non-free: Software that isn't compliant with the Debian Social Contract Guidelines (https://www.debian.org/social_contract#guidelines)
Ubuntu adds several extra components, or repositories:
- Universe: Community-provided, no support, updates possible
- Restricted: Proprietary device drivers
- Multiverse: Software restricted by copyright or legal issues
Software Management with ZYpp
SUSE, like Red Hat, uses RPM for package management. But instead of using yum, they use another toolset with ZYpp (also known as libzypp) as a backend. Software management can be done with the graphical configuration software YaST, or the command-line interface tool, Zypper.
Note
YUM and DNF are also available in the SUSE software repositories. You can use them to manage (limited to installing and removing) software on your local system, but that's not why they are available. The reason is Kiwi: an application to build OS images and installers.
The important basic parameters are as follows:

Figure 5.13: Important Zypper commands and their description
There is a search option to search for a command, what-provides, but it's very limited. If you don't know the package name, there is a utility called cnf instead. Before you can use cnf, you'll need to install scout; this way, the package properties can be searched:
sudo zypper install scout
After that, you can use cnf:

Figure 5.14: Using the cnf utility
If you want to update your system to a new distribution version, you have to modify the repositories first. For instance, if you want to update from SUSE LEAP 42.3, which is based on SUSE Linux Enterprise Server (SLES), to version 15.0, which is based on SUSE Linux Enterprise (SLE), execute the following procedure:
- First, install the available updates for your current version:
sudo zypper update
- Update to the latest version in the 42.3.x releases:
sudo zypper dist-upgrade
- Modify the repository configuration:
sudo sed -i 's/42.3/15.0/g' /etc/zypp/repos.d/*.repo
- Initialize the new repositories:
sudo zypper refresh
- Install the new distribution:
sudo zypper dist-upgrade
Of course, you have to reboot following the distribution upgrade.
Besides installing packages, you can install the following:
- patterns: Groups of packages, for instance, to install a complete web server including PHP and MySQL (also known as LAMP)
- patches: Incremental updates for a package
- products: Installation of an additional product
To list the available patterns, use the following command:
zypper patterns
To install them, use the following command:
sudo zypper install --type pattern <pattern>
The same procedure applies to patches and products.
Zypper uses online repositories to view the currently configured repositories:
sudo zypper repos
You can add repositories with the addrepo parameter; for instance, to add a community repository for the latest PowerShell version on LEAP 15.0, execute the following command:
sudo zypper addrepo
https://download.opensuse.org/repositories
/home:/aaptel:/powershell-stuff/openSUSE_Leap_15.0/
home:aaptel:powershell-stuff.repo
If you add a repository, you always need to refresh the repositories:
sudo zypper refresh
Note
SUSE has the concept of repositories that can be trusted or untrusted. If a vendor is not trusted, you need to add the --from parameter to the install command. Alternatively, you can add a configuration file to /etc/vendors.d, as here:
[main]
vendors = suse,opensuse,obs://build.suse.de
The vendor of a package can be found with zypper info.
Now that you know how to manage the software in your distribution, let's go ahead and discuss networking. In the previous chapter, we discussed networking resources in Azure; it's now time to learn about Linux networking.
Networking
In Azure, the network settings, such as your IP address and DNS settings, are provided via Dynamic Host Configuration Protocol (DHCP). The configuration is very similar to the configuration of physical machines or VMs running on another platform. The difference is that the configuration is provided by Azure and normally shouldn't be changed.
In this section, you'll learn to identify the network configuration in Linux and how to match that information with the settings in Azure that were covered in the previous chapter.
Identifying the Network Interfaces
During the boot process and afterward, the Linux kernel is responsible for hardware identification. When the kernel identifies the hardware, it hands the collected information over to a process, a running daemon (background process), called systemd-udevd. This daemon does the following:
- Loads the network driver if necessary.
- It can assume responsibility for device naming.
- Updates /sys with all the available information.
The udevadm utility can help you to show the hardware identified. You can use the udevadm info command to query the udev database for device information:
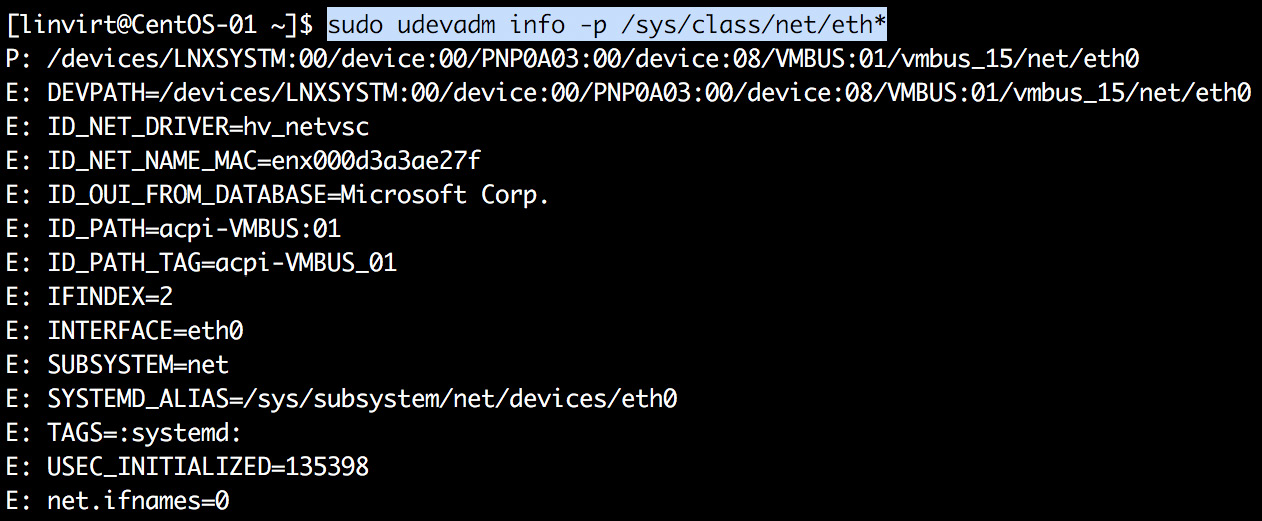
Figure 5.15: Using the udevadm info command to retrieve device information
Instead of using udevadm, you can also reach the /sys/class/net directory and view the cat command with the available files, but that's not a very user-friendly method and normally, there is no need to do it this way because there are utilities that parse all the available information.
The most important utility is the ip command. Let's start with listing the available network interfaces and the information related to that:
ip link show
The preceding command should give you the following output:
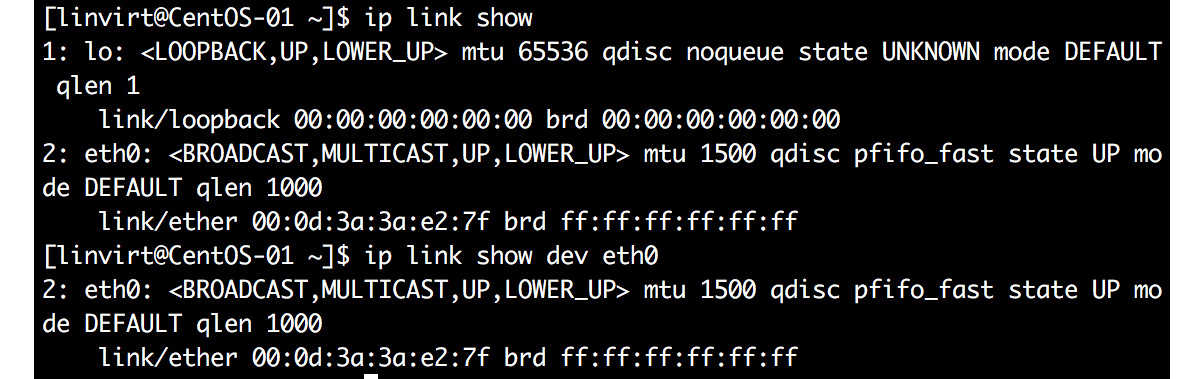
Figure 5.16: Using ip link show to list available network interfaces
Once the available network interfaces are listed, you can be more specific:
ip link show dev eth0
The meaning of all the status flags, such as LOWER_UP, can be found in man 7 netdevice.
Identifying the IP Address
After learning the name of the network interface, the ip utility can be used to show the IP address configured on the network interface, as shown in the following screenshot:
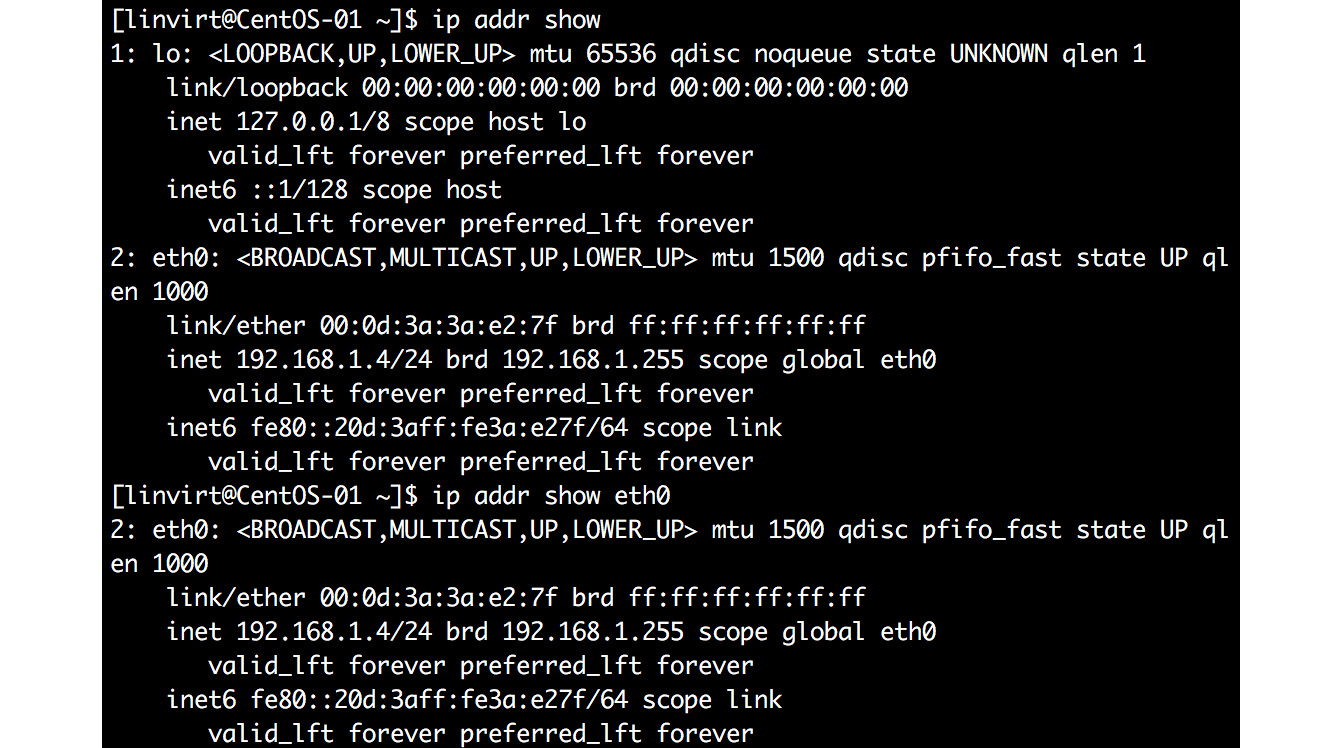
Figure 5.17: Using ip utility to retrieve configured ip address
Showing the Route Table
A route table is a structure that is stored in the Linux kernel with the information on how to route the packets. You can configure the route table and make the packets take a route based on a rule or condition. For example, you can declare that if the destination of the packet is 8.8.8.8, it should be sent to the gateway. The route table can be shown per device or per subnet:

Figure 5.18: Displaying the route table
Another nice feature is that you can query what device and gateway are used to reach a specific IP:

Figure 5.19: Querying device and gateway used for specific IP
Network Configuration
Now that we know how to identify the IP address of the interface and the routes defined for the interface, let's see how these IP addresses and routes are configured on the Linux system.
The ip command is mainly used to verify settings. The persistent configuration is normally managed by another daemon. Different distributions have different daemons for managing the network:
- RHEL distributions use NetworkManager.
- In SLE and OpenSUSE LEAP, wicked is used.
- In Ubuntu 17.10 and later, systemd-networkd and systemd-resolved are used, and earlier versions of Ubuntu completely rely on the DHCP client configured in /etc/network/interfaces.d/*cfg files.
In Ubuntu, the Azure Linux Guest Agent creates two files in the /run/system/network directory. One is a link file named 10-netplan-eth0.link to preserve the device name, based on the MAC address:
[Match]
MACAddress=00:....
[Link]
Name=eth0
WakeOnLan=off
The other is 10-netplan-eth0.network for the actual network configuration:
[Match]
MACAddress=00:...
Name=eth0
[Network]
DHCP=ipv4
[DHCP]
UseMTU=true
RouteMetric=100
If you have more than one network interface, multiple sets of files are created.
In SUSE, the Azure Linux Guest Agent creates a file, /etc/sysconfig/network/ifcfg-eth0, with the following content:
BOOTPROTO='dhcp'
DHCLIENT6_MODE='managed'
MTU=''
REMOTE_IPADDR=''
STARTMODE='onboot'
CLOUD_NETCONFIG_MANAGE='yes'
The wicked daemon reads this file and uses it for the network configuration. As in Ubuntu, multiple files are created if you have more than one network interface. The status of the configuration can be viewed with the wicked command:
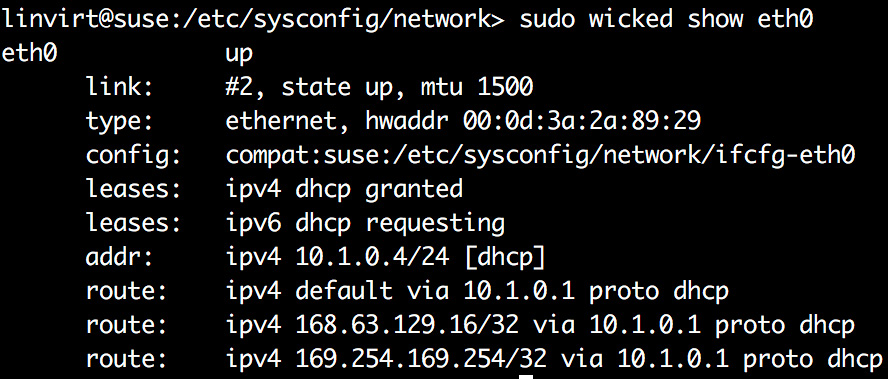
Figure 5.20: Checking configuration status using the wicked show command
In RHEL and CentOS, the ifcfg- files are created in the /etc/sysconfig/network-scripts directory:
DEVICE=eth0
ONBOOT=yes
BOOTPROTO=dhcp
TYPE=Ethernet
USERCTL=no
PEERDNS=yes
IPV6INIT=no
NM_CONTROLLED=no
DHCP_HOSTNAME=...
If NM_CONTROLLED is set to no, then NetworkManager will not be able to control the connection. Most Azure Linux machines have this set to yes; nevertheless, you can verify it from the ifcfg- files in the /etc/sysconfig/network-scripts directory. You can use the nmcli command to show the device settings, but you can't use the command to modify those settings:
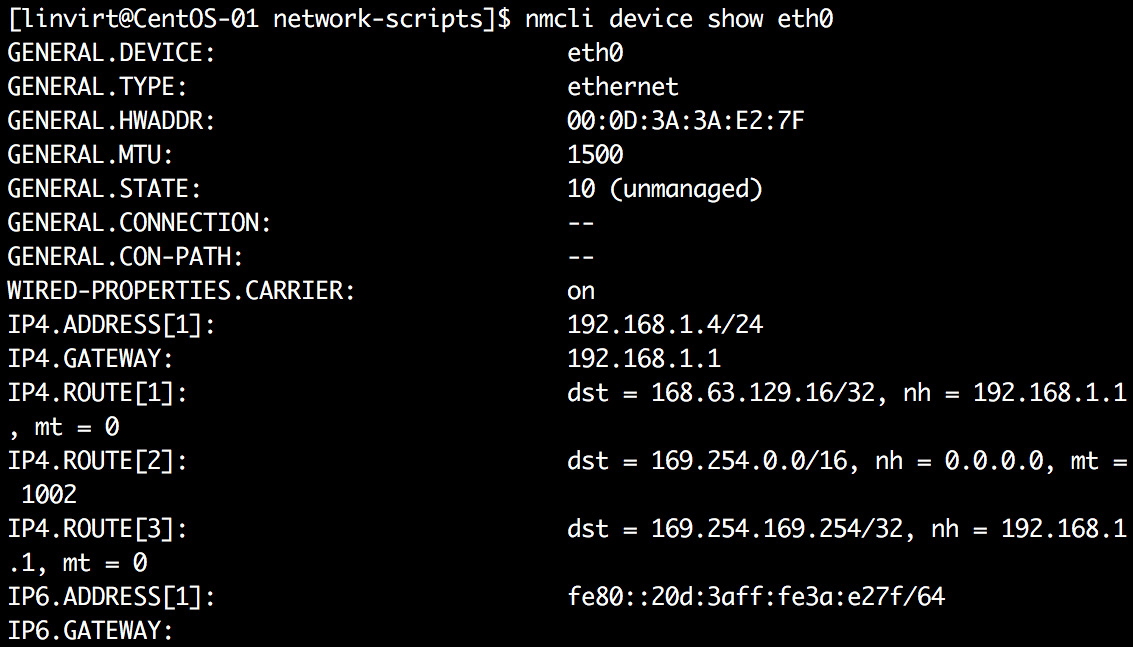
Figure 5.21: Using the nmcli command to show the device settings
Changes in the Network Configuration
As stated before, every network setting is provided by the Azure DHCP server. Everything we've learned until now was about the verification of the network settings configured in Azure.
If you changed something in Azure, you need to restart the network in Linux.
In SUSE and CentOS, you can do this with the following command:
sudo systemctl restart network
In the latest version of Ubuntu Server, use the following commands:
sudo systemctl restart systemd-networkd
sudo systemctl restart systems-resolved
Hostname
The current hostname of the VM can be found with the hostnamectl utility:
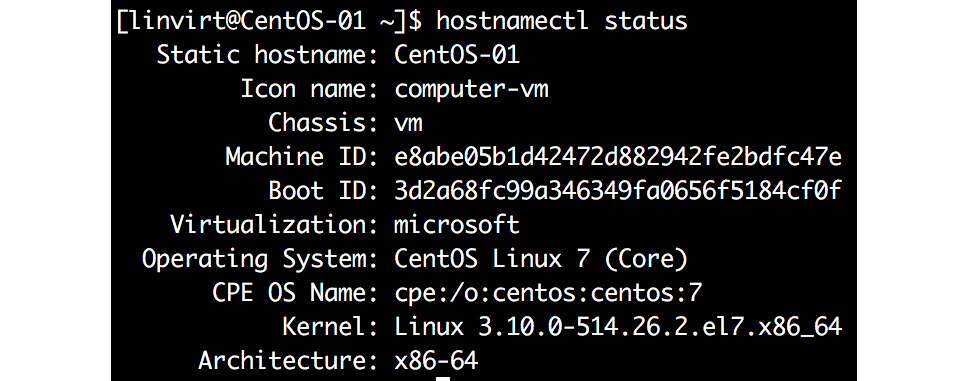
Figure 5.22: Fetching the hostname using hostnamectl utility
The hostname is provided by the DHCP server in Azure; to view the configured hostname in Azure, you can use the Azure portal, Azure CLI, or PowerShell. As an example, in PowerShell, use the following command:
$myvm=Get-AzVM -Name CentOS-01 '
-ResourceGroupName MyResource1
$myvm.OSProfile.ComputerName
In Linux, you can change the hostname with the hostnamectl utility:
sudo hostnamectl set-hostname <hostname>
sudo systemctl restart waagent #RedHat & SUSE
sudo systemctl restart walinuxagent #Ubuntu
This should change your hostname. If it doesn't work, check the configuration file of the Azure Linux VM agent, /etc/waagent.conf:
Provisioning.MonitorHostName=y
If it is still not working, edit the /var/lib/waagent/ovf-env.xml file, and change the HostName parameter. Another possible cause is the DHCP_HOSTNAME line in the ifcfg-<interface> file; just remove it and restart NetworkManager.
DNS
The DNS settings are also provided via the Azure DHCP server. In Azure, the settings are attached to the virtual network interface. You can view them in the Azure portal, PowerShell (Get-AZNetworkInterface), or Azure CLI (az vm nic show).
You can, of course, configure your own DNS settings. In PowerShell, declare the VM and identify the network interface:
$myvm = Get-AzVM -Name <vm name> '
-ResourceGroupName <resource group>
$nicid = $myvm.NetworkProfile.NetworkInterfaces.Id
The last command will give you the complete ID of the required network interface; the last part of this ID is the interface name. Let's now strip it from the output and request the interface properties:
$nicname = $nicid.split("/")[-1]
$nic = Get-AzNetworkInterface '
-ResourceGroupName <resource group> -Name $nicname
$nic
If you look at the value of the $nic variable, you can see that it has all the information we need:

Figure 5.23: Getting interface properties using $nic variable
The last step is to update the DNS nameserver settings. For the purpose of this book, we are using 9.9.9.9, which is a public, freely available DNS service called Quad9. You can also use the DNS service of Google (8.8.8.8 and 8.8.4.4):
$nic.DnsSettings.DnsServers.Add("9.9.9.9")
$nic | Set-AzNetworkInterface
$nic | Get-AzNetworkInterface | '
Select-Object -ExpandProperty DnsSettings
The method that uses the Azure CLI is similar but involves fewer steps. Search for the network interface name:
nicname=$(az vm nic list
--resource-group <resource group>
--vm-name <vm name> --query '[].id' -o tsv | cut –d "/" -f9)
Update the DNS settings:
az network nic update -g MyResource1 --name $nicname
--dns-servers 9.9.9.9
And then verify the new DNS settings:
az network nic show --resource-group <resource group>
--name $nicname --query "dnsSettings"
In the Linux VM, you have to renew the DHCP lease to receive the new settings. In order to do this, you can run systemctl restart NetworkManager in RHEL or dhclient -r in Ubuntu. The settings are saved in the /etc/resolv.conf file.
In Linux distributions that use the network implementation of systemd, such as Ubuntu, the /etc/resolv.conf file is a symbolic link to a file in the /run/systemd/resolve/ directory, and the sudo systemd-resolve --status command shows you the current settings:
link 2 (eth0)
Current Scopes: DNS
LLMNR setting: yes
MulticastDNS setting: no
DNSSEC setting: no
DNSSEC supported: no
DNS Servers: 9.9.9.9
DNS Domain: reddog.microsoft.com
To test the DNS configuration, you can use dig, or the simpler host utility, as here:
dig www.google.com A
Storage
In the previous chapter, we discussed how to create disks and attach them to the VM, but our job doesn't end there. We have to partition or mount the disk to the Linux machine. In this section, we will be discussing storage management in Linux. There are two types of storage available in Azure: virtual disks that are attached to the VM, and Azure file shares. In this chapter, both types will be covered. We will be discussing the following topics:
- Adding a single virtual disk to a VM
- Working with filesystems
- Working with multiple virtual disks using the Logical Volume Manager (LVM) and RAID software
Storage Provided by Block Devices
Local and remote storage can be delivered by block devices. In Azure, it's almost always a virtual hard disk that is attached to the VM, but it is possible to use internet Small Computer System Interface (iSCSI) volumes as well, delivered by Microsoft Azure StorSimple or third parties.
Every disk attached to a VM is identified by the kernel, and, after identification, the kernel hands it over to a daemon called systemd-udevd. This daemon is responsible for creating an entry in the /dev directory, updating /sys/class/block, and, if necessary, loading a driver to access the filesystem.
The device file in /dev provides a simple interface to the block device and is accessed by an SCSI driver.
There are multiple methods to identify available block devices. One possibility involves using the lsscsi command:

Figure 5.24: Using the lsscsi command to identify block devices
The first available disk is called sda—SCSI disk A. This disk is created from the image disk used during the provisioning of the VM and is also known as the root disk. You can access this disk via /dev/sda or /dev/disk/azure/root.
Another way to identify the available storage is to use the lsblk command. It can provide more information about the content of the disk:

Figure 5.25: Identifying available storage using the lsblk command
In this example, there are two partitions created on /dev/sda, sda1 and sda2 (or /dev/disk/azure/root-part1 and root-part2). The major number in the second column, 8, means that this is an SCSI device; the minor part is just numbering. The third column tells us that the device is not removable, indicated by a 0 (it's a 1 if it is removable), and the fifth column tells us that the drives and partitions aren't read-only: again, a 1 for read-only and a 0 for read-write.
Another disk is available, the resource disk, /dev/sdb (/dev/disk/azure/resource), which is a temporary disk. This means that data is not persistent and is gone after a reboot and is used for storing data such as a page or swap file. Swap is like virtual memory in Windows, which is used when the physical RAM is full.
Adding a Data Disk
In this section, we will recollect what we have done in the previous chapter to continue with the exercise and help you to become familiar with the commands. If you already have a VM with data disks added, you can skip this section.
You can add an extra virtual disk to a VM using the Azure portal or via PowerShell. Let's add a disk:
- First, declare how we want to name our disk and where the disk should be created:
$resourcegroup = '<resource group>'
$location = '<location>'
$diskname = '<disk name>'
$vm = Get-AzVM '
-Name <vm name> '
-ResourceGroupName $resourcegroup
- Create the virtual disk configuration—an empty, standard managed disk of 2 GB in size:
$diskConfig = New-AzDiskConfig '
-SkuName 'Standard_LRS' '
-Location $location '
-CreateOption 'Empty' '
-DiskSizeGB 2
- Create the virtual disk using this configuration:
$dataDisk1 = New-AzDisk '
-DiskName $diskname '
-Disk $diskConfig '
-ResourceGroupName $resourcegroup
- Attach the disk to the VM:
$vmdisk = Add-AzVMDataDisk '
-VM $vm -Name $diskname '
-CreateOption Attach '
-ManagedDiskId $dataDisk1.Id '
-Lun 1
Update-AzVM '
-VM $vm '
-ResourceGroupName $resourcegroup
- Of course, you can use the Azure CLI as well:
az disk create
--resource-group <resource group>
--name <disk name>
--location <location>
--size-gb 2
--sku Standard_LRS
az vm disk attach
--disk <disk name>
--vm-name <vm name>
--resource-group <resource group>
--lun <lun number>
Note
LUN is the abbreviation of Logical Unit Number, a number or identifier used for the labeling of storage (in our case, virtual storage), which will help users to distinguish storage. You can start the numbering at zero.
After creation, the virtual disk is visible in the VM as /dev/sdc (/dev/disk/azure/scsi1/lun1).
Tip: if it's not available, execute the rescan-scsi-bus command, which is part of the sg3_utils package.
Look again at the output of lssci:
[5:0:0:1] disk Msft Virtual Disk 1.0 /dev/sdc
The first column is formatted:
<hostbus adapter id> : <channel id> : <target id> : <lun number>
hostbus adapter is the interface to the storage and is created by the Microsoft Hyper-V virtual storage driver. The channel ID is always 0, unless you have configured multi-pathing. The target ID identifies an SCSI target on a controller; this is always zero for direct-attached devices in Azure.
Partitioning
Before you can use the block device, you'll need to partition it. There are multiple tools available for partitioning, and some distributions come with their own utilities to create and manipulate partition tables. SUSE, for instance, has one in its YaST configuration tool.
In this book, we will use the parted utility. This is installed by default on every Linux distribution and can handle all known partition layouts: msdos, gpt, sun, and so on.
You can use parted in a scripted way from the command line, but, if you're new to parted, it's easier to use the interactive shell:
parted /dev/sdc
GNU Parted 3.1
Using /dev/sdc
Welcome to GNU Parted! Type 'help' to view a list of commands.
- The first step is to show the information available regarding this device:
(parted) print
Error: /dev/sdc: unrecognised disk label
Model: Msft Virtual Disk (scsi)
Disk /dev/sdc: 2147MB
Sector size (logical/physical): 512B/512B
Partition Table: unknown
Disk Flags:
The important line here is unrecognised disk label. This means that there was no partition layout created. Nowadays, the most common layout is GUID Partition Table (GPT).
Note
parted supports autocompletion after a question mark—press Ctrl + I twice.
- Change the partition label to gpt:
(parted) mklabel
New disk label type? gpt
- Verify the result by printing the disk partition table again:
(parted) print
Model: Msft Virtual Disk (scsi)
Disk /dev/sdc: 2147MB
Sector size (logical/physical): 512B/512B
Partition Table: gpt
Disk Flags:
Number Start End Size File system Name Flags
- The next step is to create a partition:
(parted) mkpart
Partition name? []? lun1_part1
File system type? [ext2]? xfs
Start? 0%
End? 100%
Filesystems will be covered later in this chapter. For sizing, you can use percentages or fixed sizes. In general, in Azure, it makes more sense to use the whole disk.
- Print the disk partition table again:
(parted) print
Model: Msft Virtual Disk (scsi)
Disk /dev/sdc: 2147MB
Sector size (logical/physical): 512B/512B
Partition Table: gpt
Disk Flags:
Number Start End Size File system Name Flags
1 1049kB 2146MB 2145MB lun1_part1
Please note that the filesystem column is still empty, because the partition is not formatted.
- Use Ctrl + D, or quit, to exit parted.
Filesystems in Linux
Filesystems have their mechanism for organizing the data, and this will differ from one filesystem to another. If we compare the available filesystems, we see that some are fast, some are designed for larger storage, and some are designed to handle smaller chunks of data. Your choice of filesystem should depend upon the end requirements and what kind of data you are storing. Linux supports many filesystems—native Linux filesystems, such as ext4 and XFS, and third-party filesystems, such as FAT32.
Every distribution supports the native filesystems, ext4 and XFS; on top of that, SUSE and Ubuntu have support for a very modern filesystem: BTRFS. Ubuntu is one of the few distributions that have support for the ZFS filesystem.
After formatting the filesystem, you can mount it to the root filesystem. The basic syntax of the mount command is as follows:
mount <partition> <mountpoint>
A partition can be named with the device name, label, or universally unique identifier (UUID). ZFS can be mounted with the mount command or via the zfs utility.
Another important filesystem is the swap filesystem. Besides the normal filesystems, there are also other special filesystems: devfs, sysfs, procfs, and tmpfs.
Let's start with a short description of the filesystems and the utilities around them.
The ext4 Filesystem
ext4 is a native Linux filesystem, developed as the successor to ext3, and it was (and, for some distributions, still is) the default filesystem for many years. It offers stability, high capacity, reliability, and performance while requiring minimal maintenance. On top of that, you can resize (increase/decrease) the filesystem without a problem.
The good news is that it can offer this with very low requirements. There is, of course, also bad news: it's very reliable, but it cannot completely guarantee the integrity of your data. If data is corrupted while already on disk, ext4 has no way of either detecting or repairing such corruption. Luckily, because of the underlying architecture of Azure, this will not happen.
ext4 is not the fastest filesystem around, but, for many workloads, the gap between ext4 and the competition is very small.
The most important utilities are as follows:
- mkfs.ext4: Formats the filesystem
- e2label: Changes the label of the filesystem
- tune2fs: Changes the parameters of the filesystem
- dump2fs: Shows the parameters of the filesystem
- resize2fs: Changes the size of the filesystem
- fsck.ext4: Checks and repairs the filesystem
- e2freefrag: Reports on defragmentation
- e4defrag: Defrags the filesystem; normally not needed
To create an ext4 filesystem, use the following command:
sudo mkfs.ext4 -L <label> <partition>
The label is optional, but makes it easier to recognize a filesystem.
The XFS Filesystem
XFS is a highly scalable filesystem. It can scale to 8 EiB (exbibyte = 2^60 bytes) with online resizing; the filesystem can grow as long as there is unallocated space and it can span multiple partitions and devices.
XFS is one of the fastest filesystems around, especially in combination with RAID volumes. However, this does come at a cost: you'll need at least 1 GB of memory in your VM if you want to use XFS. And if you want to be able to repair the filesystem, you'll need at least 2 GB of memory.
Another nice feature of XFS is that you can quiesce the traffic to the filesystem to create consistent backups of, for instance, a database server.
The most important utilities are as follows:
- mkfs.xfs: Formats the filesystem
- xfs_admin: Changes the parameters of the filesystem
- xfs_growfs: Decreases the size of the filesystem
- xfs_repair: Checks and repairs the filesystem
- xfs_freeze: Suspends access to an XFS filesystem; this makes consistent backups easier
- xfs_copy: Fast copies the content of an XFS filesystem
To create an XFS filesystem, use the following command:
sudo mkfs.xfs -L <label> <partition>
The label is optional, but makes it easier to recognize a filesystem.
The ZFS Filesystem
ZFS is a combined filesystem and logical volume manager developed by SUN, owned by Oracle since 2005. It's very well known for its excellent performance and rich features:
- Volume management and RAID
- Protection against data corruption
- Data compression and deduplication
- Scalable to 16 exabytes
- Able to export filesystems
- Snapshot support
ZFS can be implemented on Linux with a user-space driver (FUSE) or with a Linux kernel module (OpenZFS). In Ubuntu, it's better to use the kernel module; it performs better and doesn't have some of the limitations of the FUSE implementation. For instance, if you use FUSE, you can't export the filesystem with NFS.
The main reason why OpenZFS is not widely adopted is licensing. OpenZFS's Common Development and Distribution License (CDDL) license is incompatible with the Linux kernel's General Public License. Another reason is that ZFS can be a real memory hog; your VM requires 1 GB of memory extra per TB of storage, meaning 16 TB of storage requires 16 GB of RAM for applications. For ZFS, at least 1 GB of memory is recommended. But the more the better, as ZFS uses a lot of memory.
The most important utilities are as follows:
- zfs: Configures the ZFS filesystem
- zpool: Configures the ZFS storage pools
- zfs.fsck: Checks and repairs the ZFS filesystem
In this book, only the basic functionality of ZFS is covered.
Ubuntu is the only distribution with ZFS support. To be able to use ZFS in Ubuntu, you have to install the ZFS utilities:
sudo apt install zfsutils-linux
Following installation, you can start using ZFS. Let's assume that you added three disks to a VM. It is a good idea to use RAID 0 because it offers better performance and throughput than a single disk.
As a first step, let's create a pool with two disks:
sudo zpool create -f mydata /dev/sdc /dev/sdd
sudo zpool list mydata
sudo zpool status mydata
Let's now add the third disk, to show how to extend the pool:
sudo zpool add mydata /dev/sde
sudo zpool list mydata
sudo zpool history mydata
You can use this pool directly, or you can create datasets in it for more fine-grained control over features such as quotas:
sudo zfs create mydata/finance
sudo zfs set quota=5G mydata/finance
sudo zfs list
Last but not least, you'll need to mount this dataset to be able to use it:
sudo zfs set mountpoint=/home/finance mydata/finance
findmnt /home/finance
This mount will be persistent across reboots.
The BTRFS Filesystem
BTRFS is a relatively new filesystem, mainly developed by Oracle, but with contributions from SUSE and companies such as Facebook.
It's very similar to ZFS in terms of features, but it is in heavy development. This means that not all the features are considered to be stable. Before using this filesystem, please visit https://btrfs.wiki.kernel.org/index.php/Status.
The memory requirements are the same as XFS: 1 GB of memory in your VM. You don't need extra memory if you want to repair the filesystem.
In this book, only the basic functionality of BTRFS is covered. You can use BTRFS on all distributions, but please be aware that on RHEL and CentOS, the filesystem is labeled as deprecated and, in RHEL 8, it's removed. For more information, please visit https://access.redhat.com/solutions/197643.
The most important utilities are as follows:
- mkfs.btrfs: Formats devices with this filesystem
- btrfs: Manages the filesystem
Let's assume that you added three disks to a VM. It is a good idea to use RAID 0 to improve performance and allow for improved throughput compared to using just a single disk.
As a first step, let's create a BTRFS filesystem with two underlying disks:
sudo mkfs.btrfs -d raid0 -L mydata /dev/sdc /dev/sdd
Of course, you can extend the filesystem with the third disk, but before you can do that, you have to mount the filesystem:
sudo mkdir /srv/mydata
sudo mount LABEL=mydata /srv/mydata
sudo btrfs filesystem show /srv/mydata
Now, add the third disk:
sudo btrfs device add /dev/sde /srv/mydata
sudo btrfs filesystem show /srv/mydata
Like ZFS, BTRFS has the concept of datasets, but in BTRFS, they are called subvolumes. To create a subvolume, execute the following command:
sudo btrfs subvolume create /srv/mydata/finance
sudo btrfs subvolume list /srv/mydata
You can mount a subvolume independently of the root volume:
sudo mkdir /home/finance
sudo mount -o subvol=finance LABEL=mydata /home/finance
You can see the ID 258 in the output of the findmnt command:

Figure 5.26: Creating a subvolume
The swap Filesystem
If you do not enough memory available for your application, you can use swap. It's always a good practice to use swap, even if you have an ample amount of RAM on the machine.
Idle memory is memory that was used before but is not currently needed by an application. If this idle memory is not used for an extended period of time, it will be swapped to make more memory available for more frequently used applications.
To improve the overall performance, it's a good idea to add some swap space to your Linux installation. It is a good idea to use the fastest storage available, preferably on the resource disk.
Note
In Linux, you can use swap files and swap partitions. There is no difference in performance. In Azure, you can't use swap partitions; this will make your system unstable, which is caused by the underlying storage.
Swap in Azure is managed by the Azure VM Agent. You can verify whether the ResourceDisk.EnableSwap parameter is set to y to confirm that the swap is enabled in /etc/waagent.conf. Also, you can check the swap size in ResourceDisk.SwapSizeMB:
# Create and use swapfile on resource disk.
ResourceDisk.EnableSwap=y
# Size of the swapfile.
ResourceDisk.SwapSizeMB=2048
In general, a swapfile of 2,048 MB of memory is more than enough to increase the overall performance. If the swap was not enabled, to create a swap file, you can update the /etc/waagent.conf file by setting the following three parameters:
- ResourceDisk.Format=y
- ResourceDisk.EnableSwap=y
- ResourceDisk.SwapSizeMB=xx
And to restart the Azure VM Agent, for Debian/Ubuntu, execute the following command:
sudo systemctl restart walinuxagent
For Red Hat/CentOS, execute the following command:
service waagent restart
Verify the result:
ls -lahR /mnt | grep -i swap
swapon –s
If you find that the swap file is not created, you can go ahead and restart the VM. To do this, use either of the following commands:
shutdown -r now init 6
Linux Software RAID
Redundant Array of Independent Disks (RAID), originally known as Redundant Array of Inexpensive Disks, is a redundancy technique where the same data is stored in different disks, which will help you recover data in the case of disk failure. There are different levels available for RAID. Microsoft officially states at https://docs.microsoft.com/en-us/azure/virtual-machines/linux/configure-raid that you'll need RAID 0 for optimal performance and throughput, but this is not a mandatory implementation. If your current infrastructure demands RAID, then you can implement it.
If your filesystem doesn't support RAID, you can use Linux Software RAID to create a RAID 0 device. You'll need to install the mdadm utility; it's available on every Linux distribution, but is probably not installed by default.
Let's assume you added three disks to your VM. Let's create a RAID 0 device called /dev/md127 (just a random number that is not yet in use):
sudo mdadm --create /dev/md127 --level 0
--raid-devices 3 /dev/sd{c,d,e}
Verify the configuration as follows:
cat /proc/mdstat
sudo mdadm --detail /dev/md127
The preceding commands should give you the following output:

Figure 5.27: Verifying the RAID configuration
Make the configuration persistent:
mdadm --detail --scan --verbose >> /etc/mdadm.conf
Now, you can use this device and format it with a filesystem, as here:
mkfs.ext4 -L BIGDATA /dev/md127
Stratis
Stratis is newly introduced in RHEL 8 and is used to create a multi-disk, multi-tiered storage pool, to monitor the pool and manage it with ease, and with a minimal amount of manual intervention. It does not provide RAID support, but it converts multiple block devices into one pool with a filesystem on top of it. Stratis uses already existing technology: LVM and the XFS filesystem.
If Stratis is not installed on your RHEL, this can be easily installed by executing the following command:
sudo dnf install stratis-cli
Enable the daemon with the following command:
sudo systemctl enable --now stratisd
Let's assume that you added two data disks to your VM: /dev/sdc and /dev/sdd. Create the pool:
sudo stratis pool create stratis01 /dev/sdc /dev/sdd
Verify using this command:
sudo stratis pool list
The output shows the total amount of storage; in the example above, 64 GB. 104 MiB of it is already occupied by metadata required for pool management:

Figure 5.28: Storage details of stratis pool
To get more details about the disks in the pool and the usage, execute the following command:
sudo stratis blockdev list
As you can see in the following screenshot, we get the same output, but with more details about the disks in the pool and usage. In the following output, you can see the pool name and the status:

Figure 5.29: Pool name and status
Here, the storage is used for data, because it's also possible to have a disk configured as a read/write cache. Stratis forms a filesystem (which is xfs, by default) on top of the newly created pool:
sudo stratis filesystem create stratis01 finance
The filesystem is labeled finance and is accessible via the device name (/stratis/stratis01/finance) or UUID.
With this information, you can mount it as you would do for any other filesystem, like with systemd mounts, as we'll discuss later in this chapter.
After creating a filesystem, you can create snapshots, which are basically copies of the original filesystem. A snapshot can be added by executing this command:
sudo stratis filesystem snapshot stratis01 finance finance_snap
To list the filesystem, we can execute the following command:
sudo stratis filesystem
And you have to mount it as a normal filesystem!
Adding a read/write cache can improve performance, especially if you use a disk with better performance than the standard SSD disks (or even non-SSD disks). Let's say that this disk is /dev/sde:
sudo sudo stratis pool add-cache stratis01 /dev/sde
And verify it the same way, with the blockdev parameter as we did before:

Figure 5.30: Adding a cache to /dev/sde disk
To conclude the section, we have discussed various filesystems; your choice of them will depend on your requirements. First, you need to make sure that the filesystem is compatible with your distribution; for example, BTRFS is removed in RHEL 8. So, it's always best to check compatibility before choosing.
systemd
After the Linux kernel boots, the first Linux process begins the first process. This process is known as an init process. In modern Linux systems, this process is systemd. Have a look at the following screenshot, which shows the running process in a tree format:

Figure 5.31: A view of the running processes in a tree format
systemd is responsible for starting all processes in parallel during the boot process, except the processes that are created by the kernel. After that, it activates services, among other things, on demand. It also tracks and manages mount points, and it manages system-wide settings such as the hostname.
systemd is an event-driven system. It communicates with the kernel and will react to an event such as a point in time or a user who introduces a new device or who presses Ctrl + Alt + Del.
Working with Units
systemd works with units, which are entities that are managed by systemd and encapsulate information about every object that is relevant to systemd.
The unit files are configuration files that contain configuration directives, describing the unit and defining its behavior. These files are stored as follows:

Figure 5.32: Unit files and their description
Units are manageable via the systemctl utility. If you want to see all the available types, execute the following command:
systemctl --type help
To list all installed unit files, use the following command:
sudo systemctl list-unit-files
To list the active units, use the following command:
sudo systemctl list-units
Both the list-unit-files and list-units parameters can be used in combination with --type.
Services
The service units are there to manage scripts or daemons. Let's have a look at the SSH service:
Note
The screenshots are taken from Ubuntu 18.04. The names of services may be different on other distributions.
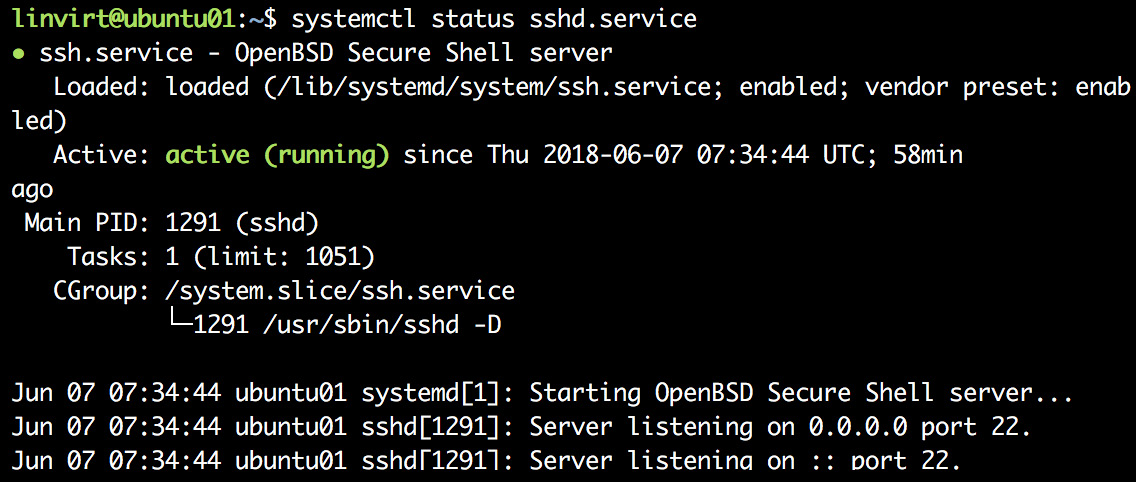
Figure 5.33: ssh service details
Using the status parameter of systemctl, you can see that the unit is loaded, enabled at boot, and that it's the default value. If it's not enabled, you can enable it with this command; enabling will add the service to the autostart chain:
sudo systemctl enable <service name.service>
To see the status of the service, you can execute this command:
sudo systemctl status <service name>
In the output, you can see that the SSH service is running and that the last entries in the logging are shown:

Figure 5.34: Service status and entries
To look into the content of the unit file, execute the following command:
sudo systemctl cat <service name.service>
A unit file always has two or three sections:
- [Unit]: Description and dependency handling
- [<Type>]: Configuration of the type
- [Install]: Optional section if you want to be able to enable the service at boot time
To handle the dependencies, there are several directives available; the most important ones are these:
- before: The specified unit is delayed until this unit is started.
- after: The specified unit is started before this unit is started.
- requires: If this unit is activated, the unit listed here will be activated as well. If the specified unit failed, this one will fail as well.
- wanted: If this unit is activated, the unit listed here will be activated as well. There are no consequences if the specified unit fails.
Note
If you don't specify before or after, the listed unit or units (comma separated) will be started at the same time as the unit starts.
An example of an ssh service is as follows:
[Unit]
Description=OpenSSH Daemon After=network.target
[Service]
EnvironmentFile=-/etc/sysconfig/ssh
ExecStartPre=/usr/sbin/sshd-gen-keys-start
ExecStart=/usr/sbin/sshd -D $SSHD_OPTS
ExecReload=/bin/kill -HUP $MAINPID KillMode=process
Restart=always
[Install]
WantedBy=multi-user.target
Most options in the Service section speak for themselves; if not, just look into the man pages of systemd.unit and systemd.service. For the [Install] section, the WantedBy directive states that if you enable this service, it will become a part of the multi-user.target collection, which is activated at boot.
Before going into the targets, the last thing to cover is how to create overrides. systemd units can have many different directives; many are default options. To show all possible directives, execute the following command:
sudo systemctl show
If you want to change one of the defaults, use the following command:
sudo systemctl edit <service name.service>
An editor is started. Add the entry, for instance, as follows:
[Service]
ProtectHome=read-only
Save the changes. You need to reload the systemd configuration files and restart the service:
sudo systemctl daemon-reload
sudo systemctl restart sshd
Review the changes with systemctl cat sshd.service. Log in again and try to save something in your home directory.
Note
If you want another editor for systemctl edit, add a variable, SYSTEMD_EDITOR, to the /etc/environment file, for instance, SYSTEMD_EDITOR=/usr/bin/vim.
Targets
A target is a collection of units. There are two types of targets:
- Non-isolatable: A normal collection of units; for instance, the timers.target, which contains all scheduled tasks.
- Isolatable: If you execute systemctl isolate <target name.target>, this will shut down all processes that are not part of the target and start all those that are part of it. Examples include the rescue.target and graphical.target units.
To see the content of a target, use the following command:
systemctl list-dependencies <target name.target>
Scheduled Tasks
systemd can be used to schedule tasks. An example of a timer unit file follows:
[Unit]
Description=Scheduled backup task
[Timer]
OnCalendar=*-*-* 10:00:00
[Install]
WantedBy=timers.target
If you save the content of this file to /etc/systemd/system/backup.timer, you'll need a corresponding file, /etc/systemd/system/backup.service, for example, with the following content:
[Unit]
Description = backup script
[Service]
Type = oneshot
ExecStart = /usr/local/bin/mybackup.sh
Enable and activate the timer:
sudo systemctl enable --now backup.timer
To find out about the scheduled tasks, use the following command:
sudo systemctl list-timers
Note
Read man 7 systemd.time to learn more about the syntax of the calendar events. There is a special section on this man page for it.
If the scheduled task is not a recurring one, you can use the following command:
sudo systemd-run --on-calendar <event time> <command>
For example, if we want to echo done to a file /tmp/done on October 11, 2019, 12:00 AM, we must do as shown in the following screenshot:

Figure 5.35: Running a scheduled task by providing event time
Mounting Local Filesystem
The mount unit is available to mount filesystems. There is something special about the name of the mount unit: it must correspond to the mount point. For instance, if you want to mount on /home/finance, the mount unit file becomes /etc/systemd/system/home-finance.mount:
[Unit]
Description = Finance Directory
[Mount]
What = /dev/sdc1
Where = /home/finance
Type = xfs
Options = defaults
[Install]
WantedBy = local-fs.target
Use systemctl start home-finance.mount to start mounting, and systemctl enable home-finance.mount to mount at boot time.
Mounting Remote Filesystem
If a filesystem is not local but remote, for instance, if it's an NFS share, the best way to mount it is using automount. If you are not using automount (the autofs service), you have to manually mount the remote share; the advantage here is that if you have accessed the remote share, autofs will automatically mount. It will mount the share, and if you lose the connection to the share, it will try to automount the share on demand.
You have to create two files. Let's take an NFS mount on /home/finance as an example. First, create /etc/systemd/system/home-finance.mount with the following content:
[Unit]
Description = NFS Finance Share
[Mount]
What = 192.168.122.100:/share
Where = /home/finance
Type = nfs
Options = vers=4.2
Create a file named /etc/systemd/system/home-finance.automount:
[Unit]
Description = Automount NFS Finance Share
[Automount]
Where = /home/finance
[Install]
WantedBy = remote-fs.target
Start the automount unit, and not the mount unit. Of course, you can enable it at boot.
Summary
In this chapter, we took a deep dive into Linux, explaining the fundamental tasks of every Linux system administrator: managing software, the network, storage, and services.
Of course, as a Linux system administrator, this is not something you're going to do on a daily basis. Most likely, you're not going to do it manually, but automate or orchestrate it. But to be able to orchestrate it, you'll need to understand how it works and be able to verify and troubleshoot the configuration. This will be covered in Chapter 8, Exploring Continuous Configuration Automation.
In the next chapter, we will explore the options available in Linux that limit access to the system:
- Mandatory access control
- Network access control lists
- Firewalls
We'll also cover how to join Linux machines to the domain using Azure Active Directory Domain Services.
Questions
- What is responsible for the recognition of hardware?
- What is responsible for device naming?
- What are the methods for identifying network interfaces?
- Who maintains the network configuration?
- What are the methods for identifying locally attached storage?
- Why do we use RAID 0 in Azure?
- What are the options for implementing RAID 0 in Azure?
- Try to implement a RAID 0 device using three disks; format it with XFS. Mount it, and make sure that it's mounted at boot time.
Further Reading
In one way, this chapter was a deep dive, but there is much more to learn in relation to all the topics covered in this chapter. I strongly suggest that you read the man pages of all the commands used.
For storage, besides the documentation on the Azure website, some filesystems have their own websites:
- XFS: https://xfs.org
- BTRFS: https://btrfs.wiki.kernel.org
- ZFS: http://open-zfs.org
- Stratis: https://stratis-storage.github.io
Lennart Poettering, one of the main developers of systemd, has a nice blog with lots of tips and background information: http://0pointer.net/blog. And, in addition, documentation is available at https://www.freedesktop.org/wiki/Software/systemd.
As the systemctl status command doesn't provide you with enough information, we will be discussing more regarding logging in Chapter 11, Troubleshooting and Monitoring Your Workloads.