
In Chapter 2, Getting Started with the Azure Cloud, we started our journey in Azure with the creation of our first workload in Azure: the deployment of a Linux VM. After that, we covered many aspects of the Linux operating system.
In Chapter 7, Deploying Your Virtual Machines, we explored several options to deploy your VMs, and Chapter 8, Exploring Continuous Configuration Automation, was all about what to do afterward in terms of configuration management using orchestration tooling.
Orchestration is a growing part of a movement called DevOps. DevOps is about breaking down the classic silos in an organization. The different teams involved in developing, testing, and deploying products must communicate and work together. DevOps is a combination of cultural philosophies, practices, and tools. And DevOps is a way to make deployments incremental, frequent, and routine events while constraining the impact of failure.
VMs are not the only way to deploy workloads: you can also deploy your workload in containers. It makes it possible, together with orchestration, to fulfill DevOps requirements.
So, before we actually learn about and implement containers in Azure, let's quickly have a look at what this chapter has to offer. By the end of this chapter, you will:
- Understand the history of containers and know the early adoptions of containerization.
- Be familiar with container tools such as systemd-nspawn and Docker.
- Be able to work with Docker Machine and Docker Compose.
- Be able to use Azure Container Instances and Azure Container Registry.
- Know about the new generation container tools such as Buildah, Podman, and Skopeo.
Now, we'll first understand what a container is and how it has evolved.
Introduction to Container Technology
In Chapter 1, Exploring the Azure Cloud, we had a short introduction to containers. So, let's go ahead and cover containers in more detail. We know that VMs are run on a hypervisor, and for each purpose, in most cases you have to create a separate VM to isolate the environments. VMs will have a guest OS, such as Linux, and on top of that we will install the software we require. There will be scenarios where you have to deploy a large number of VMs for testing. If you are using an on-premises infrastructure running Hyper-V, you have to think about resource utilization—that is, how much memory, CPU, and so on you will use for each VM. If you are deploying in Azure, you have to think about the cost as well. You might need some VMs only for a couple of hours just to test something, but the footprints of these VMs are large; they're complete computers that are running virtually. Another problem is compatibility issues. Let's assume you have an app that requires a dependency package such as Python 2.2. Now think about another app running in the same VM that has compatibility issues with Python 2.2 and can only work with Python 2.1. You would end up creating a new VM for the second app with Python 2.1. To overcome this, containers were introduced. Here is a pictorial representation of how containers differ from VMs:

Figure 9.1: Representation of VMs and Containers
Like VMs, containers allow you to package your application along with all the dependencies and libraries. They are isolated environments like VMs and can be used to test and run applications without needing to create multiple VMs. Containers are also lightweight.
Instead of virtualizing each hardware component as with the VMs, containers virtualize at the OS level. This means that the containers have a smaller footprint than VMs. For example, an Ubuntu ISO image will have a size close to 2.4 GB; on the other hand, an Ubuntu container image is less than 200 MB. Let's consider the previous example, where we had dependency issues with Python 2.2 and ended up creating two VMs. With containers, we can have two containers with a much smaller footprint than two VMs. Also, the cost and resource utilization of the host OS is far less than that of two VMs. Containers are deployed using a container runtime; there are different runtimes available. In this chapter, we will take a look at the popular container runtimes.
A container is not the Holy Grail. It doesn't fix all your problems. However, you can consider the following scenarios, and if any of them match your requirements, you might want to containerize your application:
- There is a need for applications that often need updates with new features, preferably without downtime, driven by business needs.
- System engineers and developers can work together to address the business needs and have enough understanding and knowledge of each other's domains (without being a specialist in both), and have a culture of continual experimentation and learning.
- There is room for failure in order to make the application better.
- The application is not a single point of failure.
- The application is not a critical application in terms of availability and security.
One other little thing: if you have many different types of applications and there is almost no code shared between those applications, container technology is still an option, but it's possible that VMs are a better solution in this scenario.
We'll cover a little bit of the history of container technology to give you a better understanding of where it comes from. We'll explore some of the solutions available today: systemd-nspawn and Docker. There are more container virtualization implementations available, even some of the earliest implementations, such as LXC. In fact, it doesn't matter which containerization tool you're using: if you understand the ideas and concepts behind containers, it's easy to implement the same ideas and concepts with other tools. The only thing that changes is the command; the underlying concepts for all these tools are the same.
History of Containers
Containers are very popular nowadays. But they are not new; they didn't come out of the blue. It's not easy to point to an exact time when they started. We don't want to give you a history lesson, but history can give you an understanding of the technology and even give you a clue as to why or when you should use containers in your organization.
So, instead of focusing on an exact timeline, we'll only cover the important steps: the implementation of technologies that are important if you want to understand container technology as it is today.
The chroot Environment
In Linux, there is a root filesystem, as covered in Chapter 5, Advanced Linux Administration, and everything is mounted to that filesystem, which will be visible to the currently running processes and their children.
A process running in chroot has its own root filesystem, fully separated from the system-wide root, known as chroot jail. In chroot jail is a filesystem called fs.chroot. It is often used in development as the program running in chroot cannot access files or commands outside its root filesystem. To start a chroot jail from a directory, execute the following:
chroot /<directory>
In 1979, the chroot system call was introduced in version 7 of Unix, and in 1982, it was introduced in BSD Unix. Linux has implemented this system call since the early days of its existence.
OpenVZ
In 2005, almost at the same time that Solaris started its container technology, a company called Virtuozzo started the OpenVZ project.
They took the principle of the chroot environment and applied it to other resources. A chroot process will have the following:
- A root filesystem
- Users and groups
- Devices
- A process tree
- A network
- Interprocess communication objects
At that time, OpenVZ was seen as a lightweight alternative to virtualization based on a hypervisor, and also as a solid platform for developers. It still exists, and you can use it on top of every Linux operating system, running in the cloud or not.
Using OpenVZ is similar to using a VM: you create an image with a base installation of your favorite distribution and, if you want, after that you can use orchestration to install the application and maintain everything.
LXC
In 2006, engineers at Google started working on a feature in the Linux kernel called cgroups (control groups) to enable resource control on resources such as CPU, memory, disk I/O, and the network for collections of processes (resource groups).
A related feature of the Linux kernel is the concept of namespace isolation: the possibility to isolate resource groups so that they cannot see resources in other groups. So, cgroups became a namespace.
In 2008, cgroups was merged into the Linux kernel and a new namespace was introduced, the user namespace. Both technologies were then enabled for a new step forward for containers: LXC.
Other available namespaces are pid, mount, network, uts (own domain name), and ipc.
There is no longer any need to keep up to date with Linux kernel development: every component needed is available, and there is much better resource management.
Recently, Canonical developed a new container manager called the LXD, which has LXC in its backend and aims to provide an improved user experience for managing containers. Technically, LXD uses LXC through liblxc and its Go binding to achieve this aim. Some advantages of LXD are listed here:
- Secure
- Highly scalable
- Simplifies resource sharing
systemd-nspawn
systemd comes with a container solution. It started as an experiment, and then Lennart Poettering considered it ready for production. It is, in fact, the base for another solution, Rkt. At the time of writing this book, Rkt development has stopped. However, you can still access the Rkt GitHub repository (https://github.com/rkt/rkt).
systemd-nspawn is not very well known, but it is a powerful solution that is available on every modern Linux system. It is built on top of the kernel namespaces and systemd for management. It's a sort of chroot on steroids.
If you want to learn more about the underlying technologies of containers, systemd-nspawn is a good start. Here, every component is visible and can be configured manually if you want. The downside of systemd-nspawn is that you have to do everything on your own, from creating the image, to orchestration, to high availability: it's all possible, but you have to build it.
Containers can also be created using package managers such as yum and by extracting raw cloud images (several distributions provide such images, such as https://cloud.centos.org/centos/7/images and https://cloud-images.ubuntu.com/). You can even use Docker images!
As stated, there are multiple ways to create a container. As an example, we'll cover two of them: debootstrap and yum.
Creating a Container with debootstrap
The debootstrap utility is a tool that will install a Debian- or Ubuntu-based system into a subdirectory of another already installed system. It is available in the repositories of SUSE, Debian, and Ubuntu; on CentOS or other Red Hat–based distributions, you'll need to pull it from the Extra Packages for Enterprise Linux (EPEL) repository.
As an example, let's bootstrap Debian on a CentOS machine to create a template for our systemd containers.
For the purposes of this chapter, if you are running on CentOS, you have to change the security label for systemd-nspawn:
semanage fcontext -a -t virtd_lxc_exec_t /usr/bin/systemd-nspawn
restorecon -v /usr/bin/systemd-nspawn
First, install debootstrap:
sudo yum install epel-release
sudo yum install debootstrap
Create a subdirectory:
sudo mkdir -p /var/lib/machines/releases/stretch
sudo -s
cd /var/lib/machines/releases
And bootstrap, for instance, from the US mirror of Debian:
debootstrap --arch amd64 stretch stretch
http://ftp.us.debian.org/debian
Creating a Container with yum
The yum utility is available in every repository and can be used to create a container with a Red Hat–based distribution.
Let's go through the steps to create a CentOS 7 container:
- Create a directory in which we're going to install CentOS, and that will be used for our template:
sudo mkdir -p /var/lib/machines/releases/centos7
sudo -s
cd /var/lib/machines/releases/centos7
First, you have to download the centos-release rpm package at http://mirror.centos.org/centos-7/7/os/x86_64/Packages/.
- Initialize the rpm database and install this package:
rpm --rebuilddb --root=/var/lib/machines/releases/centos7
rpm --root=/var/lib/machines/releases/centos7
-ivh --nodeps centos-release*rpm
- Now you are ready to install at least the bare minimum:
yum --installroot=/var/lib/machines/releases/centos7
groups install 'Minimal Install'
After the installation of the packages, a complete root filesystem is available, providing everything that is needed to boot the container. You can also use this root filesystem as a template; in that scenario, you need to modify the template to make sure that every container is unique.
systemd-firstboot
systemd-firstboot is a nice way to configure a few things if you start the container for the first time. You can configure the following parameters:
- System locale (--locale=)
- System keyboard map (--keymap=)
- System time zone (--timezone=)
- System hostname (--hostname=)
- Machine ID of the system (--machine-id=)
- Root user's password (--root-password=)
You can also use the -prompt parameter to ask for these parameters at first boot.
In the following example, we will be modifying the systemd-firstboot unit to pass a configuration that is going to be executed when the container is run for the first time.
Execute chroot in the container directory. Let's take our CentOS image as an example:
chroot /var/lib/containers/releases/centos7
passwd root
Fire up the image:
systemd-nspawn --boot -D centos7
Open the systemd-firstboot unit, /usr/lib/systemd/system/systemd-firstboot.service, and modify it:
[Unit]
Description=First Boot Wizard
Documentation=man:systemd-firstboot(1)
DefaultDependencies=no
Conflicts=shutdown.target
After=systemd-readahead-collect.service systemd-readahead-replay.service systemd-remount-fs.service
Before=systemd-sysusers.service sysinit.target shutdown.target
ConditionPathIsReadWrite=/etc
ConditionFirstBoot=yes
[Service]
Type=oneshot
RemainAfterExit=yes
ExecStart=/usr/bin/systemd-firstboot --locale=en_US-utf8 --root-password=welk0mITG! --timezone=Europe/Amsterdam
StandardOutput=tty
StandardInput=tty
StandardError=tty
systemctl enable systemd-firstboot
Clean up the settings:
rm /etc/
{machine-id,localtime,hostname,shadow,locale.conf,securetty}
Exit the chroot environment with Ctrl + D.
Deploying the First Container
If you are using the BTRFS filesystem template directory as a subvolume, you can use the --template parameter of systemd-nspawn. Otherwise, it will create a new subvolume:
cd /var/lib/machines/releases
cp -rf centos7/ /var/lib/machines/centos01
It's time to boot our first container:
systemd-nspawn --boot -D centos01
Try to log in and kill it with Ctrl + ]]].
From now on, you can manage the containers with the machinectl command:
machinectl start <machine name>
Log in with the following:
machinectl login <machine name>
There are many other parameters of machinectl that are worth investigating! If you get a permission-denied message, think about SELinux troubleshooting! Also, journalctl has a -M parameter to see the logging within the container, or use the following:
journalctl _PID=<pid of container> -a
If you execute hostnamectl in the container, you'll see something similar to the following:

Figure 9.2: Output of the hostnamectl command
The kernel is the one of the host!
Enabling a Container at Boot Time
To make a container available at boot time, enable the target, machines.target:
sudo systemctl enable machines.target
Now create a nspawn file for our container: /etc/systemd/nspawn/centos01.nspawn. The filename must be the same as the container:
[Exec]
PrivateUsers=pick
[Network]
Zone=web
Port=tcp:80
[Files]
PrivateUsersChown=yes
[Network] also sets up port forwarding from TCP port 80 in the container to port 80 on the host. You have to configure an IP address on the network interface in the container and on the host on the virtual Ethernet interface in the subnet to make it work.
Now enable the VM:
sudo machinectl enable centos01
Now that you know how to work with systemd-nspawn and deploy your container, let's go ahead and discuss the most popular containerization tool: Docker. You might have heard a lot about Docker, so let's get started!
Docker
In March 2010, Solomon Hykes started the development of Docker. It started in France as an internal dotCloud. Thanks to the public release at a big Python conference in 2013 and the interest of Red Hat, Docker really took off. In the last quarter of that same year, the name of the company was changed to Docker Inc.
Docker was originally built on top of LXC but after a while, LXC was replaced by their own libcontainer library.
The architecture of Docker is quite complex: it consists of a client, Docker, and a daemon, dockerd. Another daemon, containerd, is an abstraction layer for the OS and the type of container technology that is being used. You can interact with containerd using the docker- containerd-ctr utility. The containerd daemon is responsible for the following:
- The registry (where you can store images)
- The image (building, metadata, and so on)
- Networking
- Volumes (to store persistent data)
- Signing (trust on content)
containerd communicates with RunC, which is responsible for the following:
- Life cycle management
- Runtime information
- Running commands within the container
- Generating the specs (image ID, tags, and so on)
There are two editions of Docker available—Docker Community Edition (CE) and Docker Enterprise Edition (EE). Docker EE was sold to Mirantis by Docker Inc in November 2019; however, Docker CE is still handled by Docker Inc. Docker EE adds Docker support, but also an integrated security framework, certified plugins, support for Docker Swarm (which is a container orchestration solution like Kubernetes), and support for RBAC/AD/LDAP. All of this comes at a price, though. If you feel like your environment needs these added advantages, it's worth paying for. On the other hand, Docker CE is open-source software that is available for free.
Docker Installation
There are multiple ways to install and use Docker CE in Azure. You can install a Linux distribution of your choice and install Docker on top of it. There are several VMs available in the Azure Marketplace, such as RancherOS, which is a very minimal Linux distribution that was specially created to run Docker. And, last but not least, there is the Docker for Azure template, which is provided by Docker at https://docs.docker.com/docker-for-azure and https://docs.docker.com/docker-for-azure.
For the purposes of this chapter, the Docker on Ubuntu Server VM is absolutely not a bad idea; it saves a lot of work! But there are several reasons not to use this VM:
- It really can help to understand things better if you configure everything yourself.
- The software used is relatively old.
- The Docker VM extension that is used to create the VM is deprecated and not in active development any longer.
The Docker for Azure template also installs and configures Docker Swarm, a Docker-native clustering system.
The Docker website provides excellent documentation about how to install Docker manually. If you would like to install using apt or yum without following the script, you can follow the official Docker documentation (https://docs.docker.com/v17.09/engine/installation/#supported-platforms). If you are following that, then you can skip the cloud-init script.
Here, we'll follow the installation via our script. Please note that this script is convenient for lab environments, but not for production environments.
It installs the latest version of Docker from the Edge channel, not from the Stable channel. In theory, this could be a little bit unstable.
However, for the purposes of this chapter, it's a good way to get started. To get things up and running very quickly, let's use the technique of cloud-init that we learned in Chapter 7, Deploying Your Virtual Machines.
Start by creating a new resource group, for instance, Docker_LOA:
az group create --name Docker_LOA --location westus
Create a cloud-init configuration file; in my example, the file is named docker.yml with the following content:
#cloud-config
package_upgrade: true
write_files:
- content: |
[Service]
ExecStart=
ExecStart=/usr/bin/dockerd
path: /etc/systemd/system/docker.service.d/docker.conf
- content: |
{
"hosts": ["fd://","tcp://127.0.0.1:2375"]
}
path: /etc/docker/daemon.json
runcmd:
- curl -sSL https://get.docker.com/ | sh
- usermod -aG docker <ssh user>
Don't forget to replace <ssh user> with the login name of the account you're using to execute the az command.
You might have noticed that we added ExecStart twice in the script. ExecStart allows you to specify what command needs to be run when a unit is started. It's a good practice to clear it by setting ExecStart= and then specifying the actual command in the second line. The reason is that when Docker is installed, it will have an ExecStart value initially and when we supply another value, it will lead to a conflict. This conflict will stop the service from starting. Let's go ahead and create a VM with Docker installed using the cloud-init file we created:
- Create a VM with the distribution of your choice:
az vm create --name UbuntuDocker --resource-group Docker_LOA
--image UbuntuLTS --generate-ssh-keys --admin-username <ssh-user>
--custom-data docker.yml
- When the VM is ready, log in and execute the following:
sudo systemctl status docker.service
Note
If you get a message that says "Warning: docker.service changed on disk, run systemctl daemon-reload to reload docker.service," be patient, cloud-init is still busy. Also, if you see that docker.service is not found, allow some time for cloud-init to finish the installation. You can always verify if the Docker CE is installed by executing dpkg -l | grep docker.
- Execute the following to receive even more information about the Docker daemon:
docker info
- It's time to download our first container and run it:
docker run hello-world
In the following screenshot, you can see that the container was run successfully and you received a Hello from Docker! message:
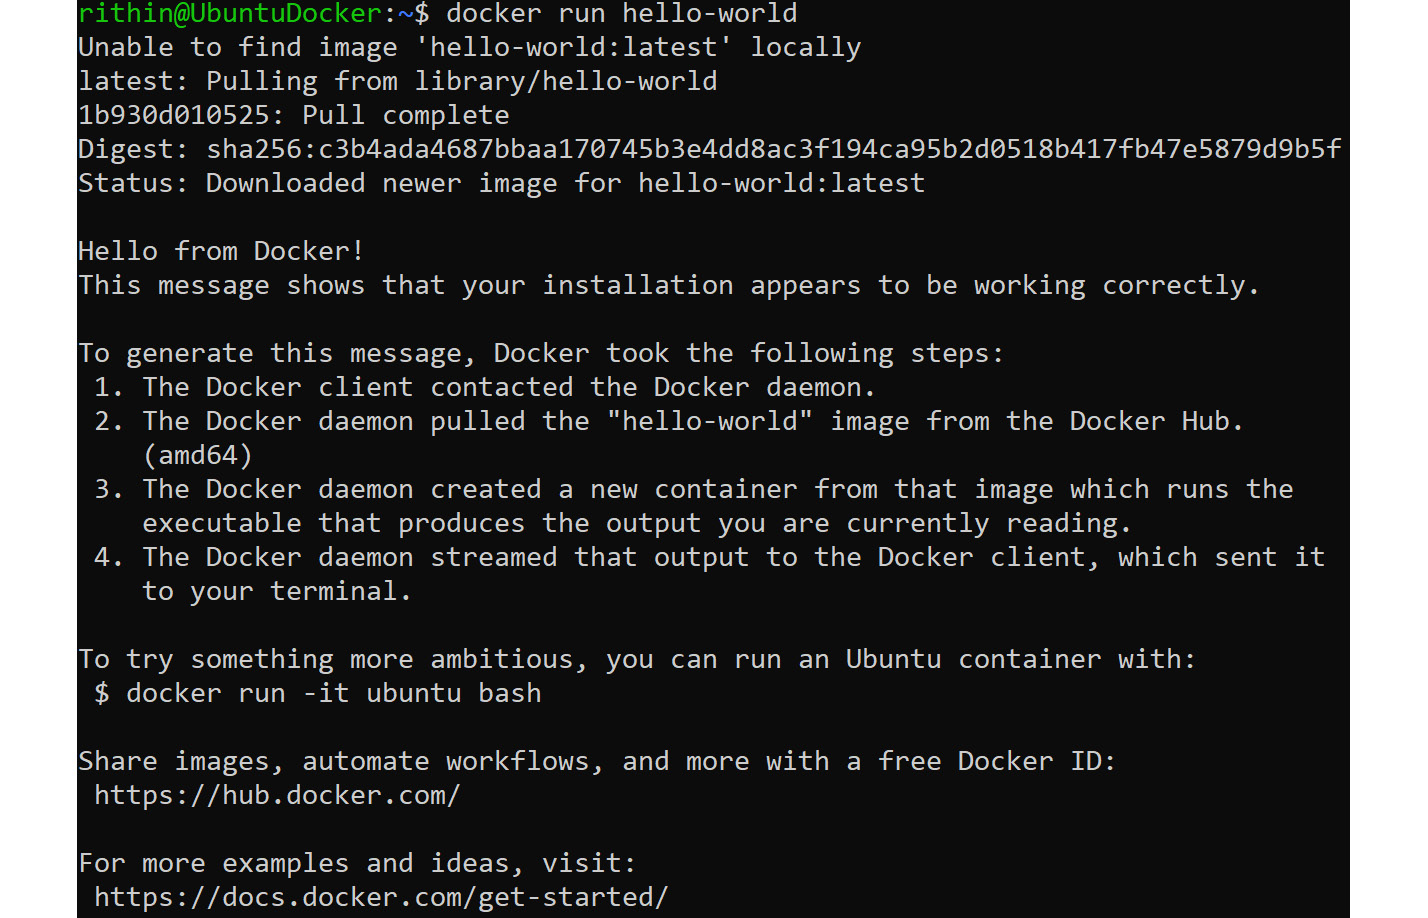
Figure 9.3: Successful container execution
A Docker container is an executed image. To list the available images on your system, execute the following:
docker image ls
In the previous example, we ran docker run hello-world. So, the image is already pulled in and you can see that the hello-world image is listed when we use the docker image ls command:

Figure 9.4: Listing the Docker image
If you execute docker run hello-world again, this time the image will not be downloaded. Instead, it will go for the image that was already stored or downloaded during the previous run.
Let's download another image:
docker run ubuntu
After that, we'll list all containers, even those that are not running:
docker ps -a
All containers have the exited status. If you want to keep the container running, you have to add the -dt parameters to the run command; -d means run as detached:
docker run -dt ubuntu bash
If you want an interactive shell to the Ubuntu container (as you SSH to a VM), you can add the -i parameter:
docker run -it ubuntu
Verify that it is running by viewing the process list again:
docker ps
Using the container ID or name, you can execute a command in a container and receive the standard output in your Terminal:
docker exec <id/name> <command>
For instance, you can execute the following command to see the OS release of the container image:
docker exec <id/name> cat /etc/os-release
Attach to the container to verify whether the content is as expected:
docker attach <id/name>
And detach using Ctrl + P and Ctrl + Q, which means that you will exit from the interactive shell and the container will start running in the background.
To conclude, if you have been following along, by this time, you will be able to run containers, run them as detached, execute commands to the container from the host machine, and also get an interactive shell to the container. So far, we have used images that are already available in Docker Hub. In the next section, we will learn how to build our own Docker images with custom configurations from a base image.
Building Docker Images
A Docker image contains layers. For every command you run to add a component to the container, a layer is added. Each container is an image with read-only layers and a writable layer on top of that. The first layer is the boot filesystem and the second is called the base; it contains the OS. You can pull images from the Docker Registry (you'll find out more about the Registry later on) or build them yourself.
If you want to build one yourself, you can do so in a similar way to what we saw earlier on, with systemd-nspawn containers, for instance, by using debootstrap. Most of the commands require root user access, so escalate your privileges as follows:
sudo -i
Let's take Debian as the base image here. This will help you understand the docker import command. Download and extract Debian Stretch:
debootstrap --arch amd64 stretch stretch
http://ftp.us.debian.org/debian
Create a tarball and import it directly into Docker:
tar -C stretch -c . | docker import - stretch
Verify it using the following command:
docker images
Docker also provides a very minimal base image called scratch.
A Docker image is built from a Dockerfile. Let's create a working directory to save the Dockerfile:
mkdir ~/my-image && cd ~/my-image
As the stretch image is already available in Docker Hub, it's a good idea to tag your image with a new name so that Docker will not try to pull the image, but rather go for the local image. To tag the image, use the following command:
docker tag stretch:latest apache_custom:v1
Then, create a Dockerfile by executing vi Dockerfile (you can use any text editor). The first line in this file adds the base image as a layer:
FROM apache_custom:v1
The second layer contains Debian updates:
RUN apt-get --yes update
The third layer contains the Apache installation:
RUN apt-get --yes install apache2
Add the latest layer and run Apache in this read/write layer. CMD is used to specify the defaults for executing the container:
CMD /usr/sbin/apachectl -e info -DFOREGROUND
Open port 80:
EXPOSE 80
Save the file and your file entries will look like the following screenshot. Adding comments is a good practice; however, it's optional:

Figure 9.5: Creating a Docker image
docker build -t apache_image .
If everything went well, the output should show something similar to the following:

Figure 9.6: Docker image built successfully
You can test the container:
docker run -d apache_image
Review the history of the build:
docker history <ID/name>
As shown in the following screenshot, you'll be able to see the history of the build for your container:

Figure 9.7: Reviewing the history of the container built
Execute docker ps to get the ID of the container, and use that to collect information about the container:
docker inspect <ID/name> | grep IPAddress
In the output, you can find the IP address of the container:

Figure 9.8: Fetching the IP address of the Docker
Use curl to see whether the web server is really running:
curl <ip address>
You will be able to see the famous "It works" page in HTML as shown here:
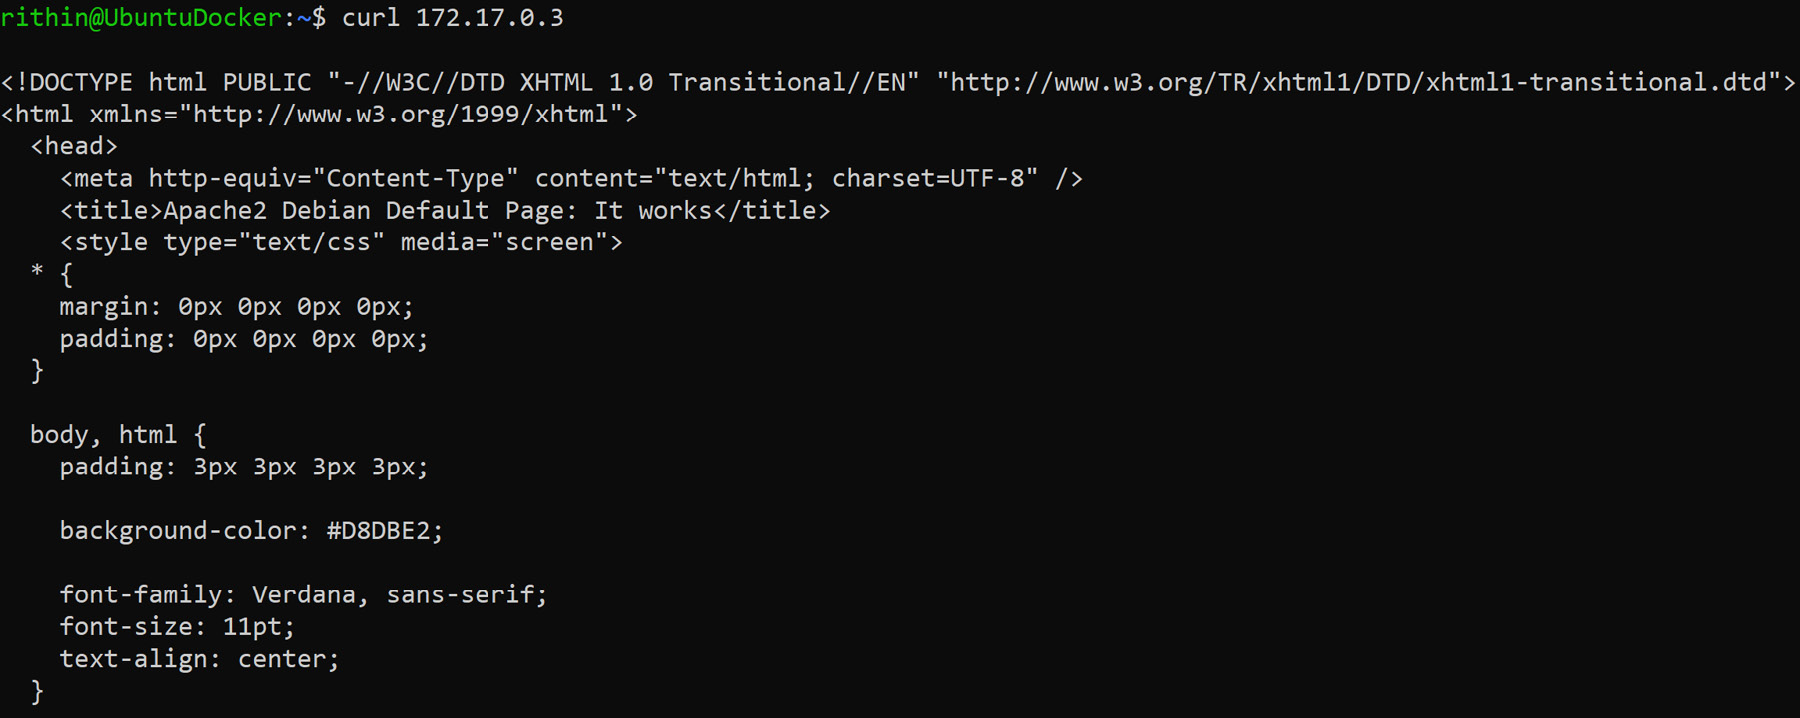
Figure 9.9: Using the curl command to test the web server
Now, we'll stop the container using the following command:
docker stop <ID>
Now run it again:
docker run -d <ID> -p 8080:80
This makes the website available on localhost port 8080.
You can also use acbuild to build Docker containers.
Docker Machine
There is another way to create Docker containers: Docker Machine. This is a tool that creates VMs that will host Docker. It's something you should run on a development machine, physical or not, and you should execute everything remotely.
Please note that Docker Machine can be installed on macOS, Linux, and Windows machines. Refer to the Docker Machine documentation (https://docs.docker.com/machine/install-machine/) for macOS and Windows installation as we're following only the Linux installation.
Switch back to the Ubuntu machine where we installed Docker. Install the following dependency:
sudo apt install sshfs
Next, you need to download Docker Machine and then extract it to your PATH:
base=https://github.com/docker/machine/releases/download/v0.16.0
&& curl -L $base/docker-machine-$(uname -s)-$(uname -m)
>/tmp/docker-machine &&
sudo mv /tmp/docker-machine /usr/local/bin/docker-machine
&& chmod +x /usr/local/bin/docker-machine
Autocompletion can be very useful, and also make sure you run the following script as root, as the script will write to the /etc/ directory:
base=https://raw.githubusercontent.com/docker/machine/v0.16.0
for i in docker-machine-prompt.bash docker-machine-wrapper.bash
docker-machine.bash
do
sudo wget "$base/contrib/completion/bash/${i}" -P /etc/bash_completion.d
source /etc/bash_completion.d/$i
done
Log out and log in again. In order to verify that bash-completion is working, you can tap the tab button to see available commands for docker-machine as shown in the following screenshot:

Figure 9.10: Verifying that bash-completion is successful
Verify the version:
docker-machine version
Using Azure as a driver, you can now deploy a VM:
docker-machine create -d azure
--azure-subscription-id <subscription id>
--azure-ssh-user <username>
--azure-open-port 80
--azure-size <size> <vm name>
There are other options, such as the public IP and the resource group name, that can be passed during deployment. You can see the complete list and default values for these options in the Docker documentation (https://docs.docker.com/machine/drivers/azure/). If we don't specify a value for a specific option, Docker will take the default value. Another thing to keep in mind is that the VM name should only contain lowercase alpha-numeric characters or hyphens if required; otherwise, you will get an error.
In the following screenshot, you can see that the deployment of a VM named docker-machine-2 of size Standard_A2 was successful and that Docker is running on the machine. For simplicity, we have saved our subscription ID to a variable, $SUB_ID, so that we don't have to check it every time; you can also do the same if required. Since we have already authenticated before, the driver is not asking us to sign in again. The driver remembers your credentials for up to two weeks, which means you don't have to sign in every time you deploy. You can also see what resources were deployed:

Figure 9.11: Deploying the docker-machine-2 VM
To tell Docker to use the remote environment instead of running containers locally, execute the following:
docker-machine env <vm name>
eval $(docker-machine env <vm name>)
To verify that the remote environment is being used, use the info command:
docker info
Among other information, the output shows you that you are using a specific VM running in Azure:

Figure 9.12: Fetching the docker information
And for Docker Machine, execute the following command:
docker-machine ls
The output should be similar to the following:

Figure 9.13: Listing docker-machine
Let's create an nginx container with the host port 80 mapped to container port 80. This means that all traffic coming to the host VM's port 80 will be directed to port 80 of the container. This is given using the –p parameter. Execute the following command to create an nginx container:
docker run -d -p 80:80 --restart=always nginx
Find the IP address of the VM:
docker-machine ip <vm name>
Use that IP address in a browser to verify that nginx is running.
Docker Machine also allows us to copy files into the VM with the scp parameter, or even to mount the files locally:
mkdir -m 777 /mnt/test
docker-machine mount <vm name>:/home/<username> /mnt/test
Use docker ps to find the running instances, stop them, and remove them, so that they are ready for the next utility.
Docker Compose
Docker Compose is a tool for creating a multiple-container application, for instance, a web application that needs a web server and a database.
You can check for the latest or stable release of Docker Compose at https://github.com/docker/compose/releases and install it, replacing the version number in the command with the latest release:
sudo curl -L "https://github.com/docker/compose/releases/download/1.24.1/docker-compose-$(uname -s)-$(uname -m)" -o /usr/local/bin/docker-compose
Now, apply executable permission to the binary we downloaded:
sudo chmod +x /usr/local/bin/docker-compose
Next, verify the installation:
docker-compose version
If the installation was successful, you will be able to see the version of Docker Compose installed:

Figure 9.14: Verifying Docker compose installation
Note
After installation, if the preceding command fails, then check your path or else create a symbolic link to /usr/bin or any other directory in your path. To find out what directories are in your PATH, execute $PATH in the shell.To create a symbolic link, execute sudo ln -s /usr/local/bin/docker-compose /usr/bin/docker-compose.
Create a file named docker-compose.yml with the following content:
wordpress:
image: wordpress
links:
- db:mysql
ports:
- 80:80
db:
image: mariadb
environment:
MYSQL_ROOT_PASSWORD: <password>
Replace <password> with the password of your choice. While still being connected to the Azure environment, using Docker Machine, execute the following:
docker-compose up -d
If the build is successful, two containers are running, which you can verify by using docker ps and opening a browser with the correct IP address (docker-machine ip <vm name>). The WordPress installer is waiting for you.
Docker Registry
Every time we executed docker run or docker pull (download only), images were fetched from the internet. Where did they come from? Run this command:
docker info | grep Registry
The output of the preceding command gives you the answer: https://index.docker.io/v1/. This URL is the official Docker Hub. Docker Hub, or Docker Store, also has a nice web interface available via https://hub.docker.com, and is an online repository of private and publicly available Docker images.
The docker search command can be used to search this repository. To limit the output of this command, you can add filters:
docker search --filter "is-official=true" nginx --no-trunc
Here's the output of the docker search command:

Figure 9.15: Output of the docker search command
Optionally, add the --no-trunc parameter to see the complete description of the image. In the output, there is also a star rating that can help us to select the best available image.
If you create your own account on the Docker Hub website, you can use docker push to upload your images to the registry. It is free of charge!
Log in with the following:
docker login -u <username> -p <password>
Build the image:
docker build -t <accountname>/<image>:versiontag .
You can also tag the image afterward:
docker tag <tag id> <accountname>/<image>:versiontag
For versioning, it is a good idea to use a string such as v1.11.1.2019, which means the first version was released on November 1, 2019. If you don't add the version, it is tagged as the latest version.
You can't see the tags using the docker search command. You'll need the web interface or to query the Docker API using curl (a tool to transfer data to and from a server) and jq (a tool similar to sed but specifically for JSON data):
wget -q https://registry.hub.docker.com/v1/repositories/<image>/tags -O - | jq
Note
jq is not installed by default. You have to install it using apt install jq.
This output will be in JSON format. You can further query using jq and refine the output if needed. If you don't want to use jq for formatting JSON, you can use the native sed, tr, and cut commands to format output and get something cleaner:
wget -q https://registry.hub.docker.com/v1/repositories/<image name>/tags -O - | sed -e 's/[][]//g' -e 's/"//g' -e 's/ //g' | tr '}' ' ' | cut -d ":" -f3
If you would like to get all the tags for nginx, you can replace <image name> with nginx.
We have discussed Docker Hub and how to check available images. Similarly, Azure offers Azure Container Registry, where you can store your private images and pull them when required. Before we start Azure Container Registry, we need to understand Azure Container Instances, with which you can run containers without the hassle of managing the host machines. Let's go ahead and learn more.
Azure Container Instances
Now that we are able to run a container in a VM, we can go one step further: we can use the Azure Container Instances service to run it without managing servers.
You can do that using the Azure portal. In the left-hand navigation bar, select All Services and search for Container instances. Once you are in Container instances, click on Add to create a new container instance and the portal will redirect you to the following window:

Figure 9.16: Creating a Docker container instance
You can create a resource group or use an existing one. Set the container name to nginx, set Image type to Public because we are going to pull a public image, set the image name to nginx:latest, set OS type to Linux, and choose the desired resource requirement for the container. Hit Next and in the Networking section, we will expose port 80 for HTTP traffic as shown in the following screenshot. Also, you can add a DNS label and opt for a public IP address if required:

Figure 9.17: Adding networking details a container instance
This is enough for the validation and creation of the instance. You can skip the next sections and go to Review+ Create. However, Azure offers advanced options in the Advanced tab. These can be used to add environment variables, set the restart policy option, and use command override to include a set of commands that need to be executed when the container is initialized. If you want, you can configure this as well.
You can also create containers with the command line using the Azure CLI:
az container create --resource-group <resource group> --name nginx --image nginx:latest --dns-name-label nginx-loa --ports 80
You can also use PowerShell:
New-AzContainerGroup -ResourceGroupName <resource group> '
-Name nginx -Image nginx:latest r -OsType Linux '
-DnsNameLabel nginx-loa2
Please note that the DNS label must be unique in your region.
In the output of the commands, the IP address of the instance is visible:

Figure 9.18: Creating containers using PowerShell
You should be able to access the web server on an FQDN and IP address. As shown in the screenshot, you can point your browser to the DNS label or IP address and you can see the Welcome to nginx! page:
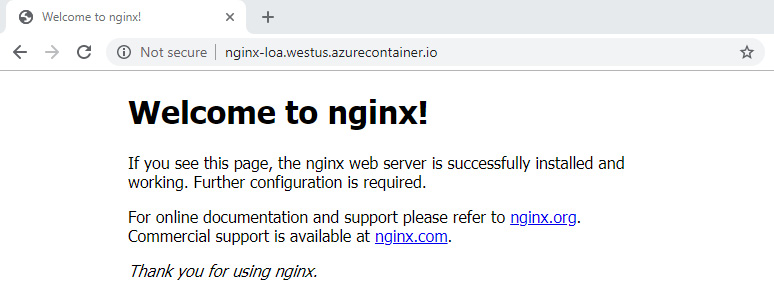
Figure 9.19: Output of the web server when the browser is pointed to the DNS label
To get the list of container instances, execute the following:
az container list
Alternatively, execute the following:
Get-AzContainerGroup | Format-List
So far, we have been relying on the Docker Registry to save, pull, and push images. Azure offers a private image registry where you can store your images so that they can be used when needed. This service is called Azure Container Registry. Let's learn about it.
Azure Container Registry
As mentioned, instead of the Docker Registry, you can use the private Azure Container Registry. This service is not free of charge! Using this Azure service has the advantage that you have all the features of Blob storage (reliability, availability, replication, and so on) and can keep all the traffic within Azure, which makes this registry an interesting option in terms of features, performance, and cost.
Using the Azure Portal
The easiest way to create a registry is by using the Azure portal. In the left-hand navigation bar, select All Services and search for Container registries. Click on Add and you should get the following screen. Don't forget to enable the Admin user option; by doing so, you can sign in to the container registry via docker login with the username as the registry name and the password as the access key:

Figure 9.20: Creating a container registry using the Azure portal
If the registry is ready, there will be a popup saying that the job is finished and you will be able to see the resource. If you navigate to the Access Keys blade, you will find the login server and your username, which is the same as the registry name and the set of passwords:
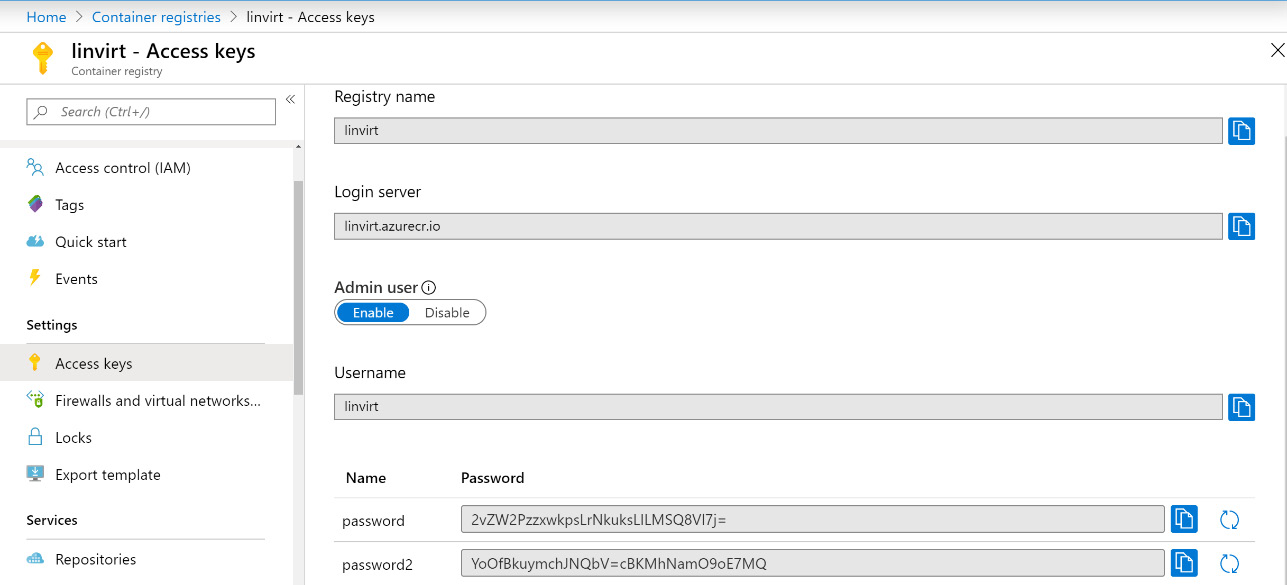
Figure 9.21: The Access key blade pane
Use this information to log into the repository, the same way you did with Docker Hub.
After pushing an image, it will be available in the repository. From there, you can deploy it to the Azure Container Instances service and run it.
Using the Azure CLI
We have created an Azure Container Registry instance via the Azure portal. It is also possible to use the Azure CLI and PowerShell to perform the same task. We will be following the Azure CLI steps and we encourage you to attempt this process using PowerShell on your own.
To start with, we need a Linux VM in which Docker and the Azure CLI are installed.
Let's start by creating a resource group, or you can use the same resource group that was used in the portal example. Just to recall the command we studied in the beginning, in the Docker Installation section; we will proceed with a new resource group:
az group create --name az-acr-cli --location eastus
Once you get the success message, proceed with the creation of the container registry using the following:
az acr create --resource-group az-acr-cli --name azacrcliregistry --sku Basic --admin-enabled true
Here, we are creating the container registry with the Basic SKU. There are other SKUs available that offer more storage options and throughput. SKUs point to different pricing tiers of container registry. Visit the Microsoft Azure pricing page (https://azure.microsoft.com/en-in/pricing/details/container-registry/) to see the pricing of each SKU. Since this is a demonstration and to keep the cost minimal, we will go with Basic.
After the deployment of the Azure Container Registry instance, we will log in to the registry. But to sign in, we require the password. We already know the username, which is the name of the registry, so let's find the password of the registry:
az acr credential show --name azacrcliregistry --resource-group az-acr-cli
The output will show the username and password. Please make a note of them. You can use password 1 or password 2. Now that we are sure of the credentials, we'll log in to the Azure Container Registry instance by executing the following:
az acr login --name azacrcliregistry --username azacrcliregistry --password <password>
If the login is successful, you should receive the output shown in the following screenshot:

Figure 9.22: Azure Container Registry login successful
Let's go ahead and push an image to the registry. In order to push an image, first we need to have an image. If you are using the same VM that was used in the previous examples, you might have some images pulled in. If the images are not there, you can use docker pull <image name> to get the image. You can verify the list of available images using the docker images command. Since we already have an nginx image, we are not going to pull it from Docker Hub.
Now that we have the image, let's tag it. Tagging will help you know which image you are using. For example, if you have an image tagged as v1 and you make some changes to it, you can tag it as v2. Tagging helps you to have a logical organization of your images based on release date, version number, or any other identifier. We need to tag in a <AcrLoginName>/<image name>:<version tag> format, where acr-name is the FQDN of the Azure Container Registry instance. To get the FQDN of the Azure Container Registry instance, execute the following:
az acr show -n azacrcliregistry -g az-acr-cli | grep loginServer
For the nginx image, we are going to tag it as nginx:v1:
docker tag nginx azacrcliregistry.azurecr.io/ngnix:v1
Let's push the tagged image to Azure Container Registry using the docker push command:
docker push azacrcliregistry.azurecr.io/ngnix:v1
All layers should be pushed, as shown in the screenshot:

Figure 9.23: Pushing the tagged image to the container registry
Suppose you have pushed multiple images to Azure Container Registry and would like to get a list of all images. Then you can make use of the az acr repository list command. To list all the images in the Azure Container Registry instance we created, use this command:
az acr repository list --name azacrcliregistry -o table
You can use the docker run command to run the container. But always make sure that the image name is in the format <AcrLoginName>/<image>. The era of Docker is going to end, and eventually it will be replaced with daemonless next-generation tools.
The next section is all about these tools and how you can create an analogy with Docker for a smooth transition.
Buildah, Podman, and Skopeo
In the previous section, we discussed how Docker works and how it can be used to deploy containers. As previously stated, Docker uses the Docker daemon, which helps us to achieve all this. What if we say people have started bidding goodbye to Docker? Yes, with the introduction of next-generation container management tools, Docker is fading away. We are not saying that Docker is completely out of the picture, but in time it will be replaced by rootless or daemonless Linux container tools. You read it right: there is no daemon running for these tools, and the approach of using the monolith daemon is coming to an end. No wonder people have started calling the containers deployed using these tools "Dockerless containers."
History
You might wonder when this all happened. Back in 2015, Docker Inc. and CoreOS, along with some other organizations, came up with the idea of the Open Container Initiative (OCI). The intention behind this was to standardize the container runtime and image format specs. OCI image format is supported by most container image registries, such as Docker Hub and Azure Container Registry. Most container runtimes that are available now are either OCI-compatible or they have OCI in the pipeline. This was just the beginning.
Earlier, Docker was the only container runtime available for Kubernetes. Obviously, other vendors wanted to have support for their specific runtimes in Kubernetes. Due to this dilemma and the lack of support for other vendors, Kubernetes created CRI in 2017. CRI stands for Container Runtime Interface. You can use other runtimes, such as CRI-O, containerd, or frakti. Since Kubernetes was booming and due to their support for multiple runtimes, the monopoly of Docker started to topple. In no time, the monopoly status of Docker changed and it became one of the supported runtimes in Kubernetes. The ripples made by this change actually gave birth to the idea of daemonless tools and the idea to overthrow the approach of using the monolith daemon, which requires superuser access.
Instead of using generic terms, let's try to understand popular ones. Buildah is for building containers, Podman is for running containers, and Skopeo lets you perform various operations on images and repositories where images are stored. Let's take a closer look at each of these tools. Some people suggest removing Docker before using these tools, but we suggest keeping Docker so that you can constantly compare these tools to it. If you have followed the previous sections on Docker, you will be able to create an analogy.
Installation
Installing these tools is very straightforward. You can use apt in Ubuntu or yum in RHEL to install these tools. Since we are using the same VM, we will be following the Ubuntu installation of these packages. To install Buildah, execute the following:
sudo apt update
sudo apt install -y software-properties-common
sudo add-apt-repository -y ppa:projectatomic/ppa
sudo apt update
sudo apt install -y buildah
Since we already have the PPA repository added during the installation of Buildah, we can deploy Podman straight away using apt install. To install Podman, execute the following:
sudo apt -y install podman
In order to install Skopeo, we need snap to be installed on the Ubuntu VM. If you are on Ubuntu 16.04 LTS or later, snap will be installed by default. Otherwise, you have to manually install it using apt install snapd.
Let's install Skopeo using snap:
sudo snap install skopeo --edge
Note
If you are getting an error message stating that revision is not meant production, you can use the –devmode parameter to install; this will skip this error and complete the installation.
Now we are ready to explore these tools.
Buildah
In the previous section, we discussed Dockerfiles. Here is the interesting part: Buildah has full support for Dockerfiles. All you have to do is write the Dockerfile and use the bud command, which stands for build-using-docker. Let's take the same example we used in the Dockerfile section. Create a Dockerfile by executing vi Dockerfile (you can use any text editor) and add the following lines:
FROM nginx
RUN apt-get --yes update
RUN apt-get --yes install apache2
CMD /usr/sbin/apachectl -e info -DFOREGROUND
EXPOSE 80
Save the file.
Before we build, there is something else we need to take care of. Buildah looks for the list of registries in the /etc/containers/registries.conf file. If this file doesn't exist, we need to create one, add the following code, and save the file:
[registries.search]
registries = ['docker.io']
By doing so, we are instructing to search Docker Hub for the image. You can also add your Azure Container Registry instance to the list if required.
Let's go ahead and build the image; make sure you are in the directory where the Dockerfile is. Start the build process using this:
buildah bud -t ngnix-buildah .
We have created an image called nginx-buildah. To see the list of images, you can use the buildah images command. Yes, we know it looks very similar to how you list images in Docker. We need to keep this analogy in mind and it will help you learn.
The output will be similar to this:

Figure 9.24: Listing the images using the buildah command
You can see that Buildah lists the image we pulled from Docker Hub and also the image we created that is stored in the localhost repository.
To build a container from an image, we can use the following:
buildah from <image>
This will create a container called <image>-working-container. If you want to build an nginx container, execute this:
buildah from nginx
You will get a similar output to this:

Figure 9.25: Building an nginx container
Just like using docker ps to list all the containers, we will run buildah ps and we will be able to see the nginx-working-container we just created:

Figure 9.26: Listing the containers using the buildah ps command
Also, we can execute commands directly in the container using the buildah run command. The syntax is as follows:
buildah run <container name> <command>
Let's try to print the content of the /etc/os-release file of the nginx container we created. The command will be as follows:
buildah run nginx-working-container cat /etc/os-release
The output will be similar to this:
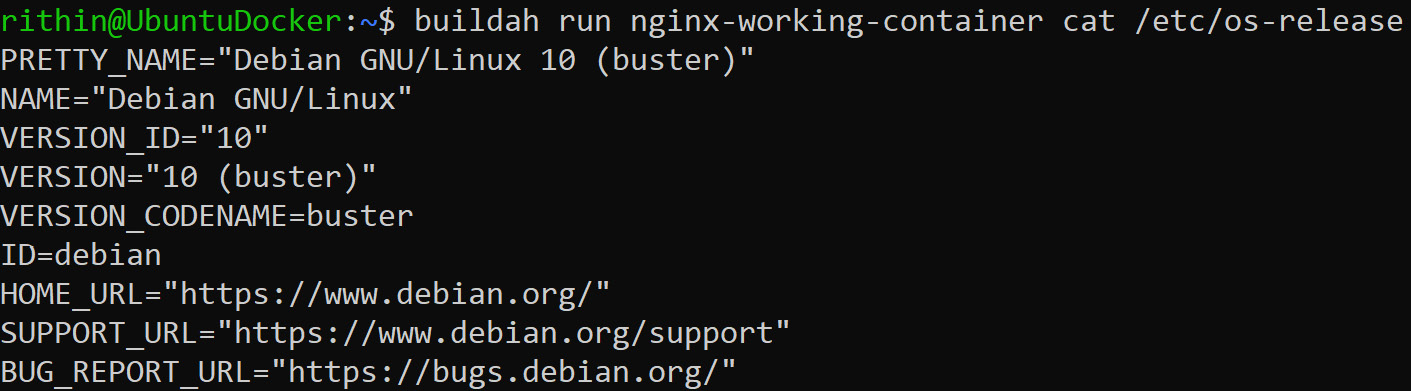
Figure 9.27: Printing the content of the nginx container
Like Docker, Buildah has support for commands such as push, pull, tag, and inspect.
Podman
The images we build via Buildah follow OCI compliance and can be used with Podman. In Podman, the analogy keeps on continuing; all we have to do is replace all Docker commands with Podman commands. One of the key things that we have to keep in mind is that in Podman, we cannot do port binding for a container as a non-root user. If your container needs a port mapping, then you have to run Podman as root. As we have already covered Docker and you are already familiar with Docker commands, we will just try to run a container and verify. Let's create an nginx container with the port mapped to 8080. Since we need to map a port, we will run the command as sudo:
sudo podman run -d -p 8080:80 --name webserver nginx
Since we have created the container using the sudo command, it will be owned by the root user. If a container is created using sudo, make sure you chain sudo for all actions related to that container.
To list the containers, use podman ps, and we can see that the container is listening on 0.0.0.0:8080 of the host, which is mapped to the port of the container:

Figure 9.28: Listing the containers using the podman ps command
Let's do a curl call and confirm whether the web server is running on port 8080 or not:
curl localhost:8080
If everything is working, you will be able to see the nginx welcome page:

Figure 9.29: Verifying the authentication to the port of the web server
Yes, the container is running daemonless!
We are not covering all Podman commands here, and once you are familiar with Docker, all you have to do is replace docker with podman in the command line.
Skopeo
If you recall, earlier we tried to get the tags of an image using Docker. Using Skopeo, you can inspect a repository, copy images, and delete images. To start with, we will use the skopeo inspect command to obtain the tags of an image in Docker Hub without pulling it:
skopeo inspect docker://nginx:latest
Running this command will trigger some warnings. You can ignore them. If you check the output, you can see that it is giving the tags, layers, OS type, and so on.
You can use the skopeo copy command to copy container images across multiple storage repositories. Also, you can use Skopeo with Azure Container Registry.
We will not be covering all these. However, you can visit the GitHub repositories of these tools:
- Buildah: https://github.com/containers/buildah
- Podman: https://github.com/containers/libpod
- Skopeo: https://github.com/containers/skopeo
Containers and Storage
This section aims to give you a basic idea of containers and storage. Every build tool that can create images provides the option to add data to your container.
You should use this feature only to provide configuration files. Data for applications should be hosted, as much as possible, outside the container. If you want to quickly update/remove/replace/scale your container, it's almost impossible if the data is within the container.
When we create a container, storage is attached to the container. However, the containers are ephemeral, which means that the storage is also destroyed when you destroy the container. Let's assume you created a Ubuntu container for testing and you saved some scripts that were tested on the container in the hope that you can use them later. Now, if you accidentally deleted this container, all the scripts that you tested and saved for later would be gone.
Your application data is important and you would like to retain it even after the container's life cycle is complete. So, we want to separate the data from the container life cycle. By doing so, your data is not destroyed and can be reused if needed. In Docker, this is achieved by using volumes.
Docker supports a wide range of options for persistent volumes, including Azure Files. In other words, you can tie your Azure file share to a Docker container as a persistent volume. To demonstrate this, we will go for the host volume, where a location will be mounted as a volume to the container. The purpose of these steps is to show how data can be saved even after the container is removed from the host.
Volume info is passed to the docker run command using the -v parameter while creating the container. The general syntax is as follows:
docker run -v /some-directory/on host:/some-directory/in container
Assume that you have an application that will create a file in a /var/log directory in the container and we need to make this persistent. In the next command, we are mapping a directory in the host to the /var/log directory of the container.
To complete this exercise, you need a Linux VM with Docker running on it. Let's create a ~/myfiles directory on the host machine that will be mapped to the container:
mkdir ~/myfiles
Let's create an Ubuntu container with an interactive shell, where the -v parameter is passed to mount the volume:
docker run -it -v ~/myfile:/var/log ubuntu
If the container was created successfully, you will be logged in as a root user to the container:

Figure 9.30: Creating the Ubuntu container
We will go to the /var/log directory of the container and create 10 empty files using this command:
touch file{1..10}
Listing the contents of the directory will show the 10 files we just created:

Figure 9.31: Listing the contents of the /var/log directory
Exit from the interactive shell using Ctrl + D, and now we are back in the host machine. Now we will delete the container:
docker rm <id/name of the container>
The id/name can be obtained from the output of the docker ps --all command.
Now that the container has been deleted, we will go to the ~/myfiles directory of the host machine to verify the contents.
In the following screenshot, you can see that the container has been successfully deleted; however, the ~/myfiles directory still holds the files we created inside the container:

Figure 9.32: Listing the files in the ~/myfiles directory
Now we know how to make our volume persistent. For Docker, there are solutions such as https://github.com/ContainX/docker-volume-netshare.
If you are using Docker and want to use Azure Files, you can use Cloudstor, a plugin that is available at https://docs.docker.com/docker-for-azure/persistent-data-volumes.
Using Azure File Storage maybe not the cheapest solution, but this way you get all the availability and backup options you need.
If you're going to use Kubernetes, it's a whole other story. We'll cover that in the next chapter.
Summary
In this chapter, another way of deploying your workload in Azure was discussed. After an introduction to the history, ideas, and concepts of container virtualization, we went into some of the available options. Along with older implementations, such as LXC, we discussed other great and rock-solid implementations to host containers: systemd-nspawn and Docker.
We not only saw how to run existing images pulled from repositories but also how to create our own image. Perhaps the greatest news is that there is a tool called Buildah that is able to create an image using the OCI standard from the Open Container Initiative and can be used for Docker.
The majority of this chapter was about Docker. This is by far the most widely implemented container solution today. And, talking about implementations, there are many ways to implement/deploy Docker:
- Deploy it manually in a VM
- Deploy a ready-to-go VM from the marketplace
- Docker Machine
- Azure Container Instances
Working with Docker Hub and Azure Container Registry was also discussed.
Finally, we discussed new container technologies such as Buildah, Podman, and Skopeo.
We ended the chapter with a few words about containers and storage. You might be wondering what will happen to the storage attached to a container if the container is destroyed, or how to make the storage persistent. You will learn about persistence in the next chapter, Chapter 10, Working with Azure Kubernetes Service. Also, we will be discussing the famous container orchestration tool Kubernetes.
Questions
- What are the reasons for using containers?
- When are containers not the solution that you need?
- If you need something like a virtual private server, do you want a VM, or is there a container virtualization solution available that may be a good idea?
- Why shouldn't it be difficult to migrate from one solution, let's say Docker, to another, for example, Buildah?
- What is a development machine used for?
- Why is using Buildah such a good idea, even if it is under heavy development?
- Why shouldn't you store application data in a container?
Further Reading
Carrying out further reading is not a very easy thing to do in the area of container virtualization. For systemd-nspawn, it's relatively easy: the man pages are an easy read. Let's make a suggestion that is relevant for systemd-nspawn and even Docker: Red Hat provides a document on their website called the Resource Management Guide (https://access.redhat.com/documentation/en-us/red_hat_enterprise_linux/7/html/resource_management_guide/) with good information about cgroups.
A couple of references on Docker are listed here:
- Orchestrating Docker, by Shrikrishna Holla, where you can understand how to manage and deploy Docker services
- Mastering Docker Enterprise: A companion guide for agile container adoption, by Mark Panthofer, where you can explore add-on services of Docker EE and how they can be used