
In the previous chapter, we explored the world of container virtualization, and in particular Docker containers. This chapter is all about managing containerized workloads using Azure Kubernetes Service (AKS).
This chapter is different from all the other chapters in this book. Until now, every chapter has been about infrastructure and providing a platform: the classic system administrator working in the cloud. Even Chapter 9, Container Virtualization in Azure, contained questions such as ''How do we install Docker?'' and ''How do we get the container up and running?'' The questions we'll answer in this chapter are the following:
- How do we deploy and manage our workload during the development phase and afterward?
- How can we scale up/down?
- What are the availability options?
Kubernetes provides an important answer to all of these questions. It is a solution that is used to automate important tasks such as the deployment, management, scaling, networking, and management of the availability of container-based applications.
Kubernetes was originally designed by Google and is now maintained by the Cloud Native Computing Foundation (https://www.cncf.io). Microsoft is a big partner of this foundation and is an important contributor to Kubernetes projects in terms of money and code. Actually, one of the co-founders of Kubernetes, Brendan Burns, works for Microsoft and leads the teams that work on container orchestration within Microsoft. On top of that, Microsoft has started several open source projects with additional tooling for Kubernetes.
Because Microsoft is so heavily involved in Kubernetes, it is able to implement a version of Kubernetes in Azure that is fully upstream-compatible. This is also important for developers so that they can use a local Kubernetes installation to develop software, and when the development is done, release it to the Azure cloud.
AKS provides a fully managed containers-as-a-service solution for Kubernetes. This means that you don't have to think about the configuration, management, and upgrading of the Kubernetes software. The control plane is managed by Azure.
AKS makes it easy to deploy and manage Kubernetes within Azure: it can handle the complete maintenance process, from provisioning to keeping your applications up to date and upscaling as per your needs.
Even the process of upgrading your Kubernetes cluster without any downtime can be done with AKS.
And last but not least, monitoring is available for every part of your Kubernetes cluster.
By the end of this chapter, you'll be able to:
- Explain what Kubernetes and AKS are.
- Use AKS to deploy and manage your clusters.
- Maintain the complete life cycle of your applications in AKS.
So, let's go ahead and first understand what the technical requirements are before we actually start using AKS.
Technical Requirements
As stated in the introduction of this chapter, this chapter is different from all the other chapters and this affects the technical requirements. Until now, the technical requirements were simple: you just needed a bunch of virtual machines.
This chapter needs a DevOps environment in which developers and operators are in the same team, working closely together, and where there is also someone who is doing both development- and operations-related tasks.
Another choice has to be made: where do we develop? Locally, or in the Azure cloud? Both are possible and it shouldn't make any difference! Cost-wise, it may be better to do it on a workstation. In this chapter, it's sort of assumed that you're doing it locally. So, you'll need a workstation (or virtual machine). We need the following:
- The Azure CLI.
- Docker and build tools.
- Kubernetes.
- Some essential developer tools, such as Git.
- Some other tools, such as Helm, covered later on.
- A good integrated development environment (IDE). We prefer Microsoft Visual Studio (VS) Code with the Microsoft extensions for Docker and Kubernetes (only if a graphical interface is available; otherwise, use the Nano editor).
- Optionally, an orchestration tool such as Ansible. Please have a look at the Ansible azure_rm_aks and 8ks_raw modules.
Using WSL and VS Code
You can use Windows Subsystem for Linux (WSL) and VS Code along with the VS Code Remote WSL extension to get a Linux development environment on your Windows desktop or laptop without the overhead of having a virtual machine. This will enable you to access your Linux files from PowerShell or CMD and your Windows files from Bash. VS Code is a source code editor that can run on various platforms and supports many languages. You can develop, run, and debug Linux-based applications from your favorite Windows platform using WSL and VS Code. WSL features can be enabled using PowerShell and by installing Linux from the Microsoft Store. VS Code is available for Windows and Linux and can be downloaded from https://code.visualstudio.com/. Since the configuration settings of VS Code are maintained across both Windows and Linux platforms, you can easily switch back and forth from Windows to Linux and Linux to Windows.
You can find the step-by-step tutorial for WSL at https://docs.microsoft.com/en-us/learn/modules/get-started-with-windows-subsystem-for-linux/ and a detailed installation guide at https://docs.microsoft.com/en-us/windows/wsl/install-win10. You can configure default shells and choose between PowerShell and WSL when running on Windows, and you can choose Zsh or Bash on Linux.
Installing Dependencies
We are going to use Ubuntu 18.04 LTS Desktop edition. But you can use an Ubuntu 18.04 LTS server in an Azure virtual machine as well. With all the knowledge that you've gained in the other chapters, it's easy to transfer what we'll be doing to other Linux distributions, macOS, and even Windows:
- First, upgrade Ubuntu:
sudo apt update &&sudo apt upgrade
- Install the developer tools, including some other dependencies and openssh:
sudo apt install build-essential git curl openssh-server
ebtablesethtoolsocat
- First, we are going to install the Azure CLI.
You can install the Azure CLI by running a single command:
curl -sL https://aka.ms/InstallAzureCLIDeb | sudo bash
Alternatively, you can use the following instructions for manual installation.
Get the required package:
sudo apt-get install ca-certificates curl apt-transport-https lsb-release gnupg
Get and install the signing key:
curl -sL https://packages.microsoft.com/keys/microsoft.asc | gpg --dearmor |
sudo tee /etc/apt/trusted.gpg.d/microsoft.asc.gpg> /dev/null
sudo apt-add-repository
https://packages.microsoft.com/repos/azure-cli
curl -L https://packages.microsoft.com/keys/microsoft.asc
| sudo apt-key add -
sudo apt update
sudo apt install azure-cli
- To install PowerShell and VS Code, we are using snaps, universal software packages similar to portable apps for Windows:
sudo snap install --classic powershell
sudo snap install --classic vscode
Alternatively, you can use the following commands to install PowerShell Core:
curl https://packages.microsoft.com/keys/microsoft.asc | sudo apt-key add -
curl https://packages.microsoft.com/config/ubuntu/18.04/prod.list | sudo tee /etc/apt/sources.list.d/microsoft.list
sudo apt update
sudo apt install -y powershell
- Type pwsh to start PowerShell Core:
admin123@kubes:~$ pwsh
If the PowerShell Core starts successfully, you will get the following output:

Figure 10.1: Starting PowerShell Core
- Install the Azure cmdlet for Azure:
sudo pwsh -Command "Install-Module PowerShellGet -Force"
sudo pwsh -Command "Install-Module -Name AzureRM.Netcore
-AllowClobber"
sudo chown -R $USER ~/.local/
- Install Docker:
curl -sSL https://get.docker.com/ | sudo sh
sudo usermod -aG docker $USER
You will get the Docker version details as follows:

Figure 10.2: Docker version details
- Stop Docker for now:
Sudo systemctl stop docker.service
kubectl Installation
kubectl is a command-line interface that can be used to manage your Kubernetes clusters. It can be used for many operations. For example, use kubectl create to create one or more files and use kubectl delete to delete resources from a file. We are going to use the Azure CLI to install kubectl and execute the following commands as root to grant the required permissions:
sudo -i
az login
az aks install-cli
First, you need to download the latest release using the following command:
curl -LO https://storage.googleapis.com/kubernetes-release/release/v1.16.3/bin/linux/amd64/kubectl
Next, make it executable:
chmod +x ./kubectl
Now, move it to your PATH:
Sudo mv ./kubectl /usr/local/bin/kubectl
Verify the installation by asking for the version information:
kubectl version
To enable autocompletion, which could save you from a lot of typing. For Bash and Zsh in kubectl, execute the following:
kubectl completion bash > ~/.kube/completion.bash.inc
printf"
# Kubectl shell completion
source '$HOME/.kube/completion.bash.inc'
">> $HOME/.bash_profile
source $HOME/.bash_profile
For Zsh, execute the following:
sudo -i
kubectl completion zsh>"${fpath[1]}/_kubectl"
exit
source <(kubectl completion zsh)
So far, we have installed the latest version of the kubectl binary with a curl command on Linux and enabled shell auto-completion for kubectl. We are now ready to use AKS.
Note
If you are using kubectl and you get error messages similar to Error from server (NotAcceptable): unknown (get nodes), downgrade your client using https://dl.k8s.io/v1.10.6/kubernetes-client-linux-amd64.tar.gz.
Though this is completely outside the scope of this book, we personally like to use the Zsh shell with a nice customization called Spaceship. The prompt gives you more insight into where you are and what you are doing while working with AKS.
Here is the quick installation:
sudo apt install zshnpm fonts-powerline
zsh # and create a .zshrc file with option 0
npm install spaceship-prompt
chsh -s /bin/zsh
Starting to Use AKS
Azure AKS makes it easy to deploy and manage your container applications. You can quickly define, deploy, and debug Kubernetes applications in addition to automatically containerizing your applications using Azure AKS. You can automate the monitoring, upgrading, repair, and scaling, which reduces the manual infrastructure maintenance. With kubectl installed, it's time to set up and explore the Kubernetes environment in Azure:
- Create a cluster.
- Find information about the cluster.
- Deploy a simple workload.
Creating a Cluster with the Azure CLI
In Kubernetes, we're going to work with clusters. A cluster contains a master or control plane that is in control of everything and one or more worker nodes. In Azure, we don't have to care about the master, only about the nodes.
It's a good idea to make a new resource group for the purposes of this chapter:
az group create --location eastus--name MyKubernetes
In this resource group, we will deploy our cluster:
az aks create --resource-group MyKubernetes
--name Cluster01
--node-count 1 --generate-ssh-keys
This command can take up to 10 minutes. As soon as you get your prompt back, verify it with the following:
az aks list
In the output, you'll find a lot of information, such as the fully qualified domain name, the name of the cluster, and so on:
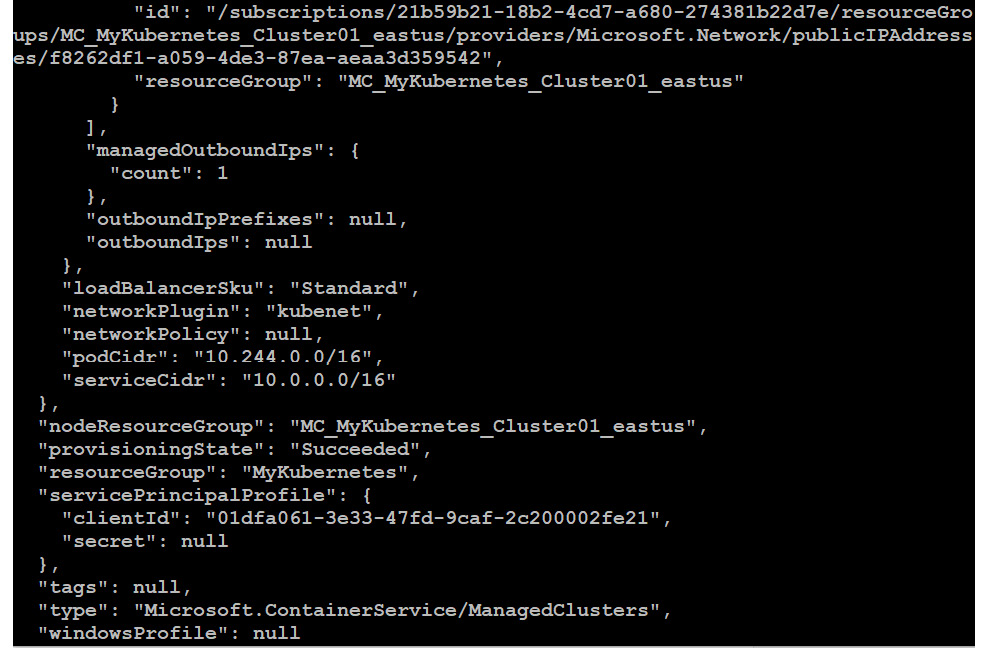
Figure 10.3: Details of the deployed cluster
There is a web interface available called Kubernetes Dashboard that you can use to access the cluster. To make it available, execute the following:
az aks browse --name Cluster01 --resource-group MyKubernetes
Point your browser to http://127.0.0.1:8001:
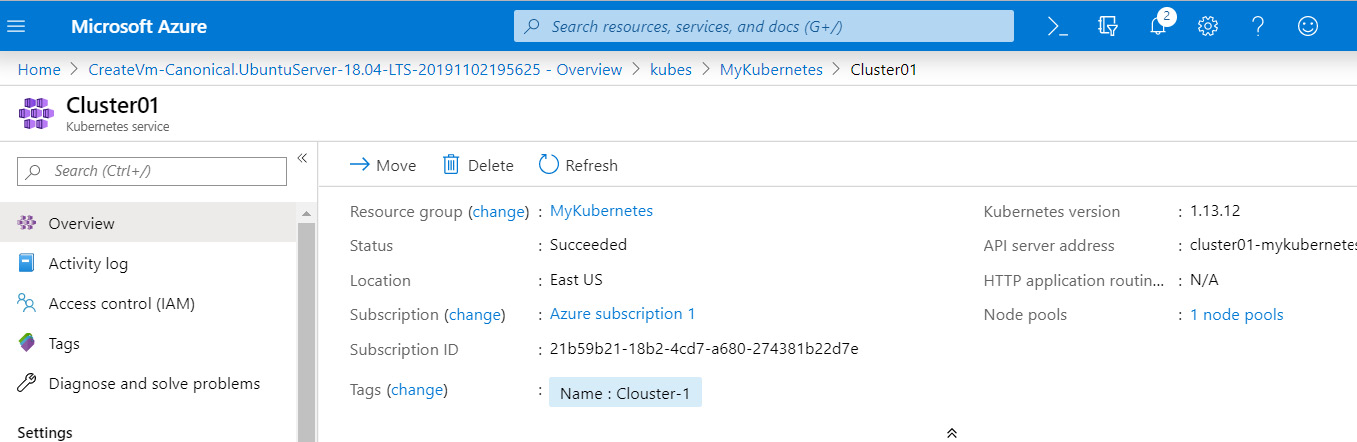
Figure 10.4: Kubernetes Dashboard
The az utility is tunneling the portal to your localhost. Press Ctrl + C to exit the tunnel.
To be able to use the kubectl utility, we need to merge the configuration into the local configuration file:
az aks get-credentials --resource-group MyKubernetes
--name Cluster01
The output of the preceding command is as follows:
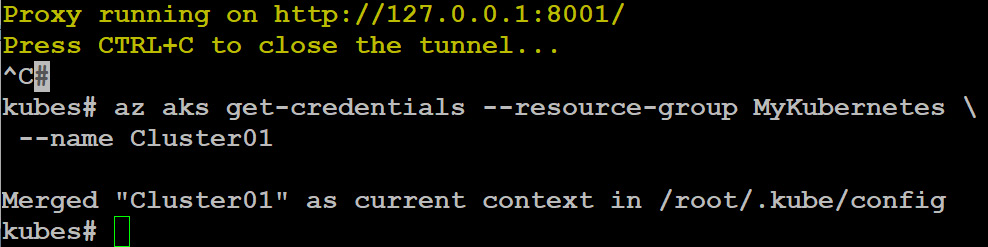
Figure 10.5: Merging the configuration into the local configuration file
Thanks to our fancy Command Prompt, you can see that we switched from our local Kubernetes cluster to the cluster in Azure. To see the available clusters, execute the following:
kubectl config get-contexts
The output of the preceding command is as follows:

Figure 10.6: Viewing the available clusters
You can switch to the other cluster using kubectl config use-context <cluster>.
You can also find information about your cluster using kubectl:
kubectl cluster-info
The output of the preceding command is as follows:
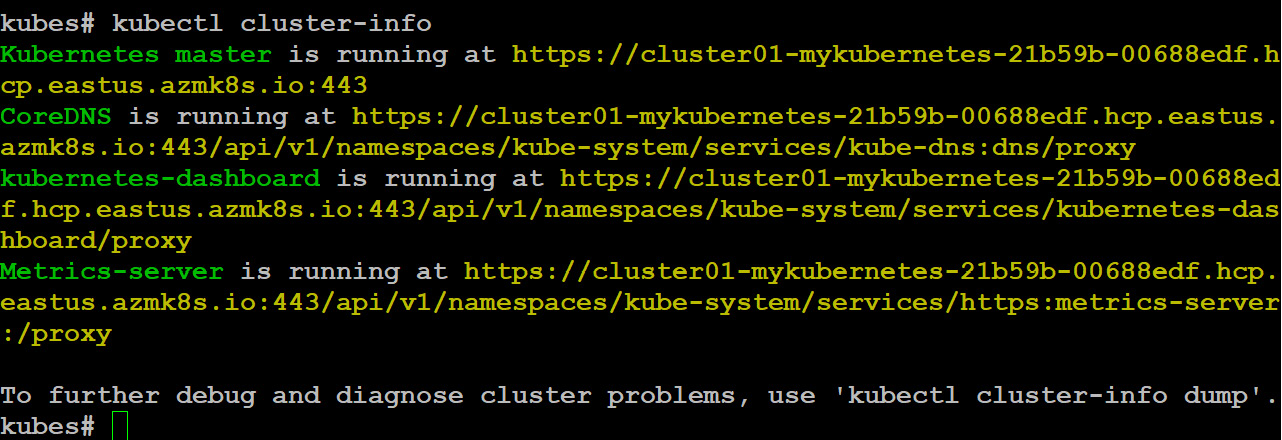
Figure 10.7: Information about the cluster
We created a Kubernetes cluster here called Cluster01 using the az aks create command. Now let's list the nodes, which are the worker machines of Kubernetes and are managed by a master node:
kubectl get nodes
The output of the preceding command is as follows:

Figure 10.8: Listing the nodes
First Deployment in AKS
AKS allows you to build and deploy applications into a managed Kubernetes cluster, which manages the connectivity and availability of your containerized application. You can use a simple kubectl create command to deploy a Docker container in AKS:
Kubectl createnginx --image=nginx --port=80
And within seconds, there is a message: deployment.apps/nginx created.
Verify the deployment using the following:
kubectl get deployment
The output of the preceding command is as follows:

Figure 10.9: Verifying the image deployment
When we executed the run command, the Docker container was deployed in the cluster. Or, more specifically, a pod was created with the container running in it. A pod is a group of containers with shared resources, such as storage and network resources and it also contains the specification for how to run the containers. To see the created pod, execute the following:
kubectl get pods
The output of the preceding command returns the list of pod names, pod statuses (running, pending, succeeded, failed, or unknown), the number of restarts, and the uptime, as follows:

Figure 10.10: Details of the pods
Pods come and go; they are created dynamically while scaling up/down, among other things. Using the explain command, you can find all kinds of information about the pod:
kubectl explain pods/nginx-57867cc648-dkv28
kubectl delete pod nginx-57867cc648-dkv28
Execute kubectl get pods again; you should see that a new pod is available.
Creating Services
But actually, you shouldn't care about the pod: the service is what's important. A service is an object that makes the application accessible to the outside world. Behind the service, there are one or more pods. The service keeps tracks of the pods and their IP addresses, and it is an abstraction of a logical set of pods and their policies. You can use the following command to list all the services in a namespace:
kubectl get services
The output of the preceding command is as follows:

Figure 10.11: Listing all the services in a namespace
Only one service is found, CLUSTER-IP. More details can be found using the following command:
kubectl describe services/kubernetes
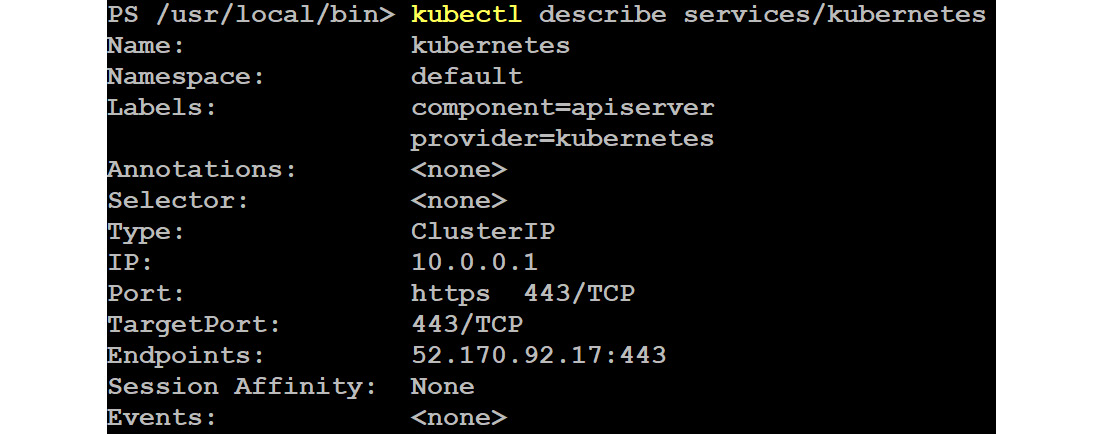
Figure 10.12: Getting the description of the Kubernetes services
Let's get rid of our first deployment:
kubectl delete deployment nginx

Figure 10.13: Deleting the first deployment
Let's create a new one:
kubectl run nginx --image=nginx

Figure 10.14: Creating a new nginx image
Please note that we didn't expose the ports. Let's list the pods using kubectl get pods. To make the resource accessible, we add a service of the LoadBalancer type:
kubectl expose pod <pod name> --port=80 --target-port=80
--type=LoadBalancer
The output should be similar to the following:

Figure 10.15: Listing the pods and adding a service of the LoadBalancer type
Use the EXTERNAL-IP address in your browser. It will show you the welcome page of nginx.
Multi-Container Pods
A pod is also an abstraction layer used by Kubernetes to maintain the container. There are many use cases and real-world scenarios to have multiple containers in a single pod to support microservices container applications to communicate with each other, as shown in the following diagram. The persistent storage in this diagram shows how each container communicates for read and write operations during the life of the pod and the shared persistent storage data is lost when you delete the pod:
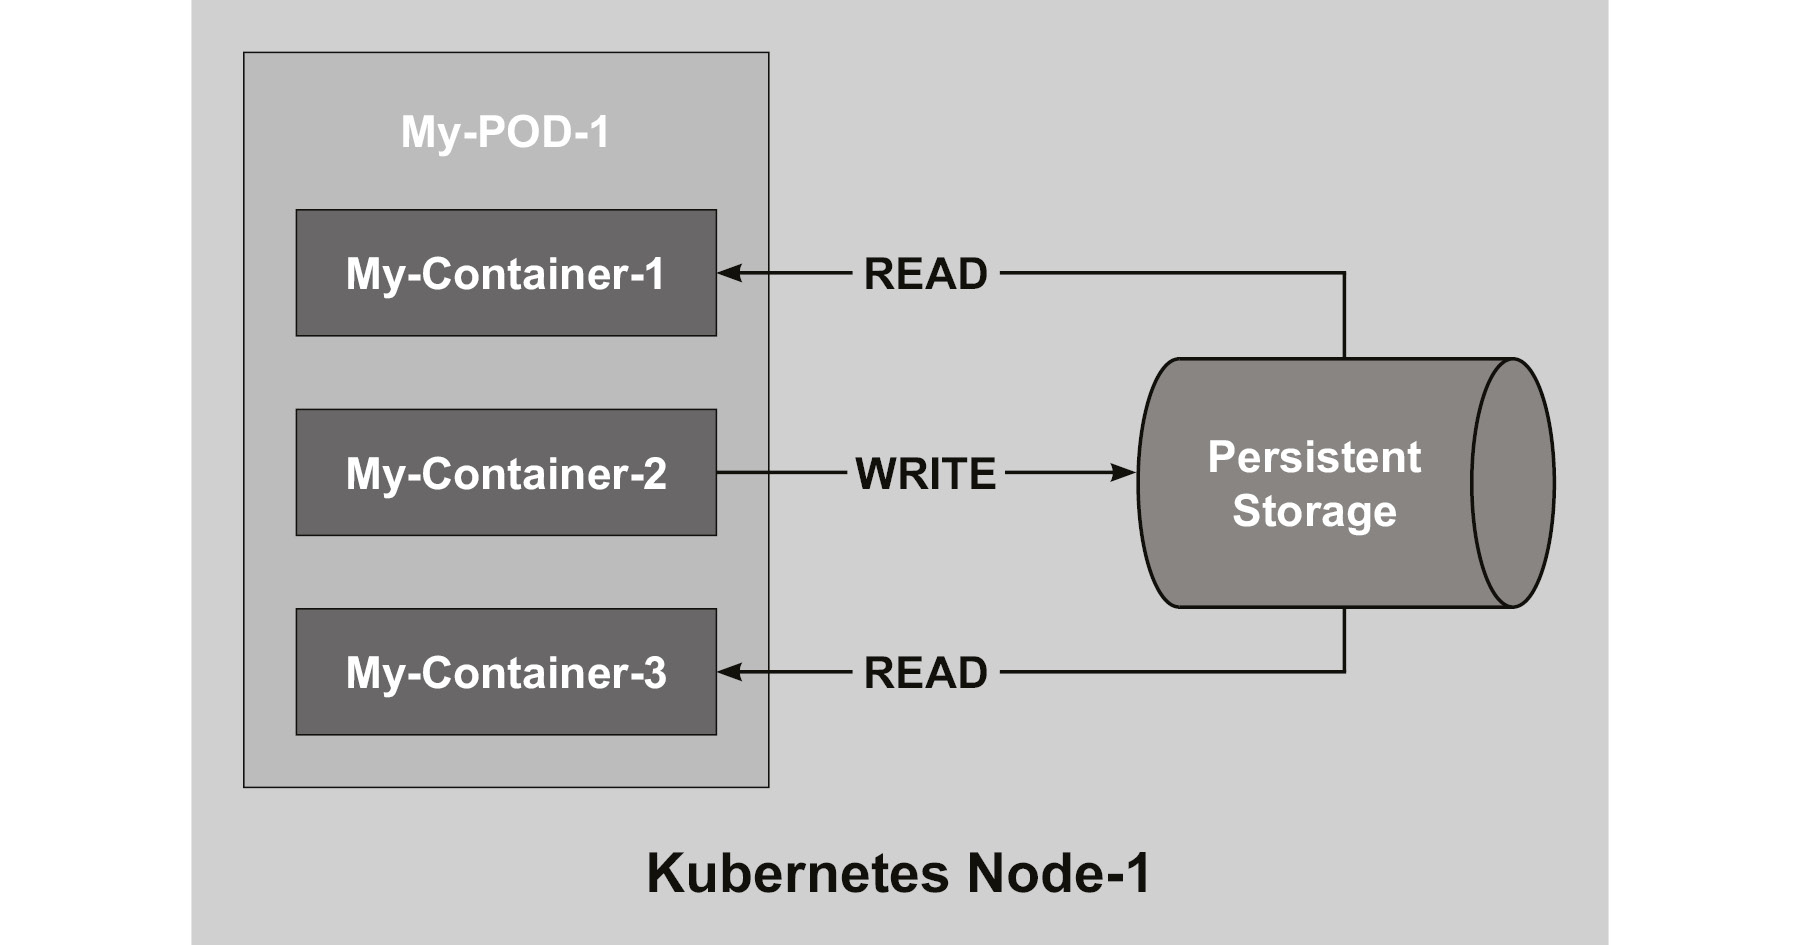
Figure 10.16: Architecture of multi-container pods
But there are use cases that are based on the fact that a pod provides shared resources for the containers within the pod, such as:
- Containers with helper applications such as logging and monitoring
- Reverse proxies
Until now, we used the —image parameter to create a simple pod. For a more complex pod, we need to make a specification in YAML format. Create a file called myweb.yaml with the following content:
apiVersion: v1
kind: Pod
metadata:
name: myweb
spec:
restartPolicy: Never
volumes:
- name: logger
emptyDir: {}
containers:
- name: nginx
image: nginx
volumeMounts:
- name: logger
mountPath: /var/log/nginx
readOnly: false
- name: logmachine
image: ubuntu
volumeMounts:
- name: logger
mountPath: /var/log/nginxmachine
In this file, a shared volume is created, called journal. The emptydir directive makes sure that the volume is created while creating the pod.
To verify, execute the following:
kubectl exec myweb -c nginxfindmnt | grep logger
This command executes in the myweb pod on the nginx container by using the findmnt command. We have created containers, pods, and shared storage. Now let's shift our focus to Helm, which is the package manager for Kubernetes.
Note
The preceding option cannot be used as a cluster solution and you should probably mount one of the containers' filesystems as read-only using the mountOptions flag.
Working with Helm
Helm (https://helm.sh and https://github.com/helm) is an application package manager for Kubernetes. You can compare it with apt and yum for Linux. It helps to manage Kubernetes using charts, which define, install, and upgrade the application you want to deploy on Kubernetes.
There are many charts available in Helm's GitHub repository and Microsoft, which is one of the biggest contributors to this project, also provides a repository with examples.
Installing Helm
If you are on an Ubuntu system, you have two choices—you can install Helm with a snap package or just download the binary from https://github.com/kubernetes/helm/releases. Using the binary works for every Linux distribution, and the snap repository doesn't always have the latest version of Helm. So, let's use https://github.com/helm/helm/releases to find the latest release of Helm and change x in the helm-vx.x.x-linux-amd64.taz.gz filename accordingly:
cd /tmp
wget https://storage.googleapis.com/kubernetes-helm/
helm-v2.9.1-linux-amd64.tar.gz
sudo tar xf helm-v2.9.1-linux-amd64.tar.gz --strip=1 -C
/usr/local/bin linux-amd64/helm
Always check for the latest release on the website and change the command accordingly.
macOS users can use Brew (https://brew.sh/):
brew install kubernetes-helm
The client is installed, and with this client, we can deploy the server part, Tiller, into our Kubernetes cluster:
helm init
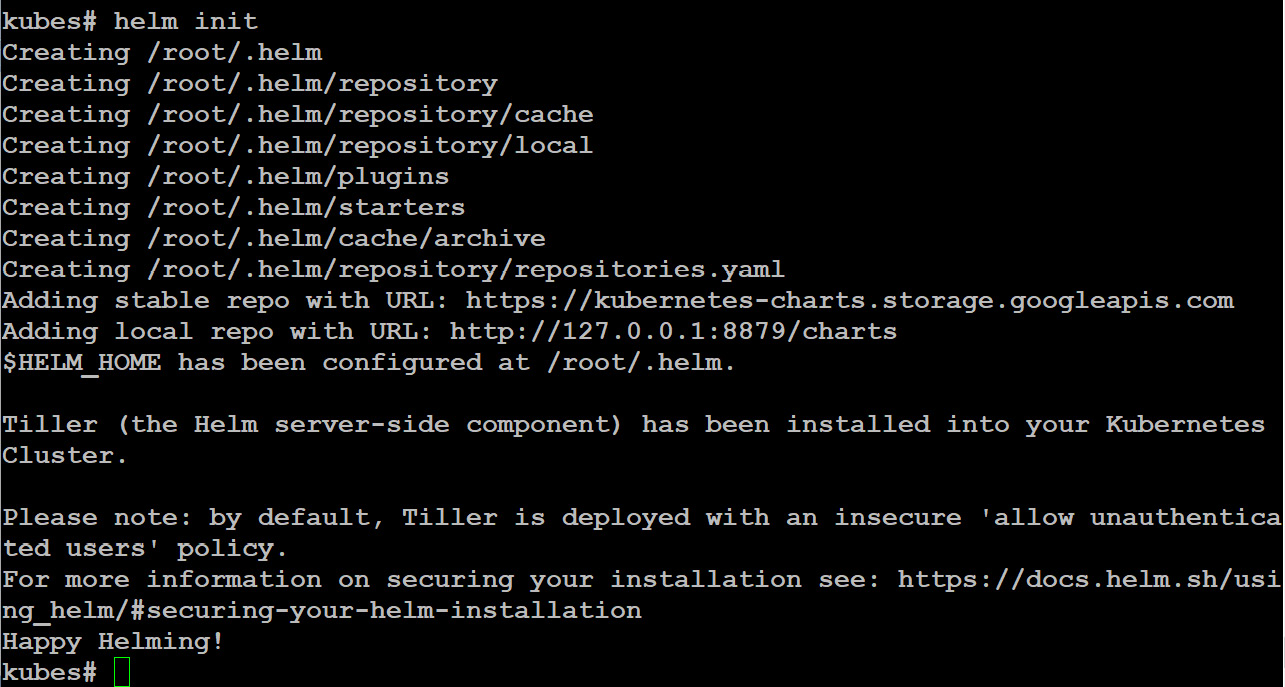
Figure 10.17: Deploying Tiller into the Kubernetes Cluster
Verify the versions:
helm version
The output should be similar to the following:

Figure 10.18: Verifying the Helm version
To allow Helm to get access to the Kubernetes cluster, a service account must be created with a corresponding role:
kubectl create serviceaccount
--namespace kube-system tiller
As shown in the following screenshot, we created Tiller service account in the kube-system namespace using the kubectl create command:

Figure 10.19: Creating Tiller service account in the kube-system namespace
Grant cluster-admin access to Kubernetes resources to perform administrative tasks:
kubectl create clusterrolebinding tiller-cluster-rule
--clusterrole=cluster-admin
--serviceaccount=kube-system:tiller
As shown in the following screenshot, you can create a custom role based on your requirements:

Figure 10.20: Creating a custom role
Helm is the client installed on your local machine and Tiller is the server that is installed on your Kubernetes. To reconfigure Helm—that is, to make sure the version of Tiller matches with your local Helm—execute:
helm init --service-account tiller --upgrade
Helm Repository Management
A Helm repository is an HTTP server that can serve YAML files and consists of packaged charts and index.yml hosted on the same server. There are two repositories that are added during installation:
- https://kubernetes-charts.storage.googleapis.com/
- http://127.0.0.1:8879/charts
Let's add the repository from Microsoft:
helm repo add azure
https://kubernetescharts.blob.core.windows.net/azure

Figure 10.21: Adding the repository from Microsoft
Check the available repositories:
helm repo list
The output should be similar to the following:

Figure 10.22: Checking the available repositories
To update the repository information, execute the following:
helm repo update
You can also remove repositories using the remove parameter.
Installing Applications with Helm
Let's see what is available in the repositories:
helm search wordpress
The output of the preceding command is as follows:

Figure 10.23: Searching the wordpress repository
If you want information about the chart, how to use it, the available parameters, and so on, you can use the helm inspect command. For now, we're just going to deploy it:
helm install stable/wordpress
The installation output log from the preceding command contains the necessary details to access the WordPress instance.
Verify the status of the Helm charts in the cluster using the following command:
helm ls
The output of the preceding command returns the revision name, update timestamp, status, chart, and its namespace as follows:

Figure 10.24: Verifying the status of the Helm charts
Review the previous output of the installation process:
helm status contrasting-chicken
This command returns the deployment timestamp, namespace, and status, in addition to resource details such as v1/PersistentVolumeClaim, v1/Service, extensions/Deployment, v1/Secret, and the connection details of the database server:

Figure 10.25: Reviewing the helm status
And, of course, kubectl will also show you the following results:

Figure 10.26: Using kubectl to get the deployment details
The following screenshot shows the output of the kubectl get service command:

Figure 10.27: Output of the kubectl get service command
Let's remove our deployment (the name can be found using helm ls):
helm delete <NAME>

Figure 10.28: Removing the deployment with the helm delete command
To customize the application, execute the following:
helm inspect stable/wordpress
Then, search for the WordPress settings:
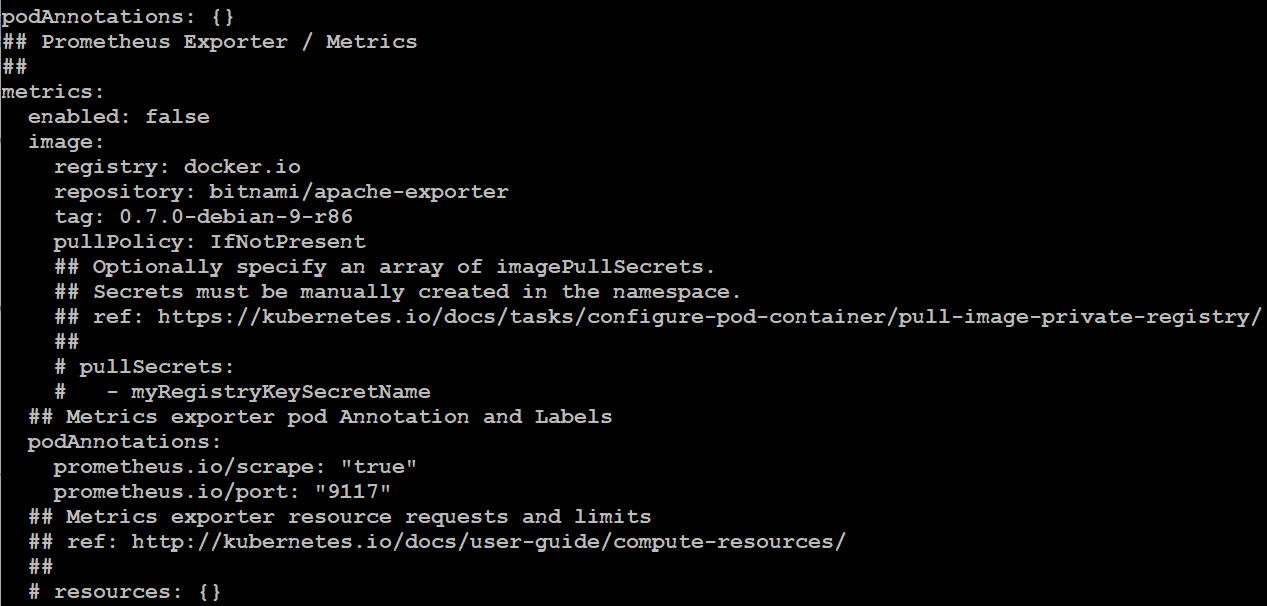
Figure 10.29: Searching for the WordPress settings
Create a YAML file, for instance, custom.yaml, with the following content:
image:
registry: docker.io
repository: bitnami/wordpress
tag: 4-ol-7
wordpressUsername: linuxstar01
wordpressEmail: [email protected]
wordpressFirstName: Kamesh
wordpressLastName: Ganesan
wordpressBlogName: Linux on Azure – 2nd Edition!
Then, deploy the WordPress application:
helm install stable/wordpress -f custom.yaml
You can verify the results using the kubectl command. First, get the Pod's name:
kubectl get pod

Figure 10.30: Verifying the deployment of the WordPress application
After that, execute the following:
kubectl describe pod <podname>

Figure 10.31: Getting the pod description
For instance, in the Events section, you'll see that the docker.io/bitnami/wordpress:4-ol-7 image is pulled.
Clean everything up:
helm delete stable/wordpress
kubectl scale sts --all --replicas=0
kubectl delete pod --all
kubectl delete sts --all --cascade=false
Don't bother about the stateful sets (sts); they were created by this application to have an ordered deployment and shared persistent storage.
Creating Helm Charts
Helm charts are similar to software packages used in Linux distributions and you can browse the package repository (chart) directory structure using the Helm client. There are many charts created for you, and it is also possible to create your own.
First, create a working directory and make it ready for use:
helm create myhelm
cd myhelm
The preceding command should give you a similar output:
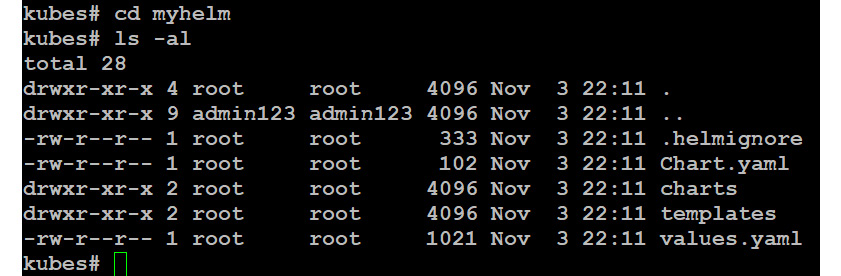
Figure 10.32: Creating a working directory
Some files and directories are created:
- The Chart.yaml file: This file contains basic information about the chart.
- The values.yaml file: The default configuration value.
- The charts directory: The dependency charts.
- The templates directory: This is used to create manifest files for Kubernetes
Additionally, you can add a LICENSE file, a README.md file, and a file with requirements, requirements.yaml.
Let's modify Chart.yaml a little bit:
apiVersion: v1
appVersion: 1.15.2
description: My First Nginx Helm
name: myhelm
version: 0.1.0
maintainers:
- name: Kamesh Ganesan
email: [email protected]
url: http://packtpub.com
The file is more or less self-explanatory: the maintainers are optional. appVersion refers to the version of, in this example, nginx.
Verify the configuration with the following:
helm lint
Take some time to investigate the files in the templates directory and the value.yaml file. Of course, there is a reason why we used nginx as an example, because the files that are created by helm create also use nginx as an example.
First, execute a dry run:
helm install --dry-run --debug ../myhelm
This way, you can see the manifest that will be used to deploy the application. After that, you're ready to install it:
helm install ../myhelm
After the installation, we realized that looking at the dry run, there is something that is not OK: the version of nginx is nginx: stable, which is version 1.14.0. Open the values.yaml file and change tag: stable to tag: 1.15.2.
Use helm ls to find the name and update it:
helm upgrade <name> ../myhelm
A new pod will be created; the old one will be deleted:

Figure 10.33: Updating the pod version
There is even a rollback option if you want to revert back to your old version:
helm rollback <RELEASE> <REVISION>
You just need to specify the release and revision to which you want to revert.
Working with Draft
Helm is typically something you're going to use, as a developer, on applications that are more or less production-ready and should be maintained. It's also most likely that you hosted the code on a version control system such as GitHub.
This is where Draft (https://github.com/Azure/draft) comes in. It tries to streamline the process, starting with your code, in the Kubernetes cluster.
The tool is in heavy development. Draft is getting more popular and stable with new languages and features being added regularly.
If the development phase turns into something that seems to be usable, you can still use Draft, but it's more likely that you'll switch to Helm as well.
To find out what programming languages are supported by Draft, you can execute the following commands after the installation:
draft pack list
Available Packs:
github.com/Azure/draft/clojure
github.com/Azure/draft/csharp
github.com/Azure/draft/erlang
github.com/Azure/draft/go
github.com/Azure/draft/gradle
github.com/Azure/draft/java
github.com/Azure/draft/javascript
github.com/Azure/draft/php
github.com/Azure/draft/python
github.com/Azure/draft/ruby
github.com/Azure/draft/rust
github.com/Azure/draft/swift
Installing Draft
To be able to use Draft, Helm must be installed and configured.
Get your copy from https://github.com/Azure/draft/releases:
cd /tmp
wget https://azuredraft.blob.core.windows.net/draft/
draft-v0.15.0-linux-amd64.tar.gz
sudo tar xf draft-v0.15.0-linux-amd64.tar.gz --strip=1
-C /usr/local/bin linux-amd64/draft
Always check for the latest release on the website and change the command accordingly.
macOS users can install it with Brew:
brew tap azure/draft && brew install draft
You can see that the developers who work on Helm are also involved with the development of Draft. In both cases, many of them are Microsoft developers. Similar to Helm, after installing the client, you have to initialize Draft:
draft init
This will install some default plugins and set up the repositories you can use within Draft.
Check the version with the following:
draft version
At the time of writing, its version is 0.16.0:

Figure 10.34: Checking the Draft version
The last step involves configuring a Docker repository, Docker Hub, or Azure. For the purposes of this book, we are using Azure.
Create an Azure container registry (ACR):
az acr create --resource-group MyKubernetes --name LinuxStarACR --sku Basic
Log in to LinuxStarACR:
az acr login --name LinuxStarACR

Figure 10.35: Logging in to LinuxStarACR
Configure the repository:
draft config set registry LinuxStarACR
Log in to the registry:
az acr login --name LinuxStarACR
Create trust between Draft and the ACR:
export AKS_SP_ID=$(azaks show
--resource-group <resource group>
--name <Kubernetes Cluster>
--query "servicePrincipalProfile.clientId" -o tsv)
export ACR_RESOURCE_ID=$(azacr show
--resource-group <resource group>
--name <ACR Name> --query "id" -o tsv)
az role assignment create --assignee $AKS_SP_ID --scope $ACR_RESOURCE_ID --role contributor
We have successfully installed Draft v0.16.0 and created ACR. Finally, we created trust between Draft and ACR. It's time to go ahead and start using Draft.
Using Draft
Let's develop some simple Draft code. For this, we'll create a directory and name it mynode. In this directory, we'll create a file called mynode.js with the following code:
var http = require('http');
var server = http.createServer(function(req, res) {
res.writeHead(200);
res.end('Hello World!');
});
server.listen(8080);
This is a simple web server that serves a page saying Hello World!. We're in a very early stage of our development process. To create a package.json file, execute the following:
npminit
Fill in the information:
name: (mynode)
version: (1.0.0) 0.0.1
description: My first Node App
entry point: (mynode.js)
test command: node mynode.js
git repository:
keywords: webapp
author: Kamesh Ganesan
license: (ISC)
Now we are ready to execute Draft:
draft create

Figure 10.36: Creating a Dockerfile using the draft create command
This will create a Dockerfile and all the information for Helm.
The last line of the output, Ready to sail, actually means that you are ready to execute:
draft up
The preceding command generates the following output:
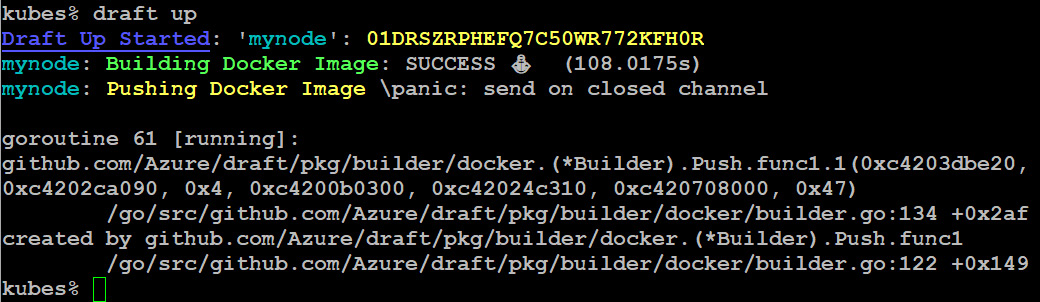
Figure 10.37: Building and pushing the Docker image
This will build the image and release the application.
Executing helm ls will show the mynode application:

Figure 10.38: Getting the details of mynode application
Use kubectl get services to show the service:

Figure 10.39: Using kubectl get services to display the service
Everything seems to be OK here, but kubectl get pod tells us otherwise:

Figure 10.40: Checking the status of the pod
The draft logs command doesn't show any errors. So, let's find out what Kubernetes thinks:
kubectl logs <Pod Name>
It states npm ERR! missing script: start. On purpose, we made a mistake in the package.json file. Change the content, modifying the values as per the following example:
{
"name": "mynode",
"version": "0.0.2",
"description": "My first Node App",
"main": "mynode.js",
"scripts": {
"start": "node mynode.js",
"test": "echo "Error: no test specified"& exit 1"
},
"keywords": [
"webapp"
],
"author": "Kamesh Ganesan",
"license": "ISC"
}
Update the application by executing the following again:
draft update
Connect to the application:
draft connect

Figure 10.41: Connecting to the application
Open another terminal:
curl localhost:39053
The output must be Hello World!.
Press Ctrl + C in the terminal, run draft connect, and remove the deployment:
draft delete
Check the cluster resources with kubectl get all and clean up, if needed.
Managing Kubernetes
We've created a Kubernetes cluster, and we've learned about the kubectl utility and about some of the tools that are available to develop and maintain your applications in a Kubernetes cluster.
So, if you look back at our three questions in the introduction of this chapter, we've answered the first question. In this section, we are going to answer the other two questions and also cover how to update the Kubernetes version.
Updating Applications
Earlier on, we used Helm and Draft to manage our application, which meant all the hard work was done for us. But you can also update the workload with the help of kubectl.
Normally, our cluster will be empty now, so let's quickly deploy our nginx pod again:
kubectl run nginx --image=nginx
Have a good look at the deployment:

Figure 10.42: Deploying the nginx pod
This actually tells us that we wanted one instance, there is one running, it is up to date (the number of instances that were updated to match the desired capacity), and it is available. The version of nginx running is not the latest one, so we want to update it to version 1.17.5. Execute the following:
kubectl edit deployment/nginx
Change the image to nginx:1.17.5:

Figure 10.43: Changing the image to nginx:1.17.5
The kubectl rollout command can be used to manage your resource deployment. Some of the valid rollout options are status, history, pause, restart, resume and undo. kubectl rollout status displays the current status of a rollout whereas kubectl rollout history lists previous revisions and configurations.
kubectl rollout status deployment nginx
kubectl rollout history deployment nginx
Alternatively, even better, you can use the describe command, which provides you with a more detailed output than the preceding two commands combined:
kubectl describe deployment nginx
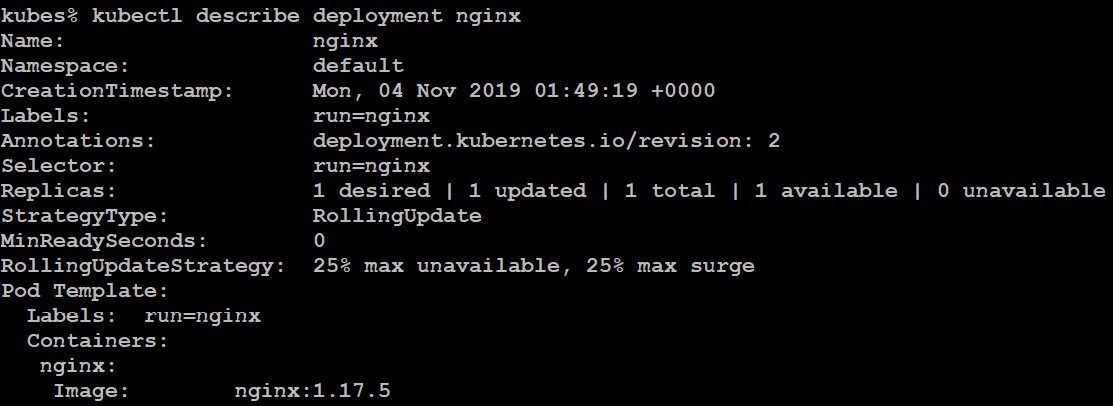
Figure 10.44: Detailed information of the nginx deployment
Another way to update the deployment is by using the set image command to roll out the updated nginx containers with the new version, 1.17.5, of your deployment by updating the image as shown here:
kubectl set image deployment/nginxnginx=nginx:1.17.5 --record
As you can see from the preceding screenshot, the nginx container image has been upgraded to version 1.17.5 successfully.
Scaling Applications
At the moment, there is one pod running, but to handle all the load coming in, you may need more instances and to load balance the incoming traffic. To do so, you'll need replicas to define a specified number of pod replicas that are running at any given time.
Let's go back to kubectl and get the current deployment:

Figure 10.45: Getting the status of the current deployment
The desired (configured) state at this moment is 1. The current situation is 1 and there is 1 available.
To scale up to three instances, execute the following:
kubectl scale deployment nginx --replicas=3
Run kubectl get deployments again; after that, look at the available pods:
kubectl get pods -o wide

Figure 10.46: Checking the available pods after scaling up
Create a load balancer service:
kubectl expose deployment nginx --type=LoadBalancer
--name=nginx-lb --port 80
kubectl get services

Figure 10.47: Creating a load balancer service
Now every HTTP request is taken by the load balancer and traffic is spread over the instances.
You can also use autoscaling. First, install Metrics Server:
git clone https://github.com/kubernetes-incubator/metrics-server.git
kubectl create -f metrics-server/deploy/1.8+/
Configure autoscaling: if the load is above 50 percent, an extra instance is created, to a maximum of 10:
kubectl autoscale deployment nginx --cpu-percent=50 --min=3 --max=10
Of course, in this scenario, it makes sense to have at least two nodes available in your cluster:
azaks scale --name Cluster01
--resource-group MyKubernetes
--node-count 2
kubectl get nodes
Note that this process will take about 10 minutes. To view the status of the autoscaling, execute the following:
kubectl get hpa

Figure 10.48: Listing the autoscalers
Upgrading Kubernetes
As with any software or application, you need to keep your Kubernetes clusters up to date by upgrading them regularly. Upgrading is very important to get the most recent bug fixes and all the critical security features along with the latest Kubernetes features. Having multiple nodes available is also necessary if you want to upgrade the Kubernetes control plane without downtime. The following steps will show you how to quickly upgrade your Kubernetes clusters.
First, view the current version:
az aks list --query "[].kubernetesVersion"

Figure 10.49: Viewing the current version of Kubernetes
Ask for the versions available in your location:
az aks get-versions --location eastus --output table | egrep "^1.13.12"

Figure 10.50: Available versions for East US location
We can upgrade to version 1.14.8:
az aks upgrade --resource-group MyKubernetes
--name Cluster01
--kubernetes-version 1.14.8 --yes --no-wait
Adding the --no-wait parameter has the effect that you'll get your prompt back almost directly.
This way, after about 3 minutes, you can start playing with kubectl to get the status of the nodes and pods (use the -owide parameter, for example, kubectl get pods -o wide) and find out that a new node has been created with the newest version. The workload is recreated on that node and the other node is updated. After that, the last one remaining is emptied and upgraded.
Persistent Storage
In the previous chapter, we stated that there are multiple ways to use persistent storage in our container, and we also referred to this in this chapter.
Kubernetes can configure persistent storage, but you have to provide it, for instance, via an NFS container or by implementing a StorSimple iSCSI Virtual Array (which is especially useful if you need read/write access from multiple containers). Even if you are using Azure Storage, there are many choices to make. Do you want to use disks or Azure Storage? Do you want to create them on the fly (dynamically) or use existing ones (statically)? Most of these questions are answered based on cost and the need for services such as replication, backup, and snapshots.
In this section, we want to cover the dynamic options; orchestration-wise, it's a better choice because you can do everything within Kubernetes (or using the tooling around it).
Whether you are using Azure Storage or disks, you'll need a storage account in the same resource group as Kubernetes:
az storage account create --resource-group MyKubernetes
--name mystorageest1 –sku Standard_LRS
Please revisit Chapter 2, Getting Started with the Azure Cloud, for the syntax of the preceding command. Remember that the name must be unique.
Azure Disk for Kubernetes
You can dynamically or statically provision persistent volume for use with one or many Kubernetes pods in an AKS cluster. There are two storage classes: standard Azure disk (the default) and premium Azure disk, which is a managed premium storage class:
- First, create a YAML file to create the storage class. This makes it possible to automatically provision the storage:
kind: StorageClass
apiVersion: storage.k8s.io/v1
metadata:
name: storageforapp
provisioner: kubernetes.io/azure-disk
parameters:
storageaccounttype: Standard_LRS
location: eastus
kind: shared
- Apply it with the following:
kubectlapply -f storageclass.yaml
Replace the filename with the name of the file you just created.
- Another YAML file is needed to claim the persistent volume, or in other words, create it:
kind: PersistentVolumeClaim
apiVersion: v1
metadata:
name: claim-storage-for-app
annotations:
volume.beta.kubernetes.io/storage-class: storageforapp
spec:
accessModes:
- ReadWriteOnce
resources:
requests:
storage: 5Gi
- Please note that the match is made in the annotations. Apply this file as well:
kubectlapply -f persistentvolume.yaml
- Verify the result with the following:
kubectl get sc

Figure 10.51: Verifying the creation of the storage class
- To use the storage in a pod, you can use it in a similar way to the following example:
kind: Pod
apiVersion: v1
metadata:
name: my-web
spec:
containers:
- name: nginx
image: nginx
volumeMounts:
- mountPath: "/var/www/html"
name: volume
volumes:
- name: volume
persistentVolumeClaim:
claimName: claim-storage-for-app
Azure Files for Kubernetes
When you mount your Azure disk with access mode type ReadWriteOnce, then it will be available to only a single pod in AKS. As such, you need to use Azure Files to share a persistent volume across multiple pods. The configuration for Azure Files is not that different than Azure Disk, as described in the preceding section. The YAML file to create the storage class is as follows:
kind: StorageClass
apiVersion: storage.k8s.io/v1
metadata:
name: azurefile
provisioner: kubernetes.io/azure-file
mountOptions:
- dir_mode=0888
- file_mode=0888
- uid=1000
- gid=1000
- mfsymlinks
- nobrl
- cache=none
parameters:
skuName: Standard_LRS
Use the persistent volume claim to provision the Azure file share by executing the following YAML file:
apiVersion: v1
kind: PersistentVolumeClaim
metadata:
name: azurefile
spec:
accessModes:
- ReadWriteMany
storageClassName: azurefile
resources:
requests:
storage: 5Gi
Apply these two YAML files as follows:
.

Figure 10.52: Using the persistent volume claim to create Azure file
The result of executing the Azure file storage creation YAML and the storage volume claim YAML is as follows:

Figure 10.53: Verifying the creation of Azure files and Azure disks
As you can see, the specification in the pod remains the same. With these step-by-step implementations, we have successfully created Azure disks and Azure files for our persistent storage requirements.
Summary
This chapter was all about Kubernetes. We started this chapter by describing a possible work environment for a developer: a good workstation with tooling to start local development, even with Kubernetes locally installed. We used Ubuntu Desktop as an example, but in fact, it doesn't really matter as long as you are happy with your development environment.
With everything in place locally, we covered the configuration of Kubernetes clusters in Azure using the Azure CLI and PowerShell.
The deployment of workloads in Azure can be as simple as executing kubectl run, but more complex scenarios were also explored, such as multi-container applications.
As a developer, two tools are available to help streamline your development process: Draft and Helm. Draft is used for the initial development phase, and Helm is used afterward to install and maintain the application.
Kubernetes is a tool for managing your containers, making it easy to deploy, maintain, and update your workloads. Scalability is one of the advantages of using Kubernetes; it's even possible to automatically scale depending on the required CPU and memory resources.
The last section of this chapter covered the use of persistent storage in Kubernetes, actually providing you with a much better way than storing data in a container or attaching storage directly to a container.
In the next chapter, we're going back to the Ops part of DevOps – that is, troubleshooting and monitoring your workloads, and by workloads, we mean virtual machines with Linux installed, containers, and AKS.
Questions
- What is a pod?
- What would be a good reason to create a multiple-container pod?
- What methods can you use to deploy your application in Kubernetes?
- What methods can you use to update your application in Kubernetes?
- Do you need to create extra nodes in Kubernetes if you want to upgrade the control plane?
- Can you think of any reason why you would want an iSCSI solution?
- As an exercise, recreate the multi-container pod using persistent storage.
Further Reading
The goal of this chapter was to provide a practical approach to get your workload running in the Azure cloud. We hope it's the beginning of a journey into the world of Kubernetes for you. There is so much more to discover!
Nigel Poulton, an author who has already written a great book about Docker, has also written a book about Kubernetes, The Kubernetes Book. It's a good starting point if you are really new to Kubernetes. Gigi Sayfan has written Mastering Kubernetes. Make sure you buy the second edition! Not only because the first edition was not that good, but just because it's a must-have and provides much more information than the first edition.
As a developer, you should give Kubernetes for Developers a try: Joseph Heck can tell you much more about the development life cycle using Kubernetes, using examples in Node.js and Python. In the last chapter of his book, he mentions emerging projects such as Helm and Brigade. We hope this will be explored in more detail in a later edition, or maybe even in another book.
Talking about Brigade, https://brigade.sh is described on its own website as "a tool for running scriptable, automated tasks in the cloud — as part of your Kubernetes cluster." It's far beyond the scope of this book and it's more or less in the early stages of development. As a developer, you should invest some time in reading more about it and trying it.
Last but not least, another important source worth mentioning is the Open Service Broker for Azure (OSBA: https://osba.sh). It didn't make it into this chapter because it's not completely production-ready at the time of writing. OSBA is an open standard for communicating with external services such as databases and storage. It's another solution for providing data to and storing data from your container.