Chapter 3. Containers
Containers are a popular and standard format for packaging applications. The format is an open standard promoted by the Open Container Initiative (OCI), an open governance structure for the express purpose of creating open industry standards around container formats and runtimes. The openness of this format ensures portability and interoperability across different operating systems, vendors, platforms, or clouds. Kubernetes runs containerized apps, so before going into the GitOps approach to managing apps on Kubernetes, we provide a list of recipes useful for understanding how to package your application as a container image.
The first step for creating images is to use a container engine for packaging your application by building a layered structure containing a base OS and additional layers on top such as runtimes, libraries, and applications. Docker is a widespread open source implementation of a container engine and runtime, and it can generate a container image by specifying a manifest called a Dockerfile (see Recipe 3.1).
Since the format is open, it’s possible to create container images with other tools. Docker, a popular container engine, requires the installation and the execution of a daemon that can handle all the operations with the container engine. Developers can use a software development kit (SDK) to interact with the Docker daemon or use dockerless solutions such as JiB to create container images (see Recipe 3.2).
If you don’t want to rely on a specific programming language or SDK to build container images, you can use another daemonless solution like Buildah (see Recipe 3.3) or Buildpacks (see Recipe 3.4). Those are other popular open source tools for building OCI container images. By avoiding dependencies from the OS, such tools make automation more manageable and portable (see Chapter 6).
Kubernetes doesn’t provide a native mechanism for building container images. However, its highly extensible architecture allows interoperability with external tools and the platform’s extensibility to create container images. Shipwright is an open source framework for building container images on Kubernetes, providing an abstraction that can use tools such as kaniko, Buildpacks, or Buildah (see Recipe 3.5) to create container images.
At the end of this chapter, you’ll learn how to create OCI-compliant container images from a Dockerfile, either from a host with Docker installed, or using tools such as Buildah and Buildpacks.
3.1 Building a Container Using Docker
Solution
The first thing you need to do is install Docker.
Note
Docker is available for Mac, Windows, and Linux. Download the installer for your operating system and refer to the documentation to start the Docker service.
Developers can create a container image by defining a Dockerfile. The best definition for a Dockerfile comes from the Docker documentation itself: “A Dockerfile is a text document that contains all the commands a user could call on the command line to assemble an image.”
Container images present a layered structure, as you can see in Figure 3-1. Each container image provides the foundation layer for a container, and any update is just an additional layer that can be committed on the foundation.

Figure 3-1. Container image layers
You can create a Dockerfile like the one shown here, which will generate a container image for Python apps. You can also find this example in this book’s repository.
FROM registry.access.redhat.com/ubi8/python-39ENV PORT 8080EXPOSE 8080WORKDIR /usr/src/appCOPY requirements.txt ./RUN pip install --no-cache-dir -r requirements.txtCOPY . . ENTRYPOINT ["python"]CMD ["app.py"]

FROM: always start from a base image as a foundational layer. In this case we start from a Universal Base Image (UBI), publicly available based on RHEL 8 with Python 3.9 runtime.
ENV: set an environment variable for the app.
EXPOSE: expose a port to the container network, in this case port TCP 8080.
WORKDIR: set a directory inside the container to work with.
COPY: copy the assets from the source code files on your workstation to the container image layer, in this case, to theWORKDIR.
RUN: run a command inside the container, using the tools already available within the base image. In this case, it runs thepiptool to install dependencies.
ENTRYPOINT: define the entry point for your app inside the container. It can be a binary or a script. In this case, it runs the Python interpreter.
CMD: the command that is used when starting a container. In this case it uses the name of the Python appapp.py.
You can now create your container image with the following command:
docker build -f Dockerfile -t quay.io/gitops-cookbook/pythonapp:latest
Note
Change the container image name with the your registry, user, and repo. Example: quay.io/youruser/yourrepo:latest. See Chapter 2 for how to create a new account on registries such as Quay.io.
Your container image is building now. Docker will fetch existing layers from a public container registry (DockerHub, Quay, Red Hat Registry, etc.) and add a new layer with the content specified in the Dockerfile. Such layers could also be available locally, if already downloaded, in special storage called a container cache or Docker cache.
STEP 1: FROM registry.access.redhat.com/ubi8/python-39
Getting image source signatures
Copying blob adffa6963146 done
Copying blob 4125bdfaec5e done
Copying blob 362566a15abb done
Copying blob 0661f10c38cc done
Copying blob 26f1167feaf7 done
Copying config a531ae7675 done
Writing manifest to image destination
Storing signatures
STEP 2: ENV PORT 8080
--> 6dbf4ac027e
STEP 3: EXPOSE 8080
--> f78357fe402
STEP 4: WORKDIR /usr/src/app
--> 547bf8ca5c5
STEP 5: COPY requirements.txt ./
--> 456cab38c97
STEP 6: RUN pip install --no-cache-dir -r requirements.txt
Collecting Flask
  Downloading Flask-2.0.2-py3-none-any.whl (95 kB)
     |████████████████████████████████| 95 kB 10.6 MB/s
Collecting itsdangerous>=2.0
  Downloading itsdangerous-2.0.1-py3-none-any.whl (18 kB)
Collecting Werkzeug>=2.0
  Downloading Werkzeug-2.0.2-py3-none-any.whl (288 kB)
     |████████████████████████████████| 288 kB 1.7 MB/s
Collecting click>=7.1.2
  Downloading click-8.0.3-py3-none-any.whl (97 kB)
     |████████████████████████████████| 97 kB 31.9 MB/s
Collecting Jinja2>=3.0
  Downloading Jinja2-3.0.3-py3-none-any.whl (133 kB)
     |████████████████████████████████| 133 kB 38.8 MB/s
STEP 7: COPY . .
--> 3e6b73464eb
STEP 8: ENTRYPOINT ["python"]
--> acabca89260
STEP 9: CMD ["app.py"]
STEP 10: COMMIT quay.io/gitops-cookbook/pythonapp:latest
--> 52e134d39af
52e134d39af013a25f3e44d25133478dc20b46626782762f4e46b1ff6f0243bb
Your container image is now available in your Docker cache and ready to be used. You can verify its presence with this command:
docker images
You should get the list of available container images from the cache in output. Those could be images you have built or downloaded with the docker pull command:
REPOSITORY                           TAG         IMAGE ID      CREATED↳
        SIZE
quay.io/gitops-cookbook/pythonapp    latest      52e134d39af0  6 minutes ago↳
        907 MB
Once your image is created, you can consume it locally or push it to a public container registry to be consumed elsewhere, like from a CI/CD pipeline.
You need to first log in to your public registry. In this example, we are using Quay:
docker login quay.io
You should get output similar to this:
Login Succeeded!
Then you can push your container image to the registry:
docker push quay.io/gitops-cookbook/pythonapp:latest
As confirmed, you should get output similar to this:
Getting image source signatures
Copying blob e6e8a2c58ac5 done
Copying blob 3ba8c926eef9 done
Copying blob 558b534f4e1b done
Copying blob 25f82e0f4ef5 done
Copying blob 7b17276847a2 done
Copying blob 352ba846236b done
Copying blob 2de82c390049 done
Copying blob 26525e00a8d8 done
Copying config 52e134d39a done
Writing manifest to image destination
Copying config 52e134d39a [--------------------------------------] 0.0b / 5.4KiB
Writing manifest to image destination
Storing signatures
Discussion
You can create container images in this way with Docker from your workstation or any host where the Docker service/daemon is running.
Tip
Additionally, you can use functionalities offered by a public registry such as Quay.io that can directly create the container image from a Dockerfile and store it to the registry.
The build requires access to all layers, thus an internet connection to the registries storing base layers is needed, or at least having them in the container cache. Docker has a layered structure where any change to your app is committed on top of the existing layers, so there’s no need to download all the layers each time since it will add only deltas for each new change.
Note
Container images typically start from a base OS layer such as Fedora, CentOS, Ubuntu, Alpine, etc. However, they can also start from scratch, an empty layer for super-minimal images containing only the app’s binary. See the scratch documentation for more info.
If you want to run your previously created container image, you can do so with this command:
docker run -p 8080:8080 -ti quay.io/gitops-cookbook/pythonapp:latestdocker run has many options to start your container. The most common are:
-p-
Binds the port of the container with the port of the host running such container.
-t-
Attaches a TTY to the container.
-i-
Goes into an interactive mode.
-d-
Goes in the background, printing a hash that you can use to interact asynchronously with the running container.
The preceding command will start your app in the Docker network and bind it to port 8080 of your workstation:
 * Serving Flask app 'app' (lazy loading)
 * Environment: production
   WARNING: This is a development server. Do not use it in a production deployment.
   Use a production WSGI server instead.
 * Debug mode: on
 * Running on all addresses.
   WARNING: This is a development server. Do not use it in a production deployment.
 * Running on http://10.0.2.100:8080/ (Press CTRL+C to quit)
 * Restarting with stat
 * Debugger is active!
 * Debugger PIN: 103-809-567
From a new terminal, try accessing your running container:
curl http://localhost:8080
You should get output like this:
Hello, World!
3.2 Building a Container Using Dockerless Jib
Problem
You are a software developer, and you want to create a container image without installing Docker or any additional software on your workstation.
Solution
As discussed in Recipe 3.1, you need to install the Docker engine to create container images. Docker requires permissions to install a service running as a daemon, thus a privileged process in your operating system. Today, dockerless solutions are also available for developers; a popular one is Jib.
Jib is an open source framework for Java made by Google to build OCI-compliant container images, without the need for Docker or any container runtime. Jib comes as a library that Java developers can import in their Maven or Gradle projects. This means you can create a container image for your app without writing or maintaining any Dockerfiles, delegating this complexity to Jib.
We see the benefits from this approach as the following:1
- Pure Java
-
No Docker or Dockerfile knowledge is required. Simply add Jib as a plug-in, and it will generate the container image for you.
- Speed
-
The application is divided into multiple layers, splitting dependencies from classes. There’s no need to rebuild the container image like for Dockerfiles; Jib takes care of modifying the layers that changed.
- Reproducibility
-
Unnecessary updates are not triggered because the same contents generate the same image.
The easiest way to kickstart a container image build with Jib on existing Maven is by adding the plug-in via the command line:
mvn compile com.google.cloud.tools:jib-maven-plugin:3.2.0:build -Dimage=<MY IMAGE>Alternatively, you can do so by adding Jib as a plug-in into your pom.xml:
<project>...<build><plugins>...<plugin><groupId>com.google.cloud.tools</groupId><artifactId>jib-maven-plugin</artifactId><version>3.2.0</version><configuration><to><image>myimage</image></to></configuration></plugin>...</plugins></build>...</project>
In this way, you can also manage other settings such as authentication or parameters for the build.
Let’s now add Jib to an existing Java application, a Hello World application in Spring Boot that you can find in the book’s repository.
Run the following command to create a container image without using Docker, and push it directly to a container registry. In this example, we use Quay.io, and we will store the container image at quay.io/gitops-cookbook/jib-example:latest, so you will need to provide your credentials for the registry:
mvn compile com.google.cloud.tools:jib-maven-plugin:3.2.0:build-Dimage=quay.io/gitops-cookbook/jib-example:latest-Djib.to.auth.username=<USERNAME>-Djib.to.auth.password=<PASSWORD>
The authentication here is handled with command-line options, but Jib can manage existing authentication with Docker CLI or read credentials from your settings.xml file.
The build takes a few moments, and the result is a Java-specific container image, based on the adoptOpenJDK base image, built locally and pushed directly to a registry. In this case, to Quay.io:
[INFO] Scanning for projects...
[INFO]
[INFO] --------------------------< com.redhat:hello >--------------------------
[INFO] Building hello 0.0.1-SNAPSHOT
[INFO] --------------------------------[ jar ]---------------------------------
...
[INFO] Containerizing application to quay.io/gitops-cookbook/jib-example...
[INFO] Using credentials from <to><auth> for quay.io/gitops-cookbook/jib-example
[INFO] The base image requires auth. Trying again for eclipse-temurin:11-jre...
[INFO] Using base image with digest:↳
 sha256:83d92ee225e443580cc3685ef9574582761cf975abc53850c2bc44ec47d7d943O]
[INFO]
[INFO] Container entrypoint set to [java, -cp, @/app/jib-classpath-file,↳
 com.redhat.hello.HelloApplication]FO]
[INFO]
[INFO] Built and pushed image as quay.io/gitops-cookbook/jib-example
[INFO] Executing tasks:
[INFO] [==============================] 100,0% complete
[INFO]
[INFO] ------------------------------------------------------------------------
[INFO] BUILD SUCCESS
[INFO] ------------------------------------------------------------------------
[INFO] Total time:  41.366 s
[INFO] Finished at: 2022-01-25T19:04:09+01:00
[INFO] ------------------------------------------------------------------------
Discussion
Your container image is not present in your local cache, as you don’t need any container runtime to build images with Jib. You won’t see it with the docker images command, but you can pull it from the public container registry afterward, and it will store it in your cache.
This approach is suitable for development velocity and automation, where the CI system doesn’t need to have Docker installed on the nodes where it runs. Jib can create the container image without any Dockerfiles. Additionally, it can push the image to a container registry.
If you also want to store it locally from the beginning, Jib can connect to Docker hosts and do it for you.
You can pull your container image from the registry to try it:
docker run -p 8080:8080 -ti quay.io/gitops-cookbook/jib-exampleTrying to pull quay.io/gitops-cookbook/jib-example:latest...
Getting image source signatures
Copying blob ea362f368469 done
Copying blob d5cc550bb6a0 done
Copying blob bcc17963ea24 done
Copying blob 9b46d5d971fa done
Copying blob 51f4f7c353f0 done
Copying blob 43b2cdfa19bb done
Copying blob fd142634d578 done
Copying blob 78c393914c97 done
Copying config 346462b8d3 done
Writing manifest to image destination
Storing signatures
. ____ _ __ _ _
/\ / ___'_ __ _ _(_)_ __ __ _
( ( )\___ | '_ | '_| | '_ / _` |
\/ ___)| |_)| | | | | || (_| | ) ) ) )
' |____| .__|_| |_|_| |_\__, | / / / /
=========|_|==============|___/=/_/_/_/
:: Spring Boot :: (v2.6.3)
2022-01-25 18:36:24.762 INFO 1 --- [ main] com.redhat.hello.HelloApplication↳
: Starting HelloApplication using Java 11.0.13 on a719cf76f440 with PID 1↳
(/app/classes started by root in /)
2022-01-25 18:36:24.765 INFO 1 --- [ main] com.redhat.hello.HelloApplication↳
: No active profile set, falling back to default profiles: default
2022-01-25 18:36:25.700 INFO 1 --- [ main] o.s.b.w.embedded.tomcat.TomcatWebServer↳
: Tomcat initialized with port(s): 8080 (http)
2022-01-25 18:36:25.713 INFO 1 --- [ main] o.apache.catalina.core.StandardService↳
: Starting service [Tomcat]
2022-01-25 18:36:25.713 INFO 1 --- [ main] org.apache.catalina.core.StandardEngine↳
: Starting Servlet engine: [Apache Tomcat/9.0.56]
2022-01-25 18:36:25.781 INFO 1 --- [ main] o.a.c.c.C.[Tomcat].[localhost].[/]↳
: Initializing Spring embedded WebApplicationContext
2022-01-25 18:36:25.781 INFO 1 --- [ main] w.s.c.ServletWebServerApplicationContext↳
: Root WebApplicationContext: initialization completed in 947 ms
2022-01-25 18:36:26.087 INFO 1 --- [ main] o.s.b.w.embedded.tomcat.TomcatWebServer↳
: Tomcat started on port(s): 8080 (http) with context path ''
2022-01-25 18:36:26.096 INFO 1 --- [ main] com.redhat.hello.HelloApplication↳
: Started HelloApplication in 1.778 seconds (JVM running for 2.177)curl localhost:8080/hello
{"id":1,"content":"Hello, World!"}
See Also
3.3 Building a Container Using Buildah
Problem
Sometimes installing or managing Docker is not possible. Dockerless solutions for creating container images are useful in use cases such as local development or CI/CD systems.
Solution
The OCI specification is an open standard, and this favors multiple open source implementations for the container engine and the container image building mechanism. Two growing popular examples today are Podman and Buildah.
Note
While Docker uses a single monolithic application for creating, running, and shipping container images, the codebase for container management functionalities here has been split between different projects like Podman, Buildah, and Skopeo. Podman support is already available on Mac and Windows, however Buildah is currently only available on Linux or Linux subsystems such as WSL2 for Windows. See the documentation to install it on your workstation.
Those are two complementary open source projects and command-line tools that work on OCI containers and images; however, they differ in their specialization. While Podman specializes in commands and functions that help you to maintain and modify container images, such as pulling, tagging, and pushing, Buildah specializes in building container images. Decoupling functions in different processes is done by design, as the authors wanted to move from the single privileged process Docker model to a lightweight, rootless, daemonless, and decoupled set of tools to improve agility and security.
Tip
Following the same approach, you find Skopeo, a tool used to move container images; and CRI-O, a container engine complaint with the Kubernetes container runtime interface for running applications.
Buildah supports the Dockerfile format, but its goal is to provide a lower-level interface to build container images without requiring a Dockerfile. Buildah is a daemonless solution that can create images inside a container without mounting the Docker socket. This functionality improves security and portability since it’s easy to add Buildah builds on the fly to a CI/CD pipeline where the Linux or Kubernetes nodes do not require a Docker installation.
As we discussed, you can create a container image with or without a Dockerfile. Let’s now create a simple HTTPD container image without a Dockerfile.
You can start from any base image such as CentOS:
buildah from centos
You should get output similar to this:
Resolved short name "centos" to a recorded short-name alias↳
 (origin: /etc/containers/registries.conf.d/shortnames.conf)
Getting image source signatures
Copying blob 926a85fb4806 done
Copying config 2f3766df23 done
Writing manifest to image destination
Storing signatures
centos-working-container
Tip
Similarly to Docker and docker images, you can run the command buildah containers to get the list of available images from the container cache. If you also have installed Podman, this is similar to podman images.
In this case, the container image ID is centos-working-container, and you can refer to it for creating the other layers.
Now let’s install the httpd package inside a new layer:
buildah run centos-working-container yum install httpd -y
You should get output similar to this:
CentOS Linux 8 - AppStream                          9.0 MB/s | 8.4 MB     00:00
CentOS Linux 8 - BaseOS                             436 kB/s | 4.6 MB     00:10
CentOS Linux 8 - Extras                              23 kB/s |  10 kB     00:00
Dependencies resolved.
===============================================================================
 Package                      Arch    Version         Repository     Size
===============================================================================
Installing:
 httpd                        x86_64  2.4.37-43.module_el8.5.0+1022+b541f3b1
Installing dependencies:
 apr                          x86_64  1.6.3-12.el8
 apr-util                     x86_64  1.6.1-6.el8
 brotli                       x86_64  1.0.6-3.el8
 centos-logos-httpd           noarch  85.8-2.el8
 httpd-filesystem             noarch  2.4.37-43.module_el8.5.0+1022+b541f3b1
 httpd-tools                  x86_64  2.4.37-43.module_el8.5.0+1022+b541f3b1
 mailcap                      noarch  2.1.48-3.el8
 mod_http2                    x86_64  1.15.7-3.module_el8.4.0+778+c970deab
Installing weak dependencies:
 apr-util-bdb                 x86_64  1.6.1-6.el8
 apr-util-openssl             x86_64  1.6.1-6.el8
Enabling module streams:
...
Complete!
Now let’s copy a welcome HTML page inside the container running HTTPD. You can find the source code in this book’s repo:
<html><head><title>GitOps CookBook example</title></head><body><h1>Hello, World!</h1></body></html>
buildah copy centos-working-container index.html /var/www/html/index.html
For each new layer added, you should get output with the new container image hash, similar to the following:
78c6e1dcd6f819581b54094fd38a3fd8f170a2cb768101e533c964e04aacab2e
buildah config --entrypoint "/usr/sbin/httpd -DFOREGROUND" centos-working-containerbuildah commit centos-working-container quay.io/gitops-cookbook/gitops-website
You should get output similar to this:
Getting image source signatures
Copying blob 618ce6bf40a6 skipped: already exists
Copying blob eb8c13ba832f done
Copying config b825e91208 done
Writing manifest to image destination
Storing signatures
b825e91208c33371e209cc327abe4f53ee501d5679c127cd71c4d10cd03e5370
Your container image is now in the container cache, ready to run or push to another registry.
As mentioned before, Buildah can also create container images from a Dockerfile. Let’s make the same container image from the Dockerfile listed here:
FROM centos:latest
RUN yum -y install httpd
COPY index.html /var/www/html/index.html
EXPOSE 80
CMD ["/usr/sbin/httpd", "-DFOREGROUND"]
buildah bud -f Dockerfile -t quay.io/gitops-cookbook/gitops-website
STEP 1: FROM centos:latest
Resolved short name "centos" to a recorded short-name alias↳
 (origin: /etc/containers/registries.conf.d/shortnames.conf)
Getting image source signatures
Copying blob 926a85fb4806 done
Copying config 2f3766df23 done
Writing manifest to image destination
Storing signatures
STEP 2: RUN yum -y install httpd
CentOS Linux 8 - AppStream                      9.6 MB/s | 8.4 MB     00:00
CentOS Linux 8 - BaseOS                         7.5 MB/s | 4.6 MB     00:00
CentOS Linux 8 - Extras                          63 kB/s |  10 kB     00:00
Dependencies resolved.
...
Complete!
STEP 3: COPY index.html /var/www/html/index.html
STEP 4: EXPOSE 80
STEP 5: CMD ["/usr/sbin/httpd", "-DFOREGROUND"]
STEP 6: COMMIT quay.io/gitops-cookbook/gitops-website
Getting image source signatures
Copying blob 618ce6bf40a6 skipped: already exists
Copying blob 1be523a47735 done
Copying config 3128caf147 done
Writing manifest to image destination
Storing signatures
--> 3128caf1475
3128caf147547e43b84c13c241585d23a32601f2c2db80b966185b03cb6a8025
If you have also installed Podman, you can run it this way:
podman run -p 8080:80 -ti quay.io/gitops-cookbook/gitops-websiteThen you can test it by opening the browser on http://localhost:8080.
Discussion
With Buildah, you have the opportunity to create container images from scratch or starting from a Dockerfile. You don’t need to install Docker, and everything is designed around security: rootless mechanism, daemonless utilities, and more refined control of creating image layers.
Buildah can also build images from scratch, thus it creates an empty layer similar to the FROM scratch Dockerfile statement. This aspect is useful for creating very lightweight images containing only the packages needed to run your application, as you can see in Figure 3-2.
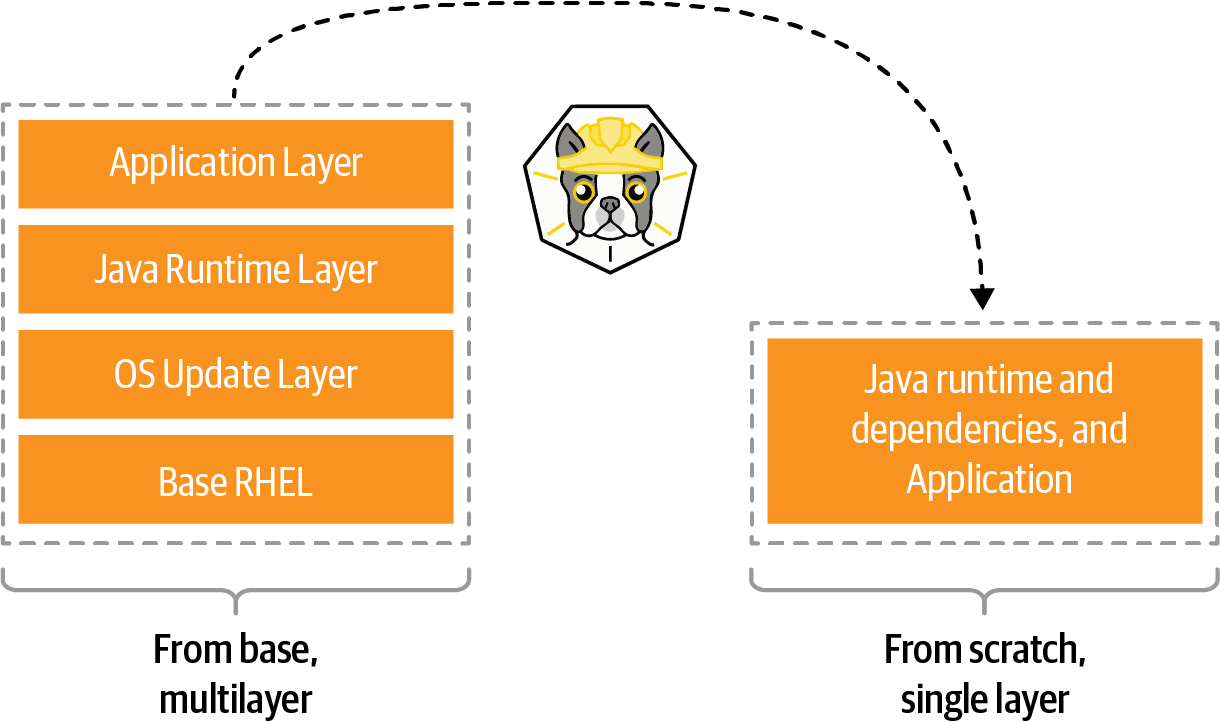
Figure 3-2. Buildah image shrink
A good example use case for a scratch build is considering the development images versus staging or production images. During development, container images may require a compiler and other tools. However, in production, you may only need the runtime or your packages.
See Also
3.4 Building a Container with Buildpacks
Problem
Creating container image by using Dockerfiles can be challenging at scale. You want a tool complementing Docker that can inspect your application source code to create container images without writing a Dockerfile.
Solution
Cloud Native Buildpacks is an open source project that provides a set of executables to inspect your app source code and to create a plan to build and run your application.
Buildpacks can create OCI-compliant container images without a Dockerfile, starting from the app source code, as you can see in Figure 3-3.

Figure 3-3. Buildpacks builds
This mechanism consists of two phases:
- Detection
-
Buildpacks tooling will navigate your source code to discover which programming language or framework is used (e.g., POM, NPM files, Python requirements, etc.) and assign a suitable buildpack for the build.
- Building
-
Once a buildpack is found, the source is compiled and Buildpacks creates a container image with the appropriate entry point and startup scripts.
To use Buildpacks, you have to download the pack CLI for your operating system (Mac, Windows, Linux), and also have Docker installed.
Now let’s start creating our container image with Buildpacks from a sample Node.js app. You can find the app source code in this book’s repository:
cd chapters/ch03/nodejs-appThe app directory structure contains a package.json file, a manifest listing Node.js packages required for this build, which helps Buildpacks understand which buildpack to use.
You can verify it with this command:
pack builder suggest
You should get output similar to this:
Suggested builders:
        Google:                gcr.io/buildpacks/builder:v1↳
              Ubuntu 18 base image with buildpacks for .NET, Go, Java, Node.js,↳
              and Python
        Heroku:                heroku/buildpacks:18↳
               Base builder for Heroku-18 stack, based on ubuntu:18.04 base↳
               image
        Heroku:                heroku/buildpacks:20↳
               Base builder for Heroku-20 stack, based on ubuntu:20.04 base↳
               image
        Paketo Buildpacks:     paketobuildpacks/builder:base↳
               Ubuntu bionic base image with buildpacks for Java, .NET Core,↳
               Node.js, Go, Python, Ruby, NGINX and Procfile
        Paketo Buildpacks:     paketobuildpacks/builder:full↳
               Ubuntu bionic base image with buildpacks for Java, .NET Core,↳
               Node.js, Go, Python, PHP, Ruby, Apache HTTPD, NGINX and Procfile
        Paketo Buildpacks:     paketobuildpacks/builder:tiny↳
               Tiny base image (bionic build image, distroless-like run image)↳
               with buildpacks for Java, Java Native Image and Go
Now you can decide to pick one of the suggested buildpacks. Let’s try the paketobuildpacks/builder:base, which also contains the Node.js runtime:
pack build nodejs-app --builder paketobuildpacks/builder:base
Tip
Run pack builder inspect paketobuildpacks/builder:base to know the exact content of libraries and frameworks available in this buildpack.
The building process should start accordingly, and after a while, it should finish, and you should get output similar to this:
base: Pulling from paketobuildpacks/builder
bf99a8b93828: Pulling fs layer
...
Digest: sha256:7034e52388c11c5f7ee7ae8f2d7d794ba427cc2802f687dd9650d96a70ac0772
Status: Downloaded newer image for paketobuildpacks/builder:base
base-cnb: Pulling from paketobuildpacks/run
bf99a8b93828: Already exists
9d58a4841c3f: Pull complete
77a4f59032ac: Pull complete
24e58505e5e0: Pull complete
Digest: sha256:59aa1da9db6d979e21721e306b9ce99a7c4e3d1663c4c20f74f9b3876cce5192
Status: Downloaded newer image for paketobuildpacks/run:base-cnb
===> ANALYZING
Previous image with name "nodejs-app" not found
===> DETECTING
5 of 10 buildpacks participating
paketo-buildpacks/ca-certificates 3.0.1
paketo-buildpacks/node-engine     0.11.2
paketo-buildpacks/npm-install     0.6.2
paketo-buildpacks/node-module-bom 0.2.0
paketo-buildpacks/npm-start       0.6.1
===> RESTORING
===> BUILDING
...
Paketo NPM Start Buildpack 0.6.1
  Assigning launch processes
    web: node server.js

===> EXPORTING
Adding layer 'paketo-buildpacks/ca-certificates:helper'
Adding layer 'paketo-buildpacks/node-engine:node'
Adding layer 'paketo-buildpacks/npm-install:modules'
Adding layer 'launch.sbom'
Adding 1/1 app layer(s)
Adding layer 'launcher'
Adding layer 'config'
Adding layer 'process-types'
Adding label 'io.buildpacks.lifecycle.metadata'
Adding label 'io.buildpacks.build.metadata'
Adding label 'io.buildpacks.project.metadata'
Setting default process type 'web'
Saving nodejs-app...
*** Images (82b805699d6b):
      nodejs-app
Adding cache layer 'paketo-buildpacks/node-engine:node'
Adding cache layer 'paketo-buildpacks/npm-install:modules'
Adding cache layer 'paketo-buildpacks/node-module-bom:cyclonedx-node-module'
Successfully built image nodejs-app
Now let’s run it with Docker:
docker run --rm -p 3000:3000 nodejs-appYou should get output similar to this:
Server running at http://0.0.0.0:3000/
View the running application:
curl http://localhost:3000/
You should get output similar to this:
Hello Buildpacks!
Discussion
Cloud Native Buildpacks is an incubating project in the Cloud Native Computing Foundation (CNCF), and it supports both Docker and Kubernetes.
On Kubernetes, it can be used with Tekton, a Kubernetes-native CI/CD system that can run Buildpacks as a Tekton Task to create container images.
It recently adopted the Boson Project to provide a functions-as-a-service (FaaS) experience on Kubernetes with Knative, by enabling the build of functions via buildpacks.
3.5 Building a Container Using Shipwright and kaniko in Kubernetes
Problem
You need to create a container image, and you want to do it with Kubernetes.
Solution
Kubernetes is well known as a container orchestration platform to deploy and manage apps. However, it doesn’t include support for building container images out-of-the-box. Indeed, according to Kubernetes documentation: “(Kubernetes) Does not deploy source code and does not build your application. Continuous Integration, Delivery, and Deployment (CI/CD) workflows are determined by organization cultures and preferences as well as technical requirements.”
As mentioned, one standard option is to rely on CI/CD systems for this purpose, like Tekton (see Chapter 6). Another option is to use a framework to manage builds with many underlying tools, such as the one we discussed in the previous recipes. One example is Shipwright.
Shipwright is an extensible framework for building container images on Kubernetes. It supports popular tools such as Buildah, Cloud Native Buildpacks, and kaniko. It uses Kubernetes-style APIs, and it runs workloads using Tekton.
The benefit for developers is a simplified approach for building container images, by defining a minimal YAML file that does not require any previous knowledge of containers or container engines. This approach makes this solution agnostic and highly integrated with the Kubernetes API ecosystem.
The first thing to do is to install Shipwright to your Kubernetes cluster, say kind or Minikube (see Chapter 2), following the documentation or from OperatorHub.io.
Tip
Using Operators and Operator Lifecycle Manager (OLM) gives consistency for installing/uninstalling software on Kubernetes, along with dependency management and lifecycle control. For instance, the Tekton Operator dependency is automatically resolved and installed if you install Shipwright via the Operator. Check the OLM documentation for details with this approach.
Let’s follow the standard procedure from the documentation. First you need to install the Tekton dependency. At the time of writing this book, it is version 0.30.0:
kubectl apply -f Then you install Shipwright. At the time of writing this book, it is version 0.7.0:
kubectl apply -f Finally, you install Shipwright build strategies:
kubectl apply -f Once you have installed Shipwright, you can start creating your container image build using one of these tools:
-
kaniko
-
Cloud Native Buildpacks
-
BuildKit
-
Buildah
Let’s explore kaniko.
kaniko is another dockerless solution to build container images from a Dockerfile inside a container or Kubernetes cluster. Shipwright brings additional APIs to Kubernetes to use tools such as kaniko to create container images, acting as an abstract layer that can be considered an extensible building system for Kubernetes.
Let’s explore the APIs that are defined from Cluster Resource Definitions (CRDs):
ClusterBuildStrategy-
Represents the type of build to execute.
Build-
Represents the build. It includes the specification of one
ClusterBuildStrategyobject. BuildRun-
Represents a running build. The build starts when this object is created.
Run the following command to check all available ClusterBuildStrategy (CBS) objects:
kubectl get cbs
You should get a list of available CBSs to consume:
NAME                     AGE
buildah                  26s
buildkit                 26s
buildpacks-v3            26s
buildpacks-v3-heroku     26s
kaniko                   26s
kaniko-trivy             26s
ko                       26s
source-to-image          26s
source-to-image-redhat   26s
Note
This CRD is cluster-wide, available for all namespaces. If you don’t see any items, please install the Shipwright build strategies as discussed previously.
Shipwright will generate a container image on the Kubernetes nodes container cache, and then it can push it to a container registry.
You need to provide the credentials to push the image to the registry in the form of a Kubernetes Secret. For example, if you use Quay you can create one like the following:
REGISTRY_SERVER=quay.ioREGISTRY_USER=<your_registry_user>REGISTRY_PASSWORD=<your_registry_password>=<your_email> kubectl create secret docker-registry push-secret--docker-server=$REGISTRY_SERVER--docker-username=$REGISTRY_USER--docker-password=$REGISTRY_PASSWORD--docker-email=
Tip
With Quay, you can use an encrypted password instead of using your account password. See the documentation for more details.
Now let’s create a build-kaniko.yaml file containing the Build object that will use kaniko to containerize a Node.js sample app. You can find the source code in this book’s repository:
apiVersion:shipwright.io/v1alpha1kind:Buildmetadata:name:buildpack-nodejs-buildspec:source:url:https://github.com/shipwright-io/sample-nodejscontextDir:docker-buildstrategy:name:kanikokind:ClusterBuildStrategyoutput:image:quay.io/gitops-cookbook/sample-nodejs:latestcredentials:name:push-secret
Repository to grab the source code from.
The directory where the source code is present.
The
ClusterBuildStrategyto use.The destination of the resulting container image. Change this with your container registry repo.
The secret to use to authenticate to the container registry and push the image.
Now, let’s create the Build object:
kubectl create -f build-kaniko.yaml
You should get output similar to this:
build.shipwright.io/kaniko-nodejs-build created
Let’s list the available builds:
kubectl get builds
You should get output similar to the following:
NAME                  REGISTERED   REASON      BUILDSTRATEGYKIND↳
      BUILDSTRATEGYNAME   CREATIONTIME
kaniko-nodejs-build   True         Succeeded   ClusterBuildStrategy↳
      kaniko              13s
At this point, your Build is REGISTERED, but it’s not started yet. Let’s create the following object in order to start it:
apiVersion:shipwright.io/v1alpha1kind:BuildRunmetadata:generateName:kaniko-nodejs-buildrun-spec:buildRef:name:kaniko-nodejs-build
kubectl create -f buildrun.yaml
If you check the list of running pods, you should see one being created:
kubectl get pods
NAME                                           READY   STATUS            RESTARTS↳
      AGE
kaniko-nodejs-buildrun-b9mmb-qbrgl-pod-dk7xt   0/3     PodInitializing   0↳
      19s
When the STATUS changes, the build will start, and you can track the progress by checking the logs from the containers used by this pod to run the build in multiple steps:
- step-source-default
-
The first step, used to get the source code
- step-build-and-push
-
The step to run the build, either from source code or from a Dockerfile like in this case with kaniko
- step-results
-
The result of the build
Let’s check the logs of the building phase:
kubectl logs -f kaniko-nodejs-buildrun-b9mmb-qbrgl-pod-dk7xt -c step-build-and-push
INFO[0001] Retrieving image manifest ghcr.io/shipwright-io/shipwright-samples/node:12
INFO[0001] Retrieving image ghcr.io/shipwright-io/shipwright-samples/node:12↳
 from registry ghcr.io
INFO[0002] Built cross stage deps: map[]
INFO[0002] Retrieving image manifest ghcr.io/shipwright-io/shipwright-samples/node:12
INFO[0002] Returning cached image manifest
INFO[0002] Executing 0 build triggers
INFO[0002] Unpacking rootfs as cmd COPY . /app requires it.
INFO[0042] COPY . /app
INFO[0042] Taking snapshot of files...
INFO[0042] WORKDIR /app
INFO[0042] cmd: workdir
INFO[0042] Changed working directory to /app
INFO[0042] No files changed in this command, skipping snapshotting.
INFO[0042] RUN     pwd &&     ls -l &&     npm install &&↳
     npm run print-http-server-version
INFO[0042] Taking snapshot of full filesystem...
INFO[0052] cmd: /bin/sh
INFO[0052] args: [-c pwd &&     ls -l &&     npm install &&↳
     npm run print-http-server-version]
INFO[0052] Running: [/bin/sh -c pwd &&     ls -l &&     npm install &&↳
     npm run print-http-server-version]
/app
total 44
-rw-r--r-- 1 node node   261 Jan 27 14:29 Dockerfile
-rw-r--r-- 1 node node 30000 Jan 27 14:29 package-lock.json
-rw-r--r-- 1 node node   267 Jan 27 14:29 package.json
drwxr-xr-x 2 node node  4096 Jan 27 14:29 public
npm WARN [email protected] No repository field.
npm WARN [email protected] No license field.

added 90 packages from 40 contributors and audited 90 packages in 6.405s

10 packages are looking for funding
  run `npm fund` for details

found 0 vulnerabilities


> [email protected] print-http-server-version /app
> serve -v

13.0.2
INFO[0060] Taking snapshot of full filesystem...
INFO[0062] EXPOSE 8080
INFO[0062] cmd: EXPOSE
INFO[0062] Adding exposed port: 8080/tcp
INFO[0062] CMD ["npm", "start"]
INFO[0070] Pushing image to quay.io/gitops-cookbook/sample-nodejs:latest
INFO[0393] Pushed image to 1 destinations
The image is built and pushed to the registry, and you can check the result from this command as well:
kubectl get buildruns
And on your registry, as shown in Figure 3-4.

Figure 3-4. Image pushed to Quay
Discussion
Shipwright provides a convenient way to create container images on Kubernetes, and its agnostic approach makes it robust and interoperable. The project aims at being the Build API for Kubernetes, providing an easier path for developers to automate on Kubernetes. As Tekton runs under the hood creating builds, Shipwright also makes transitioning from micropipeline to extended pipeline workflows on Kubernetes easier.
As a reference, if you would like to create a build with Buildah instead of kaniko, it’s just a ClusterBuildStrategy change in your Build object:
apiVersion:shipwright.io/v1alpha1kind:Buildmetadata:name:buildpack-nodejs-buildspec:source:url:https://github.com/shipwright-io/sample-nodejscontextDir:source-buildstrategy:name:buildahkind:ClusterBuildStrategyoutput:image:quay.io/gitops-cookbook/sample-nodejs:latestcredentials:name:push-secret
As we discussed previously in Recipe 3.3, Buildah can create the container image from the source code. It doesn’t need a Dockerfile.
Selecting Buildah as the
ClusterBuildStrategy.
3.6 Final Thoughts
The container format is the de facto standard for packaging applications, and today many tools help create container images. Developers can create images with Docker or with other tools and frameworks and then use the same with any CI/CD system to deploy their apps to Kubernetes.
While Kubernetes per se doesn’t build container images, some tools interact with the Kubernetes API ecosystem to add this functionality. This aspect improves development velocity and consistency across environments, delegating this complexity to the platform.
In the following chapters, you will see how to control the deployment of your containers running on Kubernetes with tools such as Kustomize or Helm, and then how to add automation to support highly scalable workloads with CI/CD and GitOps.
1 For a presentation about Jib, see Appu Goundan and Qingyang Chen’s presentation from Velocity San Jose 2018.