Chapter 6. Cloud Native CI/CD
In the previous chapter you learned about Helm, a popular templating system for Kubernetes. All the recipes from previous chapters represent a common tooling for creating and managing containers for Kubernetes, and now it’s time to think about the automation on Kubernetes using such tools. Let’s move our focus to the cloud native continuous integration/continuous deployment (CI/CD).
Continuous integration is an automated process that takes new code created by a developer and builds, tests, and runs that code. The cloud native CI refers to the model where cloud computing and cloud services are involved in this process. The benefits from this model are many, such as portable and reproducible workloads across clouds for highly scalable and on-demand use cases. And it also represents the building blocks for GitOps workflows as it enables automation through actions performed via Git.
Tekton is a popular open source implementation of a cloud native CI/CD system on top of Kubernetes. In fact, Tekton installs and runs as an extension on a Kubernetes cluster and comprises a set of Kubernetes Custom Resources that define the building blocks you can create and reuse for your pipelines.1 (See Recipe 6.1.)
The Tekton engine lives inside a Kubernetes cluster and through its API objects represents a declarative way to define the actions to perform. The core components such as Tasks and Pipelines can be used to create a pipeline to generate artifacts and/or containers from a Git repository (see Recipes 6.2, 6.3, and 6.4).
Tekton also supports a mechanism for automating the start of a Pipeline with Triggers. These allow you to detect and extract information from events from a variety of sources, such as a webhook, and to start Tasks or Pipelines accordingly (see Recipe 6.8).
Working with private Git repositories is a common use case that Tekton supports nicely (see Recipe 6.4), and building artifacts and creating containers can be done in many ways such as with Buildah (see Recipe 6.5) or Shipwright, which we discussed in Chapter 3. It is also possible to integrate Kustomize (see Recipe 6.9) and Helm (see Recipe 6.10) in order to make the CI part dynamic and take benefit of the rich ecosystem of Kubernetes tools.
Tekton is Kubernetes-native solution, thus it’s universal; however, it’s not the only cloud native CI/CD citizen in the market. Other good examples for GitOps-ready workloads are Drone (Recipe 6.11) and GitHub Actions (Recipe 6.12).
6.1 Install Tekton
Solution
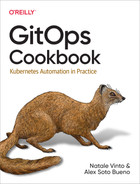
Tekton is a Kubernetes-native CI/CD solution that can be installed on top of any Kubernetes cluster. The installation brings you a set of Kubernetes Custom Resources (CRDs) that you can use to compose your Pipelines, as shown in Figure 6-1:
- Task
-
A reusable, loosely coupled number of steps that perform a specific function (e.g., building a container image). Tasks get executed as Kubernetes pods, while steps in a Task map onto containers.
- Pipeline
-
A list Tasks needed to build and/or deploy your apps.
- TaskRun
-
The execution and result of running an instance of a Task.
- PipelineRun
-
The execution and result of running an instance of a Pipeline, which includes a number of TaskRuns.
- Trigger
-
Detects an event and connects to other CRDs to specify what happens when such an event occurs.
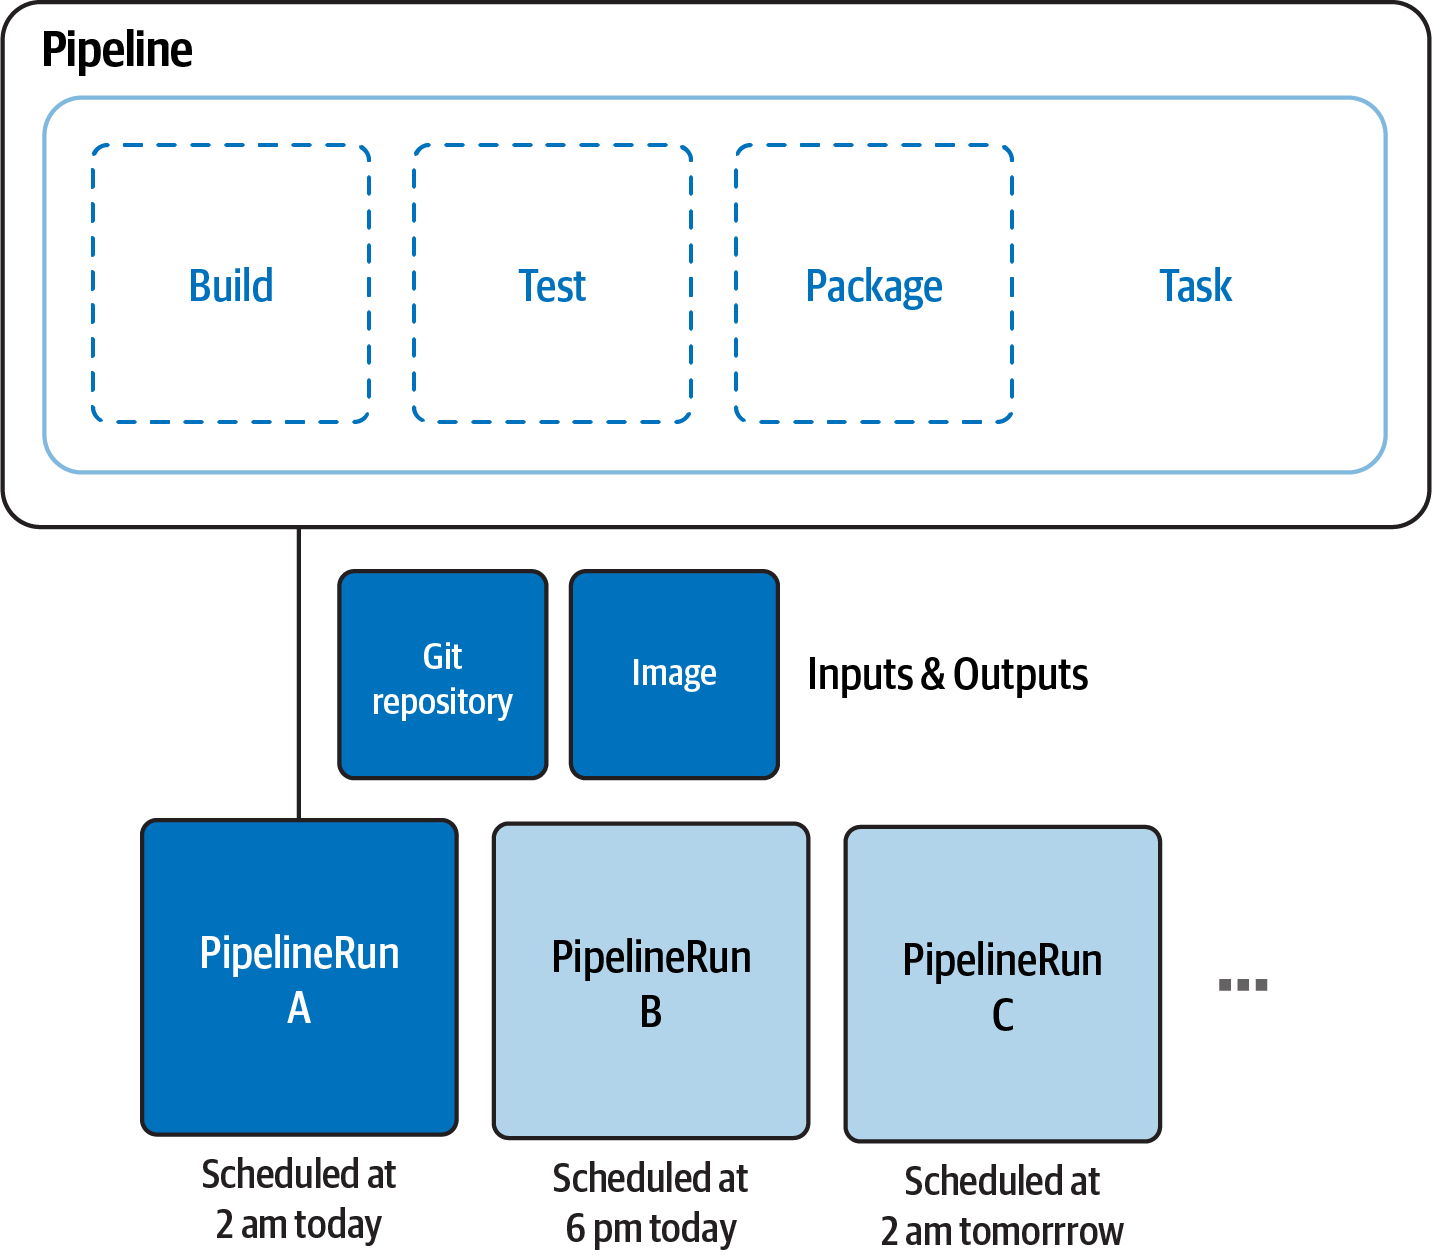
Figure 6-1. Tekton Pipelines
To install Tekton, you just need kubectl CLI and a Kubernetes cluster such as Minikube (see Chapter 2).
Tekton has a modular structure. You can install all components separately or all at once (e.g., with an Operator):
- Tekton Pipelines
-
Contains Tasks and Pipelines
- Tekton Triggers
-
Contains Triggers and EventListeners
- Tekton Dashboard
-
A convenient dashboard to visualize Pipelines and logs
- Tekton CLI
-
A CLI to manage Tekton objects (start/stop Pipelines and Tasks, check logs)
Tip
You can also use a Kubernetes Operator to install and manage Tekton components on your cluster. See more details on how from OperatorHub.
First you need to install the Tekton Pipelines component. At the time of writing this book, we are using version 0.37.0:
kubectl apply The installation will create a new Kubernetes namespace called tekton-pipelines and you should see output similar to the following:
namespace/tekton-pipelines created
podsecuritypolicy.policy/tekton-pipelines created
clusterrole.rbac.authorization.k8s.io/tekton-pipelines-controller-cluster-access created
clusterrole.rbac.authorization.k8s.io/tekton-pipelines-controller-tenant-access created
clusterrole.rbac.authorization.k8s.io/tekton-pipelines-webhook-cluster-access created
role.rbac.authorization.k8s.io/tekton-pipelines-controller created
role.rbac.authorization.k8s.io/tekton-pipelines-webhook created
role.rbac.authorization.k8s.io/tekton-pipelines-leader-election created
role.rbac.authorization.k8s.io/tekton-pipelines-info created
serviceaccount/tekton-pipelines-controller created
serviceaccount/tekton-pipelines-webhook created
clusterrolebinding.rbac.authorization.k8s.io/tekton-pipelines-controller-cluster-access created
clusterrolebinding.rbac.authorization.k8s.io/tekton-pipelines-controller-tenant-access created
clusterrolebinding.rbac.authorization.k8s.io/tekton-pipelines-webhook-cluster-access created
rolebinding.rbac.authorization.k8s.io/tekton-pipelines-controller created
rolebinding.rbac.authorization.k8s.io/tekton-pipelines-webhook created
rolebinding.rbac.authorization.k8s.io/tekton-pipelines-controller-leaderelection created
rolebinding.rbac.authorization.k8s.io/tekton-pipelines-webhook-leaderelection created
rolebinding.rbac.authorization.k8s.io/tekton-pipelines-info created
customresourcedefinition.apiextensions.k8s.io/clustertasks.tekton.dev created
customresourcedefinition.apiextensions.k8s.io/pipelines.tekton.dev created
customresourcedefinition.apiextensions.k8s.io/pipelineruns.tekton.dev created
customresourcedefinition.apiextensions.k8s.io/resolutionrequests.resolution.tekton.dev created
customresourcedefinition.apiextensions.k8s.io/pipelineresources.tekton.dev created
customresourcedefinition.apiextensions.k8s.io/runs.tekton.dev created
customresourcedefinition.apiextensions.k8s.io/tasks.tekton.dev created
customresourcedefinition.apiextensions.k8s.io/taskruns.tekton.dev created
secret/webhook-certs created
validatingwebhookconfiguration.admissionregistration.k8s.io/validation.webhook.pipeline.tekton.dev created
mutatingwebhookconfiguration.admissionregistration.k8s.io/webhook.pipeline.tekton.dev created
validatingwebhookconfiguration.admissionregistration.k8s.io/config.webhook.pipeline.tekton.dev created
clusterrole.rbac.authorization.k8s.io/tekton-aggregate-edit created
clusterrole.rbac.authorization.k8s.io/tekton-aggregate-view created
configmap/config-artifact-bucket created
configmap/config-artifact-pvc created
configmap/config-defaults created
configmap/feature-flags created
configmap/pipelines-info created
configmap/config-leader-election created
configmap/config-logging created
configmap/config-observability created
configmap/config-registry-cert created
deployment.apps/tekton-pipelines-controller created
service/tekton-pipelines-controller created
horizontalpodautoscaler.autoscaling/tekton-pipelines-webhook created
deployment.apps/tekton-pipelines-webhook created
service/tekton-pipelines-webhook created
You can monitor and verify the installation with the following command:
kubectl get pods -w -n tekton-pipelines
You should see output like this:
NAME READY STATUS RESTARTS AGE tekton-pipelines-controller-5fd68749f5-tz8dv1/1 Running03m4s tekton-pipelines-webhook-58dcdbfd9b-hswpk1/1 Running03m4s
Note
The preceding command goes in watch mode, thus it remains appended. Press Ctrl+C in order to stop it when you see the controller and webhook pods in Running status.
Then you can install Tekton Triggers. At the time of writing this book, we are using version 0.20.1:
kubectl apply You should see the following output:
podsecuritypolicy.policy/tekton-triggers created
clusterrole.rbac.authorization.k8s.io/tekton-triggers-admin created
clusterrole.rbac.authorization.k8s.io/tekton-triggers-core-interceptors created
clusterrole.rbac.authorization.k8s.io/tekton-triggers-core-interceptors-secrets created
clusterrole.rbac.authorization.k8s.io/tekton-triggers-eventlistener-roles created
clusterrole.rbac.authorization.k8s.io/tekton-triggers-eventlistener-clusterroles created
role.rbac.authorization.k8s.io/tekton-triggers-admin created
role.rbac.authorization.k8s.io/tekton-triggers-admin-webhook created
role.rbac.authorization.k8s.io/tekton-triggers-core-interceptors created
role.rbac.authorization.k8s.io/tekton-triggers-info created
serviceaccount/tekton-triggers-controller created
serviceaccount/tekton-triggers-webhook created
serviceaccount/tekton-triggers-core-interceptors created
clusterrolebinding.rbac.authorization.k8s.io/tekton-triggers-controller-admin created
clusterrolebinding.rbac.authorization.k8s.io/tekton-triggers-webhook-admin created
clusterrolebinding.rbac.authorization.k8s.io/tekton-triggers-core-interceptors created
clusterrolebinding.rbac.authorization.k8s.io/tekton-triggers-core-interceptors-secrets created
rolebinding.rbac.authorization.k8s.io/tekton-triggers-controller-admin created
rolebinding.rbac.authorization.k8s.io/tekton-triggers-webhook-admin created
rolebinding.rbac.authorization.k8s.io/tekton-triggers-core-interceptors created
rolebinding.rbac.authorization.k8s.io/tekton-triggers-info created
customresourcedefinition.apiextensions.k8s.io/clusterinterceptors.triggers.tekton.dev created
customresourcedefinition.apiextensions.k8s.io/clustertriggerbindings.triggers.tekton.dev created
customresourcedefinition.apiextensions.k8s.io/eventlisteners.triggers.tekton.dev created
customresourcedefinition.apiextensions.k8s.io/triggers.triggers.tekton.dev created
customresourcedefinition.apiextensions.k8s.io/triggerbindings.triggers.tekton.dev created
customresourcedefinition.apiextensions.k8s.io/triggertemplates.triggers.tekton.dev created
secret/triggers-webhook-certs created
validatingwebhookconfiguration.admissionregistration.k8s.io/validation.webhook.triggers.tekton.dev created
mutatingwebhookconfiguration.admissionregistration.k8s.io/webhook.triggers.tekton.dev created
validatingwebhookconfiguration.admissionregistration.k8s.io/config.webhook.triggers.tekton.dev created
clusterrole.rbac.authorization.k8s.io/tekton-triggers-aggregate-edit created
clusterrole.rbac.authorization.k8s.io/tekton-triggers-aggregate-view created
configmap/config-defaults-triggers created
configmap/feature-flags-triggers created
configmap/triggers-info created
configmap/config-logging-triggers created
configmap/config-observability-triggers created
service/tekton-triggers-controller created
deployment.apps/tekton-triggers-controller created
service/tekton-triggers-webhook created
deployment.apps/tekton-triggers-webhook created
deployment.apps/tekton-triggers-core-interceptors created
service/tekton-triggers-core-interceptors created
clusterinterceptor.triggers.tekton.dev/cel created
clusterinterceptor.triggers.tekton.dev/bitbucket created
clusterinterceptor.triggers.tekton.dev/github created
clusterinterceptor.triggers.tekton.dev/gitlab created
secret/tekton-triggers-core-interceptors-certs created
You can monitor and verify the installation with the following command:
kubectl get pods -w -n tekton-pipelines
You should see three new pods created and running—tekton-triggers-controller, tekton-triggers-core-interceptors, and tekton-triggers-webhook:
NAME READY STATUS RESTARTS AGE tekton-pipelines-controller-5fd68749f5-tz8dv1/1 Running027m tekton-pipelines-webhook-58dcdbfd9b-hswpk1/1 Running027m tekton-triggers-controller-854d44fd5d-8jf9q1/1 Running0105s tekton-triggers-core-interceptors-5454f8785f-dhsrb1/1 Running0104s tekton-triggers-webhook-86d75f875-zmjf41/1 Running0105s
After this you have a fully working Tekton installation on top of your Kubernetes cluster, supporting Pipelines and automation via event Triggers. In addition to that, you could install the Tekton Dashboard in order to visualize Tasks, Pipelines, and logs via a nice UI. At the time of writing this book, we are using version 0.28.0:
kubectl apply You should have output similar to the following:
customresourcedefinition.apiextensions.k8s.io/extensions.dashboard.tekton.dev created
serviceaccount/tekton-dashboard created
role.rbac.authorization.k8s.io/tekton-dashboard-info created
clusterrole.rbac.authorization.k8s.io/tekton-dashboard-backend created
clusterrole.rbac.authorization.k8s.io/tekton-dashboard-tenant created
rolebinding.rbac.authorization.k8s.io/tekton-dashboard-info created
clusterrolebinding.rbac.authorization.k8s.io/tekton-dashboard-backend created
configmap/dashboard-info created
service/tekton-dashboard created
deployment.apps/tekton-dashboard created
clusterrolebinding.rbac.authorization.k8s.io/tekton-dashboard-tenant created
You can monitor and verify the installation with the following command:
kubectl get pods -w -n tekton-pipelines
You should see a new pod created and running—tekton-dashboard:
NAME READY STATUS RESTARTS AGE tekton-dashboard-786b6b5579-sscgz1/1 Running02m25s tekton-pipelines-controller-5fd68749f5-tz8dv1/1 Running1(7m16s ago)5d7h tekton-pipelines-webhook-58dcdbfd9b-hswpk1/1 Running1(7m6s ago)5d7h tekton-triggers-controller-854d44fd5d-8jf9q1/1 Running2(7m9s ago)5d7h tekton-triggers-core-interceptors-5454f8785f-dhsrb1/1 Running1(7m7s ago)5d7h tekton-triggers-webhook-86d75f875-zmjf41/1 Running2(7m9s ago)5d7h
By default, the Dashboard is not exposed outside the Kubernetes cluster. You can access it by using the following command:
kubectl port-forward svc/tekton-dashboard 9097:9097 -n tekton-pipelinesTip
There are several ways to expose internal services in Kubernetes; you could also create an Ingress for that as shown in the Tekton Dashboard documentation.
You can now browse to http://localhost:9097 to access your Dashboard, as shown in Figure 6-2.
You can download and install the Tekton CLI for your OS to start creating Tasks and Pipelines from the command line. At the time of writing this book, we are using version 0.25.0.

Figure 6-2. Tekton Dashboard
Finally, verify that tkn and Tekton are configured correctly:
tkn version
You should get the following output:
Client version: 0.25.0
Pipeline version: v0.37.0
Triggers version: v0.20.1
Dashboard version: v0.28.0
See Also
6.2 Create a Hello World Task
Solution
In Tekton, a Task defines a series of steps that run sequentially to perform logic that the Task requires. Every Task runs as a pod on your Kubernetes cluster, with each step running in its own container. While steps within a Task are sequential, Tasks can be executed inside a Pipeline in parallel. Therefore, Tasks are the building blocks for running Pipelines with Tekton.
Let’s create a Hello World Task:
apiVersion:tekton.dev/v1beta1kind:Taskmetadata:name:hellospec:steps:-name:say-helloimage:registry.access.redhat.com/ubi8/ubicommand:-/bin/bashargs:['-c','echoHelloGitOpsCookbookreader!']

The API as an object of kind
Task
The name of the Task

The list of steps contained within this Task, in this case just one

The name of the step

The container image where the step starts
First you need to create this resource in Kubernetes:
kubectl create -f helloworld-task.yaml
You should get the following output:
task.tekton.dev/hello created
You can verify that the object has been created in your current Kubernetes namespace:
kubectl get tasks
You should get output similar to the following:
NAME    AGE
hello   90s
Now you can start your Tekton Task with tkn CLI:
tkn task start --showlog hello
You should get output similar to the following:
TaskRun started: hello-run-8bmzz Waitingforlogs to be available...[say-hello]Hello World
Note
A TaskRun is the API representation of a running Task. See Recipe 6.3 for more details.
See Also
6.3 Create a Task to Compile and Package an App from Git
Solution
As seen in Recipe 6.2, Tekton Tasks have a flexible mechanism to add a list of sequential steps to automate actions. The idea is to create a list of Tasks with a chain of input/output that can be used to compose Pipelines. Therefore a Task can contain a series of optional fields for a better control over the resource:
inputs-
The resources ingested by the Task.
outputs-
The resources produced by the Task.
params-
The parameters that will be used in the Task steps. Each parameter has:
name-
The name of the parameter.
description-
The description of the parameter.
default-
The default value of the parameter.
results-
The names under which Tasks write execution results.
workspaces-
The paths to volumes needed by the Task.
volumes-
The Task can also mount external volumes using the
volumesattribute.
The following example, as illustrated in Figure 6-3, shows a Task named build-app that clones the sources using the git command and lists the source code in output.
Figure 6-3. build-app Task
apiVersion:tekton.dev/v1beta1kind:Taskmetadata:name:build-appspec:workspaces:-name:sourcedescription:Thegitrepowillbeclonedontothevolumebackingthisworkspaceparams:-name:contextDirdescription:thecontextdirwithinsourcedefault:quarkus-name:tlsVerifydescription:tlsverifytype:stringdefault:"false"-name:urldefault:https://github.com/gitops-cookbook/tekton-tutorial-greeter.git-name:revisiondefault:master-name:subdirectorydefault:""-name:sslVerifydescription:definesifhttp.sslVerifyshouldbesettotrueorfalseintheglobalgitconfigtype:stringdefault:"false"steps:-image:'gcr.io/tekton-releases/github.com/tektoncd/pipeline/cmd/git-init:v0.21.0'name:cloneresources:{}script:|CHECKOUT_DIR="$(workspaces.source.path)/$(params.subdirectory)"cleandir() {# Delete any existing contents of the repo directory if it exists.## We don't just "rm -rf $CHECKOUT_DIR" because $CHECKOUT_DIR might be "/"# or the root of a mounted volume.if [[ -d "$CHECKOUT_DIR" ]] ; then# Delete non-hidden files and directoriesrm -rf "$CHECKOUT_DIR"/*# Delete files and directories starting with . but excluding ..rm -rf "$CHECKOUT_DIR"/.[!.]*# Delete files and directories starting with .. plus any other characterrm -rf "$CHECKOUT_DIR"/..?*fi}/ko-app/git-init-url "$(params.url)"-revision "$(params.revision)"-path "$CHECKOUT_DIR"-sslVerify="$(params.sslVerify)"cd "$CHECKOUT_DIR"RESULT_SHA="$(git rev-parse HEAD)"-name:build-sourcesimage:gcr.io/cloud-builders/mvncommand:-mvnargs:--DskipTests-clean-installenv:-name:user.homevalue:/home/tektonworkingDir:"/workspace/source/$(params.contextDir)"
A Task step and Pipeline Task can share a common filesystem via a Tekton workspace. The workspace could be either backed by something like PersistentVolumeClaim (PVC) and a
ConfigMap, or just ephemeral (emptyDir).A Task can have parameters; this feature makes the execution dynamic.
Let’s create the Task with the following command:
kubectl create -f build-app-task.yaml
You should get output similar to the following:
task.tekton.dev/build-app created
You can verify that the object has been created in your current Kubernetes namespace:
kubectl get tasks
You should get output similar to the following:
NAME        AGE
build-app   3s
You can also list the Task with the tkn CLI:
tkn task ls
You should get output similar to the following:
NAME        DESCRIPTION   AGE
build-app                 10 seconds ago
When you start a Task, a new TaskRun object is created. TaskRuns are the API representation of a running Task; thus you can create it with the tkn CLI using the following command:
tkn task start build-app--paramcontextDir='quarkus'--workspacename=source,emptyDir=""--showlog
Tip
When parameters are used inside a Task or Pipeline, you will be prompted to add new values or confirm default ones, if any. In order to use the default values from the Task defintion without prompting for values, you can use the --use-param-defaults option.
You should get output similar to the following:
? Valueforparam`tlsVerify`oftype`string`?(Default is`false`)false? Valueforparam`url`oftype`string`?(Default is`https://github.com/gitops-cookbook/tekton-tutorial-greeter.git`)https://github.com/gitops-cookbook/tekton-tutorial-greeter.git ? Valueforparam`revision`oftype`string`?(Default is`master`)master ? Valueforparam`subdirectory`oftype`string`?(Default is``)? Valueforparam`sslVerify`oftype`string`?(Default is`false`)falseTaskRun started: build-app-run-rzcd8 Waitingforlogs to be available...[clone]{"level":"info","ts":1659278019.0018234,"caller":"git/git.go:169","msg":"Successfully cloned https://github.com/gitops-cookbook/tekton-tutorial-greeter.git @ d9291c456db1ce29177b77ffeaa9b71ad80a50e6 (grafted, HEAD, origin/master) in path /workspace/source/"}[clone]{"level":"info","ts":1659278019.0227938,"caller":"git/git.go:207","msg":"Successfully initialized and updated submodules in path /workspace/source/"}[build-sources][INFO]Scanningforprojects...[build-sources]Downloading from central: https://repo.maven.apache.org/maven2/io/quarkus/quarkus-universe-bom/1.6.1.Final/quarkus-universe-bom-1.6.1.Final.pom Downloaded from central: https://repo.maven.apache.org/maven2/io/quarkus/quarkus-universe-bom/1.6.1.Final/quarkus-universe-bom-1.6.1.Final.pom(412kB at118kB/s)[build-sources][INFO]...[build-sources][INFO]Installing /workspace/source/quarkus/target/tekton-quarkus-greeter.jar to /root/.m2/repository/com/redhat/developers/tekton-quarkus-greeter/1.0.0-SNAPSHOT/tekton-quarkus-greeter-1.0.0-SNAPSHOT.jar[build-sources][INFO]Installing /workspace/source/quarkus/pom.xml to /root/.m2/repository/com/redhat/developers/tekton-quarkus-greeter/1.0.0-SNAPSHOT/tekton-quarkus-greeter-1.0.0-SNAPSHOT.pom[build-sources][INFO]------------------------------------------------------------------------[build-sources][INFO]BUILD SUCCESS[build-sources][INFO]------------------------------------------------------------------------[build-sources][INFO]Total time:04:41 min[build-sources][INFO]Finished at:2022-07-31T14:38:22Z[build-sources][INFO]------------------------------------------------------------------------
Or, you can create a TaskRun object manually like this:
apiVersion:tekton.dev/v1beta1kind:TaskRunmetadata:generateName:build-app-run-labels:app.kubernetes.io/managed-by:tekton-pipelinestekton.dev/task:build-appspec:params:-name:contextDirvalue:quarkus-name:revisionvalue:master-name:sslVerifyvalue:"false"-name:subdirectoryvalue:""-name:tlsVerifyvalue:"false"-name:urlvalue:https://github.com/gitops-cookbook/tekton-tutorial-greeter.gittaskRef:kind:Taskname:build-appworkspaces:-emptyDir:{}name:source
If you don’t want to specify a name for each
TaskRun, you can use thegenerateNameattribute to let Tekton pick a random one from the string you defined.
And start it in this way:
kubectl create -f build-app-taskrun.yaml
You should get output similar to the following:
taskrun.tekton.dev/build-app-run-65vmh created
You can also verify it with the tkn CLI:
tkn taskrun ls
You should get output similar to the following:
NAME STARTED DURATION STATUS build-app-run-65vmh1minutes ago 2m37s Succeeded build-app-run-rzcd82minutes ago 3m58s Succeeded
You can get the logs from the TaskRun by specifying the name of the TaskRun:
tkn taskrun logs build-app-run-65vmh -f
See Also
6.4 Create a Task to Compile and Package an App from Private Git
Solution
In Recipe 6.3 you saw how to compile and package a sample Java application using a public Git repository, but most of the time people deal with private repos at work, so how do you integrate them? Tekton supports the following authentication schemes for use with Git:
-
Basic-auth
-
SSH
With both options you can use a Kubernetes Secret to store your credentials and attach them to the ServiceAccount running your Tekton Tasks or Pipelines.
Tip
Tekton uses a default service account, however you can override it following the documentation here.
Let’s start with a common example of basic authentication and a popular Git service such as GitHub.
Note
GitHub uses personal access tokens (PATs) as an alternative to using passwords for authentication. You can use a PAT instead of a clear-text password to enhance security.
First you need to create a Secret. You can do this by creating the following YAML file:
apiVersion:v1kind:Secretmetadata:name:github-secretannotations:tekton.dev/git-0:https://github.comtype:kubernetes.io/basic-authstringData:username:YOUR_USERNAMEpassword:YOUR_PASSWORD
Here you specify the URL for which Tekton will use this Secret, in this case GitHub
This is the type of Secret, in this case a basic authentication one
Your Git user, in this case your GitHub user
You Git password, in this case your GitHub personal access token
You can now create the Secret with the following command:
kubectl create -f git-secret.yaml
You should get the following output:
secret/git-secret created
You can also avoid writing YAML and do everything with kubectl as follows:
kubectl create secret generic git-secret--type=kubernetes.io/basic-auth--from-literal=username=YOUR_USERNAME--from-literal=password=YOUR_PASSWORD
And then you just annotate the Secret as follows:
kubectl annotate secret git-secret "tekton.dev/git-0=https://github.com"Once you have created and annotated your Secret, you have to attach it to the ServiceAccount running your Tekton Tasks or Pipelines.
Let’s create a new ServiceAccount for this purpose:
apiVersion:v1kind:ServiceAccountmetadata:name:tekton-bot-sasecrets:-name:git-secret
List of Secrets attached to this
ServiceAccount
kubectl create -f tekton-bot-sa.yaml
You should get the following output:
serviceaccount/tekton-bot-sa created
Tip
You can create the ServiceAccount directly with kubectl as
follows:
kubectl create serviceaccount tekton-bot-sa
and then patch it to add the secret reference:
kubectl patch serviceaccount tekton-bot-sa -p '{"secrets": [{"name": "git-secret"}]}'Once credentials are set up and linked to the ServiceAccount running Tasks or Pipelines, you can just add the --serviceaccount=<NAME> option to your tkn command, using the Recipe 6.3 example:
tkntaskstartbuild-app--serviceaccount='tekton-bot-sa'--paramurl='https://github.com/gitops-cookbook/tekton-greeter-private.git'--paramcontextDir='quarkus'--workspacename=source,emptyDir=""--showlog
Here you specify the
ServiceAccountto use; this will override the default one at runtime.Here you can override the default repository with one of your choice. In this example there’s a private repository that you cannot access, but you can create a private repository on your own and test it like this.
You should get output similar to the following:
...[clone]{"level":"info","ts":1659354692.1365478,"caller":"git/git.go:169","msg":"Successfully cloned https://github.com/gitops-cookbook/tekton-greeter-private.git @ 5250e1fa185805373e620d1c04a0c48129efd2ee (grafted, HEAD, origin/master) in path /workspace/source/"}[clone]{"level":"info","ts":1659354692.1546066,"caller":"git/git.go:207","msg":"Successfully initialized and updated submodules in path /workspace/source/"}...[build-sources][INFO]------------------------------------------------------------------------[build-sources][INFO]BUILD SUCCESS[build-sources][INFO]------------------------------------------------------------------------[build-sources][INFO]Total time:04:30 min[build-sources][INFO]Finished at:2022-07-31T15:30:01Z[build-sources][INFO]------------------------------------------------------------------------
See Also
6.5 Containerize an Application Using a Tekton Task and Buildah
Solution
Automation is essential when adopting the cloud native approach, and if you decide to use Kubernetes for your CI/CD workloads, you need to provide a way to package and deploy your applications.
In fact, Kubernetes per se doesn’t have a built-in mechanism to build containers; it just relies on add-ons such as Tekton or external services for this purpose. That’s why in Chapter 3 we did an overview on how to create containers for packaging applications with various open source tools. In Recipe 3.3 we used Buildah to create a container from a Dockerfile.
Thanks to Tekton’s extensible model, you can reuse the same Task defined in Recipe 6.3 to add a step to create a container using the outcomes from the previous steps, as shown in Figure 6-4.

Figure 6-4. Build Push app
The container can be pushed to a public container registry such as DockerHub or Quay.io, or to a private container registry. Similar to what we have seen in Recipe 6.4 for private Git repositories, pushing a container image to a container registry needs authentication. A Secret needs to be attached to the ServiceAccount running the Task as follows. See Chapter 2 for how to register and use a public registry.
kubectl create secret docker-registry container-registry-secret--docker-server='YOUR_REGISTRY_SERVER'--docker-username='YOUR_REGISTRY_USER'--docker-password='YOUR_REGISTRY_PASS'
secret/container-registry-secret created
Verify it is present and check that the Secret is of type kubernetes.io/dockerconfigjson:
kubectl get secrets
You should get the following output:
NAME                        TYPE                             DATA   AGE
container-registry-secret   kubernetes.io/dockerconfigjson   1      1s
Let’s create a ServiceAccount for this Task:
kubectl create serviceaccount tekton-registry-sa
Then let’s add the previously generated Secret to this ServiceAccount:
kubectl patch serviceaccount tekton-registry-sa-p'{"secrets": [{"name": "container-registry-secret"}]}'
You should get the following output:
serviceaccount/tekton-registry-sa patched
Let’s add a new step to create a container image and push it to a container registry. In the following example we use the book’s organization repos at Quay.io—quay.io/gitops-cookbook/tekton-greeter:latest:
apiVersion:tekton.dev/v1beta1kind:Taskmetadata:name:build-push-appspec:workspaces:-name:sourcedescription:The git repo will be cloned onto the volume backing this workspaceparams:-name:contextDirdescription:the context dir within sourcedefault:quarkus-name:tlsVerifydescription:tls verifytype:stringdefault:"false"-name:urldefault:https://github.com/gitops-cookbook/tekton-tutorial-greeter.git-name:revisiondefault:master-name:subdirectorydefault:""-name:sslVerifydescription:defines if http.sslVerify should be set to true or false in the global git configtype:stringdefault:"false"-name:storageDrivertype:stringdescription:Storage driverdefault:vfs-name:destinationImagedescription:the fully qualified image namedefault:""steps:-image:'gcr.io/tekton-releases/github.com/tektoncd/pipeline/cmd/git-init:v0.21.0'name:cloneresources:{}script:|CHECKOUT_DIR="$(workspaces.source.path)/$(params.subdirectory)"cleandir() {# Delete any existing contents of the repo directory if it exists.## We don't just "rm -rf $CHECKOUT_DIR" because $CHECKOUT_DIR might be "/"# or the root of a mounted volume.if [[ -d "$CHECKOUT_DIR" ]] ; then# Delete non-hidden files and directoriesrm -rf "$CHECKOUT_DIR"/*# Delete files and directories starting with . but excluding ..rm -rf "$CHECKOUT_DIR"/.[!.]*# Delete files and directories starting with .. plus any other characterrm -rf "$CHECKOUT_DIR"/..?*fi}/ko-app/git-init-url "$(params.url)"-revision "$(params.revision)"-path "$CHECKOUT_DIR"-sslVerify="$(params.sslVerify)"cd "$CHECKOUT_DIR"RESULT_SHA="$(git rev-parse HEAD)"-name:build-sourcesimage:gcr.io/cloud-builders/mvncommand:-mvnargs:--DskipTests-clean-installenv:-name:user.homevalue:/home/tektonworkingDir:"/workspace/source/$(params.contextDir)"-name:build-and-push-imageimage:quay.io/buildah/stablescript:|#!/usr/bin/env bashbuildah --storage-driver=$STORAGE_DRIVER --tls-verify=$(params.tlsVerify) bud --layers -t $DESTINATION_IMAGE $CONTEXT_DIRbuildah --storage-driver=$STORAGE_DRIVER --tls-verify=$(params.tlsVerify) push $DESTINATION_IMAGE docker://$DESTINATION_IMAGEenv:-name:DESTINATION_IMAGEvalue:"$(params.destinationImage)"-name:CONTEXT_DIRvalue:"/workspace/source/$(params.contextDir)"-name:STORAGE_DRIVERvalue:"$(params.storageDriver)"workingDir:"/workspace/source/$(params.contextDir)"volumeMounts:-name:varlibcmountPath:/var/lib/containersvolumes:-name:varlibcemptyDir:{}
Let’s create this Task:
kubectl create -f build-push-app.yaml
You should get the following output:
task.tekton.dev/build-push-app created
Now let’s start the Task with the Buildah step creating a container image and with a new parameter destinationImage to specify where to push the resulting container image:
tkntaskstartbuild-push-app--serviceaccount='tekton-registry-sa'--paramurl='https://github.com/gitops-cookbook/tekton-tutorial-greeter.git'--paramdestinationImage='quay.io/gitops-cookbook/tekton-greeter:latest'--paramcontextDir='quarkus'--workspacename=source,emptyDir=""--use-param-defaults--showlog
Here you can place your registry; in this example we are using the book’s organization repos at Quay.io.
You should get output similar to the following:
... Downloaded from central: https://repo.maven.apache.org/maven2/org/codehaus/plexus/plexus-utils/3.0.5/plexus-utils-3.0.5.jar(230kB at301kB/s)[build-sources][INFO]Installing /workspace/source/quarkus/target/tekton-quarkus-greeter.jar to /root/.m2/repository/com/redhat/developers/tekton-quarkus-greeter/1.0.0-SNAPSHOT/tekton-quarkus-greeter-1.0.0-SNAPSHOT.jar[build-sources][INFO]Installing /workspace/source/quarkus/pom.xml to /root/.m2/repository/com/redhat/developers/tekton-quarkus-greeter/1.0.0-SNAPSHOT/tekton-quarkus-greeter-1.0.0-SNAPSHOT.pom[build-sources][INFO]------------------------------------------------------------------------[build-sources][INFO]BUILD SUCCESS[build-sources][INFO]------------------------------------------------------------------------[build-sources][INFO]Total time:02:59 min[build-sources][INFO]Finished at:2022-08-02T06:18:37Z[build-sources][INFO]------------------------------------------------------------------------[build-and-push-image]STEP1/2: FROM registry.access.redhat.com/ubi8/openjdk-11[build-and-push-image]Trying to pull registry.access.redhat.com/ubi8/openjdk-11:latest...[build-and-push-image]Getting imagesourcesignatures[build-and-push-image]Checkingifimage destination supports signatures[build-and-push-image]Copying blob sha256:1e09a5ee0038fbe06a18e7f355188bbabc387467144abcd435f7544fef395aa1[build-and-push-image]Copying blob sha256:0d725b91398ed3db11249808d89e688e62e511bbd4a2e875ed8493ce1febdb2c[build-and-push-image]Copying blob sha256:1e09a5ee0038fbe06a18e7f355188bbabc387467144abcd435f7544fef395aa1[build-and-push-image]Copying blob sha256:0d725b91398ed3db11249808d89e688e62e511bbd4a2e875ed8493ce1febdb2c[build-and-push-image]Copying blob sha256:e441d34134fac91baa79be3e2bb8fb3dba71ba5c1ea012cb5daeb7180a054687[build-and-push-image]Copying blob sha256:e441d34134fac91baa79be3e2bb8fb3dba71ba5c1ea012cb5daeb7180a054687[build-and-push-image]Copying config sha256:0c308464b19eaa9a01c3fdd6b63a043c160d4eea85e461bbbb7d01d168f6d993[build-and-push-image]Writing manifest to image destination[build-and-push-image]Storing signatures[build-and-push-image]STEP2/2: COPY target/quarkus-app /deployments/[build-and-push-image]COMMIT quay.io/gitops-cookbook/tekton-greeter:latest[build-and-push-image]--> 42fe38b4346[build-and-push-image]Successfully tagged quay.io/gitops-cookbook/tekton-greeter:latest[build-and-push-image]42fe38b43468c3ca32262dbea6fd78919aba2bd35981cd4f71391e07786c9e21[build-and-push-image]Getting imagesourcesignatures[build-and-push-image]Copying blob sha256:647a854c512bad44709221b6b0973e884f29bcb5a380ee32e95bfb0189b620e6[build-and-push-image]Copying blob sha256:f2ee6b2834726167d0de06f3bbe65962aef79855c5ede0d2ba93b4408558d9c9[build-and-push-image]Copying blob sha256:8e0e04b5c700a86f4a112f41e7e767a9d7c539fe3391611313bf76edb07eeab1[build-and-push-image]Copying blob sha256:69c55192bed92cbb669c88eb3c36449b64ac93ae466abfff2a575273ce05a39e[build-and-push-image]Copying config sha256:42fe38b43468c3ca32262dbea6fd78919aba2bd35981cd4f71391e07786c9e21[build-and-push-image]Writing manifest to image destination[build-and-push-image]Storing signatures
See Also
6.6 Deploy an Application to Kubernetes Using a Tekton Task
Solution
While in Recipes 6.3, 6.4, and 6.5 we have listed a Tekton Task that is useful for continuous integration (CI), in this recipe we’ll start having a look at the Continous Deployment (CD) part by deploying an existing container image to Kubernetes.
We can reuse the container image we created and pushed in Recipe 6.5, available at quay.io/gitops-cookbook/tekton-greeter:latest:
apiVersion:tekton.dev/v1beta1kind:Taskmetadata:name:kubectlspec:params:-name:SCRIPTdescription:ThekubectlCLIargumentstoruntype:stringdefault:"kubectlhelp"steps:-name:ocimage:quay.io/openshift/origin-cli:latestscript:|#!/usr/bin/env bash$(params.SCRIPT)
For this example we are using
kubectlfrom this container image, which also contains OpenShift CLI and it has an smaller size compared togcr.io/cloud-builders/kubectl.
Let’s create this Task:
kubectl create -f kubectl-task.yaml
You should get the following output:
task.tekton.dev/kubectl created
As discussed in Recipe 6.5, Tekton uses a default ServiceAccount for running Tasks and Pipelines, unless a specific one is defined at runtime or overridden at a global scope. The best practice is always to create a specific ServiceAccount for a particular action, so let’s create one named tekton-deployer-sa for this use case as follows:
kubectl create serviceaccount tekton-deployer-sa
You should get the following output:
serviceaccount/tekton-deployer-sa created
A ServiceAccount needs permission to deploy an application to Kubernetes. Roles and RoleBindings are API objects used to map a certain permission to a user or a ServiceAccount.
You first define a Role named pipeline-role for the ServiceAccount running the Tekton Task with permissions to deploy apps:
apiVersion:rbac.authorization.k8s.io/v1kind:Rolemetadata:name:task-rolerules:-apiGroups:-""resources:-pods-services-endpoints-configmaps-secretsverbs:-"*"-apiGroups:-appsresources:-deployments-replicasetsverbs:-"*"-apiGroups:-""resources:-podsverbs:-get-apiGroups:-appsresources:-replicasetsverbs:-get
Now you need to bind the Role to the ServiceAccount:
apiVersion:rbac.authorization.k8s.io/v1kind:RoleBindingmetadata:name:task-role-bindingroleRef:kind:Rolename:task-roleapiGroup:rbac.authorization.k8s.iosubjects:-kind:ServiceAccountname:tekton-deployer-sa
Now you can create the two resources as follows:
kubectl create -f task-role.yaml
kubectl create -f task-role-binding.yaml
You should get the following output:
role.rbac.authorization.k8s.io/task-role created
rolebinding.rbac.authorization.k8s.io/task-role-binding created
Finally, you can define a TaskRun as follows:
apiVersion:tekton.dev/v1beta1kind:TaskRunmetadata:name:kubectl-taskrunspec:serviceAccountName:tekton-deployer-sataskRef:name:kubectlparams:-name:SCRIPTvalue:|kubectl create deploy tekton-greeter --image=quay.io/gitops-cookbook/tekton-greeter:latest
And run it in this way:
kubectl create -f kubectl-taskrun.yaml
You should get the following output:
taskrun.tekton.dev/kubectl-run created
You can check the logs to see the results:
tkn taskrun logs kubectl-run -f
You should get output similar to the following:
? Select taskrun: kubectl-run started9seconds ago[oc]deployment.apps/tekton-greeter created
After a few seconds you should see the Deployment in Ready state:
kubectl get deploy NAME READY UP-TO-DATE AVAILABLE AGE tekton-greeter1/11030s
Note
The first time might take a while due to the time it takes to pull the container image.
Check if the app is available, expose the Deployment, and forward Kubernetes traffic to your workstation to test it:
kubectl expose deploy/tekton-greeter --port8080kubectl port-forward svc/tekton-greeter8080:8080
In another terminal, run this command:
curl localhost:8080
You should see the following output:
Meeow!! from Tekton ----
See Also
6.7 Create a Tekton Pipeline to Build and Deploy an App to Kubernetes
Solution
In the previous recipes we have seen how to create Tasks to execute one or more steps sequentially to build apps. In this recipe we will discuss Tekton Pipelines, a collection of Tasks that you can define and compose in a specific order of execution, either sequentially or in parallel, as you can see in Figure 6-5.

Figure 6-5. Tekton Pipelines flows
Tekton Pipelines supports parameters and a mechanism to exchange outcomes between different Tasks. For instance, using the examples shown in Recipes 6.5 and 6.6:
kubectl patch serviceaccount tekton-deployer-sa-p'{"secrets": [{"name": "container-registry-secret"}]}'
apiVersion:tekton.dev/v1beta1kind:Pipelinemetadata:name:tekton-greeter-pipelinespec:params:-name:GIT_REPOtype:string-name:GIT_REFtype:string-name:DESTINATION_IMAGEtype:string-name:SCRIPTtype:stringtasks:-name:build-push-apptaskRef:name:build-push-appparams:-name:urlvalue:"$(params.GIT_REPO)"-name:revisionvalue:"$(params.GIT_REF)"-name:destinationImagevalue:"$(params.DESTINATION_IMAGE)"workspaces:-name:source-name:deploy-apptaskRef:name:kubectlparams:-name:SCRIPTvalue:"$(params.SCRIPT)"workspaces:-name:sourcerunAfter:-build-push-appworkspaces:-name:source
Pipeline parameters
A list of Tasks for the Pipeline
The exact name of the Task to use
You can decide the order with the
runAfterfield to indicate that a Task must execute after one or more other TasksOne or more common Workspaces used to share data between Tasks
Let’s create the Pipeline as follows:
kubectl create -f tekton-greeter-pipeline.yaml
You should get the following output:
pipeline.tekton.dev/tekton-greeter-pipeline created
Similarly to TaskRuns, you can run this Pipeline by creating a PipelineRun resource as follows:
apiVersion:tekton.dev/v1beta1kind:PipelineRunmetadata:generateName:tekton-greeter-pipeline-run-spec:params:-name:GIT_REPOvalue:https://github.com/gitops-cookbook/tekton-tutorial-greeter.git-name:GIT_REFvalue:"master"-name:DESTINATION_IMAGEvalue:"quay.io/gitops-cookbook/tekton-greeter:latest"-name:SCRIPTvalue:|kubectl create deploy tekton-greeter --image=quay.io/gitops-cookbook/tekton-greeter:latestpipelineRef:name:tekton-greeter-pipelineworkspaces:-name:sourceemptyDir:{}
You can run the Pipeline by creating this PipelineRun object as follows:
kubectl create -f tekton-greeter-pipelinerun.yaml
You can check the status:
tkn pipelinerun ls
NAME                                STARTED         DURATION   STATUS
tekton-greeter-pipeline-run-ntl5r   7 seconds ago   ---        Running
Now that you have seen how to reuse existing Tasks within a Pipeline, it’s a good time to introduce the Tekton Hub, a web-based platform for developers to discover, share, and contribute Tasks and Pipelines for Tekton (see Figure 6-6).

Figure 6-6. Tekton Hub
You can implement the same Pipeline with Tasks already available in the Hub. In our case, we have:
git-clone-
Task that clones a repo from the provided URL into the output Workspace.
buildah-
Task that builds source into a container image and can push it to a container registry.
kubernetes-actions-
The generic
kubectlCLI task, which can be used to run all kinds of k8s commands.
First let’s add them to our namespace as follows:
tkn hub install task git-clone
tkn hub install task maven
tkn hub install task buildah
tkn hub install task kubernetes-actions
You should get output similar to the following to confirm they are installed properly in your namespace:
Task git-clone(0.7)installedindefault namespace Task maven(0.2)installedindefault namespace Task buildah(0.4)installedindefault namespace Task kubernetes-actions(0.2)installedindefault namespace
You can cross-check it with the following command:
kubectl get tasks
You should get output similar to the following:
NAME                 AGE
...
buildah              50s
git-clone            52s
kubernetes-actions   49s
maven                51s
...
Tip
Some Tekton installations like the one made with the Operator for OpenShift Pipelines provide a common list of useful Tasks such as those just listed, provided as ClusterTasks. ClusterTasks are Tasks available for all namespaces within the Kubernetes cluster. Check if your installation already provides some with this command: kubectl get clustertasks.
Now the Pipeline has four Tasks, as you can see in Figure 6-7.

Figure 6-7. Pipeline
In this example you’ll see a PersistentVolumeClaim as a Workspace because here the data is shared among different Tasks so we need to persist it:
apiVersion:v1kind:PersistentVolumeClaimmetadata:name:app-source-pvcspec:accessModes:-ReadWriteOnceresources:requests:storage:1Gi
As usual, you can create the resource with kubectl:
kubectl create -f app-source-pvc.yaml
You should see the following output:
persistentvolumeclaim/app-source-pvc created
kubectl get pvc

NAME             STATUS   VOLUME                                     CAPACITY   ACCESS MODES   STORAGECLASS   AGE
app-source-pvc   Bound    pvc-e85ade46-aaca-4f3f-b644-d8ff99fd9d5e   1Gi        RWO            standard       61s
Note
In Minikube you have a default StorageClass that provides dynamic storage for the cluster. If you are using another Kubernetes cluster, please make sure you have a dynamic storage support.
The Pipeline definition now is:
apiVersion:tekton.dev/v1beta1kind:Pipelinemetadata:name:tekton-greeter-pipeline-hubspec:params:-default:https://github.com/gitops-cookbook/tekton-tutorial-greeter.gitname:GIT_REPOtype:string-default:mastername:GIT_REFtype:string-default:quay.io/gitops-cookbook/tekton-greeter:latestname:DESTINATION_IMAGEtype:string-default:kubectl create deploy tekton-greeter --image=quay.io/gitops-cookbook/tekton-greeter:latestname:SCRIPTtype:string-default:./Dockerfilename:CONTEXT_DIRtype:string-default:.name:IMAGE_DOCKERFILEtype:string-default:.name:IMAGE_CONTEXT_DIRtype:stringtasks:-name:fetch-repoparams:-name:urlvalue:$(params.GIT_REPO)-name:revisionvalue:$(params.GIT_REF)-name:deleteExistingvalue:"true"-name:verbosevalue:"true"taskRef:kind:Taskname:git-cloneworkspaces:-name:outputworkspace:app-source-name:build-appparams:-name:GOALSvalue:--DskipTests-clean-package-name:CONTEXT_DIRvalue:$(params.CONTEXT_DIR)runAfter:-fetch-repotaskRef:kind:Taskname:mavenworkspaces:-name:maven-settingsworkspace:maven-settings-name:sourceworkspace:app-source-name:build-push-imageparams:-name:IMAGEvalue:$(params.DESTINATION_IMAGE)-name:DOCKERFILEvalue:$(params.IMAGE_DOCKERFILE)-name:CONTEXTvalue:$(params.IMAGE_CONTEXT_DIR)runAfter:-build-apptaskRef:kind:Taskname:buildahworkspaces:-name:sourceworkspace:app-source-name:deployparams:-name:scriptvalue:$(params.SCRIPT)runAfter:-build-push-imagetaskRef:kind:Taskname:kubernetes-actionsworkspaces:-name:app-source-name:maven-settings
Let’s create the resource:
kubectl create -f tekton-greeter-pipeline-hub.yaml
Note
We are using the same Secret and ServiceAccount defined in Recipe 6.5 to log in against Quay.io in order to push the container image.
You can now start the Pipeline as follows:
tkn pipeline start tekton-greeter-pipeline-hub--serviceaccount='tekton-deployer-sa'--paramGIT_REPO='https://github.com/gitops-cookbook/tekton-tutorial-greeter.git'--paramGIT_REF='master'--paramCONTEXT_DIR='quarkus'--paramDESTINATION_IMAGE='quay.io/gitops-cookbook/tekton-greeter:latest'--paramIMAGE_DOCKERFILE='quarkus/Dockerfile'--paramIMAGE_CONTEXT_DIR='quarkus'--paramSCRIPT='kubectl create deploy tekton-greeter --image=quay.io/gitops-cookbook/tekton-greeter:latest'--workspacename=app-source,claimName=app-source-pvc--workspacename=maven-settings,emptyDir=""--use-param-defaults--showlog
[fetch-repo : clone]+CHECKOUT_DIR=/workspace/output/[fetch-repo : clone]+ /ko-app/git-init'-url=https://github.com/gitops-cookbook/tekton-tutorial-greeter.git''-revision=master''-refspec=''-path=/workspace/output/''-sslVerify=true''-submodules=true''-depth=1''-sparseCheckoutDirectories='[fetch-repo : clone]{"level":"info","ts":1660819038.5526028,"caller":"git/git.go:170","msg":"Successfully cloned https://github.com/gitops-cookbook/tekton-tutorial-greeter.git @ d9291c456db1ce29177b77ffeaa9b71ad80a50e6 (grafted, HEAD, origin/master) in path /workspace/output/"}[fetch-repo : clone]{"level":"info","ts":1660819038.5722632,"caller":"git/git.go:208","msg":"Successfully initialized and updated submodules in path /workspace/output/"}[fetch-repo : clone]+cd/workspace/output/[fetch-repo : clone]+ git rev-parse HEAD[fetch-repo : clone]+RESULT_SHA=d9291c456db1ce29177b77ffeaa9b71ad80a50e6[fetch-repo : clone]+EXIT_CODE=0[fetch-repo : clone]+'['0'!='0][fetch-repo : clone]+printf'%s'd9291c456db1ce29177b77ffeaa9b71ad80a50e6[fetch-repo : clone]+printf'%s'https://github.com/gitops-cookbook/tekton-tutorial-greeter.git ...[build-app : mvn-goals][INFO][org.jboss.threads]JBoss Threads version3.1.1.Final[build-app : mvn-goals][INFO][io.quarkus.deployment.QuarkusAugmentor]Quarkus augmentation completedin1296ms[build-app : mvn-goals][INFO]------------------------------------------------------------------------[build-app : mvn-goals][INFO]BUILD SUCCESS[build-app : mvn-goals][INFO]------------------------------------------------------------------------[build-app : mvn-goals][INFO]Total time:03:18 min[build-app : mvn-goals][INFO]Finished at:2022-08-18T10:31:00Z[build-app : mvn-goals][INFO]------------------------------------------------------------------------[build-push-image : build]STEP1/2: FROM registry.access.redhat.com/ubi8/openjdk-11[build-push-image : build]Trying to pull registry.access.redhat.com/ubi8/openjdk-11:latest...[build-push-image : build]Getting imagesourcesignatures[build-push-image : build]Checkingifimage destination supports signatures[build-push-image : build]Copying blob sha256:e441d34134fac91baa79be3e2bb8fb3dba71ba5c1ea012cb5daeb7180a054687[build-push-image : build]Copying blob sha256:1e09a5ee0038fbe06a18e7f355188bbabc387467144abcd435f7544fef395aa1[build-push-image : build]Copying blob sha256:0d725b91398ed3db11249808d89e688e62e511bbd4a2e875ed8493ce1febdb2c[build-push-image : build]Copying blob sha256:e441d34134fac91baa79be3e2bb8fb3dba71ba5c1ea012cb5daeb7180a054687[build-push-image : build]Copying blob sha256:1e09a5ee0038fbe06a18e7f355188bbabc387467144abcd435f7544fef395aa1[build-push-image : build]Copying blob sha256:0d725b91398ed3db11249808d89e688e62e511bbd4a2e875ed8493ce1febdb2c[build-push-image : build]Copying config sha256:0c308464b19eaa9a01c3fdd6b63a043c160d4eea85e461bbbb7d01d168f6d993[build-push-image : build]Writing manifest to image destination[build-push-image : build]Storing signatures[build-push-image : build]STEP2/2: COPY target/quarkus-app /deployments/[build-push-image : build]COMMIT quay.io/gitops-cookbook/tekton-greeter:latest[build-push-image : build]--> c07e36a8e61[build-push-image : build]Successfully tagged quay.io/gitops-cookbook/tekton-greeter:latest[build-push-image : build]c07e36a8e6104d2e5c7d79a6cd34cd7b44eb093c39ef6c1487a37d7bd2305b8a[build-push-image : build]Getting imagesourcesignatures[build-push-image : build]Copying blob sha256:7853a7797845542e3825d4f305e4784ea7bf492cd4364fc93b9afba3ac0c9553[build-push-image : build]Copying blob sha256:8e0e04b5c700a86f4a112f41e7e767a9d7c539fe3391611313bf76edb07eeab1[build-push-image : build]Copying blob sha256:647a854c512bad44709221b6b0973e884f29bcb5a380ee32e95bfb0189b620e6[build-push-image : build]Copying blob sha256:69c55192bed92cbb669c88eb3c36449b64ac93ae466abfff2a575273ce05a39e[build-push-image : build]Copying config sha256:c07e36a8e6104d2e5c7d79a6cd34cd7b44eb093c39ef6c1487a37d7bd2305b8a[build-push-image : build]Writing manifest to image destination[build-push-image : build]Storing signatures[build-push-image : build]sha256:12dd3deb6305b9e125309b68418d0bb81f805e0fe7ac93942dc94764aee9f492quay.io/gitops-cookbook/tekton-greeter:latest[deploy : kubectl]deployment.apps/tekton-greeter created
Tip
You can use the Tekton Dashboard to create and visualize your running Tasks and Pipelines as shown in Figure 6-8.

Figure 6-8. Tekton Dashboard TaskRuns
See Also
6.8 Using Tekton Triggers to Compile and Package an Application Automatically When a Change Occurs on Git
Solution
Tekton Triggers is the Tekton component that brings automation for Tasks and Pipelines with Tekton. It is an interesting feature for a GitOps strategy for cloud native CI/CD as it supports external events from a large set of sources such as Git events (Git push or pull requests).
Most Git repository servers support the concept of webhooks, calling to an external source via HTTP(S) when a change in the code repository happens. Tekton provides an API endpoint that supports receiving hooks from remote systems in order to trigger builds. By pointing the code repository’s hook at the Tekton resources, automated code/build/deploy pipelines can be achieved.
The installation of Tekton Triggers, which we discussed in Recipe 6.1, brings a set of CRDs to manage event handling for Tasks and Pipelines. In this recipe we will use the following, as illustrated also in Figure 6-9:

Figure 6-9. Tekton Triggers
TriggerTemplate-
A template for newly created resources. It supports parameters to create specific
PipelineRuns. TriggerBindingEventListener-
Connects
TriggerBindingsandTriggerTemplatesinto an addressable endpoint (the event sink). It uses the extracted event parameters from eachTriggerBinding(and any supplied static parameters) to create the resources specified in the correspondingTriggerTemplate. It also optionally allows an external service to preprocess the event payload via the interceptor field.
Before creating these resources, you need to set up permissions to let Tekton Triggers create Pipelines and Tasks. You can use the setup available from the book’s repository with the following command:
kubectl apply This will create a new ServiceAccount named tekton-triggers-sa that has the permissions needed to interact with the Tekton Pipelines component. As confirmation, from the previous command you should get the following output:
serviceaccount/tekton-triggers-sa created
rolebinding.rbac.authorization.k8s.io/triggers-example-eventlistener-binding configured
clusterrolebinding.rbac.authorization.k8s.io/triggers-example-eventlistener-clusterbinding configured
You can now add automation to your Pipelines like the one we defined in Recipe 6.7 creating these three resources:
apiVersion:triggers.tekton.dev/v1alpha1kind:TriggerTemplatemetadata:name:tekton-greeter-triggertemplatespec:params:-name:git-revision-name:git-commit-message-name:git-repo-url-name:git-repo-name-name:content-type-name:pusher-nameresourcetemplates:-apiVersion:tekton.dev/v1beta1kind:PipelineRunmetadata:labels:tekton.dev/pipeline:tekton-greeter-pipeline-hubname:tekton-greeter-pipeline-webhook-$(uid)spec:params:-name:GIT_REPOvalue:$(tt.params.git-repo-url)-name:GIT_REFvalue:$(tt.params.git-revision)serviceAccountName:tekton-triggers-example-sapipelineRef:name:tekton-greeter-pipeline-hubworkspaces:-name:app-sourcepersistentVolumeClaim:claimName:app-source-pvc-name:maven-settingsemptyDir:{}
apiVersion:triggers.tekton.dev/v1alpha1kind:TriggerBindingmetadata:name:tekton-greeter-triggerbindingspec:params:-name:git-repo-urlvalue:$(body.repository.clone_url)-name:git-revisionvalue:$(body.after)
apiVersion:triggers.tekton.dev/v1alpha1kind:EventListenermetadata:name:tekton-greeter-eventlistenerspec:serviceAccountName:tekton-triggers-example-satriggers:-bindings:-ref:tekton-greeter-triggerbindingtemplate:ref:tekton-greeter-triggertemplate
You can create the resources just listed as follows:
kubectl create -f tekton-greeter-triggertemplate.yaml
kubectl create -f tekton-greeter-triggerbinding.yaml
kubectl create -f tekton-greeter-eventlistener.yaml
You should get the following output:
triggertemplate.triggers.tekton.dev/tekton-greeter-triggertemplate created
triggerbinding.triggers.tekton.dev/tekton-greeter-triggerbinding created
eventlistener.triggers.tekton.dev/tekton-greeter-eventlistener created
Contextually, a new pod is created representing the EventListener:
kubectl get pods
You should get output similar to the following:
NAME READY STATUS RESTARTS AGE el-tekton-greeter-eventlistener-5db7b9fcf9-6nrgx1/1 Running010s
The EventListener pod listens for events at a specified port, and it is bound to a Kubernetes Service:
kubectl get svc
You should get output similar to the following:
NAME TYPE CLUSTER-IP EXTERNAL-IP↳ PORT(S)AGE el-tekton-greeter-eventlistener ClusterIP10.100.36.199 <none> ↳8080/TCP,9000/TCP 10s ...
If you are running your Git server outside the cluster (e.g., GitHub or GitLab), you need to expose the Service, for example, with an Ingress. Afterwards you can configure webhooks on your Git server using the EventListener URL associated to your Ingress.
Tip
With Minikube you can add support for Ingresses with this command: minikube addons enable ingress. Then you need to map a hostname for the Ingress.
For the purpose of this book we can just simulate the webhook as it would come from the Git server.
First you can map the EventListener Service to your local networking with the following command:
kubectl port-forward svc/el-tekton-greeter-eventlistener 8080Then you can invoke the Trigger by making an HTTP request to http://localhost:8080 using curl. The HTTP request must be a POST request containing a JSON payload and it should contain the fields referenced via a TriggerBinding. In our case we mapped body.repository.clone_url and body.after.
Note
Check the documentation of your Git server to get the list of parameters that a webhook can generate. In this example we are using the GitHub Webhooks reference.
To test Triggers, run this command:
curl -X POSThttp://localhost:8080-H'Content-Type: application/json'-d'{ "after": "d9291c456db1ce29177b77ffeaa9b71ad80a50e6", "repository": { "clone_url" : "https://github.com/gitops-cookbook/tekton-tutorial-greeter.git" } }'
You should get output similar to the following:
{"eventListener":"tekton-greeter-eventlistener","namespace":"default","eventListenerUID":"c00567eb-d798-4c4a-946d-f1732fdfc313","eventID":"17dd25bb-a1fe-4f84-8422-c3abc5f10066"}
A new Pipeline now is started and you can check it with the following command:
tkn pipelinerun ls
You should see it in Running status as follows:
tekton-greeter-pipeline-3244b67f-31d3-4597-af1c-3c1aa6693719 4 seconds ago --- Running6.9 Update a Kubernetes Resource Using Kustomize and Push the Change to Git
Solution
As we discussed in Chapter 4, Kustomize is a powerful tool to manage Kubernetes manifests. Kustomize can add, remove, or patch configuration options without forking. In Recipe 4.2 you saw how to update a Kubernetes Deployment with a new container image hash using the kustomize CLI.
In this recipe, you’ll see how to let Tekton update it using Kustomize. This is very useful for GitOps as it allows an automated update on Git to the manifests describing an application running on Kubernetes, favoring the interconnection with a GitOps tool such as Argo CD in order to sync resources (see Chapter 7).
When adopting the GitOps approach, it’s common to have one or more repositories for the Kubernetes manifests and then one or more repositories for the apps as well.
Thus let’s introduce a Task that accepts the Kubernetes manifests repository as a parameter and can update the container image reference as seen in Recipe 4.2:
apiVersion:tekton.dev/v1beta1kind:Taskmetadata:annotations:tekton.dev/pipelines.minVersion:0.12.1tekton.dev/tags:gitname:git-update-deploymentlabels:app.kubernetes.io/version:'0.2'operator.tekton.dev/provider-type:communityspec:description:>-This Task can be used to update image digest in a Git repo using kustomize.It requires a secret with credentials for accessing the git repo.params:-name:GIT_REPOSITORYtype:string-name:GIT_REFtype:string-name:NEW_IMAGEtype:string-name:NEW_DIGESTtype:string-name:KUSTOMIZATION_PATHtype:stringresults:-description:The commit SHAname:commitsteps:-image:'docker.io/alpine/git:v2.26.2'name:git-cloneresources:{}script:>rm -rf git-update-digest-workdirgit clone $(params.GIT_REPOSITORY) -b $(params.GIT_REF)git-update-digest-workdirworkingDir:$(workspaces.workspace.path)-image:'quay.io/wpernath/kustomize-ubi:latest'name:update-digestresources:{}script:>cd git-update-digest-workdir/$(params.KUSTOMIZATION_PATH)kustomize edit set image $(params.NEW_IMAGE)@$(params.NEW_DIGEST)echo "##########################"echo "### kustomization.yaml ###"echo "##########################"cat kustomization.yamlworkingDir:$(workspaces.workspace.path)-image:'docker.io/alpine/git:v2.26.2'name:git-commitresources:{}script:|cd git-update-digest-workdirgit config user.email "[email protected]"git config user.name "My Tekton Bot"git statusgit add $(params.KUSTOMIZATION_PATH)/kustomization.yamlgit commit -m "[ci] Image digest updated"git pushRESULT_SHA="$(git rev-parse HEAD | tr -d ' ')"EXIT_CODE="$?"if [ "$EXIT_CODE" != 0 ]thenexit $EXIT_CODEfi# Make sure we don't add a trailing newline to the result!echo -n "$RESULT_SHA" > $(results.commit.path)workingDir:$(workspaces.workspace.path)workspaces:-description:The workspace consisting of maven project.name:workspace
This Task is composed of three steps:
git-cloneupdate-digest-
Runs
kustomizeto update the Kubernetes Deployment with a container image hash given as a parameter git-commit-
Updates the Kubernetes manifest repo with the new container image hash
You can create the Task with the following command:
kubectl create -f git-update-deployment-task.yaml
You should get the following output:
task.tekton.dev/git-update-deployment created
You can now add this Task to a Pipeline similar to the one you saw in Recipe 6.7 in order to automate the update of your manifests with Kustomize:
apiVersion:tekton.dev/v1beta1kind:Pipelinemetadata:name:pacman-pipelinespec:params:-default:https://github.com/gitops-cookbook/pacman-kikd.gitname:GIT_REPOtype:string-default:mastername:GIT_REVISIONtype:string-default:quay.io/gitops-cookbook/pacman-kikdname:DESTINATION_IMAGEtype:string-default:.name:CONTEXT_DIRtype:string-default:'https://github.com/gitops-cookbook/pacman-kikd-manifests.git'name:CONFIG_GIT_REPOtype:string-default:mainname:CONFIG_GIT_REVISIONtype:stringtasks:-name:fetch-repoparams:-name:urlvalue:$(params.GIT_REPO)-name:revisionvalue:$(params.GIT_REVISION)-name:deleteExistingvalue:"true"taskRef:name:git-cloneworkspaces:-name:outputworkspace:app-source-name:build-apptaskRef:name:mavenparams:-name:GOALSvalue:--DskipTests-clean-package-name:CONTEXT_DIRvalue:"$(params.CONTEXT_DIR)"workspaces:-name:maven-settingsworkspace:maven-settings-name:sourceworkspace:app-sourcerunAfter:-fetch-repo-name:build-push-imagetaskRef:name:buildahparams:-name:IMAGEvalue:"$(params.DESTINATION_IMAGE)"workspaces:-name:sourceworkspace:app-sourcerunAfter:-build-app-name:git-update-deploymentparams:-name:GIT_REPOSITORYvalue:$(params.CONFIG_GIT_REPO)-name:NEW_IMAGEvalue:$(params.DESTINATION_IMAGE)-name:NEW_DIGESTvalue:$(tasks.build-push-image.results.IMAGE_DIGEST)-name:KUSTOMIZATION_PATHvalue:env/dev-name:GIT_REFvalue:$(params.CONFIG_GIT_REVISION)runAfter:-build-push-imagetaskRef:kind:Taskname:git-update-deploymentworkspaces:-name:workspaceworkspace:app-sourceworkspaces:-name:app-source-name:maven-settings
As you can see from this example, you can take a result of a previous Task as an input for the following one. In this case the hash of the container image generated by the
build-push-imageTask is used to update the manifests with Kustomize.
You can create the Pipeline with the following command:
kubectl create -f pacman-pipeline.yaml
You should get the following output:
pipeline.tekton.dev/pacman-pipeline created
The git-commit step requires authentication to your Git server in order to push the updates to the repo. Since this example is on GitHub, we are using a GitHub Personal Access Token (see Recipe 6.4) attached to the ServiceAccount tekton-bot-sa.
Make sure to add the repo and registry’s Kubernetes Secrets as described in Recipes 6.4 and 6.5:
kubectl patch serviceaccount tekton-bot-sa -p'{"secrets": [{"name": "git-secret"}]}'kubectl patch serviceaccount tekton-bot-sa-p'{"secrets": [{"name": "containerregistry-secret"}]}'
Note
Make sure you have created a PVC for the Pipeline as defined in Recipe 6.7.
Now you can start the Pipeline as follows:
tkn pipeline start pacman-pipeline--serviceaccount='tekton-bot-sa'--paramGIT_REPO='https://github.com/gitops-cookbook/pacman-kikd.git'--paramGIT_REVISION='main'--paramDESTINATION_IMAGE='quay.io/gitops-cookbook/pacman-kikd:latest'--paramCONFIG_GIT_REPO='https://github.com/gitops-cookbook/pacman-kikd-manifests.git'--paramCONFIG_GIT_REVISION='main'--workspacename=app-source,claimName=app-source-pvc--workspacename=maven-settings,emptyDir=""--use-param-defaults--showlog
6.10 Update a Kubernetes Resource Using Helm and Create a Pull Request
Solution
In Chapter 5 we discussed Helm and how it can be used to manage applications on Kubernetes in a convenient way. In this recipe you’ll see how to automate Helm-powered deployments through a Pipeline in order to install or update an application running on Kubernetes.
As shown in Recipe 6.7, you can use Tekton Hub to find and install Tekton Tasks. In fact, you can use the helm-upgrade-from-repo Task to have Helm support for your Pipelines.
To install it, run this command:
tkn hub install task helm-upgrade-from-repo
This Task can install a Helm Chart from a Helm repository. For this example, we provide a Helm repository in this book’s repository that you can add with the following command:
helm repo add gitops-cookbook https://gitops-cookbook.github.io/helm-charts/
You should get the following output:
"gitops-cookbook" has been added to your repositoriesYou can install the Helm Chart with the following command:
helm install pacman gitops-cookbook/pacman
You should get output similar to the following:
NAME: pacman LAST DEPLOYED: Mon Aug1517:02:212022NAMESPACE: default STATUS: deployed REVISION:1TEST SUITE: None USER-SUPPLIED VALUES:{}
The app should be now deployed and running on Kubernetes:
kubectl get pods -l=app.kubernetes.io/name=pacman
You should get the following output:
NAME READY STATUS RESTARTS AGE pacman-6798d65d84-9mt8p1/1 Running030s
Now let’s update the Deployment with a Tekton Task running a helm upgrade with the following TaskRun:
apiVersion:tekton.dev/v1beta1kind:TaskRunmetadata:generateName:helm-pacman-run-spec:serviceAccountName:tekton-deployer-sataskRef:name:helm-upgrade-from-repoparams:-name:helm_repovalue:https://gitops-cookbook.github.io/helm-charts/-name:chart_namevalue:gitops-cookbook/pacman-name:release_versionvalue:0.1.0-name:release_namevalue:pacman-name:overwrite_valuesvalue:replicaCount=2
The
helm-upgrade-from-repoTask needs permission to list objects in the working namespace, so you need aServiceAccountwith special permissions as seen in Recipe 6.6.You can override values in the Chart’s values.yaml file by adding them in this param. Here we are setting up two replicas for the Pac-Man game.
Run the Task with the following command:
kubectl create -f helm-pacman-taskrun.yaml
You should get output similar to the following:
taskrun.tekton.dev/helm-pacman-run-qghx8 created
Check logs with tkn CLI and select the running Task:
tkn taskrun logs -f
You should get output similar to the following, where you can see the Helm upgrade has been successfully performed:
[upgrade-from-repo]current installed helm releases[upgrade-from-repo]NAME NAMESPACE REVISION UPDATED STATUS CHART APP VERSION[upgrade-from-repo]pacman default12022-08-1517:02:21.633934129 +0200 +0200 deployed pacman-0.1.01.0.0[upgrade-from-repo]parsing helms repo name...[upgrade-from-repo]adding helm repo...[upgrade-from-repo]"gitops-cookbook"has been added to your repositories[upgrade-from-repo]adding updating repo...[upgrade-from-repo]Hang tightwhilewe grab the latest from your chart repositories...[upgrade-from-repo]...Successfully got an update from the"gitops-cookbook"chart repository[upgrade-from-repo]Update Complete. ⎈Happy Helming!⎈[upgrade-from-repo]installing helm chart...[upgrade-from-repo]history.go:56:[debug]gettinghistoryforrelease pacman[upgrade-from-repo]upgrade.go:123:[debug]preparing upgradeforpacman[upgrade-from-repo]upgrade.go:131:[debug]performing updateforpacman[upgrade-from-repo]upgrade.go:303:[debug]creating upgraded releaseforpacman[upgrade-from-repo]client.go:203:[debug]checking2resourcesforchanges[upgrade-from-repo]client.go:466:[debug]Looks like there are no changesforService"pacman"[upgrade-from-repo]wait.go:47:[debug]beginningwaitfor2resources with timeout of 5m0s[upgrade-from-repo]ready.go:277:[debug]Deployment is not ready: default/pacman.1out of2expected pods are ready[upgrade-from-repo]ready.go:277:[debug]Deployment is not ready: default/pacman.1out of2expected pods are ready[upgrade-from-repo]ready.go:277:[debug]Deployment is not ready: default/pacman.1out of2expected pods are ready[upgrade-from-repo]upgrade.go:138:[debug]updating statusforupgraded releaseforpacman[upgrade-from-repo]Release"pacman"has been upgraded. Happy Helming![upgrade-from-repo]NAME: pacman[upgrade-from-repo]LAST DEPLOYED: Mon Aug1515:23:312022[upgrade-from-repo]NAMESPACE: default[upgrade-from-repo]STATUS: deployed[upgrade-from-repo]REVISION:2[upgrade-from-repo]TEST SUITE: None[upgrade-from-repo]USER-SUPPLIED VALUES:[upgrade-from-repo]replicaCount:2[upgrade-from-repo][upgrade-from-repo]COMPUTED VALUES:[upgrade-from-repo]image:[upgrade-from-repo]containerPort:8080[upgrade-from-repo]pullPolicy: Always[upgrade-from-repo]repository: quay.io/gitops-cookbook/pacman-kikd[upgrade-from-repo]tag:1.0.0[upgrade-from-repo]replicaCount:2[upgrade-from-repo]securityContext:{}[upgrade-from-repo][upgrade-from-repo]HOOKS:[upgrade-from-repo]MANIFEST:[upgrade-from-repo]---[upgrade-from-repo]# Source: pacman/templates/service.yaml[upgrade-from-repo]apiVersion: v1[upgrade-from-repo]kind: Service[upgrade-from-repo]metadata:[upgrade-from-repo]labels:[upgrade-from-repo]app.kubernetes.io/name: pacman[upgrade-from-repo]name: pacman[upgrade-from-repo]spec:[upgrade-from-repo]ports:[upgrade-from-repo]- name: http[upgrade-from-repo]port:8080[upgrade-from-repo]targetPort:8080[upgrade-from-repo]selector:[upgrade-from-repo]app.kubernetes.io/name: pacman[upgrade-from-repo]---[upgrade-from-repo]# Source: pacman/templates/deployment.yaml[upgrade-from-repo]apiVersion: apps/v1[upgrade-from-repo]kind: Deployment[upgrade-from-repo]metadata:[upgrade-from-repo]name: pacman[upgrade-from-repo]labels:[upgrade-from-repo]app.kubernetes.io/name: pacman[upgrade-from-repo]app.kubernetes.io/version:"1.0.0"[upgrade-from-repo]spec:[upgrade-from-repo]replicas:2[upgrade-from-repo]selector:[upgrade-from-repo]matchLabels:[upgrade-from-repo]app.kubernetes.io/name: pacman[upgrade-from-repo]template:[upgrade-from-repo]metadata:[upgrade-from-repo]labels:[upgrade-from-repo]app.kubernetes.io/name: pacman[upgrade-from-repo]spec:[upgrade-from-repo]containers:[upgrade-from-repo]- image:"quay.io/gitops-cookbook/pacman-kikd:1.0.0"[upgrade-from-repo]imagePullPolicy: Always[upgrade-from-repo]securityContext:[upgrade-from-repo]{}[upgrade-from-repo]name: pacman[upgrade-from-repo]ports:[upgrade-from-repo]- containerPort:8080[upgrade-from-repo]name: http[upgrade-from-repo]protocol: TCP[upgrade-from-repo]
kubectl get deploy -l=app.kubernetes.io/name=pacman
pacman2/2229s
6.11 Use Drone to Create a Pipeline for Kubernetes
Solution
Drone is an open source project for cloud native continuous integration (CI). It uses YAML build files to define and execute build pipelines inside containers.
- Server
-
Integrates with popular SCMs such as GitHub, GitLab, or Gitea
- Runner
-
Acts as an agent running on a certain platform
You can install the Server of your choice following the documentation and install the Kubernetes Runner.
In this example you will create a Java Maven-based pipeline using the Pac-Man app. First, install the Drone CLI for your OS; you can get it from the official website here.
Tip
On macOS, drone is available through Homebrew as follows:
brew tap drone/drone && brew install drone
Then configure Drone, copy the DRONE_TOKEN from your instance under the Drone Account settings page, then create/update the file called .envrc.local and add the variables to override:
exportDRONE_TOKEN="<YOUR-TOKEN>"
Ensure the token is loaded:
drone info
Now activate the repo in Drone:
drone repo enable https://github.com/gitops-cookbook/pacman-kikd.gitSimilarly to Tekton, Drone’s pipeline will compile, test, and build the app. Then it will create and push the container image to a registry.
Add credentials to your container registry as follows (here, we’re using Quay.io):
drone secret add --name image_registry--data quay.io https://github.com/gitops-cookbook/pacman-kikd.git drone secret add --name image_registry_user--data YOUR_REGISTRY_USER https://github.com/gitops-cookbook/pacman-kikd.git drone secret add --name image_registry_password--data YOUR_REGISTRY_PASS https://github.com/gitops-cookbook/pacman-kikd.git drone secret add --name destination_image--data quay.io/YOUR_REGISTRY_USER>/pacman-kikd.git https://github.com/gitops-cookbook/pacman-kikd.git
Create a file called .drone.yaml as follows:
kind:pipelinetype:dockername:java-pipelineplatform:os:linuxarch:arm64trigger:branch:-mainclone:disable:truesteps:-name:clone sourcesimage:alpine/gitpull:if-not-existscommands:-git clone https://github.com/gitops-cookbook/pacman-kikd.git .-git checkout $DRONE_COMMIT-name:maven-buildimage:maven:3-jdk-11commands:-mvn install -DskipTests=true -B-mvn test -B-name:publishimage:plugins/docker:20.13pull:if-not-existssettings:tags:"latest"dockerfile:Dockerfileinsecure:truemtu:1400username:from_secret:image_registry_userpassword:from_secret:image_registry_passwordregistry:from_secret:image_registryrepo:from_secret:destination_image
Start the pipeline:
droneexec--pipeline=java-pipeline
6.12 Use GitHub Actions for CI
Solution
GitHub Actions are event-driven automation tasks available for any GitHub repository. An event automatically triggers the workflow, which contains a job. The job then uses steps to control the order in which actions are run. These actions are the commands that automate software building, testing, and deployment.
In this recipe, you will add a GitHub Action for building the Pac-Man game container image, and pushing it to the GitHub Container Registry.
Tip
As GitHub Actions are connected to repositories, you can fork the Pac-Man repository from this book’s code repositories to add your GitHub Actions. See the documentation about forking repositories for more info on this topic.
GitHub Actions workflows run into environments and they can reference an environment to use the environment’s protection rules and secrets.
Workflows and jobs are defined with a YAML file containing all the needed steps. Inside your repository, you can create one with the path .github/workflows/pacman-ci-action.yml:
# This is a basic workflow to help you get started with Actionsname:pacman-ci-actionenv:IMAGE_REGISTRY:ghcr.io/${{github.repository_owner}}REGISTRY_USER:${{github.actor}}REGISTRY_PASSWORD:${{github.token}}APP_NAME:pacmanIMAGE_TAGS:1.0.0${{github.sha}}# Controls when the workflow will runon:# Triggers the workflow on push or pull request events but only for the# "main" branchpush:branches:["main"]pull_request:branches:["main"]# Allows you to run this workflow manually from the Actions tabworkflow_dispatch:# A workflow run is made up of one or more jobs that can run sequentially or in# paralleljobs:# This workflow contains a single job called "build-and-push"build-and-push:# The type of runner that the job will run onruns-on:ubuntu-latest# Steps represent a sequence of tasks that will be executed as part of the# jobsteps:# Checks-out your repository under $GITHUB_WORKSPACE, so your job can# access it-uses:actions/checkout@v3-name:SetupJDK11uses:actions/setup-java@v3with:java-version:'11'distribution:'adopt'cache:maven-name:BuildwithMavenrun:mvn--batch-modepackage-name:BuildahActionid:build-imageuses:redhat-actions/buildah-build@v2with:image:${{env.IMAGE_REGISTRY}}/${{env.APP_NAME}}tags:${{env.IMAGE_TAGS}}containerfiles:|./Dockerfile-name:PushtoRegistryid:push-to-registryuses:redhat-actions/push-to-registry@v2with:image:${{steps.build-image.outputs.image}}tags:${{steps.build-image.outputs.tags}}registry:${{env.IMAGE_REGISTRY}}username:${{env.REGISTRY_USER}}password:${{env.REGISTRY_PASSWORD}}
Name of the Action.
Environment variables to be used in the workflow. This includes default environment variables and the Secret you added to the environment.
Here’s where you define which type of trigger you want for this workflow. In this case, any change to the repository (Push) to the
masterbranch will trigger the action to start. Check out the documentation for a full list of triggers that can be used.Name of this Job.
List of steps; each step contains an action for the pipeline.

Buildah Build. This action builds container images using Buildah.

Push to Registry. This action is used to push to the GitHub Registry using built-in credentials available for GitHub repository owners.
After each Git push or pull request, a new run of the action is performed as shown in Figure 6-10.
Note
GitHub offers its own container registry available at ghcr.io, and container images are referenced as part of the GitHub Packages. By default the images are public. See this book’s repository as a reference.
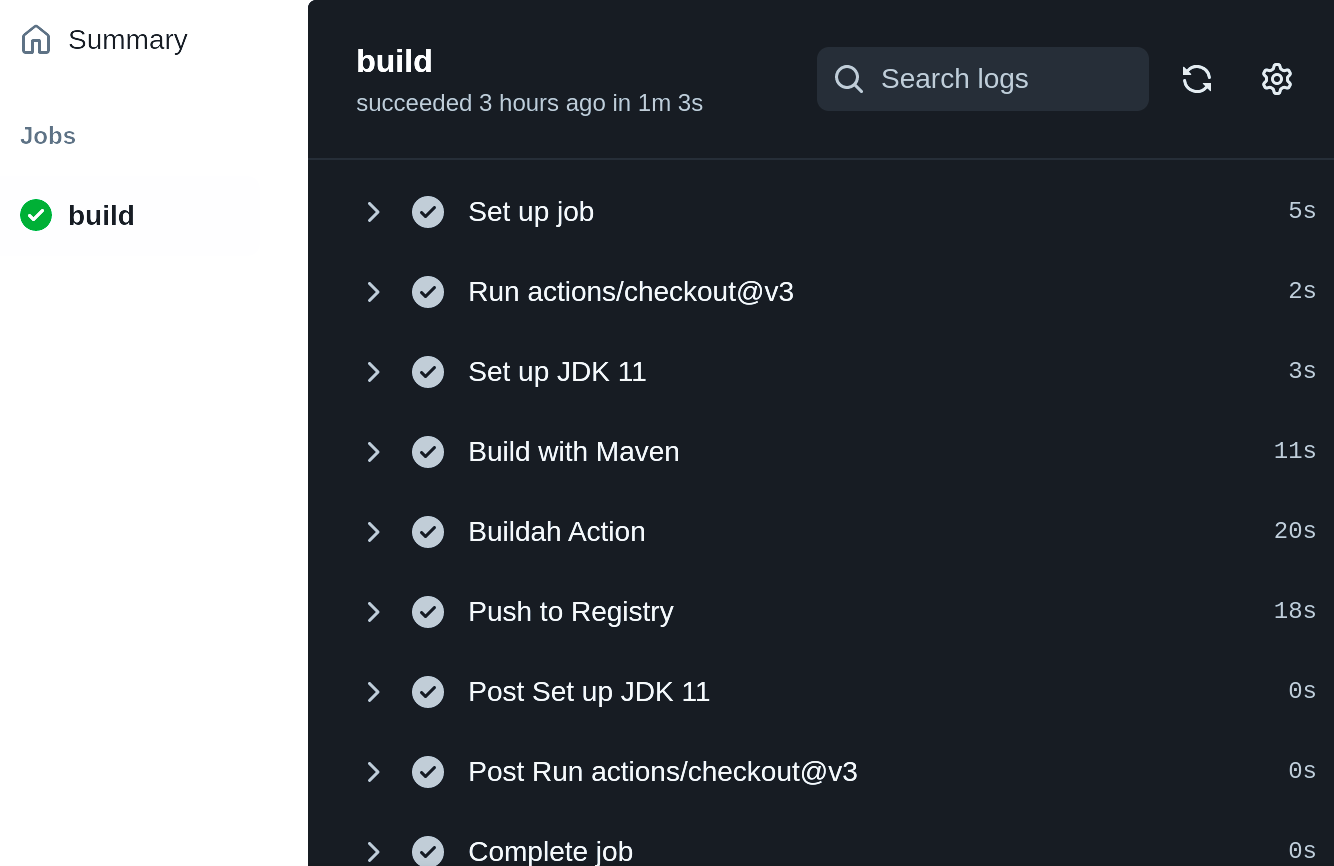
Figure 6-10. GitHub Actions Jobs
1 See the Tekton documentation.