Chapter 5. Helm
In Chapter 4, you learned about Kustomize, a simple yet powerful tool to manage Kubernetes resources. But another popular tool aims to simplify the Kubernetes resources management too: Helm.
Helm works similarly to Kustomize, but it’s a template solution and acts more like a package manager, producing artifacts that are versionable, sharable, or deployable.
In this chapter, we’ll introduce Helm, a package manager for Kubernetes that helps install and manage Kubernetes applications using the Go template language in YAML files.
The first step is to create a Helm project and deploy it to a Kubernetes cluster (see Recipes 5.1 and 5.2). After the first deployment, the application is updated with a new container image, a new configuration value, or any other field, such as the replica number (see Recipe 5.3).
One of the differences between Kustomize and Helm is the concept of a Chart. A Chart is a packaged artifact that can be shared and contains multiple elements like dependencies on other Charts (see Recipes 5.4, 5.5, and 5.6).
Application configuration values are properties usually mapped as a Kubernetes ConfigMap.
Any change (and its consequent update on the cluster) on a ConfigMap doesn’t trigger a rolling update of the application, which means that the application will run with the previous version until you manually restart it.
Helm provides some functions to automatically execute a rolling update when the ConfigMap of an application changes (see Recipe 5.7).
5.1 Creating a Helm Project
Solution
Use the Helm CLI tool to create a new project.
In contrast to Kustomize, which can be used either within the kubectl command or as a standalone CLI tool, Helm needs to be downloaded and installed in your local machine.
Helm is a packager for Kubernetes that bundles related manifest files and packages them into a single logical deployment unit: a Chart. Thus simplified, for many engineers, Helm makes it easy to start using Kubernetes with real applications.
Helm Charts are useful for addressing the installation complexities and simple upgrades of applications.
For this book, we use Helm 3.7.2, which you can download from GitHub and install in your PATH directory.
Open a terminal and run the following commands to create a Helm Chart directory layout:
mkdir pacman
mkdir pacman/templates

cd pacman
Then create three files: one that defines the Chart, another representing the deployment template using the Go template language and template functions from the Sprig library, and finally a file containing the default values for the Chart.
A Chart.yaml file declares the Chart with information such as version or name. Create the file in the root directory:
apiVersion:v2name:pacmandescription:AHelmchartforPacmantype:applicationversion:0.1.0appVersion:"1.0.0"

Version of the Chart. This is updated when something in the Chart definition is changed.

Version of the application.
Let’s create a deployment.yaml and a service.yaml template file to deploy the application.
The deployment.yaml file templatizes the deployment’s name, the application version, the replica count, the container image and tag, the pull policy, the security context, and the port:
apiVersion:apps/v1kind:Deploymentmetadata:name:{{.Chart.Name}}labels:app.kubernetes.io/name:{{.Chart.Name}}{{-if.Chart.AppVersion}}app.kubernetes.io/version:{{.Chart.AppVersion|quote}}{{-end}}spec:replicas:{{.Values.replicaCount}}selector:matchLabels:app.kubernetes.io/name:{{.Chart.Name}}template:metadata:labels:app.kubernetes.io/name:{{.Chart.Name}}spec:containers:-image:"{{.Values.image.repository}}:{{.Values.image.tag|default.Chart.AppVersion}}"imagePullPolicy:{{.Values.image.pullPolicy}}securityContext:{{-toYaml.Values.securityContext|nindent14}}name:{{.Chart.Name}}ports:-containerPort:{{.Values.image.containerPort}}name:httpprotocol:TCP
Sets the name from the Chart.yaml file
Conditionally sets the version based on the presence of the
appVersionin the Chart.yaml file
Sets the
appVersionvalue but quoting the property
Placeholder for the
replicaCountproperty
Placeholder for the container image

Placeholder for the image tag if present and if not, defaults to the Chart.yaml property

Sets the
securityContextvalue as a YAML object and not as a string, indenting it 14 spaces
The service.yaml file templatizes the service name and the container port:
apiVersion:v1kind:Servicemetadata:labels:app.kubernetes.io/name:{{.Chart.Name}}name:{{.Chart.Name}}spec:ports:-name:httpport:{{.Values.image.containerPort}}targetPort:{{.Values.image.containerPort}}selector:app.kubernetes.io/name:{{.Chart.Name}}
The values.yaml file contains the default values for the Chart. These values can be overridden at runtime, but they provide good initial values.
Create the file in the root directory with some default values:
image:repository:quay.io/gitops-cookbook/pacman-kikdtag:"1.0.0"pullPolicy:AlwayscontainerPort:8080replicaCount:1securityContext:{}
Defines the
imagesectionSets the
repositorypropertyEmpty
securityContext
Built-in properties are capitalized; for this reason, properties defined in the Chart.yaml file start with an uppercase letter.
Since the toYaml function is used for the securityContext value, the expected value for the securityContext property in values.yaml should be a YAML object.
For example:
securityContext:capabilities:drop:-ALLreadOnlyRootFilesystem:truerunAsNonRoot:truerunAsUser:1000
The relationship between all elements is shown in Figure 5-1.

Figure 5-1. Relationship between Helm elements
At this point the Helm directory layout is created and should be similar to this:
pacman├──Chart.yaml├──templates│├──deployment.yaml│├──service.yaml└──values.yaml
The Chart.yaml file is the Chart descriptor and contains metadata related to the Chart.
The templates directory contains all template files used for installing a Chart.
These files are Helm template files used to deploy the application.
The values.yaml file contains the default values for a Chart.
To render the Helm Chart locally to YAML, run the following command in a terminal window:
helm template .
The output is:
---apiVersion:v1kind:Servicemetadata:labels:app.kubernetes.io/name:pacmanname:pacmanspec:ports:-name:httpport:8080targetPort:8080selector:app.kubernetes.io/name:pacman---apiVersion:apps/v1kind:Deploymentmetadata:name:pacmanlabels:app.kubernetes.io/name:pacmanapp.kubernetes.io/version:"1.0.0"spec:replicas:1selector:matchLabels:app.kubernetes.io/name:pacmantemplate:metadata:labels:app.kubernetes.io/name:pacmanspec:containers:-image:"quay.io/gitops-cookbook/pacman-kikd:1.0.0"imagePullPolicy:AlwayssecurityContext:{}name:pacmanports:-containerPort:8080name:httpprotocol:TCP
Name is injected from Chart.yaml
Port is set in values.yaml
Version is taken from Chart version
Concatenates content from two attributes
Empty security context
You can override any default value by using the --set parameter in Helm.
Let’s override the replicaCount value from one (defined in values.yaml) to three:
helm template --setreplicaCount=3.
And the replicas value is updated:
apiVersion:apps/v1kind:Deploymentmetadata:name:pacmanlabels:app.kubernetes.io/name:pacmanapp.kubernetes.io/version:"1.0.0"spec:replicas:3...
Discussion
Helm is a package manager for Kubernetes, and as such, it helps you with the task of versioning, sharing, and upgrading Kubernetes applications.
Let’s see how to install the Helm Chart to a Kubernetes cluster and upgrade the application.
With Minikube up and running, execute the following command in a terminal window, and run the install command to deploy the application to the cluster:
helm install pacman .
The Chart is installed in the running Kubernetes instance:
LAST DEPLOYED: Sat Jan2215:13:502022NAMESPACE: default STATUS: deployed REVISION:1TEST SUITE: None
Get the list of current deployed pods, Deployments, and Services to validate that the Helm Chart is deployed in the Kubernetes cluster:
kubectl get pods NAME READY STATUS RESTARTS AGE pacman-7947b988-kzjbc1/1 Running060s
kubectl get deployment NAME READY UP-TO-DATE AVAILABLE AGE pacman1/1114m50s
kubectl get services NAME TYPE CLUSTER-IP EXTERNAL-IP PORT(S)AGE pacman ClusterIP172.30.129.123 <none>8080/TCP 9m55s
Also, it’s possible to get history information about the deployed Helm Chart using the history command:
helmhistorypacman REVISION UPDATED STATUS CHART ↳ APP VERSION DESCRIPTION1Sat Jan2215:23:222022deployed pacman-0.1.0↳1.0.0 Installcomplete
To uninstall a Chart from the cluster, run uninstall command:
helm uninstall pacman

release "pacman" uninstalled
Helm is a package manager that lets you share the Chart (package) to other Charts as a dependency. For example, you can have a Chart defining the deployment of the application and another Chart as a dependency setting a database deployment. In this way, the installation process installs the application and the database Chart automatically.
We’ll learn about the packaging process and adding dependencies in a later section.
5.2 Reusing Statements Between Templates
Solution
Use _helpers.tpl to define reusable statements.
We deployed a simple application to Kubernetes using Helm in the previous recipe.
This simple application was composed of a Kubernetes Deployment file and a Kubernetes Service file where the selector field was defined with the same value.
As a reminder:
...spec:replicas:{{.Values.replicaCount}}selector:matchLabels:app.kubernetes.io/name:{{.Chart.Name}}template:metadata:labels:app.kubernetes.io/name:{{.Chart.Name}}...
service.yaml----...selector:app.kubernetes.io/name:{{.Chart.Name}}----
If you need to update this field—for example, adding a new label as a selector—you would need to update in three places, as shown in the previous snippets.
Helm lets you create a _helpers.tpl file in the templates directory defining statements that can be called in templates to avoid this problem.
Let’s refactor the previous example to use the _helpers.tpl file to define the selectorLabels.
Create the _helpers.tpl file in the templates directory with the following content:
{{-define"pacman.selectorLabels"-}}app.kubernetes.io/name:{{.Chart.Name}}{{-end}}
Defines the statement name
Defines the logic of the statement
Then replace the template placeholders shown in previous snippets with a call to the podman.selectorLabels helper statement using the include keyword:
spec:replicas:{{.Values.replicaCount}}selector:matchLabels:{{-include"pacman.selectorLabels".|nindent6}}template:metadata:labels:{{-include"pacman.selectorLabels".|nindent8}}spec:containers:
Calls
pacman.selectorLabelswith indentationCalls
pacman.selectorLabelswith indentation
To render the Helm Chart locally to YAML, run the following command in a terminal window:
helm template .
The output is:
apiVersion:v1kind:Servicemetadata:labels:app.kubernetes.io/name:pacmanname:pacmanspec:ports:-name:httpport:8080targetPort:8080selector:app.kubernetes.io/name:pacman---apiVersion:apps/v1kind:Deploymentmetadata:name:pacmanlabels:app.kubernetes.io/name:pacmanapp.kubernetes.io/version:"1.0.0"spec:replicas:1selector:matchLabels:app.kubernetes.io/name:pacmantemplate:metadata:labels:app.kubernetes.io/name:pacmanspec:containers:-image:"quay.io/gitops-cookbook/pacman-kikd:1.0.0"imagePullPolicy:AlwayssecurityContext:{}name:pacmanports:-containerPort:8080name:httpprotocol:TCP
Selector is updated with value set in _helpers.tpl
Selector is updated with value set in _helpers.tpl
Selector is updated with value set in _helpers.tpl
Discussion
If you want to update the selector labels, the only change you need to do is an update to the _helpers.tpl file:
{{-define"pacman.selectorLabels"-}}app.kubernetes.io/name:{{.Chart.Name}}app.kubernetes.io/version:{{.Chart.AppVersion}}{{-end}}
Adds a new attribute
To render the Helm Chart locally to YAML, run the following command in a terminal window:
helm template .
The output is:
---# Source: pacman/templates/service.yamlapiVersion:v1kind:Servicemetadata:...selector:app.kubernetes.io/name:pacmanapp.kubernetes.io/version:1.0.0---apiVersion:apps/v1kind:Deploymentmetadata:name:pacmanlabels:app.kubernetes.io/name:pacmanapp.kubernetes.io/version:"1.0.0"spec:replicas:1selector:matchLabels:app.kubernetes.io/name:pacmanapp.kubernetes.io/version:1.0.0template:metadata:labels:app.kubernetes.io/name:pacmanapp.kubernetes.io/version:1.0.0spec:...
Label is added
Label is added
Label is added
5.3 Updating a Container Image in Helm
Solution
With Minikube up and running, deploy version 1.0.0 of the pacman application:
helm install pacman .
With the first revision deployed, let’s update the container image to a new version and deploy it.
You can check revision number by running the following command:
helmhistorypacman REVISION UPDATED STATUS CHART APP VERSION↳ DESCRIPTION1Sun Jan2316:00:092022deployed pacman-0.1.01.0.0↳ Installcomplete
To update the version, open values.yaml and update the image.tag field to the newer container image tag:
image:repository:quay.io/gitops-cookbook/pacman-kikdtag:"1.1.0"pullPolicy:AlwayscontainerPort:8080replicaCount:1securityContext:{}
Updates to container tag to 1.1.0
Then update the appVersion field of the Chart.yaml file:
apiVersion:v2name:pacmandescription:AHelmchartforPacmantype:applicationversion:0.1.0appVersion:"1.1.0"
Version is updated accordingly
Tip
You can use appVersion as the tag instead of having two separate fields. Using two fields or one might depend on your use case, versioning strategy, and lifecycle of your software.
After these changes, upgrade the deployment by running the following command:
helm upgrade pacman .
The output reflects that a new revision has been deployed:
Release"pacman"hasbeenupgraded.HappyHelming!NAME:pacmanLASTDEPLOYED:MonJan2411:39:282022NAMESPACE:asotobue-devSTATUS:deployedREVISION:2TESTSUITE:None
New revision
The history command shows all changes between all versions:
helmhistorypacman REVISION UPDATED STATUS CHART APP VERSION↳ DESCRIPTION1Mon Jan2410:22:062022superseded pacman-0.1.01.0.0↳ Installcomplete2Mon Jan2411:39:282022deployed pacman-0.1.01.1.0↳ Upgradecomplete
Note
appVersion is the application version, so every time you change the application version, you should update that field too. On the other side, version is the Chart version and should be updated when the definition of the Chart (i.e., templates) changes, so both fields are independent.
Discussion
Not only you can install or upgrade a version with Helm, but you can also roll back to a previous revision.
In the terminal window, run the following command:
helm rollback pacman 1

Rollback was a success! Happy Helming!
Running the history command reflects this change too:
helmhistorypacman REVISION UPDATED STATUS CHART APP VERSION↳ DESCRIPTION1Mon Jan2410:22:062022superseded pacman-0.1.01.0.0↳ Installcomplete2Mon Jan2411:39:282022superseded pacman-0.1.01.1.0↳ Upgradecomplete3Mon Jan2412:31:582022deployed pacman-0.1.01.0.0↳ Rollback to
Finally, Helm offers a way to override values, not only using the --set argument as shown in Recipe 5.1, but by providing a YAML file.
Create a new YAML file named newvalues.yaml in the root directory with the following content:
image:tag:"1.2.0"
Then run the template command, setting the new file as an override of values.yaml:
helm template pacman -f newvalues.yaml .
The resulting YAML document is using the values set in values.yaml but overriding the images.tag set in newvalues.yaml:
apiVersion:apps/v1kind:Deploymentmetadata:name:pacman...spec:replicas:1selector:matchLabels:app.kubernetes.io/name:pacmantemplate:metadata:labels:app.kubernetes.io/name:pacmanspec:containers:-image:"quay.io/gitops-cookbook/pacman-kikd:1.2.0"imagePullPolicy:Always...
5.4 Packaging and Distributing a Helm Chart
Solution
Helm is a package manager for Kubernetes. As we’ve seen in this chapter, the basic unit in Helm is a Chart containing the Kubernetes files required to deploy the application, the default values for the templates, etc.
But we’ve not yet seen how to package Helm Charts and distribute them to be available to other Charts as dependencies or deployed by other users.
Let’s package the pacman Chart into a .tgz file.
In the pacman directory, run the following command:
helm package .
And you’ll get a message informing you where the archive is stored:
Successfully packaged chart and saved it to:↳
gitops-cookbook/code/05_helm/04_package/pacman/pacman-0.1.0.tgz
A Chart then needs to be published into a Chart repository. A Chart repository is an HTTP server with an index.yaml file containing metadata information regarding Charts and .tgz Charts.
To publish them, update the index.yaml file with the new metadata information, and upload the artifact.
The directory layout of a repository might look like this:
repo
├── index.yaml
├── pacman-0.1.0.tgz
The index.yaml file with information about each Chart present in the repository looks like:
apiVersion:v1entries:pacman:-apiVersion:v2appVersion:1.0.0created:"2022-01-24T16:42:54.080959+01:00"description:A Helm chart for Pacmandigest:aa3cce809ffcca86172fc793d7804d1c61f157b9b247680a67d5b16b18a0798dname:pacmantype:applicationurls:-pacman-0.1.0.tgzversion:0.1.0generated:"2022-01-24T16:42:54.080485+01:00"
Discussion
In addition to packaging a Helm Chart, Helm can generate a signature file for the packaged Chart to verify its correctness later.
In this way, you can be sure it has not been modified, and it’s the correct Chart.
To sign/verify the package, you need a pair of GPG keys in the machine; we’re assuming you already have one pair created.
Now you need to call the package command but set the -sign argument with the required parameters to generate a signature file:
helm package --sign --key'[email protected]'--keyring /home/me/.gnupg/secring.gpg .
Now, two files are created—the packaged Helm Chart (.tgz) and the signature file (.tgz.prov):
.├──Chart.yaml├──pacman-0.1.0.tgz├──pacman-0.1.0.tgz.prov├──templates│├──deployment.yaml│└──service.yaml└──values.yaml
Chart package
Signature file
Note
Remember to upload both files in the Chart repository.
To verify that a Chart is valid and has not been manipulated, use the verify
command:
helmverifypacman-0.1.0.tgzSignedby:alexs(book)<[email protected]>UsingKeyWithFingerprint:57C4511D738BC0B288FAF9D69B40EB787040F3CFChartHashVerified:↳sha256:d8b2e0c5e12a8425df2ea3a903807b93aabe4a6ff8277511a7865c847de3c0bf
It’s valid
5.5 Deploying a Chart from a Repository
Solution
Use the repo add command to add the remote repository and the install command to deploy it.
Public Helm Chart repositories like Bitnami are available for this purpose.
To install Charts from a repository (either public or private), you need to register it using its URL:
helmrepoaddbitnamihttps://charts.bitnami.com/bitnami
URL of Helm Chart repository where index.yaml is placed
List the registered repositories:
helmrepolistNAMEURLstablehttps://charts.helm.sh/stablebitnamihttps://charts.bitnami.com/bitnami
Bitnami repo is registered
After registering a repository, you might want to find which Charts are available.
If you want to deploy a PostgreSQL instance in the cluster, use the search command to search all repositories for a Chart that matches the name:
helm search repo postgresql
The outputs are the list of Charts that matches the name, the version of the Chart and PostgreSQL, and a description.
Notice the name of the Chart is composed of the repository name and the Chart name, i.e., bitnami/postgresql:
NAME                               	CHART VERSION	APP VERSION↳
	DESCRIPTION
bitnami/postgresql                 	10.16.2      	11.14.0↳
    	Chart for PostgreSQL, an object-relational data...
bitnami/postgresql-ha              	8.2.6        	11.14.0↳
    	Chart for PostgreSQL with HA architecture (usin...
stable/postgresql                  	8.6.4        	11.7.0↳
     	DEPRECATED Chart for PostgreSQL, an object-rela...
stable/pgadmin                     	1.2.2        	4.18.0↳
     	pgAdmin is a web based administration tool for ...
stable/stolon                      	1.6.5        	0.16.0↳
     	DEPRECATED - Stolon - PostgreSQL cloud native H...
stable/gcloud-sqlproxy             	0.6.1        	1.11↳
       	DEPRECATED Google Cloud SQL Proxy
stable/prometheus-postgres-exporter	1.3.1        	0.8.0↳
      	DEPRECATED A Helm chart for prometheus postgres...
To deploy the PostgreSQL Chart, run the install command but change the location of the Helm Chart from a local directory to the full name of the Chart (<repo>/<chart>):
helminstallmy-db--setpostgresql.postgresqlUsername=my-default,postgresql.↳postgresqlPassword=postgres,postgresql.postgresqlDatabase=mydb,↳postgresql.persistence.enabled=falsebitnami/postgresql
Sets the name of the deployment
Overrides default values to the ones set in the command line
Sets the PostgreSQL Chart stored in the Bitnami repo
And a detailed output is shown in the console:
NAME: my-db
LAST DEPLOYED: Mon Jan 24 22:33:56 2022
NAMESPACE: asotobue-dev
STATUS: deployed
REVISION: 1
TEST SUITE: None
NOTES:
CHART NAME: postgresql
CHART VERSION: 10.16.2
APP VERSION: 11.14.0

** Please be patient while the chart is being deployed **

PostgreSQL can be accessed via port 5432 on the following DNS names↳
from within your cluster:

    my-db-postgresql.asotobue-dev.svc.cluster.local - Read/Write connection

To get the((("passwords", "Helm Charts")))((("Helm", "Charts", "passwords")))((("Charts", "passwords"))) password for "postgres" run:

    export POSTGRES_ADMIN_PASSWORD=$(kubectl get secret↳
     --namespace asotobue-dev my-db-postgresql -o↳
     jsonpath="{.data.postgresql-postgres-password}" | base64 --decode)

To get the password for "my-default" run:

    export POSTGRES_PASSWORD=$(kubectl get secret↳
     --namespace asotobue-dev my-db-postgresql -o↳
     jsonpath="{.data.postgresql-password}" | base64 --decode)

To connect to your database run the following command:

    kubectl run my-db-postgresql-client --rm --tty -i --restart='Never'↳
     --namespace asotobue-dev↳
     --image docker.io/bitnami/postgresql:11.14.0-debian-10-r28↳
     --env="PGPASSWORD=$POSTGRES_PASSWORD"↳
     --command -- psql --host my-db-postgresql -U my-default -d mydb↳
     -p 5432


To connect to your ((("Helm", "Charts", "connecting to databases")))((("Charts", "databases", "connecting to")))((("databases", "connecting to", "Helm Charts")))database from outside the cluster execute the following commands:

    kubectl port-forward --namespace asotobue-dev svc/my-db-postgresql 5432:5432 &
    PGPASSWORD="$POSTGRES_PASSWORD" psql --host 127.0.0.1 -U my-default -d mydb -p 5432
Inspect the installation by listing pods, Services, StatefulSets, or Secrets:
kubectl get pods NAME READY STATUS RESTARTS AGE my-db-postgresql-01/1 Running023s
kubectl get services NAME TYPE CLUSTER-IP EXTERNAL-IP PORT(S)AGE my-db-postgresql ClusterIP172.30.35.1 <none>5432/TCP 3m33s my-db-postgresql-headless ClusterIP None <none>5432/TCP 3m33s
kubectl get statefulset

NAME               READY   AGE
my-db-postgresql   1/1     4m24s
kubectl get secrets NAME TYPE DATA AGE my-db-postgresql Opaque25m23s sh.helm.release.v1.my-db.v1 helm.sh/release.v115m24s
Discussion
When a third party creates a Chart, there is no direct access to default values or the list of parameters to override.
Helm provides a show command to check these values:
helm show values bitnami/postgresql
And shows all the possible values:
## @section Global parameters## Global Docker image parameters## Please, note that this will override the image parameters, including dependencies## configured to use the global value## Current available global Docker image parameters: imageRegistry, imagePullSecrets## and storageClass#### @param global.imageRegistry Global Docker image registry## @param global.imagePullSecrets Global Docker registry secret names as an array## @param global.storageClass Global StorageClass for Persistent Volume(s)##global: imageRegistry:""## E.g.## imagePullSecrets:## - myRegistryKeySecretName##imagePullSecrets:[]...
5.6 Deploying a Chart with a Dependency
Solution
Use the dependencies section in the Chart.yaml file to register other Charts. So far, we’ve seen how to deploy simple services to the cluster, but usually a service might have other dependencies like a database, mail server, distributed cache, etc.
In the previous section, we saw how to deploy a PostgreSQL server in a Kubernetes cluster. In this section, we’ll see how to deploy a service composed of a Java service returning a list of songs stored in a PostgreSQL database. The application is summarized in Figure 5-2.

Figure 5-2. Music application overview
Let’s start creating the Chart layout shown in Recipe 5.1:
mkdir music
mkdir music/templates

cd music
Then create two template files to deploy the music service.
The templates/deployment.yaml file contains the Kubernetes Deployment definition:
apiVersion:apps/v1kind:Deploymentmetadata:name:{{.Chart.Name}}labels:app.kubernetes.io/name:{{.Chart.Name}}{{- if .Chart.AppVersion}}app.kubernetes.io/version:{{.Chart.AppVersion | quote}}{{- end}}spec:replicas:{{.Values.replicaCount}}selector:matchLabels:app.kubernetes.io/name:{{.Chart.Name}}template:metadata:labels:app.kubernetes.io/name:{{.Chart.Name}}spec:containers:-image:"{{.Values.image.repository}}:↳{{.Values.image.tag|default.Chart.AppVersion}}"imagePullPolicy:{{.Values.image.pullPolicy}}name:{{.Chart.Name}}ports:-containerPort:{{.Values.image.containerPort}}name:httpprotocol:TCPenv:-name:QUARKUS_DATASOURCE_JDBC_URLvalue:{{.Values.postgresql.server | ↳default (printf "%s-postgresql" ( .Release.Name )) | quote}}-name:QUARKUS_DATASOURCE_USERNAMEvalue:{{.Values.postgresql.postgresqlUsername | ↳default (printf "postgres" ) | quote}}-name:QUARKUS_DATASOURCE_PASSWORDvalueFrom:secretKeyRef:name:{{.Values.postgresql.secretName | ↳default (printf "%s-postgresql" ( .Release.Name )) | quote}}key:{{.Values.postgresql.secretKey}}
The templates/service.yaml file contains the Kubernetes Service definition:
apiVersion:v1kind:Servicemetadata:labels:app.kubernetes.io/name:{{.Chart.Name}}name:{{.Chart.Name}}spec:ports:-name:httpport:{{.Values.image.containerPort}}targetPort:{{.Values.image.containerPort}}selector:app.kubernetes.io/name:{{.Chart.Name}}
After the creation of the templates, it’s time for the Chart metadata Chart.yaml file. In this case, we need to define the dependencies of this Chart too. Since the music service uses a PostgreSQL database, we can add the Chart used in Recipe 5.5 as a dependency:
apiVersion:v2name:musicdescription:AHelmchartforMusicservicetype:applicationversion:0.1.0appVersion:"1.0.0"dependencies:-name:postgresqlversion:10.16.2repository:"https://charts.bitnami.com/bitnami"
Dependencies section
Name of the Chart to add as dependency
Chart version
Repository
The final file is Values.yaml with default configuration values. In this case, a new section is added to configure music deployment with PostgreSQL instance parameters:
image:repository:quay.io/gitops-cookbook/musictag:"1.0.0"pullPolicy:AlwayscontainerPort:8080replicaCount:1postgresql:server:jdbc:postgresql://music-db-postgresql:5432/mydbpostgresqlUsername:my-defaultsecretName:music-db-postgresqlsecretKey:postgresql-password
PostgreSQL section
With the Chart in place, the next thing to do is download the dependency Chart and store it in the charts directory.
This process is automatically done by running the dependency update command:
helm dependency update
The command output shows that one Chart has been downloaded and saved:
Hang tight while we grab the latest from your chart repositories...
...Successfully got an update from the "stable" chart repository
...Successfully got an update from the "bitnami" chart repository
Update Complete. ⎈Happy Helming!⎈
Saving 1 charts
Downloading postgresql from repo https://charts.bitnami.com/bitnami
Deleting outdated charts
The directory layout looks like this:
music├──Chart.lock├──Chart.yaml├──charts│└──postgresql-10.16.2.tgz├──templates│├──deployment.yaml│└──service.yaml└──values.yaml
PostgreSQL Chart is placed in the correct directory
Finally, we deploy the Chart, setting configuration PostgreSQL deployment values from the command line:
helm install music-db --set postgresql.postgresqlPassword=postgres postgresql.postgresqlDatabase=mydb,postgresql.persistence.enabled=false.
The installation process shows information about the deployment:
NAME: music-db LAST DEPLOYED: Tue Jan2517:53:172022NAMESPACE: default STATUS: deployed REVISION:1TEST SUITE: None
Inspect the installation by listing pods, Services, StatefulSets, or Secrets:
kubectl get pods NAME READY STATUS RESTARTS AGE music-67dbf986b7-5xkqm1/1 Running1(32s ago)39s music-db-postgresql-01/1 Running039s
kubectl get statefulset

NAME                  READY   AGE
music-db-postgresql   1/1     53s
kubectl get services NAME TYPE CLUSTER-IP EXTERNAL-IP PORT(S)AGE kubernetes ClusterIP10.96.0.1 <none>443/TCP 40d music ClusterIP10.104.110.34 <none>8080/TCP 82s music-db-postgresql ClusterIP10.110.71.13 <none>5432/TCP 82s music-db-postgresql-headless ClusterIP None <none>5432/TCP 82s
We can validate the access to the music service by using port forwarding to the Kubernetes Service.
Open a new terminal window and run the following command:
kubectl port-forward service/music8080:8080 Forwarding from127.0.0.1:8080 ->8080Forwarding from[::1]:8080 ->8080
The terminal is blocked and it’s normal until you stop the kubectl port-forward process.
Thanks to port forwarding, we can access the music service using the localhost address and port 8080.
In another terminal, curl the service:
curl localhost:8080/song
The request is sent to the music service deployed in Kubernetes and returns a list of songs:
[{"id":1,"artist":"DT","name":"Quiero Munchies"},{"id":2,"artist":"Lin-Manuel Miranda","name":"We Don't Talk About Bruno"},{"id":3,"artist":"Imagination","name":"Just An Illusion"},{"id":4,"artist":"Txarango","name":"Tanca Els Ulls"},{"id":5,"artist":"Halsey","name":"Could Have Been Me"}]
5.7 Triggering a Rolling Update Automatically
Solution
Use the sha256sum template function to generate a change on the deployment file.
In Recipe 4.5, we saw that Kustomize has a ConfigMapGenerator that automatically appends a hash to the ConfigMap metadata name and modifies the deployment file with the new hash when used.
Any change on the ConfigMap triggers a rolling update of the deployment.
Helm doesn’t provide a direct way like Kustomize does to update a deployment file when the ConfigMap changes, but there is a template function to calculate a SHA-256 hash of any file and embed the result in the template.
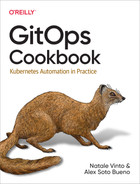
Suppose we’ve got a Node.js application that returns a greeting message.
An environment variable configures this greeting message, and in the Kubernetes Deployment, this variable is injected from a Kubernetes ConfigMap.
Figure 5-3 shows an overview of the application.

Figure 5-3. Greetings application overview
Let’s create the Helm Chart for the Greetings application; note that we’re not covering the entire process of creating a Chart, but just the essential parts. You can refer to Recipe 5.1 to get started.
Create a deployment template that injects a ConfigMap as an environment variable. The following listing shows the file:
apiVersion:apps/v1kind:Deploymentmetadata:name:{{.Chart.Name}}labels:app.kubernetes.io/name:{{.Chart.Name}}{{-if.Chart.AppVersion}}app.kubernetes.io/version:{{.Chart.AppVersion|quote}}{{-end}}spec:replicas:{{.Values.replicaCount}}selector:matchLabels:app.kubernetes.io/name:{{.Chart.Name}}template:metadata:labels:app.kubernetes.io/name:{{.Chart.Name}}spec:containers:-image:"{{.Values.image.repository}}:↳{{.Values.image.tag|default.Chart.AppVersion}}"imagePullPolicy:{{.Values.image.pullPolicy}}name:{{.Chart.Name}}ports:-containerPort:{{.Values.image.containerPort}}name:httpprotocol:TCPenv:-name:GREETINGvalueFrom:configMapKeyRef:name:{{.Values.configmap.name}}key:greeting
ConfigMapnameProperty key of the
ConfigMap
The initial ConfigMap file is shown in the following listing:
apiVersion:v1kind:ConfigMapmetadata:name:greeting-configdata:greeting:Aloha
Sets
ConfigMapnameKey/value
Create a Kubernetes Service template to access the service:
apiVersion:v1kind:Servicemetadata:labels:app.kubernetes.io/name:{{.Chart.Name}}name:{{.Chart.Name}}spec:ports:-name:httpport:{{.Values.image.containerPort}}targetPort:{{.Values.image.containerPort}}selector:app.kubernetes.io/name:{{.Chart.Name}}
Update the values.yaml file with the template configmap parameters:
image:repository:quay.io/gitops-cookbook/greetingstag:"1.0.0"pullPolicy:AlwayscontainerPort:8080replicaCount:1configmap:name:greeting-config
Refers to
ConfigMapname
Finally, install the Chart using the install command:
helm install greetings .
When the Chart is deployed, use the kubectl port-forward command in one terminal to get access to the service:
kubectl port-forward service/greetings 8080:8080And curl the service in another terminal window:
curllocalhost:8080AlohaAda
Configured greeting is used
Now, let’s update the ConfigMap file to a new greeting message:
apiVersion:v1kind:ConfigMapmetadata:name:greeting-configdata:greeting:Hola
New greeting message
Update the appVersion field from the Chart.yaml file to 1.0.1 and upgrade the Chart by running the following command:
helm upgrade greetings .
Restart the kubectl port-forward process and curl the service again:
curllocalhost:8080AlohaAlexandra
Greeting message isn’t updated
The ConfigMap object is updated during the upgrade, but since there are no changes in the Deployment object, there is no restart of the pod; hence the environment variable is not set to the new value.
Listing the pods shows no execution of the rolling update:
kubectlgetpodsNAMEREADYSTATUSRESTARTSAGEgreetings-64ddfcb649-m5pml1/1Running02m21s
Age value shows no rolling update
Figure 5-4 summarizes the change.
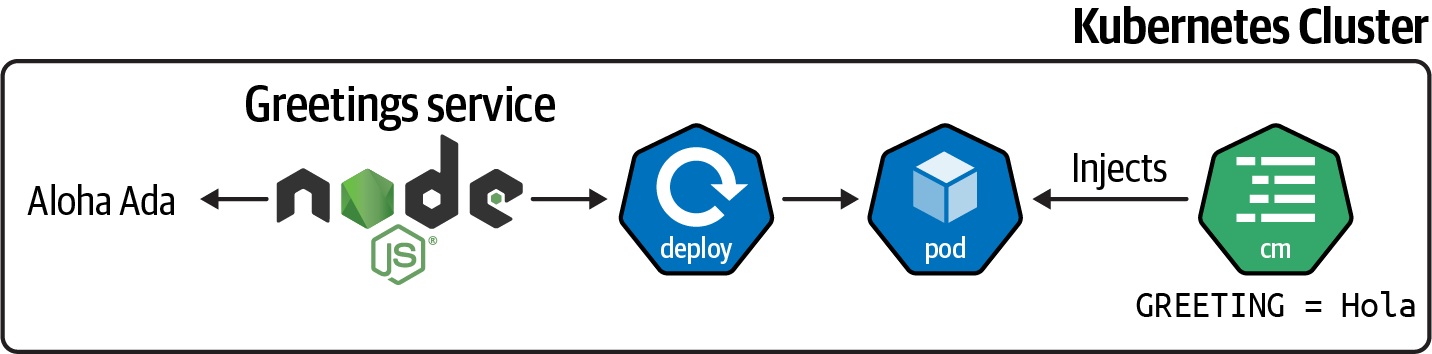
Figure 5-4. Greetings application with new configuration value
Let’s use the sha256sum function to calculate an SHA-256 value of the configmap.yaml file content and set it as a pod annotation, which effectively triggers a rolling update as the pod definition has changed:
spec:replicas:{{.Values.replicaCount}}selector:matchLabels:app.kubernetes.io/name:{{.Chart.Name}}template:metadata:labels:app.kubernetes.io/name:{{.Chart.Name}}annotations:checksum/config:{{include$.Template.BasePath"/configmap.yaml")↳.|sha256sum}}
Includes the configmap.yaml file, calculates the SHA-256 value, and sets it as an annotation
Update the ConfigMap again with a new value:
apiVersion:v1kind:ConfigMapmetadata:name:greeting-configdata:greeting:Namaste
New greeting message
Update the appVersion field from Chart.yaml to 1.0.1 and upgrade the Chart by running the following command:
helm upgrade greetings .
Restart the kubectl port-forward process and curl the service again:
curllocalhost:8080NamasteAlexandra
Greeting message is the new one
List the pods deployed in the cluster again, and you’ll notice that a rolling update is happening:
kubectlgetpodsNAMEREADYSTATUSRESTARTSAGEgreetings-5c6b86dbbd-2p9bd0/1ContainerCreating03sgreetings-64ddfcb649-m5pml1/1Running02m21s
A rolling update is happening
Describe the pod to validate that the annotation with the SHA-256 value is present:
kubectl describe pod greetings-5c6b86dbbd-s4n7b
The output shows all pod parameters.
The important one is the annotations placed at the top of the output showing the checksum/config annotation containing the calculated SHA-256 value:
Name:greetings-5c6b86dbbd-s4n7bNamespace:asotobue-devPriority:-3PriorityClassName:sandbox-users-podsNode:ip-10-0-186-34.ec2.internal/10.0.186.34StartTime:Thu,27Jan202211:55:02+0100Labels:app.kubernetes.io/name=greetingspod-template-hash=5c6b86dbbdAnnotations:checksum/config:↳59e9100616a11d65b691a914cd429dc6011a34e02465173f5f53584b4aa7cba8
Calculated value
Figure 5-5 summarizes the elements that changed when the application was updated.

Figure 5-5. Final overview of the Greetings application
5.8 Final Thoughts
In the previous chapter, we saw Kustomize; in this chapter, we’ve seen another tool to help deploy Kubernetes applications.
When you need to choose between Kustomize or Helm, you might have questions on which one to use.
In our experience, the best way to proceed is with Kustomize for simple projects, where only simple changes might be required between new deployments.
If the project is complex with external dependencies, and several deployment parameters, then Helm is a better option.