
Chapter 5: Fault Tolerance and Auto-Rebalancing
In Chapter 4, Geo-Partitioning, we learned about what geo-partitioning is, why we need it, and how it's supported in CockroachDB.
In this chapter, we will discuss what fault tolerance and auto-rebalancing are and how CockroachDB provides these features. We will also learn about multi-node failure scenarios and how to recover from them.
Fault tolerance refers to how CockroachDB copes with various types of failures. Auto-rebalancing in general is the ability to adapt and increase or decrease the number of nodes in a cluster to avoid hotspots. We will discuss auto-rebalancing with specific examples that you can also try.
The following topics will be covered in this chapter:
- Achieving fault tolerance
- Automatic rebalancing
- Recovering from multi-node failures
Technical requirements
We are going to discuss fault tolerance using an experiment in this chapter that will require you to have CockroachDB installed. If you still haven't done so, please refer to the Technical requirements section in Chapter 2, How Does CockroachDB Work Internally?.
Achieving fault tolerance
Fault tolerance is the ability to continue to operate even in the case of a system, network, or storage failure. This feature is critical to avoid data loss and for the continuity of your business. Whenever a node goes down or becomes incommunicado, the cluster automatically rebalances the number of replicas among remaining active nodes and continues to serve read and write traffic.
It is important to understand how many node failures you want to withstand, as based on that, you must decide how many nodes should be in your cluster. For example, in a cluster of three nodes, the cluster can withstand one node failure when the replication factor is three. In a cluster of seven nodes, the cluster can withstand two node failures when the replication factor is five.
Next, we will learn about having fault tolerance at the storage layer. After that, we will go over an example to understand fault tolerance using a six-node CockroachDB cluster. Finally, we will observe how CockroachDB rebalances data whenever a new node is added to the cluster.
Achieving fault tolerance at the storage layer
Although CockroachDB can help with fault tolerance and recovery at the database level, it is also very important to have the same at the storage layer as well.
Disk corruption, the spread of corruption to replicas, and data loss are some of the issues you might see at the storage layer. Fortunately, many cloud providers already provide storage options to avoid this.
For example, Amazon Elastic Block Store (EBS) provides persistent block storage volumes that can be used with Amazon Elastic Compute Cloud (EC2) instances. EBS volumes are automatically replicated within an availability zone, which provides high durability and availability.
Similarly, you can use persistent disks on Google Cloud Platform (GCP). Data on each persistent disk is distributed onto several physical disks. Compute Engine is responsible for managing these physical disks. Compute Engine is also responsible for data distribution, data redundancy, and increased performance. Make sure you pick the right option for storage, one that provides high availability and durability with optimal performance.
Now, let's look at an example offered by Cockroach Labs in order to understand how CockroachDB continues to operate in case of failures.
Working example of fault tolerance at play
All the commands used in this chapter will also be shared in the following GitHub repository: https://github.com/PacktPublishing/Getting-Started-with-CockroachDB:
- Setting up a six-node cluster: The following is the command for starting the first node:
Start node 1
$ cockroach start
--insecure
--store=fault-node1
--listen-addr=localhost:26257
--http-addr=localhost:8080
--join=localhost:26257,localhost:26258,localhost:26259
--background
Start another five nodes in the same cluster with unique listening addresses and ports.
For example, you can use the following combinations of listening addresses and HTTP ports for the rest of the nodes: 26258/8081, 26259/8082, 26260/8083, 26261/8084, 26262/8085. Please refer to https://github.com/PacktPublishing/Getting-Started-with-CockroachDB if you want complete commands to start the rest of the five nodes.
- Initializing the cluster: You can initialize the cluster with the following command:
$ cockroach init
--insecure
--host=localhost:26257
Output
Cluster successfully initialized
- Setting up the load balancer: The load balancer helps with spreading the requests between all the nodes. Cockroach Labs recommend using HAProxy as the load balancer. The following are the instructions for installing HAProxy on the different operating systems:
Mac
$ brew install haproxy
Ubuntu
$ sudo apt-get update
$ sudo apt-get install haproxy
Linux
$ yum install haproxy
The following command generates an haproxy.cfg file that you can use to provide load balancing for your CockroachDB cluster:
$cockroach gen haproxy
--insecure
--host=localhost
--port=26257
You can view the contents of the generated file using the following command:
$ cat haproxy.cfg
In haproxy.cfg, change bind :26257 to bind :26000. This port is used by HAProxy to accept requests and it should not coincide with any of the previously used ports.
Before you change the port to 26000, please make sure that no other process is already using it with the help of the following command:
$ lsof -i -P -n | grep 26000
The preceding command will return empty output if there are no other processes using port 26000. If 26000 is already occupied, pick some other port for HAProxy:
$ sed -i.saved 's/^ bind :26257/ bind :26000/' haproxy.cfg
- Next, start HAProxy by providing the haproxy.cfg file in the input as follows:
$ haproxy -f haproxy.cfg &
Now you can check port 26000 to make sure it's used by HAProxy:
$ lsof -i -P -n | grep 26000
haproxy 26517 kishen 5u IPv4 0x4067c1a3fa14b465 0t0 TCP *:26000 (LISTEN)
- Running a sample workload: You can use the cockroach workload command to run CockroachDB's built-in version of the Yahoo! Cloud Servicing Benchmark (YCSB), which simulates multiple client connections that perform a combination of read and write operations.
- Load the ycsb schema and data through HAProxy as follows:
$ cockroach workload init ycsb --splits=50
'postgresql://root@localhost:26000?sslmode=disable'
Output
I210516 10:00:04.066268 1 workload/workloadsql/dataload.go:140 imported usertable (5s, 10000 rows)
I210516 10:00:04.084302 1 workload/workloadsql/workloadsql.go:113 starting 50 splits
This workload creates a new ycsb database and a usertable table in that database and inserts data into the table. The --splits flag tells the workload to manually split ranges at least 50 times.
Now, let's run the ycsb workload as follows:
$ cockroach workload run ycsb
--duration=30m
--concurrency=5
--max-rate=500
--tolerate-errors
'postgresql://root@localhost:26000?sslmode=disable'
The preceding command initiates 5 concurrent client workloads for 30 minutes but limits the total load to 500 operations per second.
Per-operation statistics are printed to standard output every second.
After the specified duration, the workload will stop, and you will see the summary printed in the standard output, as shown here:
_elapsed___errors_____ops(total)___ops/sec(cum)__avg(ms)__p50(ms)__p95(ms)__p99(ms)_pMax(ms)__total
1200.0s 0 567529 472.9 1.5 1.0 2.9 5.5 436.2 read
_elapsed___errors_____ops(total)___ops/sec(cum)__avg(ms)__p50(ms)__p95(ms)__p99(ms)_pMax(ms)__total
1200.0s 0 29755 24.8 81.0 75.5 151.0 192.9 486.5 update
_elapsed___errors_____ops(total)___ops/sec(cum)__avg(ms)__p50(ms)__p95(ms)__p99(ms)_pMax(ms)__result
1200.0s 0 597284 497.7 5.4 1.0 41.9 109.1 486.5
Open the CockroachDB web UI at http://localhost:8080. This web UI can also be opened at ports 8081, 8082, 8083, 8084, and 8085.
To check the SQL queries being executed, click on Metrics on the left, and hover over the SQL Queries graph at the top, as shown in the following screenshot:

Figure 5.1 – Overview Dashboard showing query statistics
In the CockroachDB web UI, to check the client connections from the load generator, select SQL Dashboard and hover the cursor over the SQL Connections graph, as shown in the following screenshot:

Figure 5.2 – SQL Dashboard showing SQL Connections metrics
You will notice three client connections from the load generator.
To see more details about the ycsb database and the usertable table, click Databases in the top left and then check ycsb:
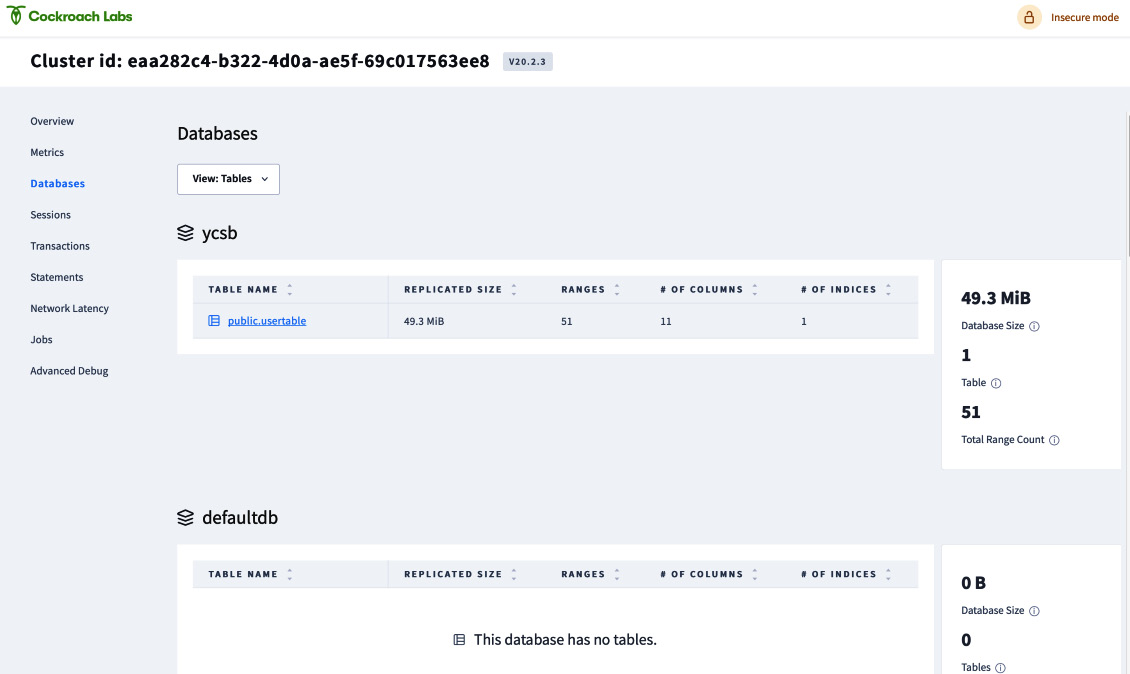
Figure 5.3 – Databases dashboard showing tables
You can also view the schema of usertable by clicking the table name as follows:
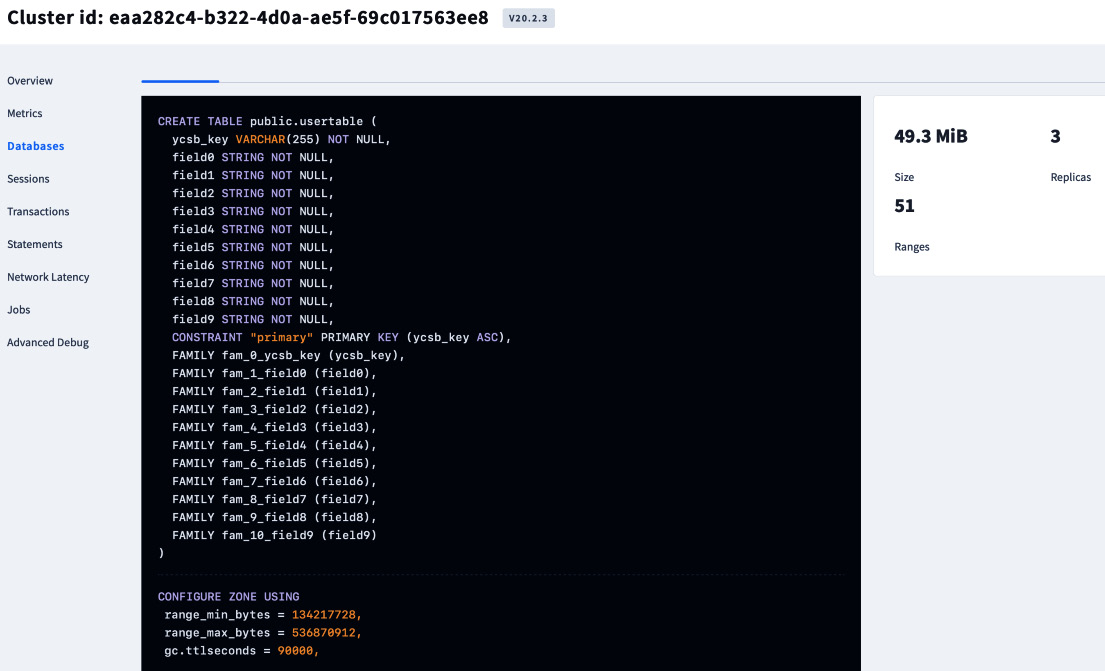
Figure 5.4 – Viewing the table schemas
By default, CockroachDB replicates all data three times and balances it across all nodes. To see this balance, go to Overview and check the replica count across all nodes as follows:
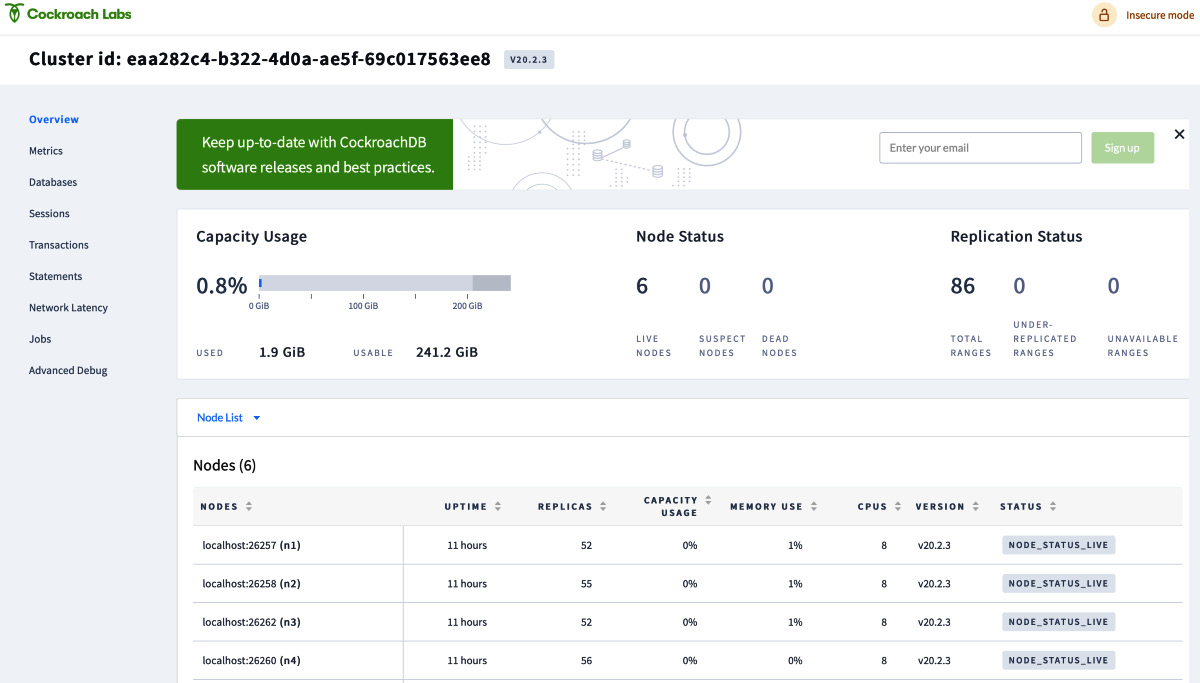
Figure 5.5 – Overview dashboard showing Node Status and Replication Status
Next, we will look at simulating a single-node failure.
- Simulating a single-node failure: By default, a node is considered dead when it doesn't respond for at least 5 minutes. After that, CockroachDB starts replicating any replicas that were on the dead node to other active nodes. In this setup, since we no longer want to wait for 5 minutes, we can change the time to 75 seconds, as shown in the following command:
$ cockroach sql
--insecure
--host=localhost:26000
--execute="SET CLUSTER SETTING server.time_until_store_dead = '1m15s';"
Output
SET CLUSTER SETTING
Time: 278ms
To permanently bring a node down, we can use the quit command:
$ cockroach quit
--insecure
--host=localhost:26261
Output
Command "quit" is deprecated, see 'cockroach node drain' instead to drain a
server without terminating the server process (which can in turn be done using
an orchestration layer or a process manager, or by sending a termination signal
directly).
node is draining... remaining: 38
node is draining... remaining: 0 (complete)
ok
- Keep checking the cluster health: Go back to the CockroachDB console, click on Metrics, and check that the cluster continues to service data, despite one of the nodes being unavailable. Also, keep an eye on Unavailable ranges 0 on the right-hand side panel, which should be zero throughout this setup.

Figure 5.6 – Metrics dashboard
The current setup shows that when all the ranges are replicated three times, a three-node cluster can withstand a single-node failure without affecting overall availability.
- Watch the cluster self-heal: Here you can see that data has been replicated from the unhealthy node to all the healthy nodes. So, now there are 0 under-replicated ranges and 0 unavailable ranges. This means the cluster is now ready to accept requests for any range, although one of the nodes is dead, as can be seen in the following screenshot:

Figure 5.7 – Overview dashboard showing five live nodes and one dead node
As discussed in step 7, once a given node is considered dead, replicas from the dead node are moved to other active nodes. So, you should see an increase in the replication count for the active nodes. A CockroachDB cluster heals itself by re-replicating the replicas from the dead node to active nodes.
In the next section, we will learn about how CockroachDB automatically rebalances the replicas when we add more nodes.
Automatic rebalancing
Automatic rebalancing is the process of rebalancing the replicas from currently active nodes to newly added ones.
Now, let's take the cluster from the previous section, which had five active nodes and one dead node. In this section, we are going to observe how data is rebalanced once we add a new node to a cluster. The following screenshot shows the node replication status:

Figure 5.8 – Overview dashboard showing Node Status and Replication Status
In this cluster of five active nodes, let's add two more nodes as follows:
$ cockroach start
--insecure
--store=fault-node5
--listen-addr=localhost:26261
--http-addr=localhost:8084
--join=localhost:26257,localhost:26258,localhost:26259
--background
cockroach start
--insecure
--store=fault-node7
--listen-addr=localhost:26263
--http-addr=localhost:8086
--join=localhost:26257,localhost:26258,localhost:26259
--background
After some time, you should see that now there are 7 active nodes. The replication count should also come down for all the previous nodes, since the replicas are rebalanced between all the nodes in the cluster. The following figure shows the CockroachDB cluster with 7 active nodes:

Figure 5.9 – Overview dashboard showing seven live nodes
In the next section, we will learn about multi-node failures.
Recovering from multi-node failures
If you want your cluster to withstand multi-node failures while continuously serving all the ranges, then you should ensure that you have enough active nodes available for all the replicas.
For example, in the previous section, we created a seven-node cluster and the replication count was three. If two nodes go down simultaneously, then some ranges will become unavailable, as there will not be a majority consensus if a given range is replicated in the two nodes that went down. So, if you want this seven-node cluster to withstand two node failures, you must increase the replication factor to five, so that there will still be a majority of 3/5 for some ranges that had replicas in the two nodes that went down. In general, a cluster can continue to serve all the ranges when (replication factor – 1) / 2 nodes go down.
You can use the following command to change the replication factor to 5:
$ cockroach sql --execute="ALTER RANGE default CONFIGURE ZONE USING num_replicas=5;" --insecure --host=localhost:26000
After the replication factor of five is consumed by the cluster and five replicas are created for each range, you can use cockroach quit to bring down any two nodes. After a few minutes, you can check that all the ranges are still available.
When you are trying the various configurations provided in this chapter, if things don't go as discussed, please refer to Chapter 10, Troubleshooting Issues, in order to understand the failure and how to fix it.
Note
Please refer to the cleanup.sh script at https://github.com/PacktPublishing/Getting-Started-with-CockroachDB in order to clean up your cluster. You can also use SIGKILL to kill the processes of CockroachDB instances and HAProxy, and later you can manually delete the data folders.
Summary
In this chapter, we learned about fault tolerance, auto rebalancing, and how to recover from multi-node failures. We also went through a few configurations to understand how CockroachDB provides these features. Basically, fault tolerance gives us enough time for the Site Reliability Engineering (SRE) and DevOps teams to deal with node failures without any service disruption.
In the next chapter, we will learn about indexes and how they are implemented in CockroachDB.