
17. Timing Effects
In This Chapter
Understanding Speed and Duration
Final Cut Pro X has a wide range of tools and techniques for altering the playback speed of your video (called retiming). You can speed things up, slow things down, freeze on a specific frame, play in reverse, and perform ramp speed effects, where the speed of a clip speeds up or slows down over time.
There are also a few one-click timing effects such as Instant Replay and Rewind, which apply preset speed changes quickly and easily.
You can also customize the playback speed of your clips in a variety of ways. Finally, you can modify settings such as the rendering quality of timing effects as well as how and when audio should change pitch when a clip’s speed has been changed.
Understanding Speed and Duration
One important concept that you must understand when beginning to experiment with timing effects is that the duration of a clip and its playback speed are fundamentally connected.
For example, if a 10-second clip of a sprinter running a 100m dash is played back at 2x normal speed, it’s going to take the runner only 5 seconds to cross the finish line. If, instead, you play the clip at 25 percent speed, she’s going to take a glacial 40 seconds to finish.
If you want to keep the slowed-down clip to ten seconds, you’ll have to do some additional editing to choose whether you’ll see her leaving the starting gate or crossing the finish line (or some section in between).
When you retime a clip, FCP’s Timeline will automatically adjust the surrounding shots to make room for the new clip length.
Constant Timing Changes
Basic timing changes are those where the speed of a clip is uniformly retimed, so the whole clip plays at a faster or slower speed than normal. These changes are called constant timing changes, because although the clip’s speed is altered, it remains at a constant speed throughout its duration.
Slow Motion
Perhaps the most common and basic of all timing effects is the slow-motion effect where a scene plays back at a slower-than-normal frame rate. Playing video at a reduced speed produces a compelling (and often comic) effect that allows the viewer to see the action of the shot in more detail than regular playback could ever allow.
FCP has preset slow-motion settings of 50 percent, 25 percent, and 10 percent. You can also modify the timing manually to set any speed between 99 percent and 1 percent. To apply a custom speed, see “Custom Timing Changes” later in this chapter.
To play a clip at a preset slow-motion speed
• Select a clip in the Timeline, and do one of the following:
• Choose Modify > Retime > Slow, and select one of the preset speeds ![]() .
.
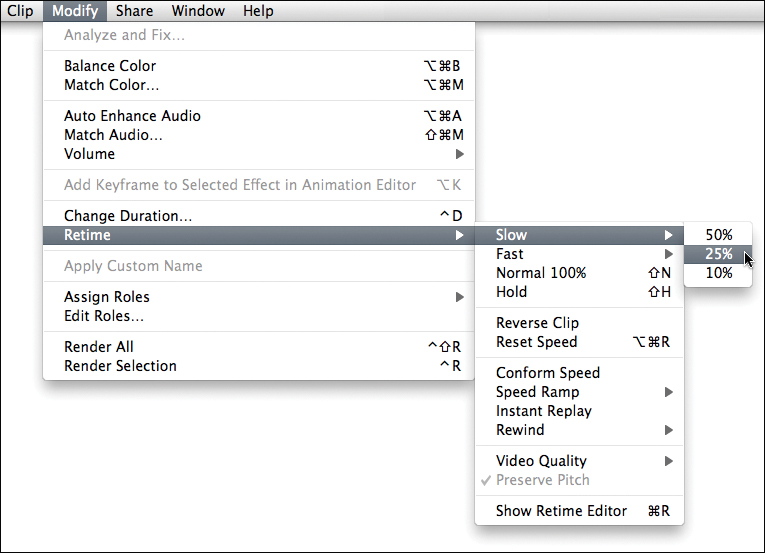
![]() The Retime submenu in the Modify menu contains all the retiming tools in FCP.
The Retime submenu in the Modify menu contains all the retiming tools in FCP.
• Click the Timing pop-up menu in the toolbar, choose Slow, and select one of the preset speeds ![]() .
.
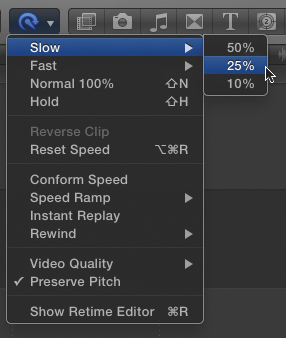
![]() The Retime menu in the toolbar (accessed by clicking the Retime button) offers duplicates of the commands in the Modify menu.
The Retime menu in the toolbar (accessed by clicking the Retime button) offers duplicates of the commands in the Modify menu.
The Retime Editor appears above the clip, and the slow-motion preset is applied ![]() .
.
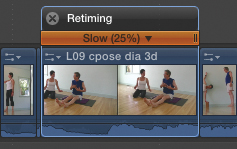
![]() When a timing effect is applied to a clip, the Retime Editor appears above that clip indicating the current speed.
When a timing effect is applied to a clip, the Retime Editor appears above that clip indicating the current speed.
Fast Motion
The opposite of the slow-motion effect is the fast-motion effect where a clip plays back faster than in real time. This is how you’d make your ten-second sprinter suddenly appear superhuman.
FCP has preset fast-motion settings of 2x, 4x, 8x, and 20x. You can also modify the timing manually to set the clip to virtually any fast speed until the clip is only one frame long. (Remember, speeding up a clip automatically shortens its duration.) To apply a custom speed, see “Custom Timing Changes” later in this chapter.
To play a clip at a preset fast-motion speed
• Select a clip in the Timeline, and do one of the following:
• Choose Modify > Retime > Fast, and select one of the preset speeds ![]() .
.
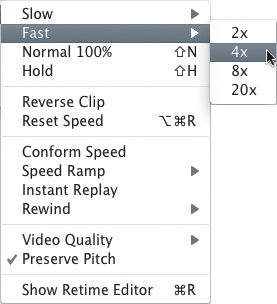
![]() Four preset fast-motion speeds are available in the Retime submenu.
Four preset fast-motion speeds are available in the Retime submenu.
• Click the Timing pop-up menu in the toolbar, choose Fast, and select one of the preset speeds ![]() .
.
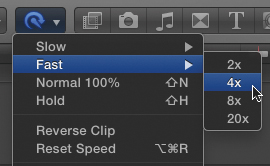
![]() If the Retime submenu is too far away, use the identical controls in the toolbar.
If the Retime submenu is too far away, use the identical controls in the toolbar.
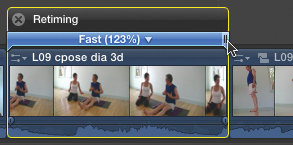
The Retime Editor appears above the clip, and the fast-motion preset is applied ![]() .
.
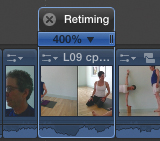
![]() When a clip is sped up, its duration gets shorter.
When a clip is sped up, its duration gets shorter.
Custom Timing Changes
Although the preset speed settings are quick to apply, sometimes you want to play your clip at a speed somewhere in between the preset values.
To assign a custom speed to a clip, you must open the clip’s Retime Editor.
As demonstrated in the previous tasks, applying a preset speed change automatically opens the Retime Editor, but you can also open it manually, without first applying a preset timing effect.
To open the Retime Editor
• Select a clip, and do one of the following:
• Press Command-R.
• Choose Modify > Retime > Show Retime Editor.
• Click the Retime pop-up menu in the toolbar, and choose Show Retime Editor.
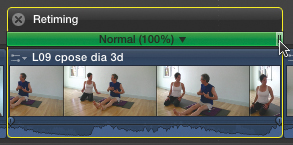
The Retime Editor appears above the clip ![]() .
.

![]() The Retime Editor appears above the clip.
The Retime Editor appears above the clip.
The Retime Editor appears in different colors depending on the current playback speed of the clip:
• Green indicates that the clip is set to 100 percent (or normal) speed ![]() .
.
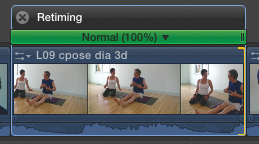
![]() Green indicates normal (100 percent) speed.
Green indicates normal (100 percent) speed.
• Blue indicates that the clip is set to a speed faster than 100 percent ![]() .
.
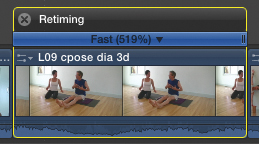
![]() Blue indicates fast-motion speed.
Blue indicates fast-motion speed.
• Orange indicates that the clip is set to a speed slower than 100 percent ![]() .
.
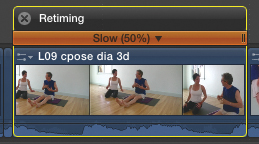
![]() Orange indicates slow-motion speed.
Orange indicates slow-motion speed.
To apply a custom speed
1. Open the Retime Editor (if it’s not already showing).
2. Drag the Retime handle at the right edge of the Retime Editor to the right to slow down the clip, and drag it to the left to speed up the clip ![]() .
.
![]() As you position your mouse over the Retime handle, it lights up.
As you position your mouse over the Retime handle, it lights up.
As you drag, the Current Speed indicator displays the current clip speed ![]() .
.
![]() As you drag the Retime handle, the current speed is displayed in the colored bar.
As you drag the Retime handle, the current speed is displayed in the colored bar.
The longer the clip gets, the slower it will play back. The shorter it gets, the faster it will play.
If, instead, you set the speed to 40 percent, then the number and placement of the “fake” frames is uneven, and you may notice some strobing or stuttering that will result in a lower-quality effect ![]() .
.
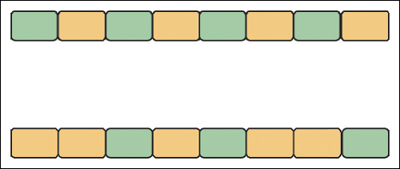
![]() Green frames represent original frames from the camera, and orange frames are the ones generated by the software. In the top figure, speed is set to 50 percent, and every other frame is computer-generated. In the lower figure, at 40 percent the interpolated frames are distributed less uniformly.
Green frames represent original frames from the camera, and orange frames are the ones generated by the software. In the top figure, speed is set to 50 percent, and every other frame is computer-generated. In the lower figure, at 40 percent the interpolated frames are distributed less uniformly.
Once you’ve modified a clip’s playback speed, you can still edit the clip’s duration by dragging the edge of the thumbnail area (or by using the Trim tool). The number of frames in the clip will change, but the timing will remain set to the speed indicated in the Retime Editor.
To return to a preset speed
1. Open the Retime Editor.
2. Click the Preset Speeds pop-up menu, and choose one of the preset speeds ![]() .
.
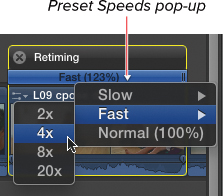
![]() Click the Preset Speeds pop-up, and select a new speed for the clip.
Click the Preset Speeds pop-up, and select a new speed for the clip.
The clip is retimed to your chosen preset speed.
You can also just apply a new speed setting from the Retime submenu or the Retime menu in the toolbar.
Resetting Speed to Normal
As you experiment with retiming clips, you may find the need to return the clip to normal 100 percent playback. You can drag the Retime Editor manually until the speed reaches exactly 100 percent, but it might be easier to use the FCP command specifically for that purpose.
To reset a clip to normal speed
• Select the clip in the Timeline, and do one of the following:
• Choose Modify > Retime > Normal 100%.
• Press Shift-N.
• Click the Retime pop-up menu in the toolbar, and choose Normal 100% ![]() .
.
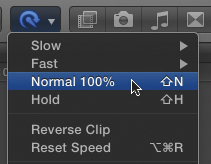
![]() Reset a clip to normal speed by pressing Shift-N.
Reset a clip to normal speed by pressing Shift-N.
• If the Retime Editor is showing, click the Preset Speeds pop-up menu, and choose Normal 100% ![]() .
.
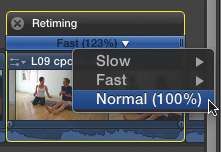
![]() The Preset Speeds pop-up in the Retime Editor contains an option for 100 percent.
The Preset Speeds pop-up in the Retime Editor contains an option for 100 percent.
The clip is reset to 100 percent speed.
Hiding the Retime Editor
The Retime Editor allows you to customize your timing effects, and as you’ll learn in the coming sections, it also allows you to divide a clip into multiple segments to perform more complex timing effects.
However, once you’re done adjusting the timing of your shots, you may want to hide the Retime Editor to keep your Timeline view clean or to use that section of the Timeline for keyframing. (To learn more about keyframing, see Chapter 21, “Animating Effects.”)
Hiding the Retime Editor does not disable any timing effects you may have applied. It just temporarily hides the controls you use to modify them.
To hide the Retime Editor
• Select the clip (or clips), and do one of the following:
• Press Command-R.
• Click the Close button in the upper left of the Retime Editor ![]() .
.
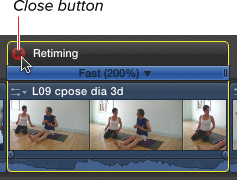
![]() Hide the Retime Editor by clicking the Close button or pressing Command-R.
Hide the Retime Editor by clicking the Close button or pressing Command-R.
• Click the Retime pop-up menu in the toolbar, and choose Hide Retime Editor.
The Retime Editor is hidden from view.
Freeze Frames
Another common retiming effect is to create a freeze frame: a few seconds of playback where the video holds (or freezes) on a single frame as if it were a photograph.
This technique is frequently employed at the end of a movie, suspending the action indefinitely as the movie fades out. Other times, a freeze frame occurs in the middle of a scene to emphasize a certain moment, and then playback resumes from where it left off.
FCP makes both of these techniques very easy to do.
To create a freeze frame at the end of a shot
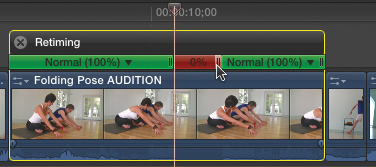
1. Select the clip you want to freeze, and position the playhead on the last frame of the shot ![]() .
.
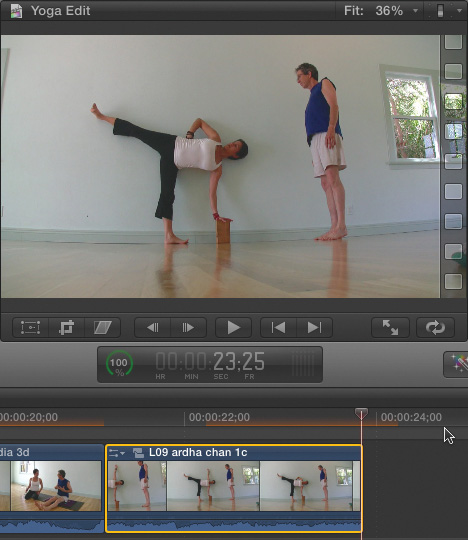
![]() Position the playhead over the last frame in the clip. The filmstrip graphic on the right side of the Viewer indicates that you’re on the last frame of the project.
Position the playhead over the last frame in the clip. The filmstrip graphic on the right side of the Viewer indicates that you’re on the last frame of the project.
2. Do one of the following:
• Press Shift-H.
• Choose Modify > Retime > Hold.
• Click the Retime pop-up menu in the toolbar, and then choose Hold.
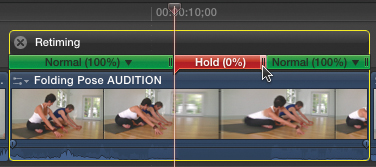
A two-second freeze frame speed segment is added to the end of the shot. If it’s not already showing, the Retime Editor appears above the clip ![]() .
.
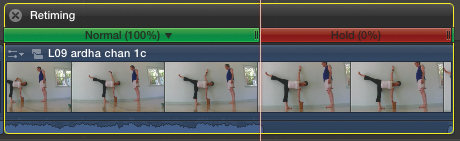
![]() A speed segment is added to represent the freeze frame. Freeze frames are indicated in red and marked as “0%” in the Retime Editor.
A speed segment is added to represent the freeze frame. Freeze frames are indicated in red and marked as “0%” in the Retime Editor.
To create a freeze frame in the middle of a shot
1. Select a clip, and position the playhead on the frame you want to freeze ![]() .
.
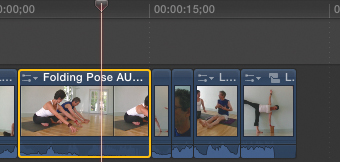
![]() Position the playhead over the frame you want to freeze.
Position the playhead over the frame you want to freeze.
2. Do one of the following:
• Press Shift-H.
• Choose Modify > Retime > Hold.
• Click the Retime pop-up menu in the toolbar, and then choose Hold.
A two-second freeze frame is added in the middle of the clip. The clip resumes normal playback after the freeze ends ![]() .
.
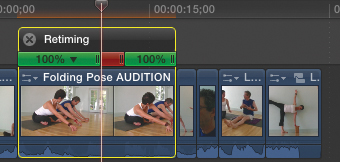
![]() A freeze frame segment is added to the clip at the selected frame.
A freeze frame segment is added to the clip at the selected frame.
While the two-second default freeze frame might be useful in some cases, most of the time you’ll probably want to change the duration to whatever is appropriate for the project at hand.
To change the duration of a freeze frame
1. Create a freeze frame using one of the techniques described earlier ![]() .
.
![]() Once you’ve created a freeze frame, you may want to customize its duration.
Once you’ve created a freeze frame, you may want to customize its duration.
2. In the Retime Editor, drag the Retime handle at the right edge of the freeze frame bar to the left to shorten the duration, and drag it right to lengthen the duration ![]() .
.
![]() Drag the Retime handle to change the duration of the freeze frame.
Drag the Retime handle to change the duration of the freeze frame.
The frozen section changes duration.
Speed Ramp Effects
In addition to creating constant speed changes, you can also make a clip’s playback speed change over time. This creates an effect where the clip’s speed appears to ramp up or ramp down, getting faster or slower over the course of the clip.
To do this, FCP breaks the clip into four speed segments and assigns a different speed value to each, adjusting each subsequent speed to make the clip appear to be slowing down or speeding up over time.
You can apply a speed ramp to an individual speed segment, restricting the clip’s speed change to that limited range.
FCP offers two speed ramp commands: Ramp to 0% and Ramp from 0%. Ramp to 0% sets each subsequent speed segment to play at a slower rate. Ramp from 0% sets each subsequent speed segment to play at a faster rate.
Once you’ve created speed segments within a clip, you can customize their individual playback rates manually (including setting an individual segment to ramp to or from 0 percent), creating a wide range of custom and unique timing effects.
Note that applying a ramp effect to a clip will replace any existing speed effects or speed segments currently applied to that clip.
To set a clip to ramp to 0 percent
• Select a clip, and choose Modify > Retime > Speed Ramp > To 0%.
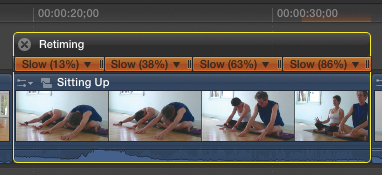
The clip is broken into four speed segments, and each is assigned a diminishing speed value ![]() .
.

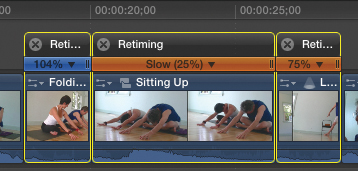
![]() Ramp to 0% breaks your clip into four speed segments, each with a slower speed. The exact speeds will depend on the original duration of your clip.
Ramp to 0% breaks your clip into four speed segments, each with a slower speed. The exact speeds will depend on the original duration of your clip.
Playing the clip will result in the playback appearing to slow down to a stop.
To set a clip to ramp from 0 percent
• Select a clip, and choose Modify > Retime > Speed Ramp > From 0%.
The clip is broken into four speed segments, and each is assigned an increasing speed value ![]() .
.
![]() Ramp from 0% also breaks your clip into four speed segments, but this time each segment is set to faster speed than the last.
Ramp from 0% also breaks your clip into four speed segments, but this time each segment is set to faster speed than the last.
Playing the clip will result in the playback beginning in very slow motion and increasing gradually to regular speed.
To select a speed segment
• Click the blank area of the Retime Editor above a clip (don’t click the speed value or the Preset Speeds pop-up) ![]() .
.
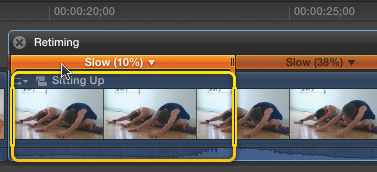
![]() The freeze frame changes length to match the value you selected.
The freeze frame changes length to match the value you selected.
The range of the clip controlled by that speed segment is selected.
To modify a speed segment’s playback rate
• Do one of the following:
• Click the Preset Speeds pop-up for the segment you want to modify, and choose an option from the menu ![]() .
.

![]() Each speed segment has its own Preset Speeds pop-up that you can use to control the speed of that segment.
Each speed segment has its own Preset Speeds pop-up that you can use to control the speed of that segment.
• Drag the Retime handle at the right edge of the Retime Editor for each speed segment to the right to slow the clip down, or drag it to the left to speed it up ![]() .
.

![]() You can drag the Retime handle to change the speed of any segment individually.
You can drag the Retime handle to change the speed of any segment individually.
• Select the speed segment, and choose a setting from the Retime menu.
Modifying a Speed Segment
You can also change the duration of a segment without changing its speed. This adds or removes frames from the segment, taking them away from or adding them to the adjacent segment.
This is equivalent to rolling an edit point, but you’re simply rolling where one speed segment ends and the next one begins.
You always modify the end of a segment, although by definition you are also adjusting the beginning of the next segment. You cannot adjust the Change End Source Frame setting on the last segment in a clip.
To change where a speed segment ends
1. Click the Preset Speeds pop-up for the segment you want to change, and choose Change End Source Frame ![]() .
.
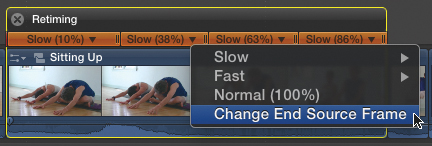
![]() Choose Change End Source Frame from the Preset Speeds pop-up.
Choose Change End Source Frame from the Preset Speeds pop-up.
A filmstrip icon appears at the edge of the speed segment ![]() .
.
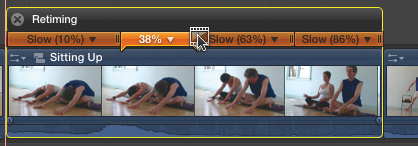
![]() The right edge of the Retime Editor turns into a filmstrip icon.
The right edge of the Retime Editor turns into a filmstrip icon.
2. Drag the filmstrip icon left or right to choose a new ending frame for the speed segment.
When you have successfully chosen the new end frame, click the Preset Speeds pop-up again, and select Change End Source Frame again ![]() .
.
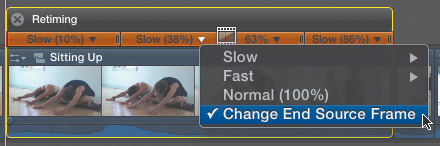
![]() A check mark to the left of a Change End Source Frame menu item indicates that it is active. Choose the item again to disable it.
A check mark to the left of a Change End Source Frame menu item indicates that it is active. Choose the item again to disable it.
The speed segment is adjusted.
Reverse Playback
Another special effect that falls in the timing category is reverse playback, where the video plays backward. Video can be played in reverse at any speed, and you can change the speed at which a clip plays before or after assigning it to play in reverse.
To set a clip (or group of clips) to play backward
• Select the clip (or clips), and choose Modify > Retime > Reverse Clip.
The clip is set to play in reverse. If the Retime Editor is not showing, it appears above the clip ![]() .
.
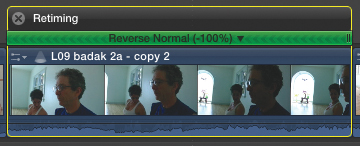
![]() When you set a clip to play in reverse, the Retime Editor appears and shows a pattern of left-facing arrows. The color of the bar still reflects whether the clip is playing in fast motion (orange), in slow motion (blue), or at its normal speed (green) as shown here.
When you set a clip to play in reverse, the Retime Editor appears and shows a pattern of left-facing arrows. The color of the bar still reflects whether the clip is playing in fast motion (orange), in slow motion (blue), or at its normal speed (green) as shown here.
The Reverse Clip command works only on whole clips. To play a segment of a clip in reverse, use the Rewind command described in the next section.
Rewind and Instant Replay
Two special retiming commands apply commonly used but complex-to-create speed effects in a single step.
Rewind
Rewind applies a timing effect where the selected range of a clip is played backward (at one of three speeds) and then playback resumes through the end of the clip.
Rewind always makes the resulting clip significantly longer: Not only does it add time to show the selected section in reverse, but then it plays forward again, replaying the selected section and then continuing with whatever frames remain in the clip.
To rewind a clip
1. Use the Range Select tool (R) to select the section of the clip you want to rewind ![]() .
.
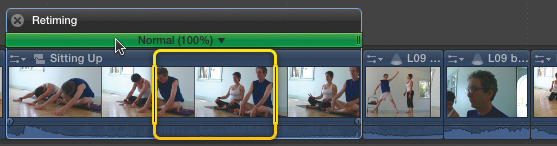
![]() Select the range of the clip you want to rewind.
Select the range of the clip you want to rewind.
2. Click the Retime pop-up menu in the toolbar, choose Rewind, and then select 1x, 2x, or 4x to determine at what speed the rewound section should play ![]() .
.
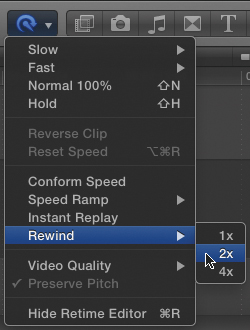
![]() Choose the speed at which you want the rewound section to play: 1x (normal speed), 2x, or 4x.
Choose the speed at which you want the rewound section to play: 1x (normal speed), 2x, or 4x.
Three new speed segments are added to the clip: one for the rewound section, one for the area where the clip is replayed in forward motion, and one for the area between the replayed section and the end of the clip ![]() .
.
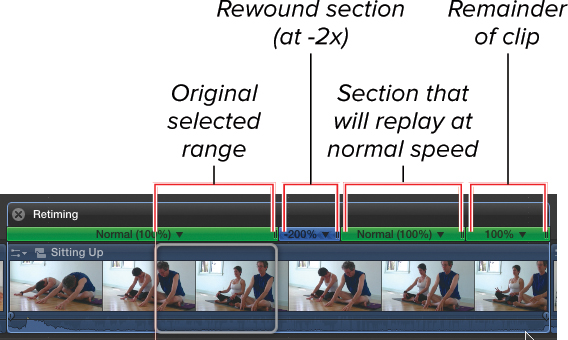
![]() Rewind adds three speed segments: one for the section playing backward, one for the section that plays forward to get back to the frame where the original clip resumes, and one for the remainder of the clip.
Rewind adds three speed segments: one for the section playing backward, one for the section that plays forward to get back to the frame where the original clip resumes, and one for the remainder of the clip.
Instant Replay
Instant Replay adds a speed segment that repeats the selected clip (or range of a clip) at the current playback speed.
Like Rewind, Instant Replay makes the clip longer by adding a section equal in length to the selected range.
Although by default Instant Replay plays the repeated section at regular speed, it’s very easy to slow it down after the fact to create a slow-motion instant replay.
To perform an instant replay
1. Use the Range Select tool to select the portion of the clip you want to replay ![]() .
.
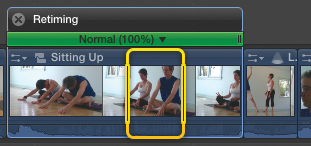
![]() Select the range of the clip you want to play as an instant replay.
Select the range of the clip you want to play as an instant replay.
2. Click the Retime pop-up menu in the toolbar, and choose Instant Replay.
A speed segment is added to the clip, repeating the selected section ![]() .
.

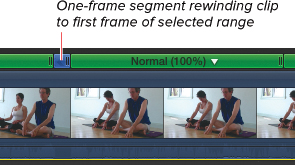
![]() Instant Reply adds two speed segments: a one-frame segment rewinding the clip to the beginning of the selected range and a second segment replaying the selected range at the speed previously selected.
Instant Reply adds two speed segments: a one-frame segment rewinding the clip to the beginning of the selected range and a second segment replaying the selected range at the speed previously selected.
To create a slow-motion instant replay
1. Complete steps 1 and 2 in the previous section.
2. Click the Adjust Speed menu on the newly created speed segment, and choose Slow > 50% (or whatever speed you prefer) ![]() .
.
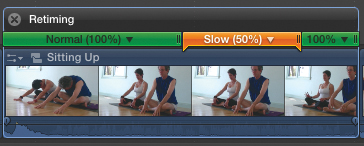
![]() Set the speed of the replay segment to 50 percent using the Preset Speeds pop-up.
Set the speed of the replay segment to 50 percent using the Preset Speeds pop-up.
The instant replay plays in slow motion.
If you zoom in and closely examine a clip after Instant Replay has been applied, you’ll see a one-frame speed segment between the end of the selected range and the new replayed version. This one frame is how the clip is rewound to the first frame so it can play forward again ![]() . Because it’s only one frame long, you don’t notice any reverse playback occur.
. Because it’s only one frame long, you don’t notice any reverse playback occur.
![]() Instant Reply adds two speed segments: a one-frame segment rewinding the clip to the beginning of the selected range and a second segment replaying the selected range at the speed previously selected.
Instant Reply adds two speed segments: a one-frame segment rewinding the clip to the beginning of the selected range and a second segment replaying the selected range at the speed previously selected.
Conform Speed
If you have clips in your sequence with differing frame rates, FCP converts the frame rate on-the-fly to make sure all clips play back in real time. However, you can override that setting and instruct FCP to play clips at the project frame rate regardless of the rate at which it was originally shot.
This means that a 5-second clip at 30fps will become 6 seconds long in a 25fps project, playing at 75 percent speed.
Similarly, shots filmed at 60fps can be put in a 30fps project and set to play at 50 percent speed without requiring any interpolation or rendering, which means they will be as visually sharp as footage that came straight from the camera, except they will play in slow motion.
For professional cameras that can record at higher frame rates, this feature enables you to add such clips to your project, preserving the high-quality slow motion created in the camera.
To force a clip to play at the project frame rate
• Select the clip, and choose Modify > Retime > Conform Speed.
The Retime Editor appears, and the clip is retimed to play at the project frame rate ![]() .
.
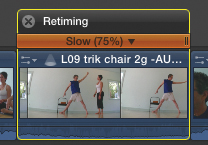
![]() A clip that was filmed at a higher frame rate will play in slow motion when conformed in a lower-frame rate project.
A clip that was filmed at a higher frame rate will play in slow motion when conformed in a lower-frame rate project.
Removing All Timing Effects
At any point you can remove all timing effects from a clip, resetting it to its default. This will remove any speed segments, remove any timing changes applied to those segments, and reset playback to forward-play if Reverse Playback had been applied.
To remove all timing effects from a clip
• Select a clip (or clips), and do one of the following ![]() :
:
![]() Select one or more clips from which you want to remove all retiming effects.
Select one or more clips from which you want to remove all retiming effects.
• Choose Modify > Retime > Reset Speed.
• Click the Retime pop-up menu in the toolbar, and choose Reset Speed ![]() .
.
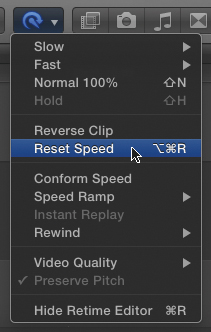
![]() Choose Reset Speed, or press Option-Command-R.
Choose Reset Speed, or press Option-Command-R.
• Press Option-Command-R.
Any timing effects applied to the clip are removed, resetting it to play forward at 100 percent ![]() .
.

![]() The clips are reset to play at 100 percent forward.
The clips are reset to play at 100 percent forward.
Retiming Settings
You can use two settings to control the way timing effects are applied. Video Quality allows you to set the interpolation method FCP uses when generating new frames for slow-motion effects. Preserve Pitch controls whether audio pitch is altered when a clip is sped up or slowed down.
Video Quality
When a clip or clip segment is assigned to play in slow motion, new intermediate frames must be generated to create the effect. FCP offers three choices for how such frames are rendered:
• Normal duplicates adjacent frames. This option doesn’t require any rendering but results in a stuttery, steppy visual effect.
• Frame Blending creates intermediate frames by cross dissolving between the surrounding frames. This requires rendering, but it creates a smoother-looking slow-motion effect than the Normal method does. Frame Blending can result in an undesirable softness or blurriness, especially at lower speeds where more artificial frames are required.
• Optical Flow uses a more sophisticated interpolation method where the clip is analyzed and the directional movement of objects within the frame is identified. Although it takes more time (the clip first must be analyzed, and the speed effect then must be rendered), Optical Flow can result in sharper and more accurate intermediate frames than Frame Blending. However, if there is too much movement in the frame—as happens with camera movement or very complex scenes—Optical Flow may produce undesirable artifacts.
Note that playing back a slow-motion clip prior to rendering will always play in the Normal, frame duplication method.
To set the rendering quality for slow-motion effects
• Choose Modify > Retime > Video Quality, and choose one of the three settings, or click the Retime pop-up menu in the toolbar, and choose one of the three Video Quality options ![]() .
.
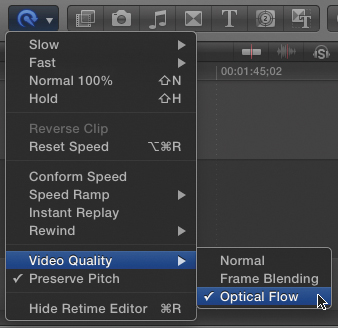
![]() Click the Retime pop-up menu in the toolbar, and choose one of the three Video Quality options.
Click the Retime pop-up menu in the toolbar, and choose one of the three Video Quality options.
The video-rendering quality is set based on your selection.
If you choose Optical Flow, a message will appear in the Viewer indicating that the clip is being analyzed ![]() .
.
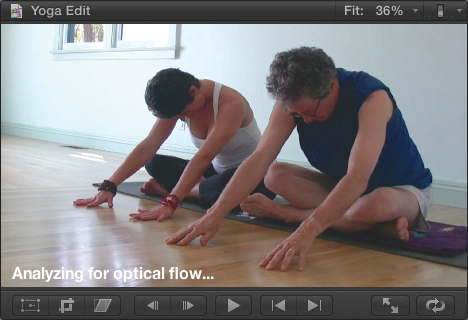
![]() While a clip is being analyzed for Optical Flow, text is displayed in the Viewer.
While a clip is being analyzed for Optical Flow, text is displayed in the Viewer.
To observe the progress of Optical Flow analysis
1. Click the Background Tasks indicator in the Current Frame indicator ![]() .
.
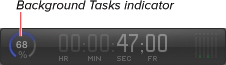
![]() Click the Render Clock to open the Background Tasks window.
Click the Render Clock to open the Background Tasks window.
The Background Tasks window opens.
2. Expand the Transcoding and Analysis category ![]() .
.
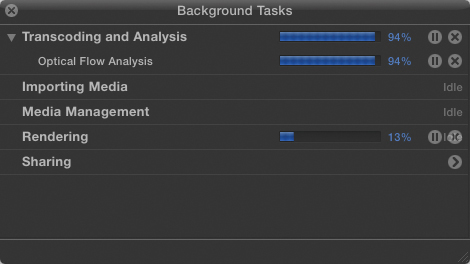
![]() The Background Tasks window shows the progress of all background rendering tasks.
The Background Tasks window shows the progress of all background rendering tasks.
The progress of the Optical Flow analysis is displayed.
Preserve Pitch
By default, FCP maintains audio pitch when a clip has been retimed. However, you may want to disable this setting to allow the audio pitch to shift up as a clip is sped up and to shift down as a clip is slowed down.
Turning off this setting creates a more obvious (and often comic) speed effect.
To disable audio pitch preservation
• Choose Modify > Retime > Preserve Pitch, or click the Retime pop-up menu in the toolbar and choose Preserve Pitch ![]() .
.

![]() Turn off Preserve Pitch to have the audio get higher when sped up or lower when slowed down. The only indicator of whether this setting is on or off is in the Retime submenu or the Retime pop-up menu in the toolbar.
Turn off Preserve Pitch to have the audio get higher when sped up or lower when slowed down. The only indicator of whether this setting is on or off is in the Retime submenu or the Retime pop-up menu in the toolbar.
Pitch preservation is disabled. When this setting is on, a check mark appears next to the command in the menu.