
10. Auditioning Clips
In This Chapter
Adding and Removing Clips from Existing Auditions
When you find yourself needing to quickly compare how a variety of related clips fit into a particular edit, you can group the clips into an audition.
An audition is a single clip object that contains a collection of shots. Only one shot can be active at a time, but you can quickly switch between the choices to see how the different clips feel in the project.
You can treat an audition just as you would treat a regular clip: editing, trimming, and moving it as needed. However, at any point you can swap out the active pick for one of the other alternates stored in the audition list.
Using Auditions
The clips in an audition can vary in length, format, and number. When a new shot is selected as the pick, the Timeline automatically adjusts to make room for the new clip.
You might create an audition out of a group of related shots, such as different close-ups of birds. Later you can swap out one bird shot for another.
Similarly, if you had multiple takes of an over-the-shoulder (OTS) shot of an actor, each one would contain the same action but with slightly different performances. Using an audition, you can easily swap out one take for another, quickly choosing the best performance and using that one in your project.
You can also make an audition out of duplicate instances of the same shot. You might do this to see how different effects play in the context of your project. So, for example, your audition might contain three instances of an identical shot, but one is tinted pink, one is tinted green, and one is tinted orange ![]() .
.
![]() In this audition, one clip is tinted three different colors.
In this audition, one clip is tinted three different colors.
Once you settle on the audition pick, you can finalize the audition, which discards the other shots in the audition list and converts the audition into a regular, flat clip.
Creating an Audition
You can create auditions in the Event Browser or in the Timeline. In the Event Browser, the audition becomes just another source file that you can edit into a project using any of the methods described in Chapter 7, “Basic Editing.” Later, you can swap out the pick for one of the alternates.
To create an audition in the Event Browser
1. Select two or more clips in the Event Browser ![]() .
.
![]() Select the clips you want to turn into an audition.
Select the clips you want to turn into an audition.
2. Choose Clip > Audition > Create, or press Command-Y.
A new audition clip is created. Any keywords in the original clips are automatically copied into the audition.
The original clips are left unaffected in the Event Browser ![]() .
.

![]() A new audition is created. The original clips remain in the event, unaffected.
A new audition is created. The original clips remain in the event, unaffected.
Instead of selecting whole clips, you can select Marked Favorites to limit the audition to the selected area of each clip.
3. Rename the audition clip ![]() .
.
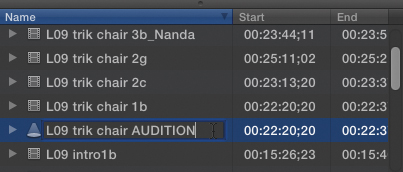
![]() Rename the audition clip to differentiate it from the similarly named clips from which it was created.
Rename the audition clip to differentiate it from the similarly named clips from which it was created.
Now your audition is ready to be used in a project.
Creating Auditions in the Timeline
In the Timeline, you can create an audition in a number of ways:
• You can add a clip to an existing clip, automatically converting the existing clip into an audition and setting the new clip as an alternate.
• You can add a clip to an existing clip, setting the new clip as the pick and saving the old clip as an alternate.
• You can duplicate an existing clip, creating an audition out of the duplicate.
• You can duplicate an existing clip with effects applied, creating an audition out of a duplicate with no effects.
The first two methods involve adding a new shot to an existing shot. The difference is that you can choose whether you want the old shot or the new shot to be set as the pick. (You can always change which one is the pick later.)
The last two methods involve duplicating an existing clip. These methods are primarily used for auditioning different effect settings.
To add a new clip as an alternate
1. Select the clip (or range) in the Event Browser that you want to add as an alternate ![]() .
.
![]() Select the shot you want to add as an audition alternate to the Timeline clip.
Select the shot you want to add as an audition alternate to the Timeline clip.
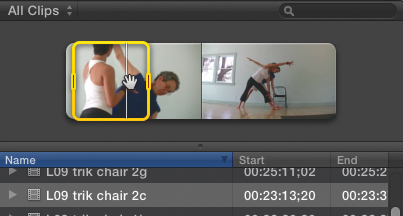
2. Drag the selection onto a clip in the Timeline, and when the clip turns white, drop the clip.
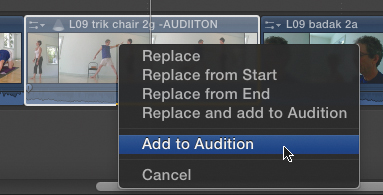
The Replace drop menu appears ![]() .
.
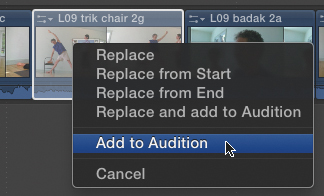
![]() Once the Timeline clip turns white, release the mouse. Choose Add to Audition from the drop menu.
Once the Timeline clip turns white, release the mouse. Choose Add to Audition from the drop menu.
3. From the drop menu, choose Add to Audition.
The Timeline clip is converted into an audition, and the dragged clip is saved as an alternate ![]() .
.
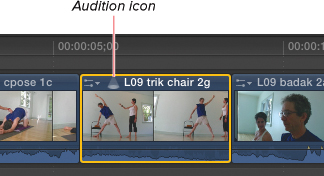
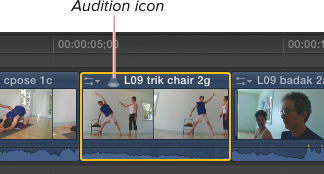
![]() Although nothing appears to change when you play the project in the Viewer, the clip has been converted to an audition. The only clue is the Audition icon that appears next to the clip in the Timeline.
Although nothing appears to change when you play the project in the Viewer, the clip has been converted to an audition. The only clue is the Audition icon that appears next to the clip in the Timeline.
Because the existing clip remains set as the pick, the content of the project does not change.
The only indication of what you’ve done is the Audition icon that appears to the left of the clip name.
Using this technique, you can add multiple clips to an audition at once. Just select multiple items in the Event Browser in step 1.
To add a new clip as the pick
1. Select the clip or range in the Event Browser that you want to add as an alternate ![]() .
.

![]() Select the clip you want to add to the Timeline.
Select the clip you want to add to the Timeline.
2. Drag the selection onto a clip in the Timeline, and when the clip turns white, drop the clip.
The Replace drop menu appears.
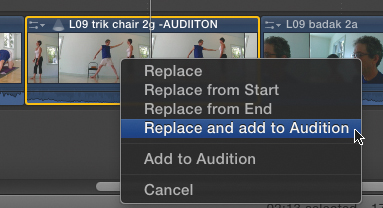
3. From the drop menu, choose Replace and Add to Audition ![]() .
.
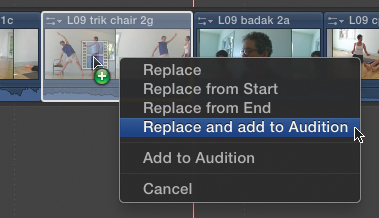
![]() When the drop menu appears, choose Replace and Add to Audition.
When the drop menu appears, choose Replace and Add to Audition.
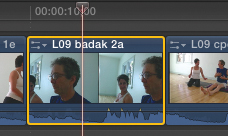
The Timeline clip is converted into an audition, and the dragged clip is set as the pick. The existing Timeline clip is saved as an alternate ![]() .
.

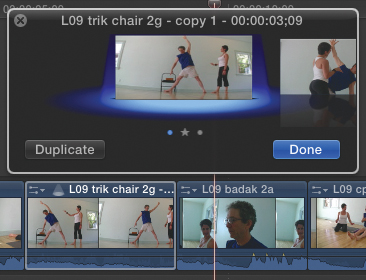
![]() The new clip becomes the pick, and the Timeline adjusts to make room for the longer clip.
The new clip becomes the pick, and the Timeline adjusts to make room for the longer clip.
To duplicate a clip as an alternate
• Select a clip in the Timeline, right-click, and, from the shortcut menu, choose Duplicate as Audition (or press Option-Y) ![]() .
.
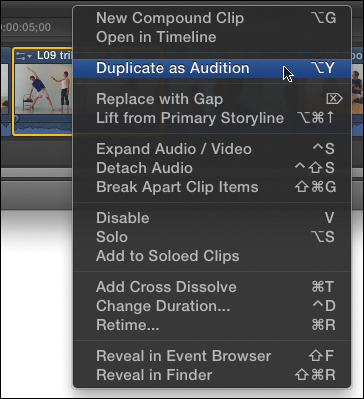
![]() Right-click a clip and choose Duplicate as Audition.
Right-click a clip and choose Duplicate as Audition.
The clip is converted into an audition, and a duplicate of the clip is saved as an alternate ![]() .
.
![]() The only noticeable change is the appearance of the Audition icon to the left of the clip name.
The only noticeable change is the appearance of the Audition icon to the left of the clip name.
Now you can make whatever changes you want to the clip, and you’ll always be able to return to the unaffected version of the clip.
To create an unaffected duplicate as an alternate
• Select a clip in the Timeline, and choose Clip > Audition > Duplicate from Original ![]() .
.

![]() The Audition submenu in the Clip menu contains all the commands related to auditions.
The Audition submenu in the Clip menu contains all the commands related to auditions.
The clip is converted into an audition, and a duplicate of the clip is saved as an alternate. The duplicate will be a “clean” version of the shot.
This works exactly like the previous method, except it’s intended to be used after you’ve already made changes to the clip—for example, if you apply a filter to a clip but then want to be able to quickly switch back to an unaffected version of the clip.
Auditioning Clips
Once you’ve collected a group of shots into an audition, you can experiment and see which clip best fits in your project, auditioning each one until you find your favorite.
Simply pick one of the clips in your audition and play the project to see how well it works. Then, if you like, audition the next option, and so on. When you’ve settled on a pick, there’s nothing more to do!
You can change your audition pick at any time. If a new pick is longer or shorter than the previous pick, the Timeline ripples automatically to accommodate the new clip length.
Note that although you can change the audition pick in the Event Browser, there’s not much benefit to doing so. Primarily, auditioning should be done once the audition has been placed into a project.
To try audition clips
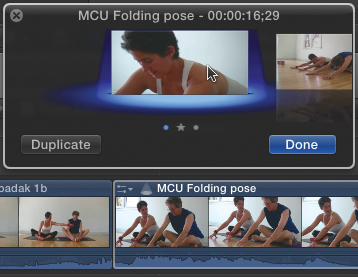
1. Select an audition in the Timeline, and click the Audition icon or press Y ![]() .
.
![]() Click the Audition icon to open the Audition window.
Click the Audition icon to open the Audition window.
The Audition window opens.
2. Press the Spacebar.
The Timeline plays the audition area including the pre-roll and post-roll frames.
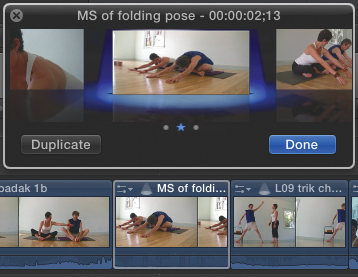
3. Press the Left Arrow key to move to the previous audition clip, or press the Right Arrow key to move to the next audition clip ![]() .
.
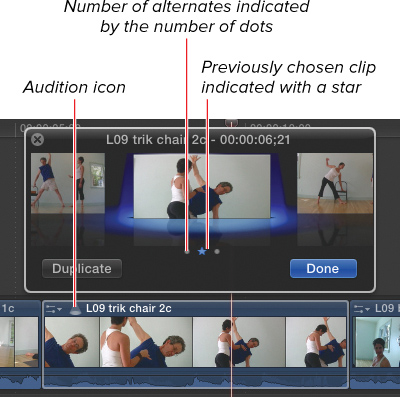
![]() Choose a new audition pick by pressing the Left Arrow key or the Right Arrow key to move to the next clip in the audition list. Note that the Timeline automatically updates to show the new pick.
Choose a new audition pick by pressing the Left Arrow key or the Right Arrow key to move to the next clip in the audition list. Note that the Timeline automatically updates to show the new pick.
The Timeline continues to play in a loop, displaying the new audition pick. Each time you select a new pick, the loop starts over.
4. When you’ve settled on a pick, press Enter or Escape, or click the Close button in the Audition window ![]() .
.
![]() The Audition window closes, and your last pick remains active in the Timeline.
The Audition window closes, and your last pick remains active in the Timeline.
The audition window closes, and the pick remains active in the Timeline.
To open the Audition window and automatically start playback of the clips (combining the earlier steps 2 and 3), press Command-Control-Y.
To customize the pre-roll and post-roll durations
1. Choose Final Cut Pro > Preferences.
2. Click the Playback icon to open the Playback pane ![]() .
.
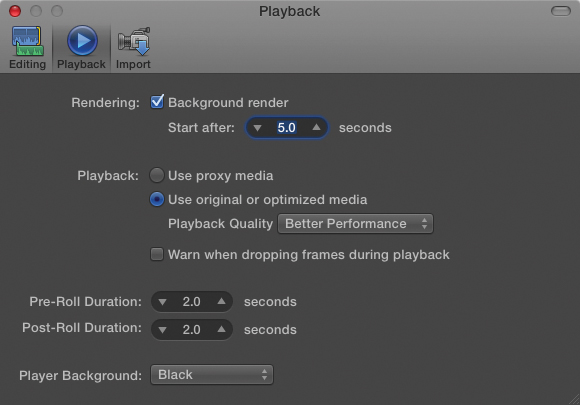
![]() The Playback pane of the Final Cut Pro Preferences window contains the Pre-Roll Duration and Post-Roll Duration settings.
The Playback pane of the Final Cut Pro Preferences window contains the Pre-Roll Duration and Post-Roll Duration settings.
3. In the Pre-Roll Duration and Post Roll Duration fields ![]() , do one of the following:
, do one of the following:

![]() You can modify the duration fields in a variety of ways.
You can modify the duration fields in a variety of ways.
• Click the increment or decrement arrows.
• Click the number and type a new value.
• Click and drag the number up to increase the value or drag it down to decrease the value.
4. Close the Preferences window.
The new pre-roll and post-roll durations are applied.
To change audition picks without opening the Audition window
1. Select the audition clip.
2. Press Control-Right Arrow to change to the next audition clip, or press Control-Right Arrow to change to the previous audition clip.
The audition changes to reflect the new pick.
You can click and drag the individual digits of the number separately to change either by whole seconds or by fractions of a second.
Auditions and Effects
One of the common uses for auditions is to compare how different effects look on the same clip. For example, you might know you want a distressed look for a clip but can’t decide between 50’s TV, Aged Film, and Aged Paper. You can create an audition where the same clip is duplicated three times, each with a different filter applied.
Or similarly, you might have added a title graphic, but you’re unsure about which font would look best and in what color. Using an audition, you can create multiple versions of the title, each with different settings.
Because this is such a common workflow, Final Cut Pro has some specific techniques for making the process of auditioning effects easy.
As described in the “Creating Auditions in the Timeline” section earlier, you can duplicate a clip, automatically saving it as an alternate. This allows you to make changes to the current pick (such as adding effects or changing text attributes), while the previous version of the shot remains unaffected in the audition list. If you ever want to return to the old version, it’s just a click away.
Similarly, you can automatically generate a duplicate as you apply an effect. Using this technique, as you drag an effect onto a clip, a clean, unfiltered version of the clip is saved as an alternate in the audition list. You see the effect instantly, but if you change your mind, the original remains handy. And you can do this again and again, saving many versions of the clip. That way, you can very quickly audition a variety of effects (such as the various distressed looks described earlier) and then quickly switch between them, all while seeing how well they integrate with the rest of the shots in your project.
To add a new effect and save an unaffected duplicate as an alternate
• Drag an effect from the Effects Browser onto a clip in the Timeline, and press Control before you release the mouse ![]() .
.
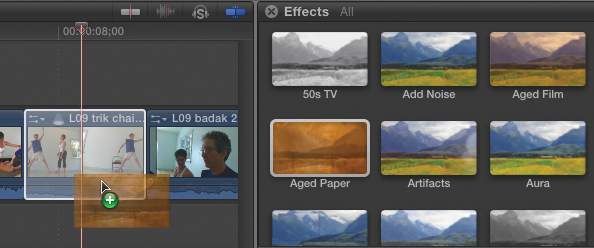
![]() To automatically save a clean version of the shot as an audition alternate, drag an effect to a Timeline clip and then press Control before you release the mouse.
To automatically save a clean version of the shot as an audition alternate, drag an effect to a Timeline clip and then press Control before you release the mouse.
The filter is applied, and a duplicate of the clip is saved as an audition alternate.
Applying Effects to All Clips in an Audition
You can also drag an effect to an audition and have it applied simultaneously to all the shots in the audition list, including the current pick.
For example, you may have a group of different shots of trees in a particular audition. You haven’t yet decided whether you’re going to opt for a spruce, a larch, or a horse chestnut. But you have decided that whichever tree shot you’ll use, it’s going to need a Simple Border effect applied to it. You can apply the effect to the entire audition list instead of just the current pick. That way, every time you switch to a different alternate, the border effect will remain.
To apply an effect to all clips in an audition list
1. Drag an effect from the Effects Browser to the audition clip in the Timeline, and before you drop the clip, press Control-Option ![]() .
.
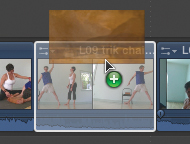
![]() While dragging an effect to a Timeline audition clip, press Control-Option before you drop the clip.
While dragging an effect to a Timeline audition clip, press Control-Option before you drop the clip.
The effect is applied to the current pick as well as any alternates in the audition list.
2. Select the audition clip, and press Y.
The Audition window opens. You can see that the effect is applied to each of the items ![]() .
.
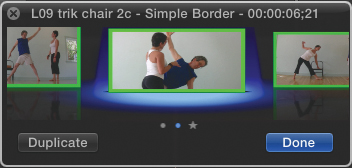
![]() Open the Audition window to see the audition list. The effect is applied to all the clips.
Open the Audition window to see the audition list. The effect is applied to all the clips.
Once the effect is applied, each clip’s effect settings remain independent from one another. To turn the border red, as in the previous example, you’d have to modify the Simple Border Color setting in the Video Effects pane of the Info window for each clip.
Adding and Removing Clips from Existing Auditions
At any point you can add clips to or remove clips from an existing audition. In this way, auditions can remain “living” objects where you can continue to modify their contents throughout the editing process.
Adding Clips to an Existing Audition
There appears to be no limit to the number of clips an audition can contain. (We successfully added more than 100, though more than 15 or so makes it pretty unwieldy.)
In the Event Browser, you can’t technically add a clip to an existing audition, but you can easily create a new audition that combines the contents of an existing audition with any new items you select.
To combine an audition with new clips in the Event Browser
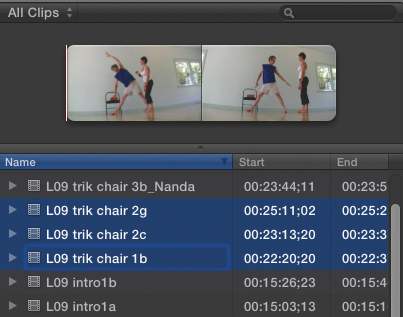
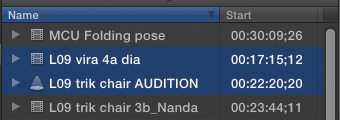
1. Select the audition and the clips you want to add to the audition ![]() .
.
![]() Select both the audition and the new clips you want to add.
Select both the audition and the new clips you want to add.
2. Choose Clip > Audition > Create, or press Command-Y.
A new audition is created that includes all of the clips from the selected audition as well as the new clips ![]() .
.
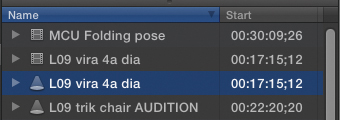
![]() A new audition is created, combining the selected audition with the additional selected clips.
A new audition is created, combining the selected audition with the additional selected clips.
3. Rename the new audition ![]() .
.
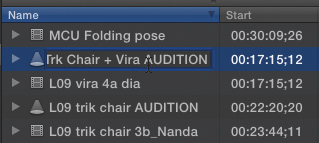
![]() To avoid confusion, it’s best to rename the new audition and delete the old one.
To avoid confusion, it’s best to rename the new audition and delete the old one.
4. Select the old audition, and press Command-Delete.
The old audition is deleted from the project.
In the Timeline, adding clips to an existing audition can be done using many of the same techniques you use to create a new audition: You can drag a new clip to an existing audition, duplicate a clip within an audition, and add an effect to an audition to create a duplicate with that new effect.
To add a new clip as an alternate
1. Select the clip (or range) in the Event Browser that you want to add as an alternate ![]() .
.
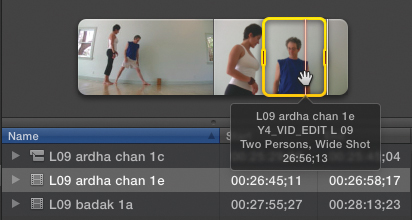
![]() Select the clip in the Event Browser that you want to add to the audition.
Select the clip in the Event Browser that you want to add to the audition.
2. Drag the selection onto an existing audition in the Timeline, and when the clip turns white, drop the clip.
The Replace drop menu appears.
3. From the drop menu, choose Add to Audition ![]() .
.
![]() When the Replace Edit drop menu appears, choose Add to Audition.
When the Replace Edit drop menu appears, choose Add to Audition.
The dragged clip is added to the audition as an alternate ![]() .
.

![]() Nothing appears to change in the Timeline or the Viewer, but the new clip has been added to the audition list as an alternate take.
Nothing appears to change in the Timeline or the Viewer, but the new clip has been added to the audition list as an alternate take.
To add a new clip as the pick
1. Select the clip or range in the Event Browser that you want to add as an alternate ![]() .
.

![]() Select the clip in the Event Browser that you want to be the new pick.
Select the clip in the Event Browser that you want to be the new pick.
2. Drag the selection onto a clip in the Timeline, and when the clip turns white, drop the clip.
The Replace drop menu appears.
3. From the Replace drop menu, choose Replace and add to Audition ![]() .
.
![]() When the Replace drop menu appears, choose Replace and add to Audition.
When the Replace drop menu appears, choose Replace and add to Audition.
The dragged clip is set as the pick. The existing Timeline clip is saved as an alternate ![]() .
.

![]() The new clip replaces the old one in the Timeline, and the old one is stored in the audition list.
The new clip replaces the old one in the Timeline, and the old one is stored in the audition list.
To duplicate a clip as an alternate
• Select a clip in the Timeline, and choose Clip > Audition > Duplicate as Audition (or press Option-Y) ![]() .
.
![]() Select the clip in the Timeline.
Select the clip in the Timeline.
A copy of the pick is added to the alternate list. Now you can modify the current pick but quickly return to the previous state by switching to the alternate.
You can press Option-Y several times consecutively to add multiple duplicates at once ![]() . That way, you can modify each of them in different ways and quickly switch between them.
. That way, you can modify each of them in different ways and quickly switch between them.
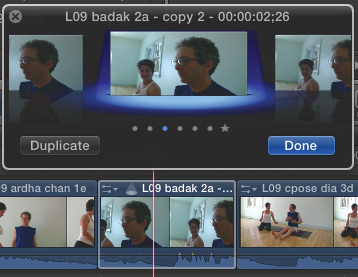
![]() Each time you press Option-Y, you’re adding a new duplicate clip as an alternate. This figure shows an audition with seven copies of the clip.
Each time you press Option-Y, you’re adding a new duplicate clip as an alternate. This figure shows an audition with seven copies of the clip.
Removing Clips from an Audition
As you home in on your final choice, you may want to remove some of the alternates from the audition group.
(NOTE: Deleting a clip from an audition does not delete other instances of that clip in your Event Browser.)
To remove a clip from an audition
1. Select the audition in either the Event Browser or the Timeline, and click the Open Audition icon (or press Y) ![]() .
.
![]() Select the audition clip, and click the Audition icon to open the Audition window.
Select the audition clip, and click the Audition icon to open the Audition window.
The Audition window opens.
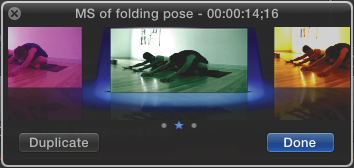
3. Press the Left Arrow key or the Right Arrow key to navigate to the alternate you want to remove ![]() .
.
![]() Navigate to the clip you want to delete from the audition list. In this example, the leftmost clip has been selected.
Navigate to the clip you want to delete from the audition list. In this example, the leftmost clip has been selected.
4. Press Delete ![]() .
.

![]() Press Delete to remove the clip from the audition list. In this example, only two audition clips remain.
Press Delete to remove the clip from the audition list. In this example, only two audition clips remain.
The selected clip is removed from the audition.
Note you cannot delete the last clip in an audition.
Finalizing an Audition
Once you’ve settled on which clip will serve as the final pick, you can lock that choice in by finalizing the audition.
Finalizing replaces the audition with a regular copy of the current pick. Any effects or adjustments applied to the pick will remain applied to the finalized clip.
Finalizing is not required. There’s no harm in leaving auditions in your project forever (other than the continued opportunity it provides to second-guess your decisions).
To finalize an audition
1. Select the audition in the Timeline ![]() .
.
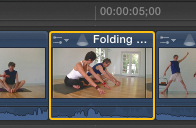
![]() When you’re ready to finalize your audition, select it in the Timeline.
When you’re ready to finalize your audition, select it in the Timeline.
2. Choose Clip > Audition > Finalize, or press Shift-Option-Y.
The audition is converted into a regular clip ![]() .
.

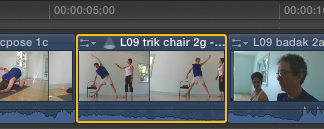
![]() Press Shift-Option-Y, and the audition is flattened, leaving only the current pick behind as a regular clip in the project. The only obvious evidence of the change is the removal of the Audition icon from beside the clip’s name.
Press Shift-Option-Y, and the audition is flattened, leaving only the current pick behind as a regular clip in the project. The only obvious evidence of the change is the removal of the Audition icon from beside the clip’s name.