
Chapter 10. Collaborating on Projects via Facebook
Expensive groupware, workflow management tools, and other collaboration programs have been around for quite a while. With its open-door policy and privacy concerns (see Chapter 13), Facebook is certainly no replacement for a dedicated, bulletproof collaboration program like Lotus Domino or Novell Groupwise. But you might find that some of Facebook’s tools are handy—and free—ways to help your team get work done quickly. This chapter gives Facebook’s messaging and subscription tools (which Chapters 4–7 introduced you to) a decidedly business spin. You’ll see how to use them to keep team members, coworkers, and clients in the loop—and projects on track.
Note
A recent study reported by Mashable.com found that around half of all employers block access to social networking sites such as Facebook. The top two reasons? Loss of productivity and security concerns such as those explained in Chapter 13. If your company won’t let you use Facebook at work, you can probably skip this chapter—unless you want to collaborate on non-work projects using Facebook.
Keeping in Touch
The same Facebook features that let you and your friends “talk” online—messaging (Sending Messages), events (Chapter 7), Groups (Chapter 6), and notes (Creating Notes (Blogs))—can help you keep up to date with coworkers, clients, and customers. The features work the same way whether you’re interacting with your old college roommate or your boss. But there are a few things you need to keep in mind when you’re using these features for work:
Professionalism. Email has done more to lower professional communication standards than casual Friday ever did. And now that everyone’s finally used to emoticons, here comes Facebook, a site so hip, hot, and happening—and easy to use—that it doesn’t just encourage you to be informal; it practically orders you to. The thing is, you never know who might view your Facebook exploits, even if you’re scrupulous about privacy (see Chapter 13). So, instead of thinking of Facebook as an employee lunchroom, think of it as a meeting that the big brass might drop in on at any time. Keep personal info, off-color jokes, and just-for-fun applications (Facebook Applications: An Overview) to a bare minimum.
Privacy. If you’re using Facebook for business, you’ll want to scale back the notifications the site sends out about your activities. That way your boss won’t get barraged with details of, say, your love life. In particular, you want to adjust your privacy settings (Chapter 13).
Tip
You may want to create a business-related Friend List and then add folks like your boss, coworkers, and clients to it. Doing so helps make customizing your privacy settings easy, because you don’t have to tell Facebook the name of each business contact every time you tweak a privacy setting—you can just give Facebook the list name. Creating a Friend List has the scoop on creating Friend Lists. Once you’ve made the list, head to the top right of any Facebook screen and click Account, then Privacy Settings, and then (for example) Profile Information. Click the button that appears to the right of each privacy setting, choose Customize, and then type in the name of the list.
Security. Be careful not to discuss anything mission-critical on Facebook, and don’t post confidential company documents of any kind. And because you can’t be sure that info you give the site won’t get out, you may even want to keep mum about things like your work phone number and travel itinerary.
Sending Messages
Whether you’re an employee working in a cubicle farm or a freelancer working from home, you’ve probably already got an email program. So, why use Facebook to send and receive messages? Two reasons:
It’s super easy. If your coworkers and clients are on Facebook, sending them a message takes only one click—whether you want to invite them to an impromptu meeting, comment on a document or website one of them posted, or share a video clip. (Thank the "Message All Members,” "Send [somebody] a Message”, “Share,” and other click-to-contact links scattered around the site.)
Tip
If some of your coworkers and clients aren’t on Facebook, Finding People Who Aren’t Facebook Members explains an easy way to invite them to join.
It helps you organize your correspondence. If your team uses Facebook to collaborate on a project, Facebook’s messaging feature helps you keep project-specific correspondence separate from your other work-related email.
Setting Up Meetings
Intranets (private websites that only company employees can access) are great for lining up in-house meetings, but Facebook events are a handy way to organize get-togethers that involve a mix of coworkers and “civilians” such as clients, potential clients, suppliers, and former employees.
Note
For the full scoop on events, flip to Chapter 7.
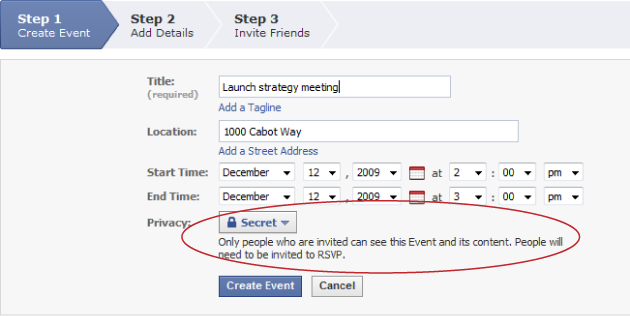
The thing you want to pay attention to when organizing an event is the level of access that you grant other people (see Creating Your Own Events). So after you click the Events link on the left side of your Home page and then click “Create an Event” to display the “Step 1: Event Info” page, do the following:
Choose Secret from the Privacy drop-down list. Doing so keeps details of your event out of non-attendees’ searches and News Feeds.
Click the Create Event button at the bottom of the “Step 1: Event Info” page and then decide how much access to grant attendees. If you expect meeting materials to flow just one way—for example, if you plan to post documents or multimedia files for attendees to review but they won’t need to post stuff—turn off the Enable checkboxes to the right of Event Options on the “Step 2: Add Details” page. (Doing so helps prevent confusion and avoid the more serious threat of breached confidentiality in cases where, for example, you want to make sure nobody uploads private company documents.) If you don’t want anyone to know who’s attending the meeting—say it’s a sales meeting and you don’t want your attendees to get together without you before you’ve had a chance to give your official pitch—turn off the “Show the guest list” checkbox.

Exchanging Ideas
Facebook Groups (Chapter 6) are terrific for:
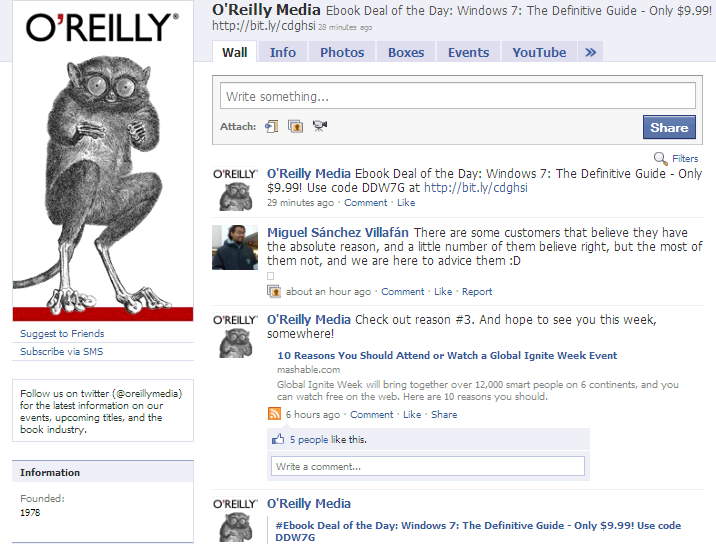
User groups and other customer-oriented information exchanges. You get to combine your company logo with Facebook’s groovy collaboration features (such as a moderated discussion board, the ability to exchange files, and one-click messaging to all Group members) to build or maintain interest in your company and products—for free!
Team discussions. If your company doesn’t have an intranet and is relying instead on email for team discussions, you’re going to love Facebook Groups. Using Groups is a lot easier than dealing with mile-long “me too” replies and CC lists—and Groups give people a single place to go for updates and file exchanges. Just be sure you restrict your Group to your company’s network and make the Group secret (Creating a Group) to keep important details out of the hands of riffraff (meaning anybody who’s not a confirmed team member).
Chapter 6 has the lowdown on setting up and using Groups.
Creating and Subscribing to Notes
Facebook notes (Creating Notes (Blogs)) are basically blog entries people can subscribe to. You could use plain old email to send your team multimedia documents like project milestones, ongoing customer service requests, or meeting minutes. But using Facebook notes instead gives team members the best of both worlds: Notifications (Customizing Your Mini Feed) that alert them every time you post a new document, and a single, easily accessible archive of everything you’ve posted.
To use notes:
Make sure all your team members are on a work-related Friend List you’ve created. See Creating a Friend List.
Adjust your notes settings. On the “Privacy Settings - Profile Information” page (Controlling Who Sees Your Profile and Contact Info), zip to the “Posts by Me” setting and choose Customize, then type in the name of your Friend List.
Have your team members subscribe to your notes. Ask each of them to head their Home pages and click the Notes link on the left side of the page (they may need to click the More link to see it), and then find a note you’ve written. They should then click the title of the note and, on the page that appears, click the “[Your Name]’s Notes” link. On the right side of the next page, they should click the “[Your Name]’s Notes” link under the “Subscribe to these Notes” header. (See Subscriptions for more on subscribing to Feeds.)
Exchanging Files
It doesn’t matter whether you’re talking team meetings, sales conferences, or product launches: All business interactions generate documents. Brochures, diagrams, attendee lists, action items, reports, flow charts—the list goes on and on. Fortunately, one of the things Facebook excels at is letting you exchange documents painlessly and privately.
Note
Privacy, of course, is relative. No free site will ever guard your data as carefully as you would. See Chapter 13 for the scoop on Facebook privacy. The bottom line: Don’t use Facebook to send confidential info.
Facebook’s built-in Photos application lets you upload and share image files with your coworkers. And the built-in Links application lets you share just about anything else, from audio and video clips to files and documents stored on the Web. Read on to learn how, or flip to High-Dollar Options to learn about applications.
Sharing Pictures
You can use Facebook’s Photos application to upload and share image files. The files you upload have to be in one of these three Internet-friendly formats: .jpg, .bmp, .png (with some restrictions that are explained in the next section), or .gif (but not animated GIFs).
Note
If you’re not sure what format an image file is in, here’s how to find out: Locate the file on your computer and right-click it (or Control-click it on a Mac); then select Properties (Get Info on a Mac) from the pop-up menu that appears. The info box you see lists the file’s format.
On Facebook, you organize your picture files by grouping them into albums. You can limit access to each album so that only certain team members can see it, and you can even tag individual pictures within the album. (Tagging is a way of associating one or more person with the picture, which is useful for establishing and tracking accountability. For example, you can tag a picture of a features list so that each list item is associated with the team member responsible for developing it.)
Note
Albums aren’t the only way to share pictures. In addition to your profile picture (Adding or Changing Profile Pictures), Facebook lets you add pictures to Groups, events, and notes. But using the Photos application’s albums is your best bet when you want to keep project- or team-related photos, drawings, sketches, or screenshots in one place.
Creating and Filling an Album
Before you can upload and share a group of picture files, you need to create an album. Here’s how to do both:
On the left side of your Home page, click the Photos link.
Note
Because Photos is an application, you can delete it (see Deleting Applications). If you deleted it by accident, turn to Adding Applications to learn how to find and reinstall it.
On the Photos page that appears, click the “+ Upload Photos” button. When you do, Facebook may display a “Facebook Plug-In” dialog box telling you that you have to install a plug-in—a tiny program that runs inside your web browser—to upload photos. (If you don’t see this dialog box, skip to step 3.) If you decide not to install the plug-in, you can use an older version of Facebook’s uploader tool that only lets you upload one image at a time. Installing the new plug-in is easy, so unless you almost never upload images, you’re best off installing it.
To install the plug-in: In the “Facebook Plug-In” dialog box, click Install, and then click the Download Facebook Plug-In link that appears. When you do, your computer asks where you want to save the downloaded file. Choose a spot you can remember (like on your desktop), and then save the file. Next, find the file on your computer, open it, choose your language, and then click OK. It takes only a few seconds for Facebook to install the file, and then it displays a dialog box confirming the installation. Back in your web browser, click the Done Installing button.
Note
If you’re on a Mac, you may have trouble downloading and installing the plug-in. Happily, Facebook offers a separate plug-in that lets you send images from iPhoto right to Facebook. For details on how to install and use it, head to http://developers.facebook.com/iphoto.
On the Add New Photos screen, describe your album, and then click Select Photos. Whatever you type in the Album Name, Location, and Description fields will be visible to everyone who can see your album, so keep it professional. From the Privacy drop-down list, choose Only Friends to restrict album access to your team members.
In the Select Photos dialog box, tell Facebook which image files you want to upload. The Select Photoshop dialog box has two parts. The upper half is where you navigate around your computer to find the images you want to upload: Click an item in the leftmost pane and the items it contains appear in the next pane; keep clicking to drill down to where your images live on your computer.
When you find the folder that holds your images, thumbnail versions of your pics appear in the lower half of the dialog box. To select an image, simply click it; click it again to deselect it. There’s also a Select All link in the middle of the dialog box if you want to upload all the images in that folder. (It changes to read Deselect All once you’ve chosen at least one image.)
The files you choose need to weigh in at less than 15 megabytes each. (See the Tip on Sharing Pictures with details about checking a photo’s file format; the info box that appears also lists the file’s size.) After you choose the files you want to upload, click the Use Selected Photos button, and Facebook takes you back to the Add New Photos page.
Tip
Facebook lets you stuff up to 200 pictures into a single album. If you need to share more, no problem: Simply create another album. Facebook doesn’t place a limit on the number of albums you can create (which is why, according to some accounts, Facebook stores more photos than any other photo-sharing site).
Decide whether you want to publish your album right away and then click Create Album. If you don’t want Facebook to alert your friends of your new images right away, turn off the Publish Automatically checkbox before you create the album. That way, you can sort through your photos, add a few captions, and make a few other changes before you let folks peek at your pictures. When you’ve got a fresh cup of joe and you’re ready to make those adjustments, start editing your album as explained next.
Note
Even if you turn off the Publish Automatically checkbox, people will still be able to see your images if they go hunting for them. As explained above, as soon as you create an album, it shows up in the Photos section of your profile. By turning off this checkbox, you simply prevent Facebook from making a big announcement about your new album by posting it on your wall and alerting your friends via their News Feeds (Types of Updates).


After you click Create Album, Facebook whisks you to your profile, where you can see the images you just uploaded by clicking the Photos tab near the top of your screen.
Editing Your Album
After you create an album, you can change practically anything about it. First, head to the My Uploads page: On the left side of your Home page, click the Photos link, and then the My Uploads link that appears below it. From there, find the album you want to edit and click the Edit Album link below it.

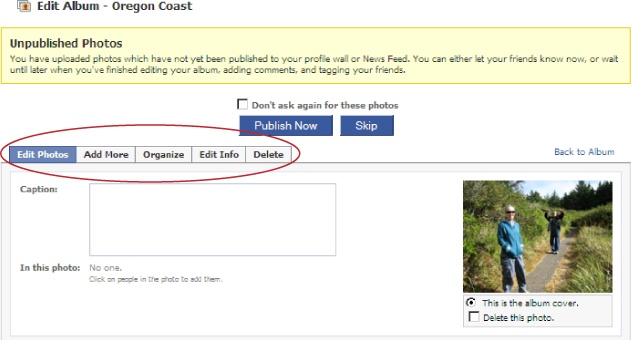
This takes you to an Edit Album screen where you can:
Add more pictures. Click the Add More tab and then, in the Select Photos dialog box that appears, follow the same steps you used to upload your first batch of image files (Creating and Filling an Album).
Delete pictures. Click the Edit Photos tab (if it’s not already selected), and then scroll to the picture you want to delete and turn on the “Delete this photo” checkbox below it. (To delete multiple pictures, turn on each picture’s checkbox.) Then head to the bottom of the page and click the Save Changes button.
Reorder your pictures. Click the Organize tab and then either drag the pictures into the order you want them, or click the Reverse Order button (which moves pictures A, B, and C so C shows up first, then B, then A). When you finish, click the Save Changes button.
Add captions to pictures. On the main Edit Photos screen (click the Edit Photos tab to get there), head to a picture and type your text into the Caption field. Don’t forget to click Save Changes when you’re done.
Choose a picture to use as the album’s “cover.” Facebook assumes you want the first picture you uploaded to be your album’s cover, but you can tell it differently. To pick your own cover, head to the main Edit Photos page and scroll to the picture you want to appear as a thumbnail (a tiny image) on your profile page and wherever else Facebook displays your album, such as in an email message you’ve attached your album to. Click the “This is the album cover” radio button below to the photo, and then head to the bottom of the page and click Save Changes.
Change the name or description of your album. Click the Edit Info tab, make your changes, and then click Save Changes.
Note
Saving your changes displays a “Share this album with friends” link you can use to share your album with people even if they aren’t Facebook members. Simply click the link and type in a recipient’s name (if they’re already on Facebook) or email address (if they’re not) and then click Send Message.
Publish your album. Click the Edit Info tab and then click the Publish Now button to let folks see the results of your handiwork.

Viewing Your Album
After you create an album, Facebook displays a thumbnail of the album’s cover in the Photos section of your profile, along with a blue icon of a pen you can click to edit your album. When someone clicks on the album’s name, Facebook displays album info along with links to each picture in the album.
Note
Everyone who can see your full profile can see your photos, but folks who can see your photos can’t necessarily see your profile. That’s because Facebook lets you set access to your profile and to your albums separately—see Restricting Access to Your Albums.

Restricting Access to Your Albums
Facebook gives you pretty tight control over who can see your albums. You determined this when you created your album, but you can change this setting at any time: From the My Uploads page (Editing Your Album), find the album you want to tweak and click its Edit Album link, then click the Edit Info tab and choose one of the following from the Privacy drop-down list:
Everyone
Friends and Networks
Friends of Friends
Only Friends
Customize… Clicking this option lets you specify particular friends or networks you want to see your album. This is useful if, for example, you’ve got a team of employees and contract workers and want certain photos to be visible only to one of the two groups. In this case, you can either grant viewing access to individual email addresses or a specific Friend List (Organizing Your Friends).
Tagging (Labeling) Your Pictures
Tagging is a nifty way to add virtual labels to your images. You can use tags to identify people in group pictures, and they’re also a handy way to indicate who’s responsible for creating or working on something shown in a picture. For example, tagging each section of a flow chart or schematic with a coworker’s name lets everyone know who’s in charge of what, quickly and easily.
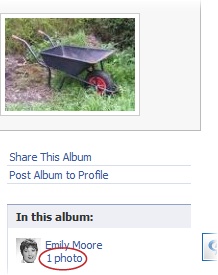
Every time someone looks at your photo album, he sees a list of all the people tagged in that album. Clicking the "photos” link next to a name lets you see all the pictures in all the albums associated with that person.
Then, when he mouses over the tagged portion of a picture, up pops the tagee’s name.

To tag a picture:
From the Edit Album page (Editing Your Album), mouse over the picture you want to tag. Your cursor turns into crosshairs.
When your cursor is right over the spot you want to tag, click. Facebook draws a white square on the picture and pops up a box you can use to associate that part of the picture with yourself or someone else.

Sharing Links and Other Items
If you can find a link to something on the Web, you can add it to your Facebook profile. Think company documents from your corporate site, video clips from your marketing department, or relevant research you’ve collected from all over the Web that you want your team to see. Depending on your privacy settings (Chapter 13), the items you post appear in your News Feed as well as on your Wall.

Unless you’ve blocked their access (see Controlling Who Sees Your Profile and Contact Info), team members can add their comments after they’ve checked out each item, and they can share the items with others (even non-Facebook members) quickly and easily by clicking the Share button or link that appears alongside each posted item. Best of all, multimedia links appear complete with controls so the people browsing your posted items can easily listen to music, watch a video clip, or check out other content you’ve posted.

To share something:
From your Profile page, click the Wall tab if it’s not already selected.
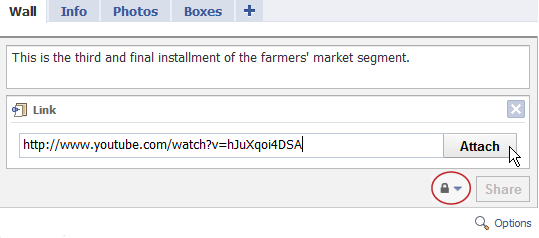
Tell Facebook where to find the link (or other item) you want to share. From the icon menu below the “What’s on your mind?” field (to the right of the word “Attach”), hover over each icon and then click the one for the type of item you want to post. (In addition to links, you can also share photos, events, music clips, and video clips, although you might have to click More to see all the choices.) Then, in the fields that appear, type in the info Facebook requests. When you finish, click Attach (if you’re sharing a link) and then click Share.
On the updated screen that appears, click in the “What’s on your mind?” field and type a note explaining why you want your team to see this item. From the web address you specified, Facebook automatically pulls in the title of the item, a description, and any pictures the web page contains. The title and description are usually pretty useful, but if you don’t like one or both, simply click either one and start typing to write your own. Then flip through the thumbnail pictures Facebook copied from the site you linked to and either choose an image you want to appear next to your posted link or turn on the No Thumbnail checkbox.
Tip
To share something only with your team members (and not clutter your own Wall), click the padlock icon and choose Customize, then—from the “Make this visible to” drop-down list—choose Specific People. Then type in the name of the Friend List containing your team members, or just type in your team members’ names one by one.
Click Share. The item appears on your Wall (unless you clicked the Options link and told Facebook otherwise). In addition, depending on your privacy settings (see Chapter 13), news of your newly posted item may also appear in your friends’ News Feeds.

Keeping Up to Date with Feeds
One of the best arguments for using Facebook on the job is notifications, messages telling you that something involving you happened on the site (Customizing Your Mini Feed). For example, when one of your team members updates a report, you get a notification; when another one weighs in on a discussion, you get a notification; and so on. Notifications make your life easier by automating one of the hardest things about keeping projects on track: keeping team members apprised of each others’ actions and of project milestones. And you can customize these automated messages to an amazing degree. Here’s how to make sure you’re notified of just the important stuff:
Note
Facebook doesn’t let you completely control the notification process. Stuff you’re not interested in is bound to get through occasionally.
Decide which team member activities you want Facebook to share with the group (for example, “Post on a Discussion Board” or “Add a Friend”). To change your settings, at the top right of any Facebook page, click Account, then Privacy Settings. On the page that appears, click Profile Information and adjust your settings to control which of your activities your team members get notified about. Finally, to ensure consistent notifications among team members, tell all the members how to adjust their settings.
Tell Facebook which team members you want to keep the closest eye on. Facebook has the last word on which stories (newsy tidbits) appear on the News Feed section of your Home page, but you can influence its selections. To do so: On your Home page (click the Home link at the top of any page to get to it), make sure Top News is selected in the News Feed section. Then scroll down to the bottom of the screen and click the Edit Options link. See Customizing Your News Feed for details on setting story preferences.
Tell Facebook which activities involvingyou you want to be notified about. Facebook can keep track of just about anything anybody does on the site that involves you. For example, you can tell Facebook to email you when a team member replies to one of your posts on a discussion board or comments on a note or photo you’ve posted. At the top of any Facebook page, click Account, then Account Settings, and then click the Notifications tab. (See Choosing Which Notifications You Want to See and Where for more about notification settings.)
Note
Notifications are a great way to keep current with your project if you travel a lot and have email access but can’t log into Facebook. (Facebook Mobile is another option.) For the skinny on notifications, flip to Types of Updates; for the scoop on Facebook Mobile, see Chapter 14.