
Chapter 6. Participating in Groups
One of Facebook’s most popular features is Groups—collections of people who share interests. Some Groups exist only online, but some real-world groups use Facebook to keep in touch. If you want to find other folks who share a passion for just about anything from Abraham Lincoln to shoe shopping, Facebook can help. And if it turns out you can’t find a Group devoted to something you love, you can always create one. This chapter shows you how to find, join, and participate in Groups—and how to start your own.
What’s a Group?
A Facebook Group is a handful (or more) of members who share a passion: knitting, parenting, coding Facebook applications, collecting Beanie Babies, whatever. Groups help people share information, tips, and advice. And they’re not just virtual: Lots of groups that meet in person use Facebook Groups to keep in touch between meetings.
Tip
Group-related events make it super easy for Facebook members to organize face-to-face meetings; see Chapter 7 for details.
Whoever starts a Group gets to decide who can join it. Some Groups let anyone join; some let all Facebook members apply, but then choose who can join; and some Groups hide their activities from everyone but Group members. Once you’re a member of a Group, you get to do things like post messages and pictures on the Group’s bulletin board, create and attend Group-related events, and more.
Note
Technically, Groups is a Facebook application (Facebook Applications: An Overview), so it’s not a built-in part of Facebook. Chances are you’ll never care about this distinction unless you decide to replace Groups with another application (see Chapter 12).
Because Groups are easy to start and join, there are zillions of them. So, along with the social-, craft-, business-, and sports-related Groups, you find a lot of silly Groups like “People Against Wet Cheetos,” “I Judge People Who Use Poor Grammar,” and “If 500,000 People Join This Group I Will Change My Middle Name to Facebook.” In fact, Facebook has established a category for groups of this ilk: the “Totally Pointless” subcategory of the “Just for Fun” event type.
Fortunately, Facebook gives you a couple of tools—explained next—to separate the wheat from the chaff and find a Group you’ll benefit from and enjoy. And if you can’t find such a Group, you can start your own.
Note
Because everyone who can see your profile can also see which Groups you’ve joined, some people use Group membership as a way to express their personal and political views. Join a Group called “Vote No on Proposition 100” or “People for the Ethical Treatment of Corporations,” for example, and people scanning your profile will draw their own conclusions.
Finding Existing Groups
Facebook gives you two ways to look for Groups you’d like to join:
Check out the groups your friends have joined. You and your friends probably have similar interests, so this can be a great way to find groups that are right up your alley.
Search for specific Groups and topics. If your buddy told you the name of a Group you want to join or if you’re interested only in Groups devoted to a specific subject—like the music of Todd Rundgren—this is your quickest option.
Tip
Another way to join a Facebook Group is to respond to an invitation sent by another member (see Inviting People to Join a Group).
Viewing Your Friends’ Groups
Facebook makes it easy to find out what your friends are up to—or into—and Groups are no exception. To see which Groups your friends belong to:
On the left side of your Home page, click the Groups link. (You may have to click the More link to see the Groups link.) The Groups page that appears shows the Groups you’ve already joined (if any).
On the left side of the Groups page that appears, click the Friends’ Groups link. Voilà! Facebook displays a list of Groups your friends have recently joined. You see the name of each Group and, below that, which of your friends is a member and how many total members the Group has.
Skim through the list of Groups that appears. Scroll down to see all the groups on the first page, and then click the right-arrow button at the bottom to view another pageful of results.
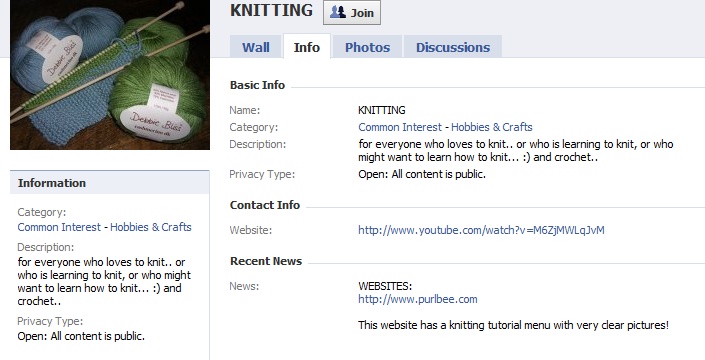
To learn more about a Group, click either the Group’s name or the picture next to it. Up pops the Group’s profile page with info you can use to decide whether you want to join. (Yup, Facebook Groups get profile pages, too; they’re a lot like to the ones for Facebook members.) You can check out the Group’s discussion board, see the pictures people have posted, or see what’s written on the Group’s Wall.


Searching for Groups
If you know the name of the Group you’re looking for or you’re interested only in Groups whose names include a certain word, searching is the way to go. To search for Groups:
In the Search field at the top of any Facebook screen, type your search word(s), and press Enter.
On the left side of the search results page that appears, click the Groups link.
To winnow down your search results, choose a category from the Show drop-down list. When you do, Facebook displays a second drop-down menu that lets you narrow things down further by choosing a subtype.
If you spot a listing you’re interested in, click either the Group’s name or its picture. Facebook displays the Group’s profile page so you can learn more.


Joining a Group
Facebook lets you join up to 200 Groups, so you can join one for each of your diverse interests—and a few just for fun. To join a Group:
Go to either the search listing (Searching for Groups) or profile page of the Group you want to join.
Click Join Group or Join, respectively.
In the confirmation box that appears, click Join. If the Group is open, that’s it—you’re in. If the Group is by invitation only, Facebook sends your request to the Group administrator, and you have to wait for approval.
That process works for open groups (ones that anyone can join). But if a Group is closed (Creating a Group), you can’t just join—you have to be invited and approved. You know a Group is closed if you don’t see the Join Group link in the Group’s listing; you see a "Request to Join” link instead. Click it to send the Group’s administrator a message requesting an invitation to join. If the administrator approves your request, you’ll get a Facebook notification telling you so.
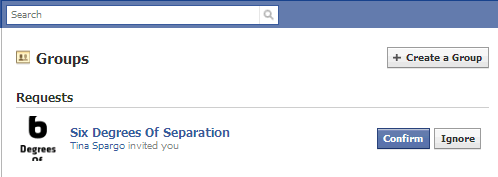
If someone has invited you to join a Group (whether open or closed), you’ll see it listed in the Requests section of the main Groups page (which you get to by clicking Groups on the left side of your Home page). To join it, simply click the Confirm button; if you’re not interested, click the Ignore button instead.
After you’ve joined a Group, click Groups on the left side of your Home page and you’ll see your new Group listed on the Groups page. All the Groups you’ve joined appear in the Groups section of your profile, too (click the Info tab of your profile to see a list of them).

Creating a Group
If you scan through all the Groups on Facebook and can’t find one that fits your needs, no problem—just start your own.
Note
You can create almost any Group that you can dream up. In its terms of use, Facebook reserves the right to pull the plug on hate groups and other unsavories—and it has. If you come across a candidate for plug-pulling, you can send a heads-up to Facebook’s customer service team by scrolling down to the bottom of the Group’s profile page and clicking Report Group.
To start your own Group:
Click the Groups link on the left side of your Home page. You may have to click the More link to see the Groups link.
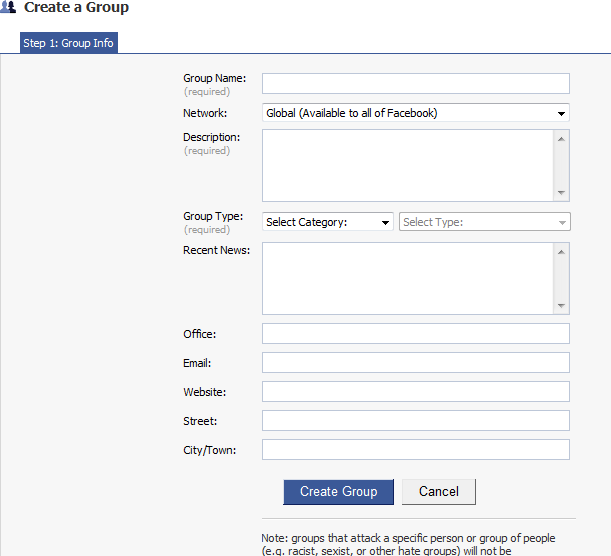
On the right side of the Groups page, click the “Create a Group” button.
On the “Step 1: Group Info” screen, fill in the text fields and then click Create Group. You have to fill out some fields—like Group Name, Network (the network whose members you want to join your Group), and Group Type (such as business or sports)—while others are optional. More is better: Details make it easier for prospective members to understand the purpose of the Group, which makes it more likely that you’ll attract the kind of people you’re looking for.
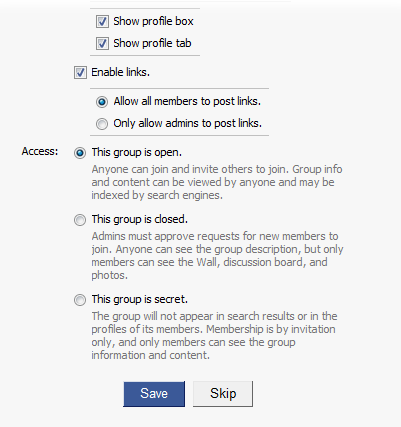
On the “Step 2: Customize” screen, scroll down to the bottom of the page and decide whether you want an egalitarian Group that anyone can join. If so, leave the “This group is open” radio button turned on. Otherwise, you’ll want to turn off some or all of the features. For example, say you’re creating a work-related Group to keep your clients up-to-date on one of your projects. In this case, you want a private, all-information-flows-one-way Group; to make that happen, scroll back up the page, turn off all the Enable checkboxes, and switch the Access setting to “This group is secret.” After you’ve made your selections, click either Save (to apply your settings to your group) or Skip (to cancel your changes).
Note
For your average, garden-variety Group, you want a balance between access to the Group and control of it. So leave the Options settings as they are, but switch Access to “This group is closed.” This lets potential members find your Group, but they can’t join it until you—the Group creator and administrator—give them the thumbs-up.
In the Publish box that appears, click either Publish (if you’re eager to get the word out) or Skip (if you’d prefer to finish setting up your Group before you announce its existence).
Note
If you chose "This group is secret” on the “Step 2: Customize” screen, you won’t see the Publish box, since the whole point of creating a secret group is so that Facebook won’t publicize its existence. Instead, you’ll jump straight to the next step of the Group-creation process, inviting friends (explained next).
On the Invite Friends page that appears, pick a few friends you’d like to join your Group and then click Send Invitations. You can type both names of your Facebook friends and email addresses of people who aren’t on Facebook yet. (Non-Facebook members can see the Group but can’t join it until they join Facebook.) After you click Send Invitations, Facebook shows you the profile page for your new Group, complete with administrator-level features (like Message All Members, Edit Group Settings, and Create Group Event—see If You’re the Group’s Creator) that only you can see.
On your Group’s profile page, upload a photo, if you like. To do so, mouse over the placeholder question-mark image that Facebook starts you out with and click the Change Picture link that appears. Then, from the drop-down list, select “Upload a Picture”. A box appears so you can browse to find an image file on your computer that you want to associate with your Group, like a photo, drawing, or logo.
Seed your Group’s profile with as much info as you can that describes your Group and offers prospective members an incentive to join. More is good, because it announces that you’re serious about this Group and have something of value to offer. Click the Wall tab to write or post something to the Group’s Wall (such as a welcome message or a handful of links); click the Info tab to view (and edit) the information you provided in step 1. To add additional tabs, click the + tab and then choose a category from the drop-down list that appears, like Discussions (to create a tab for exchanging ideas) or Photos (to create a tab for uploading some Group-related photos).

Inviting People to Join a Group
If you’re starting a Group, you can invite people to join during the creation process (Creating a Group). But you can also do so after the fact—and so can other Group members.
Note
If the person who created a Group made it part of the Global network (Joining a Network), then any Facebook member can join it. But if a Group is limited to a specific network, then only members of that network can join it.
To invite someone to join a Group:
Head to the Group’s profile page (Searching for Groups) and click the “Invite People to Join” link on the left-hand side.
On the Invite Friends page that appears, type the names of the Facebook friends you want to invite, or the email addresses of people not on Facebook yet. To invite friends, you can either turn on the checkbox next to a friend’s name (Facebook lists all of your friends who are eligible to join based on the Group’s network settings), or head down to the “Invite People via Email” field and type in email addresses separated by commas. (Non-Facebook members can see details about the Group but can’t join it until they join Facebook.)
Note
If you have a really big social circle, you might want to avoid paging through a bazillion checkboxes as you hunt for that certain someone to invite. Instead, click in the “Find Friends” field and type the name of the friend you want to invite or a Friend List you previously created (Creating a Friend List).
Deleting a Group You Started
Sometimes you goof or change your mind. If you started a Group but a couple minutes later decide it wasn’t such a great idea, you can delete it. Here’s how:
Note
You can only delete a Group that you started. What’s more, as soon as somebody else joins your Group, Facebook yanks your ability to delete it. What you can do at that point is step down as administrator. (When you do, Facebook offers the gig to the remaining members of the Group.) You follow the same steps listed below to delete a Group or to step down as administrator.
On the left side of the Group’s profile page (Searching for Groups), click the Leave Group link. If you’re the one-and-only member of a Group, leaving the Group tells Facebook to delete it. If you’re not the lone member, leaving the Group means the Group still exists—just without you in it.
In the confirmation box that appears, click Remove.
Participating in Groups
As you saw on page xx, Group creators get to pick and choose which privileges they give members. So the things you get to do as a Group member depend on how the Group was set up. (Group creators always get carte blanche.)
If You’re a Group Member
As a Group member, you may get to:
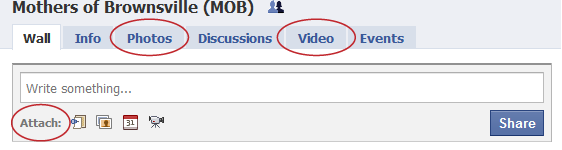
Add photos, videos, and links to the Group’s profile page. To add photos or video clips, head to the Group’s profile page (Searching for Groups) and then click the Photos tab or the Video tab. To add a link to a website, click the Wall tab and then click the Link icon.
Participate in the discussion board that appears on the Group’s profile page. On the Group’s profile page, click the Discussions tab. There, you can:
Click a subject line to display the entire post (followed by the preceding posts in that discussion thread), along with links you can use to reply to the post on the board (“Reply to Topic”), or check out a poster’s profile and perhaps send a personal message (simply click the poster’s name).
Click the Start New Topic button to display a tab you can use to start your very own discussion.
Write on the Group’s Wall. Click the Wall tab on the Group’s profile page, and then click “Write something…”.
Invite people to join the Group. On the Group’s profile page, click the “Invite People to Join” link (see Inviting People to Join a Group).
Leave the Group. On the Group’s profile page, click the Leave Group link.


If You’re the Group’s Creator
Group creators can do everything members can do, plus:
Send a message to all Group members at once. On the Group’s profile page, click Message All Members. Up pops the Compose Message tab, pre-filled with the name of your Group.
Create a Group-related event. A Group-related event is an event (Chapter 7) that shows up on the Group’s profile page. When you set up this kind of event, Facebook automatically sends an invitation to all the Group’s members. To create such an event: On the Group’s profile page, click the Create Group Event link and then follow the steps on Creating Your Own Events.
Administer the Group. Facebook lets you change the way your Group works. Among other things, you can disable the Group’s Wall or discussion board, delete members, and grant members officer (feel-good title) or administrator (actual power) status. On the Group’s profile page, click Edit Information to change what appears on the Group Info tab (Creating a Group), “Invite People to Join” to invite members as shown on Inviting People to Join a Group, or Edit Members to share your administrative powers with another Group member.