
Chapter 5. Exchanging Automatic Updates
Remember what keeping up with your friends used to require? Time-consuming emails (“Sorry it’s been so long…”), potentially intrusive instant messages (“hello? u there?”), even the occasional in-person visit. Not anymore: Thanks to Facebook’s easy-to-activate broadcast and subscription tools, staying in touch is easier than ever. Subscriptions and notifications, for example, alert you when, say, your best friend uploads a new picture, your softball coach gets off work, or your study buddy posts his analysis of Macbeth. This chapter shows you how to sign up for and tweak these handy updates.
Types of Updates
Facebook offers four different ways you can get details about your friends’ activities. Three (News Feeds, Mini Feeds, and notifications) appear automatically—on your Home page, your profile, and in your notification inbox, respectively.
Note
Although the News Feed, Mini Feed, and notifications are all hard-wired into your account, Facebook lets you customize the details you see in all three. Read on for details.
If you prefer to keep up with your pals without even having to log into Facebook, you can sign up for customized web feeds called subscriptions. The following sections explain all these options.
Note
Facebook offers one other kind of automatic update: It tells you when friends’ birthdays are coming up. At the top of any Facebook screen, click the Account link and then click Account Settings. On the page that appears, click the Notifications tab and then, in the list that appears, scroll down to the Facebook section and turn on the checkbox next to “Has a birthday coming up (weekly email)” and you’ll never again forget a friend’s birthday, because Facebook sends you an email (no more than once a week) listing all your Facebook pals whose birthdays fall somewhere in the next week.
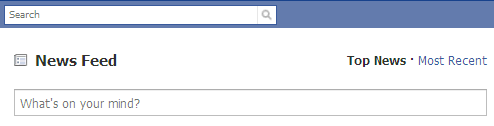
News Feeds: What Others Are Doing
Your News Feed is a constantly updated list of the things your Facebook friends are doing on the site: adding applications, writing on Walls, commenting on notes (Creating Notes (Blogs)) and photos, befriending each other, and so on.
Facebook calls the standard version of your News Feed "Top News.” In this list, you see the actions Facebook thinks you’ll find the most interesting, based on a lot of top-secret number-crunching, and it appears automatically on your Facebook Home page, front and center—you don’t need to do anything special to see it. (Facebook calls each item in this Feed a story.)
Tip
If you’re on your Home page and don’t see your News Feed, head to the left of the page and double-check that the News Feed link is selected. If it’s not, click it.
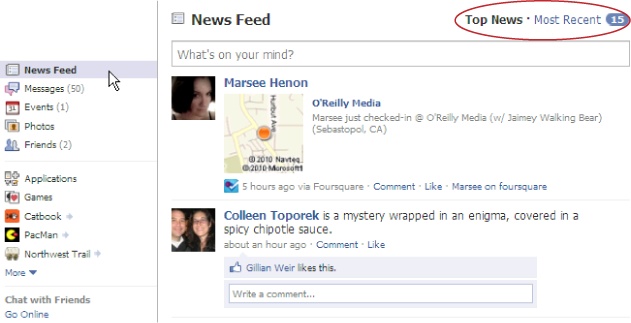
If you want to see more than just the Facebook-selected highlights, you can view a different version of your News feed that displays an up-to-the-second list of everything your Facebook pals are up to (not just the stuff Facebook thinks you’re interested in). To do so, head to your Home page and click the Most Recent link at the top of the page (if you don’t see it, check the left side of your screen to make sure the News Feed link is selected). To switch back to just the highlights, click the Top News link.
Facebook doesn’t let you do away with your News Feed or control completely what it shows, but you can customize it to show more (or less) of the activities—and the friends—you’re interested in.
Customizing Your News Feed
In every social circle, you’re bound to have some friends you’re closer to than others. If you’d prefer to concentrate on just two or three friends’ activities—or skip the who’s-dating-who-this-week chatter and focus just on certain applications (Chapter 12) or Pages (Facebook Pages: Profiles for Bands, Brands, and More) you’re interested in—you can customize your News Feed.
To see more (or less) of specific Facebook friends:
On your Home page, click the Most Recent link.
Scroll down to the bottom of the screen and click the Edit Options link.
In the Show More field of the News Feed Settings box that appears, start typing the name of the person you want to see more of and then, when Facebook displays the person’s name, click to select it. (Note that this box refers to your Live Feed; that’s the old name for the Most Recent version of your News Feed.) Alternatively, you can cut down on what you see about a particular person by typing his name in the Hide field. Either way, after you select a name, that name appears in the News Feed Settings box accompanied by an X you can click later to remove the name (useful if, over time, your interest in that particular person’s Facebook activities changes).
Tip
Another way to see less about a particular person is to mouse over any story that appears in your News Feed; when the Hide link appears, click it. In the confirmation box that appears, click “Hide [person’s name]”.

Note
News Feeds work both ways: Facebook keeps track of your actions on the site, too, and includes them in your friends’ News Feeds. To learn how to prevent certain things you do from showing up on your friends’ News Feeds, see Controlling Who Sees Your Profile and Contact Info.
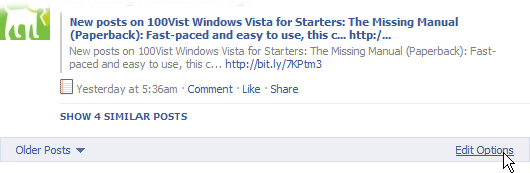
To hide a story that appears in your News Feed:
On your Home page, make sure your News Feed is displayed.
Scroll down until you spot the story you want to hide.
Mouse over the story and then, when the Hide link appears, click it.
In the confirmation box that appears, click “Hide [person]” (to cut down on future stories involving this person), “Hide [application]” (to cut down on future stories involving this application), or Cancel (to change your mind and keep the story in your Feed).

If you change your mind later and want to see stories about that person or application again, scroll to the bottom of your News Feed and click the Edit Options button. In the "Hidden from News Feed” box that appears, find the person or item you want to see again and then click the Add To News Feed button next to it.
Mini Feeds: What You’re Doing
Your News Feed keeps track of all the stuff your friends do on Facebook. Similarly, your Mini Feed (which appears on your Wall interspersed with Wall posts) chronicles the stuff you do on Facebook (and that other folks do that directly affects you, like writing on your Wall or sending you a gift). Anyone who can see your profile can see your Mini Feed.
Note
The Mini Feed doesn’t contain additional information; it just aggregates the juicy bits displayed elsewhere on your profile and adds them to your Wall (Writing on Walls). So, what people can’t see on your profile, they can’t see on your Mini Feed. For example, if you RSVP to a secret event and your friend Ralph wasn’t invited, he won’t be able to find out he was snubbed by reading your Mini Feed.
Customizing Your Mini Feed
In addition to merging the Mini Feed with the Wall (they used to be separate), Facebook recently reduced the amount of control you have over your Mini Feed. Fortunately, you can still customize your Mini Feed by removing individual stories. Stories are accounts of specific actions you or someone else has taken on Facebook, such as updating your status (Subscriptions) to “Heading home for the day.”
To customize your Mini Feed:
At the top right of any Facebook screen, click Profile.
On the page that appears, make sure the Wall tab is selected (if it isn’t, click to select it).
Scroll down the Wall section of your profile and read through the stories.
Delete any stories you don’t want people to see. To do so, mouse over the story so that the Remove link appears in its upper right. Then click the Remove link (and, in the confirmation box that appears, click the Delete button) to delete that story from your Mini Feed.
Facebook Notifications
A notification is a message telling you that something involving you happened on Facebook: Someone wrote on your Wall, for example, invited you to join a Group, or replied to something you said on a discussion board. You also get notifications from the folks at Facebook from time to time.
Note
Notifications and News Feed items are so similar that it’s easy to get them confused. Both are juicy, gossipy electronic paper trails of your friends’ activities on Facebook. The difference? Notifications somehow involve you: Someone wants to join a Group that you administer, someone tagged you in a note (Creating Notes (Blogs)), and so on. News Feed items, on the other hand, don’t involve you directly; they simply let you know what your friends are up to: that one friend installed a new application, say, and another one updated her profile picture.
In the upper-left part of all Facebook screens are three little icons. The rightmost one, which looks like a tiny Earth, is the notification icon. When you have a new notification, Facebook displays a red box above the icon letting you know how many you have. Click the icon to see a list of your notifications.
Notifications also appear in your regular email program’s inbox, and, optionally, in your cellphone’s inbox:

To see the email versions of your notifications, head to your email program and check your email just as you normally do.
Note
Subscribing to notifications lets you see them as a web feed (Subscriptions) instead of in your email inbox.
To tell Facebook to send notifications to your cellphone, you first need to activate your cellphone on Facebook (see Chapter 14), and then tell Facebook which notifications you want sent to your phone by following the instructions in the next section.
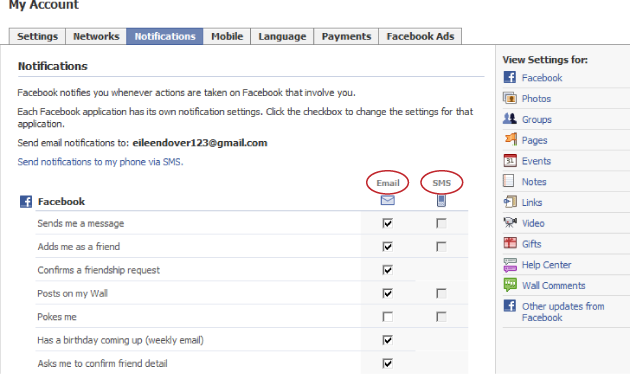
Choosing Which Notifications You Want to See and Where
Unless you tell it otherwise, Facebook assumes you want to be notified about a staggering amount of social minutiae. This means that, if you have more than two or three friends who actively use the site, your email inbox will overflow from all the notifications you’ll receive.
To specify what you want to be notified about—and what you don’t—and how, follow these steps:
At the top of any Facebook screen, click the Account link and then, in the drop-down list that appears, click Account Settings.
Tell Facebook which activities you want to be notified about:
To choose which activities you want learn about via email: On the Notifications tab, head to the Email column, scroll down to see each activity, and turn off the checkbox next to any activity you don’t want to get email about; alternatively, turn on the checkbox next to any activity you do want to get email about.
Tip
Rather than scroll down the entire list of activities, you can click the links in the “View Settings for” list on the right side of the Notifications tab to hop directly to the type of activity you’re interested in. For example, if you want to change which event-related notifications you receive, click the Events link.
To choose which activities you want to learn about via cellphone: After you’ve given Facebook your cellphone info (see Chapter 14), you can tell the site to notify you of certain activities by sending notifications directly to your phone. (You can’t have as many types of notifications sent to your cellphone as you can to your email program, but that’s probably a good thing.) On the Notifications tab, head to the SMS column, scroll down to see each activity, and turn on the checkbox next to any activity you want sent to your phone (or turn off the checkbox next to any activity you don’t want sent to your phone).
When you finish, scroll down to the bottom of the page and click Save Changes.
Note
Telling Facebook to send notifications to your cellphone is also called subscribing to your notifications. Facebook always displays friend requests, invitations to Groups and events, and photo tag requests (Restricting Access to Your Albums) on your Home page, so the notifications you get about these activities are redundant. Turn them off and you won’t miss a thing (assuming you check your Home page from time to time).
Subscriptions
Technically, subscriptions are web feeds—those ubiquitous summary blurbs provided by web publishers like the New York Times and Reuters and known to geeks everywhere as RSS (which stands for Rich Site Summary or Really Simple Syndication depending on who you ask). Whatever you call them, think of a subscription as a continuously updated newsletter that’s stored as a big chunk of data you can format and view however you like—as a basic, no-frills list of items on a web page, for example, or in a fancy online news reader.
Note
When you follow the steps on Subscribing to People’s Notes, your subscription appears as a basic list on a web page. To see it in a different format, check out one of the many free news reader (a.k.a. aggregator) programs and services, such as Bloglines (www.bloglines.com), Google Reader (www.google.com/reader), or Feed Demon (www.newsgator.com/individuals/default.aspx). For an in-depth look at all things web feed, check out http://oreilly.com/feeds.
Subscriptions don’t give you any info that you couldn’t find by combing through Facebook, but they make that information easier to get to because it appears on a single web page that updates automatically. Plus, you don’t have to log into Facebook to see it. And, depending on which web browser you use, you can customize the way you see subscription info. For example, if you use Internet Explorer, you can sort your subscription info, specify how often you want to see updates, and even have your computer play a sound when the info gets updated.
You can sign up for one or more of the following:
A subscription that sends the current status of your friends to your cellphone. Typically a quick one-liner that your friends type in from time to time, such as “I’m leaving work” or “I’m at the library,” a Facebook status update lets you know what your friends think is important enough to share. Signing up for a status subscription lets you track where your friends are and what they’re doing or thinking at any given time without having to log into Facebook. Unlike the other subscription options, you can only subscribe to your friends’ status updates by cellphone (see Chapter 14).
Tip
To update your status, head to the top of your News Feed or profile and then click the “What’s on your mind?” field. (As soon as you click the field, it appears empty.) Type whatever you want and, if you like, click one of the Attach icons to add a photo, video, or link (mouse over the icons to see which is which). When you’re done, click the Share button. Facebook updates your status so all your friends can see what you’re up to.
A subscription that shows you the links your friends are posting, as they post them. Because this kind of subscription gives you a one-stop shop for all the resources your friends are sharing, it’s perfect for work and study groups. (Chapter 10 has more about using Facebook to collaborate on projects.)
Note
To see how to post your own stuff, check out Writing on a Friend’s Wall.
A subscription that shows you the notes your friends (or other Facebook members) are publishing, as they publish them. (Flip to Creating Notes (Blogs) to learn about Facebook notes.) Signing up for a notes subscription helps ensure you don’t miss a single exciting installment of your friends’ blogs (er, Facebook notes), even when you’re not logged into Facebook. You can subscribe to notes published by any Facebook member who chooses to syndicate her notes (make them publicly available for subscription), even if you’re not friends with her.
Note
Subscribing to your own notes sounds weird (and a little narcissistic), but it’s useful if you want to package your notes for cutting and pasting to another blog service (see Importing Notes from an Existing Blog).
A subscription that shows you all your notifications. Unless you tell it differently, Facebook assumes you want to see your notifications (Customizing Your Mini Feed) in your email inbox. But if you prefer, you can choose to have them sent to your cellphone—handy if you want to keep in touch with your Facebook pals without having to log into the site or comb through a mountain of emails.
Note
Depending on what kind of cellphone and cellphone service you have, you may find that a Facebook application (such as "Facebook for iPhone” or "Facebook for BlackBerry”) can be a handier—and cheaper—way to get cellphone access to Facebook than subscriptions. See Facebook Applications: An Overview for more info.
The following sections explain how to sign up for each of these subscriptions.
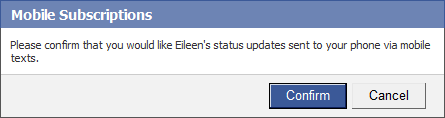
Subscribing to Friends’ Status Updates
To stay up to the minute on your friends’ doings, sign up for a status update subscription:
Give Facebook your cellphone number and double-check that you can receive text messages from the site. Facebook calls this activating your cellphone; Chapter 14 has the how-to.
Head to the profile of the friend whose status you want to track.
On the person’s profile, click the "Subscribe via SMS” link that appears under your friend’s picture.
In the confirmation box that appears, click Confirm.

Tip
If you change your mind and want to unsubscribe from someone’s status updates, you can do so from your cellphone by responding to a status update text with the word “Unsubscribe.” Alternatively, from your friend’s profile, you can click the "Unsubscribe from SMS updates” link that appears below his mug shot.
Subscribing to Friends’ Links
You can sign up for one subscription that shows you all the stuff all your friends post—websites, video clips, and so on—or for one subscription for each of the friends you’re interested in. Here’s how:
At the top of any Facebook screen, click the Account link and then, in the drop-down list that appears, click Application Settings.
On the Applications Settings page, click the Links link to display the My Friends’ Links page.
On the right side of the My Friends’ Links page, head to the “Show recent links by” drop-down box on the right and choose either All Friends or the name of one of your friends.
Scroll down the right side of the My Friends’ Links page and, under the “Subscribe to Links” heading, click either My Friends’ Links (if you chose All Friends in step 3) or the link called something like Stan Dupp’s Posted Items (if you chose a specific friend in step 3).
Follow the steps below to finalize your subscription.


Subscribing to People’s Notes
Creating Notes (Blogs) tells you all about notes (Facebook’s version of blogs). To subscribe to someone’s notes:
At the top of any Facebook screen, click the Account link and then, in the drop-down list that appears, click Application Settings.
On the Applications Settings page, click the Notes link to display the My Friends’ Notes page.
On the right side of the My Friends’ Notes page that appears, click the My Friends’ Notes link below the “Subscribe to these Notes” heading.
Tip
To subscribe to an individual’s notes, whether or not that person is your friend, go to her profile (Finding People Who Are Facebook Members), and then click the Notes tab near the top of the screen. Then, on the person’s Notes page, scroll all the way to the bottom and look for the “Subscribe to these Notes” header. Below it, click the “Eileen Doe’s Notes” link (or whatever the person’s name is). If you don’t see a Notes tab on a particular profile, it’s because the person adjusted his privacy settings to hide it (Chapter 13).
Follow the steps outlined in the next section.
Finalizing Your Links or Notes Subscription
Whether you’re subscribing to folks’ links or notes, you have to do a few more things to finish the process (do them after you finish the steps for the particular feed you’re subscribing to):
On the page that appears, click “Subscribe to this feed” (or the similarly worded link that appears in your browser).
In the box that appears, choose the bookmark folder you want to put your subscription in. The feed name Facebook suggests is perfectly workable, if a little boring, so don’t feel you have to type in a new one (although you can if you want). Because you access subscriptions through your web browser, the folder you choose from the “Create in” drop-down list (or create using the “New folder” button) appears in your web browser’s feeds list.
Tip
Bookmarking a web page makes it easy for you to return to that page again later. When you view your web browser’s feeds list, you see the name of your subscription’s bookmark folder; just click it to see the latest installment of your subscription. (How you view your feed list is different in every browser. To view it in Internet Explorer, for example, click the Favorites Center button—the tiny yellow star to the left of the main menu.)
Click Subscribe. Up pops a message telling you your subscription was successful. To see your subscription, you can either click the “View my feeds” link on the success message, or use your browser’s menu to see all your listed feeds. If you use Internet Explorer, for example, click the Favorites Center icon (the little star on the left side of the menu) to view your feeds.


Tip
If you’re not thrilled with the way your web browser displays your subscriptions (a.k.a. feeds), you can use a free news aggregator service, such as (www.bloglines.com), to display them instead. You need a feed’s URL to view it using an aggregator. If you’re using Internet Explorer as your web browser, click the Favorites icon (the little yellow star) and then the Feeds button. Then try right-clicking any feed in your feed listing, and then choosing Properties to see the feed’s copy-and-paste-able URL that you need if you want to use a news aggregator service.
Creating Notes (Blogs)
Ever since “blogosphere” replaced the more mundane “bunch o’ personal websites,” every site worth its salt offers free blogs—easy-to-use online journals where you can chronicle your hobbies, family or work life, or whatever you feel like writing about. Facebook offers free blogs, too—it just calls them notes instead.
Note
There’s a slight—but very important—difference between notes and regular old blogs: Because Facebook integrates notes with all the other stuff you do on the site (thanks to tagging, which is explained in a sec), notes can actually document the complex social interactions between you and your friends (and your friends and their friends, and so on). It’s scary, it’s exciting, it’s très 21st-century—and it’s a marketer’s dream come true.
You can either upload an existing blog (if you have one) into Facebook’s notes, or you can create your own notes from scratch. And here’s the cool part: You can tag your notes. Tagging a note means associating one or more of your Facebook friends’ names with the note. For example, say you write a note describing the fishing trip you took with your pal Fred. You can tag the note with Fred’s name, making it easy for Fred—and his Facebook friends—to find your tale of the trip.
After you create a note, Facebook lists the note’s subject line on your profile page (look for the Notes section) so other folks can find your note and comment on it. At the same time, the site automatically sends notifications to all the friends you tagged so they can check out what you said about them.
Note
By tweaking your Notes privacy settings (which you access by clicking the Profile Information link shown on Controlling Who Sees Your Profile and Contact Info and heading to the “Posts by Me” option), you can control who gets to know about, see, and comment on your notes. Flip to Restricting Access to Your Notes for step-by-step details.
Typing Notes from Scratch
If you don’t already have a blog, or you do have a blog but you don’t want to cut and paste it into Facebook, you need to start fresh. To create your first blog installment on Facebook:

On the left side of your Home page, click the Notes link.
On the Notes page that appears, click the “Write a Note” button. On the “Write a Note” page, fill in the Title field with a subject line for your note (think of it as a summary of your entry and shoot for provocative, concise, or both). In the Body field, type your note.
If you like, add a photo or two. To do so, click the Browse button and, in the window that appears, select the image file you want to add. Repeat this process to add more photos.
If you want to, tag the note. Tagging is a way of associating the note with a Facebook friend (or 10). If your note chronicles the office Christmas party, say, you might want to tag the officemates you mention. To tag your note, click the “Tag people in this note” field and start typing; then choose one of the names Facebook helpfully displays.
Note
For a blow-by-blow on tagging, see Restricting Access to Your Albums.
If you want to, restrict who will get to see your note. Facebook assumes you want everyone to see your note. If this isn’t what you want, click the drop-down list that appears next to the “Who can see this?” field and choose “Only Friends,” “Friends of Friends,” or one of the other options.
Click the Preview button to give your note a quick once-over. Double-check what you’ve written and the formatting, which can get a little funky (especially if you added photos). If you see something you don’t like, click Edit to change your note. Then repeat the preview-edit cycle until you’re happy with the result.
Note
Facebook uses HTML (hypertext markup language) to format notes. If you know HTML, use it: Type HTML tags directly into the Body field along with your text. To see a quick-and-dirty HTML cheatsheet, click the “Format your note” link just below the Body field. To learn more about HTML, check out Creating a Web Site: The Missing Manual, Second Edition.
Click the Publish button. Facebook lists your new note in the Notes section of your profile for all the world (technically, all the folks you specified in step 5) to see and comment on, and sends notifications to the folks you tagged (if any).


Tip
After you publish your note, you can share it with people who aren’t yet on Facebook. To do so: Go to the Notes page (see step 1 above), and then, on the left side of your screen, click My Notes (it’s under the Notes link). Then click the title of the note you want to share and, on the page that appears, click the Share button.
Importing Notes from an Existing Blog
If you’ve already got a blog on some other site (such as www.typepad.com or www.blogger.com), you can tell Facebook to duplicate your blog entries as Facebook notes. That way, the people on Facebook can read your musings without your having to type every blog entry twice.
Note
You can’t use Facebook to edit the notes you import from some other blogging site. Instead, you have to edit your notes using the other blogging service’s website, just as you do now. Think of Facebook’s version as merely a reprint.
To import blog entries from an existing blog into Facebook:
At the top of any Facebook screen, click the Account link and then, in the drop-down list that appears, click Application Settings.
Click the Notes link to display the My Friends’ Notes page.
On the My Friends’ Notes page, click the blue “Import a blog” link on the right side of the page (below Notes Settings).
On the “Import a Blog” page, head to the Web URL field and type in your blog’s web address (for example, http://YourNameHere.blogspot.com). Turn on the checkbox to reassure Facebook that the blog you’re importing is yours (it needs to be; adding anything to your Facebook account that you haven’t personally created or bought rights to distribute spells copyright infringement), and then click Start Importing.
On the confirmation page that appears, click Confirm Import. Facebook adds the imported blog entries to your from-scratch notes.


Viewing and Changing Your Notes
Facebook makes it easy to see all the notes you’ve written and change or delete them one at a time. To see and edit your notes:
Note
If you import notes, you can’t change them in Facebook. You can, however, see and delete them by following the steps below.
On the left side of your Home page, click the Notes link. You may have to click More to see the Notes link.
On the left side of the Notes page that appears, click the My Notes link (it’s just below the Notes link you clicked in step 1).
Find the note you want to edit or delete and click its title.
On the page that appears, click either the Edit Note link or the Delete link.
Restricting Access to Your Notes
Unless you tell Facebook otherwise, all your Facebook friends and fellow network members can see, subscribe to, and comment on the notes you write. But you can customize access to your notes before you publish them (Typing Notes from Scratch) or after the fact so that:
All Facebook members can see your notes.
Only the people in certain networks (such as your work network or school network) and friends of the folks you’re friends with can see them.
Only your friends and the people in your networks can see them.
Only your friends and your friends’ friends can see them.
Only your friends can see them.
No one can see them (think personal online journal).
Only specific friends can see (or not see) them.
Only certain people can comment on your notes (for example, friends of friends, only friends, or only the people you list).
Tip
For the scoop on subscriptions, see Subscriptions.
To modify access to your notes after you’ve created them:
On the left side of your Home page, click the Notes link. You may have to click More to see the Notes link.
On the left side of the Notes page that appears, click the My Notes link (it’s just below the Notes link you clicked in step 1) and then click the title of the note you’re interested in.
On the screen that appears, click the Edit Note link.
Scroll down to the bottom of the note that appears and click the drop-down box next to “Who can see this?” From the list, choose the set of folks you want to be able to see the note.
Click the Save button.

Tip
If you know you’re always going to want the same bunch of people to see every Facebook note you write—and you plan on writing a lot—you can save time by telling Facebook your preferences once and letting the site apply that information to each note. (You can always tweak your preferences later, on a per-note basis.) Head to the top of any Facebook page and click the Account link, and then click Privacy Settings. Next, click Profile Information; scroll down and click the “Posts by Me” drop-down list and then select the group of folks you want to let see your notes.
To change who can add public comments to your notes:
At the top of any Facebook screen, click the Account link and, in the drop-down list that appears, click Privacy Settings.
On the Privacy Settings page that appears, click Profile Information.
Scroll down to the bottom of the Profile Information page that appears and click the “Comments on Posts” drop-down box.
Adding Comments to Notes
Every time Facebook displays a note that you (or anyone else) has created, it also displays a link people can use to comment publicly on that note, either by typing in a message or by leaving a virtual thumbs-up.

Comments give the people who read your notes an easy way to stroke your ego, give you advice, or post helpful resources. And because the comments people leave appear one after the other, right after the text of your note, they’re easy to see and to change. On a notes page, you can:
Add a comment to someone else’s note. However you stumble across someone else’s note—by viewing your friends’ notes (on the left side of your Home page, click the Notes link) or by going to the Notes section of a fellow network member’s profile—the way you add a comment is the same: Simply click the “Write a comment” field that appears at the bottom of the note, type your piece, and then click the Comment button that appears as soon as you start typing. (If you don’t see this link, it’s because the note writer told Facebook to remove it—see Adding Comments to Notes.)
Note
Unless you tell it otherwise, Facebook automatically notifies you when someone comments on one of your notes. (Customizing Your Mini Feed tells you how to change this behavior.)
View the comments other people have added to your note. On the left side of your Home page, click Notes and then click the My Notes link. Then scroll down to the bottom of your note to see all the comments people have made.
Delete a comment someone has added to your note. Perhaps someone added an offensive comment, or just one you’d prefer your friends not to see. Head to the bottom of the comment and click Delete; then, in the confirmation box that appears, click Delete again.

Tip
If someone leaves an inappropriate comment—and overzealous marketing people, among others, have been known to do just that—you’ve got a couple options beyond simply deleting the offensive comment: You can block that person from seeing your notes or report him to Facebook (Fighting Back).
Tagging Notes
Tagging a note links the note to one or more of your friends, whether or not the person is actually mentioned in the body of the note. It’s a win-win situation: Your friends get warm fuzzies from being tagged (everybody likes to feel important), you get more folks reading your notes, and the companies that advertise on Facebook get a more complete picture of your social network.
You can tag a note while you’re creating it—as explained on Typing Notes from Scratch—but you can also tag a note after you’ve published it. To do so:
On the left side of your Home page, click the Notes link. You may have to click More to see the Notes link.
On the left side of the Notes page that appears, click My Notes.
Find the note you want to tag and click its title.
On the screen that appears, click the Edit Note link, just under the note’s title.
In the “Tag people in this note” field, start typing the name of the friend you want to tag. Facebook pops up names as you type; click to select one. You can tag as many of your friends as you like.
Scroll down to the bottom of the page and click Save.

Finding Mentions of Yourself in People’s Notes
Just as you can tag notes with your friends’ names, they can tag their notes with yours. To see a list of all your friends’ notes that mention you:
On the left side of your Home page, click the Notes link. You may have to click More to see the Notes link.
On the left side of the Notes page that appears, click the Notes About Me Link. All the notes your friends have tagged with your name appear.
Note
You would never write a note describing a scene of wild debauchery and then tag a squeaky-clean, trying-to-land-an-important-job friend (thus ruining any chance she has of passing her pre-interview background check), but some people would. Fortunately, Facebook lets you delete tags, even if someone else added them. On the Notes About Me page, scroll down to the note you want to disassociate yourself from, click the note’s title, and—in the “In this note” list on the right side of the page that appears—click the “remove tag” link that appears just under your name.