Chapter 13. Playing It Safe: Facebook Privacy
Social networking sites like Facebook depend on millions of people voluntarily divulging accurate personal information. But in a world where identity theft is a growing concern and spammers can’t wait to get their hands on your email address, how do you take advantage of what Facebook has to offer while minimizing risks to your personal info? This chapter explains Facebook’s privacy issues, and then gives you strategies for staying safe—from up-front planning to adjusting Facebook’s privacy settings to after-the-fact damage control.
Privacy and Facebook: An Overview
If you’re connected to the Internet, privacy is a concern. Surf the Web—privacy risk. Use email—privacy risk. The sad truth is that there are a lot of bad guys out there, and your personal info is worth a lot of money to some of them. Even virus-protection programs and firewalls can’t always keep bad things from happening to you. And while Facebook promises to do all it can to protect the personal data you add to your profile, mistakes happen.
Note
To read Facebook’s privacy policy, point your web browser to www.facebook.com/policy.php.
If you’re like most people, your personal info is already stored in lots of databases (your bank’s, your favorite magazine’s, and so on). But what’s unique about Facebook’s cache of personal data is that it includes intimate details (like your views on politics, religion, and relationships), and that it’s tied to a picture of you (your profile picture—Step 3: Adding a Picture of Yourself). This combination of identifying details with a visual image is one of the things that makes Facebook so interesting and compelling—but also so potentially dangerous. Theoretically, someone could find out what town you live in and where you plan to be next Tuesday at 8:00 p.m. (a book club meeting you RSVP’d to on Facebook, for example). Armed with your picture, that someone could show up at your book club and try to convince you he’s your long-lost cousin Al who’s down on his luck and needs a couple thousand bucks to tide him over.
The trick is to balance the benefits you get from using Facebook (and the Internet in general) with the risk of losing control of your private information.
Privacy Threats
Some of the privacy threats associated with Facebook are the same that many online companies face, such as reports that the Facebook source code (the raw programming that powers the site) was once leaked onto the Internet, potentially giving hackers access to Facebook members’ personal data. And, of course, any info you send via the Internet is vulnerable to interception. But there are other Facebook-specific threats, too:
Third-party application developers and other Facebook partners. Before you can use a Facebook application, you have to grant the person or company who created the application access to your personal data (see Applications and Privacy). Once you grant that access, control of your personal info is out of Facebook’s hands: If the application’s creator misuses your information, the beef is between you and them. Likewise, Facebook’s privacy policy lets the site share your personal details with companies who advertise or sell products on Facebook, and it’s up to those firms to keep your data safe.
People you didn’t think had access to your profile. If you think only people who live in your city, attended your alma mater, or work at your company can view your profile, you’re wrong. Hiring managers, parents, teachers, police officers, and other folks who are determined to view your Facebook profile can find a way to do so—either by asking a coworker or friend who happens to be a member of your Facebook network to look up your info, or (in the case of cops) by getting a court order.
Anybody using a search engine. Depending on the privacy settings you choose in Facebook, anybody can search your profile information using a garden-variety search engine such as Yahoo or Google, even if the he’s not a Facebook member.
Strategies for Keeping Your Info Private
So that’s the bad news. The good news is that just three simple strategies give you quite a bit of control when it comes to keeping your private data safe:
Don’t put sensitive info on Facebook. You get to choose what kind of information you share with the site, and how much. Data thieves can’t steal your Social Security number, for example, if you don’t make it available.
Customize your privacy settings. Much as keeping your front door locked dramatically reduces the chance of being robbed, customizing your privacy settings minimizes—but doesn’t eliminate—the chance of your Facebook data falling into the wrong hands. Starting on Adjusting Your Privacy Settings, this chapter shows you which settings can help protect your privacy.
If the worst happens, fight back. If a spurned lover tracks you down on Facebook and starts harassing you, you can shut her down by blocking her access to your Facebook profile (Fighting Back) or reporting her to Facebook (Fighting Back).
Deciding How Much to Share
How confessional you want to be when you create your Facebook profile is entirely up to you. But here are a few things to consider:
Give Facebook only enough info to get what you want out of the site. If you’re looking to connect with other early-music fans, for example, limit your profile info to medieval subjects. And if you plan to use Facebook to find parenting tips, you don’t need to share your academic and professional background.
Consider keeping your public and private identities separate. If you’re planning to use Facebook primarily for networking, think twice about posting pictures of your wild weekend in Jamaica. You don’t have to forego mentions of your personal life completely, but you should limit your personal info to the kind of thing you’d feel comfortable tacking up on your cubicle wall.
Think about creating an email address just for Facebook. Companies such as Google and Yahoo! let you create a free, Web-based email address you can use to sign up for Facebook. Using an email address dedicated to Facebook protects your “real” work or home email address from accidental or deliberate theft (think spammers).
If it’s sensitive and optional, leave it out. Random people viewing your profile don’t need to know your home address or phone number. If you meet people on Facebook and want to share this info with them, you can always do so in a more private way (such as a Facebook message—Sending Messages).
When in doubt, do the mom-or-boss check. If you’d be comfortable telling your mom or your boss something, go ahead and post it on your profile. Otherwise, skip it.
Controlling Access to Your Account
While you need to be wary of people getting access to your account info online, don’t forget to take precautions in the real world, too: Make sure no one can log into Facebook as you.
You already know not to share your password with anyone, but there are a couple more steps you should take to protect your account. To prevent coworkers, fellow students, or family members from using your computer to access your Facebook account (either by accident or design), follow these steps:
Log in the smart way. After you type your email address and Facebook password into the login page (www.facebook.com/login.php), make sure the "Keep me logged in” checkbox is turned off before you click the Login button.
Note
Turning on the “Keep me logged in” checkbox tells Facebook to keep you logged in until you click the Logout link at the top of your screen, even if you close your browser or shut down your computer. This may be a timesaver in theory, but if you’re using a computer at school, work, the library, or some other quasi-public place, chances are you’ll forget to log out occasionally (we all do), leaving your account wide open.
Log out when you’re finished using Facebook. Before you go on to the next item on your to-do list, take a second to click the Logout link found in the Account drop-down menu in the upper-right corner of every Facebook screen. Doing so prevents people from getting into your account if you forget to close your browser before you head out for lunch.

Adjusting Your Privacy Settings
Facebook does a lot of media chest-thumping about how strictly it protects its members’ privacy. So it may come as a surprise that, unless you change them, many privacy settings are set to the slackest possible levels. It’s up to you to understand how Facebook’s privacy settings work, where to find them, how to adjust them—and to actually spend time battening down the hatches. That’s a lot of work! Fortunately, this book has done most of the work for you; all you have to do is read this section and adjust your settings.
Note
In a privacy study reported a while back in a British newspaper, 41 percent of Facebook members chose to befriend (Responding to Friend Requests) a plastic frog, thereby granting the fictitious “Freddi Staur” (an anagram for “ID Fraudster”) access to personal details such as their home addresses, children’s names, and family photo albums. The moral? Don’t befriend indiscriminately on Facebook any more than you would offline.
Controlling Who Sees Your Profile and Contact Info
You can make your entire profile off-limits to certain groups of people, such as the people in one of your networks. You can also hide specific parts of your profile—like your contact info and which applications you’ve added—from whole groups of people, such as one of your networks or all your friends. To do so:
At the top right of any Facebook screen, click the Account link and then, in the drop-down list that appears, click Privacy Settings.
Tip
Another way to control who sees your profile and contact info is to tweak the settings as you type in your information (Adding Contact Info).
On the Privacy Settings page that appears, click one of the links to control who can see your birthday, your religious and political views, your photos, your phone number and address, and more. You can even block (Fighting Back) specific Facebook members from viewing your profile. Facebook breaks down your privacy settings into five basic categories to make it easier for you to decide which option you want for each setting:
Tip
If you don’t have time to run through all five categories, make sure you at least tweak the ones for Profile Information, Contact Information, and Search. Confusingly, all three of these categories pertain to different chunks of your profile, which is typically the stuff you want to keep private.
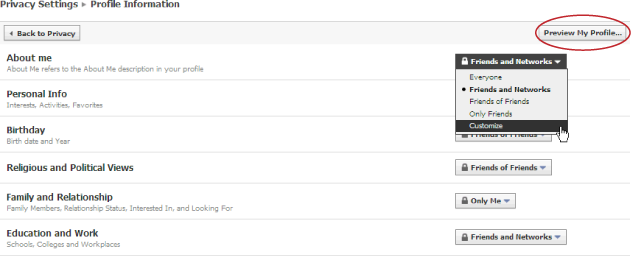
Profile Information. Here’s where you tell Facebook who you want to let post to your Wall (Writing on Walls) and access to part of your profile page. There are an awful lot of settings on this page, but the options are pretty much the same. If, for example, you want to let long-lost friends and coworkers look you up based on the interests and activities you typed into the Personal Information section of your profile, head to the drop-down list next to Personal Info and either keep the Everyone setting that Facebook starts you out with, or select “Friends and Networks” to let all of your friends and everyone in all of your school and work networks see your activities and interests. Choose “Friends of Friends” to let anyone who’s friends with any of your friends see the goods. Choosing Only Friends keeps Facebook members who aren’t on your Friend List from seeing your profile, and choosing Customize lets you create a list of specific folks you want to have the information in this particular section of your profile.
Note
If you have a group of folks you want to show chunks of information to (or hide information from), you’ll find the Customize option super-useful. Say, for example, you’re a teacher and you want only your students to see certain parts of your profile. Or maybe you spend a lot of time on Facebook for fun, but want to keep your coworkers from seeing certain parts of your profile. First, create a list (Controlling Who Sees Your Profile and Contact Info) of your students or coworkers. Then click the Customize option for every profile section and, in the Custom Privacy box that appears, click the Specific People option and type in the name of your list.
Note
Facebook knows it can be hard to remember what your profile looks like when you’re in the middle of privacy-tweaking, so the site gives you a way to double-check what’s on your profile: On the “Privacy Settings—Profile Information” page, click the Preview My Profile button to take a peek at what someone who falls in the Everyone category will see when he runs across your profile listing on Facebook. (If you want to see what a particular Facebook member—like your boss—can see based on your current settings, click in the “Start typing a friend’s name” box, type in that person’s name, and then hit Enter.)
Contact Information. This section lets you control who gets to contact you on Facebook and who gets to see non-Facebook ways to contact you, like your phone number, address, and instant messaging screen name. Adjust all these settings to Only Friends unless you have a darn good reason not to (if, for example, you signed up with Facebook because you’re coordinating your high school reunion and want far-flung former classmates to be able to contact you). And consider choosing the “Only Me” option from the Custom Privacy settings for any e-mail addresses that you’ve given Facebook to prevent folks you don’t know from clogging your personal or work email account with spam.
Applications and Websites. There aren’t a whole lot of settings for you to tweak in this section, as you don’t have any extra-special control over how much of your personal info the Facebook applications you’ve installed can use. Applications can see everything you’ve marked as visible to Everyone, (you can read more about what the applications you install and your friends can see about you by clicking the Learn More button on the "Privacy Settings—Applications and Webites” page). Still, it’s worth clicking the Edit Settings button to specify what you want your friends to be able share about you with the applications they install. And if specific applications (or friends) are barraging you with endless invitations to sling sheep or take a “If you were a vegetable, what kind of vegetable would you be?” quiz, you can use the Blocked Applications and Ignore Application Invites links on this page to block them.
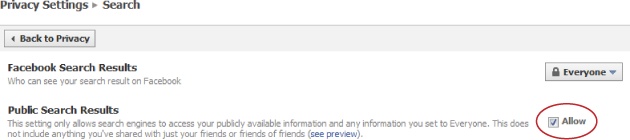
Search. Facebook assumes you want your profile listing—that tiny one-line-and-a-picture search result that lets folks searching Facebook know you’re a member—to be visible to any other Facebook member. It also assumes you want all the info you’ve made visible to everyone on Facebook to be visible to everyone on the Internet. If that’s not what you want, you can use the options on this page to restrict your profile listing (useful if, for example, you’re a teacher using Facebook for class discussions) as well as the ability of search engines, such as Google, to access your profile information.
Block List. Considering the enormous number of people using the site, the incidents of Facebook stalking and other unsavory behaviors are actually pretty low. Still, it’s nice to know that if someone does cross the line from mildly annoying to upsetting, clicking this link gives you an easy way to remove him from your Facebook life.


Tip
Alternatively, you can block a non-friend by heading to the bottom of her profile and clicking the “Report/Block this Person” link. To block a friend—sometimes, sadly, friendships do go awry—head to the bottom of the friend’s profile and click “Remove from Friends”. Then, as you would with a non-friend, click the “Report/Block this Person” link at the bottom of the person’s Facebook profile.
Hiding from Facebook and Web Searches
Unless you tell it otherwise, Facebook shows your name and profile picture to everyone who looks you up using Facebook’s search feature (Finding New Friends)—and lets them message and befriend you—as well as to any non-Facebook member who looks you up using a search engine such as Google. Big deal, right? Letting folks find you and contact you is the reason most people join Facebook, after all.
Actually, it is a big deal. If someone who doesn’t ordinarily get to see your profile information pokes you (Poking), for example, or sends you a Facebook message and you respond to it, Facebook automatically grants that person temporary access to your profile.
Note
Blocking someone (Fighting Back) prevents them from seeing your profile or interacting with you on Facebook in any way.
If the thought of unintentionally granting profile access to people you don’t know makes you a little nervous, you’ve got three choices:
Tell Facebook not to display your name or picture in non-friends’ search results. This is a good choice if you’re not interested in long-lost friends or potential employers looking you up, but instead joined Facebook to keep in touch with people you already know. To choose this option: At the top of any Facebook page, click the Account link and then click Privacy Settings. On the Privacy Settings page that appears, click Search. Finally, from the Facebook Search Results drop-down list, choose Only Friends.
Customize how non-friend, non-fellow-network-member Facebook members can contact you. Choose this option if you want to let people look you up out of the blue, but don’t want messages from folks you don’t know (yet) clogging up your Facebook inbox. Here’s how: At the top of any Facebook page, click the Account link, and then click Privacy Settings. On the Privacy Settings page that appears, click Contact Information. On the page that appears, scroll down to the “Add me as a friend” and “Send me a message” settings. Choose which group of folks you want to be able to look for you in Facebook and then send you friend requests and messages straight from their search results.

Deciding What Applications Can Access (and What They Can Blab)
You can’t use a third-party Facebook application without granting the application access to your profile information (see Applications and Privacy). And if you’re friends with someone who installed a Facebook application, that application has access to your profile info, too—unless you adjust your privacy settings.
Tip
You can cut down—but not eliminate—the social ads (Social Ads (Targeted Announcements)) Facebook displays on your friends’ Home and profile pages. To do so: At the top of any Facebook page, click the Account link and then click Account Settings. On the page that appears, click the Facebook Ads tab.
To limit the amount of your profile information that your friends’ applications can access:
At the top of any Facebook page, click the Account link and then click Privacy Settings.
On the Privacy Settings page that appears, click the “Applications and Websites” link.
On the page that appears, click the Edit Settings button.
Turn off the checkboxes next to the things you want to hide from your friends’ applications. When you’re finished, scroll to the bottom of the page and click Save Changes.

Another way to limit what your friends’ applications can see about you is to block an application, which prevents that application from getting any info about you. To block an application:
On the left side of your Home page, click the Applications link.
Scroll down to the Friends’ Applications section and click the name of an application you want to block.
In the “Allow Access?” dialog box, click the application’s name.
On the application’s page, click the Block Application link.
In the confirmation dialog box that appears, click the “Block [application name]” button.


Tip
To see a list of all your Blocked Applications, at the top right of any Facebook page, click the Account link and then click Privacy Settings. Next, click the "Applications and Websites” link and then the Edit Blocked Applications button and Facebook displays a list of all the apps you’ve bolcked. These applications can’t access any info about you or contact you, but they may still appear on your friends’ profiles. If you want to unblock an application, click the “remove” link next to its name.
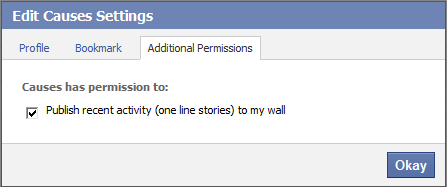
To limit what an application can tell your friends about your use of the application:
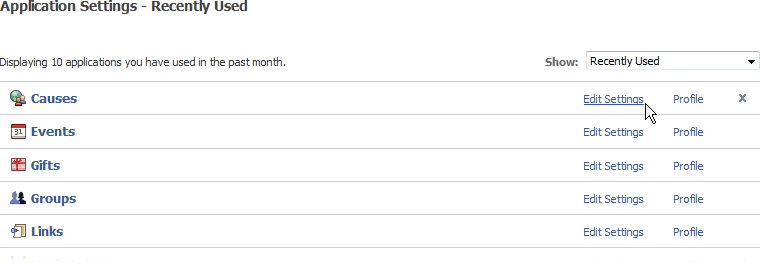
At the top right of any Facebook page, click the Account link and then click Application Settings.
Scroll down to the application you’re interested in and click the Edit Settings link that appears next to the application’s name.
In the “Edit [application name] Settings” box that appears, click the Additional Permissions tab and turn off the checkbox next to anything you’d like the application to stop doing.
Controlling Which Sites Can Access Your Profile
Facebook’s partnerships with other companies through its Connect program (Connect Facebook to Your Website with Widgets) let non-Facebook websites use your Facebook profile information—and vice versa. Using Connect, for example, a website might use your Facebook login and profile info to let you log into its site and get in touch with other Facebook pals via that site. Alternatively, a Connect-enabled site may help you post bits of its content to your Facebook Wall or shoot out custom ads to your Facebook friends based on what you did on the site (“Fred just bought high-top tennis shoes from our site. Want a pair?”).
When you interact with one of Facebook’s Connect-enabled partners by surfing to the site and clicking the Facebook logo that appears there, the site tells you how it intends to use your profile information and then asks for your okay.
Note
Unlike Beacon, the program Facebook used to use for Facebook-to-third-party-website connections, Connect lets you choose to participate. (Beacon assumed you wanted to participate until you figured out how to tell it “no,” which cheesed off so many folks that Facebook decided to retire Beacon and switch to an opt-in approach.)
To control which external websites can access your profile information:
Surf to a Facebook-enabled site. You know it’s a Facebook-enabled site because you see the Facebook logo, a link to Facebook Connect, or both. Point your browser at www.mashable.com, for example, and you see the Facebook logo. Check out www.digg.com, and you see a link to Facebook Connect.
Click the “Connect with Facebook” or “Share” button you see on the site. The exact wording of the link you see depends on the way the site chooses to use Connect; “Connect with Facebook” and “Share” are currently the two most popular links.
Follow the instructions that appear. Typically, you see either a confirmation box (in which case, click Confirm) or—in the case of the Share button—a box that lets you post site-related tidbits directly to your Facebook Wall.

Fighting Back
If you’re being harassed by another Facebook member—someone fills your Wall with unsavory comments, for example, sends you threatening messages, or pokes you 50 times a day—you can take action. The first thing you want to do is stop your tormentor from contacting you on Facebook. If that doesn’t do the trick, you can take self-defense a step further and report the person to Facebook.
Blocking Individual Members
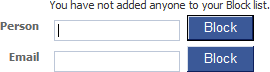
Facebook lets you prevent individual members from knowing that you’re even on the site. Blocking someone keeps him from seeing your profile, finding you with Facebook searches, or contacting you via Facebook. To block someone:
At the top of any Facebook page, click the Account link and then click Privacy Settings.
Note
To prevent people who aren’t on Facebook from using a search engine like Google to see that you’re on Facebook, you have to tell Facebook not to create a public search listing for you. Hiding from Facebook and Web Searches explains how to do that.
On the Privacy Settings page that appears, click the Block List link.
In the Person field of the page that appears, type the name of the member you want to block and then click Block.
In the search results that appear, find the person you want to block and click the Block link next to his name.
Reporting Violations
Facebook takes violations of its privacy policy seriously. The site makes reporting potential violations easy by displaying a Report link on every Facebook application page and next to virtually every potentially offensive bit of info members add to the site, from discussion threads to Wall posts.
Note
“Offensive” can mean anything from pornographic to threatening. To see a list of what Facebook considers offensive, check out the Safety section of the site’s Statement of Rights and Responsibilities: www.facebook.com/terms.php.
In addition to getting upset by things other members post on Walls or upload to their profiles, people sometimes find third-party applications (Facebook Applications: An Overview) offensive. Examples of potentially offensive applications include those that revolve around a tasteless pastime (seeing how many nude photos you can upload, say), those that don’t work or work differently than advertised, or those you suspect of misusing your profile info.
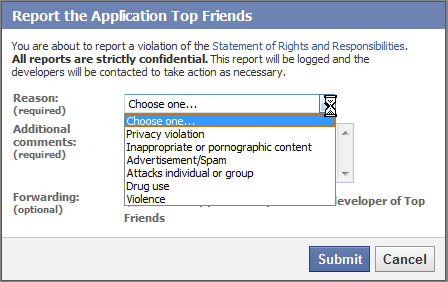
To report an application:
On the left side of your Home page, click the Applications link.
In the list that appears, find the application you want to report and then click its name.
On the application page that appears, click the Report link on the bottom left side of the screen.
In the pop-up window Facebook displays, use the drop-down list to tell Facebook why you’re reporting the application. Type your comments into the text field, and then click the Submit button.
Tip
To report offensive content, send an email to [email protected].