
Chapter 8. Records Management
In the context of SharePoint, we will define records management as the practice of maintaining electronic records in your organization from the point of their creation to their eventual disposal. A broader view of records management would include all business records, both physical and electronic, in any format. This could span paper, microform, backup media, and electronic records.
Principles and life cycle
In the context of SharePoint, a record is an electronic file or content that has been stamped at a specific time and place as a record of business. Stamping a document in SharePoint as a record consists of assigning a Document ID and, more importantly, declaring the document as a record. Content includes the body of all documents and its associated metadata, making it an immutable document that if modified either nullifies itself as a record or becomes a separate record from the original. The primary concern for management of these records is to provide evidence of an organization’s business activity.
This definition, while relevant, does not contain the whole picture. How you achieve records management is just as important as what it is. Many organizations do not have the concept or formal practice of managing records. All organizations should explore the benefits derived from the principles of records management. These include but are not limited to the ability to dispose of records that no longer have a business benefit or purpose. Most organizations simply stockpile both physical and electronic records because they see the cost and risk of maintaining records beyond the appropriate retention period outweigh the costs and structure required to implement the procedures and system configurations needed. If your organization has intentionally established the structures for records management, it is in a good position to configure SharePoint to support the records management policies, retention schedule, and disposition practices.
In conjunction with the formal definition of records management, there are principles that are widely accepted for developing a records management program. We have outlined these principles to establish a baseline of understanding for your organization. You might find that referring back to these will be helpful when deciding how records management will best fit into your ECM project.
Accountability There will be an individual or individuals responsible for all identified records, their content, and actions taken on that content.
Integrity Organizations will agree to a system for managing content and ensuring its integrity, authenticity, and reliability.
Protection Organizations will establish a system of record that protects records from alteration, unprivileged access, and business continuity.
Compliance Organizations will establish a system that allows them to comply with applicable laws and authorities in their industry.
Availability Organizations will establish a system that allows access to records in a reasonable time frame.
Retention Organizations will maintain records for a reasonable amount of time to satisfy legal, regulatory, fiscal, operational, and historical requirements.
Disposition Organizations shall securely and systematically dispose of records that are no longer relevant or required to maintain compliance with laws and organization policies.
Transparency The method of tracking, storing, and maintaining records will be transparent to authorities and authorized parties, and the practice should be verifiable and measurable.
Records management has a specific life cycle. As part of your records program, we recommend that you document and publish the life cycle outlined in Figure 8-1 as a formal process and policy that must be adhered to by the organization.

When you understand the principles behind establishing a formal records management program, you will want to start planning for the activities related to the practice of records management in your organization.
Determine a System of Record For the purposes of this book, the system of record is SharePoint 2013. It is the final storage point of the immutable record.
Establishing Policies Policies dictate how records are treated and who can access them. Where there is a physical version of a record, they also dictate how and when the physical version will be destroyed.
Retention Schedules Building and maintaining retention schedules requires listing of all the pertinent documents for each department, including the history of compliance requirements of the organization. If the document type is not in the retention schedule, it should not be stored in the system of record nor should it be kept by the organization. In addition to the types of documents, the retention schedule will, at minimum, define the life of a document—for example, that a contract should be deleted five years after its termination date.
Usage Policies One of the records management team responsibilities is to ensure that the system of record is used properly and the policies followed.
Auditing Content Periodically, the records team will perform content audits to ensure that there are no discrepancies and to ensure proper use of the system and records.
Discovery and Holds When matters arise, such as a critical legal or compliance-related event that requires the culling of content related to the topic of the matter, the records management team will issue notices to content owners, perform the hold, and, when the hold expires, ensure that content returns to its proper location and status.
Content Custodian The records team is responsible for the integrity of content and can be called during a matter to testify that content is relevant, current, and properly managed. They might also have to document any discrepancies or incidents that might have occurred during the management of content.
Business drivers
In most cases, the primary driver for establishing a records management program is an organization’s need to comply with industry or regulatory-specific rules. These organizations are in an industry or field that has strict rules about how records are handled, and there is substantial risk associated with not properly taking care of their documents. Organizations not in a regulated field, or in a risky business, can also benefit from records management by achieving better organization and work habits related to content that would help to eliminate waste and inefficiencies.
There are two sides of the records management coin. The benefits for maintaining compliance and reducing the amount of records that are maintained can be counterbalanced with the amount of effort required to implement and maintain a proper records management program. This is often seen as slowing down business operations and not providing enough of a hard dollar return on investment. For smaller organizations, enterprise content management and records management can be one and the same. In theory, ECM is less strict, but in reality, 90 percent of properly established ECM systems incorporate records management as an integral part of the entire solution.
If you find yourself in the category of company that is smaller, in an unregulated business, and that does not have a compelling need for records management, this section is still useful to review and understand. The principles of records management correlate with proper uploading of content to SharePoint. We covered the process and benefits of establishing good content usage and practices in Chapter 6. For the user community that will be working with SharePoint, the organizational habits of records management can be a fantastic driver for change management. At a minimum, you should consider a subset of the functionality that might be useful for your business, especially when considering legal risk.
Documents created by the organization are not only an asset, but they also pose a potential risk. Some organizations feel that the historical value of documents outweighs the benefit of destroying records that have no real business value or functional purpose. There is no sentimentality in records management; either you need the records for compliance or you don’t. More often than not, records that are kept beyond a specifically needed period of time become a liability. They could be leaked to your competition, causing your organization to lose valuable intellectual property (or cause embarrassment). It could be content that an employee created that is destructive to the organization. In the opposite risk case, problems could arise because you did not properly manage your records and did not keep critical business documents that were later required.
Note
Some organizations have established a formal records manager position, have implemented specific third-party records management tools, or use third-party records retention facilities. If this is the case at your organization, there is probably someone who is familiar with either AIIM International or ARMA International. Both of these independent associations provide specific records and information management resources, best practices, and guidelines.
In some organizations, all documents are records; in others, only a very specific handful of documents are considered records. In either case, calling a document a record implies very specific storage, security, handling, and life span, whereas all nonrecord documents should be disposed of immediately after their transient value is obtained.
SharePoint 2013 and its predecessor, SharePoint 2010, have a lot of functionality around records management and offer tremendous flexibility for how the platform can be used in a hybrid ECM and records management system, in strictly a records center, or where records management principles are utilized as just a subset of ECM.
In SharePoint, we talk about records management from the perspective of records management features and functionality, followed by processes and procedures. In the remaining portions of this chapter, we will take a look at both of these elements and apply them to the features in SharePoint that make them possible, and we will look at how the processes are executed with those features. But first, we will go into some detail about the power and detail of a retention schedule.
Retention schedule
A retention schedule is a detailed listing of the organization’s critical operational, historical, or compliance-related content. In many regulated industries, the retention schedule is determined in advance and modified on a biannual or less frequent basis.
The beauty of a retention schedule is that it can be used to determine the following:
Some level of Information Architecture (IA)
Content types
Metadata model
Information management policies
Security
Because organizations that have a retention schedule tend to be driven by strict compliance, there is no deviating from the retention schedule, which means that SharePoint should be set up to be consistent with the retention schedules already established.
A typical retention schedule will be segmented into a records series. Each document or content item will be associated with a unique alphanumeric identifier that can be used to categorize documents by retention period. The retention schedule should also include, at a minimum, the type of document, specific records status, and what department they are associated with. Pay attention to this because it can be used as an indication of IA already at work in the organization. If the retention schedule also includes the metadata that each record should have, this can be leveraged as an indication of content types and the columns in each content type. The document life cycle or retention period can be used to determine the information management policies set on each content type. If the content is identified as vital or privileged, this can help you as you establish your content security model. Unless the organization has internal security policies—for example, for management—the retention schedules security criteria can be used as the only security required for the records and your ECM solution.
As you can see, this defines 90 percent of what is done in ECM implementations; therefore, the retention schedule, when identified up front, is a huge help. However, if the retention schedule is not observed until later, this can also cause big issues during SharePoint deployment and usually results in project delay or a restart.
Because of its power, we recommend that organizations take on the practice of creating a retention schedule for themselves, whether or not they are in a regulated industry. The following considerations can help your organization decide whether to build out a records management program:
Understanding of content relevance for retention
Possession of confidential or proprietary documents and content
Documents or content posing a litigation or liability risk
Overall volume and diversity of content that is not purged
Defining document types on an organizational level, not just by business unit
Defining metadata models and a common language organization-wide, not just in functions or business units
Not only will an organization that goes through this exercise have a better sense of its content, it will have a large portion of the ECM planning done. Much of the heavy lifting will be done, and the organization will have already established the right state of mind that comes from properly managing and organizing content.
To help you visualize what a retention schedule looks like, we have included an example from a municipal government, as illustrated in Table 8-1. This is meant as a resource for you to see what other organizations have done. This is not a one size fits all. Although any retention schedule should contain familiar elements, all situations are unique and we recommend that you exercise your own judgment to prepare a retention schedule that meets your requirements.
Note
Permanent records are relevant only for documents that have operational long-term impact, such as bylaws or operational procedures. In Table 8-1’s code legend, the retention codes S, T, and EL are unique to municipal governments.
Content | Retention | Vital/Historical/Confidential | Authority | |
City Attorney | Court Decisions, Briefs, Research | CL+3yr | V,H | CCP 583.320(a) |
City Attorney | Correspondence | CU+2yr | H | GC34090(d) |
City Attorney | Legal Services Request | CU+2yr | H | GC34090 |
City Manager/GIS | GIS Documents | CU+3yr | V | GC34090 |
City Manager/Airport | Gate Access Application | CL+2yr | C | GC34090(d) |
Development/Building | Inspection Record | P | V,H | CCP 337.15 |
Development/Building | Construction Drawing | P | V,H | H&S 19850 |
Development/Code | Case Files (Citations) | CL+5yr | H,C | GC34090(d) |
Development/Engineering | Submittals | CL+7yr | V,H | CCP337.15 |
Environmental | Incident Reports | CL+7yr | V | 29 CFR 1904.2 |
CODE LEGEND Retention Codes:
Citation Codes: OSHA = Occupational Safety & Health Administration
| ||||
If you look at the City Attorney item in Table 8-1, you can see from this retention schedule that they will have five content types for legal services requests, correspondence, briefs, research, and court decisions. Correspondence and Legal Services Requests will have management information policies that will be set to dispose of these documents two years after their declaration as a record. Court Decisions, Briefs, and Research will have an information management policy that will be set to dispose of the documents three years after the matter close date, which means that they will need a custom column of the matter close date as a date field (in their SharePoint 2013 system). All the documents for the City Attorney appear to be historical, which might affect the IA of their site collection or site.
In the case of the City Manager/Airport department, the Gate Access Application is set to be a confidential document, which means that in the site collection security for the Airport, we should consider tighter security for these documents. This is a good example of the method we would use to leverage the retention schedule to help provide the details we need for IA, content types, retention schedule, and, possibly, site security.
We recommend that organizations start up front with a formal records management program and records inventory, all the way through to developing the retention schedule. After a retention schedule has been identified, planning of specific SharePoint functionality will follow suit and incorporate all the elements of this activity.
Records management features in SharePoint
We are assuming that all the standard ECM features that we have recommended are enabled for your SharePoint farm. In addition, there are additional sets of records management-specific features that can be used. These provide the functionality in SharePoint that allow you to perform core records management functions. We have outlined specific steps to follow, to enable the following features:
Records center, as shown in Figure 8-2
Information management policies
Content audit
Content organizer
Send-to locations
Holds and discovery
Site retention
The records center acts as a type of template or starting point. All documents saved in a site provisioned with this template are automatically declared as a record. No nonrecord documents will be stored in a records center. Usually, organizations will not have more than one records center, and they will provision more based only on size constraints, not security. This site is typically accessible only to content managers or records managers. After a records center site is created based on your IA, you will create libraries consistent with other sites. The libraries that can be unique could be hold libraries or libraries for very specific types of records, such as board, council, or executive team records.
In-place records declaration is usually the alternative to a records center, where instead of all documents in a site being declared a record automatically, the user or automated workflows decide when a document is a record, and nonrecords can live with records.

Follow the seven steps outlined and illustrated in Figure 8-3, Figure 8-4, and Figure 8-5, respectively, to enable in-place records management.
Navigate to site settings.
Click the Active button to the right of In Place Records Management. This will turn on the feature for the entire site collection.
Important
Deactivating the records management feature after it has been used can be damaging to your content. Before considering such a change, it’s recommended that you migrate content prior to deactivation to a temporary location, and then migrate back after deactivation. This will also inherently break the principles of records management; this is an extremely important concept to understand. As soon as you deactivate, you no longer have records as we have formally defined them and as a generally accepted practice of records management.
Even though the feature is activated, you need to choose which libraries you want the feature to be available in. Browse to a library where you want to allow in-place records management.
On the ribbon, click the Library tab, and then click Library Settings.
Click Record Declaration Settings. If you do not see this setting, it means that the feature was not successfully enabled in step 3.
As illustrated in Figure 8-6, select the Always Allow The Manual Declaration Of Records option. You will also notice a check box labeled Automatically Declare Items As Records When They Are Added To This List. This setting is essentially how the records center works. By default, all libraries in the records center template are enabled with this feature. For in-place records management, we will leave this unchecked because in this scenario we are allowing nonrecords to live with records.


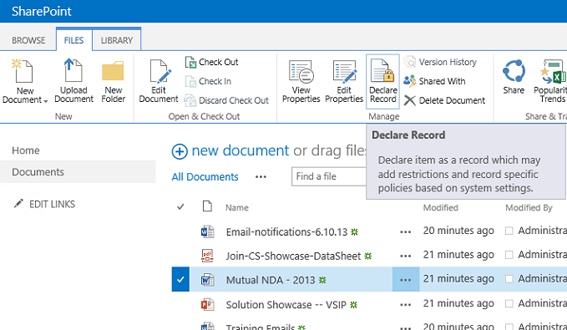
You will have to repeat steps 5–7 on all libraries in the sites and site collection where you want the feature enabled. When enabled, when you select a document in a library, you will have the option to click the new Declare Record button on the File tab of the ribbon, as shown in Figure 8-7. When you do so, the document will be stamped with the time, location, and content. This means that it cannot be moved or edited unless it is undeclared as a record.
After a record is declared, users will notice a little lock symbol on the file icon, as shown in Figure 8-8. As you can see, this record is living with nonrecords.

In-place records can also be declared via workflows or the content organizer feature in an automated fashion.
Based on existing metadata, usually a date, information management policies are the mechanism that decides when a document should be disposed of. For example, a disposition for a contract might be seven years after its termination date. In such a case, the content type will need to have an additional column for the termination date, and then it will need an information management policy created for it. When you built the content types in the ECM Hub, you established these information management policies on a content type level. Ad hoc creation of information management policies should not happen outside of this configuration.
Content audits allow content managers to review documents from a management perspective or if specific content is related to a matter. Content audits can happen on a document level, library level, or even a whole site level. Content audits will show, from the point that the document first arrived in SharePoint, all viewing, modifications, and automated actions taken on the content.
Follow the five steps outlined and illustrated in Figure 8-9, Figure 8-10, and Figure 8-11, respectively, to perform a content audit.
Browse to a library of existing content.
Select the “…” drop-down menu on the document.
Click Generate Audit Log Report. This opens a window with various options for the types of audit logs as shown in Figure 8-11.
Select the type of audit you want—for example, Content Modifications. You will be asked to browse to a location in the same site, where the resulting Excel file containing all audit data will be saved. At minimum, this should be a separate library from all other content, perhaps called the Audit library. Ideally, the content organizer is configured to take all audit content and route it to a centralized library specifically for records management to view audit documents. Mixing audit Excel files with live business content can confuse users and pose legal risks.


Note
Audit log details are compiled by a SharePoint timer job, which means actions are not real-time. They could be every 15 minutes or even every day, depending on the platform configuration for the timer job operations.
The content organizer is a special type of library that can route or modify content uploaded to it based on metadata rules. Content Organizer is a site level feature, so you must select which sites you would like the content organizer to set up.
Follow the three steps outlined and illustrated in Figure 8-12 to enable the Content Organizer.

After the feature is enabled, you will immediately notice a new library called the Drop Off Library. We typically recommend that this library be renamed to a friendlier name for your organization, relevant to its function, but for now, we will leave it. Now you can create rules for this library to act on metadata when uploaded to it. First, before creating any rules, the ECM team must decide what the rules will be and document them. This feature can be useful to get users to do the right thing without even knowing it or to make sure that as content is contributed to ECM or Records Management, it goes through the proper processes.
Follow the four steps outlined and illustrated in Figures Figure 8-13 and Figure 8-14 to create a rule.
Navigate to the Site Settings page.
Select Content Organizer Rules under Site Administration. You will notice there is also a Content Organizer Settings section. For now, we are going to leave the defaults.
Click New Item.
Here you will have various settings for the rule. All rules will be given a name and a property status. You can select what types of content types this rule will run on. After you select this, you will be given all the columns available in the content type to build rules from. In the example illustrated in Figure 8-14, we are looking at the title of all incoming documents in the Drop Off Library. If the content is a Document content type, we then check the file name. If the file name contains “Confidential,” we are automatically moving the document to the confidential document library.

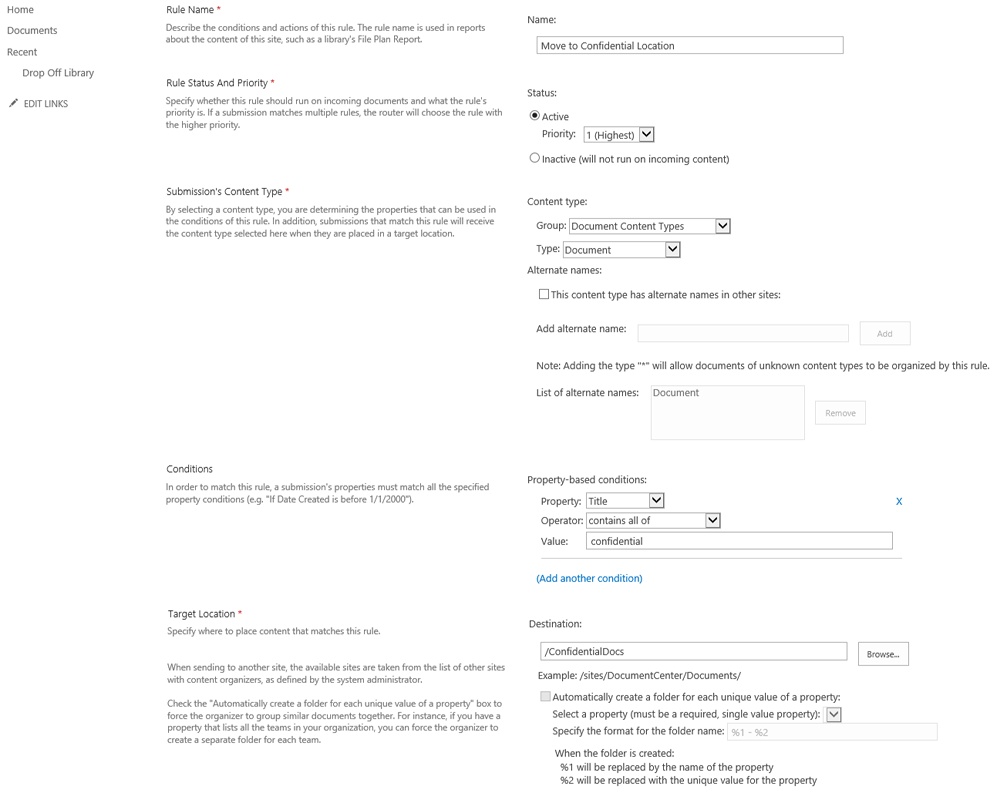
Now that this rule is created, all new documents that are confidential and uploaded to this library will be automatically routed to the proper document library.
Send To locations and Content Deployment paths are a mechanism in SharePoint to move content from one location to another in the farm. The reason this feature is so critical for records management is that content that needs to be administered by a records manager often does not originate as a record in the final location. Many organizations elect to have transient and living content in a less regulated area, but at some point, that content becomes either invalid and disposed of, or it is moved to ECM and/or records management sites for proper management. Send To locations also allow using features such as Content Organizer to its full capacity. The trick with Send To locations and Content Deployment paths is that they require configuration in Central Administration, which should not be open to everyone, and strategically placed drop-off libraries, which end up being the send-to URLs. Therefore, someone with access to Central Administration will have to participate in the set up. In the case of content deployment paths, not only does the path setup happen in Central Administration but so do the scheduled jobs.
For purposes of ECM, we are going to recommend using only Send To locations because they are the most available to the user, the most flexible when it comes to moving a batch of documents or a single one, and they fit nicely with the other features we talk about.
One of the most powerful new features of SharePoint 2013 is the ability to drag documents from one location to another. Now, moving a document from one library to another is as easy as dragging the file from one location into the desired library. This is a small enhancement but one that has huge impact as it relates to other methods of moving content. There are many cases in SharePoint 2010 where you would use Send-to connections or Content deployment paths to move content. Now with SharePoint 2013, you have an additional method; however, it’s important to use the right method for each situation.
Consider the use case of moving content. If it’s simply for the purpose of organization and not records management processes, you can consider allowing just the dragging feature within sites. If you need to move content across sites, related to some business process or enhancement in content contribution, use the Send-to connections. And finally, if you need to move large amounts of content based on a date or other action criteria on a semi-periodic basis, use Content deployment paths.
To set up a Send To location, you must first enable the Content Organizer feature in the various locations where you want to accept content. After you have enabled the Content Organizer feature, follow the nine steps we have outlined and illustrated in Figures Figure 8-15 and Figure 8-16.
Navigate to the Site Settings page.
Click Content Organizer Settings under Site Administration.
In the Content Organizer Settings window at the bottom of the page, you will notice a unique URL. This is the send-to URL for this particular content organizer. There will be one per content organizer, per site. The URL will look something like this: http://c4968397007/_vti_bin/OfficialFile.asmx. Copy this URL to a temporary location.
Now that you know the destination of content, navigate to Central Administration.
Click General Application Settings.
In the Send To configuration settings, give the location an action-oriented name. This will make users understand the purpose more clearly. Set an action type such as copy, move, or move with link. We recommend that you not use the Copy action type because this method causes duplicate documents in ECM and records management, which goes against the core principles we have outlined in the book.
Click the Click Here To Test link to verify that the Send To location works. It is not uncommon for security errors to occur. Verify that the Send To location has rights to all possible groups that might contribute content to it.
Click OK, and the Send To location will be added to the farm.


We recommend creating send-to locations for the following purposes:
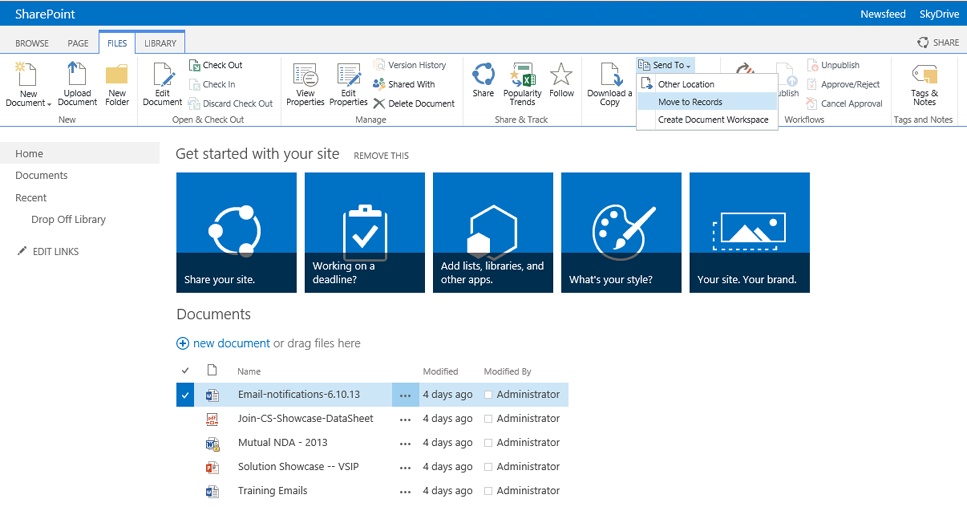
After you have configured your Send To location, you will have a new option on the ribbon, as shown in Figure 8-17, for send-to locations that can be used on individual documents, multiple documents, and even workflows.
Note
The user experience of Send To locations is greatly impacted by the performance of the farm. If the farm is not high performance, users will get confused because content will not to appear to move for as long as 30 seconds. We recommend that you test and optimize the performance of this with your IT team.
Another major component of records management is the process of holds and eDiscovery. These features will be covered in detail in Chapter 9. We mention them here because in some organizations, even without the need for eDiscovery, holds are a tool used by records managers to audit and review content. The feature and mechanism for doing a hold and for using eDiscovery are the same but can have different purposes.
Site disposition is a brand-new feature of SharePoint 2013, and just like the ability to use information management policies to purge content on specific time frames based on metadata, site disposition behaves the same. This is an incredibly powerful tool to prevent sprawl on team and project sites. It would be extremely uncommon to have the core IA of either the records management sites or the ECM sites disposed, because these sites are not transient. However, a records manager’s job is also to prevent sprawl. If you consider project sites and team sites individually as a document, their existence can produce content that ends up in ECM, but ultimately, when the project ends, the site should be removed.
We have provided an outline of the nine steps you will need to follow for setting up site disposition. This happens in two stages: first the creation of site policies, as illustrated in Figure 8-18, and then the setting of the site disposition date, as illustrated in Figure 8-19.
Site Policies are created at the site collection level, as shown in the following steps:
Navigate to the site settings of the root site for the site collection where you want to enable site disposition. For example, you could navigate to the root site collection of team sites where all the sites for each individual project will be created.
Click the Create button.
Give the policy a name—for example, Team Project Deletion.
Select one of the following options: Do Not Close Or Delete Site Automatically, Delete Sites Automatically, or Close And Delete Sites Automatically.
Select whether the deletion is based on the site creation or close date, and how long after—for example, 12 months after the project is created.
Select whether you want notification sent to site owners in advance of deletion and, if so, how far in advance.
Decide whether you will allow site owners to postpone deletion.
Select whether or not to make the site read only.


Note
The user interface indicates Site Collection only. However, disposition can be applied to individual sites.
Let’s step through the decision process regarding what settings to choose over others. There are many approaches that you can take with site disposition. Each situation is unique, and we encourage you to build and configure your site disposition based on your requirements. Following are the positions an organization can take, along with their associated disposition configurations:
Hard line
Site closure type: Delete sites automatically
Deleted event criteria: site created date
Allow owners to postpone: No
Site is read-only: n/a
Bargained hard line
Site closure type: Delete sites automatically
Deleted event criteria: site created date
Allow owners to postpone: Yes
Site is read-only: n/a
Empowered owner
Site closure type: Delete sites automatically
Deleted event criteria: site closed date
Allow owners to postpone: Yes
Site is read-only: n/a
Empowered owner with flexibility
Archive
Site closure type: Do not close or delete site automatically
Deleted event criteria: n/a
Allow owners to postpone: n/a
Site is read-only: Yes
The site closure type of “Do not close or delete site automatically” will become read-only if a site owner closes a site using this option. The benefit of such an option is realized if an organization chooses to archive all sites and maintain them for the indefinite future. This will essentially declare the site a record but still make it visible. The danger of this option is for areas where site creation is done rapidly, because this will result in empty and nonsense sites being kept forever.
We advise that taking the flexible or empowered owner approach is essentially the same as using no policies at all. Owners of sites will always be inclined to keep a site open “just in case.” Even if they have the intention of closing the site when it’s time, our experience indicates that they neglect to do so. This results in site sprawl and in a small portion of the sites being treated correctly where another portion is not. In our experience with ECM solutions and records management, it’s not what you get right that hurts you but what you miss, so we are recommending these options be avoided.
The bargained hard line setting has the same problem of the site owner’s ability to postpone, but you can limit the amount of time in days, months, years that a postpone will happen, and because the site closure is set to delete, there is no going back, so the bargained hard line setting works for a well-trained and conscientious site owner. A hard line is the recommended option, and we suggest that all organizations start with this option until it’s a problem. It’s easier to give the users choices than to take them away. For example, in the hard line, the organization must make it very clear how long sites will last for all new project sites and publicize this everywhere. We even recommend that the organization create custom site templates that include this notice in the home page of the site.
In summary, the archive approach should be selectively used only if archive processes have been established and made clear. The empowered owner approaches should never be used. And organizations should start with the hard line approach but move to the bargained hard line if they need to.
Now that the policy is created, we need to apply it. Navigate to the site you want to apply the disposition to, and perform the folllowing three steps as outlined and as illustrated in Figure 8-20. If enabled, this is where the site owner can manually close the site.

After you click OK, this page will be updated with the deletion date. This is a good reference for records managers and site owners to keep track of.
After a policy is applied, owners will be able to close the site manually and see the disposition date. If they have been given the option to postpone, they can do so here. If a site has been closed and the retention date has been reached, but the policy allows for it to be read only, it will remain visible in the IA, but new content cannot be added and edits to existing content cannot occur.
Arguably, all features of SharePoint ECM are also features of records management. Content types, MMS, and the metadata model in general are critically important to the records management processes. However, the features we have covered and the steps to configure them are specifically used for records management in SharePoint.
The subtle difference between ECM with records management and ECM without records management is that ECM accommodates living documents as well as documents that will no longer be edited and will be used for reference and consumption only. We have found that this subtle difference has caused a lot of confusion and failure to act on SharePoint ECM projects. The root of the confusion seems to be the records center.
Records center vs. in-place records management
Prior to SharePoint 2010, the ability to lock down individual documents as immutable content with a stamp in time, location, content, and metadata was possible only with a special type of template called the records center.
In the records center, all documents were declared records. This gave a single location for records managers to manage their records, and it walled off records from nonrecords. But this created a problem because it did not provide flexibility and, ultimately, limited the domain of the records and Legal department to only this subset of documents. This created a large opportunity (and risk) for large chunks of content to remain in a digital dump without proper records management.
Starting with SharePoint 2010, a new feature of in-place records management was provided so that you could declare a document as a record and allow it to live with nonrecords. This increased the flexibility, allowing organizations to have records management principles across all ECM components in the farm. But it also begs the question, “When do I use records center over in-place records management?”
This seems like a technology and feature question, but it is not. It is a business question, and it has as much to do with the structure of your organization as it does with how it is implemented. As we showed earlier, any library in any site can essentially be converted to a mini records center where all documents sent there are automatically converted to a record, so it’s not really a one-or-the-other option.
However, if you do commit to the records center, you are locked into a practice that must be maintained and that presents some risk and complexity if you want to undo or remove the features.
To help the organization make the decision about which method to use, here are some of the questions that you should ask the ECM team:
Is it feasible to have nonrecords mixed with records?
Can the curators of a record see the record after it is established as one?
Is the dedicated records manager responsible for all content or only for a particular subset of content?
Are living documents excluded from the legal process of the organization?
Is everything considered a record?
Table 8-2 provides the answers to these questions in the context of the records management system types.
Question | Response | Hybrid | ||
Is it feasible to have nonrecords mixed with records? | Yes | X | - | X |
Can the curators of a record see the record after it is established as one? | Yes | X | - | X |
Do you have a dedicated records manager? | Yes | X | X | X |
Is the dedicated records manager responsible for all content, or only for a particular subset of content? | Yes | - | X | - |
Are living documents excluded from the legal process of the organization? | Yes | - | X | - |
Is everything considered a record? | Yes | - | - | - |
The matrix in Table 8-2 relates a positive response to the questions and what that implies in terms of features. You can see that a “yes” on only questions 3,4,5 has any implication to doing a records center, and only 4 and 5, which are rare scenarios, imply a clear need for using only a records center. If you have a records manager whose scope of influence or effort is only a small subset of highly critical documents, it’s more convenient to remove those documents from the creators’ eyes and put them in a single site collection or site where the records manager can operate. Similarly, if according to the organization’s mandate, living documents are not considered records, it’s important to isolate records from living documents to wall them off.
Most the time, we see that organizations find it hard to justify a records center only. We believe that a “yes” response to question 4 spells some serious problems for the organization, because limiting the scope of a records manager’s manageable content is contrary to the purpose of the role of protecting the organization. And it’s not common for organizations to not consider living documents as serious content.
Therefore, we find that most organizations have in-place records or a hybrid scenario. We would recommend starting with the in-place records management approach, and add hybrid later if needed.
In the hybrid approach, you establish a library in a site where the setting of the library is that all documents in this library are automatically declared as records. The biggest benefit of this feature is that the average users might not need to see documents declared as records on a regular basis, which prevents them from being inundated with a records declaration process or slowing interactions with content that is not considered a record. This can especially be true with our recommended approach of flatter IAs. By moving the documents to a separate library where they can be declared as records automatically but also allowing declaration of records in the spot where they live, the organization has the greatest flexibility.
The problem with the hybrid approach is that it requires thought and intention for some users who might not be familiar with the concepts outlined in this chapter. If it’s a records manager, this is a part of their daily job, but if it is a knowledge worker, this will often be neglected and not followed, resulting in documents that should have been moved to a records library and declared a record.
Again, we recommend starting with the in-place records management approach until such time that declared records of a particular type become troublesome for day-to-day users.
We have covered in detail the features of records management in SharePoint, but what about their application? After all, this is one of the killer problems of SharePoint, where features are easy to throw out to the masses but usage of those features is not contained, nor is correct usage established. The processes themselves are as important as the features that make the processes possible.
Records management processes in SharePoint
In the last chapter, we talked about governance. With the records management portions of SharePoint, governance over features is key. Let’s start with who manages this governance.
In larger organizations, there is no question of who is in charge of the accuracy, consistency, and management of the content. This individual is usually given the title Records Manager or Content Manager. They will be found in all regulated industries and in government.
Looking at smaller nonregulated organizations, the records management position is not common, and it’s unfortunate. Having a role responsible for content shows intent to manage content in the correct way. Without the intent, contributors to the system are considering only their immediate goals with the system, such as uploading or searching for content. These actions add up, usually not in a positive way, to a collection of events that can pollute the content management system.
Our hope would be, even in small organizations that do not have the ability to hire a specific role for a records manager, to establish this as a duty of one of the existing roles. Making it the responsibility of an existing role that the organization does require will allow for some to take ownership of the records manager function. Without this, the organization is at high risk for being unsuccessful with the ECM solution, along with records management.
In addition to the oversight, the interaction and the abilities of users is also very important. SharePoint, with all its flexibility, opens many back doors to doing the wrong thing. For example, workspaces allow users to avoid metadata and records declaration, even if in a records center.
Not only is the organization responsible for planning out records management, the features, and how they will be used, it also, as we described in Chapter 7, needs to plan how those features are governed. Records management done incorrectly is the equivalent of not doing it at all. Here are the top questions to consider when governing the records management features of SharePoint:
Who can declare a record? Can anyone declare records? If yes, all users need to be trained on what types of content should be declared a record, and when. If this can be automated at the content type level with information management policies, it should be. If everyone can’t declare a record, users need to be aware that the feature exists but that they are not to use it.
Who can un-declare a record? We recommend that only legal and records mangers can un-declare records upon request from users. This should be an extremely rare occurrence. It is possible with a flexible security model, where users are all content owners, to determine which users can have the option to navigate to compliance details and un-declare a record. If so, they need to be aware of this feature, and a policy needs to be created telling them if they are not allowed to use it.
Who can run a content audit? For most organizations, this is not a concern, other than having more unneeded content that needs to be managed. Because all audits create a new Excel document, you do not want users blindly running the process. However, for the most part, you can allow all users to do so if they need to see the history of a document, but this is rare. For some organizations, there is a concern that users will see information about other users’ contribution or viewing of content. Therefore, they might want to create a policy of not allowing users to run audits.
Where do audit documents live? We do not recommend leaving audit documents in the same location as the content being audited. Instead, we recommend setting up a content organizer drop-off library where all audit documents are placed. When put in this library, they should be routed to a central audit location visible only to certain users. If users can see audits, we recommend adding to your IA an audit library in each site where audit Excel files can be placed.
What are the site policies and disposition? It sounds funny, but you need to create a policy for site policies, or you need to strongly limit who can be site owners. It is possible for site owners in SharePoint to, at any point in time, set the site closure policy to “no site policy.” If you want to allow site owners, such as in project sites, this is a real possibility. There needs to be a policy that is strictly enforced, telling site owners that they cannot remove site closure policies.
What do records managers have access to? Our hope and recommendation is that records managers have access to all content. The exception to this might be content managed by the executive team, or employee records for the managers and all other employees. Employee documents should never be part of ECM. The record manager should be a site owner on all sites, with the exception of the executive and employee record content, and should not have the ability to audit content, but have the ability to audit the IA and site disposition policies.
What happens to physical records that have an electronic equivalent? Depending on your organization’s records management principles, you will have decided what the immutable record is, whether the physical or the electronic. If you have decided that it is the physical record, the records management features in SharePoint should not be used, but there should be a policy that when that physical record is created, the electronic one is deleted completely. Usually the opposite is true, that the electronic document is considered the record. In such a case, the organization needs to be educated that printing a document is for temporary consumption only, and the document should be destroyed after its use is completed, meaning that no physical document should live for more than some period of time, hopefully less than a week. This is a very critical point, because any duplication, even in a different medium, is the equivalent of not doing records management at all.
Next steps
As you have seen, a common theme throughout this book has been that ECM and records management features in SharePoint are fantastic. However, the success of the system depends on how you plan for and implement the solution. As you start to understand the relationship of features to one another, the relationship of features to users, and how the system as a whole is governed, it becomes much clearer how you will achieve success. SharePoint projects fail most often because of unclear planning for how the ECM solution will be married to the operational business and functional requirements. This leads to low user adoption and disappointment.
At this point in the book, you have a deep understanding of ECM methodologies, SharePoint ECM features, IA design, and now, records management. In the next chapter, we are going to discuss an extension to records management that we have touched on called eDiscovery and holds. Like records management, it’s not found in all organizations, but the benefits and principles of eDiscovery and holds are useful and relevant to anyone planning an ECM solution in SharePoint.