
Chapter 5. Packaging projects
| 5.1 | Working with files | |
| 5.2 | Introducing mappers | |
| 5.3 | Modifying files as you go | |
| 5.4 | Preparing to package | |
| 5.5 | Creating JAR files | |
| 5.6 | Testing with JAR files | |
| 5.7 | Creating Zip files | |
| 5.8 | Packaging for Unix | |
| 5.9 | Working with resources | |
| 5.10 | Summary |
We can now compile and test our diary classes, using Ant, <javac>, and <junit>. This code can be turned into a JAR library. It can be used inside our application, or it can be redistributed for other people to use.
This brings us and our build file to the next problem: packaging a program for reuse and redistribution. We want to take the compiled classes and create a JAR file that can itself be bundled into some source and binary redistribution packages—such as Zip and tar files—for different platforms. We will then be able to execute the JAR file and upload the Zip and tar files to servers. We are effectively releasing our diary as a library, on the basis that having passed its tests, it’s ready for use.
What else does a project need to do before releasing a Java program?
- Create the documentation.
- Write any platform-specific bootstrap scripts, batch files, or programs.
- Write any installer configuration files, such as Java Web Start files.
- Build the application and package it into a JAR file.
- Pass the test suite.
- Bundle the JAR, the documentation, and any other files into redistributable packages (usually Zip and tar files).
Ant can handle the activities in figure 5.1. It can take the source files and create .class files and JavaDoc documentation, then package everything up as redistributables. Along the way it can copy, move, and delete files and directories.
Figure 5.1. The packaging process: a JAR library consists of getting the source and data files into the JAR and the documentation into a directory, then creating the Zip and tar packages for distribution.

The build file can already compile the source and run the tests; in this chapter we’ll look at the rest of the packaging problem. We’ll start with file system operations to get everything into the right place.
5.1. Working with files
The basis of the packaging and deployment process is copying and moving files around. Ant has a set of tasks to do this, most of which operate on filesets. We can use them to prepare directories and files for the packaging steps in the build.
Creating Directories
Before we can distribute, we need a destination for our distributable files. Let’s create a subdirectory dist with another doc for documentation under it. As usual, we declare these locations through properties to provide override points.
<property name="dist.dir" location="dist" />
<property name="dist.doc.dir" location="${dist.dir}/doc" />
<mkdir dir="${dist.dir}"/>
<mkdir dir="${dist.doc.dir}"/>
This XML will create all the distribution directories. The <mkdir> task creates all parent directories in its dir attribute, so when the task is executed with dir="dist/doc", the whole directory tree would be created on demand.
This same recursive creation applies to deletion, where the entire distribution directory can be deleted all at once.
5.1.1. Deleting files
We’ve been deleting files since chapter 2, using the <delete> task. This task can delete an individual file with a single file attribute:
<delete file="${dist.doc.dir}/readme.txt" />
It can just as easily delete an entire directory with
<delete dir="${dist.dir}" />
This task is dangerous, as it can silently delete everything in the specified directory and those below it. If someone accidentally sets the dist.dir property to the current directory, then the entire project will be destroyed. Be careful of what you delete.
For more selective operations, <delete> takes a fileset as a nested element, so you can specify a pattern, such as all backup files in the source directories:
<delete>
  <fileset dir="${src.dir}"
           includes="*~"
           defaultexcludes="false" />
</delete>
This fileset has the attribute defaultexcludes="false". Usually, filesets ignore the editor- and SCM-generated backup files that often get created, but when trying to delete such files you need to turn off this filtering. Setting the defaultexcludes attribute to false has this effect.
Three attributes on <delete> handle failures: quiet, failonerror, and deleteonexit. The task cannot delete files if another program has a lock on the file, so deletion failures are not unheard of, especially on Windows. When the failonerror flag is true, as it is by default, Ant halts the build with an error. If the flag is false, then Ant reports the error before it continues to delete the remaining files. You can see that something went wrong, but the build continues:
<delete defaultexcludes="false"
  failonerror="false" >
  <fileset dir="${dist.dir}" includes="**/"/>
</delete>
The quiet option is nearly the exact opposite of failonerror. When quiet="true", errors aren’t reported and the build continues. Setting this flag implies you don’t care whether the deletion worked or not. It’s the equivalent of rm -q in Unix. The final flag, deleteonexit, tells Ant to tell the JVM to try to delete the file again when the JVM is shut down. You can’t rely on this cleanup being called, but you could maybe do some tricks here, such as marking a file that you know is in use for delayed deletion. Things may not work as expected on different platforms or when Ant is run from an IDE.
There’s also a verbose flag to tell the task to list all the files as it goes. This can be useful for seeing what’s happening:
<delete failonerror="false"
  verbose="true">
  <fileset dir="${dist.dir}" includes="**/"/>
</delete>
Deleting files is usually a housekeeping operation. Its role in packaging is to clean up destination directories where files can go before adding the directory contents to JAR, Zip, or tar archives. Create a clean directory with a <delete> command and a <mkdir> command, then copy all the files to be packaged into this directory tree.
5.1.2. Copying files
The task to copy files is, not surprisingly, <copy>. At its simplest, you can copy files from one place to another. You can specify the destination directory; the task creates it and any parent directories if needed:
<copy file="readme.html" todir="${dist.doc.dir}"/>
You can also give it the complete destination filename, which renames the file during the copy:
<copy file="readme.html" tofile="${dist.doc.dir}/README.HTML"/>
To do a bulk copy, declare a fileset inside the copy task; all files will end up in the destination directory named with the todir attribute:
<copy todir="${dist.doc.dir}">
  <fileset dir="doc" >
    <include name="**/*.*"/>
  </fileset>
</copy>
By default, <copy> is timestamp-aware; it copies only the files that are newer than those of the destination. At build time this is what you want, but if you’re using the task to install something over a newer version, set overwrite="true". This will always overwrite the destination file.
![]()
Copied files’ timestamps are set to the current time. To keep the date of the original file, set preservelastmodified="true". Doing so can stop other tasks from thinking that files have changed. Normally, it isn’t needed.
If you want to change the names of files when copying or moving them, or change the directory layout as you do so, you can specify a <mapper> as a nested element of the task. We’ll cover mappers in section 5.2.
One limitation of Ant is that <copy> doesn’t preserve Unix file permissions, because Java doesn’t let it. The <chmod> task can be used to set permissions after a copy—a task that is a no-op on Windows—so it can be inserted where it’s needed. Similarly, Ant cannot read permissions when creating a tar archive file, a problem we’ll solve in a different way.
Related to the <copy> task is the <move> task, which enables you to move or rename files.
5.1.3. Moving and renaming files
Ant’s <move> task can move files around. It first tries to rename the file or directory; if this fails, then it copies the file and deletes the originals. An unwanted side effect is that if <move> has to copy, Unix file permissions will get lost.
The syntax of this task is nearly identical to <copy>, as it’s a direct subclass of the <copy> task, so any of the examples listed in section 5.1.1 can be patched to move files instead:
<move file="readme.txt" todir="${dist.doc.dir}"/>
As with <copy>, this task uses timestamps to avoid overwriting newer files unless overwrite="true".
The <move> task is surprisingly rare in build files, as copying and deleting files are much more common activities. Its main role is renaming generated or copied files, but since <copy> can rename files during the copy process and even choose a different destination directory, there’s little need for the task.
5.2. Introducing mappers
We’ve shown how filesets can select files to copy or move, but what if you want to rename them as they’re moved? What if you want to flatten a directory so that all JAR files are copied into one single directory? These are common operations in preparing files for packaging. To do these operations you need mappers.
Ant’s mappers generate a new set of filenames from source files. Any time you need to move sets of files into a new directory hierarchy, or change parts of the filename itself, such as an extension, look for an appropriate mapper. Table 5.1 shows the built-in mapper types. They are used by <uptodate>, <move>, <copy>, <apply>, and several other tasks.
Table 5.1. Mapper types. Mappers implement file-renaming algorithms, telling tasks like <copy> how files should be renamed during the operation.
|
Type |
Description |
|---|---|
| identity | The target is identical to the source filename. |
| flatten | Source and target filenames are identical, with the target filename having all leading directory paths stripped. |
| merge | All source files are mapped to a single target file specified in the to attribute. |
| glob | A single asterisk (*) used in the from pattern is substituted into the to pattern. Only files matching the from pattern are considered. |
| package | A subclass of the glob mapper, package functions similarly except that it replaces path separators with the dot character (.) so that a file with the hierarchical package directory structure can be mapped to a flattened directory structure while retaining the package structure in the filename. |
| regexp | Both the from and to patterns define regular expressions. Only files matching the from expression are considered. |
| unpackage | Replaces dots in a Java package with directory separators. |
| composite | Applies all nested mappers in parallel. |
| chained | Applies all nested mappers in sequence. |
| filter | Applies a list of ‘pipe’ commands to each filename. |
| scriptmapper | Creates an output filename by running code in a scripting language. |
Mappers are powerful, and it’s worthwhile looking at them in detail. If a project has any need to rename files and directories or move files into a different directory tree, a mapper will probably be able to do it. Let’s explore them in some more detail.
Identity mapper
The first mapper is the identity mapper, which is the default mapper of <copy> and <move>. It’s used when a task needs a mapper, but you don’t need to do any filename transformations:
<identitymapper/>
Because it’s the default mapper of <copy>, the following declarations are equivalent:
<copy todir="new_web">
  <fileset dir="web" includes="**/*.jsp"/>
  <identitymapper/>
</copy>

<copy todir="new_web">
  <fileset dir="web" includes="**/*.jsp"/>
</copy>
It’s fairly rare to see the identity mapper because you get it for free.
The next mapper, the flatten mapper, is used when collecting files together in a single directory, such as when collecting JAR files to go into the WEB-INF/lib directory of a web application.
Flatten mapper
The flatten mapper strips all directory information from the source filename to map to the target filename. This is one of the most useful mapping operations, because it collects files from different places and places them into a single directory. If we wanted to copy and flatten all JAR files from a library directory hierarchy into a single directory ready for packaging, we would do this:
<copy todir="dist/lib">
  <fileset dir="lib" includes="**/*.jar"/>
  <flattenmapper />
</copy>
If multiple files have the same name in the source fileset, only one of them will be mapped to the destination directory—and you cannot predict which one.
Although it copies everything to a single directory, the flatten mapper doesn’t rename files. To do that, use either the glob or regexp mapper.
Glob mapper
The very useful glob mapper can do simple file renaming, such as changing a file extension. It has two attributes, to and from, each of which takes a string with a single asterisk (*) somewhere inside. The text matched by the pattern in the from attribute is substituted into the to pattern:
<globmapper from="*.jsp" to="*.jsp.bak"/>
The glob mapper is useful for making backup copies of files by copying them to new names, as shown in the following example. Files not matching the from pattern are ignored.
<copy todir="new_web">
  <fileset dir="web" includes="**/*.jsp"/>
  <globmapper from="*.jsp" to="*.jsp.bak" />
</copy>
This task declaration will copy all JSP pages from the web directory to the new_web directory with each source .jsp file given the .jsp.bak extension.
If you have more complex file-renaming problems, it’s time to reach for the big brother of the glob mapper, the regexp mapper, which can handle arbitrary regular expressions.
Regexp mapper
The regexp mapper takes a regular expression in its from attribute. Source files matching this pattern get mapped to the target file. The target filename is built using the to pattern, with pattern substitutions from the from pattern, including � for the fully matched source filename and 1 through 9 for patterns matched with enclosing parentheses in the from pattern.
Here’s a simple example of a way to map all .java files to .java.bak files. It has the same effect as the glob mapper example, shown above:
<regexpmapper from="^(.*).java$" to="1.java.bak"/>
The <copy> example for the glob mapper can be rewritten this way:
<copy todir="new_web">
  <fileset dir="web" includes="**/*.jsp"/>
  <regexpmapper from="^(.*).jsp$" to="1.jsp.bak" />
</copy>
Quite sophisticated mappings can be done with this mapper, such as removing a middle piece of a directory hierarchy and other wacky tricks. To find the pattern syntax, look up java.util.regex.Pattern in the JDK documentation.
One conversion is so common it has its own mapper: the package mapper.
Package mapper
The package mapper transforms the * pattern in its from attribute into a dotted package string in the to pattern. It replaces each directory separator with a dot (.). The result is a flattening of the directory hierarchy where Java files need to be matched against data files that have the fully qualified class name embedded in the filename. This mapper was written for use with the data files generated by the <junit> task’s XML formatter.
The data files resulting from running a test case with <junit> are written to a single directory with the filename TEST-<fully qualified classname>.xml. The package mapper lets you map from Java classnames to these files:
<packagemapper from="*.java" to="${results.dir}/TEST-*.xml" />
Another use would be to create a flat directory tree of all the source code:
<copy todir="out">
  <fileset dir="src" includes="**/*.java"/>
  <packagemapper from="*.java" to="*.java" />
</copy>
Running this target would copy a file such as src/org/d1/core/Constants.java to out/core.d1.Constants.java.
This mapper has an opposite, the unpackagemapper, which goes from dotted filenames to directory separators.
All the mappers covered so far focus on renaming individual files in a copy. Mappers can do more than this, as they can provide any mapping from source filenames to destination names. One mapper, the merge mapper, maps every source file to the same destination mapper.
Merge mapper
The merge mapper maps all source files to the same destination file, which limits its value in a <copy> operation. However, it comes in handy in the <uptodate> task. This is a task that compares a fileset of source files to a mapped set of destination files and sets a property if the destination files are as new as the source files. This property indicates that the destination files are up-to-date.
With the merge mapper, <uptodate> lets us test if an archive file contains all the latest source files:
<uptodate property="zip.notRequired">
  <srcfiles dir="src" includes="**/*.java"/>
  <mergemapper to="${dist.dir}/src.zip"/>
</uptodate>
The property will not be set if the Zip file is out of date, a fact that can be used to trigger the execution of a conditional target that will create the Zip file only on demand.
Mappers can also go the other way, generating multiple names from a single source, which lets you map a source file to multiple destinations.
Composite mapper
The composite mapper takes multiple mappers inside it and returns the result of mapping the source file to every mapper. The more source files you have, the more mapped filenames you end up with: it’s the “or” operation of mapping. Here we copy our source files to their original name and into the same directory with a .java.txt suffix:
<copy todir="dist/source">
  <fileset dir="src" includes="**/*.java" />
  <compositemapper>
    <identitymapper />
    <globmapper from="*.java" to="*.java.txt"/>
  </compositemapper>
</copy>
There’s one other mapper that takes nested mappers, the chained mapper.
Chained Mapper
The chained mapper lets you chain together a list of other mappers to create the final set of filenames. We could use this mapper to copy the source files into a flat directory using <flattenmapper>, then change the extension to .txt using the <globmapper>:
<copy todir="dist/source">
  <fileset dir="src" includes="**/*.java" />
    <chainedmapper>
      <flattenmapper/>
      <globmapper from="*.java" to="*.txt" />
    </chainedmapper>
</copy>
This is good for composing complex filename transformations.
There are a few more mappers listed in the documentation but rarely used. Chapter 18 covers one of these, the script mapper. The script mapper lets you describe the mapping logic in any scripting language that Java supports. If you have a complex renaming problem that the regexp mapper can’t handle, script mapper offers you a way to solve it without writing a new mapper in Java.
The whole mapper concept may seem a bit complex, but it gives <move> and <copy> operations complete control over the name, the location, and even the number of copied files. We can even have the tasks change the contents of the files by filtering them.
5.3. Modifying files as you go
It’s good to customize the text files that go with a library, inserting the current date and version into them. These are the files that people read, and people like to know they have the current release. We can customize text files in Ant by patching the files on the fly.
Both the <move> and <copy> tasks can be set up to act as token filters for files. These are something we introduced in section 3.6. When filtering, the tasks replace tokens in the file with absolute values. You do this by nesting a <filterset> element inside the <copy> task.
In our diary project, we have a text file called doc/readme.html with some release notes. When creating the distribution packages, we want to insert a timestamp into this file. The <copy> task can do that. Here’s the file:
<html>
  <head><title>d1 Diary Release Notes</title></head>
  <body>
    This product was built on: @DATE@ - @TIME@
  </body>
</html>
The @DATE@ and @TIME@ in the file are “tokens,” which can be replaced during the copy:
<tstamp/>
<copy todir="${dist.doc.dir}" overwrite="true">
  <fileset dir="doc" includes="**/*.html"/>
  <filterset>
    <filter token="DATE" value="${DSTAMP}"/>
    <filter token="TIME" value="${TSTAMP}"/>
  </filterset>
</copy>
The <tstamp> task sets the DSTAMP and TSTAMP properties to the current date and time. The <copy> task contains a <filterset> element, which lists each token to replace and the value to use; we get the value from the properties.
The other trick in the task declaration is that it disables dependency checking by setting overwrite="true". This is because we want the filtered copy to always overwrite the destination file, even if it exists.
Applying this filtered copy on the HTML template produces the following:
<html>
  <head><title>d1 Diary Release Notes</title></head>
  <body>
    This product was built on: 20061219 - 2248
  </body>
</html>
Adding information to a generated file is good for support because you can tell when something was built. If a project keeps version information in a properties file, the build version can also be included in the filter. Keeping this data out of text files lets you update the version in a single place and have it propagate to the documentation automatically.
Replacing text in a file can be tricky, which is why Ant’s filters search for the filter tokens within a pair of delimiters. The default delimiter is the “at” sign (@), so the filterset will only replace occurrences of @TIMESTAMP@ in the file. If you want, you can supply a new prefix and suffix in the filterset declaration. For example, to replace the string [[TIMESTAMP]] with a real timestamp, the declaration would be
<tstamp>
  <format property="timestamp.isoformat"
    pattern="yyyy-mm-dd'T'HH:mm:ss" locale="en"/>
</tstamp>

<filterset begintoken="[[" endtoken ="]]">
  <filter token="TIMESTAMP" value="${timestamp.isoformat}"/>
</filterset>
One thing you must never do is try to filter a binary file; it may get corrupted. This essentially means do not copy binary files with a filter set.
In the Ant manual, there’s a <filter> task that lets you specify a default filter for every move and copy that follows. Since this filter applies even to binary files, DO NOT USE IT! Once a global <filter> is set, you cannot copy a binary file without bad things happening.
That completes our overview of the basic file operations, <copy>, <move>, and <delete>, and the mappers and filters that can be used with them. It’s time to use the tasks to prepare our code for packaging.
5.4. Preparing to package
When preparing to distribute code, always do a clean build first. We want no relics of previous builds. Our clean target should clean up all the output directories:
<target name="clean"
  description="Deletes files generated by the build.">
  <delete dir="${build.dir}"
    defaultexcludes="false" />
  <delete dir="${dist.dir}"
    defaultexcludes="false" />
</target>
This target purges our directories of all files. We’ve opted not to set failonerror="false" on the deletions, because we’ve chosen to find out if the delete fails.
When run, the clean target guarantees that there’s nothing in the directories that Ant will build into. The <javac> task will build everything again, so the .class files in build/classes will be current. We need to accompany those files with any resources in the source tree; we do so with a <copy> action.
5.4.1. Adding data files to the classpath
Alongside the generated .class files, developers often need to include data files in the Java package hierarchy and, in so doing, copy them into the JAR. These files, which are called resources when they are on the classpath, can then be retrieved with a call to this.getClass().getResource() or getResourceAsStream(). The normal way to work with these files is to keep them all in the source directory and copy them into the compiled classes directory after compiling the Java code. First, we define a property containing the pattern to include:
<property name="source.files.tocopy"
  value="**/*.properties,**/*.dtd,**/*.xml,**/*.xsd,**/*.jpg" />
We declare this as a property for ease of reuse. For the source, we add:
<copy todir="${build.classes.dir}">
  <fileset dir="src"
    includes="${source.files.tocopy}"/>
</copy>
This target copies the data files into the build/classes directory, and so onto the classpath or into the JAR we’re about to make. Make sure the pattern includes all the files you want to distribute and none that you do not. If we include resources with our test classes, we need to do the same action, albeit with a different source and destination:
<copy todir="${test.classes.dir}">
  <fileset dir="test"
    includes="${source.files.tocopy}"/>
</copy>
We normally do this copy immediately after compiling the source, right after the <javac> task. There’s never any situation in which we would not want to copy the resources over, so having a unified target is good.
After compiling the code we need to generate the JavaDoc HTML files that both the source and binary distribution packages can redistribute.
5.4.2. Generating documentation
To create the JavaDoc files, we turn to the <javadoc> task, which offers complete access to the javadoc program. Its basic use is quite straightforward. As usual, we have to declare and create a destination directory in our init target:
<mkdir dir="${javadoc.dir}"/>
<mkdir dir="${javadoc.dir}"/>
Then we declare a new target to create the documentation.
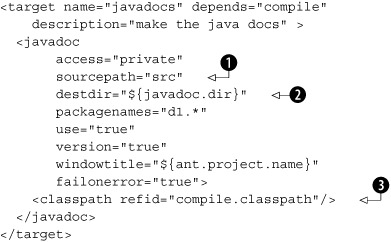
We aren’t going to cover how to use the <javadoc> task because it would take far too long. It has 50-odd parameters and over a dozen nested elements that show how complex creating the documentation can be. The underlying javadoc program has about 25 arguments; the complexity in the task is mainly to provide detailed control as to what that program does.
Fortunately, most of this stuff is irrelevant. The task needs only three things—the source directories ![]() , the destination directory
, the destination directory ![]() , and a list of files to document. It also likes the classpath used by <javac> to compile the application
, and a list of files to document. It also likes the classpath used by <javac> to compile the application ![]() .
.
The <source> nested element is where you can list the Java files to document, but specifying packages is usually much easier, especially when you can give a wildcard to import an entire tree. You can specify a package in three ways, as listed in table 5.2. For any complex project, the standard tactic is to list the packages to compile with nested <package> elements, using wildcards to keep the number of declarations to a minimum.
Table 5.2. Ways to specify packages to include. The final option, packagelist, is not usually used; it exists to make it easier to migrate from Ant.
|
Attribute/element |
Specification |
Example |
|---|---|---|
| packagenames | List of packages; wildcards OK. | packagenames="org.*,com.*" |
| <package> | One package; wildcards OK. | <package name="d1.core.*"/> |
| packagelist | File listing the packages to import. This is handed directly to the javadoc program using the @ command. | packagelist="packages.txt" |
| packages.txt= d1. d1.core |
For <javadoc> to work, it needs access to all the libraries used in the application. If the task cannot resolve references to classes, it prints out warnings and the documentation ends up incomplete. To minimize this, we pass the task the compile classpath via the classpathref attribute. By placing the <javadoc> task in a target called javadocs, with a dependency declaration of depends="compile", the task is only called when the classpath is set up and the source compiled.
One big choice to make is what level of methods and fields to document—internal versus external. We’ve set access="private" to expose everything; the other options being package, protected, and public.
Figure 5.2 shows the result: HTML pages that cover our library.
Figure 5.2. The generated API documentation

This documentation can be included in the redistributables, or served up on the team’s web site. Many projects do both.
Existing documents can be packaged as is, or get copied through a filterset to expand common tokens such as a release version. There’s one other change for some files: fixing the line endings.
5.4.3. Patching line endings for target platforms
Shell scripts and plain text documentation have one extra need: their lines must end with the appropriate line endings for the target platform. Files intended for use on Windows should have line endings; Unix files need terminators.
The task for adjusting line endings is <fixcrlf>; this task can be set to convert to the Unix ( ), MSDOS ( ), or Mac OS ( ) line endings, depending on the setting of the eol option. If that option is not set, the task defaults to setting the line ending of the local system.
For our project, we currently have only a Python script, but we may want to add some more. We’re ready for Unix and Windows scripts, with different patterns for each:
<property name="unix.scripts"
  value="**/*.sh,**/*.pl,**/*.py" />
<property name="dos.scripts"
  value="**/*.bat,**/*.cmd" />
These patterns are used in our "scripts" target, which does three things. It copies the files into the distribution directory, patches the name of the JAR file we are creating, and then fixes the line endings before finally making the Unix files executable:
<target name="scripts" depends="init">
  <copy todir="${dist.dir}" overwrite="true">
    <fileset dir="bin" includes="${unix.scripts},${dos.scripts}"/>
    <filterset begintoken="[[" endtoken ="]]">
      <filter token="TARGET.NAME" value="${target.name}"/>
    </filterset>
  </copy>
  <fixcrlf srcdir="${dist.dir}" eol="unix"
    includes="${unix.scripts}" />
  <fixcrlf srcdir="${dist.dir}" eol="dos"
    includes="${dos.scripts}" />
  <chmod dir="${dist.dir}"  perm="a+x"
    includes="${unix.scripts}" />
</target>
The <fixcrlf> task overwrites the destination files if the existing line endings don’t match those in the eol attribute. If the file is already patched, <fixcrlf> does nothing. Unless you specify a directory in the destdir attribute, this will mean it overwrites the original files.
Now, what if we want to create text files and scripts for both Windows and Unix?
Creating multiple versions for multiple targets
If you create distributions with scripts and text files that are targeted at multiple operating systems, you may need to create multiple copies of the relevant files, each with the correct line endings in the target.
Listing 5.1 shows a target that takes a readme template and creates the Unix file README and a Windows version, README.TXT, each with the appropriate line endings. This target also uses another service provided by the task, the conversion of tabs to spaces. Tab conversion lets you avoid layout surprises when the recipient views a file in an editor with different tab spacing parameters than normal.
Listing 5.1. Example target to generate Unix and Windows Readme files from the same original
<target name="fix-docs" depends="dist-docs,javadocs">
  <property name="readme.windows.file"
    location="${dist.doc.dir}/readme.txt" />
  <property name="readme.unix.file"
    location="${dist.doc.dir}/README" />
  <copy file="${readme.windows.file}"
    tofile="${readme.unix.file}"/>
  <fixcrlf eol="crlf" file="${readme.windows.file}"
    tab="remove" tablength="4" />
  <fixcrlf eol="lf" file="${readme.unix.file}"
    tab="remove" tablength="2" />
</target>
Tab conversion inside Java source files receives special treatment by <fixcrlf>. If you need to do it, look at the javafiles attribute in the documentation. We prefer to leave redistributed source untouched, as it makes it much easier to incorporate submitted patches.
Creating Javadoc files and patching text files are pretty much the limit of Ant’s built-in document processing facilities. In chapter 13, we’ll use its XML tasks to create HTML and Java source files from XML source documents, which is another way to create documentation. For anything more advanced, consider Apache Forrest.
Creating Dynamic Content with Apache Forrest
There’s another Apache project, Apache Forrest, that provides a tool to create documentation as PDF files and web pages from content written in various XML formats, such as the DocBook and OpenOffice.org formats. It uses Apache Cocoon for the XML processing, Apache Batik for rendering SVG drawings into images, and Apache FOP for creating the PDF files. The tool uses Ant to start everything off, and it includes its own version of Ant for that purpose.
Forrest is good for any project that has complex documentation requirements, because you can handwrite documents in the OpenOffice.org word processor and design graphics using an SVG editing tool, such as Inkscape. This content can be integrated with machine-generated content, all of which can be converted to HTML and PDF and published at build time or served dynamically.
Because Forrest is based on Ant, it can be integrated with an Ant-based build process. We’re not going to use Forrest, but we will point people to the web site, http://forrest.apache.org/. If you have a project with lots of documentation, investigate it.
Assuming all the documentation is ready, it’s now time to create the archives JAR, tar, and Zip.
5.5. Creating JAR files
The JAR file is the central redistributable of Java. It has derivatives, the most common of which are the WAR and EAR files for web applications and Enterprise applications, respectively. Underneath, they’re all Zip archives (figure 5.3). Zip files/archives are the ubiquitous archive files of DOS and, more recently, Windows. They can store lots of files inside by using a choice of compression algorithms, including “uncompressed.”
Figure 5.3. A UML view of the Java archives. WAR and EAR files are subclasses of the JAR file, which is itself a subclass of a Zip file class. WAR files can contain JAR libraries; EAR files can contain JAR and WAR files. JAR files contain a manifest, and usually at least some .class files.

The JAR, WAR, and EAR archives are all variations of the basic Zip file, with a text manifest to describe the file and potentially add signing information. The WAR and EAR files add standardized subdirectories to the JAR file to store libraries, classes, and XML configuration files. This can make the WAR and EAR files self-contained redistributables.
Building and manipulating JAR files is a common activity; anyone who uses Ant to build a project will soon become familiar with the <zip> and <jar> tasks. The full set of packaging tasks have the implementation class hierarchy of figure 5.4.
Figure 5.4. The implementation hierarchy of Ant’s packaging classes and tasks. The <zip>, <jar>, <war> and <ear> task hierarchy resembles that of their respective file types.

A JAR file stores classes in a simple tree resembling a package hierarchy, with any metadata added to the META-INF directory. This directory contains a manifest file MANIFEST.MF, which describes the JAR file to the classloader.
We’ve been generating JAR files since chapter 2, using the <jar> task. At its simplest, it archives an entire tree of files, usually the output of the build.
<target name="jar" depends="compile">
  <jar destfile="${dist.dir}/d1-core.jar"
       duplicate="preserve"
       compress="false">
     <fileset dir="${build.classes.dir}"/>
  </jar>
</target>
The task creates a manifest file unless you explicitly provide one. The compress attribute controls whether the archive is compressed. By default compress="true", but an uncompressed archive may be faster to load. Compressed files do download faster, however.
The current preferred practice for libraries is to create an archive filename from a project name along with a version number in the format d1-core-0.1.jar. This lets users see at a glance what version a library is. We can support this practice with some property definitions ahead of the jar target:
<property name="project.name" value="${ant.project.name}" />
<property name="project.version" value="0.1alpha" />
<property name="target.name"
  value="${project.name}-${project.version}.jar" />
<property name="target.jar"
  location="${dist.dir}/${target.name}" />
Ant automatically defines the property ant.project.name from the <project> declaration in the build file; we reassign this property to a new property to give developers the opportunity to pick a different name. The project version is also something we want to allow for easy overrides. To create the JAR file, we use the target.jar property to pass its name to the destfile attribute:
<target name="jar" depends="compile">
  <jar destfile="${target.jar}"
       duplicate="preserve"
       compress="true">
     <fileset dir="${build.classes.dir}"/>
  </jar>
</target>
This target will now create the JAR file dist/diary-core-0.1alpha.jar. The <jar> task is dependency-aware; if any source file is newer than the JAR file, the JAR is rebuilt. Deleting source files doesn’t constitute a change that merits a rebuild; a clean build is needed to purge those from the JAR file.
There is an update attribute that looks at dependencies between source files and files stored inside the archive. It can be used for incremental JAR file updates, in which only changed files are updated. Normally, we don’t bother with things like this; we just rebuild the entire JAR when a source file changes. JAR creation time only becomes an issue with big projects, such as in EAR files or WAR files.
One thing that is important is that all the <jar> targets in this book have duplicate="preserve" set. The duplicate attribute tells Ant what to do when multiple filesets want to copy a file to the same path in the archive. It takes three values
- add: silently add the duplicate file. This is the default.
- preserve: ignore the duplicate file; preserve what is in the archive.
- fail: halt the build with an error message.
The default option, add, is dangerous because it silently corrupts JAR files. Ant itself will ignore the duplicate entry, and so will the JDK jar program. Other tools, such as the javac compiler, aren’t so forgiving, and will throw an IndexOutOfBounds-Exception or some other obscure stack trace if they encounter duplicate entries. If you don’t want to have users of your application or library making support calls, or want to waste mornings trying to track down these problems in other people’s libraries, change the default value! The most rigorous option is fail, which warns of a duplication; preserve is good for producing good files without making a fuss.
Once created, we need to check that the JAR file contains everything it needs.
5.5.1. Testing the JAR file
Just as there’s a <jar> task, there’s an <unjar> task to expand a JAR, a task which is really an alias of <unzip>. The task expands the Zip/JAR file into a directory tree, where you can verify that files and directories are in place either manually or by using the <available> and <filesmatch> conditions. Graphical tools may be easier to use, but they have a habit of changing the case of directories for usability, which can cause confusion. WinZip is notorious for doing this, making any all-upper-case directory lower-case and leading to regular bug reports in Ant, bug reports that are always filed as “INVALID”.[1]
1 There is an online bug reporting system for Ant, but all the developers are working in their spare time, for free. INVALID and WORKSFORME are two ways defects can be closed. If your bug report gets closed this way, don’t take it personally.
<target name="unjar" depends="dist" >
  <unjar
     src="${target.jar}"
     dest="${build.dir}/unjar"/>
</target>
The <unjar> task takes a source file, specified by src, and a destination directory, dest, and unzips the file into the directory, preserving the hierarchy. It’s dependency-aware; newer files are not overwritten, and the timestamp of the files in the archive is propagated to the unzipped files.
You can selectively unzip parts of the archive, which may save time when the file is large. To use the task to validate the build process after the archive has been unzipped, you should check for the existence of needed files or, perhaps, even their values:
<target name="test-jar" depends="jar" >
  <property name="unjar.dir"
    location="${build.dir}/unjar"/>
  <unjar
    src="${target.jar}"
     dest="${unjar.dir}">
     <patternset>
       <include name="d1/**/*"/>
     </patternset>
   </unjar>
  <condition property="jar.uptodate">
    <filesmatch
     file1="${build.classes.dir}/d1/core/Event.class"
     file2="${unjar.dir}/d1/core/Event.class"
     />
  </condition>
  <fail unless="jar.uptodate" message="file mismatch in JAR"/>
</target>
Here we expand classes in the archive and then verify that a file in the expanded directory tree matches that in the tree of compiled classes. Binary file comparison is a highly rigorous form of validation, but it can be slow for large files.
To be honest, we rarely bother with these verification stages. Instead, we include the JAR file on the classpath when we run our unit tests. This is the best verification of them all. If we left something out of the JAR, the unit tests will let us know. We’ll modify our test run to do this in section 5.6, once the JAR file has the manifest and a signature.
5.5.2. Creating JAR manifests
The <jar> task creates a JAR manifest if needed. It will contain the manifest version and the version of Ant used to build the file:
Manifest-Version: 1.0
Ant-Version: Apache Ant 1.7
Created-By: 1.5.0_09 (Sun Microsystems Inc.)
Sometimes this isn’t enough, such as when you want to specify the default entry point of the JAR or add version information to the manifest, as is covered in the JDK document Java Product Versioning Specification. You also need to provide a manifest if you want to add extension libraries, following the even more complex Java extension specification Extension Mechanism Architecture.
Adding a manifest to the JAR file is trivial; point the manifest attribute of the task at a predefined manifest file:
<target name="dist-with-manifest"
  depends="compile"
    description="make the distribution" >
   <jar destfile="${jarfile.path}"
       duplicate="preserve"
       index="true"
       manifest="src/META-INF/MANIFEST.MF">
     <fileset dir="${build.classes.dir}"/>
  </jar>
</target>
This target needs a manifest file here in src/META-INF/MANIFEST.MF

The Sealed: true entry in the manifest marks non-empty packages as sealed ![]() . The classloader won’t allow any other JAR files to contain classes in the d1.core package, not even our own test classes. They are allowed in their own package under d1.core, which is why the test classes are defined in the d1.core.test package. We’ve set our default entry point to a diagnostics class
. The classloader won’t allow any other JAR files to contain classes in the d1.core package, not even our own test classes. They are allowed in their own package under d1.core, which is why the test classes are defined in the d1.core.test package. We’ve set our default entry point to a diagnostics class ![]() .
.
When Ant runs the <jar> task, it will parse and potentially correct the manifest before inserting it into the JAR file. If the manifest is invalid, you’ll find out now, rather than when you ship.
This process has one weakness: someone has to create the manifest first. Why not create it during the build process, enabling us to use Ant properties inside the manifest? This is where the <manifest> task comes in.
<target name="jar-dynamic-manifest"
    depends="compile" >
  <property name="manifest.mf"
    location="${build.dir}/manifest.mf" />
  <manifest file="${manifest.mf}" >
    <attribute name="Built-By" value="${user.name}"/>
    <attribute name="Sealed" value="true"/>
    <attribute name="Built-On" value="${timestamp.isoformat}"/>
    <attribute name="Main-Class" value="${main.class}"/>
  </manifest>
  <jar destfile="${target.jar}"
    duplicate="preserve"
    manifest="${manifest.mf}">
    <fileset dir="${build.classes.dir}"/>
  </jar>
</target>
The outcome of this task will be something like the following manifest, although the exact details depend on who created the file, when they created it, and the version of Ant and Java used:
Manifest-Version: 1.0
Ant-Version: Apache Ant 1.7
Created-By: 1.5.0_09 (Sun Microsystems Inc.)
Built-By: stevel
Sealed: true
Built-On: 2006-12-20T00:15:28
Main-Class: d1.core.Diagnostics
For complex manifests, the task can create manifest sections, using the <section name="..."> nested element, which can contain attributes and values of a separate section in the manifest. The task can also be used as an element inside the <jar> task, avoiding the need to save the manifest to a temporary file. We prefer the stand-alone action, as it’s easier to examine the generated content.
Another recurrent bug report raised against Ant is that “<jar> wraps long manifest entries,” usually related to the classpath attribute. The task follows the specification to the letter, especially the rule “No line may be longer than 72 bytes.” If you encounter a problem with something failing to parse a manifest, and the cause is wrapped lines, then it is usually the third-party application that’s at fault.
Note
Ant’s <jar> task creates manifest files that follow the specification exactly, and fixes up any supplied manifest where appropriate. This is exactly what you want, except in the special case where the system reading the manifest doesn’t comply with the specification. Some mobile phones with J2ME runtimes suffer from this problem. If you want a handwritten manifest in the JAR, without any changes, use the <zip> task instead of <jar>.
The MANIFEST.MF file is the main piece of metadata JAR files use. Sometimes you may need to add extra content to the META-INF directory, alongside the manifest, which the <jar> task can cope with.
5.5.3. Adding extra metadata to the JAR
There’s a nested fileset element, <metainf>, which lets you specify the metadata files to add to the JAR.
<jar destfile="${target.jar}"
  duplicate="preserve"
  manifest="src/META-INF/MANIFEST.MF">
  <fileset dir="${build.classes.dir}"/>
  <metainf dir="src/META-INF/"/>
</jar>
We still declared the manifest file, even though the <metainf> element appeared to import the manifest. There’s special handling in the <jar> task of manifest files that it encounters in any fileset: it silently skips them. There’s an attribute, fileset-manifest, that lets you control this behavior: skip, merge, and merge-withoutmain are the three options. If you need to merge manifests, look at this attribute. Otherwise, we recommend explicit naming of the manifest, rather than relying on merging possibly taking place.
5.5.4. JAR file best practices
There are four things to consider for better <jar> tasks:
- Copy all the files you want to include in the JAR into one place before building. This makes it easier to see what will be included.
- Create your own manifest, either in a file or in Ant, and explicitly ask for it with the manifest attribute. If you leave it to the <jar> task, you get a minimal manifest.
- Always set duplicate="preserve". It keeps duplicate entries out of a file and avoids possible problems later on.
- Finally, and arguably most importantly, give your libraries a version number at the end.
When we get into repository-based downloading, in chapter 11, you’ll see how version-labeled JAR files can be used. It pays off in your own project the moment you start trying to track down bugs related to versions of libraries. If every JAR file has a version, including your own, it’s much easier to replicate a problem.
Now that we’ve built the JAR, we can sign it.
5.5.5. Signing JAR files
Signing is useful when you redistribute stuff through Java Web Start or by other means. It doesn’t take much effort to add signing support, but it’s important to start doing it early on. Signed JAR files are loaded slightly differently, with the classloader preventing other JAR files from declaring classes in the same packages. It’s important, therefore, to start signing early on—even if the key is made up just for the purpose. It avoids our creating fundamental design errors that only show up later on in the project.
To sign JAR files, we need a public/private key pair in a password-protected keystore, and Ant will need that password. One thing you don’t want to do is put that in the build file itself—anyone with access to the source repository will see it. This isn’t what you want in your build file:
<property name="keystore.password" value="secret" />
Instead, you need the <input> task to prompt the user.
<target name="get-password" >
  <input addproperty="keystore.password" >password for
 keystore:</input>
  <echo level="verbose">password = ${keystore.password}</echo>
</target>
This task pauses the build with a prompt; the user then has to enter a string. In a -verbose run, we echo this back:

The task has two problems. First, it doesn’t work properly in older IDEs or in automated builds, but we can work around that. More seriously, the string you type in gets echoed to the console. Anyone looking over your shoulder can see the password. We cannot avoid this, not until Ant adds a Java 6-specific input handler
![]()
For unattended builds, you need to know that <input> doesn’t halt with a prompt if the property is already set. If we define the property in a properties file that’s not in your SCM system and that’s protected from all other users, we can read it in before the <input> task, and so skip the prompt. Here we use ${user.home}/.secret, a location which is restricted to the user on a Windows NTFS file system. For Unix, we want to make it readable only by us. For that, we declare a <chmod> operation to lock it down. This task runs the chmod program to set file or directory permissions, but only on platforms that support it. On Windows, it’s a harmless noop. We look for a keystore.properties file in this directory and save the keystore there to keep it private:
<target name="init-security">
  <property name="keystore.dir" location="${user.home}/.secret" />
  <mkdir dir="${keystore.dir}" />
  <chmod file="${keystore.dir}" perm="700"/>
  <property name="keystore"
     location="${keystore.dir}/local.keystore" />
  <property file="${keystore.dir}/keystore.properties" />
  <property name="keystore.alias" value="code.signer"/>
</target>
After changing the get-password target to depend upon this new init-security target, the file keystore.properties will be read before the <input> operation. If we put the relevant declaration in there (keystore.password=hidden. secret), this is what we see at input time:
get-password:
    [input] skipping input as property keystore.password
            has already been set.
     [echo] password = hidden-secret
The <chmod> task is encountered very rarely in Ant projects. Because Java 5 and earlier has no API to read or write Unix file permissions, all of Ant’s file operations drop their values. This includes <copy> as well as the <tar> and <zip> tasks we’ll cover in section 5.8. For this reason, <zip> and <tar> offer ways to declare the permission on files in the archives. If you want to set permissions on a local file, <chmod> must be the last Ant task to manipulate the file.
With the password in a property, we’re nearly ready to sign the JAR. We just need a certificate and the <signjar> task. First, the certificate.
Generating a signing key
To authenticate JARs in a Java runtime, you have to buy a certificate from one of the approved vendors. For testing purposes or for private use, you can generate a self-signed certificate using Sun’s keytool tool, which Ant wraps up into the <genkey> task. This task adds a key into a keystore, creating the store if needed:
<target name="create-signing-key" depends="get-password">
  <genkey
    alias="${keystore.alias}"
    keystore="${keystore}"
    storepass="${keystore.password}"
    validity="366" >
    <dname>
      <param name="CN" value="autosigner"/>
      <param name="OU" value="Steve and Erik"/>
      <param name="O"  value="Apache Software Foundation"/>
      <param name="C"  value="EU"/>
    </dname>
  </genkey>
</target>
This task creates a new alias in the keystore, with a certificate that’s valid for 366 days. Although these keys are cryptographically sound, tools such as the Java Web Start don’t trust them. If you’re verifying JAR files in your own application, you’re free to use self-generated keys, and within an organization or community you may be able to convince end users to add your certificate (or private certification authority) to the trusted list.
What we can do with an untrusted key is sign the JAR and verify that our application works with signed JAR files and the classloader complications that follow.
Signing the file
The <signjar> task signs JAR files. It checksums all the entries in the file, signs these checksums, and adds them to the manifest. It also adds signature information to the META-INF directory in the JAR file. The task needs the location and the password of the keystore file, and the alias and any optional extra password for the signature itself. It will then modify the JAR file in place by invoking the jarsigner tool in the JDK:
<target name="sign-jar" depends="jar,get-password">
  <signjar jar="${target.jar}"
    alias="${keystore.alias}"
    keystore="${keystore}"
    storepass="${keystore.password}" />
</target>
Our manifest now contains digest signatures of the classes inside the JAR, and there are new files in the META-INF directory, including the public certificate of the generated pair. The <signjar> task can bulk sign a set of JAR files, using a nested fileset element. It also performs basic dependency checking, by not attempting to sign any files that are already signed by the user. It doesn’t check to see if the file has changed since the last signing. This means that you should not mix JAR signing with incremental JAR creation: the update flag in the <jar> task must remain at false.
Java behaves differently with signed JARs, and some applications can break. To be sure that this has not happened, we must take the signed JAR file of the diary classes and run our existing tests against it.
5.6. Testing with JAR files
Running JUnit against a signed JAR file, rather than the raw classes, lets us test more things. It lets us test that the classes were added to the JAR file, that we’ve remembered to add any resources the application needs, and that the signing process has not broken anything. It also lets us state that the tests were run against the redistributables, which is something to be proud of.
It is very easy to test against the JAR file. Recall that in chapter 4, we set up our classpath for compiling and running tests like this:
<path id="test.compile.classpath">
  <path refid="compile.classpath"/>
  <pathelement location="${build.classes.dir}"/>
</path>
We need to change one line to run against the generated JAR file:
<path id="test.compile.classpath">
  <path refid="compile.classpath"/>
  <pathelement location="${target.jar}"/>
</path>
We also have to declare that the test targets depend upon the JAR file being created:
<target name="test-init" depends="sign-jar">
As all the test targets, including test-compile, depend upon this test-init target, we are now set up to compile and run the tests against the JAR file.
To verify everything works, run ant clean test. As clean builds are usually fast, don’t be afraid to run them regularly.
Since the tests still appear to be working, we can say that we’ve finished our process of generating the JAR file. Next comes redistributing the JAR file inside Zip and tar packages.
5.7. Creating Zip files
Ant creates Zip files as easily as it creates JAR files, using <jar>’s parent task, <zip>. All attributes and elements of <zip> can be used in <jar>, but the JAR-specific extras for the manifest and other metadata aren’t supported. What the <zip> and <jar> tasks support is the <zipfileset> element. The <zipfileset> extends the normal fileset with some extra parameters, as listed in table 5.3. It lets you add the contents of one Zip file to another, expanding it in the directory tree where you choose, and it lets you place files imported from the file system into chosen places in the Zip file. This eliminates the need to create a complete directory tree on the local disk before creating the archive.
Table 5.3. Extra attributes in <zipfileset> compared to a <fileset>
|
Attribute |
Meaning |
|---|---|
| prefix | A directory prefix to use in the Zip file |
| fullpath | The full path to place the single file in archive |
| src | The name of a Zip file to include in the archive |
| encoding | The encoding to use for filenames in the Zip file; default is the local encoding |
| filemode | Unix file system permission; default is 644 |
| dirmode | Unix directory permission; default is 755 |
The last two attributes let you declare the Unix file permissions. The values are interpreted by the Info-ZIP implementations of the zip and unzip programs that are common on Unix and Linux systems. In theory, you could set the permissions for executables and files, and when unzipped on the command line, they would be set.
We tend to use the tar file format when setting permissions, but that could just be a historical quirk of ours. If you create a Zip file with permissions, you may not need to make a tar file at all.
Planning the redistribution
To create the Zip file in our build, the first step is to define the names of the new output files. We use the plural, as we plan to create two files for distribution: a binary redistributable and a source edition. We do so by adding properties to the start of the project, declaring a full path to each Zip file.
First, we realize that the combination of project-name and version is going to be used so often it needs factoring into its own property
<property name="project.name-ver"
  value="${project.name}-${project.version}"
Then we create properties naming both the Zip files we’re about to create
<property name="target.zip"
  location="${dist.dir}/${project.name-ver}.zip" />
<property name="src.zip"
  location="${dist.dir}/${project.name-ver}-src.zip" />
These files will be fed into the tasks to create the Zip files and follow-on tasks that will expand the same files for testing. There are two Zip files to create—binary and source—with two targets.
5.7.1. Creating a binary Zip distribution
Our binary distribution contains the project’s JAR file, all the documentation, and any scripts in the bin directory. Listing 5.2 contains the target to do this.
Listing 5.2. Creating a binary Zip distribution
<target name="create-bin-zipfile" depends="sign-jar,fix-docs"
  description="create the distributable for Windows">
  <zip destFile="${target.zip}"
    duplicate="preserve">
    <zipfileset file="${target.jar}"
      prefix="${project.name-ver}" />
    <zipfileset dir="${dist.doc.dir}"
      includes="**/*"
      prefix="${project.name-ver}/docs" />
    <zipfileset dir="${javadoc.dir}"
      includes="**/*"
      prefix="${project.name-ver}/docs/api" />
  </zip>
</target>
This target depends on the signed JAR created in the "sign-jar" target of section 5.5.5 and the "fix-docs" target of section 5.4.3. We want the signed JAR and the documents that were patched with DOS file endings.
We’ve given every zipfileset the prefix of the project name and version. This is the Unix tradition: the redistributable should expand into a directory containing the name and title of the project. This is very useful for having versions of programs side by side, which is why it’s a common technique.
To verify that this task works, we create a target to unzip the file:
<property name="unzip.dir" location="${build.dir}/unzip" />
<property name="unzip.bin.dir" location="${unzip.dir}/bin" />

<target name="unzip-bin-zipfile" depends="create-bin-zipfile">
  <unzip src="${target.zip}" dest="${unzip.bin.dir}" />
</target>
The result should be that the contents of the file are unzipped into the directory build/unzip/bin/diary-core-0.1alpha. We could go on to test using the same techniques for verifying that JAR worked: either with <available> tests or, better, by using the unzipped files in the next stage of the project.
Our Zip file is ready for redistribution. If we depended on other libraries we’d have to include them as another <zipfileset> in the <zip> target and then worry about the license implications. If you use a GPL- or LPGL-licensed library, this is where you discover whether its license applies to your own code.
Hand in hand with the binary distribution goes the source distribution.
5.7.2. Creating a source distribution
In the open-source world, there’s often little difference between source and binary distributions. In closed-source software there is a difference, but the source is still regularly distributed, just not as broadly.
A source-only distribution contains the source tree and the build file(s); the recipient has to compile everything. Open-source projects may want to consider a single distribution containing the source and the binaries, delivering a quick start from the JAR files, yet offering the opportunity of editing the source to all users.
We’re going to include the JAR file; then the components for our source build file become clear. They are: the source, test, and documentation directory trees; the build file; and the binary Zip file itself:
<target name="create-src-zipfile" depends="sign-jar">
  <zip destfile="${src.zip}"
    duplicate="preserve">
    <zipfileset file="${target.jar}"
      prefix="${project.name-ver}" />
    <zipfileset dir="."
      includes="src/**,test/**,doc/**,*.xml"
      prefix="${project.name-ver}" />
  </zip>
</target>
The result is a file that runs out of the box but which contains the entire source and, of course, the build file. We can verify this by unzipping the file:
<target name="unzip-src-zipfile" depends="create-src-zipfile">
  <unzip src="${src.zip}" dest="${build.dir}/src" />
</target>
There’s one little extra trick we can do to validate a source distribution: we can run Ant in it and verify that it works. This is wonderfully recursive; however, it uses the <ant> task, which will not be formally introduced until chapter 10. At the risk of a forward reference, here’s the target to run the unzipped copy of our own build file:
<target name="validate-src-zipfile" depends="unzip-src-zipfile">
  <ant dir="${build.dir}/src/${project.name-ver}"
    antfile="core-chapter5.xml"
    inheritall="false" >
    <propertyset>
      <propertyref prefix="keystore"/>
    </propertyset>
  </ant>
</target>
There’s some magic there to deal with passing down the password and other signing information, which is where the <ant> task gets complicated and why we won’t return to it for five more chapters.
5.7.3. Zip file best practices
Here are some tips to make creating Zip files easier:
- Copy all files you want to include in the JAR into one place before building. This makes it easier to test that the needed files have been copied.
- Don’t distribute JAR files with a .zip extension—it causes confusion.
- Use the <zipfileset> element for more control over the entries in the Zip file.
- Create a subdirectory for everything, with the name and version of the project. This is what files will be unzipped into.
- Set the attribute duplicate="fail" or duplicate="preserve" to handle duplicate entries more robustly.
- Include the Unix documents and scripts alongside the Windows ones. Set the permissions for these scripts in a <zipfileset>, even if you cannot rely on them being set by the unzip programs.
Zip is a good format for distributing Java packages. Everything that runs Java can expand the files by using the jar tool if need be, and they’re supported on Windows, Unix, and other platforms. Even so, there’s some value in producing Unix-specific source and binary distribution packages, which Ant can do as easily as it can create a Zip file.
5.8. Packaging for Unix
The preferred archive format for Unix systems is the tar file, while many Linux distributions can install RPM or .deb packages. Projects may want to produce these files alongside .zip distributions. Doing so makes the files more acceptable to Unix users. It also can give you some statistics that measure Unix and Linux package downloads alongside Windows ones if you’re distributing via a web site that collects download statistics.
The main format to consider is the tar file.
5.8.1. Tar files
Tar files are the classic distribution format of Unix. The archive includes not only the folder hierarchy, but also the file permissions, including the files that are executable. A version of the tar program can be found on every Unix platform, and it’s even cross-compiled for Windows. Ant can create tar files, including permissions, using its <tar> task. This task takes an implicit fileset with attributes such as includes and excludes to control which files to include. We prefer a more verbose and explicit policy of listing filesets as nested elements. This is more than simply a style policy for better maintenance; it’s a way of having more control over the build. At the same time, we want to minimize maintenance. Although we could create the tar file by copying fileset declarations from the <zip> task of listing 5.2, we do not want to do that. That would force us to keep both the tar and Zip processes synchronized, or else we may accidentally leave something out of a distribution. Also, we can’t reference <zipfileset> declarations inside the <tar> task. So how can we reuse all the Zip file work to create a tar file?
Well, after creating the Zip distribution, we unzipped it, to verify it was all there. What if we were to create a tar file from that directory tree, adding file permissions as we go? That might seem like cheating, but from the extreme programming perspective, it’s exactly the kind of lazy coding developers should be doing. Listing 5.3 shows the target that we use to create the archive of the binary distribution, giving shell scripts execute permissions as we do so.
Listing 5.3. Creating a tar file from our expanded Zip file
<property name="target.tar"
  location="${dist.dir}/${project.name-ver}.tar" />

<target name="create-bin-tar"
  depends="unzip-bin-zipfile">
  <tar destfile="${target.tar}"
    longfile="gnu">
    <tarfileset dir="${unzip.bin.dir}"
      excludes="${executables}" />
    <tarfileset dir="${unzip.bin.dir}"
      includes="${executables}"
      filemode="755"/>
  </tar>
</target>
![]()
The <tar> task extends the usual <fileset> element with the <tarfileset>: a fileset with filemode and dirmode attributes for Unix permissions. The file permission is in the base-8 format used in Unix API calls. The default permission is 644 (read/write to the owner, read to everyone else), and the default identity is simply the empty string. A mask of 755 adds an executable flag to this permission list, whereas 777 grants read, write, and execution access to all. The <tarfileset> element also supports the prefix element found in <zipfileset>, which lets you place files into the archive in a directory with a different name from their current directory. If you want to set user and group names and identities, <tarfileset> has four attributes of relevance, as shown in table 5.4.
Table 5.4. Attributes in a <tarfileset> to set the user and group owners of files
|
Meaning |
example |
|
|---|---|---|
| username | user name as a string | "mysql" |
| group | group name as a string | "users" |
| uid | decimal user ID | "60" |
| gid | decimal group ID | "100" |
We normally ignore these options, worrying only about file permissions. First, we include everything but the executable files with default permissions, then we include the executable files with the relevant mask. We must not include the executables in the first fileset, because if we did, the files would be included twice with unpredictable results.
Problems with tar files
The original tar file format and program doesn’t handle very long path names. There’s a 100-character limit, which is easily exceeded in any Java source tree. The GNU tar program supports longer filenames, unlike the original Unix implementation. You can tell the <tar> task what to do when it encounters this situation with its longfile attribute, which takes any of the values listed in table 5.5.
Table 5.5. Values for the longfile attribute. Although optional, setting this attribute shows that you have chosen an explicit policy. Of the options, fail, gnu, and warn make the most sense.
|
Longfile value |
Meaning |
|---|---|
| fail | Fail the build |
| gnu | Save long pathnames in the gnu format |
| omit | Skip files with long pathnames |
| truncate | Truncate long pathnames to 100 characters |
| warn | Save long pathnames in the gnu format, and print a warning message [default] |
If you choose to use the GNU format, add a warning note on the download page about using GNU tar to expand the library. Also, tell whomever deals with support calls about the issue, because not enough people read the documentation. The usual sign is a bug report about missing source files, primarily on Solaris, AIX, or HP/UX. The problem never surfaces on Linux, as GNU tar is the only tar tool there.
Tar files are also a weak format for sharing, because they’re uncompressed, and so can be overweight compared to Zip files. This issue is addressed by compressing them.
Compressing the archive
Redistributable tar files are normally compressed by using either the gzip or bzip2 algorithms as .tar.gz and .tar.bz2 files, respectively. This process is so ubiquitous that the GNU tar tool has the options --gzip and --ungzip to do the .gz compression and decompression, along with the tar creation or extraction operations.
Ant can compress the .tar file by using the <gzip> and <bzip2> tasks:
<property name="target.tar.gz"
  location="${target.tar}.gz"/>
<property name="target.tar.bz2"
  location="${target.tar}.bz2"/>

<target name="compress-tar" depends="create-bin-tar">
  <gzip src="${target.tar}"
    destfile="${target.tar.gz}"/>
  <bzip2 src="${target.tar}"
    destfile="${target.tar.bz2}"/>
</target>
Apart from the different compression algorithms, the <gzip> and <bzip2> tasks behave identically. They take a single source file in the src attribute and an output file in either the destfile or zipfile attribute. When executed, these tasks create a suitably compressed file whenever the destination file is absent or older than the source.
We do, of course, have to check that the compressed tar file is usable. Ant has a task called <untar> to reverse the tar operation, and others called <gunzip> and <bunzip2> to uncompress the files first. You can use these tasks to verify that the redistributable files are in good condition. For example, here’s the .tar.gz file expanded into a directory tree:
<property name="untar.dir" location="${build.dir}/untar" />

<target name="untar-bin.tar.gz" depends="compress-tar">
  <mkdir dir="${untar.dir}" />
  <gunzip src="${target.tar.gz}"
    dest="${untar.dir}" />
  <untar src="${untar.dir}/${project.name-ver}.tar"
    dest="${untar.dir}" />
</target>
Because Ant doesn’t set permissions on untarred files, these tasks aren’t quite as useful as Unix and GNU gunzip and tar commands.
Projects have to be ruthless and ask if creating tar files is worth the effort, or if using a Zip file is adequate. Every project will have to answer this for itself. Simple projects should find that Zip files are an adequate cross-platform redistributable, especially if you’re targeting other Java users. Creating tar files is an act of political correctness: Unix users may expect it, and the JPackage group (see below) likes to use it as a starting place for its RPM files.
Projects should always create Zip files. Not only are they the only files that work on Windows, every JDK comes with the jar tool. Therefore, wherever there’s a JDK, there’s a way to expand the file. Tar files, on the other hand, are an optional extra.
The other important file format is the Linux RPM package.
5.8.2. Generating RPM packages
Closing the subject of packaging for Linux, we note that there’s a task, <rpm>, that runs the RedHat Package manager, generating an RPM file. These are files that can be installed by using the application management tools of RedHat, SuSE, and other RPM-based Linux distributions.
The authors never use <rpm>, because we don’t create RPM packages. It’s a personal choice. The RPM format is great for managing native programs on Linux. But only system administrators can install RPM files, and they affect the whole system. In Java, it’s a lot easier to have personal installations with personal copies of all needed JAR files, even private JREs for separate projects. You don’t often need system-wide installation on a self-managed box.
The JPackage project team (http://jpackage.org/) has a different opinion on the matter. They’re trying to integrate Java projects with Linux distributions. If you want to start creating RPM files, look at what they do and join their mailing list. You should also be aware that recent Linux distributions often include the JPackage artifacts, which can be a help or a hindrance depending on how you adapt to them. Consult the JPackage team for its advice on how to redistribute JPackage-friendly code, especially if you want to integrate with Linux distributions or management tools.
Together, the JAR, Zip, and tar files form the core of Ant’s packages. JAR is universal, as most projects create JAR files of one form or other. The other archives are more for redistribution.
There’s one more thing we can do with all these archives, and that is read the data back. Tasks like <unzip>, and <untar> can expand the entire archives, but that’s sometimes a bit of overkill. What if we just need to get one file from inside a JAR and feed it into another task? Do we really have to create a temporary directory, expand the JAR, pass the file reference, and remember to clean up afterwards? Isn’t there an easier way?
There is an easier way: Ant resources.
5.9. Working with resources
![]()
Back in section 3.11 we mentioned that Ant 1.7 retrofitted Ant with a coherent model behind <filesets>, <filelists>, and other resources, but we didn’t provide any more details. Now it’s time to explore the topic, since our project has things like JAR, Zip, and tar files. Why? Because these files can contain Ant resources.
5.9.1. A formal definition of a resource
We’re going to peek under the covers of Ant for a moment and describe what a resource is in terms of Java classes and interfaces.
![]()
1. The org.apache.tools.ant.types.resources package contains the base classes and interfaces that define resources.
2. A resource is anything that can act as a source and possibly a destination for reading and writing data. Some resources are touchable, meaning they implement the Touchable interface with its method touch() to set the time of the resource.
3. Files, URLs, and files inside Zip and tar archives are some of Ant’s built-in resource types.
4. A resource collection is anything that acts as a container for resources. Formally, it is any datatype that implements the ResourceCollection interface, with its methods size(), iterator(), and isFileSystemOnly(). Filesets are one such resource collection.
5. The Resource class itself claims to be a ResourceCollection with one resource—itself.
6. A resource-enabled task is a task that’s been written or updated to support resources and/or resource collections. Many such tasks accept resource collections that refer to only those resources that are in the local file system—that is, whose isFileSystemOnly() test returns true.
From the build file perspective, this means there’s a new way of defining a data source or destination—resources and resource collections. These collections can be used in resource-enabled tasks that no longer have to care where or how the data gets into the task. You can feed the contents of a property to a task as easily as pointing it at a file.
From a packaging perspective, there are built-in resources to access the individual entries in a JAR, Zip, or tar archive. These resources enable build files to access files inside the archives without expanding them.
5.9.2. What resources are there?
Table 5.6 lists the built-in resources. These resources can be passed directly to any resource-enabled task, or grouped into a resource collection. Every resource is something that can act as a source of data. Some can act as output streams; those that are touchable can be used in the <touch> task to set their timestamps.
Table 5.6. Ant’s built-in resources
|
Resource name |
Description |
Access |
|---|---|---|
| <resource> | The base of all resources | only if implemented in derivatives |
| <bzip2resource> | Dynamically compresses/uncompresses a nested resource | read/write |
| <file> | A normal file or a directory | read/write |
| <gzipresource> | Dynamically compresses/uncompresses a nested resource | read/write |
| <javaresource> | Anything that can be loaded off a classpath, such as class or property files | read-only |
| <property> | A resource view of an Ant property | writeable once |
| <stringentry> | A string whose contents act as the input stream | read-only |
| <tarentry> | Anything inside a tar file | read-only |
| <url> | A URL to remote data | read/write |
| <zipentry> | Anything inside a Zip file | read-only |
The <file> resource is nothing special, but the <javaresource>, <zipentry>, and <tarentry> resources are new: they let you refer to something inside an archive or classpath, and they feed it directly to a task. The <property> and <stringentry> resources make it possible to generate source data in Ant without having to <echo> into a file. The <url> resource lets you use any URL that the Java runtime supports as a source of data.
To actually use any of these resources, you need to declare them inside a resource collection, which is an Ant datatype that supports nested resources.
5.9.3. Resource collections
Resources can be collected into resource collections, and this is where it gets interesting. Some of the resource collections are things that we’ve already encountered: <fileset>, <filelist>, <path>, <zipfileset>, and <tarfileset>. These resource collections are essentially different ways to describe a set of resources to a task. The best bit comes when you look at the ability to restrict, combine, and sort resources.
Table 5.7. Resource collections: ways to group resources
|
Resource collection name |
Description |
|---|---|
| <resources> | A collection of resources of arbitrary type. |
| <filelist> | An ordered list of file resources. |
| <files> | A collection of files—essentially a <fileset> without the basedir attribute. |
| <fileset> | The ubiquitous <fileset> datatype. All filesets have a base directory and contain a list of file resources. |
| <path> | The <path> type: a list of file resources. |
| <tarfileset> | Things in a tar file: <file> or <tarentry> resources. |
| <zipfileset> | Things in a Zip or JAR file: <file> or <zipentry> resources. |
| <difference> | Examines multiple resource collections and returns only those that appear in one collection. |
| <intersect> | Returns the intersection of two or more resource collections. |
| <restrict> | Restricts another collection by selection criteria. Restrictions include resource name, existence, size, modified date, and others. |
| <sort> | Sorts a set of resources. Sort comparisons can be on attributes of the resource or its actual content. |
| <tokens> | String tokens extracted from nested resources. |
| <union> | Merges resource collections into a larger one. |
The <union>, <difference>, and <intersect> collections provide the classic set operations to resource collections nested or referred to inside them.
To summarize where we are so far: resources represent sources (and sometimes destinations) of data; they can be aggregated in resource collections. The built-in resources can refer to files, strings, properties, or files stored inside packaged tar or Zip files. We can use the resource collections to access these resources.
Making use of resources
To use resource collections, you declare them inside a resource-enabled task. In an ideal world, you wouldn’t need to differentiate between filesets, paths, filelists, and other collection types—you’d just pass them to a task. Nor would you worry about whether source files for <javac> compile or an <xslt> transformation came from local files, entries inside a Zip archive, or from remote http:// URLs. This ideal world doesn’t exist.
![]()
A unified model of resources is new to Ant, and it’s only gradually being added to Ant’s tasks. Many tasks can work only with files or resource collections that contain file system resources; the <move> and <delete> tasks are examples. This file-centric view of the world is not just restricted to Ant: tools like Sun’s Java compiler work only with files in the file system, not remote URLs or source in a Zip file. The only way to move such programs to support arbitrary resources would be to provide a complete new virtual file system underneath.
This sounds a bit demoralizing, but don’t worry. The <copy> task is fully resource-enabled; it will copy content from any resource to a file or directory. You can use <copy> to get anything onto the local file system for other tasks to work with. This is the primary way that non-file resources are used in Ant today. When we write new tasks in chapter 17, they’ll be resource-enabled from the outset.
We’ve used <unzip>, <gunzip>, and <untar> to remove files from Zip and tar files. Can we treat everything as a resource and use <copy> instead? Yes. Here’s a target that uses one <copy> to extract the .tar file from inside the .gz file, then extracts all the entries inside the tar file:
<target name="untar-with-copy" depends="compress-tar">
  <mkdir dir="${untar.dir}"/>
  <copy todir="${untar.dir}" >
    <gzipresource>
      <file file="${target.tar.gz}"/>
    </gzipresource>
    <mapper type="glob" from="*.gz" to="*"/>
  </copy>

  <copy todir="${untar.dir}" preservelastmodified="true" >
    <tarfileset src="${untar.dir}/${project.name-ver}.tar"
        includes="**/*"/>
   </copy>
</target>
We have to remember to provide a <mapper> to the gunzip <copy> so that it knows to remove the .gz ending for the file. In the second <copy>, we need to set the preserveLastModified flag to keep the normal policy of <untar> and <unzip>: that of giving extracted files the timestamps they have in the archive.
We’re going to use resources in the future when they solve specific problems. The whole resource concept will take time to propagate through tasks, especially third-party ones. Tasks that accept resource collections rather than just, say, filesets, are much more flexible as they can accept data from so many more sources. Build file authors will be able to do tricks, such as pull source files straight from a JAR or Zip file and feed them straight into another task. Resources can be used in another interesting way: developers can provide new resources or resource collections to represent new sources of data.
For now, the primary use of the concept is in <copy>. It can extract resources from any collection and save them to a file. Most other tasks, especially those that wrap existing code, can only handle in-file-system resources.
The immediate benefit from the resource and resource collection concepts is, therefore, that the <filelist>, <fileset>, and <path> lists of files are essentially interchangeable in a resource-enabled task.
5.10. Summary
Packaging your Java classes into JAR files is the first step to using or distributing your code. Ant’s <jar> task is the foundation for creating a JAR, and <signjar> is the means of signing it, if that’s desired.
Once the JAR is made, you can use it in other programs or execute it. We’ll cover those uses next. What we’ve covered in this chapter is the full spread of distribution packaging, from Zip to tar. Zip is the most uniformly supported and the one to start with; tar is also popular in Unix.
Building a redistributable package can go wrong—usually due to errors in the build file. There are three ways of addressing this problem: manual tests, automated tests, or shipping the product and waiting for complaints. We like the automated test system, and we’ve shown some ways to verify that the process works. Even if you don’t bother with testing the tar and Zip files, using the JAR files in your test target is essential for ensuring that your JAR files have been correctly assembled.
Finally, we’ve introduced the resource and resource collection model of Ant. These form the conceptual model behind the fileset and other collections of data sources and destinations in Ant. Resource-enabled tasks, such as <copy>, are able to use arbitrary resources as data sources, which lets build files work directly with files straight out of JAR, Zip, or tar archives. Although new to Ant, resources will become more broadly supported over time and will lead to a better conceptual model of data sources and destinations.
With our diary JAR file created and the source and binary distributions put together, our build is in a position to do two things. The JAR can be executed, and the distribution packages redistributed. This is what the next two chapters will cover.