
Chapter 10. Working with big projects
| 10.1 | Master builds: managing large projects | |
| 10.2 | Controlling child project builds | |
| 10.3 | Advanced delegation | |
| 10.4 | Inheriting build files through <import> | |
| 10.5 | Applying <import> | |
| 10.6 | Ant’s macro facilities | |
| 10.7 | Writing macros with <macrodef> | |
| 10.8 | Summary |
Scalability is one of the classic challenges of software engineering. Every time you think you’ve solved it, the problem scales up: people expect even more the next time.
When this book introduced Ant, it started off with a small project—a diary library. As the chapters added more features, the project itself grew. It’s now becoming a big project, as we’re planning to use it in a web application. We now have the problem of scale to deal with, which is where this chapter comes to our aid. It looks at how to use Ant with big projects. That means projects that use multiple Ant build files to build different parts of a big system. Somehow, we want Ant to integrate those separate builds into one big application.
Ant was written to deal with the problem of building a large Java project across multiple platforms. Now that that’s possible, the next problem arises. How do you build very large projects? How do you manage library dependencies? How do you manage the many build files you end up with? These are the problems that big projects encounter. Ant itself is continually evolving to address these problems, as developers use it for larger and larger projects. Don’t wait until your project gets big before adopting features in Ant that are needed in big projects; small projects can benefit too. Indeed, the earlier you start to use some of the techniques, the better.
Building a large project is hard
A build system is a means to an end. The end is your project’s deliverables, and as a project gets bigger, the structure of the application itself has to change. You may break the code into different modules, each comprising its own JAR/WAR/EAR file. You may split the project into subprojects, each with its own source tree. You may even have different release schedules for the subprojects. But no matter what, you will still need to test it all. Ant should not dictate how you organize your project; instead it has to adapt to you.
Here are the key problems in large-scale Ant projects:
- Delegating work to build files in subprojects
- Building subprojects in the correct order
- Ensuring build files are easy to maintain
- Managing libraries
We’re going to look at all of these. (Library management is such a complex topic that it merits its own chapter, chapter 11.) In this chapter we’ll cover the other problems, starting with that of delegating work across build files.
10.1. Master builds: managing large projects
Large projects create their own problems. There’s more to do, there are more people on the team, and the integration issues are worse. A small project could have one artifact, such as a JAR file, and its documentation. A large project could have client-side and server-side components, native library add-ins, and a database somewhere. These all need to be built, tested, and deployed together. If the build process is inadequate, the effort of managing the build can spiral out of control.
Can Ant manage the build for a big project? Yes. It may be great for small to medium projects, but it also scales up to work with large ones. Like any software scaling exercise, scaling up doesn’t come automatically: you need to plan. You also need the other foundational tools of a large project—source control management, defect tracking, and some planning—that we’ll assume you have in place.
Our diary project is slowly becoming a large project. It has a core library, and we’re now about to write a web-based front end and, perhaps, data persistence. We still want to be able to run a single build file to bring it all up-to-date.
The standard solution to size in any system is to break it into smaller, more manageable modules. In Ant, that means dividing the application into child projects, each with its own set of deliverables. For our example application, penciling in some future subprojects gives us a number of child projects, as shown in table 10.1.
Table 10.1. Subprojects within our example project
|
Child project |
Function |
Deliverables |
|---|---|---|
| core | Diary core | diary-core.jar |
| webapp | Web application | diary-webapp.war |
| persist | Data persistence | diary-persist.jar |
| ear | Everything as an Enterprise Archive | diary-ear.ear |
These projects need to build in the right order, with the generated artifacts passed down to those projects that depend upon them. We’ll do this with a master build file that can call the subprojects in the order that the file’s authors specify, with significant control over these invoked builds. The key to this is the <ant> task.
10.1.1. Introducing the <ant> task
We covered the <antcall> task in chapter 7. It can invoke a target and all its dependencies with a new set of properties. The <ant> task extends <antcall> by allowing you to specify the build file to use. This enables you to divide your build file into subprojects, one for each of the child projects of the actual software project, and call them from other build files.
The basic use of the <ant> task is simple: you use it to call any target in any other build file, passing in properties and references, if you desire. When you call a target with it, you implicitly invoke any other target in the build file that the invoked target depends on. That means if we use <ant> to call the dist target of another build file, that build file will run every target required to create the distribution.
To use <ant>, we have to know the name of a target to call, which means every project must have a standard set of targets. These entry points are listed in table 10.2.
Table 10.2. Our unified set of entry points. These are implemented across all child projects.
|
Target Name |
Function |
|---|---|
| default | The default entry point |
| all | Builds and tests everything; creates a distribution |
| clean | Deletes all generated files and directories |
| dist | Produces the distributables |
| docs | Generates all documentation |
| test | Runs the unit tests |
| noop | Does nothing but print the name of the project |
The default target is going to be the default for each project, and will usually depend on dist to create a distribution. The noop target is a special target added to test the whole build process. In code, the stub targets look like those in listing 10.1
Listing 10.1. An initial set of entry-point targets
<target name="default" depends="dist"
  description="default: Make everything" />

<target name="all" depends="dist"
  description="build everything"/>

<target name="test" depends="dist"
  description="run tests" />

<target name="docs" depends="javadocs"
  description="generate documentation" />

<target name="default" depends="all"
    description="default: build 'all'"/>

<target name="clean"
  description="clean up"/>

<target name="noop">
  <echo>in ${basedir}</echo>
</target>
We now add similar targets for the other projects, resulting in a set of entry points whose meaning is consistent across the projects.
With all the projects laid out under a root directory, diary, we can create a basic master build file that calls the targets. Listing 10.2 shows a master build file that builds the five subprojects.
Listing 10.2. Using <ant> to build subprojects
<?xml version="1.0"?>
<project name="master" default="delegate">

  <target name="delegate"  description="Build everything">
    <property name="target" value="all" />
    <ant dir="core"   target="${target}"  inheritAll="false"/>
    <ant dir="persist" target="${target}" inheritAll="false"/>
    <ant dir="webapp" target="${target}"  inheritAll="false"/>
    <ant dir="ear" target="${target}"  inheritAll="false"/>
  </target>

</project>
This build file contains one target that invokes the subprojects. We ordered the <ant> calls to ensure that all predecessor projects are built before those that depend on them. Although the default target here is all, we use a property so that it can be overridden on the command line. To run, say, the noop target, we would run Ant, explicitly selecting the noop target in our subsidiary build files by way of the target property:
C:diary> ant -Dtarget=noop
This produces a trace of all the targets that are run:
delegate:

noop:
     [echo] in c:diarycore

noop:
     [echo] in c:diarypersist

noop:
     [echo] in c:diarywebapp

noop:
     [echo] in c:diaryear
Ant doesn’t show which subprojects are being built, unless you ask for it with a -verbose option. This can be very confusing at times. A good trick is for every build file to print out its filename/directory with an <echo> statement outside any target.
This shows how Ant, a master build file, can delegate down to a set of child build files. It’s the secret for breaking things up into modules, yet coordinating work between them. To manage that work, we need to keep the master build file under control.
10.1.2. Designing a scalable, flexible master build file
We have a master build file that can delegate to child projects, but the ordering of those projects is done by hand. Why not use Ant’s target structure to model dependencies between subprojects? If there’s a target defined in the master build file for each subproject, invoking it with <ant>, then we can use their depends attributes to state how they depend on each other. Ant will then control the order in which targets are run and, hence, subprojects are built.
The first step is to determine the direct dependencies between projects, as shown in figure 10.1.
Figure 10.1. A graph of the direct dependencies between our modules.

Listing 10.3 shows our reworked master build file, now with each <ant> call split into its own target, mirroring the dependency graph.
Listing 10.3. Dependency logic inside a master build file
<target name="init">
  <fail unless="target">no target to delegate</fail>
</target>

<target name="do-core" depends="init">
  <ant dir="core" target="${target}"
    inheritAll="false"/>
</target>

<target name="do-persist" depends="do-core">
  <ant dir="persist" target="${target}"
    inheritAll="false"/>
</target>

<target name="do-webapp" depends="do-persist,do-core">
  <ant dir="webapp" target="${target}"
    inheritAll="false"/>
</target>

<target name="do-ear" depends="do-persist,do-webapp">
  <ant dir="ear" target="${target}"
    inheritAll="false"/>
</target>

<target name="delegate" depends="do-ear" />
Just as before, a call to ant delegate -Dtarget=clean will run the target "clean" on all delegate systems, only now Ant handles the correct order of child project invocation.
We can then write entry points to the build file, each using <antcall> to invoke the delegate target, setting the target parameter for us:
<target name="noop"
    description="do nothing">
  <antcall target="delegate">
    <param name="target" value="noop"/>
  </antcall>
</target>

<target name="clean"
    description="clean up">
  <antcall target="delegate">
    <param name="target" value="clean"/>
  </antcall>
</target>

<target name="all"
    description="clean up">
  <antcall target="delegate">
    <param name="target" value="clean"/>
  </antcall>
</target>

<target name="default"
    description="default actions">
  <antcall target="delegate">
    <param name="target" value="default"/>
  </antcall>
</target>
At this point, we can use the master build file to coordinate the overall build. Calling a target such as all will delegate down to the child projects, calling the same target in each of them, in the order that the projects depend on each other. This means that Ant can handle the problems of ordering the child projects—which becomes more important the more projects you have. The master build file can do one other thing: it can control those child builds by passing data down to them.
10.2. Controlling child project builds
We’ve just shown how to subdivide a project into a number of standalone child projects—each with its own build file—with one master build file to integrate them all and execute them in the right order.
If there’s a problem in this design, it’s that we don’t want to have to declare the same properties and tasks in all the different child projects. There are ways to do this, which we shall now explore.
10.2.1. Setting properties in child projects
Master build files can control their child projects through properties. Because of Ant’s property immutability rule, a child project cannot override any property set by a master build file. This lets you write master build files that control complex details of the child project, even child projects that were never written to be called from a master build file. As an example, figure 10.2 shows a build file that sets the dist.dir property for two child projects. The outcome of this operation will be that the two child projects will place all their final distribution files into a single directory, rather than into their own directories.
Figure 10.2. A master build can set the properties for the child projects, even if those projects try to override them. If the master build had accidentally used value instead of location, the directory location would have still been resolved in the client build files relative to their own directory, which would be a bug.

In all our uses of the <ant> task so far, we’ve carefully declared inheritall="false" without explaining why. We actually introduced this attribute in chapter 7, when looking at property inheritance in <antcall> target. The <antcall> task actually uses <ant> to do its work, so the property inheritance model for both is identical.
Although the two tasks share the same implementation code, when creating a master build file you use them slightly differently. The <antcall> task can call targets inside the current build file with new parameters. The <ant> task can invoke a completely separate build file.
Any of the properties and references that the <ant> task sets for the invoked project are immutable. You can control the settings of a child project by predefining any property or path before its own initialization code tries to define it. If the <ant> call defines a dest.dir property and all child projects use that property to name the directory for their redistributables, then that location becomes the destination directory for all distribution files—even if the child build files try to redefine it.
To use this feature, you need to know the rules by which properties are passed down:
- Properties set on the command line are always passed down and can never be overridden.
- If inheritAll is true, all properties set in the master build file are passed to the child projects.
- Any properties defined inside <ant> override those set in the master build, but not the command line.
- If inheritAll is false, only those properties defined inside the <ant> declaration and the command line are passed down.
The command-line rule means that you can configure the master build from the command line and have those changes propagate down to all the child builds, as shown here:
ant -Ddist.dir=/projects/CDimage/dist
Of course, this works only if projects are designed to be overridden.
Designing a project for easy overriding
Controlling where the projects place their distribution packages is one common control option for a master build; others are which tests to run and which servers to deploy against. For a child project to be controllable, it needs to make extensive use of properties.
A good build file should already be using properties to define any string, attribute, or file that’s used in multiple places. For easy integration into a larger project, any option that could sensibly be overridden should first be defined with a property and then referred to, giving the master build an option to change the value. To make this work, all child project build files should use the same names for the same controllable options. It’s no use if core/build.xml used dest.dir for the destination directory, and webapp/build.xml used destination.dir.
To make overriding work better, use <property location> to define file locations, rather than <property value>. In a single build file, using the value attribute to define a file location works, because when these properties are resolved to file locations, it will be in the same build file. When you’re passing properties around to other build files, using the location attribute ensures that relative paths are resolved in the build file declaring the property, not in the build file using the property.
Sometimes, overridden projects get corrupted by some of the properties of the parent project. This happens if the parent accidentally sets a property that’s used in the internal workings of the project. Imagine if the child used a property tests.failed to log whether the unit tests failed. If the parent project set the same property, the child project would think that the tests had failed.
The way to avoid this is to have standard names for properties that parent build files are expected to configure in children, and for the parent build files to not pass down any other properties.
If you call a project with <ant> without setting inheritall="false", all properties defined by the parent file will propagate to the child project. This is dangerous as it increases the risk of an accidental property overwrite. This is why setting inheritall="false" is so important: the best way to pass information down is inside the <ant> call.
10.2.2. Passing down properties and references in <ant>
The <ant> task lets you declare properties to pass down with the <property>, <propertyset>, and <reference> nested elements. To anyone using <antcall>, this should seem familiar, although in that task the equivalent of the <property> element is called <param>.
The <property> element of <ant> resembles a normal <property> task: it can set properties to a value, a location, a file, or a resource. You can even use <property env="env"> to load the environment variables. Loading properties from a file is powerful, because a single file can then control which properties are set. For example, we could modify our targets to load a common file, the values of which would be set in all the child projects:
<target name="do-core" depends="init">
  <ant dir="core" target="${target}"
    inheritAll="false"/>
    <property file="master.properties"/>
  </ant>
</target>
All properties declared in the file master.properties will be set in the child project. For example, it could be
build.compiler=modern
dist.dir=/projects/CDimage/dist
This would force all projects to stick their distributables into the same target directory. We cannot place relative file references in the file, as all properties are treated as simple values. You must use absolute paths in a property file. Relative paths can be used in an inline declaration:
<ant dir="core" target="${target}"
      inheritAll="false">
  <property name="dest.dir" location="dest" />
  <property file="master.properties"/>
</ant>
To pass a datatype reference down, declare the type in the build file and then insert a <reference> tag:
<ant dir="core" target="${target}"
      inheritAll="false">
  <property name="dest.dir" location="dest" />
  <property file="master.properties"/>
  <reference refid="main.classpath"/>
</ant>
This will pass the classpath main.classpath down to the child project. You can rename a reference with the torefid attribute:
<ant dir="core" target="${target}"
      inheritAll="false">
  <property name="dest.dir" location="dest" />
  <property file="master.properties"/>
  <reference refid="main.classpath" torefid="compile.classpath"/>
</ant>
The <propertyset> element can be used to pass down a whole set of properties defined in the current build. It lets you specify a prefix or regular expression for properties, which is useful for bulk propagation of values. Some example <propertyset> declarations are

The last of these examples passes down a single property, but only if it’s defined. If it’s undefined, the property is unset. Ant’s own documentation covers a few more features and examples; consult them if you have any complicated property propagation needs.
The other way to configure child projects is to have each one pull in a configuration file from the parent directory. This ensures that every child project shares common settings, even when not invoked from a parent build file. It becomes a single place to set project-wide settings. Here’s how we load the file:

This is quite a complex process. First, we load our local properties ![]() . Next we set a property root.dir to the parent directory
. Next we set a property root.dir to the parent directory ![]() , unless it was set to something else in our build.properties file. If you move a project, you can point to the original root.dir location in your local build.properties file.
, unless it was set to something else in our build.properties file. If you move a project, you can point to the original root.dir location in your local build.properties file.
We then declare a property to be the build.properties file in that root directory (another override point) ![]() , and finally we actually load it
, and finally we actually load it ![]() . This file can contain all the shared settings across projects, and, provided every child project uses the root.dir property to identify the root directory, that property’s file can use the value ${root.dir} to declare paths:
. This file can contain all the shared settings across projects, and, provided every child project uses the root.dir property to identify the root directory, that property’s file can use the value ${root.dir} to declare paths:
build.compiler=modern
dist.dir=${root.dir}/dist
This is a highly effective way of eliminating repetition across projects.
Overall, <ant> forms the basis for sharing work across build files. That doesn’t just include those of a single project. There’s nothing to stop a project taking an existing project from a third party, such as an open source project, and rebuilding it with customized settings. There are some other tasks, built-in and third-party, that extend <ant> with more complex delegations. Ant developers should know of them in case they have a need to use them.
10.3. Advanced delegation
Three other tasks that can assist with delegation are <subant>, which is built into Ant, and the <antcallback> and <antfetch> tasks from the Ant-contrib project. Let’s take a quick look at them.
<subant>
The <subant> task exists to make delegation to an entire set of build files easier. It looks very similar to <ant>, with various enhancements and with some corrections of default values that are, with hindsight, wrong:
![]()
- You can nominate multiple <fileset> or <filelist> listings of directories/build files to run.
- You can run the same “generic” build file in all the specified directories.
- If you set failonerror="false", failures in child projects will be ignored.
- Setting target="" will invoke the default target of the project; <ant> would try to run a target called "" instead.
- By default, nothing is inherited by child projects. That is, inheritall="false".
This task offers opportunities. Want to build the default target of all projects under the extensions directory, ignoring failures? It takes only three lines:
<subant target="" failonerror="false">
  <fileset dir="extensions" includes="*/build.xml" />
</subant>
Applying it to our build file, we can use <subant> to delegate all our work.
<filelist id="children">
  <file name="core"/>
  <file name="persist"/>
  <file name="webapp"/>
  <file name="ear"/>
</filelist>

<target name="delegate"  description="Delegate the build">
  <fail unless="target">no target to delegate</fail>
  <subant target="${target}" verbose="true">
    <filelist refid="children" />
  </subant>
</target>
In chapter 11 we’ll introduce an advanced way of ordering child builds, using the Ivy library management Antlib to create a list of projects sorted correctly for their internal dependencies. The <subant> task can take this list and invoke the children in the right order. Accordingly, we’ll return to this task in the next chapter.
10.3.1. Getting data back
The Ant-contrib team has added its own tasks to the mix: <antcallback> and <antfetch> are tasks that extend <antcall> and <ant>, respectively, by adding a new attribute called return. return takes a list of properties to copy back from the invoked target into the calling project—effectively a function call.
Here’s an example of using return to get some checksum values back from our core project:
<project name="fetch"
  xmlns:ac="antlib:net.sf.antcontrib">

  <ac:antfetch
    dir="core"
    target="checksum"
    return="target.zip.sha1, target.tar.sha1"/>

  <echo>target.zip.sha1=${target.zip.sha1}</echo>

</project>
As with the other Ant-contrib tasks, they need the Ant-contrib library introduced in chapter 9. The two tasks are used much less frequently than the other delegation tasks, but enable something that isn’t built into Ant—the ability to use build files as function calls.
In the projects we work on, we find <ant> and <subant> do most of the work, the latter in conjunction with the Ivy tasks forthcoming in chapter 11. In either case, we try not to delegate too deeply: the master build file manages dependencies between the build files, and the individual build files assume that they are being called in the right order. Any team that tries too hard to chain work together across too many build files is going to end up confused about what’s going on, and end up with a build that doesn’t behave.
What we do strive for across all our build files is code reuse by sharing and extending template build files. Rather than copy and paste a working build file across ten projects, we try to have one build file that acts a bit like “base class” for the child projects. How can we do that? With the <import> task.
10.4. Inheriting build files through <import>
Once you have more than one build file, you have a problem keeping them synchronized. If you deal with this problem by copying and pasting values, your project is doomed to become a build file maintenance nightmare, just as when you use copy-and-paste coding throughout your Java source.
The solution, in build files as well as Java, is this: “Don’t Repeat Yourself!”
This is a phrase from The Pragmatic Programmer, and it’s an important rule to remember. If you find yourself doing something by hand—repeatedly—you should try to find a better solution. Manual repetition creates errors and increases maintenance costs.
Even with a fully automated build, it’s hard to stop repetition from creeping into large projects. Once a project has more than one build file, you tend to want the same targets in each. Unless you can share these targets, you’ll end up with duplicate targets in different files.
You need to avoid the following things:
- Repeated options, such as the names of files or directories
- Repeated fragments of XML in different build files
- Repeated declarations of tasks, with the same or slightly different parameters
- Repeated fragments of XML in a build file
Repeated options is the easiest of these to deal with: use properties to avoid declaring the same constant text more than once, which is what we’ve been doing in the book up till now. More advanced features of Ant are needed to address the others. The first of these will deal with the problem of repeated fragments of XML in different build files.
The first step to doing this is to know that in pure XML, the only way to share data between files is to use XML entities. Ant supports this, although its use is now discouraged.
10.4.1. XML entity inclusion
XML parsers let you declare references to fragments of XML text, text that will be inserted into the document when the declared entity is used.
First we must declare the entity at the beginning of the file, after the <?xml?> header and before the XML data itself:
<?xml version="1.0"?>
<!DOCTYPE project [
    <!ENTITY properties SYSTEM "../properties.xml">
]>
<project name=" application " default="default" basedir=".">
This doesn’t insert the file yet; it merely makes it known to the XML parser using the name properties. We’ll use this entity name when inserting the text. The path to the file must be an absolute or relative URL and cannot contain Ant properties.
To insert the XML text inside the build file, we must declare the entity name between an ampersand (&) and a semicolon (;)—just as if we were inserting characters into the XML file, such as the > and < angle brackets:
<project name="application" default="default" basedir=".">

  &properties;
When parsing the file, the XML parser will replace all entity references with the text behind them. Ant sees everything from the included file as if it were pasted directly into the main XML file.
This technique is very limited, primarily because the XML parser does all the work. Only incomplete fragments of an XML document can be included. You can’t use Ant properties in setting the path to the file you want to include, and there’s no way of overriding included targets with new targets.
This mechanism is now obsolete, at least within Ant, which has its own solution—the <import> task.
10.4.2. Importing build files with <import>
![]()
The <import> task is the Ant-specific successor to XML entities. To import a build file into the current build file, you just use an <import> task outside any target:
<import file="${base-dir}/common.xml"/>
When Ant processes a build file, it runs through all declarations outside the targets before executing any requested target. Whenever Ant encounters an <import> declaration, it imports the referenced file by
- Resolving the file reference, expanding any properties in the process
- Retrieving and parsing the file
- Inserting its (transformed) contents into the current file
- Handling collisions between target names by renaming the targets of the imported file
On the surface, the task looks very similar to that of XML entities. How do they differ? Table 10.3 shows the differences.
![]()
Table 10.3. Comparing XML entity inclusion with Ant’s <import>
|
XML Entities |
<import> |
|---|---|
| Valid in any XML file | Ant only |
| Declare at top of document | Declare anywhere outside a target |
| Takes absolute or relative URL references | Takes absolute or relative filenames |
| Cannot use ${property} references in the URL | Can use ${property} references in the filename |
| Must resolve to a file | optional="true" imports will skip missing files |
| Must resolve to a fragment of an XML document | Must resolve to a complete Ant build file |
| It’s an error to declare targets with the same name | Has a model for overriding target declarations |
| Are interpreted in the directory of the file into which they’re imported | Has access to the original name and directory of the imported file through properties |
| Hard to track down problems | Slightly easier to debug |
At first glance, <import> doesn’t appear significantly better than XML entities, but it is, because Ant is in control of the process. It happens as the containing build file is interpreted, so property expansion can be used to locate the file. Ant interprets the targets declared in the file specially, and provides what is effectively a simple inheritance model of build files. One of the big differences is that Ant lets you override the targets defined in a file that’s pulled in via <import>.
10.4.3. How Ant overrides targets
When we import a build file, it can add targets to our own build file. Ant allows us to override those imported targets with new ones. That gives build files a feature very similar to subclassing in Java itself. A base build file can define the default behavior for a project by using standard targets, and build files that import the project can override this behavior by redefining the targets.
Let’s explore this behavior with a base.xml file containing the targets init, all, and dist:
<project name="basefile" basedir=".">

  <target name="init" >
    <mkdir dir="build" />
  </target>

  <target name="dist" depends="init"/>

  <target name="all" depends="dist" />

</project>
Now import base.xml into a new build file, which will import this project and define a new dist target:
<project name="app" basedir=".">
<import file="base.xml"/>

  <target name="dist">
    <echo>creating a distribution</echo>
  </target>

</project>
What’s going to happen? If we run ant -f app.xml all, what is printed?
Buildfile: app.xml

dist:
     [echo] creating a distribution

all:

BUILD SUCCESSFUL
Total time: 0 seconds
The imported all target has run, as has its direct dependency, dist. But instead of the implementation from the same build file running, the one from the outer build file has been executed. And, because the new dist target did not depend upon the init target, that target wasn’t called at all.
This demonstrates the following:
- The targets in the imported file are available on the command line.
- Targets in the imported file can depend upon targets in the main file, and vice versa.
- If a target is already defined in the build file, then it overrides any in the imported file.
- When such an override takes place, any dependencies of the overridden target are lost.
These are the main aspects of the behavior of <import>. These inheritances and overwritten rules let you selectively override targets of a base build file, creating extended build files.
10.4.4. Calling overridden targets
What if you don’t want Ant to override a target? You cannot prevent that, but you can explicitly invoke the original target by prefixing the project name to the target. This is important: not the name of the file, exactly, but the name of the project as defined in the name attribute of the root <project> element of the build file:
<target name="dist" depends="basefile.dist">
  <echo>creating a distribution</echo>
</target>
With our overriding dist target declared as depending on the basefile.dist target of the imported file, our Ant build now invokes the imported target and all its dependencies:
init:
    [mkdir] Created dir: C:ig_projectsuild
basefile.dist:

dist:
     [echo] creating a distribution

all:
You can’t import two build files with the same project name; the build will fail if you try this. You can always be sure that a fully qualified target is the one you want, not one from another build file.
![]()
From Ant 1.7, every imported target can always be referred to by its fully qualified name. In Ant 1.6, only targets that were overridden got this treatment. The advantage of the new rule is that it allows build files to explicitly call specific targets, whether they are overridden or not. You can use this behavior to stop targets from being accidentally overridden:
<target name="all" depends="basefile.init,basefile.dist" />
If you don’t want target dependencies in an imported project to be overridden, always use the full target name.
There’s one other aspect to the <import> process that can be useful: the properties it defines in the process.
10.4.5. The special properties of <import>
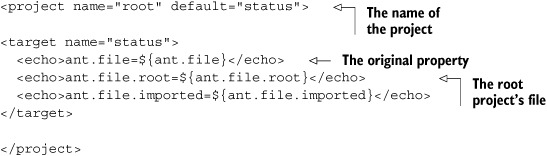
Any imported build file can find out its original filename. When a file is imported, a new property is created that records the name of the file. First, you need to know that ant.file is a property that’s always set to the full path of the build file that’s executed. This is one of those things that Ant has always done. With <import>, Ant sets the property ant.file.projectname to the path of the imported file:
The output of this build file is the path of the build file twice:
Buildfile: root.xml

status:
     [echo] ant.file=/tmp/root.xml
     [echo] ant.file.root=/tmp/root.xml
     [echo] ant.file.imported=${ant.file.imported}
Now let’s create an import file in a subdirectory:
<project name="imported" >

<echo>*Imported file
*ant.file.imported=${ant.file.imported}
</echo>
</project>
We can use it in our main project:
project name="root" default="status">

<target name="status">
  <echo>ant.file=${ant.file}</echo>
  <echo>ant.file.root=${ant.file.root}</echo>
  <echo>ant.file.imported=${ant.file.imported}</echo>
</target>

<import file="subdir/imported.xml" />

</project>
What are we going to see now?
Buildfile: root.xml
     [echo] *Imported file
     [echo] *ant.file.imported=/tmp/subdir/imported.xml

status:
     [echo] ant.file=/tmp/root.xml
     [echo] ant.file.root=/tmp/root.xml
     [echo] ant.file.imported=/tmp/subdir/imported.xml
This output shows that the imported file’s top-level declarations run before any targets. It also shows that Ant has created a new property, ant.file.imported, set to the path of the imported project. This property is visible across the merged build files from the <import> declaration onwards. We can use this in the <dirname> task to determine the base directory of an imported project. Here’s how we do this in imported.xml:
<dirname property="imported.dir" file="${ant.file.imported}"/>
<echo>imported.dir=${imported.dir}</echo>
The extra line of output is
[echo] imported.dir=/tmp/subdir
Once you have the base directory, you can find files and directories relative to that location, instead of just relative to the outer build file.
There’s one little caveat here: for all this to work, you cannot <import> projects with the same name into another project. Ant will halt the build if you try to do so. You must set the name of every <project> to something different.
That ends our introduction to <import>, a task that constitutes possibly the most radical change to Ant in recent years. Given it is so radical, we need to think about the best way to use it in real projects.
10.5. Applying <import>
The <import> task can pull in other build files, inserting its tasks and targets into the outer project in a way that allows Ant to override targets. How can we use <import> to make maintaining a big project easier?
There are three different ways of using <import> that regularly crop up in build files:
- Extending existing build files
- Creating a base build file for many projects
- Mixin build files
Let’s run through each of these methods in turn.
10.5.1. Extending an existing build file
One use of the <import> task is to completely import an existing build file, just to stick a few more tasks on the end. Doing so guarantees that you don’t break the existing build file and lets you add new targets to a build file that may not even be yours; it may be from another project that you just need to build.
The sample build files for chapter 5 onwards have used <import> this way. Anyone who looked at the sample files and saw the “ignore this for now” comments has now reached the point where we explain this situation.
As an example, here’s the start of the chapter 7 build file, core-chapter-07.xml:
<project name="core-chapter07" default="default">

<description>
  This is the core build file for chapter 7.
  </description>

<!-- we don't cover imports until chapter 10
    If you are curious, what we are doing here
    is importing every single declaration of the
    imported build file, both toplevel and targets.
-->

<import file="core-chapter-06.xml" />

<target name="ftp-init" depends="init">
  <fail unless="server">Set the "server" property!</fail>
  <property name="ftp.propfile" location="secure/${server}.properties" />
  <loadproperties srcFile="${ftp.propfile}" />
</target>
We’ve included all the targets of the chapter 6 build file, which includes all the packaging, testing, and execution targets. By adding the distribution targets of chapter 7 to a separate file, we can be sure that no changes we make to the chapter 7 targets will have any effect on the build of chapter 6. Yet we can still make targets in our new build file depend on those in the original, such as where our ftp-init target depends on the base init target.
Isolating some parts of the build process, here, distribution, can help with some aspects of build-file maintenance. We can be sure that the side effects of changes to the distribution build file will be limited to that file and any that import it or call it with <ant>. What we cannot do is isolate the file from changes in the files it imports—any error in the chapter 6 build or changes to its init target could break our distribution build.
The second use of the <import> task is to create a reusable template file that can be extended by all the child build files in a large project.
10.5.2. Creating a base build file for many projects
Remember the master build file from section 10.1, which used <ant> to invoke build files for the project core, persist, webapp, and ear? Did we have to write stub build files for each project? Yes, but not very big stubs. What we did do was write the base build file, diary/xml/base.xml, a build file containing nothing other than the main entry points we want to implement across all projects.
<?xml version="1.0"?>
<project name="base" default="all">

  <echo>Building ${ant.file}</echo>

  <property file="build.properties"/>
  <property name="root.dir" location=".."/>
  <property name="settings.file"
    location="${root.dir}/master.properties"/>
  <property file="${settings.file}"/>

  <target name="default" depends="all"
    description="default: build 'all'"/>

  <target name="dist"  description="Build the distribution"/>

  <target name="all"  description="Build everything"
    depends="dist"/>

  <target name="diagnostics"
    description="diagnostics">
    <diagnostics/>
  </target>

  <target name="clean"
    description="clean up"/>

  <target name="noop">
    <property name="dist.dir" location="dist"/>
    <echo>in ${basedir}</echo>
    <echo>dist.dir=${dist.dir}</echo>
  </target>

</project>
All our child projects will import this target, allowing it to override any of the stub declarations with its actual implementations. Here, for example, is the file persist/build.xml, which currently does nothing other than import the targets.
<?xml version="1.0"?>
<project name="persist" default="default">

  <property file="build.properties" />
  <property name="root.dir" location=".." />
  <property name="xmlfiles.dir" location="${root.dir}/xml" />
  <!-- import our base file -->
  <import file="${xmlfiles.dir}/base.xml" />

  <!-- insert any new targets here -->
</project>
The initial property settings will read the per-project build.properties file before anything else, then set up the location of the base build file to import. This allows developers to move the entire child project somewhere else on their hard disk, yet still refer back to the original file. If the path had been hard-coded into the <import>, as the declaration file="../../xml/base.xml", it would be impossible to move the project.
This behavior shows an unwelcome consequence of <import>. Once a project starts depending on XML files in parent or sibling directories, it’s no longer self-contained. This prevents projects from releasing self-contained source distributions of child projects. The whole project tree needs to be included for a build to work. You can use the optional attribute of <import> to say that the build should continue if the imported file is missing, but that doesn’t help, because everything contained in the file is now missing from the build. Source distributions need to include the whole source tree, including the common build files.
The other problem is that even with standardized target names, it becomes hard to manage the dependencies of targets across the base and extended build files.
Creating milestone targets for easier overrides
Once you embrace <import>, build files become deceptively complex. Just as a deep hierarchy of Java classes can be hard to visualize, so can a deep tree of <import> declarations and overridden targets. One technique that appears to make this more manageable is to have targets that represent states you want the project to be in.
Ant targets are usually named for actions or deliverables, such as "jar", "compile", and "copy-files". They say what the target does. Once you start overriding things, however, it’s not so clear what the targets do. Our solution to this situation is to declare what we call milestone targets. These targets represent the state of a build, such as ready-to-compile and packaged. Most importantly, these targets contain no tasks. Instead they just declare what targets need to run to reach the milestone. On a simple project, ready-to-compile is just a matter of setting up the classpath for the libraries. This would be described as
<target name="ready-to-compile" depends="classpaths-setup" />
On a more complex project, that state may be reached only if we generate Java source from XML files:
<target name="ready-to-compile"
  depends="classpaths-setup,generate-source" />
If the base build file declares the core milestones and basic sequence of actions, build files that <import> this file can define new steps that have to be taken to reach the goal, and can still inherit all the dependencies of the original milestone:
<target name="ready-to-compile"
  depends="base.ready-to-compile,javacc" />
This is why it’s so important for these milestone targets to have no tasks inside them. When we override a milestone yet declare a dependency on the base milestone, we tell Ant that the overridden target depends on base.ready-to-compile and all its dependencies. It’s the dependencies we want, but the only way to pull them in is to depend on the base.ready-to-compile target. If it did any work, such as a <javac> compile, it would run before the new javacc target and perhaps not work.
To use milestone targets, you have to define a set of states that are common across all projects. There is no standard set of milestones. Common ones we use include the following: "ready-to-compile", "compile-complete", "classpaths-setup", "dist", "all", "installed", "tested", and "deployed". The idea is that at the command line, you tell Ant what state you want the build to be in, such as
> ant deployed
The tool will do all the work needed to get the application into that state, be it the common steps of the base build file or custom steps of derivative build files.
There’s one final way to use <import> that takes this notion of milestone targets and uses it to mix multiple template build files into a single project.
10.5.3. Mixin build files
The first two ways of using <import> are both quite similar: you take a build file and extend it, just as if you were extending a Java class. There’s another way, one that bears more of a resemblance to C++ programming—mixin build files.
The mixin is a concept from C++, where you would extend a class just to get some extra methods in your own class. Because C++ lets you inherit from multiple classes, you could mix in many different parent classes, to make your class as an aggregation of all its parents.
Similarly, the <import> task lets you define mixin build files. These are build files that perform a specific function, such as creating an archive or deploying a web application to a local application server. They don’t have to be self-contained; they can import other build files, which can mix in others. Each build file will be imported only once, even if there are multiple <import> statements doing it.
This is cutting-edge Ant build file development. We aren’t going to show in detail how to do it or explain best practices, because nobody knows how to do this properly. We’re all just learning. Where it does appear to work best is when the mixin file defines template tasks, using the <presetdef> and <macrodef> tasks we’re about to introduce. This effectively makes new tasks available to the outer build files, which can glue them together in whatever order you choose.
10.5.4. Best practices with <import>
The consequences of adding <import> to Ant are profound. You can use the command to implement simple inheritance, so you now have a better way of managing projects with multiple subprojects. Ideally, each subproject should be nothing but a simple delegation to the base component. Some things to keep in mind when using <import> follow:
- Be very cautious about importing multiple files. The risk of clashes and unexpected overrides increases as you do so.
- Give every project a unique name attribute in the <project> declaration. It’s easy to miss this when using an existing file as a template, and it can be very confusing.
- Provide clear, structured override points if you want to offer default targets that may need to be overridden.
- Be very, very, careful when maintaining a common build file that’s imported into multiple projects. If you accidentally name a target the same as one in any of the projects that import it, your build will not work, and you’ll have a hard time figuring out why.
Just as object-oriented design has flaws, inheritance and overriding of targets brings new dangers. Yet <import> also delivers the ability to scale projects better than Ant has been able to do so before. It’s one of the key ways of keeping build files easy to maintain, which was listed as one of the problems of large-scale Ant projects. It can provide reusable targets, targets you can override when needed. The next way to keep maintenance down is to define template tasks, templates that can standardize the options of commonly used tasks—macros.
10.6. Ant’s macro facilities
In this chapter, we’ve looked at <ant> and <subant>, which delegate work to self-contained builds. Next came the <import> task, to share and reuse targets across build files.
That still leaves a big problem. There’s too much repetition in every task declaration. All too often, projects want standard values across all uses of a task, such as the source="1.5" for the <java> task. Even if everyone remembers to set this attribute correctly across all uses of <java> across multiple build files, what happens when the team moves to Java 7? Do we really have to edit every use of the task?
That’s the final challenge of scale this chapter addresses, through Ant’s macro facilities. Anyone who wrote C or C++ code will remember the #define preprocessor instruction. This was a tool of power—and, in the wrong hands, terror. The macro expansion took place before the language itself was parsed, so you could almost generate a new language if you got carried away.
Ant has a macro system, but it’s more restrained. It lets you do two things, both of which take place after parsing. First, you can define new tasks with different defaults from existing tasks, using <presetdef>. Secondly, you can define a macro task, which is a sequence of other tasks. This macro can declare attributes—mandatory and optional—and elements, all of which will be accessible in the macro. In this way, you can build a new composite task from those that exist already. Both techniques have their place.
10.6.1. Redefining tasks with <presetdef>
![]()
We’ll start with the <presetdef> task, which is the simpler of the two tasks. It lets you declare a new task based on an existing task. This new task can be used anywhere you would use a normal task and when it’s executed, the task it wraps is invoked. If we were fixing the <exec> task, we could define a new task, <robustExec>, which would set failonerror="true". Whenever we wanted to execute a program, we would declare it with <robustExec> and the failonerror attribute would be set for us. All other attributes and nested elements would still be the same as for the original task. We could even set failonerror="false", in overriding the values set in the template defined with <presetdef>.
We like the <presetdef> task because it lets you lay down rules for what the default arguments to tasks should be, across all projects. It also allows us to change those defaults in one place—the build file that defines the <presetdef> tasks—and have those changes propagate. We use it a lot. It crops up in Ant’s own build and test files a lot, too.
How do you actually use it? Well, let’s fix the <exec> task. This task is useful, but it defaults to ignoring any failure code returned by the program. To fix that, we define a new task, with a different failure policy:
<presetdef name="robustExec">
   <exec failonerror="true"/>
</presetdef>
This gives a new task, <robustExec>. We can use it wherever we would normally use <exec>, and know that the failure-handling policy will be consistently set to what we want:
<robustExec executable="firefox" />
It can even be used inside another <presetdef> declaration: here defining a version that runs code only on Windows and which also checks the return codes:
<presetdef name="execOnWindows">
  <robustExec os="windows" />
</presetdef>
We can then use this wherever we see fit.
<execOnWindows executable="iexplore" />
This looks a bit like subclassing in object-oriented languages, but it isn’t. We’re just predefining values, values callers can still override and extend. Anyone can overwrite predefined attributes.
Defining new default values is invaluable when you want to lay down the rules for performing common operations, such as compiling code. A <presetdef> declaration of a new task can declare all the project policies. Here, for example, we declare a new set of defaults for the <javac> task, with various options (language, debug, deprecation, etc.) all set to what we want:
<presetdef name="javac" uri="http://antbook.org/d1/ext" >
  <javac debug="${javac.debug.mode}"
    nowarn="true"
    deprecation="${javac.deprecation.mode}"
    source="${javac.java.version}"
    target="${javac.java.version}"
    includeAntRuntime="false"
    >
  </javac>
</presetdef>
By setting the uri attribute, we’ve placed the new task into a namespace. This allows our task to coexist with the original name. When we use it, we have to use the task in our new namespace:
<target name="compile" depends="init"
  xmlns:ext="http://antbook.org/d1/ext" >
  <ext:javac
    classpathref="compile.classpath"
    srcdir="${src.dir}"
    destdir="${build.classes.dir}"
    >
    <src dir="${src.dir}">
  </ext:javac>
</target>
The <presetdef> task is invaluable in a large project, because it can keep options consistent across all projects. It also makes it easy to add a new default value to all build files, wherever a target is used. We regularly create new definitions for common tasks of <javac>, <exec>, <java>, and <jar> for this reason. That doesn’t mean that it should be used everywhere; there are hazards to be aware of.
10.6.2. The hazards of <presetdef>
You may be so excited by the possibility of redefining the default options for every possible task that you’ll want to bring up the build files in your editor and rapidly redefine everything. Don’t! Wait until you’ve read more!
When a new task is declared with <presetdef>, the default attributes of a task can be redefined. Any user of the task is free to override these values when they use the task:
<execOnWindows executable="iexplore" failonerror="false"/>
The options that you set aren’t absolute rules; they are merely hints. This is inadequate if you want to enforce rules across your projects.
Any nested element in the <presetdef> declaration is included in the task along with any new definitions. Unlike attributes, which can be overridden, nested elements get concatenated. If, for example, our task declared that the source directory was ${src.dir}, there would be no way to override that declaration.
Another serious hazard is task name clashes. Imagine you decide to wrap up the <jar> task with a preset task, with the meaningful name <archive>. Now imagine a new version of Ant ships, with a task called <archive>. When <archive> is used, which one is going to be run? The answer: whichever got declared last. This can be somewhat unexpected. Now, you may think that unless Ant comes out with a new task this isn’t a risk, but what if you import a build file that declares its own <presetdef> task called <archive>? Which is going to be used now? It may depend on the order the targets were executed. This is very important: you need to know the rules for inheritance of <presetdef> (and, soon, <macrodef>) declarations, which are as follows:
- Whoever declares a task most recently wins. This is the opposite of the property assignment model.
- A task stays defined through Ant processes that are started by <ant>, <antcall>, or <subant>.
- Ant warns if you redefine things, whether the definition is the same or different.
We prefer to define new tasks in private namespaces, to make it clear that they are not Ant’s own tasks, and to isolate ourselves from Ant’s own set of tasks.
Here are some effective ways to work with the <presetdef> task:
- Don’t run out and declare <presetdef> wrappers for every task. The result is a build file that only you will understand.
- Do use <presetdef> when you want to lay down new rules for common tasks.
- Give tasks and macros meaningful names.
- Don’t redefine an existing task in the default namespace. Bad things can happen.
- Declare the tasks in a new namespace, to isolate them from the built-in tasks.
As we said, <presetdef> is a wonderful thing. It just needs a bit of care to be used effectively. The other macro tool, <macrodef>, is equally powerful and needs to be treated with similar caution.
10.7. Writing macros with <macrodef>
The <presetdef> declaration defines default values for an existing task. It doesn’t let you create a completely new task from a sequence of existing tasks, nor does it hide any of the details of the underlying task. All you can do is predefine some settings.
If you want to do more, you need a different task: <macrodef>. This task lets you define a macro task, with optional and mandatory attributes and nested elements. Inside it, you can list a sequence of tasks. When the new task is used in a build file, Ant passes the task’s parameters to the inner sequence of tasks, and your work is performed.
![]()
Here’s an example:
<macrodef name="copy-useful-files" uri="http://antbook.org/d1/ext">
    <attribute name="src"/>
    <attribute name="dest"/>
    <attribute name="failonerror" default="false"/>
    <attribute name="pattern"
    default="**/*.ini,**/*.xml,**/*.dtd,**/*.xsd,**/*.properties" />
  <sequential>
    <echo level="verbose">copying @{pattern}
      from @{src} to @{dest}</echo>
    <copy todir="@{dest}" failonerror="@{failonerror}">
      <fileset dir="@{src}" includes="@{pattern}"/>
    </copy>
  </sequential>
</macrodef>
What does this do?
The <macrodef> begins the declaration; we then list four attributes. Two of the attributes, failonerror and pattern, have default values, which implicitly indicates that these attributes are optional and provides their value in such cases. Then follows a sequence of tasks, wrapped in the <sequential> container. One of the tasks is a simple <echo> to list the parameters when you run Ant in verbose mode; the other is a <copy> operation. As with <presetdef>, we’ve placed the declaration into a new namespace by setting the optional uri attribute.
This task copies all the files matching the macro’s pattern from the source tree to the compiled classes’ directory tree. If we don’t specify a pattern, we get the default set:
<ext:copy-useful-files src="${src.dir}" dest="${build.classes.dir}"/>
We can change this to a different pattern:
<ext:copy-useful-files src="${src.dir}" dest="${build.classes.dir}"
   pattern="**/*.xslt,**/*.sxw"/>
This will completely replace the default value, which isn’t available.
10.7.1. Passing data to a macro
Macros support attributes, elements, and nested text elements. Inside the macro, we can access attribute parameters by using the @{attribute} operation, which works almost like classic ${property} property expansion, except that the case of the attribute is ignored. Ant expands macro parameters before properties, which lets you use a macro parameter to define the name of a property: ${@{property}}. This is different from normal, where ${${nested-property}} expansion is supported only in the Ant-contrib task <propertycopy>.
Nested text inside can be placed into a parameter named with the <text> element. This text can be made optional or not, and leading and trailing whitespace can be stripped with the trim attribute:
<macrodef name="verbose" uri="http://antbook.org/d1/ext">
  <text name="text.value" trim="false" optional="false" />
  <sequential>
    <echo level="verbose">@{text.value}</echo>
  </sequential>
</macrodef>
This macro prints out messages in verbose mode:
<ext:verbose>Reformatting hard drive</ext:verbose>
We could use this new task to add log messages to our build files, messages that will appear only in a -verbose run. Nested text can be very useful in a macro.
Alongside text and attributes, the <macrodef> task supports nested elements. First, we must declare an <element> parameter in the task, which says that an element called <files> is required:
<element name="files" optional="false"/>
We can then insert all XML under this element anywhere inside our sequence of targets, just by declaring the name of the element as an element inside the sequence:
<files/>
All the XML elements underneath the <files/> declaration get passed in, as if the declaration were inline[1]. Here’s a simple demonstration that echoes out the XML passed in:
1 In Ant 1.6 and Ant1.7, top-level text gets lost—which is probably a bug—but elements are passed down along with their attributes and text.
<macrodef name="exml" uri="http://antbook.org/d1/ext">
  <element name="files" optional="false"/>
  <sequential>
    <echoxml><x><files/></x></echoxml>
  </sequential>
</macrodef>
We can use this with any XML inside our <files/> element.
<ext:exml>
  <files>
    <fileset dir="." includes="*.xml" />
  </files>
</ext:exml>
The result of this run is what Ant’s <echoxml> task does: it prints out the nested XML to the screen or a file:
exml:
<?xml version="1.0" encoding="UTF-8"?>
<x>
  <fileset dir="." includes="*.xml" />
</x>
You can declare one element parameter as implicit, meaning that it takes all the XML nested inside the macro that doesn’t match any other element:
<macrodef name="do2" uri="http://antbook.org/d1/ext">
  <element name="commands" implicit="true"/>
  <sequential>
    <commands/>
    <commands/>
  </sequential>
</macrodef>
This states that the parameter <commands/> should be bound to all the nested XML. This macro executes the tasks supplied as parameters twice in a row, so we can use it like this:
<ext:do2>
  <echo>message</echo>
</ext:do2>
This shows that you can use the macro elements anywhere inside the macro, not just inside an Ant task or datatype:
do2:
     [echo] message
     [echo] message
Think of all the fun you can have with that. With this and the Ant-contrib tasks of chapter 10, Ant is almost a real programming language. It doesn’t have local variables, but it does have something close to it.
10.7.2. Local variables
Anyone who writes a complex macro will end up using properties to pass information between the tasks in the macro. This works, once. The second time the macro runs, the old properties will still be set, because Ant’s properties are immutable.
What can you do? Break the immutability rule. The <var> task from Ant-contrib creates a property that can be a real variable, meaning it can be changed. We can then unset a global property before calling any task that wants to use it. Take a macro to set a property to the full path of a file that has been “reparented” to a different directory. We need to use properties inside the macro here:
<macrodef name="reparent" uri="http://antbook.org/d1/ext">
  <attribute name="file" />
  <attribute name="destdir" />
  <attribute name="property" />
  <sequential>
    <ac:var name="var.reparent.dest" unset="true" />
    <property name="var.reparent.dest" location="@{destdir}" />
    <ac:var name="var.reparent.filename" unset="true" />
    <basename property="var.reparent.filename" file="@{file}"/>
    <property name="@{property}"
      location="${reparent.dest}/${var.reparent.filename}" />
  </sequential>
</macrodef>
We can use this task to determine the name that some files will have, after a copy operation. To make sure that our properties are acting as variables, we run the macro twice:
<target name="reparent" >
  <ext:reparent file="build.xml" property="copy1"
    destdir="${java.io.tmpdir}" />
  <ext:reparent
    file="ch10-macros.xml" property="copy2"
    destdir="${java.io.tmpdir}" />
  <echo>
   copy1=${copy1}
   copy2=${copy2}
  </echo>
</target>
When we run this macro, we get the appropriate results for each build file, showing that the macro is working:
reparent:
     [echo]
     [echo]    copy1=/tmp/build.xml
     [echo]    copy2=/tmp/ch10-macros.xml
     [echo]
Remember that the macro is still using global properties for its work, and that the <var> task will reset any properties’ values. Always use obscure property names for properties used inside macros. One convention suggested by a reviewer[2] was to use tmp. or var. as the prefix, which is what we’ve done.
2 Jon Skeet, committer emeritus on the Ant project.
10.7.3. Effective macro use
Macros give you power. With power comes responsibility: use it carefully. Here are some tips on writing safe macros:
- Write macros to manage common sequences of operations.
- Don’t write macros when you don’t have any repetition in your build file.
- Declare macros in private namespaces.
- Use the Ant-contrib tasks for conditional logic, property resets with <var>, and other complex operations inside macros.
One obvious problem arises in a big project: where to declare the macros? This is where the mixin build files, mentioned in section 10.5.3, come into play. We have a build file, xml/macros-mixin.xml, that contains nothing but <macrodef> and <presetdef > declarations.
It begins by declaring the project and the namespaces of the macros and the Ant-contrib:
<project name="macros"
  xmlns:ext="http://antbook.org/d1/ext"
  xmlns:ac="antlib:net.sf.antcontrib">

<property name="macros-mixin.uri" value="http://antbook.org/d1/ext" />
The file contains all of our <macrodef> and <presetdef> declarations, declaring them in the XML namespace http://antbook.org/d1/ext. Any build file can import this file to get all the tasks:
<import file="../xml/macros-mixin.xml"/>
This gives all build files in the project access to the predefined tasks, providing us with a single point of control over how the core tasks of Ant are used in all build files across the projects. Together, <presetdef>, <macrodef>, and <import> give you control of big project builds.
10.8. Summary
Scaling up a software project is always troublesome. Ant can scale to meet the needs of big projects, if used carefully. We have enumerated four problems with big projects:
- Delegating work to build files in subprojects
- Building subprojects in the correct order
- Ensuring build files are easy to maintain
- Managing libraries
The <ant> and <subant> tasks can delegate work to other build files, with the ability to control the invoked file by predefining properties and passing down datatype declarations.
Once you have multiple child projects, you have another problem—avoiding duplication of work. The <import> task comes to your aid here. It lets you import a shared build file into multiple build files, providing a base set of targets that can be (optionally) overridden. We have looked at three ways to use <import>:
- To extend an existing build file with new follow-on functionality—such as deployment or distribution targets. This isolates the deployment and distribution from the other work.
- To override a base build file with specific actions at various stages in the application’s build. This is similar to inheritance and overriding in object-oriented languages and can bring in similar complexity. The use of a common state model, with milestone targets, can alleviate some of the problems.
- As a way of writing mixin build files that define targets or tasks that can be used from any build file, without any dependencies on the state of the application at the time that they’re invoked.
Finally, we’ve introduced two tasks, <presetdef> and <macrodef>, that let you define new tasks from existing ones. The <presetdef> task can be used to set task policies across projects, while the <macrodef> task lets you build up complex sequences of operations from other tasks. Together they strive to keep the build files you write simple and consistent.
That leaves the final problem: managing libraries. That little problem is going to take up the whole of the next chapter.