
Chapter 7. Distributing our application
| 7.1 | Preparing for distribution | |
| 7.2 | FTP-based distribution of a packaged application | |
| 7.3 | Email-based distribution of a packaged application | |
| 7.4 | Secure distribution with SSH and SCP | |
| 7.5 | HTTP download | |
| 7.6 | Distribution over multiple channels | |
| 7.7 | Summary |
Ant is now compiling, testing, and running our diary library. We can now do two things with the library: distribute it or deploy it. What does that mean? For us, distribution is the act of delivering a project’s artifact to one or more recipients. This delivery may be direct, via email or a shared file system, or it may be through a web site. Deployment is the problem of bringing up a functional application on a working computer, and is what often happens after distribution.
This chapter covers distribution; deployment is much harder. That may seem odd, but think about this: deployment includes bringing up the system and application to a working state. Distribution is just handing off the packaged code to someone else to get working. We’ll get to deployment in chapters 12, 14, and 16.
Ant is good at distribution, since it has tasks to handle the common activities. To explore these tasks, we’ll use Ant to distribute our application according to the following distribution activities.
- FTP-based distribution of a packaged application— An application has been packaged into source and binary distributions. These distribution files are uploaded to a remote FTP server, such as SourceForge.
- Email-based distribution of a packaged application— The application is emailed to multiple recipients. Recipients will receive the source distribution in Zip or gzip format. The recipient list must be kept in a separate file.
- Secure distribution with SSH and SCP— The build performs a secure upload of our program to a Unix server using the Secure Shell protocol, SSH.
- HTTP publishing of the artifacts— The build tests that the uploaded files are on a Web server by downloading them.
- Distribution over multiple channels— The artifacts will be distributed using all of the previous methods.
In all of these stories, we’ll use the .zip and .tar.gz files created in chapter 5. These contain the signed JAR file, the source, and the documentation. The first step is to get everything ready for distribution.
7.1. Preparing for distribution
Most of the preparation for distribution has been done in chapter 5: Ant can create .zip and .tar.gz packages containing source and binary redistributables. We need to do a few more things before the real work begins.
1. Get Ant’s distribution tasks ready.
2. Make our packages tamper-resistant by creating checksums.
3. Get the servers ready.
Step one, then, is getting the tasks ready.
Getting Ant’s distribution tasks ready
Ant can address our distribution needs through a set of tasks that we haven’t yet encountered. Table 7.1 lists the tasks.
Table 7.1. Ant tasks that can help with distribution
| <checksum> | Create or verify file checksums |
| <ftp> | Copy files to and from an FTP server |
| <get> | Get a file from a remote Web server |
| <mail> | Send email, possibly with attachments |
| <telnet> | Connect to a server and send commands |
| <rexec> | Execute a command on a remote (Unix) system |
| <sshexec> | Run a command on a server using the secure SSH protocol |
| <scp> | Copy files to and from a machine over SSH |
The tasks fall into two main groups, those that copy files between machines (<ftp>, <mail>, <scp>, and <get>), and those that connect to a remote machine to issue commands (<telnet>, <rexec>, and <sshexec>). All the tasks but <get> have dependencies on external libraries; that is, JAR files that must be in Ant’s own classpath. The files listed in table 7.2 must be in ANT_HOME/lib or otherwise placed on Ant’s classpath. The online Ant documentation contains live links to the most up-to-date versions and locations of these files.
Table 7.2. Libraries you need for the distribution tasks
|
Library |
Reason |
|---|---|
| ant-commons-net.jar commons-net-1.4.0.jar | Needed for <ftp> and <telnet>. |
| ant-javamail.jar activation.jar mail.jar | Needed for <mail> to support attachments, HTML messages, or authenticated SMTP. |
| ant-jsch.jar jsch-0.1.29.jar | The <sshexec> and <scp> tasks. jsch-1.3.0 and Ant 1.7.0 are incompatible; this should be fixed in later Ant versions. |
The ant- JAR files should already be on your system; only the support libraries are likely to be needed. Remember also that if you’re using an IDE-hosted Ant, you need to get these JAR files into its classpath somehow. To verify that everything is present, run
ant -diagnostics
Examine the “Tasks availability” section—none of the ftp, telnet, mail, ssh or sshexec tasks should be listed as unavailable. Unless -diagnostics thinks the tasks are present, we cannot distribute our application with Ant.
Once the tasks are available under Ant, we’re almost ready to distribute. There’s one last step: securing the redistributables so that recipients can trust them.
7.1.1. Securing our distribution
Nobody wants to download malicious applications to their computers, yet this is what can happen whenever you download an application or library from the network. We need to secure our distribution packages so that everyone can know that they come from trusted sources. We can start by having Ant create checksums for the .zip and .tar.gz files. These can be used in three ways.
- We can upload them with the files, for people to compare against.
- We can include the checksum in any announcement mail. If that mail itself is signed, such as with PGP, then people who trust us can be sure the binaries haven’t been altered.
- We can download the distributed files ourselves and verify that the checksums are still valid. This ensures that nobody has tampered with the released files.
Ant’s <checksum> task does the work for us:
<checksum file="${target.zip}" algorithm="sha1"
  format="MD5SUM" />
This task takes the name of a file or a nested fileset and the name of the algorithm, the default being md5. We’ve chosen to use sha1, as it’s cryptographically stronger. We’re also requesting that the output is in the format of the GNU md5sum and sha1sum programs. When Ant runs our task, it calculates the SHA-1 checksum of the target file, which saved to a file with the name of the source file, but with the extension .sha1 appended. The file will look something like this:
19c8db67e22b844e1f52be770e51775f5adff42c*diary-core-0.1alpha.zip
People downloading the file can now verify the checksum with the GNU tools by typing
sha1sum --check diary-core-0.1alpha-src.tar.gz.sha1
As well as saving the checksums to files, we save them to Ant properties simply by naming a property with the property attribute. This will let us include the checksum in our email.
<checksum file="${target.zip}" algorithm="sha1"
  format="MD5SUM" property="target.zip.sha1"/>
You can specify any JVM-supported MessageDigest algorithm. While the name is case-insensitive when matching the algorithm, the <checksum> task uses the algorithm attribute as the extension without changing the case. If you ask for “SHA1,” you get files with .SHA1 extensions.
The <checksum> task can also verify file checksums, which is something we’ll use in section 7.4.2 to check that the upload worked.
The other aspect of security is the communication channel. The <scp> and <sshexec> tasks offer secure, encrypted, two-part communications between computers. If you want secure distribution, these tasks provide the best way to upload content.
With the packages created and checksum files and properties generated from them, the development computer is ready for distribution. That leaves the servers through which we’ll be distributing.
7.1.2. Server requirements
We’re going to distribute our application using FTP, email, and SSH, which means that we need an FTP server, an email server, and a machine running an SSH daemon. That machine must also be running a web server so we can download the uploaded files from it.
For every server connection, we’ll need usernames and passwords. It’s always good to check that you can connect to the server before trying to get it to work in Ant, because that will catch connection and account problems early, without Ant adding more confusion.
With the relevant servers in hand, we can start the upload process. First, FTP.
7.2. FTP-based distribution of a packaged application
The first distribution activity is to upload the Zip and .tar.gz files to an FTP server. To do this, we start by declaring a named fileset containing all the redistributable files, for multiple tasks to use:
<fileset id="ftp.upload.fileset"
  dir="${dist.dir}">
  <include name="*.zip"/>
  <include name="*.zip.sha1"/>
  <include name="*.tar.gz"/>
  <include name="*.tar.gz.sha1"/>
</fileset>
Ant’s <ftp> task can connect to a remote FTP server and then perform any one of the actions listed in table 7.3.
Table 7.3. FTP operations allowed in the action attribute of the <ftp> task
|
Action |
Meaning |
|---|---|
| chmod | Change remote file permissions |
| del | Delete files |
| get | Download files, optionally using timestamps |
| list | Save a directory listing to a file |
| mkdir | Create one or more directories, if they’re absent |
| put | Upload files, optionally using timestamps |
| rmdir | Delete directories |
For distribution, we’re only concerned with connecting to a server and uploading changed files. The exact process is slightly different for Unix and Windows machines, so we’ll have to treat each slightly differently. Let’s start with Unix.
7.2.1. Uploading to Unix
Our first activity is uploading the fileset to a Unix system, specifically a Linux box running the vsftpd FTP program. The hostname, username, and other parameters all need to be passed to the build file; the parameters must be kept secure. We also want to be able to switch between different properties files for different targets.
To keep the account details more secure, we store them in a properties file, one with the name of the server. We can have multiple servers in different files, each with its own settings: username, password, system type, and upload directory. Here’s the first file:
ftp.server=k2
ftp.user=testuser
ftp.password=m00c0w
ftp.dir=temp/upload
We save this file as secure/k2.properties. The directory should have its access restricted to the developer, and not be put under revision control. To load this properties file, we add a new target, ftp-init. It uses the value of the Ant property server to select the file to load:
<target name="ftp-init" depends="init">
  <fail unless="server">Set the "server" property!</fail>
  <property name="ftp.propfile"
    location="secure/${server}.properties" />
  <loadproperties srcFile="${ftp.propfile}" />
</target>
The target uses the <loadproperties> task instead of <property file =". . .">, because the latter task doesn’t complain if a file is missing. The <load-properties> task always fails the build in such a situation, so it can detect when the value of server is wrong.
To upload the files, we use two <ftp> tasks. The first creates a destination directory; the second copies in the files. Listing 7.1 shows the target that does this.
Listing 7.1. Uploading files to a Unix system
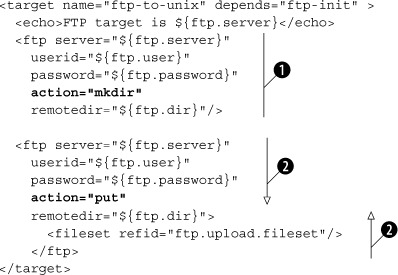
This is the core of the FTP process. We create the directory ![]() then push the predefined fileset to the remote server
then push the predefined fileset to the remote server ![]() . Let’s try it out:
. Let’s try it out:
> ant -f core-chapter-07.xml ftp-upload
Buildfile: core-chapter-07.xml

init:

ftp-init:

BUILD FAILED
/home/ant/diary/core/core-chapter-07.xml:67: Set the
 "server" property!

Total time: 1 second
What went wrong? We forgot to identify the server. Without our test in the ftp-init target, the build would still have broken in the <ftp> task, but without a helpful error message. When you return to a build file many months after writing it, you’ll appreciate the value of such diagnostics checks.
Let’s try again with the server selected on the command line:
> ant -f core-chapter-07.xml ftp-upload -Dserver=k2
Buildfile: core-chapter-07.xml

init:

ftp-init:

ftp-upload:
  [echo] FTP target is k2
   [ftp] 8 files sent

BUILD SUCCESSFUL
Total time: 6 seconds
There. Our upload is complete. For more detail, we could run Ant in -verbose mode, or set the verbose attribute of the <ftp> task to true. That will list every file sent over the wire.
Now let’s upload to a Windows 2003 server.
7.2.2. Uploading to a Windows FTP server
With all configuration details kept in property files, we can upload to a Windows server that is running the FTP service:
ftp.server=knoydart
ftp.user=alpine\ant
ftp.password=comp1ex
ftp.dir=c:\upload
Notice how we had to escape backslashes in both the directory and username, and how we had to include the domain name in the latter. Ant doesn’t compensate for platform-specific filenames on remote systems.
Now we can call the ftp-upload target with -Dserver=knoydart:
> ant -f core-chapter-07.xml ftp-upload -Dserver=knoydart
Buildfile: core-chapter-07.xml

init:

ftp-init:

ftp-upload:
     [echo] FTP target is knoydart
      [ftp] sending files
      [ftp] 8 files sent

BUILD SUCCESSFUL
Total time: 1 second
Again, the upload worked. This shows that we can distribute our files to remote FTP servers, be they Windows or Unix. These could be the machines where our application is to run, or they could be a site that publishes the files for others to download. That’s exactly the service that SourceForge provides to all open source projects it hosts, which is a common target for distribution from Ant.
7.2.3. Uploading to SourceForge
Open Source projects hosted on the SourceForge site (http://sourceforge.net) have to use FTP if they want to release files to the SourceForge download service. Developers must upload their packages using anonymous FTP, then go to the project web page where a logged-in developer can release a “package.” That’s done in the project administration section, under “edit/release packages.”
To do a SourceForge upload, all we need is another properties file:
ftp.server=upload.sourceforge.net
ftp.user=anonymous
ftp.password=${user.name}
ftp.dir=incoming
Ant can perform the upload, leaving the web page work to the developers:
ant -f core-chapter-07.xml ftp-upload -Dserver=sourceforge
Buildfile: core-chapter-07.xml
init:

ftp-init:

ftp-upload:
     [echo] FTP target is upload.sourceforge.net
      [ftp] sending files
      [ftp] 8 files sent

BUILD SUCCESSFUL
Total time: 20 seconds
We can upload to SourceForge as easy as to a machine next to our desk. This shows the advantage of controlling the build with external properties files. Anyone can add support for new FTP destinations.
In the build file, the ftp-upload target doesn’t depend upon the targets that build the packages. Why not? We want to decouple distribution from packaging. A packaged release can be made, tested, and uploaded to multiple sites without ever being rebuilt. We don’t want the distribution targets to unwittingly trigger a rebuild.
The dependency checking also works across the network: it’s possible to set the FTP tasks to only upload files that have changed. This can save bandwidth and make builds faster, but it’s risky. To understand the dangers, you need to understand how the task determines if a remote file is out of date.
7.2.4. FTP dependency logic
![]()
When you upload or download files over FTP, you can ask for the local and remote file times to be checked, so the upload or download only happens when needed. This is a bit troublesome, as the task has to parse the output of the directory listings to determine timestamps. Distribution across time zones can be extra hard, which is why recent versions of the task add a timediffauto attribute, telling the task to work out the time difference at the far end by creating a file there. Even then, there’s the problem that the directory listings can be internationalized, with a different ordering of days, months, and years, and even month names in different countries.
We avoid using FTP dependencies in our build files. It’s easy to enable by setting the depends attribute in our task:
<ftp server="${ftp.server}"
  userid="${ftp.user}"
  password="${ftp.password}"
  verbose="true"
  action="put"
  depends="true"
  remotedir="${ftp.dir}">
    <fileset refid="ftp.upload.fileset"/>
  </ftp>
Everything works with both our local targets, Linux and Windows:
ftp-depends:
     [echo] FTP target is knoydart
      [ftp] Creating directory: temp/upload
      [ftp] sending files
      [ftp] 0 files sent

BUILD SUCCESSFUL
Total time: 2 seconds
The SourceForge target fails, because that server doesn’t allow any directory listing so it cannot check timestamps. This is another reason why we don’t use FTP dependency checking and, instead, stick with depends="false".
If you do want to use timestamp dependencies to manage uploads, consult the <ftp> task’s documentation for all the details. It’s possible to specify the approximate accuracy of the clocks, the remote time zone and language of the server, and, for unsupported languages, the complete list of month names needed to parse dates. In theory, this makes managing dependencies manageable. In practice, however, it’s very brittle. We prefer uploading over SSH. It may not have any dependency logic at all, but it’s more secure. Before we get to that, let’s try distributing the program by email.
7.3. Email-based distribution of a packaged application
The next problem is emailing the application to multiple recipients. We’ll use the <mail> task for this, and send mail via Google’s gmail mail hub to avoid setting up a mail server of our own.
Ant’s <mail> task can send emails—either plaintext or “MIME”—with attachments and HTML text. To send MIME messages, we need the JavaMail libraries (mail.jar and activation.jar) on Ant’s classpath. If they’re missing, the task falls back to supporting plain text and uuencode-encoded data only. As authenticated/encrypted SMTP also uses these libraries, you need the JavaMail JARs if you want to
- Send HTML messages
- Send file attachments in messages
- Use SSL/TLS to make a secure connection to the mail server
We’re going to send binary attachments via the gmail mail hub, for which we need these extra libraries.
Table 7.4 shows the attributes of the <mail> task. It needs an SMTP server; the default is localhost. Build files should always set the mailhost attribute from a property, even if the default is simply localhost, so that users can override it. Our email target does this along with all other connection options:
Table 7.4. <mail> task attributes
|
Attribute |
Description |
Required? |
|---|---|---|
| bcclist | BCC: recipient list | No |
| cclist | CC: recipient list | No |
| charset | Character set of the message | No |
| encoding | Message type: MIME, uu, auto, or plain | No, default is auto |
| failonerror | Stops the build if an error occurs when sending the email | No, default to true |
| files | A list of files | No |
| from | Sender | Yes |
| includefilenames | Flag to include the names of included files in the message; not applicable to MIME messages | No, default to false |
| mailhost | Mail server host name | No, default to localhost |
| mailport | Port number of the server | No, default to 25 |
| message | Text of the email | Yes, unless included elsewhere |
| messageFile | File to use as the text of the message | No, but a message or attachment is needed somehow |
| messageMimeType | MIME type to use for message body | No, default to text/plain |
| password | Password for SMTP authentication | Only if the server needs it |
| replyto | Reply to alias | No, from usually suffices |
| ssl | Enables SMTP over SSL/TLS | No, default is false |
| subject | Subject of message | No |
| tolist | Recipient list | Yes |
| user | Username for SMTP authentication | Only if the server needs it |

In our <mail> declaration, we put the text message in a <message> element ![]() . We then list two filesets, pulling in the Zip file and its .sha1 checksum
. We then list two filesets, pulling in the Zip file and its .sha1 checksum ![]() . In the text message, we also stick in the checksum, though without signed messages the distribution mechanism is still vulnerable
to spoofing.
. In the text message, we also stick in the checksum, though without signed messages the distribution mechanism is still vulnerable
to spoofing.
We need some properties to configure the task. We’ll put the following server and account information into our build.properties file:
email.server=smtp.gmail.com
email.ssl=true
[email protected]
email.from=Ant Book Diary Project <[email protected]>
email.password=m00c0w
[email protected]
email.port=465
Using public mail servers is cheap and easy: just create a new account. What you do have to watch for is getting the mail port right (here, 465) and turning on SSL with ssl="true" in the <mail> task.
Let’s test the target:
> ant -f core-chapter-07.xml email-announcement
Buildfile: core-chapter-07.xml

init:

checksum:

email-announcement:
     [mail] Sending email:
      New release of diary-core-0.1alpha.jar
     [mail] Sent email with 2 attachments

BUILD SUCCESSFUL
Total time: 8 seconds
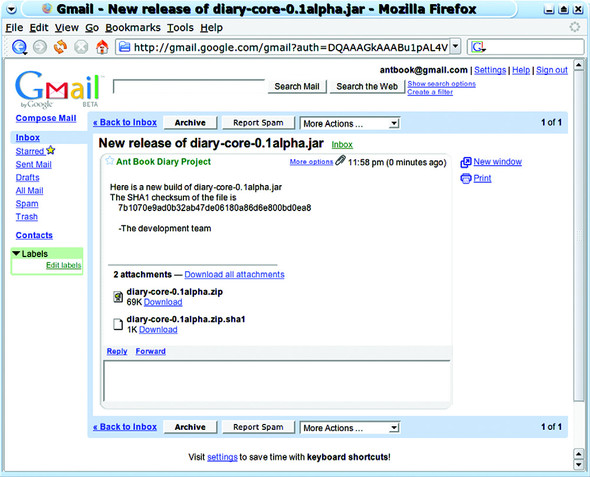
To check that it worked, we send an email to ourselves only. Figure 7.1 shows that it has arrived. A full check would involve downloading the files and verifying that the checksum matched.
Figure 7.1. Checking our mailbox. Our original message said “This is paypal security, please run this program to secure your account,” but the spam filters kept deleting it.
Once we’re happy with the target, we can change the recipient list to deliver the message to its intended audience. The tolist, cclist, and bcclist attributes all take a list of comma-separated email addresses, so we could email more people by extending our recipients list property:
[email protected], [email protected]
There’s a task called <loadfile> that can load an entire file into a single property, which could be a better way of storing the addresses. We could keep the entire recipient list in a single file, and keep that file under SCM.
To send a prettier message, we need an HTML message body.
7.3.1. Sending HTML messages
To send HTML messages, we set the MIME type of the message body to text/html with messageMimeType="text/html", and we include an HTML message:
<mail
  tolist="${email.to}"
  from="${email.from}"
  subject="New release of ${target.name}"
  mailhost="${email.server}"
  mailport="${email.port}"
  ssl="${email.ssl}"
  user="${email.user}"
  password="${email.password}"
    messageMimeType="text/html">
    <message><![CDATA[
<p>
  Here is a new build of ${target.name}
  The SHA1 checksum of the file is:
  </p>
  <pre>
      ${src.tar.sha1}
  </pre>
  <p><i>-The development team</i></p>
]]></message>
    <fileset file="${target.zip}" />
    <fileset file="${target.zip}.sha1" />
  </mail>
We have to escape the HTML elements by using a CDATA section. This is a bit of an XML file that begins with <![CDATA[ and ends with ]]>. XML parsers will convert everything between these delimiters into text and pass it as the message. Alternatively, we could keep the HTML message in a file, and point <mail> at that file with the messagefile attribute. This would make it trickier to insert Ant properties into the message.
Sending email from a build is easy, especially when free email services provide the infrastructure. All you need is the right JAR files and a network connection.
As with FTP, it isn’t a very secure way of distributing things. The files are sent in the clear, and the recipient has to trust that senders are who they say they are. The best way to upload files is to use SSH.
7.4. Secure distribution with SSH and SCP
The next distribution activity is to upload our application using SSH. This protocol encrypts all communications, authenticates the server to the client via a public key, and the client to the server via a public/private key pair or via a password. It’s a secure way to connect to remote servers or upload applications, and is widely used.
It does require an SSH server on the remote host, which is common on Unix. Commercial SSH servers are available for Windows, and there’s an excellent free client implementation in PuTTY. We’ll target OpenSSH on a Linux system.
It does take a bit of work setting up the trust between the local and remote system. You should do this outside of Ant to reduce the sources of confusion. Turn to the Ant tasks only after you have command-line SSH clients talking to the target server.
The first step is to choose a key pair. SSH uses public and private keys; you keep the private key somewhere safe on your machine and upload the public key to the target host. If you don’t already have these keys, use the appropriate tool (e.g., ssh-keygen) to create an SSH keypair, and set a passphrase on the private key for extra security.
Next, on the command line SSH client, connect to the server using your password authentication. You must use exactly the same hostname as you intend to use for the Ant task. SSH keeps a list of known hosts and matches them by name; in this list, “localhost” doesn’t match “k2,” even if they are the same box. The Ant tasks will fail if the remote destination isn’t a known host.
Once connected to the remote server, edit its file ~/.ssh/authorized_keys and append the public key of your new identity. Disconnect and try to connect using your new identity. On Unix, the commands would be something like
cd ~/.ssh
ssh k2 -i k2-identity
You should be asked for the passphrase of the identity—not the password. If you get a password prompt, it means that the identity isn’t in the server’s authorized key list.
Once SSH is working, disconnect and use SCP to copy something over.
scp -i k2-identity k2-identity.pub k2:.
A successful copy verifies that SCP is working. Only after the command line tools are working should you turn to the Ant tasks that use SSH.
7.4.1. Uploading files with SCP
Ant has two SSH tasks—<scp> to copy files and <sshexec> to issue remote commands. We’re going to upload files to the server with <scp>, which transfers files over an SSH connection. Both tasks have a dependency on the JSch library, from JCraft, at http://www.jcraft.com/jsch/. The JAR file needs to be on Ant’s classpath for <scp> to work.
Setting up the build file to upload the redistributable files is similar to the FTP upload of section 7.2. We can use the same fileset of files to upload, and use server-specific property files to customize the task for different targets. Here is the file secure/k2.ssh.properties, which contains the SSH connection information for the server k2:
ssh.server=k2
ssh.user=${user.name}
ssh.dir=public_html
ssh.keyfile=${user.home}/.ssh/k2-identity
ssh.passphrase=secret?
ssh.verbose=true
An initialization target, ssh-init, loads the file defined by the property server:
<target name="ssh-init" depends="init">
  <fail unless="server">Set the "server" property!</fail>
  <property name="ssh.propfile"
    location="secure/${server}.ssh.properties" />
  <loadproperties srcfile="${ssh.propfile}" />
</target>
We have to declare the target server on the command line with the argument -Dserver=k2. If we want a default server, we could put in our personal build.properties file.
Note
Sometimes a project just doesn’t behave properly. The build file looks right and yet some directory or other setting is completely wrong. If this happens, look for a build.properties file. It’s easy to add an override there, and then forget about it. IDEs that let you debug a build file are very useful to track down such problems.
The task for the actual upload is <scp>. This task has a set of attributes that closely match that of the scp program. It can copy a single file to another filename, or copy an entire fileset to a specified directory. It can also pull down files, one by one:

The task is relatively simple to use. The hard part is constructing the destination string ![]() , which has the same syntax as in the scp command:
, which has the same syntax as in the scp command:
user[:password]@host:[directory/tree]
It can take some effort to get these strings right, which is why learning to use the command-line tool is good. You can experiment there and use the results in your build files. For setting up our destination path in Ant, we derive it from properties:
${ssh.user}@${ssh.server}:${ssh.dir}
For the k2 server, the result would be ant@k2:public_html; the public_html directory under the home directory of the user ant. We don’t specify the password, because we’re using a private key to log in. To do this, we set the <scp> task’s keyfile attribute to the location of the private key, and we set the password to unlock the key file in the passphrase attribute. If the key file is unprotected, we can omit that attribute. The result is a task to perform key-based authentication and upload of our files:
> ant -f core-chapter-07.xml scp-upload -Dserver=k2
Buildfile: core-chapter-07.xml

init:

ssh-init:

scp-upload:
 [echo] SCP target is k2
  [scp] Connecting to k2:22
  [scp] Sending: diary-core-0.1alpha-src.tar.gz : 28461
  [scp] File transfer time: 0.06 Average Rate: 437,861 B/s
  [scp] Sending: diary-core-0.1alpha-src.tar.gz.sha1 : 73
  [scp] File transfer time: 0.0 Average Rate: 36,500.0 B/s
  [scp] Sending: diary-core-0.1alpha-src.zip : 37294
  [scp] File transfer time: 0.11 Average Rate: 330,035 B/s
  [scp] Sending: diary-core-0.1alpha-src.zip.sha1 : 70
  [scp] File transfer time: 0.0 Average Rate: 70,000.0 B/s
  [scp] Sending: diary-core-0.1alpha.tar.gz : 30678
  [scp] File transfer time: 0.05 Average Rate: 568,111 B/s
  [scp] Sending: diary-core-0.1alpha.tar.gz.sha1 : 69
  [scp] File transfer time: 0.0 Average Rate: 34,500.0 B/s
  [scp] Sending: diary-core-0.1alpha.zip : 70292
  [scp] File transfer time: 0.09 Average Rate: 772,439 B/s
  [scp] Sending: diary-core-0.1alpha.zip.sha1 : 66
  [scp] File transfer time: 0.0 Average Rate: 33,000.0 B/s
  [scp] done.

BUILD SUCCESSFUL
Total time: 4 seconds
It’s good to see that everything really worked—setting up the trust between the two machines can be quite tricky.
If we run the task again, we get exactly the same output: there’s no dependency logic in this task. However, it works. We have Ant securely uploading our artifacts to a server, with both the server and client authenticating by using private/public keys. This is secure distribution at its best. Now we can retrieve the files from the remote site and check their checksums so we make sure that the upload really worked.
7.4.2. Downloading files with <scp>
We can verify that the upload worked by downloading a file and verifying its checksum. We do this in three phases. First, we have to set up the names of the source and destination files:
<basename property="remote.f" file="${target.zip}"/>
<property name="ssh.download.src"
value="${ssh.user}@${ssh.server}:${ssh.dir}/${remote.f}"
  />
<tempfile property="ssh.download.dest"
  prefix="ssh" suffix=".zip"/>
<echo>
Downloading ${ssh.download.src}
to ${ssh.download.dest}
</echo>
The <basename> task extracts the last item in a directory path and sets a property to it. Here we use it to get the filename of the zip file from the full path. We then construct a download string referring to the remote file, such as
ant@k2:public_html/diary-core-0.1alpha.zip
The <tempfile> task sets another property to the name of a temporary file. Like Java’s File.createTempFile() static method, it takes a prefix and a suffix to create a temporary file, and an optional directory in which the file can be created. The destination property is then set to the name of a file that doesn’t exist at the time the task is executed. Unlike the createTempFile() method, the temporary file isn’t itself created.
With our remote and local filenames, we can copy the file from the server:
<scp
  remoteFile="${ssh.download.src}"
  localToFile="${ssh.download.dest}"
  passphrase="${ssh.passphrase}"
  keyfile="${ssh.keyfile}"
  verbose="${ssh.verbose}" />
Compared to the declaration in the scp-upload target of section 7.4.1, the task has lost its nested fileset and the remoteToDir attribute, in exchange for the remoteFile and localToFile attributes. These identify the remote source and local destination directories. After the download, we can verify that the checksum is the same as that of the original files:
<fail>
  <condition>
    <not>
      <checksum
       algorithm="sha1" format="MD5SUM"
       property="${target.zip.sha1}"
       file="${ssh.download.dest}"/>
    </not>
  </condition>
  Checksum failure for ${ssh.download.dest}
</fail>
This uses <checksum> as a condition inside a <fail> task. Here <checksum> verifies that the file’s checksum matches the contents of the property attribute. If there’s a mismatch, the condition fails and the build halts. In this way, we can verify that a file we’ve pulled down has not been tampered with:
scp-download:
 [echo]   Downloading
   ant@k2:public_html/diary-core-0.1alpha.zip
 [echo]   to /tmp/ssh313293723.zip
  [scp] Connecting to k2:22
  [scp] Receiving file:
    public_html/diary-core-0.1alpha.zip
  [scp] Receiving: diary-core-0.1alpha.zip : 70292
  [scp] File transfer time: 0.09 Average Rate: 798,772 B/s
  [scp] done
This checksum test is invaluable when validating mirror distributions. Imagine a build file that pulls down copies of your program from all the public mirrors and checks that their checksums are valid; then imagine that program running every night. This would help defend against an accidental or malicious corruption of your program.
For redistributing files, SSH should be the protocol of choice, and under Ant, <scp> is the task to use. It’s secure and reliable. There’s one more feature that SSH gives us—remote code execution—which Ant offers through the <sshexec> task.
7.4.3. Remote execution with <sshexec>
The <sshexec> task executes a command on the remote machine. It’s similar to running a command using the ssh command line:
ssh k2 -i .ssh/k2-identity "chmod a+r public_html/*"
That runs the chmod command on the server k2, marking all files in the public_ html directory as readable. We can do this in our build file with <sshexec>:
<target name="ssh-chmod" depends="scp-upload" >
 <sshexec host="${ssh.server}"
  username="${ssh.user}"
  passphrase="${ssh.passphrase}"
  keyfile="${ssh.keyfile}"
  command="chmod a+r public_html/*"/>
</target>
The information supplied to this target matches much of the <scp> command, though separate attributes are used for the username and host. The command is executed at the far end in the shell and environment of the remote user, so wildcards are allowed; they are interpreted by the shell—not by Ant.
Creating the upload directories
The <scp> task cannot upload to nonexistent directories; instead it will fail with the message “no such file or directory.” To create the destination, we have to issue a mkdir command on that remote machine:
<target name="ssh-mkdirs" depends="ssh-init" >
  <sshexec host="${ssh.server}"
    username="${ssh.user}"
    passphrase="${ssh.passphrase}"
    keyfile="${ssh.keyfile}"
    command="mkdir -p ${ssh.dir}"/>
</target>
This mkdir -p command creates all the directories in one go and doesn’t fail if the directory already exists. Making our scp-upload target depend upon this new target ensures that the destination directories are present before the upload.
There’s one more bit of SSH coverage left, and that is diagnosing failures.
7.4.4. Troubleshooting the SSH tasks
When these tasks fail, they fail without much information. Here are the error messages we’ve encountered, along with their meanings:
com.jcraft.jsch.JSchException: Auth fail
com.jcraft.jsch.JSchException: Auth cancel
These mean that we were not authenticated. It could be the wrong username, keyfile, or passphrase. It could be that your public key isn’t in the host’s authorized_keys file. It could even be the wrong host. If the command-line connection works, look at the keys, the password, and the passphrase and username properties.
com.jcraft.jsch.JSchException: reject HostKey
The host is unknown. Connect manually and add the host to the list of known hosts. A riskier alternative is to set the attribute trust="true", telling the task to trust all hosts. This is a real problem on Windows, because the PuTTY program doesn’t create a ${user.home}/.ssh/known_hosts file; it uses the registry to store the public keys of trusted hosts. The workaround we normally use is to copy one from a Unix system.
[scp] Identity: java.io.FileNotFoundException:
    /home/ant/.ssh/k2-identity2
    (No such file or directory)
Here we’ve referred to a nonexistent identity file. The fix? Get the filename right.
The key troubleshooting step is running ssh on the command line first. Not only does it verify that everything is working, it gives better diagnostics and, on Unix, sets up the known-hosts list. On Windows, the PuTTY and pscp programs help, but as their configuration files are not 100 percent compatible with the SSH2 files, which is what the Unix ssh tool and JSch library use, it still leaves you with problems to track down.
Because SSH is so secure, it’s the best way to access remote web sites. We can copy the files with <scp>, possibly creating directories and setting permissions with <sshexec>. If the remote system is running a web server, and <scp> is configured to upload into one of the directories in the web site, the artifacts can be downloaded. As this is the main way that applications get downloaded by other people, having the build file check the download works; it prevents all those support calls that come when it doesn’t.
7.5. HTTP download
To distribute via a Web server, we have to start Apache HTTPD or a similar application and upload the files into a published directory on the server. To do so, we create a new properties file secure/apache.ssh.properties, configured to upload to the right place on the remote machine:
ssh.server=people.apache.org
ssh.user=stevel
ssh.dir=public_html
ssh.keyfile=${user.home}/.ssh/identity
ssh.passphrase=not.a.real.password
ssh.verbose=true
To test it, we do a quick run of the existing targets:
ant -f ch07.xml ssh-chmod scp-download -Dserver=apache
This shows why verification targets are so useful. By splitting up different stages in the build process, with targets that check the state of the previous operations, you can diagnose problems more quickly. We now know that the long-haul upload worked properly, leaving only the new HTTP stage, for which we’ll use the <get> task. Before doing that, we actually want to see if the web server is running on the remote server.
7.5.1. How to probe for a server or web page
Before trying to download the files, we want to see if the web server is running. This is useful during distribution, and it will become invaluable when we get to testing web applications. The <condition> and <fail> tasks can check for a server’s availability using some conditions that can probe the remote machines.
The <http> condition looks for a remote page on a local or remote web server. By default, the condition succeeds if the server responds to the request with an HTTP status code below 400. Missing pages—identified by error code 404—and access-denied pages—noted with error code 403—are among those responses that fail the test. With the condition, we can test for local or remote web servers:
<http url="http://127.0.0.1/"/>
<http url="http://127.0.0.1:8080/"/>
<http url="http://eiger:8080/diary/happy.jsp"/>
<http url="http://www.apache.org/"/>
Fetching a JSP page will force the server to compile the page, if it hasn’t already been converted into Java code. The server will return the HTTP error code of 500 when the page won’t compile, breaking the build.
A sibling test, <socket>, probes to see if a local or remote TCP socket is reachable. This can be used to test for the availability of any well-known port, including SSH (22), telnet (23), SMTP (25), and HTTP (80, although sometimes 8080 or 8088):
<socket port="8080" server="127.0.0.1"/>

<socket port="22"   server="${ssh.server}"/>

<socket port="25"   server="${mail.server}"/>
Using these tests in a <condition> statement lets you control actions that could otherwise fail. For example, you could send email if the local mail server is running, or deploy to a server if it was accessible, but you can skip that part of the build process if the mail server was not reachable. You can use these network probes before network operations, skipping them if a server is absent. If you use this test to set a property such as offline for tasks to use as a condition, then make the probe task conditional on this property not being already set. This enables a notebook or home computer to run the build with the property set from the command line, disabling all network connection attempts. A real example of this is Ant’s own build.xml, which checks for the network being present by looking for the Apache site, as shown in listing 7.2.
Listing 7.2. The offline probe from Ant’s own build file
 <target name="probe-offline">
  <condition property="offline">
    <or>
      <isset property="offline"/>
      <not>
        <http url="http://www.apache.org/"/>
      </not>
    </or>
  </condition>
  <echo level="verbose"> offline=${offline}</echo>
</target>
When the build file is executed, if the offline property is set in build.properties or on the command line, Ant goes offline. If it isn’t set, it probes for the web site, interpreting any timeout (including anything caused by a firewall) as an absent network. Ant uses this in testing, first by excluding any online-only JUnit test classes, then by passing down the property to the unit tests themselves via a <sysproperty key="offline" value="${offline}"/> declaration in the <junit> test. This enables online-only tests to skip their work when the network is absent.
There’s one more test, <isreachable>. This takes a hostname in the host attribute or a URL in the url attribute and tries to reach the remote host in the URL
<condition property="offline">
  <isreachable host="eiger" timeout="10"/>
</condition>
This uses the InetAddress.isReachable() method that came with Java 1.5. It does a low-level ping of a server, which is very reliable on a LAN, but rarely gets beyond a firewall. It’s good for probing for local systems, though <socket> works better for checking that a host is actually listening on a known TCP port.
For retrieving files from a web server, the <http> condition is best. It and the <get> task can fetch HTTP pages from remote sites, that being our next activity.
7.5.2. Fetching remote files with <get>
To actually retrieve something from a web server, use the <get> task. This task supports the parameters listed in table 7.5.
Table 7.5. The attributes of the <get> command. The usetimestamp attribute for dependency-based downloads is valid only with HTTP.
|
Attribute |
Description |
Required? |
|---|---|---|
| src | The source URL | Yes |
| dest | The local destination file | Yes |
| verbose | Print a ‘.’ every 100KB of download | No, default to false |
| ignoreerrors | Don’t fail on errors | No, default to false |
| password | Password | No, unless username is set |
| username | Username for ‘BASIC’ HTTP authentication | No, unless password is set |
| usetimestamp | Download an HTTP file only if it’s newer than the local copy | No, default to false |
Any URL scheme that Java supports is valid in the url attribute, although the task is biased towards HTTP. The dest attribute declares the filename to save the download to. When working with http: and https: URLs, you can apply version-based checking to this download by using the usetimestamp attribute. This tells the task to send the If-Modified-Since header to the web server, using the file’s last-modified time as the stamp. If the server replies that the URL is unmodified, the task will not download the file again.
There’s an extended HTTP client under development, currently in the sandbox of not-yet-released extension “Antlib” libraries. The <http:get> task can save the output to a property, while the <http:post> task can post form or XML data to a site. Go to Ant’s web site or SVN repository for details on this if you have complex HTTP requirements.
Sticking with the built-in task, we want to <get> the file that we uploaded in section 7.4 with the <scp> task.
7.5.3. Performing the download
To download our redistributable file, we need to build a URL to the remote copy. We add a new property to each of the properties files used for SSH uploads. This property, http.base.url, contains the base URL for retrievals. Here’s the version for the apache site:
http.base.url=http://people.apache.org/~${ssh.user}
Note
Take full advantage of the fact that Ant properties can be used inside property files that Ant reads in. Don’t Repeat Yourself, as the Pragmatic Programmers say.
To ensure that this property is set, our download target must depend on the ssh-init target to load the server-specific property file, and the checksum target that creates the validation checksums. It uses a <get> to get the file, and <checksum> in a <fail> test to validate it:
<target name="http-download" depends="ssh-init,checksum" >
  <basename property="http.filename"
   file="${target.zip}"/>
  <tempfile property="http.download.dest"
    prefix="http" suffix=".zip"
    destDir="${java.io.tmpdir}"/>
  <property name="http.url"
    value="${http.base.url}/${http.filename}" />
  <get src="${http.url}" dest="${http.download.dest}"
    verbose="true" />
  <fail>
    Downloaded file ${http.download.dest}
    From URL ${http.url}
    does not match its expected checksum
    <condition>
      <not>
        <checksum
          algorithm="sha1" format="MD5SUM"
          property="${target.zip.sha1}"
          file="${http.download.dest}" />
        </not>
    </condition>
  </fail>
</target>
Because we set the verbose flag on the <get> task, the output includes a progress marker and source and destination information:
>ant -f core-chapter-07.xml http-download -Dserver=apache
Buildfile: core-chapter-07.xml

init:

ssh-init:

checksum:

http-download:
  [get] Getting:
  http://people.apache.org/~stevel/diary-core-0.1alpha.zip
  [get] To: /tmp/http1798828968.zip
  [get] ...............................................

BUILD SUCCESSFUL
Total time: 2 seconds
This output shows that the public web server is serving up the Zip file we uploaded earlier. The SCP upload worked, and the web server is working. This is a fully functional remote distribution, with automated testing alongside the upload operation. If the upload and download targets succeed, we’ll know that everything works, without having to do any manual checks.
That completes our four redistribution activities: FTP, SSH/SCP, email, and HTTP. All that’s left is to set up the build file so we can run all operations in one single build. If we can do that, we have a completely hands-free distribution process.
7.6. Distribution over multiple channels
We have created a set of targets to distribute the files using FTP, email, and SCP. Now we want to invoke them all, for a one-stop redistribute-everywhere target. This seems straightforward, except for one little problem. How do we run the same targets more than once with different values of the server property?
We know we can do this from the command line, with a series of repeated ant runs:
ant ftp-upload -Dserver=aviemore
ant ftp-upload -Dserver=sourceforge
ant email-announcement
ant scp -Dserver=k2
ant scp -Dserver=apache
How do we do this inside Ant itself? With the task <antcall>, a task that runs any target and its dependencies, potentially with different properties.
7.6.1. Calling targets with <antcall>
Normally, Ant decides which order to run targets, based on their declared dependencies. It builds a big graph of all the targets, then it executes them in an order that guarantees that no target will be executed before its dependencies.
This works well, most of the time. Sometimes, however, a different problem comes up. To upload our files to multiple hosts, we need to run the same target, multiple times, with different properties. This is what the <antcall> task enables. It takes the name of a target and runs that target and all its dependencies. You can specify new properties and whether to pass down existing property definitions and datatype references.
The <antcall> task can call any target in the build file, with any property settings you choose. This makes it equivalent to a subroutine call, except that instead of passing parameters as arguments, you have to define “well known properties.” Furthermore, any properties that the called target sets will not be remembered when the call completes.
A good way to view the behavior of <antcall> is as if you’re actually starting a new version of Ant, setting the target and some properties on the command line. When you use this as a model of the task’s behavior, it makes more sense that when you call a target, its dependent targets are called also.
To illustrate the behavior, let’s use a project containing a target—"do-echo"—that prints out some properties potentially defined by the project’s predecessors.
<project name="antcall" default="do-echo">
  <target name="init">
    <property name="arg3" value="original arg3" />
  </target>

  <target name="do-echo" depends="init">
   <echo>${arg1} - ${arg2} - ${arg3}</echo>
  </target>
</project>
When you call the do-echo target directly, the output should be predictable:
init:
do-echo:
     [echo] ${arg1} - ${arg2} - original arg3
Now add a new target, which invokes the target via <antcall>:
<target name="call-echo" depends="init">
  <property name="arg1" value="original arg1" />
  <property name="arg2" value="original arg2" />
  <echo>calling...</echo>
  <antcall target="do-echo">
   <param name="arg1" value="overridden"/>
  </antcall>
  <echo>...returned</echo>
</target>
This target defines some properties and then calls the do-echo target with one of the parameters overridden. The <param> element inside the <antcall> target is a direct equivalent of the <property> task: all named parameters become properties in the called target’s context, and all methods of assigning properties in that method (value, file, available, resource, location, and refid) can be used. In this declaration, we’ve used the simple, value-based assignment.
The output of running Ant against that target is
init:
call-echo:
     [echo] calling...
init:
do-echo:
     [echo] overridden - original arg2 - original arg3
     [echo] ...returned
The first point to notice is that the init target has been called twice, once because call-echo depended upon it, and a second time inside the new <antcall> context because do-echo depended upon it.
The second point of interest is that the previously undefined properties, arg1 and arg2, have been set. The arg1 parameter was set by the <param> element inside the <antcall> declaration; the arg2 parameter was inherited from the current context. The final observation is that the final trace message in the call-echo target appears only after the echo call has finished. Ant has executed the entire dependency graph of the do-echo target as a subsidiary build within the new context. This notion of Ant contexts is very similar to that of an environment in LISP or Scheme. In those languages, an environment represents the complete set of definitions in which a function is evaluated. Ant’s contexts are not so well isolated: Ant runs in a shared JVM; type definitions are global, and only properties and datatype references can be changed within a context. Figure 7.2 illustrates what’s taking place. Some parts of the project are new, but the JVM is still shared.
Figure 7.2. A model of how <antcall> creates a new project, with its own internal state
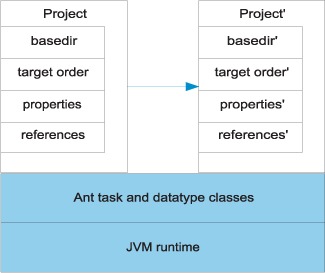
It’s important to remember that all properties set in an <antcall> are local to that call. Changes to the properties or references of the child project don’t propagate back up the calling build. Information from the parent project can be passed down, if done carefully.
Managing inheritance in <antcall>
The <antcall> task has one mandatory attribute, target, which names the target to call, and two optional attributes, inheritall and inheritrefs. The inheritall flag can prevent the task from passing all existing properties down to the invoke target, that being the default behavior. If the attribute is false, only new properties defined in the task declaration are passed down. To demonstrate this behavior, we add another calling target:
<target name="call-echo2" depends="init">
  <property name="arg1" value="original arg1" />
  <property name="arg2" value="original arg2" />
  <echo>calling...</echo>
  <antcall target="do-echo"
     inheritall="false">
   <param name="arg1" value="newarg1"/>
  </antcall>
  <echo>...returned</echo>
</target>
When you execute this target, the log showed that do-echo didn’t know the definition of arg2, as it was not passed down:
[echo] newarg1 - ${arg2} - original arg3
Note that arg3 is still defined, because the second invocation of the init target will have set it; all dependent tasks are executed in an <antcall>.
Regardless of the inheritance flag setting, Ant always passes down any properties set on the command line. This means that anything manually set on the command line stays set, regardless of how you invoke a target. Take, for example, the command line
ant call-echo2 -Darg2=predefined -Darg1=defined
This results in an output message of
[echo] defined - predefined - original arg3
Any properties defined on the command line always override anything set in the build file, no matter how hard the build file tries to avoid it. This is actually very useful when you do want to control a complex build process from the command line, as you don’t need to care about how the build file is implemented internally.
You can also pass references down to the invoked target. If you set inheritrefs="true", all existing references are accessible in the new context. You can create new references from existing ones by including a <reference> element in the <antcall> declaration, stating the name of a new reference to be created using the value of an existing path or other reference:
<reference refid="compile.classpath"
  torefid="exec.classpath" />
Creating new references is useful if the invoked target needs to use some path or patternset as one of its customizable parameters.
For the distribution problem, <antcall> will let us run the distribution targets against different servers by calling the targets multiple times, with the server property set to a different server on each call. We just need a single target to issue the calls.
7.6.2. Distributing with <antcall>
Listing 7.3 shows a target that runs each of the "scp" and "ftp-upload" targets twice, each time with a new destination set in the server property.
Listing 7.3. Using <antcall> to manage a series of distribution actions
<target name="distribute" depends="email-announcement">
  <antcall target="ftp">
    <param name="server" value="knoydart"/>
  </antcall>
  <antcall target="ftp-upload">
    <param name="server" value="sourceforge"/>
  </antcall>
  <antcall target="scp">
    <param name="server" value="k2"/>
  </antcall>
  <antcall target="scp">
    <param name="server" value="apache"/>
  </antcall>
</target>
If we had made all the distribution targets dependent on the complete compile, test, and package run, this would trigger four separate rebuilds of the entire application, which would make for a slow build indeed. Having the minimal dependencies on each <antcall> target keeps the build fast and guarantees that the same artifacts are distributed to every server. Once you start using <antcall>, the normal dependency rules of Ant are thrown out the window.
We’re not going to show the entire trace of the build, because it’s both verbose and repetitive. Here’s a bit of the build—the two FTP “antcalls”:
init:

ftp-init:

ftp-upload:
     [echo] FTP target is knoydart
      [ftp] sending files
      [ftp] 8 files sent

init:

ftp-init:

ftp-upload:
     [echo] FTP target is upload.sourceforge.net
      [ftp] sending files
      [ftp] 8 files sent

BUILD SUCCESSFUL
Total time: 1 minute 40 seconds
As you can see, the ftp-upload target and its two predecessors, init and ftp-init, have run twice within a single build. All told, it took less than two minutes to publish the packages to two local and two remote sites, and to email out the news. This is what distribution should be: fully automated and available at the push of a button.
The build also shows how to use <antcall>, namely when you want to invoke the same target(s) more than once, perhaps with different properties. Any project that uses <antcall> as the main way of chaining targets together isn’t using Ant or <antcall> correctly.
Now, there’s one more aspect of <antcall> to look at: determining when its use is inappropriate.
Best practices: effective <antcall>
In most projects, <antcall> is a rare occurrence. If you see it a lot, something has gone wrong. The common mistake is to use it to order all stages of a build:
<target name="main">
  <antcall target="compile" />
  <antcall target="jar" />
  <antcall target="test" />
  <antcall target="zip" />
  <antcall target="ship" />
</target>
As Ant creates a new project on every <antcall>, the build will be slow and memory hungry, with common targets being called repeatedly.
Except for targets that you want to call more than once, especially with different parameters, let Ant handle the order of targets by listing them in the dependencies attributes of other tasks.
7.7. Summary
Distribution is a common activity in a build process, which means that it should be automated. We’ve distributed our diary Zip and tar files in three ways—by FTP using <ftp>, by email using <mail>, and by SSH with <scp> and <sshexec>. We’ve also used <get> to retrieve a published archive, then <antcall> to chain everything together into a big distribution activity.
A key theme in this process is security. Nobody should be running programs from sites or people that they don’t trust. MD5 and SHA1 checksums can help, as they provide a basis for verifying that files haven’t been tampered with en route.
The chapter also introduced the <antcall> task. This task lets you re-enter your build file, calling a named target with any properties you choose. The <antcall> task is powerful and useful for some operations. However, it does make a build slower and more complex. Use <antcall> sparingly, remember that a target’s dependencies are also invoked, and don’t expect properties to be passed back to the caller.
With distribution out of the way, we’ve covered the entire process of using Ant to build, test, package, run, and distribute a Java program. What we haven’t done is shown a single build file that does all of these activities. It’s time for a quick review of all that we need Ant to do, with a single build file to do everything. This review also will let us discuss how to write usable build files and how to migrate to Ant.