
Chapter 16. Deployment
| 16.1 | How to survive deployment | |
| 16.2 | Deploying with Ant | |
| 16.3 | Database setup in Ant | |
| 16.4 | Deploying with SmartFrog | |
| 16.5 | Using SmartFrog with Ant | |
| 16.6 | Embracing deployment | |
| 16.7 | Summary |
We’ve been deploying web applications since chapter 12. It’s now time to look at deployment in detail—all the way to production. Before we start, we need to revisit the question: What is deployment?
According to application server vendors, deployment is just “deploy-by-copy,” such as copying a WAR or EAR file into a directory. Since all application servers now support this, isn’t deployment done? Hardly. The real problem is not getting the application to the remote machine, or even getting the application loaded by the application server. It is getting the whole system working.
A web site cannot be described as successfully deployed until the database is up and running, the web site can talk to that database, and its pages are externally visible. This is what deploy-by-copy forgets about: copying a file to the application server is a tiny piece of the problem.
Just as we’ve automated the building and testing of our applications, so can we automate deployment. It’s going to be hard, because deployment itself is complex. But it is possible, and it can transform your development if you can manage it.
In this chapter, we’re going to explore the final piece of Ant’s built-in deployment support—database setup—then look at how Ant can delegate advanced deployment to another tool, SmartFrog. The chapter will show that development processes need to evolve to embrace deployment, instead of fearing it.
16.1. How to survive deployment
We clearly think deployment is hard. Why? Mostly, it comes down to complexity.
- Complex server configurations. Production systems are far more intricate than a single developer’s box. There’s a database server, multiple application servers, and a router. Every difference between the development systems and the production systems can break the application.
- Complex organizations. Organizations often have a split between developers and operations. Developers write the code, but operations have to keep everything working.
- Optimistic schedules. Since server-side deployment is viewed as easy, everyone neglects the problem until the application is due to go live, at which point it’s too late to automate, leaving nothing but chaos and delays.
There’s a very simple test to see if the deployment process is working. If you have to go into the air-conditioned server room on a weekend, deployment is broken. If you’re scared of the phone ringing, deployment is broken. If you’re a week away from going live and you haven’t started bringing up the server, then deployment is broken—you just don’t know it yet.
It’s possible to survive deployment, just as you can stay on top of the rest of the software development process—by having a process to keep it under control. Table 16.1 shows what you have to do:
The idea of integrating deployment into the development process is very leading-edge. It’s something that some companies appear to do, though they don’t talk about it much. Our proposed process is based on applying test-centric development to the deployment process. Test, automate, and iterate: that’s the secret. What do we propose?
Table 16.1. Keep deployment under control by integrating it with the development process
|
Action |
Rationale |
|---|---|
| Start working on deployment early. | Deployment is too important to leave until the last minute. |
| Work with operations. | You cannot just throw the application over the wall to the operations team and expect it to work. |
| Target the production system. | Even during development, target the application server, database, and OS of the production system. |
| Automate deployment. | With a fully-automated deployment process, you can eliminate errors in the deployment process and deploy to more machines. |
| Test the deployment. | Deployment problems—usually configuration problems—are testable. So write the tests. |
| Track deployment defects. | Deployment problems are bugs, just like anything else. So treat them as such. |
Start working on deployment early
Your project needs to recognize that deployment will be a problem from the outset, something that needs to be part of the development process. Start now.
Work with operations
Developers have to build a system that meets the needs of the operations team—a system that is secure, manageable, and doesn’t generate support calls late at night.
The key is to treat the needs and problems of operations as just another part of the software development process, with use cases, tests, and defect tracking.
The management tasks on the system—creating, backing up, and restoring the database; tracking down why a user cannot log in; blocking the IP address of a malicious client—are all use cases that the system needs to support, one way or another. Work with operations to find out what they want to do, and support it. Then find out what causes them trouble, and avoid it.
Target the production system
Differences between production and development servers cause problems, so reduce them with development systems that match the production one. That’s very expensive to do with dedicated hardware, but you don’t need dedicated hardware if you make use of virtualization.
A virtual machine (VM) is a complete image of a computer hosted under the real operating system (OS). The virtual machine can have its own virtual disk, with its own OS, and its own virtual display and network card. Most programs and operating systems run perfectly on such virtual machines. Products that implement VMs include VMWare, Xen, and Parallels Desktop. The latest x86 CPUs can run a VM at almost the same speed as real hardware.
Virtualization transforms application testing. Every developer can have a whole set of virtual hosts to deploy and test onto. These machine images can be set up to resemble the production systems, with separate hosts for the application server and database server. Virtualization also allows a large database to be pre-populated and saved to a disk image that’s rolled back at the end of every test run, giving tests a realistic database with almost no set-up time.
There are some costs with the technology. It cannot be used for performance testing, and all host systems need more memory and hard disk than normal. Most critically, every OS image stored to a virtual disk drive is another OS to maintain. The operations team needs to be in charge of the virtual hosts.
Automate deployment
The entire act of bringing up a new physical or virtual server should be fully automated and, ideally, hands-free. If this can be achieved, then you can reliably create servers that work the first time.
The goal is to automate the entire deployment of the application server, the database, and the applications on top of the server. That includes the OS, with Preboot Execution Environments (PXE), which is something for the operations team to worry about. The stuff above the OS is something to work on together.
Everything above the OS—the application server, the database, or any other application—all need to be automatically installed. Sometimes the products can create their own repeatable installation script, which can be used to replicate an install.
One tactic is to use the package management features of the underlying OS in order to get the OS management tools to push out software. There’s an Ant <rpm> task around the rpmbuild program, and the dotnet Antlib contains a <wix> task to generate MSI files for Windows. The weakness of these tools is that only system administrators can install the packages. There should be no need to have super user/administrator rights to install or run Java applications, unless they need access to locked-down parts of the machine.
Alongside the application goes the data. The database needs to be installed, then populated with a realistic dataset. Once the database is populated, it can be backed up and reused in test runs. Either the relevant database directories can be backed up and restored before each run, or the complete virtual machine can be copied. That snapshot of the database server can be brought up whenever a test run needs a server with a database full of test data.
Test the deployment
When the deployment fails, developers can write tests to isolate the problem. These become regression tests on server configurations. For example, imagine if a network filestore’s clock is wrong, confusing a housekeeping routine into deleting new files instead of just old ones. It’s easy enough to fix the problem on a single system, but why not write a test routine? This routine would verify that the timestamp of created files is within a few seconds of the system clock. Ant does exactly this when you run ant -diagnostics, checking that files can be written to ${java.io.tmpdir}. Why? Because the problem has occurred in Ant often enough.
The book’s application has been doing something similar. The happy.jsp page and its tests for various classes are the foundation for a testable deployment. As more problems arise, new tests can be added to show the problems and to verify that they aren’t present in deployed systems.
Having health checks in a web page makes it easy for humans to check that a system is happy; they just point their browser at it. The real secret is that machines can do the testing too. In Ant, <get> or HttpUnit can probe the pages. In the production system, monitoring tools can check the page every few seconds and restart the server if one system is unhappy.
This monitoring only works if the system has a thorough set of health tests, which will come by writing them during development. Just as the benefit of unit tests grows over time, the value of having tests to validate a deployment grows over the life of the system.
Track deployment defects
Every deployment problem is a defect, one that will come back later to haunt you. Treat them as such, with entries in a defect-tracking system. For the defect database to be useful, its symptoms must be noted with a statement such as “JSP pages do not compile,” the cause, such as “javac not found,” and the fix, i.e., “added JDK/bin to the path.” This is all obvious stuff. What’s essential is that the defect tracking should begin the moment you start developing the application on your local server. The developers gain more experience in the issues than anyone else. This knowledge needs to be passed on to the rest of the team.
This whole problem of deployment is beyond anything a single tool can address. PXE Preboot tools can install an OS onto a clean server, and OS-level system management tools can configure the OS so that it meets the project’s needs. Ant can help with these tasks by preparing artifacts for deployment and by integrating deployment with the build process.
16.2. Deploying with Ant
Ant was the first build tool with built-in support for distribution and deployment. It knows how to compile, test, and package Java programs. It also knows how to redistribute the created artifacts by SSH, email, and FTP. Even so, it’s still a build tool. It doesn’t talk over the network to other copies of Ant. It is unlikely to be able to run for months, and its workflow is very simplistic. It runs a build to completion or it stops in an indeterminate state. Sometimes you can tell tasks to ignore failures, but that isn’t real fault handling.
Ant is used all the way through to deployment, cropping up as a startup script or launcher application. This happens because it’s the closest thing Java has to a cross-platform scripting language and because there are third-party tasks to simplify the process. And that’s the secret to getting Ant to deploy properly: delegate deployment to other tools.
Ant is just part of the tool chain, something that’s best at building and testing. It’s the program you can start from the IDE, the command line, or the continuous integration tool, so it’s a great way to start the deployment. If Ant cannot deploy or undeploy the program, you cannot integrate deployment into the build and test cycle. However, Ant by itself just isn’t up to the job of performing complex deployments and undeployments, especially remote ones. It needs help from tools such as Cargo and SmartFrog.
Cargo is a small open-source project, hosted at http://cargo.codehaus.org/. Its specialty is deploying WAR and EAR files to application servers, and starting and stopping those same servers. It can even install middleware by fetching and unzipping an archive, and database deployment is next on its to-do list. Cargo ships as a set of tasks for Ant, and as a plug-in for Apache Maven that can deploy applications. It can also be used inside Apache Cactus, as a way of deploying the WAR or EAR file containing the tests. Lack of space prevents us from covering Cargo, but the http://antbook.org/ web site has some details on it, along with the build file to deploy the application.
The reason we’re skipping over Cargo is that we’ve chosen to look at a more ambitious tool—SmartFrog. But before we do that, there’s one last thing we want from Ant: a database. Now, SmartFrog can do the database setup itself, but one reason to do it in Ant is that it’s easier to mix SQL operations into Ant targets, with the clean target also deleting tables from the database or having a target to create a user that sets the password from an Ant property.
16.3. Database setup in Ant
Back in chapter 14, Ant used Cactus to deploy the diary application onto an application server and test it. However, we used HSQLDB as the database, which is a pure-Java database that can run in the process creating the JDBC connection. For our production system, we want a real database, such as MySQL. Following our “target the production system” rule, that means we should be testing against MySQL, which will need to be installed and configured with a diary database and user. Following the “automate deployment” rule, we have to automate the installation and setup of MySQL. At the very least we can set up the database before we run the tests, cleaning out the old data and creating the user account.
Before Ant can talk to the database, we need to install MySQL. An automated installation of MySQL is possible, but it’s also beyond the scope of this book. Here are the steps to install MySQL by hand:
1. Download MySQL from mysql.com and install the product. For Linux it comes in various formats and in many distributions. For Windows it comes as an installable application.
2. Set an administrator password.
3. Set mysqld to start as a Windows service or a Linux daemon.
4. Test that it works from the command line. Type mysql to get the MySQL command line, then type status to see the database status.
5. Download the JDBC driver from http://www.mysql.com/products/connector/j/
6. Read the license: the driver is GPL, with special terms for open-source projects.
The licensing situation is complex. Understand it before redistributing MySQL or applications that depend upon it or its JDBC driver.
16.3.1. Creating and configuring a database from Ant
Ant’s <sql> task can issue SQL commands to a database over a JDBC link. To use this with MySQL, we need to set it up with the MySQL JDBC driver on the classpath and the password of the root account.
Ivy can fetch JDBC drivers in a new configuration, “sql.”
<conf name="sql" description="SQL drivers"/>
The ivy.xml file must also contain a list of all drivers we may need:
<dependency org="mysql" name="mysql-connector-java"
    rev="${mysql.version}"
    conf="sql->default"/>
<dependency org="hsqldb" name="hsqldb"
    rev="${hsqldb.version}"
    conf="sql->default"/>
The relevant versions go into the libraries.properties file:
hsqldb.version=1.8.0.7
mysql.version=3.1.13
These changes set Ivy up to retrieve both the MySQL and HSQLDB JDBC drivers, drivers that can be passed to the <sql> task through its classpathref attribute. We can then use <presetdef> to define two new tasks:

The <sql> task needs to know the name of the driver to use, via the driver attribute, and the JDBC URL to the database. If you don’t know about JDBC, this task isn’t really the place to learn, although it does let you improve your SQL knowledge through experimentation.
To simplify SQL coding, we’ve written two preset tasks, one for administrator operations on the root database, and a second one extending the first to run against a diary database under the login of the diary user. These can issue administrator- or user-level commands, respectively. One absolutely critical aspect of these declarations is that expandProperties="true" is set in the <sql> task. This ensures that Ant expands Ant properties in the SQL text. Otherwise, ${property} strings get passed down unexpanded from nested-text SQL commands. With the expandProperties attribute set and the drivers downloaded, Ant is ready to talk to the database.
16.3.2. Issuing database administration commands
Our <mysql-admin> preset task can issue commands to the database. Here are a pair of targets to drop the database (if present), to create a new database with full rights to the diary account, and to set the password of that account. This sequence of operations implicitly creates the diary account if it doesn’t already exist, using the password in the Ant property mysql.diary.pass.
<target name="mysql-drop-db" depends="mysql-init"
  description="create the database and account">
  <ext:mysql-admin onerror="continue">
    DROP DATABASE diary;
  </ext:mysql-admin>
</target>

<target name="mysql-create-db"
  depends="mysql-init,mysql-drop-db"
  description="create the database and account">
  <ext:mysql-admin>
    CREATE DATABASE diary;
    GRANT ALL PRIVILEGES ON diary.* TO 'diary'@'localhost';
    SET PASSWORD FOR 'diary'@'localhost' =
     PASSWORD('${mysql.diary.pass}'),
  </ext:mysql-admin>
</target>
The mysql-create-db target depends on the mysql-drop-db target to destroy the database before it’s rebuilt. To avoid an error if the database is missing, that <sql> call has onerror="continue" set. When we call the mysql-create-db target, it creates the new database.
mysql-drop-db:
[ext:mysql-admin] Executing commands
[ext:mysql-admin] 1 rows affected
[ext:mysql-admin] 1 of 1 SQL statements executed successfully
mysql-create-db:
[ext:mysql-admin] Executing commands
[ext:mysql-admin] 1 rows affected
[ext:mysql-admin] 0 rows affected
[ext:mysql-admin] 0 rows affected
[ext:mysql-admin] 3 of 3 SQL statements executed successfully
We can then use our newly defined <mysql> task to issue commands to the newly created diary database, such as setting it up in advance of a run:
<target name="mysql-create-events" depends="mysql-init"
    description="create the event table">
  <ext:mysql>
    CREATE TABLE EVENTS (
    EVENT_ID varchar(64) not null,
    EVENT_NAME varchar(255) not null,
    EVENT_DATE timestamp not null,
    EVENT_VERSION integer,
    EVENT_LASTMODIFIED timestamp,
    EVENT_TEXT varchar(8192),
    primary key (EVENT_ID));
  </ext:mysql>
</target>
This target will create the EVENTS table, which is ready for the web application:
mysql-create-events:
[ext:mysql] Executing commands
[ext:mysql] 0 rows affected
[ext:mysql] 1 of 1 SQL statements executed successfully
Although the EJB runtime can create a database schema on demand, in a production system the database administrator (DBA) owns the problem. The DBA should give the developers the SQL statements they need to set up the database and give the operations team the data binding files the application server needs to bind the web application to it. The <sql> task can run those commands. If they’re in a separate file, the src attribute can be used to load, parse, and run the file.
There’s one thing to be careful of when working with the <sql> task. The task will execute a sequence of SQL statements inline, from a file specified with the src attribute, or in nested <transaction> elements. The task has to parse the text, breaking it into separate statements, before calling the database via the specified JDBC driver. It tries to recognize comments that start with -- or //, but the code that does this is very temperamental. Avoid comments in the file, or any non-standard SQL that the JDBC driver will reject.
To summarize: if you’re using a database in an application, then database creation and configuration is one of the tasks you need to automate. The <sql> task can do this. What it cannot do is install and configure the database itself, or bind the application server to the database. For that, we need another tool.
16.4. Deploying with SmartFrog
What if you need to install and configure the application server? What if you need to add the JDBC drivers to its classpath? What if the database needs to be set up on a different machine? What if the LDAP server on a remote system needs to come up before the database or the application server does?
Those are the kinds of problems that real applications encounter. Deployment is a complex problem, with configuration of different parts of the system and choreography across parts of the system a key issue. Ant cannot handle this; it’s beyond the scope of a build tool. What can? SmartFrog, an open source application from HP Laboratories, can do all of this from its Ant tasks.
Before we proceed, know that Steve works on SmartFrog as his day job, addressing the challenges of large-scale deployment. Expect some bias in this section.
16.4.1. SmartFrog: a new way of thinking about deployment
SmartFrog is a Java-based framework for deploying and configuring applications across one or more machines. It is to deployment what Ant is to building things: a language, a runtime, and a set of components for configuring and deploying applications. View it as the machine-readable version of the fifty-page file telling the operations team how to install and configure the database and application servers, then deploy the application on top. That’s what we want to automate. We want to run an Ant target that deploys our application across our multiple test servers, then later onto the production systems, as shown in figure 16.1.
Figure 16.1. The goal for our distribution: Ant telling SmartFrog to deploy our entire system, including setting up the application server and the database

Lots of tools can configure classes, such as Spring, Plexus, and HiveMind. These all work within a single JVM, binding classes together, and perhaps binding classes to a database. The goal of these tools is to make it easier to build an application by connecting together smaller components. SmartFrog is more ambitious than these, because it tries to build a complex distributed application by connecting together code, classes, and programs across machines.
Here are some of the things it can do:
- Deploy the middleware: the database and the application server
- Set up a database with test data
- Deploy the web and enterprise applications
- Configure intimate details of deployed applications, such as the handlers of a SOAP stack, the mime types of a web application, or its Log4J policies
- Run JUnit tests on multiple host machines, aggregating the results
- Start VMWare or Xen images, then deploy other things onto these images
- Test the health of all deployed components
- Shut down everything just deployed
How can it do all this? Primarily because it’s nothing but a large distributed system itself, one that can configure, start, and stop components on the machines. Everything else—the things that get started, the sequence of how they are started and stopped—is all implemented in SmartFrog components. It’s these components that can handle complex deployments.
The fundamental concept behind SmartFrog
The core concept behind SmartFrog is fairly profound: deployment is configuration. The hard part of deployment is configuring everything to work together. The SmartFrog solution to this mirrors the problem: configuration is deployment.
Instead of trying to remember what to do to bring up a complex system, or have a fifty-page document listing the actions to take, operations and developers create a description of the installation process that the computer can itself understand. Something that people write, but which a program can take and turn into a functional system, deployed over the target hosts. This is what SmartFrog does.
The underpinning of SmartFrog is effectively a domain-specific language for modeling complex systems. Each model describes what is to be deployed, and how it is to be configured. It’s a simple language, not much more than nested templates of name-value pairs. What it adds is two unique things. Firstly, all templates can be inherited and overwritten, so you do not need to repeat definitions. Base templates can be taken, extended, and used to describe specific installations on specific systems. Secondly, it has the ability to cross-reference values. If two parts of a deployment description take the same value, such as the port of a web server, then that value is not duplicated by cut-and-paste. Instead, the value is cross-referenced, so that the port is defined in one place and shared wherever it’s needed.
A language that describes complex configurations is useless unless you have a way to turn it into a running deployment. That’s the job of the SmartFrog runtime. It takes a description and deploys it. It builds up a graph of nested templates, expands all inherited templates, resolves the references and produces an expanded, resolved graph of name-value pairs. The runtime then turns these templates into deployed components.
Every SmartFrog component represents something that can be configured and started. Running components can be pinged to see if they are healthy and, eventually, stopped. The actual sequencing of starting and stopping components is handled by the container components in which the child components are declared. These components are just Java classes with an RMI interface for remote access. Simple components implement their functionality inside the class, just as Ant tasks do. More complex components bind to native applications, such as the Apache HTTPD web server.
To summarize: SmartFrog is a language for describing configurations, a runtime to instantiate those configurations, and an extensible set of components that can be deployed and undeployed.
16.4.2. The concepts in more detail
That was a quick overview of the concept, a configuration-centric system for distributed deployment. Now let’s look a bit deeper, focusing on how to use SmartFrog for deploying our web application and database. For our deployment, we need to get the MySQL JDBC driver into a directory in the application server where it can be used to set up the data source. Inserting the JAR inside a WAR or EAR file doesn’t work, because it isn’t visible to the right classloader. A manual deployment document, would say something like “download the MySQL JDBC driver version 5.0.4, verify its checksum, and copy it into the lib/subdirectory of the chosen JBoss configuration.” We need a SmartFrog descriptor that does the same thing, somehow marking the destination directory as something that will be defined later.
The SmartFrog language
SmartFrog comes with a new language—it isn’t XML. The language’s author, Patrick Goldsack doesn’t think XML documents are easily writeable or, more importantly, readable by humans, and sometimes you have to agree with him. Instead, a new language has been written, with the JavaCC tool used to create the parser.[1]
1 Puppet, a Ruby-based configuration management tool, has a very similar non-XML syntax. It’s clearly the new trend of post-XML programming.
The language itself is very simple, and quite Java-like. It consists of templates, surrounded by curly-braces and name-value pairs inside the templates. Listing 16.1 shows the descriptor to install the MySQL JDBC driver.
Listing 16.1. A SmartFrog file to fetch and deploy the MySQL JDBC driver

This template solves one tiny part of the bigger deployment and can be reused wherever we need to install the MySQL JDBC drivers.
Putting aside how it all works for a moment, the language has some interesting features. Every template here extends some other template. Where did the templates come from? They came from the files named in the #include statements at the beginning of the document. These are all resources in JAR files on the classpath. Component developers provide the initial templates with the implementations of the components, so that component users can import them and start using them immediately.
The next point to note is that although the names of things appear to be simple, values can be more complex. There are some primitive types—string, integers, and Boolean values among them—but there are a few that are different, like LAZY PARENT:repo. That is a reference, a link to the attribute repo of the parent component. It’s marked as LAZY, meaning this reference should be dynamically resolved at runtime. Non-lazy references are evaluated earlier on, before the runtime starts bringing up the components.
The reference mechanism is incredibly powerful. A complex path can be built up by chaining template names, such as InstallDrivers:jdbcJAR:version. This refers to the version attribute of the jdbcJAR template in the InstallDrivers template.
Being able to cross-reference things, be they simple values or complex nested templates, eliminates the need to duplicate information. The other trick is that when components deploy, they can add new attributes. A LAZY reference to an attribute can refer to something that isn’t defined in any descriptor, but is picked up at deployment time. This can be used for things such as setting the absolute path of a created file or the JDBC URL to a running database.
There’s one other interesting attribute value, the TBD declaration:
destDir TBD;
This means that the destDir attribute is To Be Defined. That value must be set in the template before deployment begins, but this particular template doesn’t know what the value will be. It means the template can be deployed only as part of something bigger.
The power of composition
The deployment descriptor that sets up the database driver describes one small, albeit critical, part of a big deployment. It’s useful only as part of a bigger system. How does that happen? Through composition. Just as a big program is built from small classes, a big deployment is created from small deployment descriptors, each of which solves a specific problem. Listing 16.2 shows the deployment descriptor that deploys the application server, the database, the web application, and a component that checks the resulting site’s “happy page.”
Listing 16.2. How to compose a system from components


This descriptor describes the system in about forty lines. It configures the database, copies the JDBC JAR to the application server’s library directory, and shows the web application where to go. It also has a monitoring component, which, after a sixty-second delay, starts checking the health of the application.
This is the secret of making big things manageable, by inheriting templates, then expanding or overriding them. This description is nearly ready to be deployed. We just need to fill in those attributes that aren’t yet there, those marked as TBD, or the deployment will not even begin.
The SmartFrog runtime
The SmartFrog runtime takes a description and turns it into deployed components. Here is one that fills in all the undefined attributes with data that’s valid for a target Windows system.
sfConfig extends System {
  jboss.home "C:\Java\Apps\jboss";
  jdk.home "C:\Java\jdk";
  webapp:examples "C:\antbook\examples";
}
This description can be deployed on any Windows system that has JBoss, the JDK, and the diary application in the configured locations. This single-host configuration can be kept under revision control, with descriptors for different hosts and platforms alongside it.
This descriptor can be deployed by handing it to the SmartFrog runtime and asking for it to be deployed. Every host that can be a target for deployment must run a copy of the SmartFrog daemon. This is the core SmartFrog runtime running as a service or Unix daemon. It listens on the network port 3800 for requests to deploy a tree of SmartFrog templates and an application, turning them in to deployed components. If part of the graph needs to be hosted on another machine, then it hands off that part of the graph to the remote system. There is no central controller of the machines—just a set of hosts that trust each other. All communication is via Java Remote Method Invocation (RMI) over SSL. This is Java’s built-in distributed object framework. It does have its limitations, primarily versioning, long-distance communications, and the problem of distributed garbage collection. SmartFrog works best between hosts on the same site.
After reading in the descriptor, the SmartFrog runtime creates a distributed graph of things to deploy. By default, every component is deployed in the same host and JVM as its parent. To deploy our multi-tier application across a cluster of machines, we would need a new descriptor, one that declares new locations for some components, simply by declaring target hosts inside the descriptor:

This descriptor uses the sfProcessHost attribute to tell the runtime where to host the different parts of the template graph and, later, the components. The application
is deployed on the host “pelvoux” ![]() , as will all children except for the database
, as will all children except for the database ![]() and the happy page
and the happy page ![]() , which are hosted on “eiger.” The home directory is picked up from the Java property user.home on the remote system
, which are hosted on “eiger.” The home directory is picked up from the Java property user.home on the remote system ![]() . That gives us a two-tier server and, by hosting the happy page remotely, checks that the web site’s firewall is open. Figure 16.2 shows what happens. The description is taken and turned into a graph of component descriptions across machines.
. That gives us a two-tier server and, by hosting the happy page remotely, checks that the web site’s firewall is open. Figure 16.2 shows what happens. The description is taken and turned into a graph of component descriptions across machines.
Figure 16.2. The SmartFrog daemons build up a distributed graph of things to deploy. Cross-references are still valid across the network.

The way the sfProcessHost attribute of the database and happy templates were set shows another trick of the SmartFrog language. Deployment descriptors can inject data into templates, by giving the full path to the attribute, here database: sfProcessHost. This is useful for putting last-minute information in, although it’s a bit like using Ant properties to configure an existing target. It’s useful, but does make the deployment more brittle, as you effectively code in more assumptions about the structure of the template.
Once deployed, the components will run on two different machines. Even though they are now distributed, the graph of components is still intact; components can navigate around and locate their parent or other components. This allows components to share runtime information, by adding new attributes or changing existing ones. They can also talk directly to each other using the Java RMI protocol. Having a single graph of components across multiple servers lets the developers and their build files have control of the complete deployment. Our build file can start or stop the application in one go.
SmartFrog components and their lifecycle
Once the deployment graph has been built up, the next step is to instantiate the components. The runtime instantiates the top node in the graph, here the HomeLinuxCluster node, and starts to deploy it.
This is quite a complex process, as the SmartFrog runtime tries to move all components through their lifecycle according to the policy implemented by their parent components; deployment is choreographed. Figure 16.3 shows the lifecycle of a single component; child components follow the same lifecycle by default.
Figure 16.3. The lifecycle of a component. Things get deployed, then started, and finally terminated. Unless something fails, of course.

The lifecycle of an application, a hierarchical tree of components, is shown in table 16.2:
Table 16.2. Lifecycle actions that SmartFrog components support, and how they react
| The graph is constructed | The graph of component descriptions is created, with each template on its chosen host. |
| The root component is instantiated | The Java class implementing the root component is created and bound to the graph. |
| The root component is deployed | The class’s sfDeploy() method is called; attributes can be read or written; children can be instantiated and deployed. The node’s RMI interfaces are exported. |
| The root component is started | The class’s sfStart() method is called to start actual work, such as the database or the application server. Children may also be started. |
| The root component is terminated | The component stops what it’s doing, unexports its RMI interface, and cleans up. Programs are stopped, files are deleted, and so on. |
| A component is pinged | The class’s sfPing() method is called. It should check its health and throw an exception if it’s unhappy. Children also should be checked. |
| A component is destroyed | Once all references to a component are lost, the JVM may garbage-collect the class behind it. |
| A component fails | If the component fails to deploy, start, or respond to a ping request, it is considered to have failed. This is reported to any parent node. |
This is quite a complex process. Under the hood, SmartFrog components do resemble Ant tasks: they are both Java classes that you configure through text files; they merely know more about deploying and cleaning up afterwards than Ant tasks. The biggest difference is that by default, parent nodes deploy all their children in parallel—Ant executes tasks in sequence, except inside the <parallel> container task.
The component lifecycle in action
When our HomeLinuxCluster application is deployed, the SmartFrog runtime instantiates, deploys, and then starts the components. Some components, such as the ones to download and copy the MySQL driver, are contained entirely in the implementation classes. Others, like the JBoss and MySQL support components, are separate processes—Java and native, respectively. They are started by the framework’s equivalent of <java> and <exec>. The happy component is special in that it only deploys its action child after a sixty-second pause; it’s an instance of the Delay component, which manages its child’s lifecycle according to its own policy.
The final deployment is that of figure 16.4. The application server is running, and the diary WAR file has been deployed to it by copying into the deploy directory of the active configuration. When the JBoss JVM process started, it was passed the database connection information—the URL, the username, and the password—information that has been picked up and used to bind to the database.
Figure 16.4. A running system. JBoss and MySQL are running on separate hosts. The happy component’s action fetches the happy.jsp page every time its parent pings it.

While the system is running, the root runtime will ping the HomeLinuxCluster. The server will be healthy if JBoss is still running; the same for the remote database. The happy component considers itself happy if it can retrieve the happy.jsp JSP page from the web site. If it gets an error code or cannot connect, it reports an error to its parent. The result is that it becomes impossible to deploy an unhappy application.
16.4.3. The SmartFrog components
Just as Ant has built-in tasks and third-party tasks and Antlibs, SmartFrog has components, which come in JARs that contain the template .sf files, RMI interface and proxy classes, and the implementation classes. The daemons can download classes and SmartFrog descriptors using Java’s remote classloading facility. A list of URLs needs to be supplied the daemons on startup, or they can be set in a deployment descriptor. Table 16.3 lists the main components currently available.
Table 16.3. Packages of SmartFrog components
|
Component package |
Function |
|---|---|
| Ant | Invocation of Ant components during deployment or termination. |
| Anubis | A fault-tolerant tuple space for building a high-availability system out of a cluster of machines. This is cutting-edge, distributed-system research—the SLP package is simpler. |
| Database | Database deployment and table population. Similar to Ant’s <sql> task. |
| Filesystem | Files, directories, temporary files and directories, self-deleting files, copy, touch, mkdir, and the like. |
| Java | Start Java programs; retrieve artifacts from repositories. |
| xunit/junit | Components to deploy tests on different hosts and processes; then collect the results. |
| LoggingServices | Log integration with Log4J and commons logging. |
| Networking | Networking components, supporting DNS, FTP, email, and SSH. |
| OS | OS-specific features and program execution. |
| SLP | A Service Location Protocol server and clients, for LAN-based discovery. |
| SSH | SSH client code, to connect to remote machines and issue commands. |
| Workflow | Components to choreograph child components in different ways. |
| WWW | Jetty, Tomcat, and JBoss deployment. |
| Alpine | A prototype lightweight “Alpine Style” SOAP stack. |
| CERN openlab | A third-party package to manipulate .ini, text and XML files, install SSH keys and bring up Grid service platforms. |
| SmartDomains | CERN components to deploy Xen virtual machines; SourceForge hosted. |
The web application sticks to the WWW and database packages, along with foundational content such as workflow, OS, filesystem, and Java. We also have experimented with the testing framework, which can integrate testing with deployment. All of these packages come as separate JARs, which need to be on the classpath of the daemons, either on startup or through dynamic downloads.
Running SmartFrog
For operations, the SmartFrog daemon can be started on the command line, or as a service when the machine boots. For developers’ use, there’s a broad set of Ant tasks that can deploy and undeploy applications, start and stop the daemons, and even bring up a management window to view the system and its log. There are also Eclipse and NetBeans plugins for in-IDE work. We will use the Ant tasks, of course.
16.5. Using SmartFrog with Ant
That’s enough of a description of the tool. Let’s use it to integrate deployment of local and clustered applications into the build.
Installing SmartFrog
The project’s home page is http://smartfrog.org/. There you can find the latest releases, documentation, and links to the source code repository. When you are starting off with the tool, you will need
- SmartFrog Core: the base runtime
- SmartFrog Components: the equivalent of Ant tasks
The core comes with documentation and a set of Ant tasks for calling SmartFrog from Ant. Follow the instructions to install it and add its bin directory to the path if you want the command-line tools. If it isn’t included in the distribution, download the sf-www JAR file containing web application support and add it to SFHOME/lib, where SFHOME is the SmartFrog directory.
Be aware that the tool is released under the Lesser GPL (LGPL) license. This has implications if you were to redistribute modified versions of the JAR files to third parties, but not if you only use the tool internally.
The Ant tasks
Table 16.4 lists the tool’s Ant tasks. Two of these tasks, <faultingwaitfor> and <functionaltest> are general-purpose tasks used for testing SmartFrog itself. The rest are for starting and stopping daemons and for deploying, pinging, and undeploying applications.
Table 16.4. The tasks built into the SmartFrog sf-tasks Antlib
|
Task name |
Function |
|---|---|
| <deploy> | Deploy applications to a SmartFrog daemon. |
| <gui> | Start the SmartFrog editor application. |
| <management-console> | Start the management GUI, targeted at a named host. |
| <parse> | Parse a SmartFrog file and pre-validate it before deployment. |
| <ping> | Probe an application to verify it’s working. |
| <run> | Run one or more applications in a new process. |
| <sign> | Sign JAR files with a SmartFrog certificate. |
| <startdaemon> | Start a SmartFrog daemon. |
| <stopdaemon> | Stop a SmartFrog daemon. |
| <undeploy> | Undeploy an application. |
| <faultingwaitfor> | A copy of <waitfor> that will fail on timeout. |
| <functionaltest> | A task that integrates startup, a <waitfor> condition, and a shutdown sequence into a <junit> run or other sequence of operations. |
To use them we need the SmartFrog JARs, including the sf-tasks JAR on the task’s classpath. Ivy can do this with a new configuration, “smartfrog”:
<dependency org="org.smartfrog" name="sf-www"
  rev="${smartfrog.version}"
  conf="smartfrog->default" />
<dependency org="org.smartfrog" name="sf-tasks"
  rev="${smartfrog.version}"
  conf="smartfrog->default"/>
<dependency org="org.smartfrog"name="sf-database"
  rev="${smartfrog.version}"
  conf="smartfrog->default"/>
As usual, Ivy’s <cachepath> task sets up the classpath:
<target name="smartfrog-classpath"
    depends="ivy-resolve,tests-packaged">
  <ivy:cachepath pathid="smartfrog.libraries.classpath"
    conf="smartfrog"/>
  <path id="smartfrog.classpath">
    <path refid="smartfrog.libraries.classpath"/>
    <pathelement location="${test.jar}"/>
  </path>
</target>
This target depends on the tests-packaged target and adds the test classes as a JAR. This is in case we want to deploy a component that runs JUnit tests, integrating testing with the deployment. With this classpath set up, we can declare the tasks:
<target name="smartfrog-tasks" depends="smartfrog-classpath">
  <taskdef uri="antlib:org.smartfrog.tools.ant"
      classpathref="smartfrog.classpath"
      onerror="failall"/>
</target>
The sf-tasks JAR declares the tasks in an antlib.xml file under the URI antlib: org.smartfrog.tools.ant. All tasks also support a nested <classpath> element for adding extra libraries to the classpath—but it’s easier to declare the tasks with everything needed on the classpath.
16.5.1. Deploying with SmartFrog
SmartFrog deployment descriptors are files with the .sf extension. Although we’ve shown some examples of them, the full language and how to write deployment descriptors and components are beyond the scope of this book. We’ll just deploy the descriptor to start the web application and JBoss, and deploy it from Ant. First, we need to declare the local configuration, which we do in listing 16.3. Listing 16.3 includes the file in listing 16.2 and makes it deployable by giving values to all the attributes that were marked TBD.
Listing 16.3. The SmartFrog deployment descriptor to deploy everything

This descriptor takes the abstract system definition ![]() and fills in the system-specific values
and fills in the system-specific values ![]() . Finally, it declares the sfConfig template that names what is to be deployed
. Finally, it declares the sfConfig template that names what is to be deployed ![]() . This name is special; it and everything under it gets deployed.
. This name is special; it and everything under it gets deployed.
In the build file, we need to identify this file and the host for the deployment:
<target name="smartfrog-ready"
  depends="smartfrog-tasks,deploy-properties"/>

<target name="deploy-properties" depends="init">
  <property name="deploy.host" value="localhost"/>
  <property name="application.name" value="${project.name}"/>
  <property name="deploy.sf"
    value="deploy/targets/ch16-winxp-laptop.sf"/>
  <property name="parse.quiet" value="true"/>
  <property name="deploy.jar"
    location="${build.dir}/ch16-sf-deploy.jar"/>
</target>
These properties deploy to the local host, with a descriptor explicitly bound to a specific machine. Other systems will have to point to their own descriptor via a build.properties file. The descriptors are all in the directory config/deploy, with machine-specific targets in the targets/ subdirectory. There are currently versions for Windows, Linux standalone, and a Linux cluster, all of which extend the same base configuration and change a few options. Figure 16.5 shows the structure.
Figure 16.5. Package layout for deployment descriptors. Every descriptor is a resource in a Java package but is built into a separate JAR from the application. That lets us change this JAR and sign it without having to rebuild the application itself. Descriptors in the deploy. targets package are targeted at different machines, while those in the parent deploy package are the reusable templates.

We’ve split the files into two sets. General purpose .sf files contain configuration details for a specific part of the big system, such as JBoss, the database, and the MySQL drivers. In a separate directory, we’ve added system-specific configurations that hard-code in the locations of MySQL and JBoss on different platforms. Individual developers can add their own custom .sf files in this target’s directory, targeting specific machines.
All of these configuration files need to be packaged into a JAR file, so that the operations can be given a JAR file they can sign and use in a secure SmartFrog environment—one in which the daemons only load classes and .sf files from signed JAR files. For now, we just package the JAR and skip the signing:
<target name="deployment-jar" depends="deploy-properties">
  <jar destfile="${deploy.jar}">
    <fileset dir="config" includes="**/*.sf"/>
  </jar>
</target>
This target creates a new JAR file, build/ch16-sf-deploy.jar, which contains all of the deployment files for this project. We can deploy them or even check them for validity in advance of a deployment.
Preflight validation
We use the term preflight checks for the static validation of the files; it’s a term derived from airplane safety checks:

The <parse> task parses the deployment descriptor ![]() and checks that all included files can be found and are syntactically correct. It checks that all attributes marked as TBD have been overwritten with valid data, and that there are no unresolved non-lazy references. Many components have an optional
“schema” declaration that lists the type of some attributes and whether they are compulsory or optional. All such schemas
are validated during this preflight phase:
and checks that all included files can be found and are syntactically correct. It checks that all attributes marked as TBD have been overwritten with valid data, and that there are no unresolved non-lazy references. Many components have an optional
“schema” declaration that lists the type of some attributes and whether they are compulsory or optional. All such schemas
are validated during this preflight phase:
preflight:

 [sf:parse] Parser - SmartFrog 3.10.00
 [sf:parse] -----------------------------------------------
 [sf:parse] -  Parsing: C:antbookdiary
   persist-webappconfigdeploy	argetsch16-winxp-laptop.sf
 [sf:parse] -----------------------------------------------
 [sf:parse] STATUS REPORT: File: C:antbookdiary
   persist-webappconfigdeploy	argetsch16-winxp-laptop.sf
 [sf:parse]    raw phase: OK   type phase: OK   place phase: OK
   function phase: OK   sfConfig phase: OK   link phase: OK
   predicate phase: OK, parsed in 3665 millisecs.
 [sf:parse] SFParse: SUCCESSFUL

BUILD SUCCESSFUL
Total time: 5 seconds
The tool doesn’t check whether LAZY references resolve, because they can link to attributes that are created during deployment. This is one disadvantage of runtime binding—you find out what’s missing only when you deploy.
Preflight checks are invaluable while working on the deployment descriptors themselves, after which point they mostly become a few seconds of delay. If the property skip.preflight is set, the check is skipped; developers can set this property once the descriptor is stable.
Starting the daemon
To actually deploy the application, we need a running daemon on the target host. One of the tasks, <run>, does a deployment in its own process, blocking Ant until it’s finished. This task is easier to integrate with an Ant workflow, but it doesn’t give you the option of deploying to a remote host. This makes it less useful than the <deploy> task, which can deploy to the host specified in the host attribute, once a daemon is running on the target system.
A SmartFrog daemon can be started on the command line by running the sfDaemon batch file/shell script:
>sfDaemon
SmartFrog 3.10.00
(C) Copyright 1998-2006 Hewlett-Packard Development Company, LP
Graphics mode available
SmartFrog ready... [rootProcess:3800]
At this point, the GUI opens up and displays a log window. Closing this window will shut down the daemon. A menu action will bring up the management console, which shows all deployed components and lets developers view their attributes or terminate all or part of a deployed application.
The <startdaemon> task can start the daemon from inside Ant. It doesn’t bring up the logging window, so it’s useful for unattended operations.
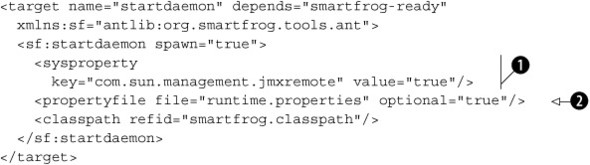
JVM properties can be set with the <sysproperty> keyword, here used to make the process accessible to the JDK’s jconsole program ![]() . The <propertyfile> element identifies a file of properties, here marked with optional="true" to indicate that it doesn’t have to be present
. The <propertyfile> element identifies a file of properties, here marked with optional="true" to indicate that it doesn’t have to be present ![]() . It’s the deployment equivalent of the tradition of the <property file="build.properties"/> declaration in build files, which allow per-developer overrides. These properties let developers provide late binding information outside any descriptor.
The PROPERTY and IPROPERTY references resolve string or integer properties from either the process starting the deployment or, if LAZY, the running daemon itself:
. It’s the deployment equivalent of the tradition of the <property file="build.properties"/> declaration in build files, which allow per-developer overrides. These properties let developers provide late binding information outside any descriptor.
The PROPERTY and IPROPERTY references resolve string or integer properties from either the process starting the deployment or, if LAZY, the running daemon itself:

This property binding can pass extra information down or pick up state information about the target host, such as the value of the java.io.tmpdir temporary directory property. It’s the final bit of customization.
Stopping the daemon
The <stopdaemon> task can shut down a local or remote daemon:
<target name="stopdaemon" depends="smartfrog-ready"
  description="shutdown smartfrog"
  xmlns:sf="antlib:org.smartfrog.tools.ant">
  <sf:stopdaemon
    failonerror="false"
    host="${deploy.host}"
    timeout="30000"/>
</target>
This task will terminate the daemon if it’s running:
stopdaemon:
[sf:stopdaemon] SmartFrog 3.10.00
[sf:stopdaemon] SmartFrog daemon terminated
[sf:stopdaemon]  - Successfully terminated: 'rootProcess',
   host:localhost

BUILD SUCCESSFUL
The failonerror attribute is set to false because it doesn’t normally matter if the daemon is already stopped.
Daemons listen for RMI messages on port 3800, so the <socket> condition can probe for a running daemon in the <fail> or <waitfor> tasks. The SmartFrog task suite includes a new task, <faultingwaitfor>, that fails the build if the nested condition isn’t met:
<target name="assert-daemon-running" depends="smartfrog-ready"
  xmlns:sf="antlib:org.smartfrog.tools.ant">
  <sf:faultingwaitfor maxwait="10">
    <socket server="localhost" port="3800"/>
  </sf:faultingwaitfor>
</target>
If the task times out without the condition being met, it throws an exception:
assert-daemon-running:

BUILD FAILED
    Timeout while waiting for conditions to be met
Clearly, we need to go back and run the daemon before deploying.
16.5.2. Deploying with the <deploy> task
After the descriptors are packaged and preflight-successful and after the daemon is started, we can deploy:
<target name="deploy"
        depends="preflight,ready-to-deploy"
        description="deploy"
    xmlns:sf="antlib:org.smartfrog.tools.ant">
  <sf:deploy host="${deploy.host}"
     timeout="30000">
    <classpath>
      <pathelement location="${deploy.jar}"/>
    </classpath>
    <application name="${application.name}"
      descriptor="${deploy.sf}"/>
  </sf:deploy>
</target>
The task parses the descriptor and expands it completely, resolving all non-LAZY references. It then connects to the target daemon and deploys the descriptor:
deploy:
[sf:deploy] SmartFrog 3.10.00
[sf:deploy]  - Successfully deployed:
   'HOST Zermatt:rootProcess:diary',
   [deploy/targets/ch16-winxp-laptop.sf],  host:localhost

BUILD SUCCESSFUL
Total time: 16 seconds
Once the expanded and resolved descriptor is submitted to the daemon, the task returns. The deployment is still going on, as the components declared in it get moved through their lifecycle to the instantiated, initialized, and—finally—the running state. We can check this state through the management console.
Checking on the application
We can check what is going on with the deployed application by starting the management console. This lets us see what the actual runtime attributes are and what the application’s current state is:
<target name="console" depends="smartfrog-ready">
  <sf:management-console spawn="true"/>
</target>
This brings up the application of figure 16.6 to view the deployed applications.
Figure 16.6. The management console, showing the status of the deployed application. The elements under the happy component have not yet been deployed, as it delays for a minute before starting happy page checks.
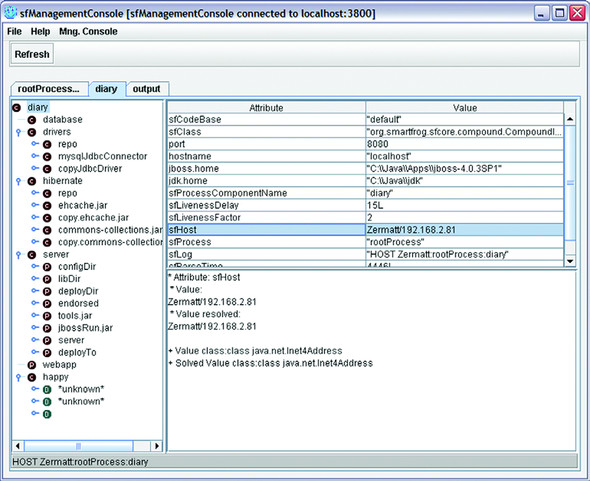
The console lets you view and manipulate the graph, terminating components or detaching parts of the tree from their parents, so that they can live a separate life.
The basic check of pinging an application to verify that it’s alive is so common that it can be run from Ant; there’s no need to use the console.
Pinging an application
The <ping> task probes an application to see if it’s healthy:
<target name="ping" depends="smartfrog-ready"
  description="shutdown smartfrog"
  xmlns:sf="antlib:org.smartfrog.tools.ant">
  <sf:ping application="${application.name}"
    host="${deploy.host}"
    timeout="30000"/>
</target>
If the daemon isn’t reachable or if the application isn’t running, then the task fails:
ping:
  [sf:ping] SmartFrog 3.10.00
  [sf:ping] - FAILED when trying PING of 'diary', host:localhost
  [sf:ping]     Result:
  [sf:ping]       * Exception: 'SmartFrogResolutionException::
                    Unresolved Reference: diary
  [sf:ping]         source: HOST Zermatt:rootProcess
  [sf:ping]         path(25)
  [sf:ping]         Cause: Reference not found'
This message indicates that there was an unresolvable reference, diary, presumably because there was no active application called “diary.” A successful ping verifies that the application is present and healthy:
ping:
  [sf:ping] SmartFrog 3.10.00
  [sf:ping] -"diary" was successfully contacted in "localhost".
           Ping time :0.0 seconds
BUILD SUCCESSFUL
Total time: 6 seconds
Being able to integrate health checks—such as the happy page checks—into the application’s deployment descriptor transforms the notion of what constitutes a valid deployment. All the static and runtime configuration information from the deployment can feed straight into health checks, checks that can be performed by the framework.
Undeployment
Eventually, we need to undeploy the application. The <undeploy> task handles that:
<target name="undeploy" depends="smartfrog-ready"
        description="deploy">
  <sf:undeploy classpathref="smartfrog.classpath"
     host="${deploy.host}"
     application="${application.name}"/>
</target>
This task triggers a clean termination of the application. All components that have termination routines will do their work. Forked Java and native processes will be stopped, files and directories cleaned up, databases taken offline. The system is returned to its original state.
16.5.3. Summary of SmartFrog
We’ve just used SmartFrog to deploy our database, application server, and application. With the appropriate configuration files, it can deploy to the local system or to a nearby cluster.
SmartFrog is probably the most advanced distributed deployment framework available and, being open source, is free for anyone to use. However, it does take a bit of time to become familiar with the tool, the language, and the error messages. Once you’ve learned your way around, you can use it to install, configure, and run applications that span one machine or whole “server farms” of hundreds of machines.
Using the tool, we can trigger deployment from our builds, either to a developer’s system or to a cluster of test servers, real or virtual. That not only enables us to automate deployment to the development systems, but to the production systems as well. With automated deployment integrated into the build process, we can then move to a deployment-centric build-and-test cycle.
16.6. Embracing deployment
This chapter has looked at how to deploy successfully, by automating deployment and integrating it into the build cycle. But just adding new development tools isn’t enough; the process must adapt. Just as adding unit testing to a build file added testing to our edit-and-build cycle, adding deployment can change how we deliver software.
When software is handed off to an operations team, the classic “waterfall” development process starts sneaking in, as figure 16.7 shows.
Figure 16.7. The waterfall process is inflexible and widely discredited. But look how an iterative development cycle can revert to a waterfall at the final stage.

By leaving deployment as an afterthought, you don’t get feedback from the deployment process or the live system, feedback that could be used to adapt the application to make it easier to deploy and manage. The result can be a hard-to-deploy application that doesn’t suit the needs of the operations team.
What can be done? How about integrating deployment with testing and the continuous integration process? The goal is to produce a development lifecycle more like figure 16.8, in which deployment is part of the normal develop-and-test loop.
Figure 16.8. Integrating deployment into the development cycle. Deploy to production systems, then test.

In this lifecycle, the operations team owns the test hosts. Developers deploy to those machines, running their tests on or against them. This ensures that operations get the experience of deploying and managing the application, while developers can write code that works on the production systems.
There’s a small logistical problem here: how to integrate deployment with a test run. We could have Ant block until a condition indicates the application is deployed, and run <junit> and <junitreport> once the <get> indicates the site is live. SmartFrog’s own <functionaltest> task can do this.
Alternatively, we can take advantage of the fact that SmartFrog deploys anything—including tests! A JUnit test run is just something else to deploy on a host on the network, as is a test listener component to create HTML pages from the results. The JUnitTestSuite component takes a list of JUnit 3.8.x tests, tests it can run:

This component can be deployed under a TestRunner component, which can run tests in different processes or on different hosts, relaying the results to a test listener. The HTML test listener creates XHTML pages as the results come in: there’s no need to wait for the whole run to finish before the results are created. Admittedly, the pages are not very pretty—there’s clearly scope for improving the presentation and analysis of the test results collected from tens or hundreds of systems. But it’s a start and, being live, it’s convenient on big test runs.
Moving deployment into the core development cycle isn’t easy. Developers will have to work with operations earlier than normal; operations have to start supporting many more systems earlier on. This is exactly why you need to do it: the two teams need to work together right from the outset of a project!
Continuous deployment
With deployment automated and testing integrated with the deployment, then one more action becomes possible. The team’s continuous integration server can redeploy the application and its functional tests. It could even be set up to redeploy to production on a nightly basis if the functional tests pass, of course!
If you intend to explore this possibility, here’s some advice:
- Have the production deployment driven off a tagged branch. This stops code from being released accidentally.
- Restrict the update frequency to a limited rate, such as once per day. If your customers think you can roll out a patch in half an hour, they will demand all bugs fixed within an hour. Having a delay built in to the process reduces stress and encourages better fixes.
- Have a good rollback mechanism and test it.
This whole notion of continuous deployment goes hand in hand with the “everlasting beta” phenomenon of web site development, in which the site is never stable and new features appear daily. It goes even better with web service development, in which you are trying to develop a public API for use by external callers. Just as agile development encourages developers to work with the customers, agile web site and service development requires the team to integrate with operations, and to rapidly evolve the live application based on the experience of real users. Integrating deployment into the continuous integration process makes agile development possible, while exposing a web site or service to outside callers.
16.7. Summary
We’ve explored the challenges of deploying to production servers and have proposed some ways to survive that phase of a project:
1. Start working on deployment early.
2. Work with operations.
4. Automate deployment.
5. Test deployment.
6. Track deployment defects.
Ant’s <sql> task can set up a database setup, while SmartFrog can completely automate the deployment of complex applications. SmartFrog can transform how developers and operations teams deploy things, and it lets you integrate deployment into the build cycle.
We’ve closed with the idea of continuous deployment—having the continuous integration server handle deployment to the staging and perhaps even the production system. This is one of the many leading-edge techniques you can explore once you have deployment under control.
And that’s it! We’ve reached the end of the part of the book that covers applying Ant. We started the section with a build file for a single library, and we’ve gone through third-party tasks and Antlibs. We’ve looked at large projects with multiple-build files, using Ivy for dependency management, and we’ve applied these techniques to build a web application and then an Enterprise Java application. Then we’ve shown how to use a continuous integration server to build and test everything, before getting into the world of automated deployment.
The remaining two chapters go low-level into Ant’s own source code to look at how to extend Ant with new tasks, datatypes, and resources.