
Chapter 4. Testing with JUnit
| 4.1 | What is testing, and why do it? | |
| 4.2 | Introducing our application | |
| 4.3 | How to test a program | |
| 4.4 | Introducing JUnit | |
| 4.5 | The JUnit task: <junit> | |
| 4.6 | Generating HTML test reports | |
| 4.7 | Advanced <junit> techniques | |
| 4.8 | Best practices | |
| 4.9 | Summary |
“Any program feature without an automated test simply doesn’t exist.”
Kent Beck, Extreme Programming Explained
At this point we’ve learned how Ant can build and run an application. But does the application work? Does it do what we wanted? Sure, we can use Ant to run the program after the compile, and we can then check the output, but is that adequate?
You can write code, but unless you’re going to write tests or formal proofs of correctness, you have no way of knowing if it works. You can pretend it does, but your end users will discover the truth. Unless you like fielding support calls, you need to be testing your code. Ant and JUnit make this possible. JUnit provides the test framework to write your tests in Java, and Ant runs the tests. The two go hand in hand. JUnit makes it easy to write tests. Ant makes it easy to run those tests, capture the results, and halt the build if a test fails. It will even create HTML reports.
This chapter is going to look at testing, introduce JUnit, and show you how and why testing can and should be central to every software project. It will introduce the program that will be developed through the book. Using this program—a diary—it will show how Ant can integrate this testing into the build process so that every time you type ant, the source is compiled and tested. This makes it easy to run the tests and makes it impossible to ship code that fails those tests.
4.1. What is testing, and why do it?
Testing is running a program or library with valid and invalid inputs to see that it behaves as expected in all situations. Many people run their application with valid inputs, but that’s just demonstrating that it can be made to work in controlled circumstances. Testing aims to break the application with bad data and to show that it’s broken. Automated testing is the idea that tests should be executed automatically, and the results should be evaluated by machines. Modern software development processes all embrace testing as early as possible in the development lifecycle. Why?
To show that code works
With a test, you can pass in parameters that are designed to break the program, to stress it at the corners, and then you can see what happens. A well-written test often reveals bugs in your code that you can fix.
To replicate bugs
If you can write a unit test that replicates the bug, you are one step closer to fixing it. You have a way of verifying the problem, and you have some code you can step into to find out what’s going wrong. The best part? The test remains, stopping the bug from creeping back.
To avoid proofs-of-correctness
In theory, formal methods can let you prove that a piece of code works. In practice, they can’t. The complexity of a modern system implies that you need to have studied something like the pi-calculus to stand a chance. Even if you have the skills, are you really going to prove everything still works after every change?
We believe formal logic has a place in software. However, we also think that the people writing the java.util.concurrent libraries should do the proofs, not us.
To test on different platforms
If you’ve automated tests, you can run them on all target platforms. That includes Java versions, application/web server releases, and operating systems. People always criticize Java as “write once, test everywhere,” but once testing becomes easy, testing everywhere becomes possible. At that point, you really do have code that runs everywhere.
To enable regression testing
A new Java release comes out every six to twelve months. Libraries in a big project may be updated every month or two. How do you know that your program still works whenever a piece is upgraded? Regression testing, that’s how. Regression tests verify that an application still works the way it used to, that there have been no regressions. All bug-replication tests become regression tests the moment the bug is fixed.
To enable refactoring
Refactoring is now a well-known concept: the practice of rearranging your code to keep it clean and to help it adapt to change. As defined by Martin Fowler, refactoring is “the restructuring of software by applying a series of internal changes that do not affect its observable behavior” (Fowler 1999). That is, it changes the internals of a program without changing what it does.
If you’re going to refactor your program, large portions of your source can change as they’re moved around, restructured, or otherwise refactored—often at the click of a button in the IDE. After you make those changes, how can you be sure that everything is still working as before? The only way to know is through those tests that you wrote before you began refactoring, the tests that used to work.
Automated testing transforms how you develop programs. Instead of writing code and hoping that it works, or playing with a program by hand to reassure yourself that all is well, testing can show how much of a program really is working. Ant goes hand in hand with this concept, because it integrates testing with the build process. If it’s easy to write tests and easy to run them, there’s no longer any reason to avoid testing.
4.2. Introducing our application
This is the first place in our book where we delve into the application that we built to accompany this text. We’re going to use this application through most of the remaining chapters.
Why is the “testing” chapter the right place to introduce our application? Because the tests were written alongside our application: the application didn’t exist until this chapter.
4.2.1. The application: a diary
We’re going to write a diary application that will store appointments somewhere and print them out. Later on, the diary will save data to a database and generate RSS feeds and HTML pages from that database. We’ll add these features as we go along, extending the application, the tests, and the build file in the process.
Using an agile process doesn’t mean we can skip the design phase. We just avoid overdesigning before implementing anything we don’t immediately need. Accordingly, the first step for the application is to sketch out the architecture in a UML tool. Figure 4.1 shows the UML design of the library.
Figure 4.1. UML diagram of the core of our diary. Interfaces and classes in grey are those of the Java libraries. We’re going to assume they work and not test them ourselves.

The core of our application will be the Events class, which will store Event instances. Every Event must have a non-null id, a date, and a name; extra text is optional. The operation Event.equals() compares only the ID values; the hashCode() value is also derived from that. The Event.compareTo operator is required to have the same semantics as the equals operator, so it too works only on the ID value. To sort events by time, we must have a special Comparator implementation, the DateOrder class. We mark our Event as Serializable to use Java’s serialization mechanism for simple persistence and data exchange. Oh, and the ID class itself is the java.util.UUID GUID class.
We aggregate events in our Events class, which provides the manipulation options that we currently want. It’s also Serializable, as is the class to which it delegates most of the work, a java.util.HashMap. Provided all elements in the collection are serializable, all the serialization logic is handled for us. Two methods, Events.load() and Events.save() aid serialization by saving to/from a file. We don’t override the equals()/hashCode() logic in our Events class; it’s too much effort. In keeping with XP philosophy, we avoid writing features until they’re needed; if they’re not needed, we omit them. This is also why the class exports very few of the operations supported by its internal map; initially it exports only size() and iterator().
The Java package for the application is d1 for “diary-1”; the core library that will go into the package is d1.core.
There. That’s a sketch of the initial design of our program. Is it time to start coding? Almost. We just have to think about how to test the program before we write a line of code, as that’s the core philosophy of test-first development.
4.3. How to test a program
Test-first development means writing the tests before the code, wherever possible. Why? Because it makes developers think about testing from the outset, and so they write programs that can be tested. If you put off testing until afterwards, you’ll neglect it. When someone does eventually sit down to write a test or two, they’ll discover that the application and its classes may be written in such a way that its almost impossible to test.
The classic way to show that a program works is to write special main methods on different classes, methods that create an instance of the class and check that it works as expected. For example, we could define a main method to create and print some files:
public class Main {

    public static void main(String args[]) throws Exception {
        Events events = new Events();
        events.add(new Event(UUID.randomUUID(),
                        new Date(), "now", null));
        events.add(new Event(UUID.randomUUID(),
                new Date(System.currentTimeMillis() + 5 * 60000),
                "Future", "Five minutes ahead"));
        System.out.println(events);
    }
}
We can run this program from the command-line:
java -cp buildclasses;build estclasses d1.core.test.Main
It will print something we can look at to validate:
Wed Feb 16 16:15:37 GMT 2005:Future - Five minutes ahead
Wed Feb 16 16:10:37 GMT 2005:now -
This technique is simple and works with IDEs. But it doesn’t scale. You don’t just want to test an individual class once. You want to test all your classes, every time you make a change, and then have the output of the tests analyzed and presented in a summary form. Manually trying to validate output is a waste of time. You should also want to have your build stop when the tests fail, making it impossible to ship broken programs.
Ant can do this, with help. The assistant is JUnit, a test framework that should become more important to your project than Ant itself. The two tools have a long-standing relationship: JUnit made automated testing easy, while Ant made running those tests part of every build.
Before exploring JUnit, we need to define some terms.
- Unit tests test a piece of a program, such as a class, a module, or a single method. They can identify problems in a small part of the application, and often you can run them without deploying the application.
- System tests verify that a system as a whole works. A server-side application would be deployed first; the tests would be run against that deployed system, and may simulate client behavior. Another term for this is functional testing.
- Acceptance tests verify that the entire system/application meets the customers’ acceptance criteria. Performance, memory consumption, and other criteria may be included above the simple “does it work” assessment. These are also sometimes called functional tests, just to cause extra confusion.
- Regression testing means testing a program to see that a change has not broken anything that used to work.
JUnit is a unit-test framework; you write tests in Java to verify that Java components work as expected. It can be used for regression testing, by rerunning a large test suite after every change. It can also be used for some system and acceptance testing, with the help of extra libraries and tools.
4.4. Introducing JUnit
JUnit is one of the most profound tools to arrive on the Java scene. It single-handedly took testing mainstream and is the framework that most Java projects use to implement their test suites. If you consider yourself a Java developer and you don’t yet know JUnit, now is the time to learn. We’ll introduce it briefly. (If you wish to explore JUnit in much more detail, we recommend JUnit in Action by Vincent Massol.) Ant integrates JUnit into a build, so that you don’t neglect to run the tests and to give you nice HTML reports showing which tests failed.
JUnit is a member of the xUnit testing framework family and is now the de facto standard testing framework for Java development. JUnit, originally created by Kent Beck and Erich Gamma, is an API that makes it easy to write Java test cases, test cases whose execution can be fully automated.
JUnit is just a download away at http://www.junit.org. All JUnit versions can be downloaded from http://prdownloads.sourceforge.net/junit/. The archive contains junit.jar—which is the JAR file you need—the JavaDocs, and the source (in src.jar). Keep the source handy for debugging your tests. We’re using JUnit 3.8.2, not the version 4.x branch.
Why use JUnit 3.8.2 and not JUnit 4.0?
This book uses JUnit 3.8.2 throughout. JUnit 4.0, released in February 2006, is the successor to this version, as are versions 4.1 and beyond. So why aren’t we using the 4.x branch? Primarily, because the new version isn’t very backwards-compatible with the existing JUnit ecosystem. JUnit 3.x has been stable for so long that many tools have built up around it—including Ant itself. Because Ant is designed to work on all versions of Java from 1.2 upwards, Ant and its own test suite haven’t migrated to the JUnit 4.x branch.
Ant’s <junit> task does work with JUnit 4, so you can run JUnit 4 tests under Ant. However the generated reports aren’t perfect, as Ant is still running and reporting the tests as if they were JUnit 3.x tests. A new task for JUnit 4 is needed, one that will probably be hosted in the JUnit codebase itself.
JUnit’s architecture
Figure 4.2 shows the UML model of the JUnit 3.8.2 library. The abstract TestCase class is of most interest to us.
Figure 4.2. JUnit UML diagram depicting the composite pattern utilized by TestCase and TestSuite. A TestSuite contains a collection of tests, which could be either more TestSuites or TestCases, or even classes simply implementing the test interface. The Assert class provides a set of static assertions you can make about your program.

The TestCase class represents a test to run. The Assert class provides a set of assertions that methods in a test case can make, assertions that verify that the program is doing what we expect. Test case classes are what developers write to test their applications.
4.4.1. Writing a test case
The first thing we must do with JUnit is write a test case, a class that contains test methods. This is easy to do. For a simple test case, we follow three steps:
. Create a subclass of junit.framework.TestCase.
. Provide a constructor, accepting a single String name parameter, which calls super(name).
. Write some public no-argument void methods prefixed by the word test.
Here is one such test case, the first one for our application:

This test actually performs useful work. We have a single test, testCreation, in which we try to create an event. Until that class is written, the test case won’t compile. If the Event constructor throws a RuntimeException, the test won’t work. Merely by trying to instantiate an object inside a test case, we’re testing parts of the application.
With the test case written, it’s time to run it.
4.4.2. Running a test case
Test cases are run by way of JUnit’s TestRunner classes. JUnit ships with two built-in test runners—a text-based one, junit.textui.TestRunner, and a GUI one, junit.swingui.TestRunner. From the Windows command-line, we could run the text TestRunner like this:
java -cp buildclasses;build	estclasses;
      %ANT_HOME%libjunit-3.8.2.jar junit.textui.TestRunner
       d1.core.test.SimpleTest
.
Time: 0.01

OK (1 test)
The ‘.’ character indicates a test case is running; in this example only one exists, testCreation. The Swing TestRunner displays success as green and failure as red and has a feature to reload classes dynamically so that it can pick up the latest test case classes whenever you rebuild. For this same test case, its display appears in figure 4.3.
Figure 4.3. JUnit’s Swing GUI has successfully run our test case. A green bar indicates that all is well. If there was a red bar, we would have a problem.

Ant uses its own TestRunner, which runs the tests during the build, so the GUI isn’t needed. Java IDEs come with integrated JUnit test runners. These are good for debugging failing test cases. Ant can do something the GUIs can’t do: bulk-test hundreds of tests and generate HTML reports from the results. That is our goal: to build and test our program in one go.
4.4.3. Asserting desired results
A test method within a JUnit test case succeeds if it completes without throwing an exception. A test fails if it throws a junit.framework.AssertionFailedError or derivative class. A test terminates with an error if the method throws any other kind of exception. Anything other than success means that something went wrong, but failures and errors are reported differently.
AssertionFailedError exceptions are thrown whenever a JUnit framework assertion or test fails. These aren’t Java assert statements, but inherited methods that you place in tests. Most of the assertion methods compare an actual value with an expected one, or examine other simple states of Object references. There are variants of the assert methods for the primitive datatypes and the Object class itself.
Diagnosing why a test failed is easier if you provide meaningful messages with your tests. Which would you prefer to deal with, an assertion that “expected all records to be deleted,” or “AssertionFailedError on line 423”? String messages become particularly useful when you have complex tests with many assertions, especially those created with assertTrue(), assertFalse, and fail(), for which there is no automatically generated text. Table 4.1 lists JUnit’s built-in assertions.
Table 4.1. Assertions that you can make in a JUnit test case
|
Assertion |
Explanation |
|---|---|
| assertTrue([String message], boolean condition) | Asserts that a condition is true. |
| assertFalse([String message], boolean condition) | Asserts that a condition is false. |
| assertNull([String message], Object object) | Asserts that an object reference is null. The complementary operation asserts that a reference is not null. |
| assertNotNull([String message], Object object) | |
| assertEquals([String message], Type expected, Type actual) | Asserts that two primitive types are equal. There are overloaded versions of this method for all Java’s primitive types except floating point numbers. |
| assertEquals([String message], Object expected, Object actual) | States that the test expected.equals(actual) returns true, or both objects are null. |
| assertEquals([String message], FloatType expected, FloatType actual, FloatType delta) | Equality assertion for floating point values. There are versions for float and double. The values are deemed equal if the difference is less than the delta supplied. If an infinite value is expected, the delta is ignored. |
| assertSame([String message], Object expected, Object actual) | Asserts that the two objects are the same. This is a stricter condition than simple equality, as it compares the object identities using expected == actual. |
| assertNotSame([String message], Object expected, Object actual | Asserts that the two objects have different identities, that is, expected != actual. |
| fail() fail(String message) | Unconditional failure, used to block off a branch of the test. |
Every test case should use these assertions liberally, checking every aspect of the application.
Using the assertions
To use the assertions, we have to write a test method that creates an event with sample data, then validates the event:

It’s important to keep test methods as simple as you can, with many separate test methods. This makes analysis easier: there should be only one reason for any test to fail.
For thorough testing, you need lots and lots of tests. In a well-tested project, the amount of test code may well be bigger than the main source itself. It’s certainly not trivial to write good, thorough tests. Everyone on the team needs to think it’s important—all the developers, all the management. If anyone thinks that writing tests is a waste of time, you won’t get the support or coverage you need. You’ll need to convince them otherwise by showing how testing gets applications working faster than shipping broken code and waiting for support calls. The only way to do that is to write those tests, then run them.
The lifecycle of a TestCase
JUnit runs every test method in the same way. It enumerates all test methods in a test class (here, our LessSimpleTest class) and creates an instance of that class for each test method, passing the method name to the constructor. Then, for every test method, it runs the following routine:
public void runBare() throws Throwable {
      setUp();
      try {
            runTest();
      }
      finally {
            tearDown();
      }
}
That is, it calls the method public void setUp(), runs the test method through some introspection magic, and then calls public void tearDown(). The results are forwarded to any classes that are listening for results.
You can add any number of test methods to a TestCase, all beginning with the prefix test. Methods without this prefix are ignored. You can use this trick to turn off tests or to write helper methods to simplify testing. JUnit 4.0 and TestNG let you use Java 5 annotations to mark the tests to run, but JUnit 3.8.x simply tests every method beginning with the word test.
Test methods can throw any exception they want: there’s no need to catch exceptions and turn them into assertions or failures. What you do have to make sure of is that the method signature matches what’s expected: no parameters and a void return type. If you accidentally add a return type or an argument, the method is no longer a test.
Tip
If you have an IDE that has macros or templates, write a template for a testcase. For example, with IntelliJ IDEA you can map something like “test” to:
public void test$NAME$() throws Throwable {
    $END$
}
This creates a stub test method and prompts us to fill in the name. Declaring that it throws an Exception lets our test throw anything. Eclipse ships with a similar template predefined.
To create or configure objects before running each test method, you should override the empty TestCase.setUp method and configure member variables or other parts of the running program. You can use the TestCase.tearDown method to close any open connections or in some way clean up the machine, along with try {} finally {} clauses in the methods themselves. If, for example, we wanted to have a configured Event instance for each test, we could add the member variable and then create it in an overridden setUp() method. Because an instance of the class is created for every test method before any of the tests are run, you can’t do setup work in the constructor, or cleanup in any finalizer.
To summarize: the setUp and tearDown methods are called before and after every test method and should be the only place where you prepare for a test and clean up afterwards.
Once the tests are written, it’s time to run the tests. This is where Ant comes into play.
4.4.4. Adding JUnit to Ant
Ant has a task to run the JUnit tests called, not surprisingly, <junit>. This is an optional task. Ant has three categories of tasks.
- Core tasks are built into ant.jar and are always available.
- Optional tasks are tasks that are supplied by the Ant team, but are either viewed as less important or they depend on external libraries or programs. They come in the ant-optional.jar or a dependency-specific JAR, such as ant-junit-jar.
- Third-party tasks are Ant tasks written by others. These will be introduced in chapter 9.
The <junit> task is an optional task, which depends upon JUnit’s JAR file to run the tests.
![]()
Older versions of Ant required junit.jar to be in Ant’s classpath by placing it in a directory that Ant loaded at startup. Ant 1.7 has changed this, so that now a copy of JUnit in the classpath that you set up for compiling and running the test code is all that’s needed. Unfortunately, a lot of existing build files assume that the junit.jar is always on Ant’s classpath, so they don’t bother to add it. Given how important JUnit is, you may as well copy it and place it where Ant can load it. This is a good time to introduce how Ant adds libraries to its classpath.
When you type ant at the command line, it runs Ant’s launcher code in ant-launcher.jar. This sets up the classpath for the rest of the run by
- Adding every JAR listed in the CLASSPATH environment variable, unless the -noclasspath option is set
- Adding every JAR in the ANT_HOME/lib directory
- Adding every JAR in ${user.home}/.ant/lib, where ${user.home} is the OS-specific home directory of the user, unless the -nouserlib option is set
- Adding every JAR in every directory listed on the command line with the -lib option
The key thing to know is that all JAR files in ANT_HOME/lib and ${user.home}/.ant/lib are added to Ant’s classpath automatically. If junit.jar, or any other library is placed there, then it’s available to Ant and its tasks. It can also be picked up by any build file that uses Ant’s own classes when compiling or running programs.
All we need to do then is download junit.jar, stick it in the correct place and have Ant’s <junit> task pick it up. This is something that can be done by hand, or it can be done by asking Ant to do the work itself.
![]()
Interlude: how to automatically fetch JAR files for use with Ant. If you’re online and a proxy server is not blocking outbound HTTP connections, change to Ant’s home directory, then type:
ant -f fetch.xml all
This code runs a special build file that fetches all the libraries that Ant needs and saves them in ANT_HOME/lib. If you need to save the JAR files in your personal .ant/lib directory, add the -Ddest=user clause. Welcome to the world of automated JAR-file downloading!
If you work in a security-sensitive organization, you shouldn’t download and install files without first authenticating them. You might even want to consider downloading the source and building the files yourself.
To see what is on Ant’s classpath, type:
ant -diagnostics
![]()
This tells Ant to look at its internal state and print out useful information. One section in the listing analyzes the availability of tasks and lists any tasks that are missing or unable to run. It also prints out system properties, including Ant’s Java classpath. If there is no junit.jar listed there, the <junit> task will work only if it’s explicitly added to the test classpath.
This concludes our little interlude. Optional tasks often need external JAR files, which are best installed by adding them to ANT_HOME/lib or ${user.home}/lib. Now, on with the coding.
4.4.5. Writing the code
We’ve already written our first tests. Now let’s write the first bit of our Event class.
public class Event implements Serializable {
    private UUID id;
    private Date date;
    private String name;
    private String text;

    public Event() {
    }

    public Event(UUID id, Date date, String name, String text) {
        this.id = id;
        this.date = date;
        this.name = name;
        this.text = text;
    }

    public Date getDate() {
        return date;
    }

    public void setDate(Date date) {
        this.date = date;
    }

    public String toString() {
        return "Event #" +
                id + " - "+
                (date != null ? date.toString() : "(no date)")
                " - "
                + (text != null ? text : "");
    }
}
Once we implement this much of our class, the tests compile. If we run the tests, Ant should be happy. In the eyes of the tests, we’re finished. Let’s get Ant building and running the tests to see if our implementation is adequate.
4.5. The JUnit task: <junit>
The <junit> task is an “optional” task, one that is so important you must have it and junit.jar in your Ant distribution. The task runs one or more JUnit tests, then collects and displays the results. It can also halt the build when a test fails.
To execute the test case that we’ve just written via Ant, we can declare the task with the name of the test and its classpath, like this:
<property name="test.suite"
  value="d1.core.test.AllTests" />

<target name="test-basic" depends="test-compile">
  <junit >
    <classpath refid="test.classpath"/>
    <test name="${test.suite}"/>
  </junit>
</target>
When we run it, we see the following:
test-basic:
    [junit] Test d1.core.test.AllTests FAILED
BUILD SUCCESSFUL
This tells us two things. First, our code is broken and second, we need <junit> to tell us what failed and stop the build afterwards.
Before fixing these problems, we need to get our directory structure and Ant build file set up to accommodate testing.
Interlude: how to lay out source and test directories. Once you start writing tests, you have two sets of source files for every project, the main source and the test source. It’s essential to control how everything is laid out in the file system to avoid contaminating the release software with test code.
Test code must be kept separate from production code to keep the test code out of the production binary distributions and to let you compile the tests and source separately. Tests should also use a Java package hierarchy, as with normal source.
One strategy is to place tests in their own source tree but in the same package as the codes they test. This gives the tests package-level access privileges to the code being tested so the tests can test classes and methods that aren’t public.
The other strategy is to place tests in their own source tree, in different packages. This forces the tests to use the public API of the classes. It also keeps the tests running when the main files are archived into signed JAR files.
In our projects, we have the following layout:
- The main source tree is under the directory src.
- These files are compiled into build/classes.
- Test files go into the directory tree test.
- Tests are put into test packages under the packages they test.
- Test files are compiled into build/test/classes.
It’s essential to keep project source and test source separate and to be consistent across projects. Ant can use this proposed layout to build and package the source and test classes separately and to keep all generated files, including test results, away from the original content.
4.5.1. Fitting JUnit into the build process
With this new layout, we need to add a few additional targets to initialize the testing directory structure, compile the test code, and then execute the tests and generate the reports. Figure 4.4 illustrates the target dependency graph of the build file.
Figure 4.4. Adding test targets to the build process. Tests can be compiled only after the main source is compiled; the test run depends on the tests being compiled.

We use Ant properties and datatypes to make writing our test targets cleaner, to avoid hard-coded paths, and to allow flexible control of the testing process.
First, we assign properties to the various directories used by our test targets:
<property name="test.dir" location="${build.dir}/test" />
<property name="test.classes.dir" location="${test.dir}/classes" />
<property name="test.data.dir" location="${test.dir}/data" />
<property name="test.reports.dir" location="${test.dir}/reports" />
Declaring the directories this way gives individual developers flexibility. For example, by overriding test.reports.dir we could place reports in a directory served by a web server.
We need a different classpath for our tests than for the main source. We need JUnit’s JAR file for compilation and execution, and the test/classes directory for execution. How do we do this? We rely on junit.jar being on Ant’s classpath. As long as we include Ant’s classpath in our tasks, we get JUnit for free. This is cheating and only works provided all projects can use the same version of JUnit.
Let’s start with the classpath for compiling our library. It includes all JARs in the lib subdirectory.
<path id="compile.classpath">
  <fileset dir="lib">
    <include name="*.jar"/>
  </fileset>
</path>
To compile the tests, we need to add in the compiled classes:
<path id="test.compile.classpath">
  <path refid="compile.classpath"/>
  <pathelement location="${build.classes.dir}"/>
</path>
To run the tests, we also need the compiled tests on the classpath:
<path id="test.classpath">
  <path refid="test.compile.classpath"/>
  <pathelement location="${test.classes.dir}"/>
</path>
This technique of chaining classpaths is very effective. If we add a dependency to the core project, the classpaths to compile and run the tests pick it up immediately.
Before compiling tests, we need to create the relevant directories:
<target name="test-init">
  <mkdir dir="${test.classes.dir}"/>
  <delete dir="${test.data.dir}"/>
  <delete dir="${test.reports.dir}"/>
  <mkdir dir="${test.data.dir}"/>
  <mkdir dir="${test.reports.dir}"/>
</target>
This target creates all the output directories. Most unusually, it deletes two of them before recreating them. This is a brute-force purge of the directories’ contents to make sure the results of previous test runs aren’t mixed in with the latest run.
Our test-compile target uses test.classpath as well as test.dir:
<target name="test-compile" depends="compile,test-init">
   <javac destdir="${test.classes.dir}"
          debug="true"
          includeAntRuntime="true"
          srcdir="test">
     <classpath refid="test.compile.classpath"/>
   </javac>
 </target>
The includeAntRuntime="true" flag is a sign that we’re pulling in Ant’s own classpath in order to get one file, junit.jar. The alternative is to add junit.jar to the projects lib directory.
Having set up the directories and the various classpaths, we’re ready to set up <junit> to stop the build after tests fail and to present the results.
4.5.2. Halting the build when tests fail
If we care about testing, the build must stop when the tests fail. We don’t want to package or release a program that doesn’t work.
By default, <junit> doesn’t halt the build when tests fail. There’s a reason for this: you may want to format the results before halting. For now, we can set the haltonfailure attribute to true to stop the build immediately.
Let’s add both haltonfailure="true" and printsummary="true" to our <junit> declaration
<junit printsummary="true" haltonfailure="true">
  <classpath refid="test.classpath"/>
  <test name="${test.suite}"/>
</junit>
We now get the following output:
test-summary:
    [junit] Running d1.core.test.AllTests
    [junit] Tests run: 2, Failures: 1, Errors: 0,
            Time elapsed: 0.02 sec

BUILD FAILED
The build halted because the test case failed, exactly as it should. The summary output provides slightly more details: how many tests were run, and how many didn’t pass. We need more information than this, which <junit> will gladly provide.
4.5.3. Viewing test results
To analyze why tests fail, we need to see the results in detail, including the names of the failing tests, stack traces of exceptions and anything printed to the output and error streams.
The JUnit task outputs test results through formatters. One or more <formatter> elements can be nested either directly under <junit> or under its <test> and <batchtest> elements. Ant includes the three formatters shown in table 4.2.
Table 4.2. Ant <junit> result formatters can output the test results in different ways.
|
<formatter> |
Description |
|---|---|
| brief | Summarizes test failures in plain text |
| plain | Provides text details of test failures and statistics of each test run |
| xml | Creates XML results for post-processing |
By default, <formatter> output is directed to files, but it can be directed to Ant’s console instead. To get detailed console output, we change the task slightly:
<junit printsummary="false" haltonfailure="true">
  <classpath refid="test.classpath"/>
  <formatter type="brief" usefile="false"/>
  <test name="${test.suite}"/>
</junit>
Formatters normally write their output to files in the directory specified by the <test> or <batchtest> elements, but usefile="false" tells them to write to the Ant console. We turn off the printsummary option because it duplicates and interferes with the console output. The result is the following:
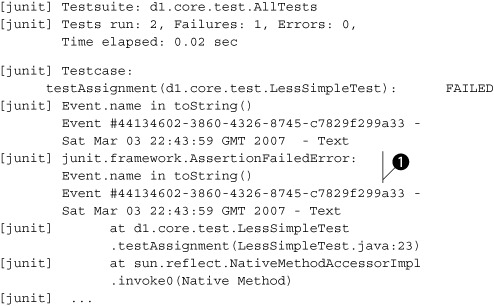
Now we can see the problem. The testAssignment() test threw an AssertionFailedError containing the message “Event.name in toString()” ![]() , causing the test to fail. Looking at the source of this test, we can find the line that caused the problem:
, causing the test to fail. Looking at the source of this test, we can find the line that caused the problem:
public void testAssignment() {
    Date date = new Date();
    Event event = new Event(UUID.randomUUID(),
        date, "now", "Text");
    String eventinfo = event.toString();
    assertTrue("Event.name in toString() " + eventinfo,
        eventinfo.contains("now"));
}
It is the test of toString() that is failing, because we forgot to include the event name in the string. We can fix that now, and we’ll know when it’s fixed, as the tests will pass and the <junit> task will not fail. Detailed test results are the best way of determining where problems lie. The other thing that can aid diagnosing the problem is the application’s output, which we can also pick up from a test run.
Viewing System.out and System.err output
Lots of Java code prints information to the console, either directly to System.out and System.err or via logging libraries. All this output is invaluable when troubleshooting failures. With no formatters specified and printsummary either on or off, the <junit> task swallows all console output. If printsummary is set to "withOutAndErr", <junit> will forward everything through Ant’s console. If we inserted a print System.out.println(eventinfo) into our failing test method, we would see it in the test summary:
[junit] Running d1.core.test.AllTests
[junit] Tests run: 2, Failures: 1, Errors: 0, Time elapsed: 0.1 sec
[junit] Output:
[junit] Event #972349e6-00e8-449f-b3bc-d1aac4595109 -
        Sat Mar 03 22:45:00 GMT 2007 - Text
The brief formatter also captures the log:
[junit] Tests run: 2, Failures: 1, Errors: 0, Time elapsed: 0.1 sec

[junit] ------------- Standard Output ---------------
[junit] Event #972349e6-00e8-449f-b3bc-d1aac4595109 -
        Sat Mar 03 22:45:00 GMT 2007
[junit] ------------- ---------------- ---------------
[junit] Testcase:
    testAssignment(d1.core.test.LessSimpleTest):      FAILED
Printed output is great for diagnostics after a test has failed. Don’t be afraid to log messages inside a test. All Ant’s formatters will capture the log for output.
The next thing we need to do is run all the tests in the project in a single <junit> task.
4.5.4. Running multiple tests with <batchtest>
So far, we’ve only run one test case using the <test> tag. You can specify any number of <test> elements inside a <junit> declaration, but that’s inefficient. Developers should not have to edit the build file when adding new test cases. Likewise, you can write TestSuite classes, but again, who wants to edit Java source unless they need to? Why not delegate all the work to the machine?
Enter <batchtest>. You can nest filesets within <batchtest> to include all your test cases.
Tip
Standardize the naming scheme of your test case classes for easy fileset inclusion. The normal naming-convention scheme calls for test cases to end with the word “Test”. Here, SimpleTest and LessSimpleTest are our test cases, and CoreTestCase is the abstract base class. We use TestCase as the suffix for our abstract test cases and declare the classes as abstract so that IDEs do not try to run them either.
The <junit> task has now morphed into
<junit printsummary="false" haltonfailure="true">
  <classpath refid="test.classpath"/>
  <formatter type="brief" usefile="false"/>
  <batchtest todir="${test.data.dir}">
    <fileset dir="${test.classes.dir}"
      includes="**/test/*Test.class"/>
  </batchtest>
</junit>
The includes pattern, "**/test/*Test.class", ensures that only our concrete test cases in the test directory are considered, and not our abstract CoreTestCase class, as its name doesn’t match the pattern. The <junit> task fails if it’s told to run a class that’s abstract or that isn’t a test case.
Setting up a batch test pattern makes adding new test cases to a project trivial. The <javac> task compiles all source and test source files in the appropriate directory trees, and now <junit> will run any test class whose name matches the pattern. Developers can now add new test cases without editing the build file. The easier it is to add and run test cases, the more likely they are to be written.
Making it easy to add new test cases has one little side effect. Before long, there will be many test cases, which results in an increase in the time to run the tests and an explosion in the size of the test output. Developers cannot be expected to sit staring at the console watching results scroll by, so we need a better way of presenting the results—such as HTML pages.
4.6. Generating HTML test reports
Being able to read the text output is useful, as you encounter these results quite often, including in emails from other people. But it doesn’t scale to hundreds of tests. For that we need something better.
Enter the XML formatter for JUnit. This formatter creates an XML file for every test class. We can add it alongside the brief formatter:
<junit printsummary="false" haltonfailure="false">
  <classpath refid="test.classpath"/>
  <formatter type="brief" usefile="false"/>
  <formatter type="xml"/>
  <batchtest todir="${test.data.dir}">
    <fileset dir="${test.classes.dir}"
      includes="**/test/*Test.class"/>
  </batchtest>
</junit>
The effect of adding the XML formatter is the creation of an XML file for each <test> element. For us, the filename is ${test.data.dir}/TEST-d1.core. test.AllTests.xml.
XML files are not what we want; we want human-readable HTML reports. This is a bit of post-processing that <junitreport> does for us. It applies some XSL transformations to the XML files generated by the XML <formatter>, creating HTML files summarizing the test run. You can browse tests, see which ones failed, and view their output. You can also serve the HTML files up on a web site.
Adding the reporting to our routine is simply a matter of setting haltonfailure="false" in <junit> so the build continues after the failure, then declaring the <junitreport> task after the <junit> run:
<junitreport todir="${test.data.dir}">
  <fileset dir="${test.data.dir}">
    <include name="TEST-*.xml"/>
  </fileset>
  <report format="frames" todir="${test.reports.dir}"/>
</junitreport>
The <fileset> is necessary and should normally include all files called TEST-*.xml. The <report> element instructs the transformation to use either frames or noframes Javadoc-like formatting, with the results written to the todir directory. Figure 4.5 shows the framed report of our test run.
Figure 4.5. The test results presented by <junitreport>. The main page summarizes the test statistics and hyperlinks to test case details.

Navigating to a specific test case displays results such as those shown in figure 4.6. You get a summary of all tests and can zoom in on a test case of interest. Note the timestamp field; it can warn you of old results. The hostname is there in case you’re collating results from different machines.
Figure 4.6. Test case results showing the assertion that failed, and the stack trace. The output log is under the System.out link. Keep an eye on the Time Stamp to make sure you’re not viewing old test results.

There are three limitations with <junit> and <junitreport>. Firstly, <junit> doesn’t have any dependency logic; it always runs all tests. Secondly, <junitreport> simply aggregates XML files without any knowledge of whether the files it’s using have any relation to the tests that were just run. Cleaning up the old test results before running new tests gives you better reports.
The final problem is more subtle. We’ve had to turn off haltonfailure in order to run <junitreport>. How can we generate reports and stop the build if the tests failed?
4.6.1. Halting the builds after generating reports
To halt the build after creating the HTML pages, we make the <junit> task set an Ant property when a test fails, using the failureProperty and errorProperty attributes. A test failure means an assertion was thrown, while an error means that some other exception was raised in the test case. Some teams like to differentiate between the two, but we don’t. We just want to halt the built if a test failed for any reason, which we can ask for by naming the same property on both attributes. We also need to set haltOnFailure="false", or, given that false is the default value, omit the attribute entirely.
Using the properties set by <junit>, we can generate the reports before we fail the build. Listing 4.1 shows the complete target needed to run the tests, create the reports, and halt the build on failure.
Listing 4.1. Integrated testing, reporting, and failure
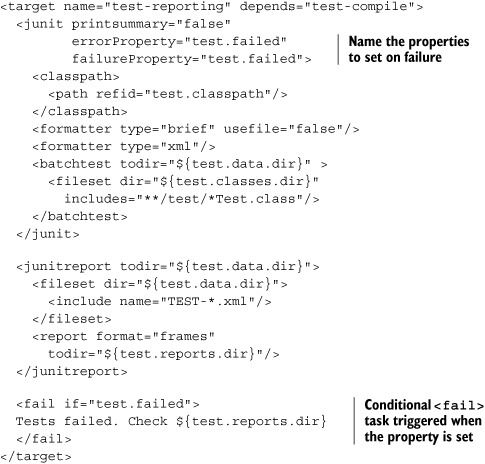
Running this target will run the tests, create the report, and halt the build if any test raised an error or failed. It even prints the name of the directory into which the reports went, for pasting into a web browser.
The HTML reports are the nicest way to view test results. Be aware that the XSL transformation can take some time when there are a lot of tests to process. The plain text output is much faster. Sometimes we split the testing and report creation in two in order to let us run the tests without creating the HTML reports.
With HTML output, the core of Ant’s JUnit coverage is complete. Projects can use what we’ve covered—batch execution of test cases and HTML output—for most of their needs. There are a few more advanced topics that may be of interest. Once you have testing up and running in a project, come back to this section and think about using them to improve the test process.
4.7. Advanced <junit> techniques
Before closing off our JUnit introduction, there are a few more tricks to know about running JUnit under Ant. These are all optional extras, described in no particular order, but useful to have on hand when needed.
Running a single test case
Once your project has a sufficiently large number of test cases, you may need to isolate a single test case to run when ironing out a particular issue. This feat can be accomplished using the if/unless clauses on <test> and <batchtest>. Our <junit> task evolves again:
<junit printsummary="false"
       errorProperty="test.failed"
       failureProperty="test.failed"
       fork="${junit.fork}"
       forkmode="${junit.forkmode}">
  <classpath>
    <path refid="test.classpath"/>
    <!-- include our current JVM's options -->
    <pathelement path="${java.class.path}"/>
  </classpath>
  <formatter type="brief" usefile="false"/>
  <formatter type="xml"/>
  <test name="${testcase}" todir="${test.data.dir}" if="testcase"/>
  <batchtest todir="${test.data.dir}" unless="testcase">
    <fileset dir="${test.classes.dir}"
      includes="**/test/*Test.class"/>
  </batchtest>
</junit>
By default, the testcase property is undefined, the <test> element will be skipped, and the <batchtest> tests will execute. To run a single test case, we just define the name of the test on the command line by setting the testcase property:
ant test -Dtestcase=d1.core.test.SimpleTest
This is a good technique for a big project—even Ant’s own build file does it!
Running JUnit in its own JVM
The <junit> task, by default, runs within Ant’s JVM. It’s a lot more robust to run tests in a new JVM, which we can do with the attribute fork="true". This term, forking, comes from Unix, where a process can fork into two identical processes. Java doesn’t implement Unix’s fork() operation, but Ant comes close and uses the term in some of its tasks.
The fork attribute can be used in the <junit> tag to control all test cases, or it can be used in the <test> and <batchtest> tags, controlling the fork option of a specific set of tests. Forking unit tests let developers do the following:
- Use a different JVM than the one used to run Ant (jvm attribute)
- Set timeout limitations to prevent tests from running too long (timeout attribute)
- Test in low memory configurations (maxmemory attribute)
- Test different instantiations of a singleton or other situations where an object may remain in memory and adversely affect clean testing
- Set up a path for loading native libraries and test Java Native Interface (JNI) code
We like to fork our code because it makes things more robust; the test run cannot break Ant, and Ant’s state doesn’t affect the test code. Running tests in a new process does cause some problems, because the classes needed by the formatters and the test cases themselves must be in the classpath. One way to do this is to adjust the classpath for running tests:
<classpath>
  <path refid="test.classpath"/>
  <pathelement path="${java.class.path}"/>
</classpath>
The JVM-provided property java.class.path is handy to make sure the spawned process includes the same classpath used by the original Ant JVM. If you want to be more selective about classpaths, include ant-junit.jar and junit.jar. You also need the Apache Xerces XML parser or an equivalent. Since this is now built into the Java runtime, there’s no need to explicitly ask for it.
![]()
What happens when <junit> forks? Unless you say otherwise, every test case class is run in its own JVM. This can be slow, especially when there’s a lot of static startup code in the application being tested. You can control this behavior with the forkMode attribute, which takes any of the values listed in table 4.3.
Table 4.3. Options for the forkMode attribute of <junit>, controlling how often a new JVM is created during the run. The once and perBatch modes are fastest.
| perTest | Fork a new JVM for every test (default) |
| perBatch | Fork a new JVM for every batch of tests |
| once | Fork a new JVM once |
![]()
The once option starts a new JVM for every set of tests which have matching JVM configuration options, so it may need to start a few if the <junit> declaration is complex. It does run tests faster and should be played with. Just don’t rely on a single JVM lasting for all tests.
Passing information to test cases
One common problem in a test run is passing configuration information down to the test.
How can test cases be configured? It may be OK to hard code values into the test source, but not things that vary on a per-system basis, such as the path to a file on the local drive or the port that a server is listening on. To configure tests dynamically, we pass the information down as Java system properties, using the <sysproperty> element. This is the equivalent of a -D argument to a Java command-line program.
<junit printsummary="false"
       errorProperty="test.failed"
       failureProperty="test.failed">
  <classpath refid="test.classpath"/>
  <sysproperty key="test.url" value="http://localhost:8080/"/>
  <sysproperty key="debug" value="true"/>
  <sysproperty key="data.dir" file="./data"/>
  <formatter type="xml"/>
  <formatter type="brief" usefile="false"/>
  <test name="${testcase}" if="testcase"/>
  <batchtest todir="${test.data.dir}" unless="testcase">
    <fileset dir="${test.dir}" includes="**/test/*Test.class"/>
  </batchtest>
</junit>
To read these values, our tests call System.getProperty or Boolean.getBoolean():
String url = System.getProperty("test.url");
String dataDir = System.getProperty("data.dir");
boolean debug = Boolean.getBoolean("debug");
It is often useful to have a helper method that asserts that the property actually exists:
public String getProperty(String property) {
    String value=System.getProperty(property);
    assertNotNull("Property "+property+" is undefined",value);
    return value;
}
If you use this method, any absent property is detected immediately and raised as a test failure. Filename properties can be handled with an extension of this technique that looks for a property naming a file that must exist:
public File getFileProperty(String property) {
    String value = getProperty(property);
    File file=new File(value);
    assertTrue("File "+file+" does not exist",file.exists());
    return file;
}
Checks like these are valuable when you run JUnit from IDEs, as they’ll have their own way of configuring properties, and a bit of rigor here stops problems from sneaking in.
We can also use Java language assertions in JUnit tests. There’s no benefit in using Java assert statements inside JUnit tests, but libraries may contain them.
Enabling Java Assertions
You can enable Java assertions in a forking <junit> task; the request is ignored when fork="false". Assertions are enabled and configured with an <assertions> element in the <junit> declaration:
<assertions enableSystemAssertions="true">
  <enable/>
  <enable package="d1.core"/>
  <disable class="d1.core.Events"/>
</assertions>
![]()
Here we’re turning on all assertions in the runtime, including all those in everything else (<enable/>) and all in package d1.core except for those in the class d1.core.events. If your libraries have assertions, turn them on during testing!
Our final bit of advanced <junit> concerns reporting.
Customizing the <junitreport> reports
Sometimes the HTML reports are too verbose or they lack the custom layout a team needs so it can publish it straight onto their web site. You can customize the pages generated by <junitreport> by using different XSL files. The XSL files used by the task are embedded in Ant’s ant-junit.jar and ship in the etc/ directory of the installation for customization. To customize, either copy the existing junitframes.xsl and junit-noframes.xsl files to another directory or create new ones. You must use these exact filenames. To use your custom XSL files, simply point the styledir attribute of the <report> element at them. Here we have a property junit.style.dir that is set to the directory where the XSL files exist:
<junitreport todir="${test.data.dir}">
  <fileset dir="${test.data.dir}">
    <include name="TEST-*.xml"/>
  </fileset>
  <report format="frames"
      styledir="${junit.style.dir}"
      todir="${test.reports.dir}"/>
</junitreport>
If you reach the limit of what XML+XSLT can do in terms of report generation, there’s one more option: writing your own result formatter.
Creating your own test result formatter
The <formatter> element has an optional classname attribute, which you can specify instead of type. You must specify a fully qualified name of a class that implements the JUnitResultFormatter interface and get that class into the classpath of the JVM that runs the unit tests. Examine the code of the existing formatters to learn how to develop your own, if you ever have the urge.
4.8. Best practices
We love JUnit. It’s easy to learn, and once you start using it you cannot help wondering why you never used it before.
Ant makes unit testing simple by running JUnit, capturing the results, and halting the build if a test fails. It will even create fancy HTML reports. By integrating testing with your build process, you can be sure that the tests are run every build, making testing as central and foundational as compiling the Java source. This is what we think developers should do:
- Think about testing from the beginning. You can design programs to make them easier to test; you can also design programs to make testing nearly impossible.
- Separate test code from production code. Give them each their own unique directory tree with an appropriate package-naming structure.
- Test everything that could possibly break.
- Write a well-written test. If all your tests pass the first time, you’re probably not testing vigorously enough.
- Add a new test case for every bug you find.
- When a test case fails, track down the problem by writing more tests before going to the debugger. The more tests you have, the better.
- Use informative names for tests. It’s better to know that testFileLoad failed, rather than test17 failed.
- Pick a unique naming convention for test cases; we use “*Test.java.” We can use this pattern with <batchtest> to run only the files that match the naming convention.
From an Ant perspective, the most important thing to do is write build files that run tests every build. Don’t make running the tests something only one person in the team does, and then only once a week.
If you need to retrofit tests to an existing application, don’t panic. Add tests as you continue to evolve the application. Before adding new code, write tests to validate the current behavior and verify that the new code doesn’t break this behavior. When a bug is found, write a test case to identify it clearly, then fix the bug and watch the test pass. Keep at it and you’ll slowly build up test coverage of the application.
Now, there’s one more little topic to cover before we finish this chapter: JUnit versions.
4.8.1. The future of JUnit
This book uses JUnit 3.8.2 throughout. The JUnit 3 branch of JUnit is the version of the framework most broadly used and is widely supported in Ant, IDEs, and other tools. There is a newer version, JUnit 4; at the time of writing, JUnit 4.2 was the latest release. It lets developers use Java 5 annotations as a way of marking up test classes and methods. Why hasn’t this book adopted the latest version of JUnit?
The main reason for sticking with the JUnit 3.8 branch is because it’s been so successful that it has become integrated with much of the Java development infrastructure. IDEs recognize test classes and can run them; Ant’s tasks are built for JUnit 3 and added only incomplete JUnit 4 support in Ant 1.7. Most critically, there are extension tools such as Apache Cactus, which work only with JUnit 3.8.x. Apache Cactus is an extension for JUnit that can run tests inside an application server; it’s invaluable for some server-side testing, and something which we’ll look at in chapter 14. There are other extensions which have yet to migrate, such as HttpUnit, XmlUnit, and DbUnit. If you need these extensions, you need to stick with the JUnit 3.8.x branch.
When will these extensions move to JUnit 4? We don’t know. It will require them to move to Java 1.5 and be incompatible with the Java 1.4 world, so isn’t a decision to be made lightly—especially when there is an alternative.
TestNG, from http://testng.org/, is another Java test framework. Like JUnit 4, it supports Java 5 annotations for marking up tests. It also runs under Java 1.4, using Javadoc annotations for test markup. Furthermore, like JUnit 4, it can run JUnit 3 tests case classes.
TestNG has its own task, which is built into the test framework. The XML reports that the task generates feed into Ant’s existing <junitreport> task, so TestNG integrates with Ant as well as JUnit does. We’re not going to cover TestNG in this book. However, it has some interesting features, and anyone thinking of moving to JUnit 4 should also look closely at TestNG before making a decision.
4.9. Summary
In this chapter, we started writing a diary application by writing the JUnit tests for these classes at the same time as the application itself and integrating the tests into the build process so that Ant compiles both source trees and runs the tests, generating HTML report pages.
We’ll extend this application through the book, packaging and running it, redistributing it, then using it in a web application with the Enterprise Java APIs adding persistence. Throughout all these changes, we’ll know the moment any change breaks the basic functionality of the system, because the test cases written in this chapter will highlight problems the moment any change breaks the core. This is why testing is better than debugging manual “experiments” with an application: tests pay for themselves many times over.
Test-centric development transforms how you write code, usually for the better. Here are some key points to keep in mind:
- JUnit is Java’s main testing framework; it integrates tightly with Ant.
- The more tests you have, the better.
- Tests are most useful if you run them after every change, which is where Ant joins in.
- <junit> runs JUnit test cases, captures results, and can set a property if tests fail.
- The <sysproperty> element can pass information from Ant to the test cases.
- <junitreport> generates HTML test reports and allows for customization of the reports generated via XSLT.
One of the surprising and disappointing things we discover as we encounter new projects is how many projects have yet to adopt a test-centric development process. JUnit makes it so easy! The benefits of tests are so tangible! Yet again and again, we join some project, ask for the tests and hear, “Oh, we haven’t written them yet.” Writing tests takes time, but so does debugging. Moving to a test-centric process is a key way to improve product quality. For that reason, if there’s one message we want readers to remember from this entire book, it is not “We should build with Ant”; it is “We should build and test with Ant.”