
Chapter 18. Extending Ant further
| 18.1 | Scripting within Ant | |
| 18.2 | Conditions | |
| 18.3 | Writing a custom resource | |
| 18.4 | Selectors | |
| 18.5 | Developing a custom mapper | |
| 18.6 | Implementing a custom filter | |
| 18.7 | Handling Ant’s input and output | |
| 18.8 | Embedding Ant | |
| 18.9 | Summary |
We’ve just been extending Ant with custom tasks in Java. Is that all that can be done to adapt it to a project? No, not at all! Some of the other ways that Ant can be extended are by
- Writing tasks using scripting languages with the <script> and <scriptdef> tasks
- Writing new conditions for use in <condition>, <fail>, and other tasks
- Writing custom resources, filters, selectors, and mappers
- Monitoring the build process with custom build listeners and loggers
- Embedding Ant inside your own program
We’re going to go through all these extension mechanisms in turn to see what they are and how to write, test, and use them.
In the previous chapter, we looked at writing an Ant task and the Ant API. Although we are extending Ant in different ways in this chapter, everything covered in the previous chapter about Ant’s Java API and how to test tasks is still essential. If you haven’t already done so, read chapter 17.
18.1. Scripting within Ant
The first thing we’re going to do is extend Ant via scripts—that is, small bits of code implemented in an interpreted language. These code fragments can be placed inline in build files or hosted in text files alongside the build. Almost all of Ant’s official extension mechanisms can be implemented in inline scripts, including tasks, conditions, filters, and more. This means you can solve complex build problems without resorting to Java code. Java is good for reusable tasks and datatypes, but it’s overkill for a one-off problem.
Ant uses the Apache Bean Scripting Framework (BSF) for its primary scripting support. This is a language-independent way of integrating Java with scripting languages. To use BSF scripting languages inside a build file, Ant needs three things:
- The Bean Scripting Framework JAR itself, bsf.jar. The current version is 2.3.0.
- The ant-apache-bsf.jar JAR file, containing the relevant Ant tasks.
- The specific JAR files for the individual libraries.
Script authors have a broad choice of languages, the complete list of which is found on the BSF pages at http://jakarta.apache.org/bsf/projects.html. Table 18.1 lists some of the main ones.
Table 18.1. Scripting languages. The language name is used in the language attributes of Ant’s scripting tasks.
|
Script language |
Description |
Home page |
|---|---|---|
| beanshell | BeanShell language | http://www.beanshell.org/ |
| groovy | Groovy—a new JVM-specific language | http://groovy.codehaus.org/ |
| jacl | TCL in the JVM | http://tcljava.sourceforge.net/ |
| jruby | Ruby in the JVM | http://jruby.codehaus.org/ |
| jython | Python in the JVM | http://www.jython.org/ |
| netrexx | Java port of the REXX mainframe language | http://www.ibm.com/netrexx/ |
| javascript | JavaScript in Java 6; Rhino | http://www.mozilla.org/rhino/ |
Of all the languages, those that seem to work best with Ant are Jython, JRuby, and BeanShell. The currently released versions of Rhino and BSF aren’t compatible—so you cannot use JavaScript except on Java 6. Otherwise, the choice comes down to which language you know, prefer, or think would be best for your career.
To use any BSF-based script language, you need the language-specific JAR and a compatible version of bsf.jar on Ant’s classpath. Ant’s fetch.xml file has a "script" target that will pull down BSF with Jython, JRuby, and BeanShell.
![]()
Java 1.6 adds a built-in script engine to the JVM, along with a JavaScript implementation. Ant has support for this, which we will look at once we’ve introduced the <script> and <scriptdef> tasks.
Running a script
With the BSF and relevant language JARs on the classpath, we can use them in the <script> task. Doing so executes a piece of script during the build, as in listing 18.1.
Listing 18.1. An inline BeanShell script
<target name="random">
  <script language="beanshell"><![CDATA[
    float r=java.lang.Math.random();
    int num = Math.round(r*10);
    project.setNewProperty("random", Integer.toString(num));
    self.log("Generated random number " + num);
  ]]>
  </script>
</target>
The script creates a random number in the range 0-9, sets the property random to the value, and prints the value out:
random:
   [script] Generated random number 6
Any target that depends on this target has access to the result, such as this AntUnit test:
<target name="testRandomScript" depends="random">
  <echo>Random number is ${random}</echo>
  <au:assertPropertySet name="random" />
  <au:assertLogContains text="Generated random number" />
</target>
The <script> task has one mandatory attribute, language, which must be set to the language of the script. The script itself can either go inline or in an external file, which is good for complex scripts:
<script language="jython" src="update.py" />
This works well for Jython, as Python’s indentation rules make it tricky to use inline in an XML file.
Implicit objects provided to <script>
The <script> task provides two fixed-name implicit objects to the script context: project and self. The project object is a reference to the current Ant Project instance, offering all the methods covered in chapter 17. The self object is a reference to the Script task instance. This reference is useful for logging messages, using the log methods that Task provides. In listing 18.1 we used both project and self, calling project.setNewProperty to assign a property and self.log to generate a message at the debugging level.
Overall, the <script> task is fairly low-level. It doesn’t integrate well with Ant, and it’s showing its age. There are newer ways to use script inside Ant, especially <scriptdef>.
18.1.1. Writing new tasks with <scriptdef>
The <script> task is very limited. It’s a piece of inline code and isn’t very reusable. Why not write a whole task in a scripting language, complete with attributes and elements? That is what <scriptdef> is for. It lets you define an Ant task inside a build file in a scripting language. Listing 18.2 uses <scriptdef> to create a task that sets a named property to a random number.
Listing 18.2. A task written in Jython, using <scriptdef>
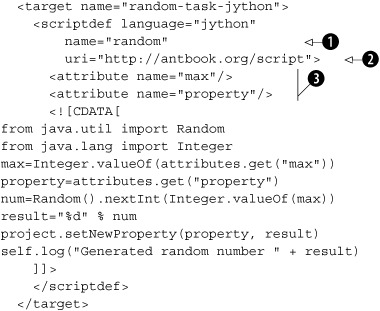
This target declares a new task, random ![]() in the namespace http://antbook.org/script
in the namespace http://antbook.org/script ![]() . We then declare two attributes, max and property
. We then declare two attributes, max and property ![]() , to configure the task. The <scriptdef> task can define tasks with attributes and elements but not with nested text, except within elements. Nor can you declare
the type of an attribute—they’re always strings. That means all the attribute-type conversion magic to set up paths and files
is lost, though Ant will expand properties before passing them down to the task.
, to configure the task. The <scriptdef> task can define tasks with attributes and elements but not with nested text, except within elements. Nor can you declare
the type of an attribute—they’re always strings. That means all the attribute-type conversion magic to set up paths and files
is lost, though Ant will expand properties before passing them down to the task.
Our <random> task is written in Jython, Python’s port to the JVM. Python uses indentation as a way of marking code blocks, the way Java uses the curly braces, so it’s sensitive to layout in the XML file. The script uses java.util.Random to create a random number; all of Java’s and Ant’s classes are available to the scripting languages.
Ant creates an attributes hash table containing all attributes that are passed to the task, indexing the attributes by their names. The attributes.get() operation returns the value of an attribute. If the attribute is absent, it returns null. Ant expects the script to handle missing elements and attributes itself, either by raising an exception or skipping some work. There’s a method, self.fail(String), that throws a BuildException if needed:
  <target name="random-task-validating">
    <scriptdef language="jython"
        name="random2"
        uri="http://antbook.org/script">
      <attribute name="max"/>
      <attribute name="property"/>
      <![CDATA[
from java.util import Random
from java.lang import Integer
max=attributes.get("max")
property=attributes.get("property")
if max and property :
    num=Random().nextInt(Integer.valueOf(max))
    result="%d" % num
    project.setNewProperty(property, result)
    self.log("Generated random number " + result)
else:
    self.fail("'property' or 'max' is not set")
]]>
    </scriptdef>
  </target>
The resulting fault trace is pretty messy, as the exception gets passed into Jython and then out again; in the process, Ant somehow ends up with a complete stack trace. Passing exceptions across JVM languages is clearly something that could be improved.
Testing <scriptdef>-defined tasks
We can use AntUnit to test the scripts, just as we did for Java tasks in chapter 17:
<target name="testRandomTaskNoProperty"
    depends="random-task-validating"
    xmlns:s="http://antbook.org/script">
  <au:expectfailure expectedMessage="not set">
    <s:random2 max="20"/>
  </au:expectfailure>
</target>
AntUnit and <scriptdef> make a very good combination; they let you write both your code and your tests in build files, or at least in interpreted languages. Because the scripting languages have full access to the Ant runtime and the Java libraries, they can do things normal tasks cannot do, yet you have a fast, iterative development cycle.
Nested elements in scripted tasks
Alongside attributes and text come nested elements. These are slightly trickier because the <scriptdef> declaration has to declare the type of the element to create, as well as its name. The task also has to deal with the possibility of multiple elements of the same name being set. Here is a JRuby script that supports a <classpath> element:

The <element> declaration has to state the type of the element ![]() . This can be a known Ant type, or it can be the full name of any Java class, a class that must have a public, no-argument
constructor.
. This can be a known Ant type, or it can be the full name of any Java class, a class that must have a public, no-argument
constructor.
When the script is executed, Ant builds up a list for every named element handed in. All these lists are stored in the elements HashMap, which can then be queried for a named list ![]() . If no element was supplied, the result will be null. Here, in Ruby, the keyword is nil, but the meaning is clear.
. If no element was supplied, the result will be null. Here, in Ruby, the keyword is nil, but the meaning is clear.
Testing this task is straightforward; a test target invokes it with a couple of paths:
<target name="testNested" depends="nested-task-jruby"
  xmlns:s="http://antbook.org/script">
  <s:nested>
    <classpath path=".:${user.home}"/>
    <classpath path="${ant.file}" />
  </s:nested>
  <au:assertLogContains text="."/>
</target>
Another test checks that calling the task with no nested elements throws the expected exception. With element support working, our scripts have access to Ant’s full suite of datatypes: paths, files, resources, and the like.
Once written, our scripted tasks need to be distributed. There are two ways to do this. The simplest way is to embed the scripts in a build file, perhaps one that’s pulled in via <import>.
The other way is to declare them in an Antlib. Build files can use the tasks just by declaring the Antlib URI. If you’re creating an Antlib for a project, you can declare <scriptdef> scripts inline in the antlib.xml file itself. When the Antlib is packaged and distributed as a JAR file, the scripted tasks are available to all users.
There’s one limitation here. The file attribute of <scriptdef> takes a file only in the local file system. That means that developers cannot currently keep all of the script files in separate .js, .py, or .ruby files in the JAR and then refer to them in <scriptdef> declarations. That is something that will be fixed in the future.
Before closing our script coverage, let’s look at how the script tasks behave under Java 6, where script support is built into the Java runtime.
Ant scripts in Java 6
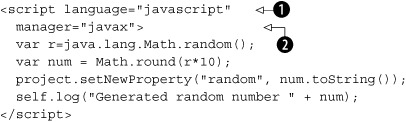
Java 6 ships with a new scripting API and a copy of the Rhino JavaScript engine in the package sun.org.mozilla.javascript. As a result, you can use JavaScript in your Ant builds without needing any extra libraries:
![]()
To use this script, we have had to do two things. Selecting language="javascript" is the first of these ![]() ; this tells Ant to use JavaScript. Ant then needs to choose which scripting engine to use. It does this based on the manager attribute. The default value, manager="auto", tells Ant to use the BSF manager if it’s present and if the requested language is available. By asking for the javax manager
; this tells Ant to use JavaScript. Ant then needs to choose which scripting engine to use. It does this based on the manager attribute. The default value, manager="auto", tells Ant to use the BSF manager if it’s present and if the requested language is available. By asking for the javax manager ![]() , we get the Java 6 manager, bypassing BSF. There’s also the option of setting manager="bsf" to only check the BSF script manager for the specific language.
, we get the Java 6 manager, bypassing BSF. There’s also the option of setting manager="bsf" to only check the BSF script manager for the specific language.
What that means is that if you don’t express a choice of script manager, Ant looks for the script language in both runtimes, BSF and Java 6. You need to set the manager attribute only if you really want to select a particular implementation.
The fact that JavaScript is built into the runtime makes it very appealing: if all developers are using Java 6, then the build files can use JavaScript inline without any external dependencies. There’s no reason not to use <script> or <scriptdef>.
18.1.2. Scripting summary
The scripting framework is very powerful. Tasks defined with <scriptdef> are true peers of Java tasks, rather than second-class citizens. Why didn’t we cover them in the previous chapter? The answer is that Java is the main language for writing tasks today, especially those that integrate with other Java applications or libraries. The other reason is that to introduce scripting at the same time as Ant’s internal API would be too much at one time. You need to know Ant’s API and how to use AntUnit first.
Once you know how Ant works under the covers and are familiar with at least one of the supported scripting languages, then <script> and, more importantly, <scriptdef> are very handy tools indeed. There are other places that you can use scripting languages in Ant, which we’ll cover as we go through Ant’s remaining extension points; we’ll start with conditions.
18.2. Conditions
Now, let’s go beyond tasks into Ant’s other types. A nice place to start is with conditions, which are little classes that evaluate to true or false. Custom conditions can be used in the <condition>, <fail>, and <waitfor> tasks. Some third-party tasks also support conditions, such as AntUnit’s <assertTrue> and <assertFalse> tasks. It’s easy to write a new condition that all these tasks can use.
To implement a condition, we write a Java class that implements Ant’s Condition interface and its boolean eval() method. This method must return true if the condition holds and false if it doesn’t. That’s it. Attributes and nested elements come via Ant’s normal XML binding mechanism. If the condition extends the ProjectComponent class, Ant even binds it to the current project, allowing the condition to log messages or manipulate the project’s state. Listing 18.3 shows a simple condition, one that tests for the contents of the value attribute being an even number.
Listing 18.3. A condition to test for a number being even
package org.antbook.conditions;
import org.apache.tools.ant.ProjectComponent;
import org.apache.tools.ant.taskdefs.condition.Condition;

public class isEven extends ProjectComponent implements Condition {

    private int value;

    public void setValue(int value) {
        this.value = value;
    }

    public boolean eval() {
        return (value & 1) == 0;
    }
}
This is all there is to it. Once compiled and declared, the condition is ready for use in any of the conditional tasks. Compiling is the traditional <javac>; nothing new. Declaring the condition is slightly different from declaring a task, because <typedef> is used.
Alongside tasks, Ant has datatypes. Examples of these are <fileset> and <path> declarations declared outside any task. When Ant encounters a datatype in a build file, it converts it to Java objects. If the type has an id attribute, it stores the converted type instance in the project by using the Project.addReference() method.
Ant’s type system also includes any Java classes that implement specific interfaces—in this case Ant’s Condition interface. Ant uses introspection to see what a declared datatype can do and to allow the custom types to be used inside tasks or other datatypes. If a task or datatype declares an add() method that takes a Java interface, any Ant type with that interface can be added. For Ant conditions, that means any task with the method add(Condition) can host the condition.
To tell Ant about our new condition, we use the <typedef> task:
<typedef name="iseven"
  classname="org.antbook.conditions.isEven"
  uri="antlib:org.antbook.conditions"
  classpath="${target.jar}" />
The declaration also can appear in Antlib libraries. Here is the antlib.xml for the conditions package:
<antlib>
  <typedef name="iseven"
    classname="org.antbook.conditions.isEven" />
</antlib>
This declaration can then be loaded via an implicit namespace-driven load or via an explicit <typedef> of its own:
<target name="define">
  <typedef
      onerror="failall"
      uri="antlib:org.antbook.conditions"
      classpath="${target.jar}"/>
</target>
After the condition has been declared as an Ant type, it’s ready for use. We can use the condition inside any conditional task, such as <condition> itself:
<condition property="2.is.even">
  <cond:iseven value="2"/>
</condition>
It can also be used in <fail>:
<fail message="-1 is odd">
  <condition>
    <not>
      <cond:iseven value="-1"/>
    </not>
  </condition>
</fail>
We can even use it inside third-party tasks that take conditions, such as AntUnit’s <assertTrue> assertion:
<target name="testZero"
    depends="define">
  <au:assertTrue>
    <cond:iseven value="0"/>
  </au:assertTrue>
</target>
Because conditions are so easy to write and because they slot so easily into so many tasks, they are a handy type to add to libraries in which conditional evaluation of some aspect of the system is appropriate.
Scripted conditions
If a project has a one-off test they need to make in a build, the developers can implement the condition in script, using the <scriptcondition> condition. Here’s the test for a single number “3” being even:
<scriptcondition language="ruby">
  <![CDATA[
  $self.value= (3&1)==0
  ]]>
</scriptcondition>
The self.value attribute is used to store the result of the evaluation. If it’s set to true by the script, then the condition is true; if it isn’t set or if it’s set to false, then the condition evaluates to false.
There’s no easy way to pass data down to a <scriptcondition>, and the script has to be repeated wherever it is used—unless the file attribute is used to point to a file containing the script. As such, it’s of fairly limited use.
18.2.1. Writing a conditional task
As well as writing custom conditions, you can write tasks that accept conditions and evaluate them. The best way to do this is to extend Ant’s ConditionBase class. This class supports all the conditions built into Ant and adds an add(Condition) method at the end to contain third-party conditions. The class does nothing with the conditions it collects, leaving it up to the subclass, which must implement an execute() method. Here’s a task that counts the number of nested tasks passing or failing:

This task supports all conditions, both built-in and custom:
<cond:count>
  <cond:iseven value="-1"/>
  <cond:iseven value="42"/>
  <istrue value="true"/>
</cond:count>
The output of this task is what we would hope—two tests passing and one failing, as shown here:
testCount:
Conditions passing: 2 failing: 1
It’s important to know that simply implementing add(Condition) doesn’t give classes access to Ant’s built-in conditions, because they aren’t actually declared as Ant types. Extending the ConditionBase class is the best way to support the built-in conditions.
To summarize, conditions are found all over build files. It’s easy to add a new one, and not that much harder to support conditions in a custom task. Either action makes it easy for Ant extension libraries to integrate with existing tasks and build processes.
18.3. Writing a custom resource
One very interesting extension point to Ant is the resource class hierarchy. In chapter 17, we resource-enabled our <filesize> task, so it could process data from any resource. Equally powerful is that the resource type itself can be extended. To do this, we extend the org.apache.tools.ant.types.Resource class with a custom resource class, overriding the base methods. The key method to override is usually getInputStream(), which returns the contents of the resource as input stream. There are some other methods that can be useful to override, specifically getLastModified() and getSize(). These methods return the timestamp of the resource (or 0L if it isn’t known) and the resource size, respectively. The base class actually has setSize() and setLastModified() methods that can be used in build files to set the values; this may be adequate for the custom resource.
The example resource we’ve chosen is one to create a stream of random characters from any cryptographically strong random number generator that is in the Java runtime, using the java.security APIs to access the generator. This resource has no last-modified time, but it will have a size—a size set in the build file. It will have the two attributes size and algorithm to set the length of the resource and the random number generator to use. Listing 18.4 shows the resource.
Listing 18.4. A custom resource to generate strongly random data
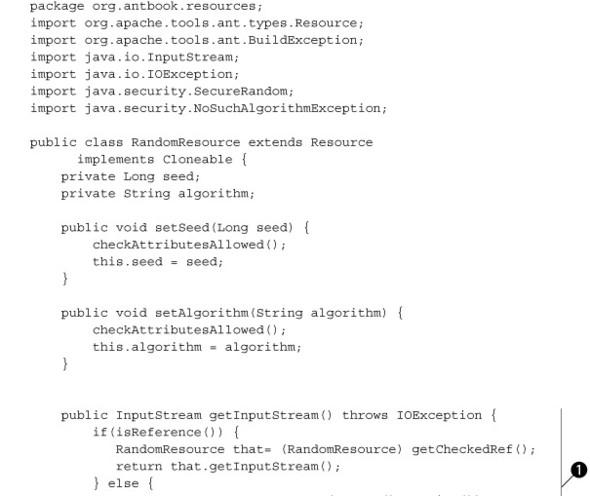

A Resource is an Ant Datatype; a Datatype is a ProjectComponent. As such, a resource has access to the project and a logger, and Ant binds to it just as it binds to any other XML element—by
creating an instance and then configuring it through its XML-to-Java mapping code. There are some subtleties with datatypes.
Every setter method needs a call to checkAttributesAllowed(), which throws an exception if the declaration has already been given a refid attribute. There’s also the strange stuff in the getInputStream() method ![]() , which is the other part of reference handling and is something that we’ll cover in section 18.3.2.
, which is the other part of reference handling and is something that we’ll cover in section 18.3.2.
Ant requires resources to state whether the data they refer to is present, and when it was last modified. This resource is
always found ![]() , and it has no last-modified date
, and it has no last-modified date ![]() . The heavy lifting—the random number creation—is implemented in the create() method
. The heavy lifting—the random number creation—is implemented in the create() method ![]() . This method creates a SecureRandom number source that is then fed into the constructor of a helper class, RandomInputStream. This class implements java.io.InputStream, returning a new random value on every read() until a predefined limit is reached:
. This method creates a SecureRandom number source that is then fed into the constructor of a helper class, RandomInputStream. This class implements java.io.InputStream, returning a new random value on every read() until a predefined limit is reached:
package org.antbook.resources;
import java.io.InputStream;
import java.io.IOException;
import java.security.SecureRandom;

class RandomInputStream extends InputStream {
    private SecureRandom generator;
    private long size;

    public RandomInputStream(SecureRandom rng, long size) {
        this.generator = rng;
        this.size = size;
    }

    public synchronized int read() throws IOException {
        if(size--<=0) {
            return -1;
        }
        return generator.nextInt(256);
    }
}
When the resource is asked for its input stream, a new generator is created and a new RandomInputStream is returned. This means that unless a seed is used to set the randomness, the input stream will be different every time getInputStream() is called. Every call will result in a new stream of finite length, full of random data[1]—that is, as soon as we can use it in a build file.
1 During development the size check was accidentally omitted, so the stream was infinite. Ant did run out of memory eventually.
18.3.1. Using a custom resource
To use our random data source, we need to tell Ant about it, which brings the <typedef> task into play again:
<typedef name="random"
  classname="org.antbook.resources.RandomResource" />
Once defined, the resource can be used in any task that supports resources, such as the <loadresource> task, which fills in a property from a resource:
<target name="showload"
  xmlns:res="antlib:org.antbook.resources"
  depends="ready-to-run">
  <loadresource property="result">
    <res:random size="10"/>
  </loadresource>
  <echo> random result=${result}</echo>
</target>
This prints out a random set of unreadable characters:
>ant showload -q
     [echo]  random result=Ï3A°IáÚG
Custom resources can be fed into any resource-enabled task. To save random data to a file, we could use it inside the <copy> task:
<copy todir="build">
  <res:random name="random.bin" size="8192"/>
</copy>
The name attribute had to be set here, so that <copy> would know what filename to create at the far end. The result? An 8-KB file full of random numbers.
18.3.2. How Ant datatypes handle references
Datatypes differ from other Ant components in the notion of “references.” If we give a datatype, including a resource, an id attribute, Ant will file it away for reuse:
<res:random size="10" id="testSharedResource" />
To use this reference, task declarations declare a generic resource with a refid attribute. This could be the simple <resource> type:
<loadresource property="set1">
  <resource refid="testSharedResource"/>
</loadresource>
Alternatively, we could declare a specific resource type, in which case the type of the declared resource must match that of the reference:
<loadresource property="set2">
  <res:random refid="testSharedResource"/>
</loadresource>
How does this work? Every “relevant” operation on a datatype needs to be redirected to any reference type, if it’s present. This explains the code in the getInputStream() method in listing 18.4. The method had to call isReference() to see if it was a reference, and, if so, get the target resource through the call to getCheckedRef(). It is the target resource whose getInputStream() method is finally invoked. Every operation that acts on the referenced datatype needs to resolve references this way.
Touchable resources
Any resource that wants to support the touch(long) operation should implement the interface org.apache.tools.ant.types.resources.Touchable. The <touch> task can update the resource with this interface. There’s an implicit assumption that touching a resource updates its last-modified time, and that getLastModified() will (approximately) reflect the new value.
Resource summary
Resources are a very interesting datatype. New to Ant 1.7, they aren’t universally supported across tasks, especially third-party ones. They offer lots of places to improve the build process, as anything that can act as a source of data or locator of files can now plug directly into other tasks. Some projects should be able to do very creative things with them, such as directly feeding remote data into other applications. We may even see custom resource collections, which group resources differently or we may provide sets of resources from new locations. It would certainly be great to have an <sshfiles> collection containing files from a remote SSH server, or an <artifact> resource giving us direct access to an Ivy artifact on a remote repository. The tools are there—we’ll have to wait and see what people do with them.
18.4. Selectors
There are three more Ant datatypes we want to look at: selectors, mappers, and filters. Let’s start with selectors.
A selector is an Ant type that can filter filesets to decide whether to include a file in a collection. As well as the built-in set, you can add new selectors to a project, writing them in Java or in scripting languages.
A simple example is one that selects read-only files. The ReadOnlySelector that does this is quite short and sweet:
package org.antbook.selectors;
import org.apache.tools.ant.types.selectors.BaseExtendSelector;
import java.io.File;

public class ReadOnlySelector extends BaseExtendSelector {

    public boolean isSelected(File basedir, String name, File file) {
        return (!file.canWrite());
    }
}
Ant’s documentation already provides extensive coverage of writing custom selectors, so we don’t cover it in detail here. The main actions are extending BaseExtendSelector and implementing the isSelected method. Custom selectors also can take parameters using nested <param> tags. The Ant manual covers this in the “Programming Your Own Selectors” page (http://ant.apache.org/manual/CoreTypes/selectors-program.html).
After the usual steps of compiling the source and creating a JAR file, the selector can be declared with a <typedef> command:
<antlib>
  <typedef name="readonly"
    classname="org.antbook.selectors.ReadOnlySelector" />
</antlib>
A custom selector can support attributes and nested elements and text, through the appropriate set- and add- methods. Once declared, the selector can then be used inside any fileset, as with this copy operation:
<target name="testTypedefSelector" depends="define">
  <copy todir="${temp.dir}"
      xmlns:sel="antlib:org.antbook.selectors">
    <fileset dir="${data.dir}">
      <sel:readonly />
    </fileset>
  </copy>
  <au:assertFalse>
    <available file="${temp.dir}/writeable.dat" />
  </au:assertFalse>
</target>
This example is from the AntUnit test that verifies that the writeable file wasn’t copied.
Selectors are easy to test in AntUnit; the setUp target builds a directory with some files that meet the selection criteria, and some that do not. For our selector, this involves creating stub files with <echo> then using <chmod> and the Windows equivalent (an <exec> of cmd.exe /c attrib +R). The tests themselves copy files from the selection to a temporary directory, which the build file then probes for files that should and should not have been copied. Finally the tearDown target cleans up the temporary directory, ready for the next test.
18.4.1. Scripted selectors
![]()
If you don’t want the overhead and build stages of a Java selector, a <scriptselector> can implement the selector inline. Here’s the selector re-implemented as a piece of BeanShell script:
<copy todir="${temp.dir}">
  <fileset dir="${data.dir}">
    <scriptselector language="beanshell" >
      self.setSelected(!(new File(filename)).canWrite());
    </scriptselector>
  </fileset>
</copy>
Since we’ve just avoided writing and compiling a Java selector, this is clearly a good way to do a one-off selection.
18.5. Developing a custom mapper
Many of the same tasks that take selectors also support the <mapper> datatype, which can rename files as they’re moved, copied, or imported into archives. Listing 18.5 shows a custom mapper that makes filenames uppercase.
Listing 18.5. A mapper that converts filenames to uppercase

A custom mapper must implement Ant’s FileNameMapper interface, which has three methods. We ignore two of the methods, and only implement the map-FileName() method. This method takes a string, the path of the file relative to the base of the fileset, and returns an array of strings, the mapped paths. Mappers are free to return multiple mappings for the same source file.
As before, the Ant type needs to be compiled, packaged, and declared using <typedef>, possibly in an antlib.xml file.
<antlib>
  <typedef name="toupper"
    classname="org.antbook.mappers.ToUpperMapper"/>
</antlib>
Once declared, the mapper can be used in a <copy> operation:
<copy todir="build/dest"
  xmlns:map="antlib:org.antbook.mappers">
  <fileset dir="src" />
  <map:toupper />
</copy>
The result of this is that files beneath the directory src are copied with uppercase file and directory names into build/dest. If there was a file src/package/filename.java, it would be copied to build/dest/PACKAGE/FILENAME.java. The parent directories of the fileset, everything up to and including src, aren’t mapped. Mappers work only on relative paths, such as turning source directory trees into dotted Java package names.
Mappers crop up a lot in Ant’s internals, as they can encode any transformation from input files to output files, such as those of Java RMI stub files. Such mappers aren’t declared as Ant datatypes, and they remain hidden from build files. Examine the <rmic> and <java> tasks in Ant’s source to see some at work.
Scripted mappers
![]()
You can avoid writing and building a mapper in Java for a one-off file mapping by using the <scriptmapper> mapper for coding the mapping inline. Here’s the previous <copy> task, this time with the mapping in BeanShell:
<copy todir="build/dest">
  <fileset dir="src"/>
  <scriptmapper language="beanshell">
    self.addMappedName(source.toUpperCase());
  </scriptmapper>
</copy>
Ant calls the script once for every invocation of FileNameMapper.mapFile-Name(). The source variable holds the source filename, and every call to self.addMappedName() adds another mapped name to be returned.
Testing mappers
As with any other Ant extension, we need to test our mappers, which brings us back to AntUnit. Some source files matching the relevant pattern should be set up, then mapped into a target directory and the results validated. The <resourcecount> task, which counts the number of resources in a nested resource collection, comes in handy, as it can count the number of files matching a pattern:
<resourcecount property="files.missing">
  <fileset dir="build/dest">
    <filename name="org/**"/>
  </fileset>
</resourcecount>
<au:assertEquals expected="0" actual="${files.missing}"/>
This test case asserts that no files matching the (case sensitive) org/** pattern was pulled in by the mapper. A similar check can count the number of files matching ORG/** to assert that uppercase files were created instead.
18.6. Implementing a custom filter
Just as mappers can transform the names of files, filters can transform their content. They are Ant types that are chained together during some operations. Once set up in a filter chain, the entire data source is pumped through a character at a time, with each filter fetching the character from its predecessor, possibly transforming it, and then passing it up to the next entry. Filters are the equivalent of piped commands in Unix. We introduced them in chapter 6, and we’ve been making use of them in <java>, <exec>, and <copy> tasks.
Custom filters can perform custom transformations on the data stream, including adding or removing data from it. The simple filter of listing 18.6 converts lowercase text to uppercase.
Listing 18.6. A custom filter to convert read text to uppercase
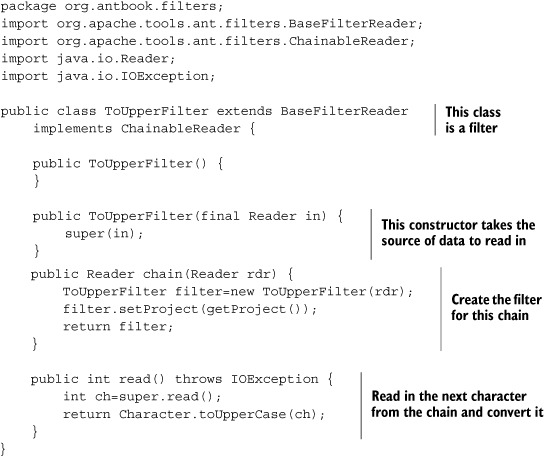
Filters use the standard java.io.Reader, which is implicitly available as the in member variable from the parent class BaseFilterReader. The chain method comes from the ChainableReader interface and allows our class to be linked to another filter, passing the modified stream through to it. The most important method is read(), which Ant calls when another character is needed. Our implementation calls the predecessor in the chain and then returns the result of converting lowercase characters to uppercase in the process.
As with the other Ant types, you need to declare the filter before use:
<typedef name="toupper"
  classname="org.antbook.filters.ToUpperFilter"/>
We can now test this class inside the <concat> task, passing a string through the filter chain:

What is the output? It’s what we hoped for:
showConcat:
   [concat] HELLO, WORLD!

BUILD SUCCESSFUL
Total time: 0 seconds
Admittedly, case conversion is a pretty simple operation, but it shows what can be done. Arbitrary post-processing can be performed on the input to or output from a Java or native program.
Scripted filter readers
If we don’t want to write Java for a quick bit of text filtering, the <scriptfilter> type can help. This can host a piece of script that will be invoked once for each token to be filtered. Here’s the AntUnit test for a scripted filter:
<target name="testScripted">
  <loadresource property="uppercase">
    <string value="Hello, World!"/>
    <filterchain>
      <scriptfilter language="beanshell">
        self.setToken(self.getToken().toUpperCase())
      </scriptfilter>
    </filterchain>
  </loadresource>
  <au:assertEquals expected="HELLO, WORLD!"
    actual="${uppercase}"/>
</target>
The test uses the <loadresource> task to load a string into a property by way of the filter. Every character gets converted into uppercase during the read, which is what we then test for.
Filter summary
Filters are the last of the main Ant extension points, though a thorough browse of the Ant documentation will undoubtedly uncover a few more. Filters are useful for preand post-processing of text, such as input to or output from a native program. They can do pretty complex things. Whenever you <copy> a file with property expansion, that’s a filter at work. If you need to process streamed data in a build, then write a filter either inline or in Java. Remember: they’re just like Unix pipes.
That’s the end of our coverage of Ant types. The other way that Ant can be extended is much more low-level. You can write new classes that change how Ant prints out the build or handles input. You can even host Ant inside another application. That is the last thing this book will cover. Let’s build up to it by hooking into Ant’s I/O and eventing infrastructure.
18.7. Handling Ant’s input and output
It’s time for the final bit of extending Ant—time to go low-level and look at topics that most people avoid. We’re going to look at the internals of Ant, first by customizing its I/O mechanisms.
Ant lets developers monitor its progress during execution. Ant prints to the console, and in IDEs Ant’s output appears in windows in the editor. How does Ant do this? Through two tightly related concepts: listeners and loggers. These receive lifecycle events and the output of a build, and both can be extended by custom versions. Let’s first take a look at the UML for the BuildListener and BuildLogger interfaces, shown in figure 18.1.
Figure 18.1. The BuildListener and BuildLogger receive lifecycle events, events which are described by BuildEvent objects.
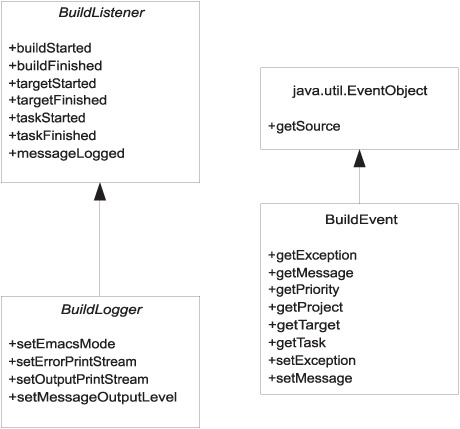
A BuildListener is a Java class that receives notifications of various build, target, and task lifecycle events during a build. The events are build started/finished, target started/finished, task started/finished, and message logged. A project can have any number of build listeners. Ant internally attaches some of its own build listeners to catch events, particularly the build-finished event, which triggers cleanups. Each of the events is handed a BuildEvent instance. This BuildEvent encapsulates all the details of the event being triggered, as listed in table 18.2.
Table 18.2. The different BuildListener callbacks and the BuildEvent data they can expect. For all the finished events, a non-null exception inside the BuildEvent implies that the task, target, or build failed.
|
BuildListener event |
BuildEvent contents |
|---|---|
| buildStarted | Project |
| buildFinished | Project and possibly an exception |
| targetStarted | Project and target |
| targetFinished | Project, target, and possibly exception |
| taskStarted | Project, target, and task |
| taskFinished | Project, target, task, and possibly exception. |
| messageLogged | Message and its priority. The Project attribute is always set, and depending on where the message originated, the target and task attributes may also be set. |
The BuildLogger interface builds on its parent BuildListener by adding access to the output and error print streams. Two additional methods that the BuildLogger interface extends beyond BuildListener allow for setting the emacs mode and the message output level. The DefaultLogger reacts to the emacs switch by generating output formatted for IDE integration, as its formatting of error locations in files is something most IDEs can parse. The message output level is used to filter the output based on the logging level.
Every Ant project has one and only one logger, which is hooked up to the output streams and attached to the project as a listener to receive lifecycle events. Users can select a specific logger on the command line via the -logger switch; otherwise they get the default one. Using -emacs enables the emacs mode. The -quiet, -verbose, and -debug switches can move the logging level up or down from its default of “info.” Because only one logger is allowed, IDEs don’t let you switch from their custom loggers, which are needed to integrate Ant with the editor.
18.7.1. Writing a custom listener
As we stated, a listener is a Java class that implements BuildListener. Listing 18.7 shows a custom listener we’ve pulled together. It records the frequency of start and finish events and then, when the build finishes, prints them to System.out.
Listing 18.7. A listener that collects statistics
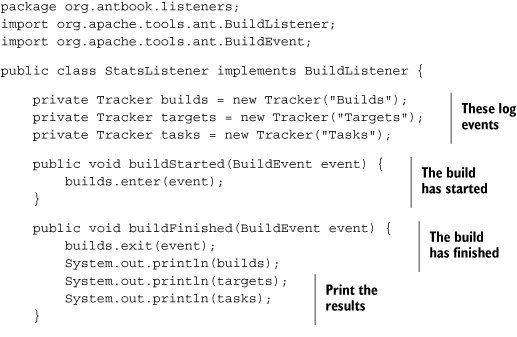

This listener delegates most of the work to a helper class—the Tracker class—which tracks notifications. This class tracks the start and finish events for each category, as well as the last exception thrown on a failure:

This class’s toString() method prints the statistics for that particular category. When a StatsListener instance receives a buildFinished() notification, it prints out all the trackers’ statistics at that point. Assuming that we receive such a message at the end of the build, this should give the statistics of the build.
There’s no test suite for listeners and loggers, no equivalent to AntUnit. Ant’s original test-harness JAR can be used to run Ant from JUnit tests, setting up a project and making JUnit assertions about the results. Suspiciously, there are no tests for any of Ant’s own listeners or loggers, just a MockBuildListener that appears in notification dispatch tests.
We’ll break our test-first rule and mimic the Ant team by running our code, instead of rigorously testing it. To run our listener, all we need to do is run Ant from the command line with the -listener argument pointing to the new class and the newly created JAR appearing on the classpath:
ant -listener org.antbook.listeners.StatsListener
     -lib dist/antbook-log-1.0.jar dist

Buildfile: build.xml

init:

compile:

jar:

dist:

ready-to-run:

ready-to-install:

install:

installed:

default:

BUILD SUCCESSFUL
Total time: 0 seconds
Builds=1
Targets=9
Tasks=16
This is actually mildly interesting, especially on a big project. A quick check of a work-related build showed 596 targets and 3456 tasks. The project count remains at one, even when multiple <ant> calls have invoked other build files. Listeners are notified only on the big builds starting and finishing, not on subsidiary projects. It is, however, possible to start targets and tasks before the previous one finishes, using <parallel>, <antcall>, and the like.
What happens on a failing build? For that, we need a build file that fails, such as that in listing 18.8.
Listing 18.8. A build file that always fails. The success and failure messages are for the logger in section 18.7.2.
<project default="fail">

  <property name="ant.build.success"
    value="Well done, ${user.name}"/>
  <property name="ant.build.failure"
    value="Better luck next time, ${user.name}"/>

  <target name="fail">
    <fail message="Example build failure"/>
  </target>
</project>
Running the test now gives us a failure message:
ant -listener org.antbook.listeners.StatsListener
     -lib dist/antbook-log-1.0.jar -f test/fail.xml
Buildfile: test/fail.xml

fail:

BUILD FAILED
/home/ant/listeners/test/fail.xml:7: Example build failure

Total time: 0 seconds
builds=1 (failure)
targets=1 (failure)
tasks=3 (failure)
This build file shows that when a task fails, the containing target and build file also are notified. There’s one more experiment to do: use the Ant-contrib <trycatch> task of chapter 9, which can catch and discard exceptions, and see what the statistics are if a task’s failure is caught and ignored:
Buildfile: test/nofail.xml

nofail:

BUILD SUCCESSFUL
Total time: 0 seconds
builds=1
targets=1
tasks=6 (failure)
This shows something mildly useful. If a task fails, it is signalled as such to a listener, even if an outer container catches the failure and discards the exception.
18.7.2. Writing a custom logger
The next coding exercise after a custom listener is a custom logger, which is a class that implements BuildLogger. This is simply a BuildListener with four additional methods to handle the system output and error streams as well as the setting of some output options. The easiest way to do some logging, if all you want to do is slightly tweak the normal output, is to extend Ant’s DefaultLogger class, which is Ant’s normal logger. Listing 18.9 is an example of this.
Listing 18.9. A new logger, an extension of the normal one, that replaces the normal success/failure message with one from project properties
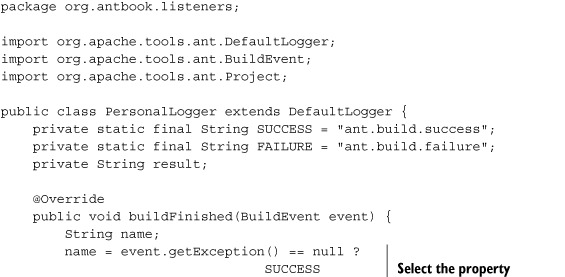
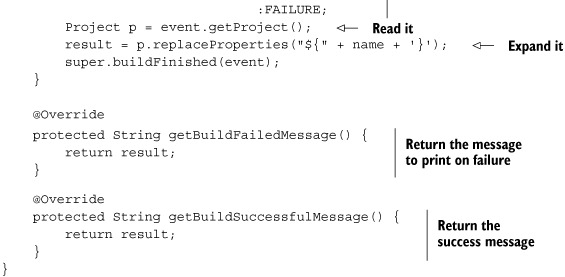
This logger replaces the usual BUILD SUCCESSFUL and BUILD FAILED messages at the end of a build with whatever the evaluations of the ${ant.build.success} and ${ant.build.failure} strings are, respectively. The parent class, the DefaultLogger, calls getBuildSuccessfulMessage() or getBuildFailedMessage(), depending on the build’s outcome. All our logger needs to do is evaluate the appropriate property at the end of the build. Instead of reading the property using Project.getProperty(), the logger just creates the appropriate ${property} string and asks the project to expand it. When the property is undefined, the message will become the name of the property to set.
We can use this logger on the command line:
>ant -logger org.antbook.listeners.PersonalLogger -q
   -Dant.build.success=well-done!

well-done!
Total time: 0 seconds
Here the -logger option set the classname of the new logger, which was already on the classpath. The -q option turned off all the output except for errors and warnings, a feature of the DefaultLogger class that subclasses get for free.
Being able to change the message in advance is one thing, but setting it inside the build is something else that’s potentially useful. In the build file of listing 18.8, the success and failure properties were set in the build; these are the properties that should propagate to the output text:
ant -logger org.antbook.listeners.PersonalLogger -f test/fail.xml

Buildfile: test/fail.xml

fail:

***Installation failed, call Julio for support ***
/home/ant/listeners/test/fail.xml:9: Example build failure

Total time: 0 seconds
This build file gives us a custom error message for our end users. We do need to make sure the new logger is selected for every build. This can be done with the ANT_OPTS environment variable, such as here in a bash configuration file:
export ANT_OPTS="-logger org.antbook.listeners.PersonalLogger"
This will switch to the new logger on all command-line runs.
Avoiding trouble in custom listeners and loggers
The Ant documentation warns against loggers or listeners printing to System.out or System.err, because doing so can create an infinite loop. The logger is handed two PrintStream instances for output; it should use these. Listeners are not really meant to generate output, but if they must, they should do it to some other device such as a file. In fact, you can get away with printing to System.out and System.err, as long as you don’t do so in messageLogged() events.
One trouble spot is the state of a project during lifecycle events. When a listener receives a buildStarted event, the project isn’t yet fully configured. Its tasks aren’t defined, and the default properties aren’t set up. The project isn’t ready for serious use. Similarly, when a listener has its buildFinished() method called, the build is already finished. The listener can examine the project and its properties, but not run any targets or tasks.
A project calls all the listeners in sequence, in the build’s current thread. Slow operations will slow the build down. When the <parallel> task is used to run tasks in a new thread, the notifications from those tasks are raised in the new thread. Listeners need to be thread-safe.
18.7.3. Using loggers and listeners
Historically, Ant loggers have been used for generating custom reports. The MailLogger creates emails, and the Log4JListener and CommonsLogging-Listener (which is actually a logger) generate more complex reports, including pretty HTML logs that can be emailed around.
Nowadays, it’s the job of the continuous integration server to generate the HTML reports and the emails, and the IDE has probably taken over from the command line as the main way of launching Ant. In either situation, do not attempt to use your own loggers. The IDE and continuous integration developers will have written their own loggers, loggers that should be left alone.
If you want Ant to send out emails when a build fails, have a continuous integration tool do the work. It will catch and report problems that the loggers won’t get, such as a missing build.xml file. There’s no need to re-implement what existing continuous integration tools can do better.
Listeners are less troublesome, as a project can have any number of active listeners, and listeners can be added or removed during the build. There aren’t any tasks to do this, other than the <record> task, which records events to a file. However, a custom <scriptdef> task could easily create the desired listener, configure it, and then call Project.addBuildListener() to add it to the project, or remove-BuildListener() to prevent it from receiving events.
18.7.4. Handling user input with an InputHandler
The opposite of Ant’s output system is its mechanism for handling user input. Although Ant is designed to run without user intervention, sometimes builds use the <input> task to ask for input from the user. Doing so delegates the task to an InputHandler, which is a class that handles all input from the user. The default handler reads from System.in., expecting input from a user at the console. Ant ships with two other handlers, the PropertyFileInputHandler and the GreedyInputHandler. The first of these handlers reads input from a property file, while the GreedyInputHandler reads the whole input stream into a single <input> request. Selecting this handler with the -inputhandler option lets Ant integrate into a Unix-style pipes-and-brackets setup:
find / -name build.xml -print | ant exec -inputhandler
       org.apache.tools.ant.input.GreedyInputHandler
New classes can act as input handlers; they have to implement the org.apache.tools.ant.input.InputHandler interface and its handleInput(Input-Request request) method.
IDE developers do all this work to stop the <input> task from hanging under their IDE. We aren’t covering the details of how to write a new InputHandler—only mentioning that it is possible. If you’re writing an IDE or continuous integration tool, then consult Ant’s documentation and source for details on how to integrate Ant’s input handling.
18.8. Embedding Ant
The final way to extend Ant is to embed it inside another Java program. This isn’t as unusual as it sounds. Java IDEs do this to integrate Ant with their GUI. Many other programs use it internally. It crops up in products such as Apache Tomcat, where <javac> compiles down JSP pages into .class files. When embedded, Ant becomes a library that can execute built-in or custom tasks. It has become a simple workflow tool with tasks for compiling and running Java programs.
Ant can be used within any Java program. You can either create a build.xml file and hand it off, or create a Project instance with tasks and targets via Java operations. Interestingly, there’s one way that is hard to use Ant: its static entry point, Main.main() calls System.exit() at the end. If you want to embed this class, you have to subclass its Main and override its exit() method. You can still use Ant’s launcher application, specifying the new entry point via the -main argument. However, we’ll ignore this route, as fully embedded Ant is more interesting.
Listing 18.10 shows Ant running inside another Java program. It doesn’t do much—just runs the <echo> task. What’s important is that a Project instance has been created and set up, with logging all wired up and running at the “info” level.
Listing 18.10. A private run of Ant


To configure the <echo> task, we just call the relevant set-, add-, or create- methods of the task, passing in the data we want. That’s all it takes to configure the task. If we had wanted to expand properties or resolve paths, we would have had to invoke the relevant Project methods before calling the task methods.
To test this program, we can run it under Ant itself, in a forked <java> task:
<target name="exec" >
  <java classname="org.antbook.embed.Embedded"
    failonerror="true"
    fork="true">
    <classpath>
      <pathelement path="${target.jar}" />
      <pathelement path="${java.class.path}" />
    </classpath>
    </java>
</target>
Here is our test run of Ant inside the output of the <java> task:
exec:
      [java] running
      [java]      [Echo] Hello, world
      [java] finished

      [java] BUILD SUCCESSFUL
      [java] Total time: 0 seconds
This shows that we’ve written a new entry point to Ant. It isn’t as complex as Ant’s own Main class, but it shows the basic techniques of running Ant and Ant tasks. You just create a project, create and configure tasks, then bind them to the project before you run them.
Tips on embedding Ant
- Don’t expect a very long-lived build not to leak memory. Supporting builds that last multiple days isn’t a priority for the tool’s development.
- If you distribute a version of Ant that can be directly invoked by end users, or if you put your version of Ant on the CLASSPATH—which has the same effect—you take on all support responsibilities. The Ant team doesn’t support any problems related to random redistributions of Ant.
- Never use an Ant task without creating a Project and binding the task to it with setProject(). Tasks depend on a project instance for logging and many other operations, and they break horribly if getProject()==null.
18.9. Summary
This chapter finishes our coverage of Ant with a look at the final ways to extend Ant. Alongside Ant tasks come Ant types—types that are defined with <typedef>. Many of the extension points explored here—conditions, resources, mappers, filters, and selectors—are all different dynamically configured Ant types.
We’ve introduced Ant’s scripting support in <script> and <scriptdef>, and we’ve shown you the script bindings to conditions, filters, and selectors. There’s nothing wrong with a bit of script to solve a problem that Ant cannot normally handle.
Custom conditions let you add new tests into a build. Ant can set properties from the condition or block until it passes. You can even write custom tasks that accept nested conditions, both built-in and third-party.
Ant resources are one example of an Ant datatype—an XML element that can be shared between tasks. Resources can provide a source of data to any resource-enabled application. They let any such task access data from any source, without having to know or care where it comes from.
Custom mappers and selectors can control how Ant processes sets of files. Mappers translate one filename to other filenames, and a custom one can provide new mapping rules. Selectors nest within filesets, allowing sophisticated filtering of files within a directory tree. Writing a custom selector can add enormous capabilities to file selection, such as the read-only file selector we developed here. Mappers are useful to identify the output files generated from source files, which is why they’re used internally in many tasks.
Filters allow for powerful data transformations, and chaining filters together accomplishes something similar to piping commands from one to another in Unix shell scripting.
Finally, there’s the low-level side of extending Ant. These are not ways to enhance a build file; rather, they are new ways to integrate Ant with other applications. Build listeners and loggers let you capture output or generate new messages. You can also embed Ant inside another Java program, simply by creating a new Project class and adding configured task classes.
The most important point we can leave you with is this: familiarize yourself with all of Ant’s out-of-the-box capabilities before beginning customizations. Very likely, you will find that Ant can already handle your needs. Consult Ant’s documentation, this book, and online resources such as Ant’s user and developer email lists, where you’ll find a helpful and often quick-responding crew of Ant users from around the world—including ourselves.