
Chapter 17. Writing Ant tasks
| 17.1 | What exactly is an Ant task? | |
| 17.2 | Introducing Ant’s Java API | |
| 17.3 | A useful task: <filesize> | |
| 17.4 | Testing tasks with AntUnit | |
| 17.5 | More task attributes | |
| 17.6 | Supporting nested elements | |
| 17.7 | Working with resources | |
| 17.8 | Delegating to other tasks | |
| 17.9 | Other task techniques | |
| 17.10 | Making an Antlib library | |
| 17.11 | Summary |
There comes a moment where it becomes clear that Ant doesn’t do everything you need. It may be that something minor is missing, such as not being able to pass all the options you want to <junit> or <java>. It may be that something major is absent, like having no way to run a custom test framework. It may even be that a common Ant task doesn’t work quite right. This happens to everyone and there’s always a solution.
Ant can be extended through Java classes, and it takes only a small amount of Java coding to write a new Ant task. If the problem lies in the actual Ant source itself, then the fact that an entire Ant source tree is a download away comes into play. If Ant doesn’t work right, then it can be fixed. However, this isn’t something we advocate—not yet. Ant can be extended without rebuilding it, in many ways:
- Custom tasks, written in Java or a scripting language
- Custom datatypes
- Custom listeners, loggers, filters, selectors, and mappers
- Hosting Ant inside another Java application
This chapter will show you how to write tasks in Java. We’ll look at the other extension mechanisms in chapter 18, because knowing how Ant tasks work and understanding the Ant API are the precursors to all extensions of Ant.
17.1. What exactly is an Ant task?
If a task is written for a project’s own use, it is a custom task. When used by other projects, it becomes a third-party task, and if it becomes part of Ant’s own source tree, it becomes a built-in task. We’ve been using the latter two task types throughout the book, but now it’s time to write our own, custom tasks.
Here’s what we have to do:
1. Write a new class that extends Ant’s Task class.
2. Add methods that Ant can use to set attributes and add elements.
3. Write an execute() method that does something useful.
All Ant tasks are implemented by a Java class that extends the org.apache.tools.ant.Task class, overriding the void execute() method to do useful work. Sometimes <macrodef>, <presetdef>, and the scripting languages we will look at in chapter 18 define tasks differently, but behind the scenes a subclass of Task is doing the work. Here’s a first task, one that prints out a message:
package org.antbook.tasks;

import org.apache.tools.ant.Task;

public class MessageTask extends Task {

    private String message = "";

    public void setMessage(String message) {
        this.message = message;
    }

    @Override
    public void execute() {
        log(message);
    }
}
In a build file that compiles the task, we can use the task after it’s been compiled by declaring it just as we do for third-party tasks:
<target name="messagetask" depends="compile">
  <taskdef name="message"
           classname="org.antbook.tasks.MessageTask"
           classpath="${build.classes.dir}"/>

  <property name="the.message" value="blue scooter"/>
  <message message="${the.message}"/>
</target>
Running this target gives the following results:
messagetask:
  [message] blue scooter
This task is similar to <echo> and does nothing but log the value assigned to the message attribute. Ant saw that the build file set the message attribute and matched that to the setMessage(String) method on the task. It then called that method with the expanded string. Before the task saw the attribute, Ant had already expanded the properties. The task printed its output through the Task.log method. This is part of Ant’s API for tasks: a method in the parent class to log text.
This little task, then, is the foundation of all custom Ant tasks. It has an attribute that Ant supports through introspection and an execute() method that does some work through Ant’s APIs. Everything else is just “feature creep.”
In this chapter we’re going explore that feature creep—Ant’s task model and API. We’ll show the reader how to write and test Ant tasks. Authors of existing Ant tasks should read this chapter, because the testing mechanism and resource API is new—everyone will learn something!
Let’s start by looking at how Ant configures and runs a task.
17.1.1. The life of a task
Ant’s mapping from XML task declarations to Java classes is a miracle of data binding. We will soon show you how attributes and elements are mapped to Java methods, but before that comes the task lifecycle. There are different stages in the processing of a build file, and the objects that implement tasks are used throughout the stages. Here’s how Ant executes a task:
- When Ant parses the build file, it creates an instance of the task’s implementation class for every declaration of the task in the file.
- Ant then calls methods on the task to tell it about its hosting project and target, as well as which line of the build file contains it.
- Ant calls the init() method of the Task class. Most tasks don’t override this method.
- Ant executes the targets in the order it chooses.
- The tasks inside a target are executed one by one. For each task
- Ant configures it with the attribute and element values in the build file, using reflection.
- Ant calls the task’s execute() method.
- If any method called throws a BuildException, the task has failed. Unless it’s somehow caught, that failure halts the build.
- Instantiated tasks remain around after they’re executed; they may be executed more than once in some circumstances.
Ant requires all tasks to extend its org.apache.tools.ant.Task class. It’s possible to declare a class that doesn’t extend this class as a task; Ant uses a proxy class in this situation. However, such a task will not have access to most of Ant’s API, so it is of limited use. Ant’s API is the real Ant—the language behind the XML and something tasks make full use of—hence something task developers need to know.
17.2. Introducing Ant’s Java API
Behind all Ant tasks comes Ant’s API. You don’t need to understand all of the classes and structures that make up the Ant codebase, but several key classes are worth knowing about, as they crop up frequently. With Ant’s source code being open, it’s easy to learn Ant’s secrets by looking at the source code and its JavaDocs.
Figure 17.1 shows the main Ant classes. A Project hosts Target and Task instances; targets (and any other TaskContainer) can also contain tasks. Task classes are themselves extensions of the abstract ProjectComponent class, which is an indirect parent of everything from datatypes to conditions.
Figure 17.1. Common classes encountered inside Ant. Projects, Targets, and Tasks map 1:1 with the <project>, <target>, and task declarations. The other interfaces and classes are implementation details.

There also are a few utility classes that crop up repeatedly, BuildException being one of them. Let’s take a quick look at some of the main methods in the core classes. Consult the JavaDocs and the source for the full details.
Project
The centerpiece of any build is the project, implemented by the org.apache.tools.ant.Project class. With a project reference, you can run targets, read and write Ant properties, or even add new targets and tasks. A project routes all I/O in the build, from logged messages to System.out, System.in, and System.err. It’s here that listeners, loggers, and input handlers integrate with Ant.
The project holds the graph of targets and tasks; there are operations to manipulate this graph. Other methods add or retrieve references, create tasks and types, and log output messages. These references include all those datatypes that are given id values, so that they can later be retrieved using refid references—filesets, paths, and the like.
void addReference(String referenceName, Object value)
This method maps the object to a reference ID in the project, so that when a refid attribute is resolved, the registered reference is returned. All Ant datatypes given an id attribute are registered by the Ant runtime, so they can be resolved in a task. Many other things internal to Ant are stored as references. It’s the best way to add the private state to a project. For example, the class that helps a project manage properties is stored as a reference under the name ant.PropertyHelper. If you add new private references to a project, pick names that are sufficiently obscure that nobody uses them for datatype references. Ant’s built-in tasks usually prefix all references with ant. and then follow with the task name.
AntClassLoader createClassLoader(Path path)
This method creates an AntClassLoader instance classloader from the supplied path. It’s how Ant creates separate classloaders for different tasks and programs run within Ant.
Task createTask(String name)
This method creates a task with the given name. For example, a Java task instance could be created in an operation such as
Java javatask=(Java)getProject().createTask("java");
The trouble with this approach is that it assumes that the type of the task <java> will always be that of the Java task, org.apache.tools.ant.tasks.Java. The moment someone uses <presetdef> to redefine the <java> task, (perhaps to give it a new default), its type changes, breaking code inside other tasks. Ant itself had to undergo a major cleanup once this problem was noticed. Current code just creates an instance and then configures it.
Java javatask=new Java();
javatask.bindToOwner(this);
![]()
The bindToOwner() call copies all binding information from the current task. If you forget to do this, the created task will probably throw an exception.
Object createDataType(String typeName)
This call creates a datatype of the given name, such as a <fileset>:
FileSet fileset=getProject().createDatatType("fileset");
Again, the warnings of the createTask() method apply; this method is rarely used in Ant’s own source. Instead, a new FileSet() operation is followed by the method called to bind the created class to the project instance.
void executeTarget(String targetName)
This method executes a named target and all its dependencies. This is how Ant runs targets and how tasks like <ant>, <subant>, and <antcall> run different targets.
Hashtable getProperties()
This call returns a copy of the current set of properties. Altering these properties doesn’t affect the property values in the project.
String getProperty(String name)
The getProperty method returns the value of an Ant property, or null if it isn’t defined. Ant automatically expands properties in attributes before handing the value to the task, so this method is rarely needed. Tasks that implement if= and unless= tests for properties use this method.
public Object getReference(String key)
Use this method to look up a reference; return the cached value or null if there is no match.
String replaceProperties(String value)
Here you can expand all properties in a string, returning a new string. This method can be used to patch up any text between the tags of an XML element as, unlike attributes, that text is not automatically expanded.
void log(String message, int msgLevel)
With this method, you can log a message at a certain level. Classes that know which project they belong to, but not which task they are working with, sometimes use this method.
void log(Task task, String message, int msgLevel)
This call logs a message as coming from a particular task. This is what Task.log() delegates to.
void setNewProperty(String name, String value)
This method assigns a value to a property. Immutability is enforced here: the property will not be changed if it already exists.
Target
The Target class implements the TaskContainer interface, telling Ant that it supports tasks nested inside. Targets contain all the information they were given in the XML file—name, depends, description, if, unless—and a list of nested ProjectComponent instances. They have a link back to the owning project, their location in the build file, and a list of all the targets that they depend on.
Custom tasks rarely need to make calls on their containing target; they cannot even rely on there being one. Some tasks do look through a project for a specific target and invoke it, using Project.executeTarget().
ProjectComponent
ProjectComponent is an abstract base class for anything that can be declared inside a build file. Two direct descendants are the Task and Datatype classes, as are conditions.
Project getProject()
This call returns the project in which the component is executing. This will never be null unless whoever created the task forgot to bind it to the project.
log(String msg, int msgLevel) and log(String msg)
These log methods forward messages to the Project log methods, adding the name of the task. There are five logging levels, listed in descending priority in table 17.1. The basic log(String) method logs at the Project.MSG_INFO level.
Table 17.1. The mapping from API log levels to build file output levels
|
Project constant |
Description |
<echo> level |
|---|---|---|
| MSG_ERR | Error messages visible at all logging levels | error |
| MSG_WARN | Warning messages visible at -quiet and below | warn |
| MSG_INFO | Messages visible by default; at -info | info |
| MSG_VERBOSE | Messages visible at the -verbose log level | verbose |
| MSG_DEBUG | Debug messages printed in -debug runs | debug |
A BuildLogger is capable of filtering the output based on the logging level selected. Normally, tasks print errors and warnings at the relevant levels, diagnostics for build file authors at the verbose level, and internal task debugging information at the lower debug level.
Tasks should normally log liberally, especially at the verbose level, showing the details of what’s going on. The MSG_INFO level shouldn’t be over-used, as it’s seen by default. Too many built-in tasks over-log at this level.
The void setProject(Project project) method binds a ProjectComponent to a Project instance. It’s done very early in component initialization. Whenever a task creates anything that is a subclass of ProjectComponent, it should bind it to the task’s own project through a call to setProject().
Task
The abstract Task class is the base class for Ant tasks and the main unit of work during an Ant build. Most custom tasks extend this class and, at a minimum, implement their own execute method. Being an extension of ProjectComponent, the getProject() and log() methods are there to provide access to the owning Project and to log messages.
When a task creates a new task to delegate some work, it should call the bindToOwner(Task owner) method to propagate shared information—the hosting project, the task name and location, and other things.
It’s important to use this method when creating tasks through their constructors, rather than by calling Project.createTask(), which, as mentioned earlier, can break if the build uses <presetdef> or <macrodef> to redefine existing tasks. The robust way to create a task is as follows:
Java javaTask=new Java();
javaTask.bindToOwner(this);
javaTask.init();
After the init() call, you can proceed to configure it and then finally call execute(). There’s a full example of this delegation in work in section 17.8.
void execute()
Here’s where it all happens! The execute() method is the heart of a task. At the point this method is called, Ant will have passed down to the task information all attributes and nested content. The execute method should validate the task’s configuration, then do the requested work.
Location getLocation()
With this call, Ant returns the location of this task—the build file and the task’s position within it. If this call is set to Location.UNKNOWN_LOCATION, the task doesn’t know where it is.
Target getOwningTarget()
This is a method that returns the Target that contains this task. If it’s null, then the task was not declared inside any target: you cannot rely on tasks having an owning target.
void init()
The init method is called when Ant encounters a task during the parsing phase of the build file. Tasks that need to do early initialization can override it. Why do that instead of doing the work in the constructor? Because at the time the init() method is called, the task has been bound to its owning project. The task can safely do work that involves a Project instance.
BuildException
This is probably the most ubiquitous of all Ant classes, and it’s used to signal any kind of problem. The class is a RuntimeException, which means that it doesn’t need to be declared on methods. Any method that Ant calls can throw a BuildException. It’s the underpinning of Ant’s failure-handling, such as in the following attribute setter:
public void setTimeout(int seconds) {
    if(seconds<0) {
        throw new BuildException("Positive timeouts only");
    }
    Timeout=seconds;
}
Whenever any method throws a BuildException, it forces a build failure, with the exception’s message being displayed to the user. Any task or datatype that needs to handle problems should be prepared to use a finally{} clause to clean up regardless of what happened.
The class has a Location attribute that’s set to the location in the build file that’s at fault. Ant sets this attribute automatically.
17.2.1. Ant’s utility classes
Ant contains a set of utility classes that provide common operations for task authors to use. It is much better to use these library classes instead of reimplementing their code, as they are stable, well-tested, and work well across different Java versions. Utility classes include the following:
ClasspathUtils
This can create a classpath and load classes from it. Tasks that dynamically load new classes from user-supplied classpaths need this. There’s also a LoaderUtils class to provide some extra classloader-related operations.
DateUtils
This class simplifies working with dates, with methods to parse ISO8601 dates and date-time strings down to java.util.Date instances.
JavaEnvUtils
This useful class contains operations to work with the JRE and JDK, including determining JRE version and executing programs in the JRE. The static method getJavaVersionNumber() returns the version number, “5” for Java1.5, while the getJdkExecutable(String) and getJreExecutable(String) methods build up platform-specific paths to JDK programs.
FileUtils
The FileUtils class is one of the most commonly used utility classes. It contains filesystem support that adapts itself for different platforms, with operations to copy files, resolve filenames, split paths, and convert between filenames and URLs. Call FileUtils.getFileUtils() to get a shared instance.
static void close(Writer)
This static method closes the supplied Java I/O class, be it a Writer, Reader, InputStream, or OutputStream, catching any IOException thrown. If the argument is null, nothing happens. This method appears everywhere Ant methods clean up open files, in the finally clause. A FileUtils.close(stream) call will safely close the supplied parameter.
copyFile(File source, File dest)
This is a method to copy a file, passing in the source and destination files. Overloaded variations support extra parameters, including overwrite flags, whether to copy timestamps, and a FilterSetCollection containing filters to apply during the copy.
boolean isUpToDate(File source, File dest)
This test compares the dates of two files, returning true if the destination file is considered up-to-date with the source file. This test compensates for platform-specific timestamp granularities.
File resolveFile(File file, String filename)
This invaluable method resolves and normalizes a file path relative to another File if the filename isn’t already an absolute path. There’s a lot of platform-specific logic here.
StringUtils
This class contains some minor String and StringBuffer operations, most importantly one to split up a String into a Vector of elements based on a separator. To break up a String by lines, use " " as the separator.
ResourceUtils
This is a utility class providing operations that work on resources, rather than just files. There are operations to compare resources for text or binary equality, content-Equals() and compareContent(), and others, including copyResource() to copy resources.
One of the most interesting methods is the selectOutOfDateSources() method, which returns an array listing all resources that are out of date with their destination. Tasks can use this method to select resources for processing, e.g., copying, compiling, or some other action that brings the destination up-to-date.
17.3. A useful task: <filesize>
Enough API coverage. It’s time to write a useful task. How about a task that sets a property to the size of the file or files passed in? This task—let’s call it <filesize>—will have two attributes:
|
Attribute |
Function |
Required? |
|---|---|---|
| Property | The name of a property in which to store the result | Yes |
| File | The file to analyze | Yes, and the file must exist |
Later, in section 17.6, we’ll extend the task to take multiple files as nested elements.
17.3.1. Writing the task
Listing 17.1 shows the task in its entirety. There is no init() for initialization; all the work is done in the execute() method, which first checks that it’s configured right and that the file exists, and then sets a property to the size of the file. If any of the preconditions aren’t met, Ant throws a BuildException.
Listing 17.1. A task to set a property to the size of a file


If the task is set up correctly, the file’s size is evaluated, the result logged at the debug level ![]() , and then Project.setNewProperty() is called to set the property to the value
, and then Project.setNewProperty() is called to set the property to the value ![]() .
.
This is a fully functional task, with validation and logging in only thirty-five lines. There is just one outstanding question. The task works with its file and property fields. How are they set? How is this going to work? What’s going on?
The answer is “magic,” or code complex enough that it may as well be. Ant is automatically translating strings in XML attributes to strongly typed Java classes. It’s calling the bean-style setters on the class, then the execute() method—all through Java reflection!
Let’s run it and see if it works.
Building the <filesize> task
Compiling this new task is easy; listing 17.2 shows the build file to compile and run the task.
Listing 17.2. The build file for the <filesize> task

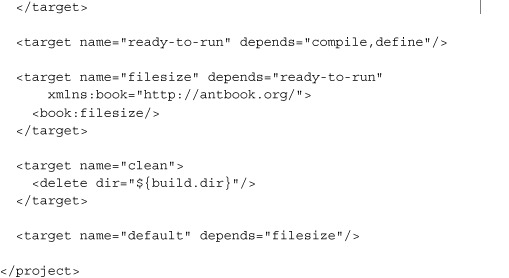
The compile target compiles the task ![]() , and the define target defines it in its own namespace
, and the define target defines it in its own namespace ![]() . That target doesn’t depend on the compile stage, because we want to be able to define the task without triggering a rebuild;
this will be useful when testing. However, the filesize target does depend on the compilation stage, so when it’s run it should execute the new task.
. That target doesn’t depend on the compile stage, because we want to be able to define the task without triggering a rebuild;
this will be useful when testing. However, the filesize target does depend on the compilation stage, so when it’s run it should execute the new task.
Running the task
The filesize target builds, defines, then calls our new task without any parameters. What’s going to happen? There’s one way to find out:
>ant filesize
Buildfile: build.xml

init:

compile:
  [javac] Compiling 1 source file to /home/ant/filesize/first/build

define:

filesize:

BUILD FAILED
/home/ant/filesize/first/build.xml:24: No property

Total time: 3 seconds
It didn’t work. Of course not: the task wasn’t configured because we haven’t gotten Ant to do that yet!
17.3.2. How Ant configures tasks
Tasks are described in a build file as XML data. When Ant encounters a new XML element, it looks up its list of types and creates an instance of the Java class registered for that element. That’s the easy part.
The hard part is configuring that instance, passing the XML attributes, nested elements, and body text to the task. Ant handles this using reflection, mapping the XML values to Java types, and then passing them to the instance that it’s configuring.
Ant scans the class for specially named methods and invokes them with the data from the build file. It supports both XML attributes and elements. Attributes are simpler, and we’ll cover them first.
Ignoring XML namespaces, an XML attribute consists of a name and a string value. Ant takes the value of each attribute and expands all properties with Project.replaceProperties() to create the expanded string. It searches for all methods with the name of the attribute prefixed by “set”. For our <filesize> task, the property attribute is mapped to the setProperty method:
public void setProperty(String property) {
    this.property = property;
}
A String parameter is the most straightforward attribute type since it can be set directly to the text:
<filesize property="new.property"/>
A String type is only the first of many types that can be used, though. Most of the main Java types can be passed in.
Boolean values
Many times a task simply needs to have a true/false option. By having your setter parameter take a boolean or java.lang.Boolean value, your task will get true (or Boolean.TRUE) if the value is yes, on, or true, and false (or Boolean.FALSE) otherwise.
private boolean failonerror = false;

public void setFailonerror(boolean failonerror) {
    this.failonerror = failonerror;
}
The task used in the build file is
<book:setter failonerror="on"/>
Because of implicit attribute expansion, our task doesn’t know the difference when the build file writer sets the attribute using a property:
<property name="fail.mode" value="true"/>
<book:setter failonerror="${fail.mode}"/>
The setFailonerror method is invoked with true in both cases.
Accepting numbers
Ant supports attributes that accept all the Java primitives numbers and their Object equivalents:
byte / java.lang.Byte
short / java.lang.Short
int / java.lang.Integer
long / java.lang.Long
float / java.lang.Float
double / java.lang.Double
If Ant cannot convert the attribute value to the desired type, a NumberFormat-Exception will be thrown, halting the build.
A single character
If you ever need a single character, implement a setter method that takes a char or java.lang.Character type. The character passed in will be the first character of the attribute value; Ant will ignore any additional characters.
Files or directories
Many tasks take a file or directory as an attribute. If a task implements a setter with a java.io.File parameter, Ant will configure the task with File instances. Ant converts the path string in the XML file to the local format, resolves any relative path against the project’s base directory, then calls the task’s setter method with a File object representing the path. For <filesize>, the setFile() method means that the task has a file attribute:
public void setFile(File file) {
    this.file = file;
}
The task must do its own validation if it wants to restrict the argument to only a directory or only a normal file.
17.3.3. Configuring the <filesize> task
Now let’s look at configuring the <filesize> task. It’s already got the setters it needs—we just need to pass the information down as attributes:
<target name="filesize2"
    depends="ready-to-run"
    xmlns:book="http://antbook.org/">
  <book:filesize property="size" file="${ant.file}"/>
  <echo>size = ${size}</echo>
</target>
Run this and we see the result we’ve been waiting for:
filesize2:
     [echo] size = 1074

BUILD SUCCESSFUL
There we have it—a fully functional task. It has attributes set by Ant, and when it runs, it sets a property in the project. This is a genuine Ant task. A bit of packaging and it will be ready for redistribution. Oh, and the tests of course—we mustn’t forget those!
17.4. Testing tasks with AntUnit
All of the Java code in this book comes with tests. Should Ant tasks be any different? Of course not! But how do you test an Ant task?
The original technique was to write JUnit tests that extended the org.apache.tools.ant.BuildFileTest base class. Each test method would run different targets in the same build file, then check the state of the project and its captured log afterwards. That was the original approach, in the past.
Things are different now. Better. There is an Ant task to test Ant tasks: AntUnit.
AntUnit is an Antlib, a library of extra tasks with the filename ant-antunit.jar. It contains the Java tasks and macros to turn build files into test suites. The <antunit> task will load a build file and run every target in it whose name matches the pattern test?*, executing the optional setUp and tearDown targets before and after each test target. The Antlib includes a set of assertion tasks to check the state of the project in the test.
AntUnit is Ant’s equivalent of JUnit. It has its own home page, http://ant.apache.org/antlibs/antunit. This web site contains AntUnit documentation and the JAR, ant-antunit.jar. The JAR can be added to ANT_HOME/lib or ${user-home}/.ant/lib, or it can be dynamically loaded via a taskdef declaration. We keep it in ANT_HOME/lib, because we use it so often.
17.4.1. Using AntUnit
To use AntUnit in a build file, you need to declare the Antlib namespace in the project or in targets that use the new tasks:
xmlns:au="antlib:org.apache.ant.antunit"
This code provides the tasks and types of table 17.2, and the assertion tasks of table 17.3.
Table 17.2. The Ant tasks and types that come with AntUnit, excluding the assertions
|
Task/type |
Description |
|---|---|
| <antunit> | Tests a specified build file. |
| <expectfailure> | Runs a nested sequence of tasks, expecting them to end in failure; a BuildException being thrown. The optional expectedMessage attribute can list the message that the exception must contain. |
| <logcapturer> | Starts capturing the build log. |
| <logcontains> | Polls a level of Ant’s log for a message. |
| <plainlistener> | A listener for AntUnit test results. Prints the output of the test runs to the console. |
| <xmllistener> | Prints the output of test runs as an XML file. |
Table 17.3. The assertions that come with AntUnit. All but <assertTrue> are actually built from <macrodef> statements.
|
Assertion |
Description |
|---|---|
| <assertTrue> | Fails if a nested condition isn’t true. |
| <assertFalse> | Fails if a nested condition isn’t false. |
| <assertEquals> | Asserts that the expected and actual strings are equal; the casesensitive option defaults to true. |
| <assertPropertySet> | Asserts that the property identified in name is set. |
| <assertPropertyEquals> | Asserts that the property identified in name is set to the string value in value. |
| <assertPropertyContains> | Asserts that the property identified in name contains the string value in value. |
| <assertFileExists> | Asserts that file is present. |
| <assertFileDoesntExist> | Asserts that file is absent. |
| <assertDestIsUptodate> | Asserts that the dest file is newer than the src file. |
| <assertDestIsOutofdate> | Asserts that the dest file is older than the src file. |
| <assertFilesMatch> | Asserts that the expected and actual files match. |
| <assertFilesDiffer> | Asserts that the expected and actual files do not match. |
| <assertReferenceSet> | Asserts the reference in refid maps to a known reference. |
| <assertReferenceIsType> | Asserts the reference in refid maps to a reference of type type, using the <isreference> condition. |
| <assertLogContains> | Asserts the log contains the specified text at the specified level, the default level being "info". |
The key tasks are <antunit>, which tests a build file, and <expectfailure>. The <antunit> task takes a nested fileset of build files to test and the name of a listener for test results, two of which are bundled: the <plainlistener> and <xmllistener>. Here’s the task calling a test build file:
<au:antunit>
  <fileset file="test.xml"/>
  <au:plainlistener/>
</au:antunit>
This will test all test targets in the file test.xml, printing the results to the console. These test targets can verify that something worked or, with <expectfailure>, that something failed. The <expectfailure> task wraps a sequence of Ant declarations and executes them in turn. If the sequence completes without throwing a BuildException, the <expectfailure> task throws an exception: the sequence was meant to fail. If an exception is thrown, it is caught and its message verified against the value of the expectedMessage attribute:
<au:expectfailure expectedMessage="No property">
  <book:filesize file="${ant.file}"/>
</au:expectfailure>
The <logcontains> condition searches the log for a string. This condition works only under an AntUnit-controlled test, when a special logger saves all the output to a buffer. It returns false in other situations. There’s no need to use it directly, as it’s used inside the <assertLogContains> task.
<au:assertLogContains text="The size of " level="debug"/>
This assertion is one of the many provided by the toolkit—table 17.3. lists them all. All of them can be used in test targets to check that the Ant task is behaving as expected.
These assertions are used to verify that the tasks being tested have the desired effect. As the underlying task, <assertTrue>, takes a nested condition, anything that <condition> can test for can also be used in an assertion.
17.4.2. Testing the <filesize> task
We know enough about AntUnit to use it. It’s time to add tests to the build by running the <antunit> against our own build file:
<target name="antunit"
  depends="ready-to-run"
  xmlns:au="antlib:org.apache.ant.antunit">
  <au:antunit>
    <fileset file="${ant.file}"/>
    <au:plainlistener/>
  </au:antunit>
</target>
Calling this target will trigger a run against the test targets in the file and the optional setUp and tearDown targets. The antunit target is set to depend upon the ready-to-run target, which ensures that the source is compiled before the tests run. The individual test targets do not depend upon this. If they did, every test target would also have the complete compile step re-executed, because when AntUnit runs a target, it runs all its dependencies. Instead, the test targets depend on the define target, which declares the custom task with <taskdef>.
The first test target runs the task with valid arguments and asserts that the property is set:
<target name="testWorking"
    depends="define"
    xmlns:au="antlib:org.apache.ant.antunit"
    xmlns:book="http://antbook.org/">
  <book:filesize property="size" file="${ant.file}"/>
  <au:assertPropertySet name="size"/>
</target>
The next test is more complex. We want the task to fail in the test, so we use <expectfailure> to run the task and look for the exception message it should raise:
<target name="testNoProperty"
    depends="define">
  <au:expectfailure expectedMessage="No property">
    <book:filesize file="${ant.file}"/>
  </au:expectfailure>
</target>
These test targets still work from the command line. The only tests that must be run under AntUnit are those that look for logged messages with <assertLogContains>:
<target name="testOutput"
    depends="define"
    xmlns:au="antlib:org.apache.ant.antunit"
    xmlns:book="http://antbook.org/">
  <book:filesize property="size" file="${ant.file}"/>
  <au:assertLogContains text="The size of " level="debug"/>
</target>
The final test is one that asks for the size of a nonexistent file. Again, it uses the <expectfailure> task:
<target name="testNoFile"
    depends="define">
  <au:expectfailure expectedMessage="Not found:">
    <book:filesize property="size" file="bad.file"/>
  </au:expectfailure>
</target>
The expectedMessage attribute lists only part of the fault string; the full message contains the path of the absent file, which isn’t a constant. The <expectfailure> task does a substring search on the message, so only a portion of the error message is needed.
17.4.3. Running the tests
With the tests written, let’s run the antunit target:
>ant antunit
Buildfile: build.xml

antunit:
[au:antunit] Build File: /home/ant/filesize/first/build.xml
[au:antunit] Tests run: 3, Failures: 0, Errors: 0,
    Time elapsed: 0.05 sec
[au:antunit] Target: testNoFile took 0 sec
[au:antunit] Target: testNoProperty took 0 sec
[au:antunit] Target: testWorking took 0.02 sec
[au:antunit] Target: testOutput took 0 sec

BUILD SUCCESSFUL
The tests passed, the report is printed, and the build succeeds. What if the opposite had happened, and a test had failed? To see that, we need a test that fails. How about a test that expects <filesize> to fail if it’s passed a directory?
<target name="testDir"
    depends="define"
    xmlns:au="antlib:org.apache.ant.antunit"
    xmlns:book="http://antbook.org/">
  <au:expectfailure>
    <book:filesize property="size" file="."/>
  </au:expectfailure>
</target>
Will this work or not? Without an explicit test for directories, it must depend on what happens when File.length() is invoked on a directory. What happens in the test?
antunit:
[au:antunit] Build File: /home/ant/filesize/first/build.xml
[au:antunit] Tests run: 4, Failures: 1, Errors: 0,
   Time elapsed: 0.05 sec
[au:antunit] Target: testNoFile took 0.01 sec
[au:antunit] Target: testNoProperty took 0 sec
[au:antunit] Target: testWorking took 0.02 sec
[au:antunit] Target: testOutput took 0 sec
[au:antunit] Target: testDir took 0 sec
[au:antunit]    FAILED
[au:antunit] Expected build failure

BUILD FAILED
/home/ant/filesize/first/build.xml:44:
Tests failed with 1 failure and 0 errors
One of the tests failed, so <antunit> itself failed. This is exactly what we want. Of course, we now have a bug to find.
Debugging a task
How do you debug a task? It’s no harder than debugging other Java programs. You need to set the IDE up to run Ant under the debugger, setting up the command line with the build file and target needed to invoke the task.
- The entry point is org.apache.tools.ant.Main.
- The classpath for debugging must include Ant, the tasks being debugged, and any other tasks and optional libraries used in the build file—including AntUnit if it’s needed.
- The JVM options should pass down the ANT_HOME value with an option such as -Dant.home=/home/ant/Ant.
- The command line should include the target to run.
- Any other Ant option can be added, except for -lib, -cp, -nouserlib, and -nouserclasspath. These options are all interpreted by Ant’s launcher program.
When we run Ant, it will load the build file and create the task, halting at any breakpoints set in the task’s source. Debugging the task is then no harder—or easier—than debugging any other Java program.
The limitations of AntUnit
AntUnit is new and still acquiring all the features you expect from a test framework. The biggest limitation is that the test builds are all executed in the same JVM—that of the project calling <antunit>. If there’s any state stored in static variables, it’s accessible to all tasks in all the tests. One build file could contaminate all the other tests, and that would be hard to fix.
17.5. More task attributes
Having built and tested the task, let’s return to the details of how Ant configures tasks. There are two more attribute options we can work with: enumerated attributes and user-defined types.
17.5.1. Enumerations
Many tasks restrict attributes to a limited set of values—an enumeration. All tasks that need to do this and still work on Java 1.4 and below have to extend Ant’s EnumeratedAttribute class. Doing so provides a basic enumeration that Ant tasks and types can use. It crops up all over Ant’s own tasks. With Java 5 things are easier. All you need is a Java enum:
public enum Day {
   monday, tuesday, wednesday, thursday, friday, saturday, sunday;
}
This enum is passed to the task in an attribute-setter method. The Ant runtime finds the enumeration instance whose name matches the attribute value, passing that instance to the task. Listing 17.3 shows a task that uses this Day enumeration, printing out its name and index value when executed.
Listing 17.3. Java enumerations can be used as task attributes.
package org.antbook.tasks;
import org.apache.tools.ant.Task;

public class Weekday extends Task {
    private Day day = Day.sunday;

    public void setDay(Day day) {
        this.day = day;
    }

    public void execute() {
        log("the day is " + day.name());
        log("the day index is " + day.ordinal());
    }
}
Using Day with the example task, we can pass down an in-range value:
<weekday day="tuesday"/>
This prints out the value and its index:
[weekday] the day is tuesday
[weekday] the day index is 1
Ant will throw an exception if the attribute doesn’t match a case-sensitive comparison with any of the allowed values. The attribute day="Tuesday" isn’t allowed:
'Tuesday' is not a permitted value for org.antbook.tasks.Day
The AntUnit tests for the two enumeration examples show AntUnit at work. In particular, the test for day="tuesday" being valid uses the <assertLogContains> assertion to probe the log for the output messages. Tasks that log information at the verbose and debug levels are easy to test.
<target name="testWeekday" depends="define">
  <book:weekday day="tuesday"/>
  <au:assertLogContains text="the day is tuesday"/>
  <au:assertLogContains text="the day index is 1"/>
</target>

<target name="testWeekdayCaseSensitive" depends="define">
  <au:expectfailure
    expectedMessage="not a permitted value">
    <book:weekday day="Tuesday"/>
  </au:expectfailure>
</target>
Java enum types are the best way to restrict the value of an attribute to a fixed range. Ant validates and converts the string, so the task developers can work with an enum that can be used in switch statements and the like.
If the enumerated or the built-in attribute mappings don’t cut it, there is one last option: a custom, user-defined type.
17.5.2. User-defined types
Any Java class that has a public String constructor can be used as an attribute. The java.math.BigDecimal class, for example, has no formal Ant support, but its string constructor is enough:
package org.antbook.tasks;
import org.apache.tools.ant.Task;
import java.math.BigDecimal;

public class Bignum extends Task {
    private BigDecimal value;

    public void setValue(BigDecimal value) {
        this.value = value;
    }

    public void execute() {
        log(value.toEngineeringString());
    }
}
This task takes a very large integer and prints it as an engineering value; any exponent is rounded to the nearest multiple of three. The statement <bignum value="1045e17" /> is printed as
[bignum] 104.5E+18
Any Java class that takes a string constructor is valid, so many classes in the Java libraries can be used as Ant attributes. When in doubt, try it!
17.6. Supporting nested elements
Attributes are easy to work with, but they’re limited. A task can have only one attribute of a given name, and every attribute is just a simple string. Most tasks use nested XML elements for complex or repeated configuration data. For our <filesize> task, we want to support lists and sets of files as nested elements:
<book:filesize property="java.source.size">
  <fileset dir="${src.dir}" includes="**/*.java"/>
</book:filesize>
Like attributes, Ant invokes specially named task methods when it encounters nested elements. There are four distinct scenarios that Ant handles using the specially named methods, listed in table 17.4.
Table 17.4. Methods that tasks can implement to support nested elements
|
Scenario |
Method |
|---|---|
| Ant constructs the object using a no-arg constructor; no pre-population. | public void addElementName(ObjectType obj) |
| Ant constructs the object using a no-arg constructor, but pre-population is needed. | public void addConfiguredElementName(ObjectType obj) |
| The task creates the object. | public ObjectType createElementName() |
| The task takes any datatype that implements the interface/extends the base class. | public void add(ObjectType obj) |
We strongly recommend that you use the add, addXXX or addConfiguredXXX methods for nested task elements, because they allow you to support subclasses of the same types. For example, a custom extension to the FileSet class could be passed to our <fileset> task.
The addConfigured method is useful if your task needs a fully populated object immediately, rather than waiting for the execute method; however, in practice it’s rarely needed. Use the create- method in situations when you need to construct the object itself, perhaps because it doesn’t have a no-argument constructor or because additional steps are needed beyond what the add-prefixed methods provide.
For our <filesize> task, if we wanted to support a single collection type, such as a fileset or a filelist, we could add an addFileset(Fileset set) or addFileList(FileList list) method. Ant uses the type of the method’s single parameter to identify the supported datatype, while the method name determines the element’s name. A method called addSource would take an element called source, independent of its type.
We want to support any Ant resource collection that can provide a list of files, so we’ll use the general purpose add() method:
public void add(ResourceCollection rc) {
    resources.add(rc);
}
Tasks that support nested elements need to handle the case where more than one element is supplied. This task adds them to a Union instance, which is the class behind the <union> resource:
private Union resources = new Union();
This collection will now aggregate all resource collections passed down to the task. When Ant executes the task, we’ll need to get those collections, or at least their inner resources, back. All resource collections have an iterator() method that provides access to the nested resources. When our task wants to retrieve the resources, it just asks for this iterator:
Iterator element = resources.iterator();
It can then iterate through the elements, measuring their size. There’s only one slight flaw in this plan. The <filesize> task measures the length of files, not strings or any other kind of resource. How can we restrict the task to file resources only?
The solution is to check the type of every resource, only converting it to a FileResource if it is one. A FileResource is a special resource that represents files, and it has a getFile() method to return the file it represents. Our extended execute() method has to iterate across the resources that have been added, halt the build if any is of the wrong type, and otherwise add the file’s length to the running total:
public void execute() throws BuildException {
    if (property == null) {
        throw new BuildException("No property");
    }
    long size = 0;
    int count = 0;
    Iterator element = resources.iterator();
    while (element.hasNext()) {
        Resource resource = (Resource) element.next();
        if (!(resource instanceof FileResource)) {
            throw new BuildException("Not a file: " + resource);
        }
        log(resource.getName(), Project.MSG_VERBOSE);
        FileResource fileResource = (FileResource) resource;
        File file = fileResource.getFile();
        if (!file.exists()) {
            throw new BuildException("Not found: " + file);
        }
        size += file.length();
        count++;
    }
    if (count == 0) {
        log("No files sized up", Project.MSG_WARN);
    }
    getProject().setNewProperty(property, Long.toString(size));
}
This is all we need to support file resources, nested in arbitrary resource collection types. Admittedly, most of those files are going to come in as <filesets>, which are the near-universal representation of files and file groups in Ant, but there are more. By using resources, our task will be flexible and extensible, supporting new collection types from Ant and third parties. There’s just one price: we need to know our way around the resource classes.
17.7. Working with resources
![]()
Ant resources are its emerging conceptual model for files, paths, URLs, and other data sources. Older tasks invariably work with a few datatypes, such as the Path and FileSet types and perhaps the FileList—all of which are now resource collections. Resource-enabled tasks can work with any of these collections as well as new ones. To do so, task authors have to know how they are implemented in Java.
The resource class hierarchy is complex enough that we’re going to have to resort to UML diagrams—in plural—to describe them. Consult the Ant JavaDocs and source to explore the resource class hierarchy in more detail. Figure 17.2 outlines the Resource classes that ship with Ant.
Figure 17.2. The Resource class has many derivatives, any of which can be added to resource collections. The Resource class is in the org.apache.tools.ant.types package; all the derivatives go under the org.apache.tools.ant.types.resources.

The Resource class represents a source or destination of data. Resources have a size, a lastModified timestamp, and a name. Their exists flag is set if the resource actually exists, and the directory flag is set if it’s a directory. There are public methods to access all of these values, methods that subclasses often override.
The method that all subclasses override is getInputStream(), which returns an InputStream reading in the contents of the resource. The Property-Resource and the StringResource resources return the contents of the property or the string as a ByteArrayInputStream, while the URLResource connects to the URL and returns the source provided by the active java.net.URL-Connection instance.
Resources can be aggregated into collections, such as <fileset> or <path>. These are implemented as classes that implement the ResourceCollection interface and its three methods:
|
Method |
Function |
|---|---|
| isFilesystemOnly() | Returns true if all resources are files in the filesystem |
| iterator() | Returns an iterator over the contained resources |
| size() | Returns the number of resources in the collection |
The common file datatypes, <fileset>, <filelist>, and <path>, are all resource collections, as are the aggregate containers such as <union>, <intersection>, and <difference>. The Resource class itself implements the ResourceCollection interface, implying that all resources are sources of resources. This is a little trick that makes it easy to treat single resources as single-element collections: the iterator() operator returns an iterator class and then returns the resource itself, once.
Figure 17.3 shows the resource collection hierarchy. It’s complex because the ResourceCollection interface was retrofitted to the existing datatypes.
Figure 17.3. A UML outline of the resource classes. The methods and attributes have been stripped off as the diagram is complex enough already.

Most tasks don’t have to worry about all these details. It shouldn’t matter to a task how resources are specified, aggregated, or sorted. All the tasks need to worry about is the contents of the collections.
17.7.1. Using a resource-enabled task
By adding the add(ResourceCollection) method to our <filesize> task, the task will support all of the resource collections, but only if the underlying resources are all files in the filesystem.
Let’s start using this task, first in AntUnit tests. We’ll begin with a fileset:
<target name="testFileset"
    depends="define">
  <book:filesize property="size">
    <fileset dir="src" includes="**/*.java"/>
  </book:filesize>
  <au:assertPropertySet name="size"/>
This task should add up the size of all Java source files. Filesets have a base directory and, when evaluated, return only those files under the base directory that match the nested patterns. This scanning of the directory tree takes place every time the iterator() method is called, so it should not be done lightly.
Other collections also can be used. First, a filelist:
<target name="testFileList"
    depends="define">
  <book:filesize property="size">
    <filelist>
      <file name="${ant.file}"/>
    </filelist>
  </book:filesize>
  <au:assertPropertySet name="size"/>
</target>
A filelist is a resource collection containing an ordered list of files. Unlike a fileset, its iterator() returns the files in the list, whether or not they exist. This is why our task has to handle missing files by throwing a BuildException.
Paths are also resource collections, so they too can be passed down:
<target name="testPath" depends="define">
  <book:filesize property="size">
    <path path="${java.class.path}"/>
  </book:filesize>
  <echo> classpath size=${size}</echo>
</target>
Running this task tells us the total size of the JAR files on the classpath:
testPath:
     [echo]  classpath size=21018332
That code demonstrates why resource-enabled tasks are good. Unless the task has a need for a specific type (like a classpath), the sole reason to not support resources is a need to be backwards-compatible with Ant 1.6. Otherwise: adopt resources!
17.8. Delegating to other tasks
This chapter has shown how to write and test Ant tasks. It has one big topic left to cover: how to delegate work to other tasks and Java programs, and how to set up the classpaths to do so. Many of Ant’s tasks are just simple wrappers around Java or native programs. Most of the SCM tasks simply set up the command line arguments for the native command-line tools. Many of the JDK-related tasks invoke the program bundled in the JDK as a native program (<genkey> and <signjar>) or by directly invoking the Java entry point (<javac> and <rmic>). There’s a lot of duplicate work going on here, so obviously some shared classes do the heavy lifting. What are these classes? They are the classes behind <exec> and <java> tasks, tasks we’ve been using throughout the book.
Many of Ant’s tasks delegate work to other tasks. Every Ant task that’s implemented in Java can be created in another Ant task simply by calling its constructor. It can then be configured by using its Java API—the setters and other methods designed for Ant to call by introspection.
Note
Ant’s tasks have a Java API, the set-, create- and add- methods written by the task authors, along with the task lifecycle methods of init() and execute(). To delegate work to other tasks, create the task, call init() to initialize it, configure it, and finally call execute().
We’re going to use the Java class to run any Java program with arguments built from nested resources. This task, <runjava> will have the following attributes and elements:
|
Configuration option |
Role |
|---|---|
| attribute classname | The name of the class to run |
| attribute classpath | The classpath of the program |
| attribute classpathref | A reference to an existing classpath |
| element classpath | A classpath as nested XML |
| resource collection elements | Arguments to the program |
The <runjava> task is going to expose only a fraction of the Java task’s features. Some options will be set to sensible values, while the rest will be left alone.
Here’s the top of the task:
public class Runjava extends Task {
    private Union resources = new Union();

    public void add(ResourceCollection rc) {
        resources.add(rc);
    }
    ...
This is pretty much the same code as for the <filesize> task: support for nested resource collections. The harder bits are the other attributes, especially supporting class and classpath set-up.
If a task has a setter method that takes a java.lang.Class parameter, Ant will automatically load the class and pass the Class instance down. Do not use this! Ant will try to load the class from Ant’s current classloader. Tasks are much more flexible if they take the classname string and support configurable classpaths.
Here are the recommended ways to work with classes:
- Tasks that dynamically load classes should support user-specified classpaths.
- Classpaths can be specified by a reference to an existing classpath, a path attribute, or as a nested path.
- Use AntClassLoader, which is an Ant-specific classloader.
- The method Project.CreateClassLoader() takes a Path instance and returns an AntClassLoader containing all the classes listed in the path, both in JAR files and under directories.
- After classes and classloaders are no longer needed, references to them should be set to null and the cleanup() method of the classloader should be called to force it to close any open JAR files. This prevents memory leaks.
Because we are delegating to the <java> task, only the first two items are our problem; the rest is the Java task’s. Our task needs only a simple string to store the classname:
private String classname;
public void setClassname(String classname) {
    this.classname = classname;
}
This does, however, leave the problem of setting up the classpath itself, which forces us to look at how Ant handles paths and datatype references.
17.8.1. Setting up classpaths in a task
There are three ways to let build files pass a classpath to a task:
- Write a setter method that takes an org.apache.tools.ant.types.Path parameter. This results in an attribute that takes a classpath as a string of colon- or semicolon-separated filenames.
- Write an add-, addConfigured-, or create- method call that takes a Path parameter. This results in a nested element that takes a full path datatype.
- Have a setter method that takes an org.apache.tools.ant.types.Reference parameter. This creates an attribute that takes the reference ID of a predefined path. By convention, the method should have “refid” or “ref” in its name. The task has to create a path and bind the reference to it.
Tasks that have an add(ResourceCollection) method can also get all nested paths passed down, alongside any other collection type. In such a situation, it’s best to treat the <path> elements equally to the other collections. A separate addClasspath(path) method keeps classpath setup separate.
Our new <runjava> task will support all three methods: the classpath attribute, the classpath element, and a classpathref attribute.
A classpath attribute
First, comes the field to store the path:
private Path classpath;
Next, the simple attribute setter:
public void setClasspath(Path classpath) {
    this.classpath = classpath;
}
This attribute will take something like
path="${java.class.path}:${build.dir}"
A classpath element
The path element is no more complex.
public void addClasspath(Path classpath) {
    setClasspath(classpath);
}
Robust tasks may check for duplicate attempts to set the classpath and then fail on the second attempt, unlike this example, which will accept the last path given to it by the runtime:
<book:runjava>
  <classpath path="${build.dir}"/>
  <classpath refid="run.path"/>
</book:runjava>
Incidentally, Ant always adds elements in the order in which they appear in the build file; there’s no way to guarantee that the same behavior happens with attributes, as the XML parser can return them in any order. This is consistent with XML’s rules, in which the order of attributes is unimportant but the order of elements is highly significant.
A classpath reference
Supporting references to predefined paths is essential for path reuse. To accept a path or other datatype reference as an attribute, use a setter that supports the org.apache.tools.ant.types.Reference type, and then create, configure, and add an instance of the desired datatype:
public void setClasspathRef(Reference refid) {
    Path cp = new Path(this.getProject());
    cp.setRefid(refid);
    setClasspath(cp);
}
This method creates a new Path instance bound to the project, and then calls its setRefid() method to set its refid attribute. Just as Ant’s tasks can be delegated to, all Ant datatypes can be created, configured, and fed into tasks.
The Path class
The Path class is so common it deserves a closer look. It’s an extension of the Union resource collection, with extra knowledge about Java classpath. Some of the most interesting methods are listed in table 17.5.
Table 17.5. Useful methods in the Path class. It’s a resource collection, from which iterator() and add() are useful methods.
|
Method |
Operation |
|---|---|
| void add(ResourceCollection) | Adds another resource collection (including a path) to the path |
| void addExisting(Path) | Adds those elements of another path that point to files/directories that exist |
| void addJavaRuntime() | Adds the Java runtime JARs to the path |
| Iterator iterator() | Returns an iterator over the path elements |
| String[] list() | Returns an array of path elements from the Path instance |
| Resource[] listResources() | Gets all path elements as an array of resources |
| void setPath(String path) | Parses a string and sets the path to the elements inside |
| void setRefid | Binds this path to an existing reference |
| int size() | Returns the number of path elements within the Path instance |
| String toString() | Returns the full path as a completely resolved and platform-specific string |
| static String[] translatePathProject project, String path) | Provides an array of path elements from a single path containing elements separated by colon (:) or semicolon (;) separators |
The Path class can be fed into other Ant tasks or used with utility classes such as ClasspathUtils, which creates an AntClassloader instance from a path instance.
Delegating to the Java task
After all the path setup, delegating to the Java task is surprisingly simple. The entire execute() method fits into about 15 lines of code:
public void execute() {
    Java java = new Java();
    java.bindToOwner(this);
    java.init();
    java.setFork(true);
    java.setFailonerror(true);
    java.setClasspath(classpath);
    java.setClassname(classname);
    Iterator element = resources.iterator();
    while (element.hasNext()) {
        Resource resource = (Resource) element.next();
        java.createArg().setValue(resource.toString());
    }
    java.execute();
}
![]()
To create a new task, just call the task’s constructor. The Task.bindToOwner() method then copies some of the delegating task’s state to the new class. Some of the information—the project and owning target—is absolutely critical, as tasks always assume that getProject() never returns null. Other attributes—name, location, description, and type—let the delegate inherit the public name and location of its owner. In the build log, it won’t appear to be a separate task.
After copying this data, we call the task’s init() method to begin its lifecycle. Once initialized, the task can be configured using the appropriate set-, create- and add- methods, mimicking in Java the attribute and element declarations in a build file. In our <runjava> task, we set the fork and failonerror attributes to true, then pass down our classpath and classname. Setting nested arguments is more complex, as a nested <arg> element is created for each one, using createArg() to return new instances of the Commandline.Argument class. This class crops up wherever Ant tasks set up classpaths, including the <exec> and <apply> tasks.
Finally, we execute() the delegate. This will run the Java program with the specified classpath and arguments, check the return value and report a failure if appropriate, and route all I/O to Ant’s own process. Internally, the <java> task itself creates and delegates to <exec> when fork="true"; otherwise, it loads and runs the Java class in its own classloader, under a security manager that intercepts System.exit() calls. Delegation is the underpinnings of Ant.
Running the task
As usual, some AntUnit tests verify that everything works. Here’s one of the tests:
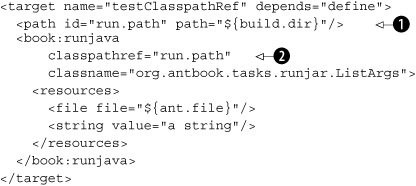
This test creates a path ![]() which we pass by reference to the <runjava> task
which we pass by reference to the <runjava> task ![]() , a task set to run a ListArgs program. Two resources are passed as arguments, a filename and a string. What is the program? It’s the program we wrote back
in chapter 2, the one that lists all of its arguments. We’ve come full circle and are now running it in Ant via a task we’ve written ourselves:
, a task set to run a ListArgs program. Two resources are passed as arguments, a filename and a string. What is the program? It’s the program we wrote back
in chapter 2, the one that lists all of its arguments. We’ve come full circle and are now running it in Ant via a task we’ve written ourselves:
testClasspathRef:
[book:runjava] /home/ant/ch17_tasks/runjava/build.xml
[book:runjava] a string
The program can now be passed anything that fits into a resource collection. It could be a path; it could be a fileset. We’ve just extended Ant’s resource collection support to an external Java program. What’s more, we’ve done it in a reusable manner. If the task is bundled into a JAR, it can be distributed to anyone who needs it. This is why custom tasks are so powerful: they can be reused by anyone.
17.9. Other task techniques
We are nearly through the tour of writing tasks. There are only a few minor aspects of task coding to cover, a mixed bag of techniques that task authors should know of.
Error handling
Ant will catch any exceptions thrown from a task and fail the build. Tasks should throw a BuildException, which is a RuntimeException subclass, when they wish a build to fail for any reason—including from inside attribute or element setters.
The failOnError attribute is a common pattern in Ant tasks; if set to false it implements a simple “ignore any errors” policy. Here’s a simple task that can be told to not fail:
package org.example.antbook.tasks;
import org.apache.tools.ant.Task;
import org.apache.tools.ant.BuildException;

public class ConditionalFailTask extends Task {
    private boolean failOnError = true;

    public void setFailOnError(boolean failOnError) {
        this.failOnError = failOnError;
    }

    public void execute() throws BuildException {
        if (failOnError) {
            throw new BuildException("oops!");
        }
        log("success");
    }
}
Tasks that follow this pattern should enable failOnError by default, forcing a build file writer to explicitly turn it off, if desired. This is consistent with the design of all new Ant tasks. Swallowed exceptions should still be logged at the verbose level, because it’s very useful when tracking down obscure problems.
Handling inline text
Many Ant tasks support plain text inside an XML element. This is very easy to do. Adding an addText() method to your task tells Ant to allow nested text. Here’s a task that gets this wrong:
package org.antbook.tasks;
import org.apache.tools.ant.Task;

public class MessageTask extends Task {

    private String text = "";

    public void addText(String text) {
        this.text = text;
    }

    public void execute() {
        log(text);
    }
}
What has gone wrong? Well, for historical reasons (bad planning), Ant doesn’t expand the properties in the text before passing it to the addText() method. You would not be able to use a property inside the message. A task use such as
<book:message>${ant.file}</book:message>
would return
[book:message]${ant.file}
This would be wrong. We need to explicitly expand the properties in this text, as in
public void addText(String text) {
    this.text = getProject().replaceProperties(text);
}
This is an easy mistake to make, because attribute setters do expand properties. Some of the Ant tasks themselves (like <sql>) have made this mistake in the past. Don’t copy them!
Ant’s binding from XML to Java makes it easy to write a task or set of tasks. We still need to make those tasks easy to use and easy for developers to pick up and use in their own build file, which means they need to be packaged as an Antlib.
17.10. Making an Antlib library
Tasks are easier to use if they’re bundled up as a library, in a JAR file. To make it even easier, the JAR file can contain property or XML files listing the types and tasks in the library. If this is done, it becomes an Antlib.
The first step in building the task library is to compile the source into a JAR. The usual <javac> and <jar> tasks come into play here. What is absolutely critical is the <copy> task that pulls in everything in the source tree with the suffixes .xml or .properties ![]() :
:

These targets create the library file dist/filesize-1.0.jar. All the library file needs are the configuration files.
Declaring a tasks.properties file
The original way of declaring tasks was a properties file, by convention a file called tasks.properties in the same package as the tasks themselves. This file lists the names of the tasks and the classes that implement them:
filesize=org.antbook.tasks.filesize.FilesizeTask
resourcesize=org.antbook.tasks.filesize.ResourceSizeTask
This file can be used by the <taskdef> task:
<target name="define-via-properties" depends="jar">
  <taskdef
    resource="org/antbook/tasks/filesize/tasks.properties"
    classpath="${tasks.jar}"/>
</target>
At this point, the new tasks are ready for use:
<filesize property="size" file="${ant.file}"/>
Task declaration through property files is a long-standing feature of Ant. Although this format is easy to write, it’s limited, and the tasks aren’t automatically loaded when Ant encounters namespaces with antlib: URIs. The antlib.xml design is better.
Declaring an antlib.xml file
![]()
The successor to the properties file is a full-blown XML file, antlib.xml, listing the task and types in the library. Most Java developers probably dread another XML configuration file, but there’s one nice thing about the antlib.xml file: it’s an Ant file! To be precise, it is an XML document with a root element <antlib>, inside of which can go any Ant task or other element that implements the interface org.apache.tools.ant.taskdefs.AntlibDefinition. There are five such tasks built into Ant: <typedef>, <taskdef>, <macrodef>, <presetdef>, and <scriptdef>; new ones can be added by the adventurous.
When an Antlib is loaded, all tasks inside it are executed inside the current project. The result is that all the tasks defined in the library become available in the project. This technique has a number of compelling features.
- It lets you define new Ant types and tasks in the same classloader.
- It makes presetdef and macrodef declarations act as part of the library.
- It allows scripting languages to be used to write tasks in the library.
- It integrates with the Antlib: URI mechanism for automatic library loading.
For our task suite, the Antlib file is just a simple <taskdef> sequence:
<antlib>
  <taskdef name="filesize"
    classname="org.antbook.tasks.filesize.FilesizeTask" />
  <taskdef name="resourcesize"
    classname="org.antbook.tasks.filesize.ResourceSizeTask" />
</antlib>
The <taskdef> tasks don’t declare any classpath. The Antlib XML file is loaded by the same classloader as the task classes, so it isn’t needed. The tasks also omit any XML namespace. This is all handled automatically.
The new Antlib can be loaded just like any of the Antlibs we’ve been using since chapter 9. The first way is in a <typedef> declaration:
<typedef
  onerror="failall"
  resource="org/antbook/tasks/filesize/antlib.xml"
  classpath="${tasks.jar}"/>
This declaration loads the tasks straight into the main Ant namespace, ready for use. The onerror attribute tells the task what to do if the resource file cannot be found: we want the build to halt, instead of display a warning message in the log.
Once the Antlib is loaded, the tasks are ready for use:
<resourcesize property="size">
  <fileset file="${ant.file}"/>
</resourcesize>
We could instead load the task into another URI:
<typedef
  onerror="failall"
  uri="http://antbook.org/"
  resource="org/antbook/tasks/filesize/antlib.xml"
  classpath="${tasks.jar}"/>
Most importantly, if the uri attribute is set to the antlib: URI of the package in which the antlib.xml file lives, the file is automatically located:
<typedef
  onerror="failall"
  uri="antlib:org.antbook.tasks.filesize"
  classpath="${tasks.jar}"/>
This is one step away from full dynamic loading, in which the namespace declaration alone is enough to pull in the tasks:
<target name="testAutoload"
    depends="define"
    xmlns:book="antlib:org.antbook.tasks.filesize">
  <book:resourcesize property="size">
    <filelist>
      <file name="${ant.file}"/>
    </filelist>
  </book:resourcesize>
</target>
Running this target will force Ant to load the antlib.xml file from the classpath when an element in the namespace is encountered; failing with an “unknown task” error if the Antlib cannot be found. You have to set up the build with the task on the classpath, which you can do in the build after the distribution JAR has been created:
>ant -f antlib2.xml testAutoload -lib dist
Buildfile: antlib2.xml
define:
testAutoload:
BUILD SUCCESSFUL
At this point, we have a fully functional Antlib. It’s now ready to be redistributed.
Adding <presetdef> and <macrodef> declarations
There’s one final trick to know: how to make <presetdef> and <macrodef> declarations in the antlib.xml file. Both tasks can be used in the antlib.xml file to define new tasks, tasks that then are available to any users of the Antlib.
However, there’s one main problem. What happens when the Antlib library is loaded into a namespace? How can declarations in the antlib.xml file predict which namespace they will be loaded into, so that they can correctly reference other things defined in the build file?

The problem is solved by having a special namespace URI to refer to the current Antlib, the string "ant.current". It needs to be declared as a namespace ![]() , and then the declared prefix can be used to identify tasks defined in the Antlib
, and then the declared prefix can be used to identify tasks defined in the Antlib ![]() . It’s a bit of a hack, but it allows end users to declare the library into any namespace of their choice. The result is that
Antlib authors can write tasks and other Ant types, extend them with <presetdef> and <macrodef>, then ship the entire package as a JAR file that build files can load just by declaring the Antlib: URL in an XML namespace declaration.
. It’s a bit of a hack, but it allows end users to declare the library into any namespace of their choice. The result is that
Antlib authors can write tasks and other Ant types, extend them with <presetdef> and <macrodef>, then ship the entire package as a JAR file that build files can load just by declaring the Antlib: URL in an XML namespace declaration.
17.11. Summary
The main way to extend Ant is by writing new tasks. This is normally done in Java, taking advantage of the full API that Ant provides. With the information in this chapter, you now have an understanding of how to do this and how Ant binds to tasks. Java introspection and method-naming conventions are the secret.
The trick to writing a good task is to use the core classes such as Project and Task, to delegate work to other Ant tasks, and to accept the common datatypes built into Ant.
Along with the tasks come the tests and packaging. The AntUnit library makes it easy to write test targets for a new task. As for packaging, Antlib libraries are just JAR files with an antlib.xml configuration file somewhere in the package hierarchy. That isn’t yet another XML format to learn, because it’s really a tiny subset of Ant itself.
We are now half-way through our exploration of Ant’s internals. Now that we’ve covered writing Java tasks and Ant’s own classes, we can go on to write tasks in scripting languages and to match the custom tasks with custom datatypes. These are the tools of the power developer.