
Microsoft Dynamics CRM 2011 and Microsoft Dynamics CRM Online both provide an out-of-the-box Import Data Wizard tool, as well as the Import file/data web service which provides additional capabilities that are not available in the Import Data Wizard.
There are also other options when considering Data Import / Migration to Microsoft Dynamics CRM, such as using third-party tools such as Scribe Insight or C360 Import Manager. The choice is based on the project.
In this task, we will populate some sample data for testing and further development into CRM by using the new Import Data Wizard.
The Import Data Wizard has been enhanced in Microsoft Dynamics CRM 2011. It takes some of the functionality from the CRM 4.0 DMM (Data Migration Manager), as well as adding some new features. We will walk through the new Import Data Wizard along with our ACM system.
Initially we need to populate three entity records into CRM: Crew Members, Airports, and Flight Routes. We will import Crew Member records with notes and attachments. Airport and Flight Route are connected entities, so we are going to import both entity records together (in a single CSV file) using the Import Data Wizard.
The Import Data Wizard supports XML Spreadsheets (.xml), Simple Text (.csv or .txt), and multiple files (.zip). By default, the maximum size of a file is 8 MB, which means:
- Any
.csv,.txt, or.xmlfile must not exceed 8 MB - Any individual file inside the
.zipfile must not exceed 8 MB and the total size of the.zipfile, including the attachment folder, must not exceed 32 MB
Note
There is a work around to change the default size limitation; see: http://billoncrmtech.blogspot.com/2008/07/data-import-wizard-will-not-upload.html.
First of all, we are going to import the first entity: Crew Member. For each Crew Member record, we also need to import a photo as an attachment.
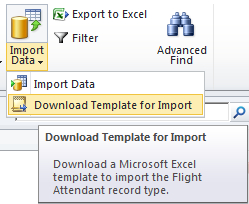
Microsoft Dynamics CRM 2011 provides the Data Import Template for entities. The template is in XML Spreadsheet 2003 format, with an .xml extension. You can download it by going to Settings | Data Management | Templates for Data Import. Alternatively, to download the Data Import Template for Crew Members, go to ACM homepage | Crew Members entity. On the ribbon bar you will see a button called Import Data. Click on the text Import Data below the button, and then click Download Template for Import:
Open the XML file using Microsoft Excel; you will see that each column corresponds to a field on the Crew Member main form. It also indicates (via bolded column text) all mandatory fields for the record.
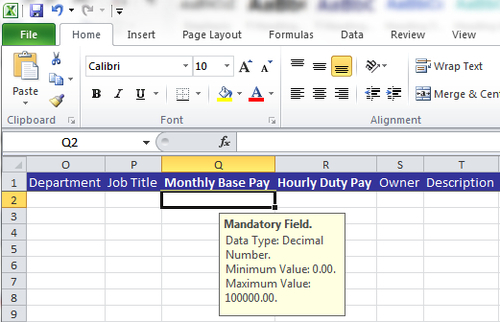
You may notice that all mandatory fields are bold text. So make sure that these fields have valid data for importing.
You also see a unique identifier data type (lookup) on the Spreadsheet call: Owner.
Owner is a system mandatory field that appears in all user-owned entities. The owner data can be populated by the data import process—we don't need to fill in this field—so remove the Owner column.
The next screenshot shows the basic information for Crew Member. Save it to XML Spreadsheet 2003 format, and name it Crew Member.xml.

There is something we should know about the template:
- The workbook contains a field format. Users should follow this format when filling in data.
- The workbook contains a picklist value for Picklist format fields, which is handy for users when filling in data.
- For the Lookup data type, the value should match the primary field of the lookup entity. That is, in our case, the team value Cabin Crew and Pilot are exactly matching the team names we entered in ACM, earlier.
- Do not use non-printable characters, such as newline ( ) or return ( ) characters.
- The workbook format must be compatible with XML Spreadsheet 2003.
As we mentioned, we are going to import a photo as an attachment for each Crew Member, in one data import process.
Attachment, in Microsoft Dynamics CRM 2011 is mapped to the Note entity which has a relationship to the related parent entity (Crew Member). In order to import both entities in parallel, we need to create a separate XML Spreadsheet 2003 workbook for Note.
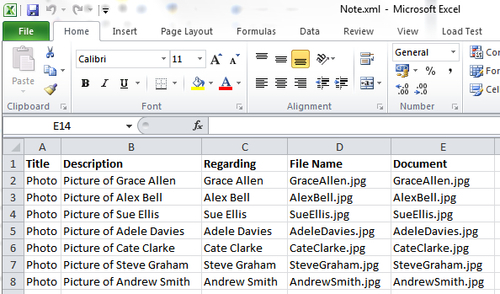
The next screenshot shows the basic information for an Attachment (Note); save it to XML Spreadsheet 2003 format, and name it Note.xml.
In this demo, all crew members have different names, so we can import Crew Member and Notes together using the Automatic Mapping option in CRM 2011.
- The Regarding column will look up the primary field of the related entity; in our case it is
contact.fullname. - File Name is the attachment name. It tells the data import process which attachment to upload; all attachments should be put in a separate folder called Attachments. See the next screenshot for an example.
- Document is the attachment name after loading it into CRM. It must have a unique name across the workbook.
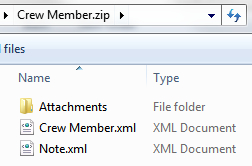
The next step is to create a folder called Attachments, put all of the pictures into that folder, zip it along with Crew Member.xml and Note.xml, and call it Crew Members.zip. Note that the zip file can contain either CSV files or XML Spreadsheet 2003 files, but not both. See the next screenshot as an example:
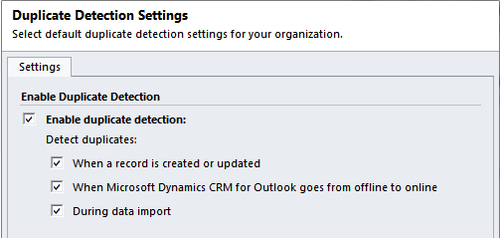
Microsoft Dynamics CRM 2011 has an out-of-the-box duplicate data detection function, which provides the capability to detect and handle duplicate data. To avoid importing duplicate data into the ACM system, we need to take a look at the duplicate detection settings: Go to the ACM homepage| Data Management | Duplicate Detection Settings.
Make sure that the Enable duplicate detection option is enabled and that the During data import option is selected. Then click on OK to save your changes and return to the previous screen.
Now we need to create a rule that tells the system how to identify a duplicated record. Double-click to open the Duplicate Detection Rules; we can see that there are four rules out-of-the-box. Because none of these will be used in our system we can select all and then delete them.
Click the New button to set up the rule as shown below, save it, and then click the Publish button to activate the rule.
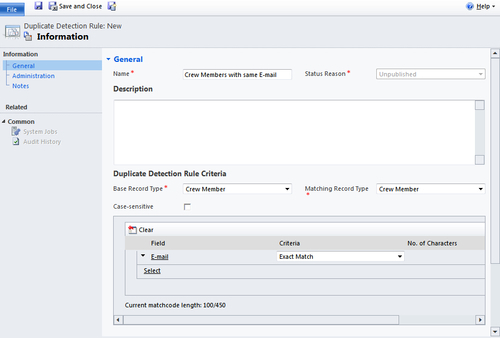
The above rule tells the system if an importing Crew Member has the same E-mail as any existing Crew Member in the system. This is a duplicated record and therefore should not be imported. CRM prompts users before saving or importing potential duplicate records:
- If you don't see the entity name in the Base/Matching Record Type list, then you might need to enable the "Duplicate detection" of that entity.
- All conditions implicitly have an "AND" connector. That is, if you set up a rule with two conditions: "E-mail exact match, Last Name exact match", the system will only identify a duplicate record when this record's E-mail and Last Name exactly match an existing record which has the same values.
- You can create a separate rule if you want to use the "OR" connector.
- All conditions for one rule are combined into a matchcode. (A matchcode is a code created for every record to which a duplicate-detection rule might apply, and is used as part of the process for detecting duplicates. The matchcodes for new and updated records are created every five minutes, rather than when a record is created. A matchcode has a maximum length limit of 450 characters.)
By default, duplicate detection is available when a record is created or updated. This includes when a record created with the Microsoft Dynamics CRM for Outlook is tracked.
Duplicate Detection has some limitations that we should be aware of:
- If you enter a duplicate record within a few minutes of entering the first record, CRM will not detect the duplicate record because the matchcode is only created every five minutes for new and updated records.
- After publishing a duplicate detection rule, increasing the length of fields that are included in the duplicate detection criteria could exceed the matchcode length limit. This could result in duplicates not being detected.
- Duplicates cannot be detected when a user merges records, converts a lead, or saves an activity as completed.
- By default, duplicates are not detected during synchronization—that is, when the Microsoft Dynamics CRM for Outlook goes from offline to online.
- Each time you define an import, the choice of checking for duplicates is available. So it is possible to create duplicate records during data import.
To work around the above limitations, we may schedule Duplicate Detection Jobs. (A job that runs in the background; you can request e-mail notification when the job completes, with a link to the page where it can be resolved.) To schedule a Duplicate Detection Job, go to ACM Settings | Duplicate Detection. It's very straight forward, and you can try it yourself.
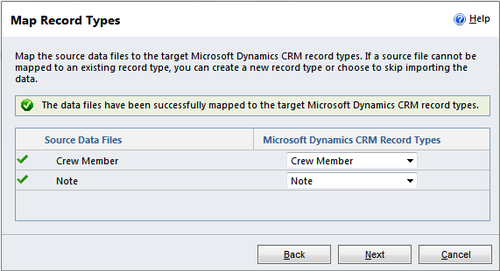
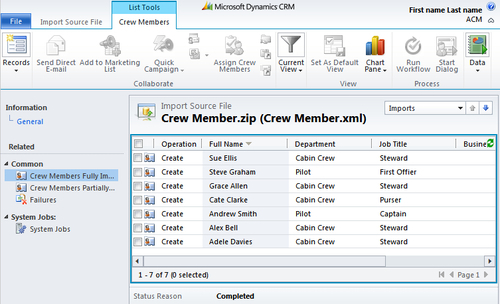
Go to ACM Workplace | Crew Member and click the Import Data button to start the Import Data Wizard. Browse to select the Crew Members.zip file, and then click Next. The Wizard will find two files in the ZIP file; click Next.
Select the Default (Automatic Mapping) option, and then click Next.
Because the columns are exactly mapped to the field Display Name, this saves our time to map it manually. You will see that both Crew Member and Note are successfully mapped to the target record types:
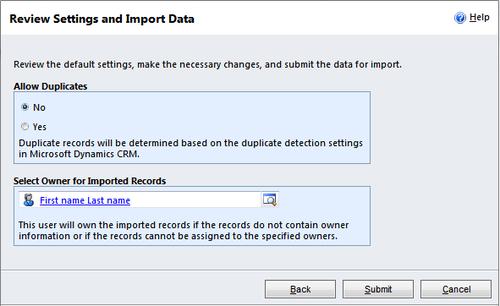
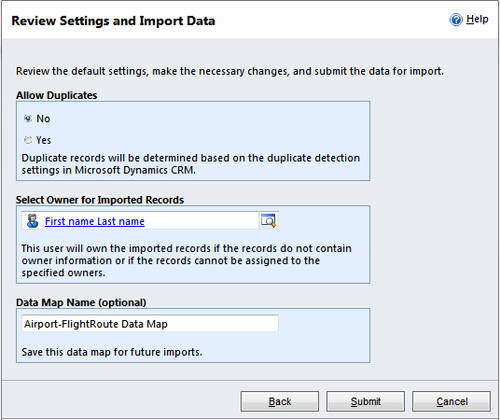
Click Next again. This will bring us to the Review Settings and Import Data screen. Select No on Allow Duplicates, select an owner for the imported records, and then click the Submit button:
Now the data has been successfully submitted for Import, and we will see a "Congratulations!" message. However this just indicates that the data has been submitted for import; that doesn't mean the import has succeeded. It's just half way finished. The system will parse the import file, then transform the parsed data, and finally it will upload the transformed data to the target Microsoft Dynamics CRM server. Fortunately, these processes (parse-transform-upload) are done by the asynchronous jobs that run in the background.
To know whether everything has been successfully imported, click the Imports link:
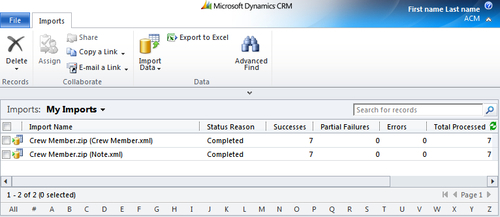
If you open an Import Source File, you will see what has been imported, what has been partially imported, and a list of the failures:
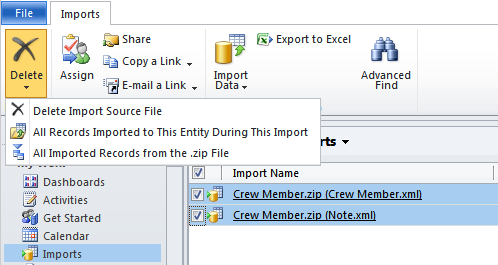
To remove the imported data, select the import source file, and click the drop-down icon for the Delete button on the ribbon. Here we can see three options, which are all intuitive and meaningful.
We have imported some Crew Member sample data, and are next going to import some Airport and Flight Route sample data.
In Microsoft Dynamics CRM 2011, you can import data from one source file or from several source files. A source file can contain data for one entity type or for multiple entity types.
The Import Data Tool doesn't know that we want to create two types of records by using a single CSV file unless we provide a Data Map (a file that contains information about how data from a source system corresponds to data in Microsoft Dynamics CRM) for it.
You can create a Data Map by using any XML editing tool. As a starting point, we want to see what a Data Map looks like, and will work from there. Go to ACM Settings | Data Management | Data Maps. Select Active Data Maps for the view, then select For Generic Map for Contact and Account, and click the Export button on the toolbar.
Use Microsoft XML Notepad 2007 to open the Data Map XML file. It looks like this:
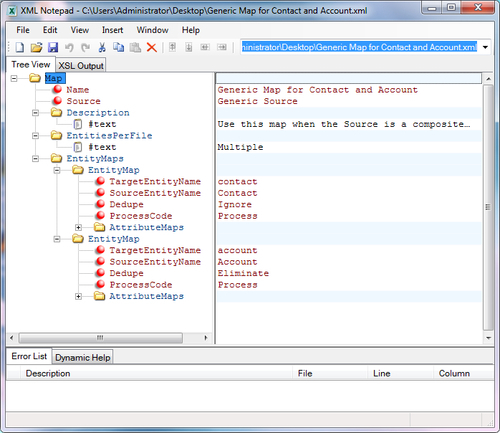
As we can see here, this Data Map is being used for Account/Contact data import. Now we need to update and simplify it so that the Data Map can be used for Airport/Flight Route data import:
- Update the TargetEntityName and the SourceEntityName.
- Change Dedupe from Ignore to Eliminate. This makes sure that we don't import duplicate records.
- Delete the Description folder and the two AttributeMaps subfolders.
The following screenshot shows the final result:
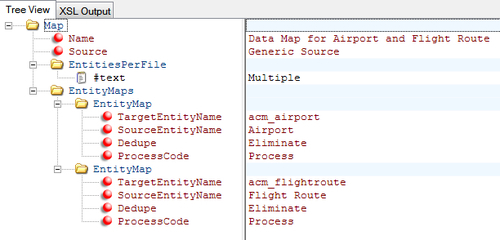
Now that we have a minimal Data Map for Airport and Flight Route, the XML looks like this:
<Map Name="Data Map for Airport and Flight Route" Source="Generic Source">
<EntitiesPerFile>Multiple</EntitiesPerFile>
<EntityMaps>
  <EntityMap TargetEntityName="acm_airport" SourceEntityName="Airport" Dedupe="Eliminate" ProcessCode="Process"/>
  <EntityMap TargetEntityName="acm_flightroute" SourceEntityName="Flight Route" Dedupe="Eliminate" ProcessCode="Process"/>
</EntityMaps>
</Map>
Save the data map file. Click the Import button on the Data Maps toolbar, upload the Data Map to CRM, and activate it. See the following screenshot for Data Maps:
Air-X provides a single CSV file that contains both Airport and Flight Route information. Our task is to import it into CRM and create two types of entity records: Airport and Flight Route. We may split them and then import them separately. However, in Microsoft Dynamics CRM 2011 you can import multiple entities using a single data source, with Data Map.
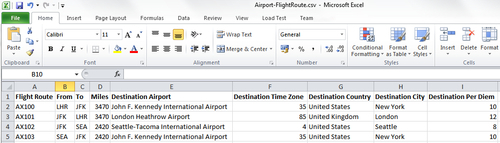

Export the Excel Spreadsheet to a CSV (comma delimited) (*.csv) file and then open it via Notepad, just to make sure you know what the delimiter is.
- You need to make sure that none of the fields in Excel Spreadsheet contain the delimiter. If one has, try using a different delimiter, or replace/remove the delimiter in the field value.
- When exporting to a CSV file, you can choose the delimiter by going to the Computer's Control Panel | Region and Language | Additional settings, then change the "List separator". The CRM Import Data Wizard only supports four types of field delimiter:
- Comma (,).
- Colon (:).
- Semicolon (;).
- Tab character (
Click the Import Data button on the ribbon, and then navigate to the CSV file that we created with both Airport and Flight Route information.
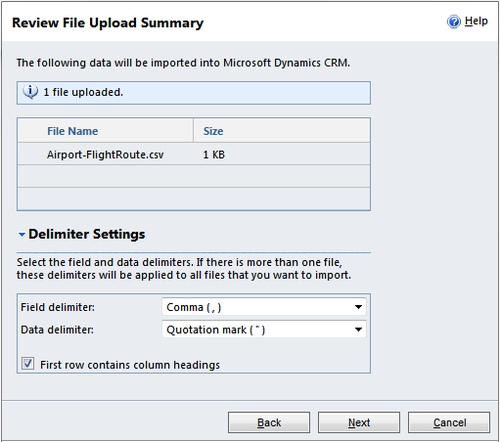
Make sure that you choose the correct Field delimiter and Data delimiter for the import file.
Select the customized map that we just created: "Data Map for Airport and Flight Route", and then click Next.
Because we didn't set the attribute maps in our XML file, we can do it here:
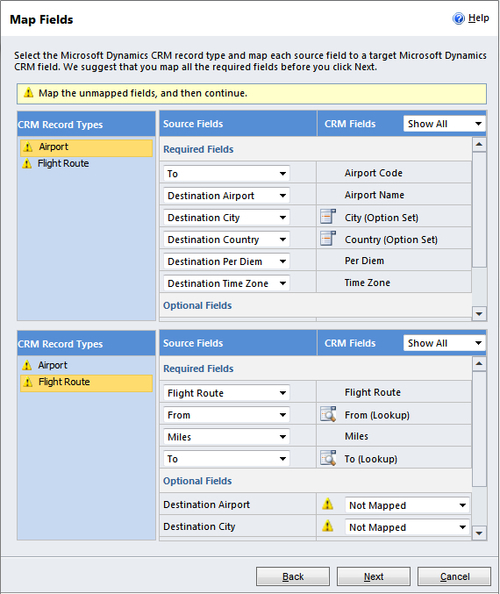
At this stage, we can save this data map for future imports, so that we don't have to map the attributes again.
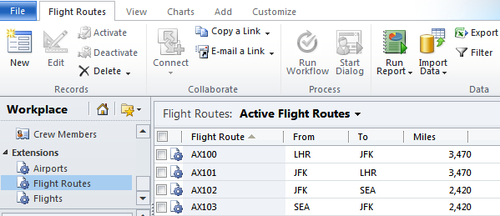
Submit this, and after a while both the Airport records and the Flight Route records are created in CRM:
General speaking, the Import Data Wizard doesn't support data update, so each time the Import Data Wizard will create new records in CRM.
A simple way to update CRM data is: export them using the XML Spreadsheet 2003 format, and then update using Excel, then import the XML into CRM.
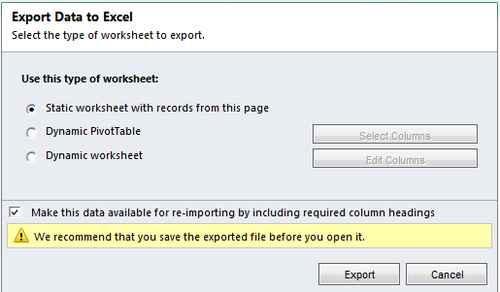
You can use the Advanced Find function to select records you want to edit, then click on the Export Data to Excel button on the toolbar, the following dialog box will pop up. Select the Static worksheet with records from this page option and check Make this data available for re-importing by including required column headings. Next time when you import using this XML file, the corresponding data in CRM will be updated:
You might have noticed that there is a limitation of the ..records from this page, so if you have lots of data that you want to export and import, this method isn't an ideal solution.
Following example of how to programmatically insert/udpate (if data exist) Flight Routes with a CSV file.
Note
More detail about the Microsoft Dynamics CRM 2011 server-side programming will be introduced in Chpater 5, Server-Side Programming.
/*
 * Update Flight Route if it exists in CRM; Otherwise Insert. *
 *
 * FlightRoutes.csv
 * Name;From;To;Miles
 * FR001;JFK;LHR;20000
 * FR002;JFK;SEA;30000
 *
 * */

using System;
using System.Collections.Generic;
using System.Linq;
using System.Text;
using System.ServiceModel.Description;
using System.Net;
using System.IO;
using Microsoft.Xrm.Sdk.Client;
using Microsoft.Xrm.Sdk;

namespace InsertUpdateFlightRoute
{
  class Program
  {
    static void Main(string[] args)
    {
      Uri OrganizationUri = new
                            Uri("http://bps:5555/ACM/XRMServices/
                            2011/Organization.svc");
      Uri HomeRealmUri = null;
      ClientCredentials Credentials = new ClientCredentials();
      Credentials.Windows.ClientCredential =
                          CredentialCache.DefaultNetworkCredentials;

      try
      {
        //Initializes a new instance of the CRM
          OrganizationServiceProxy class.
        using (OrganizationServiceProxy serviceProxy = new
               OrganizationServiceProxy(OrganizationUri,
               HomeRealmUri, Credentials, null))
        {
          serviceProxy.EnableProxyTypes();
          IOrganizationService service =
                               (IOrganizationService)serviceProxy;

          //Read the csv file into the routes array.
          var routes =
                      File.ReadAllLines("FlightRoutes.csv").
                      Skip(1).Select(line =>
          {
            //Split columns by ;
            string[] fields = line.Split(";".ToCharArray());
            return new
            {
              fRoute = fields[0],
              fFrom = fields[1],
              fTo = fields[2],
              fMiles = fields[3]
            };

          }).ToArray();

          foreach (var route in routes)
          {
            //Query record in CRM: update the record if exist; insert
              the record if doesnot exist.
            acm_flightroute fr = getRoute(service, route.fRoute);

            if (fr != null)
            {
              //Record exist - update the Flight Route.
              fr.acm_name = route.fRoute;
              fr.acm_From = new
                       EntityReference(acm_airport.EntityLogicalName,
                       getAirport(service, route.fFrom));
              fr.acm_To = new
                       EntityReference(acm_airport.EntityLogicalName,
                       getAirport(service, route.fTo));
              fr.acm_Miles = int.Parse(route.fMiles);

              fr.EntityState = EntityState.Changed;

              try
              {
                serviceProxy.Update(fr);
              }
              catch (Exception ex)
              {
                errorHandler(ex);
                continue;
              }
            }
            else
            {
              //Record doesnot exist - insert the Flight Route.
              acm_flightroute newFlightRoute = new acm_flightroute()
              {
                acm_name = route.fRoute,
                acm_Miles = int.Parse(route.fMiles),
                acm_From = new
                       EntityReference(acm_airport.EntityLogicalName,
                       getAirport(service, route.fFrom)),
                acm_To = new
                       EntityReference(acm_airport.EntityLogicalName,
                       getAirport(service, route.fTo))
              };
              try
              {
                serviceProxy.Create(newFlightRoute);
              }
              catch (Exception ex)
              {
                errorHandler(ex);
                continue;
              }
            }
          }
        }
      }
      catch (Exception ex)
      {
        errorHandler(ex);
      }

      Console.ReadLine();
    }

    //Display Errors.
    private static void errorHandler(Exception ex)
    {
      Console.WriteLine(ex.Message + ex.InnerException);
      //Console.ReadLine();
    }

    //Return the Airport ID.
    private static Guid getAirport(IOrganizationService service,
                                  string airportcode)
    {
      using (OrganizationServiceContext orgContext = new
             OrganizationServiceContext(service))
      {
        var query = from a in orgContext.CreateQuery<acm_airport>()
              where a.acm_name.Equals(airportcode)
              select a;
        if (query.FirstOrDefault() != null)
          return query.FirstOrDefault().acm_airportId.Value;
        else
          return Guid.Empty;
      }
    }

    //Return the Flight Route.
    private static acm_flightroute getRoute(IOrganizationService
                                   service, string routename)
    {
      using (OrganizationServiceContext orgContext = new
             OrganizationServiceContext(service))
      {
        var query = from r in
                    orgContext.CreateQuery<acm_flightroute>()
              where r.acm_name.Equals(routename)
              select r;

        if (query.FirstOrDefault() != null)
          return query.FirstOrDefault();
        else
          return null;
      }
    }
  }
}