
3
Installing Ansible Automation Platform on OpenShift
There are a few different ways to install Ansible Automation Platform (AAP). The two most popular involve installing it on machines, either physically or virtually, or on an OpenShift cluster. In addition, there are upstream options for installing the latest bleeding-edge versions of the Automation controller and Automation hub.
In this chapter, we will cover the following topics:
- Installing AWX on minikube
- Installing CodeReady Containers
- Installing the Red Hat Ansible Automation Platform Operator on an OpenShift cluster
- Backing up and restoring a backup for Automation hub and the Automation controller on OpenShift
Technical requirements
This chapter will cover the platform and methods that will be used in this book. The code referenced in this chapter is available at https://github.com/PacktPublishing/Demystifying-the-Ansible-Automation-Platform/tree/main/ch03. It is assumed that you have Ansible installed to run the code provided.
The Ansible Automation Platform Operator requires an OpenShift cluster to be used. While creating and customizing a full OpenShift cluster is beyond the scope of this book, there is an alternative: CodeReady Containers (CRC). CRC requires a Red Hat Developer Subscription to use. Once you have created CRC, the installation is the same as it would be on OpenShift.
An alternative is to set up an upstream instance of CRC – that is, AWX – on minikube. This chapter will talk about how to create this as well. Although very close to the previous installation method, it is slightly different.
It is highly recommended that you at least follow one of the methods from either Chapter 2, Installing Ansible Automation Platform, or Chapter 3, Installing Ansible Automation Platform on OpenShift, so that you can follow along with the rest of this book.
Installing AWX on minikube
minikube is a local version of Kubernetes that makes it easy to have a development version of Kubernetes on a machine. Kubernetes is an open source system to maintain and scale containerized applications. AWX requires four or more CPUs, 6 GB of free memory, and at least 20 GB of disk space. Due to its small requirements, it can run minikube and AWX on a free GitHub runner instance. The latest information for minikube can be found here: https://minikube.sigs.k8s.io/docs/start/. To get minikube running, follow these steps:
- Run the following commands to download the installation file, install minikube, and get it running:
$ curl -LO https://storage.googleapis.com/minikube/releases/latest/minikube-linux-amd64
$ sudo install minikube-linux-amd64 /usr/local/bin/minikube
$ minikube start --cpus=4 --memory=6g --addons=ingress
- Once minikube is running, make sure it is working properly:
$ minikube kubectl -- get nodes
$ minikube kubectl -- get pods –A
- Use the minikube dashboard to get a visual representation of the installation:
$ minikube dashboard
- To make things easier, make an alias of the kubectl command:
$ alias kubectl="minikube kubectl --"
Once minikube is ready, it is time to install AWX. This can be done with awx-operator. The instructions for installation can be found here: https://github.com/ansible/awx-operator#basic-install. It involves cloning either the development branch or a release branch of the operator. Follow one of the following options to clone the correct repository branch. If you have problems with the development branch, switch to a release branch.
Clone the release branch:
- Navigate to https://github.com/ansible/awx-operator/releases.
- Click on the latest release number, which should lead to a link similar to https://github.com/ansible/awx-operator/releases/tag/0.15.0.
- Download the tarball, untar it, and change directories:
$ tar xvf awx-operator-0.15.0.tar.gz
$ cd awx-operator-0.15.0.tar
Clone a branch based on the release label:
- Run the following commands:
$ git clone https://github.com/ansible/awx-operator.git
$ cd awx-operator
- Use autocomplete on git checkout to find the highest release number:
$ git checkout (TAB)
For example, you could use the following command:
$ git checkout 0.15.0
Clone a branch based on the development branch:
- Run the following commands:
$ git clone https://github.com/ansible/awx-operator.git
$ cd awx-operator
Now that the repository has been cloned, it is time to set up the operator:
- Export the namespace, as follows:
$ export NAMESPACE=my-namespace
- Use the make deploy command to build the deployment:
$ make deploy
Wait a while and ensure that it has been deployed correctly.
- To check the status of the deployment, run the following kubectl command. This will provide the status of the pods that have been created for the deployment:
kubectl get pods -n $NAMESPACE
- To make things easier, set a default namespace:
kubectl config set-context --current --namespace=$NAMESPACE
- Using the awx-demo.yml file in the repository, create a file of your own or use the awx-demo.yml file in this chapter’s resources. metadata.name will be the name of your AWX instance. The following code shows an example of this:
---
apiVersion: awx.ansible.com/v1beta1
kind: AWX
metadata:
name: awx-demo
spec:
service_type: nodeport
- Use kubectl to apply the configuration file:
$ kubectl apply -f awx-demo.yml -n $NAMESPACE
- You can monitor the deployment by running various commands, as follows:
- Use the following command to check the logs:
$ kubectl logs -f deployments/awx-operator-controller-manager -c awx-manager
- Use the following command to check the pods:
$ kubectl get pods -l "app.kubernetes.io/managed-by=awx-operator"
- Use the following command to check the services:
$ kubectl get svc -l "app.kubernetes.io/managed-by=awx-operator"
- Use the following command to check the logs:
- After a little while, the deployment should be complete. Check it by using the following command:
$ minikube service awx-demo-service --url -n $NAMESPACE.
This should return a URL such as http://192.168.39.74:30261.
- To get the admin password, use the following command:
$ kubectl get secret awx-demo-admin-password -o jsonpath="{.data.password}" | base64 –decode
Remember, if you changed metadata.name in your deployment file, all references to awx-demo will need to be changed as well for these commands to work.
- Navigate to the URL from step 8, and the password from step 9, and log in with a browser using the admin account.
A working installation of AWX allows a local development environment to be created. While it is not 1:1 in terms of CRC, it is extremely similar. It is very useful for development in a home lab.
Now that we have learned how to install AWX on minkube, let’s look at using CodeReady Containers. This is an alternative to minikube and is an OpenShift deployment that allows you to install Ansible Automation Platform.
Installing CodeReady Containers
CodeReady Containers is a single-node OpenShift cluster designed for use on a laptop. The latest way to install can be found at https://developers.redhat.com/products/codeready-containers/getting-started. If the instructions here do not work, please refer to the documentation. Documentation is available for installation on Linux, Windows, or Mac.
To install CRC on an RHEL-based Linux machine, follow these steps:
- Make sure that you have NetworkManager installed by running the following command:
$ sudo dnf install NetworkManager
- Navigate to https://console.redhat.com/openshift/create/local and download the latest release.
- Navigate to where you downloaded the latest release and run the following command:
$ tar xvf crc-linux-amd64.tar.xz
- Create a bin folder, copy the crc file into the bin folder, and then add the bin path to your path:
$ mkdir -p ~/bin
$ cp crc ~/bin
$ export PATH=$PATH:$HOME/bin
$ echo 'export PATH=$PATH:$HOME/bin' >> ~/.bashrc
- Configure how much memory or CPU you want to give your CRC instance and run the setup:
$ crc config set cpus 5
$ crc config set memory 9126
$ crc setup
$ crc start
Now, the CRC instance should be available at https://console-openshift-console.apps-crc.testing. Use the information from the crc start command to access the console. If you forget the login password, it can be retrieved using the crc console –credentials command. The next step is to follow the OpenShift installation instructions in the next section to install the Ansible Automation Platform Operator.
Installing the Red Hat Ansible Automation Platform operator on an OpenShift cluster
Using an OpenShift cluster to host Automation hub and the Automation controller provides benefits for scaling and integrates well with your existing OpenShift cluster. With either OpenShift or CRC, the process is the same.
Follow these steps to install the Ansible Automation Platform Operator:
- Navigate to the web console of the OpenShift instance and log in.
- In the web GUI, navigate to Operators | Operator Hub.
- In the keyword text box, enter Ansible.
- Click on Ansible Automation Platform and select Install.
- Choose one option from the following selections:
- Update channel: Which release to use. Generally, you should use the latest version:
- stable-2.2
- stable-2.1
- Early Access – v2.0.1
- Scope:
- Namespace scoped (default): Watches and manages resources in a single namespace
- Cluster scoped: Watches and manages resources cluster-wide
- These combinations of release and scope will be combined to create the following options to choose from:
- early-access
- early-access-cluster-scoped
- stable-2.1
- stable-2.1-cluster-scoped
- stable-2.2
- stable-2.2-cluster-scoped
- Select either a default namespace or a project of your choice.
- Choose Automatic or Manual updates for the Operator. I recommend Automatic as this will only update the operator.
- Update channel: Which release to use. Generally, you should use the latest version:
- Click Install. After a few moments, navigate to Installed Operators, and then to Ansible Automation Platform.
The operator manages Automation controller and Automation hub deployments. One key difference with Automation hub is that no container registry is created. It is assumed that if OpenShift is being used, a registry already exists.
With a CRC deployment created, the next step is to add the Automation controller or hub to it.
Exploring the Automation controller and Automation hub on OpenShift
The controller can be installed through the web interface through the GUI or YAML, or a definition file in the CLI. For both the Automation controller and Automation hub, the operator GUI gives you a form to fill out. The variables are presented in a flattened view, in segments. This chapter’s repository (ch03/operator_files/) contains additional references to be used for deployment.
The resource containers have limits and requests. More details on what the values mean and how they apply can be found here: https://docs.openshift.com/container-platform/3.11/dev_guide/compute_resources.html#dev-memory-requests.
The following tables are by no means a comprehensive list of all variables used in the Ansible Automation Platform Operator, a more comprehensive guide to the variables can be found here: https://github.com/ansible/awx-operator#service-type.
First, there are the resource variables. These all have entries regarding limits and requests to determine the size of the containers they operate with.
The ones for the Automation controller are as follows:

Table 3.1 – Automation controller Operator container variables
The ones for Automation hub are as follows:
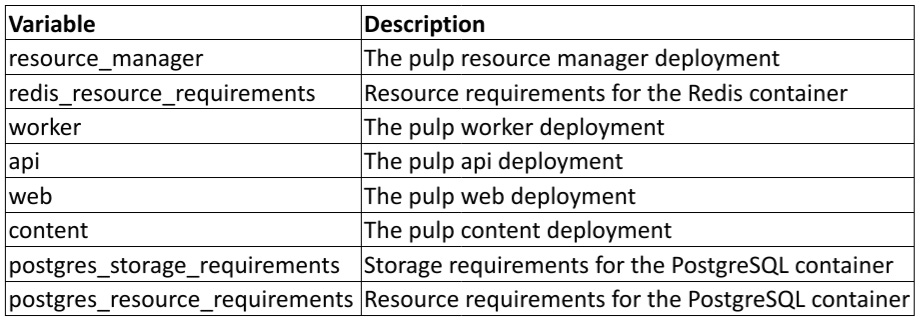
Table 3.2 – Automation hub Operator container variables
Each of these contains sub-variables called requests and limits, which are the respective constraints on the containers: what is requested and what it is limited to. A good breakdown of their usage in OpenShift can be found at https://docs.openshift.com/container-platform/4.6/nodes/clusters/nodes-cluster-limit-ranges.html.
Each of these sub-variables uses variables to dictate CPU, memory, and storage. They are as follows:
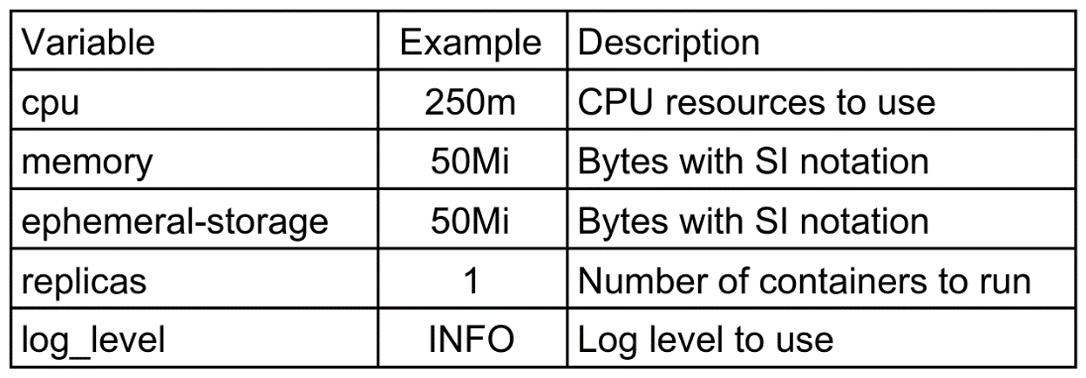
Table 3.3 – Automation controller Operator container resource variables
These are organized in YAML format for each resource. An example of a hub web resource is as follows:
operator_files/automation_hub_all.yml
web:
  log_level: INFO
  replicas: 1
  resource_requirements:
    limits:
      cpu: 500m
      memory: 50Mi
      ephemeral-storage: 50Mi
    requests:
      cpu: 500m
      memory: 50Mi
      ephemeral-storage: 50Mi
More examples such as this can be found in the chapter’s code folder.
Learning about Automation controller specifics on OpenShift
All these variables are either set in the GUI or a YAML definition file. This will create a controller. Each can be grouped into a specific category.
Secret fields
Some variables point to OpenShift secrets. Secrets are objects in OpenShift that hold sensitive data. These variable fields point at OpenShift objects that contain the actual value that the Operator uses:

Table 3.4 – Ansible Operator controller secret variables
These secret fields are used to access sensitive information, the next set of fields are the base variables.
Base variables
The following table shows the base variables for the controller:

Table 3.5 – Ansible Operator controller base variables
After the base variables, the next set to examine are those that determine ports used.
Port variables
The following table shows the variables that address the ports to use for the operator:

Table 3.6 – Ansible Operator controller port variables
After port variables, the next set are project variables where the Automation controller stores projects.
Project variables
The following table shows the variables for the storage class and other project-based variables:

Table 3.7 – Ansible Operator controller project variables
With project storage squared away, there are a few more variables used that do not fit neatly into a category.
Miscellaneous variables
The following table shows all other controller variables:
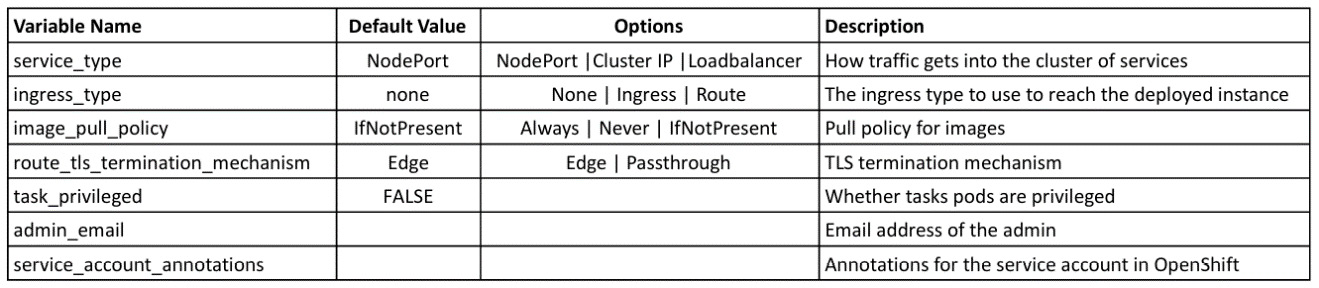
Table 3.8 – Ansible Operator controller misc. variables
These variables are used to define the Automation controller deployment, the next section will go into detail on how to use them.
Defining the Automation controller
The following is an excerpt from the Kubernetes definition file. It uses variables from the aforementioned definitions. A full example of the Operator definition can be found in this chapter’s GitHub repository:
ch03/controller_base.yml
---
apiVersion: automationcontroller.ansible.com/v1beta1
kind: AutomationController
metadata:
  name: crc-controller
  namespace: ansible-automation-platform
spec:
  create_preload_data: true
  route_tls_termination_mechanism: Edge
  loadbalancer_port: 80
  projects_storage_size: 8Gi
  task_privileged: false
  replicas: 1
  admin_user: admin
  admin_password_secret: builder-dockercfg-tbbzq
...
Once the operation is complete in a basic installation, a total of five containers will be created – one Postgres, one Redis, one web, one task, and one execution environment. To get to the web address of the controller, navigate to Networking | Routes. Next to the deployment name of the controller, you should be able to find the URL’s location. For a CRC installation and the aforementioned deployment, the URL would be https://crc-controller-ansible-automation-platform.apps-crc.testing/. To find the admin secret that houses the password to log in, navigate to Workloads | Secrets and look for crc-controller-admin-password. At the bottom of the Secrets page, the password can be revealed.
Learning Automation hub specifics
While both Automation hub and the Automation controller use the same variables to describe their containers, things shift with the other variables. All these variables are either set in the GUI or a YAML definition file. This will create an Automation hub. Each can be grouped into a specific category.
Secret fields
Secrets are where passwords are stored on OpenShift. The following table shows these secrets:
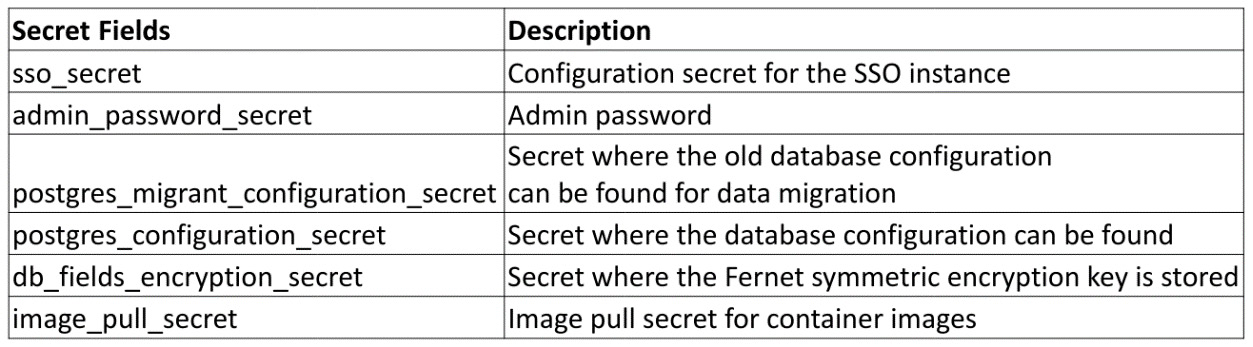
Table 3.9 – Ansible Operator hub secret variables
These variables are used to access sensitive information. The next set are the base variables to use.
Base variables
The following table shows the base variables for Automation hub:

Table 3.10 – Ansible Operator hub base variables
With the base variables defined, the next section involves storage.
Storage variables
The following table shows the variable addresses that the storage options use for the Operator:

Table 3.11 – Ansible Operator hub storage variables
With storage taken care of, the next set of variables involves which ports to use to access the Automation hub.
Port variables
The following table shows the variable addresses that the ports use for the Operator:

Table 3.12 – Ansible Operator hub port variables
These variables are all used in the Automation hub deployment, the next section will go into detail on how to use them.
Defining Automation hub
The following is an excerpt from the Kubernetes definition file for Automation hub. It uses variables from the definitions provided in Tables 3.9 to 3.12. A full example of the Operator definition can be found in this chapter’s GitHub repository:
ch03/automation_hub_base.yml
---
apiVersion: automationhub.ansible.com/v1beta1
kind: AutomationHub
metadata:
 name: crc-hub
 namespace: ansible-automation-platform
spec:
 route_tls_termination_mechanism: Edge
 loadbalancer_port: 80
 file_storage_size: 100Gi
 image_pull_policy: IfNotPresent
 web:
   replicas: 1
 file_storage_access_mode: ReadWriteMany
 api:
   log_level: INFO
   replicas: 1
 loadbalancer_protocol: http
...
In addition to the seven containers mentioned previously (one API, two content, one resource manager, one web, and two workers), the operator also created a Redis and a Postgres container. To get to the web address of Automation hub, navigate to Networking | Routes and find the URL of Automation hub next to the deployment name. For example, when using a CRC, the web address for what we did here would be https://crc-hub-ansible-automation-platform.apps-crc.testing/. The admin secret that houses the password can be found by navigating to Workloads | Secrets and looking for crc-hub-admin-password. At the bottom of the secret page, the password can be revealed.
Backing up and restoring a backup for Automation hub and the Automation controller on OpenShift
You can back up Automation hub or the Automation controller with the GUI or a YAML definition. Here, you must provide the name of the backup and the deployment name to back up, as follows:
---
apiVersion: automationhub.ansible.com/v1beta1
kind: AutomationHubBackup
metadata:
 name: example
 namespace: ansible-automation-platform
spec:
 deployment_name: crc-hub
...
The preceding variables, along with other spec variables, are described in the following table:

Table 3.13 – Ansible Operator backup variables
These allow the user to determine how much and what type of space to use, and where to store the backup.
restore is done similarly:
---
apiVersion: automationhub.ansible.com/v1beta1
kind: AutomationHubRestore
metadata:
 namespace: ansible-automation-platform
 name: restore
spec:
 backup_name: backup
 backup_source: CR
...
This restore definition relies on the previously created custom resource to point at the backup. It can also be done by supplying variables for a PVC. All these variables can be found in the following table:

Table 3.14 – Ansible Operator restore variables
The backup directory and other variable values can be found in the resource of the backup that was previously completed.
Summary
This chapter explained how to install the many different aspects of Ansible Automation Platform on some form of Kubernetes. This chapter may seem a bit daunting if you try to do everything at once. The most important piece to install is CRC, which you can do by following either this chapter’s or the previous chapter’s instructions.
Once the pieces have been installed, whether you are running CRC or AWX, Automation hub, or Galaxy NG, interacting with them is similar. The next chapter will explore the basic setup post-installation.