
8
Creating Execution Environments
Execution environments (EEs) replace virtual environments in terms of where playbooks and other jobs are run in the Automation controller. They are containers that contain system dependencies, Python libraries, a version of Ansible, and Ansible collections. This chapter will describe what EEs are and what goes into them, their benefits, and how they can be used in both the Automation controller and the command line. You will also learn how to create and manage EEs using Ansible Builder. Finally, you will learn how to use a role to build an EE and push it to Automation hub.
In this chapter, we will cover the following topics:
- What are execution environments?
- How to use execution environments
- Creating and modifying your execution environments
- Using roles to create execution environments
Technical requirements
All the code referenced in this chapter is available at https://github.com/PacktPublishing/Demystifying-Ansible-Automation-Platform/tree/main/ch08. It is assumed that you have Ansible installed to run the code provided.
This chapter assumes that you have already installed Python and Ansible.
The software for this chapter can be installed with the following commands:
- podman: For managing containers:
$ sudo dnf -y install podman
- ansible-builder: Used to build EEs:
$ pip install ansible-builder
- ansible-navigator: Used to execute playbooks in EEs:
$ pip install ansible-navigator
- podman login: Used to log in to container registries:
$ podman login <registery_fqdn>
In terms of podman login, you must enter a username and password. This allows you to authenticate to a credentialed registry so that containers can be both pulled from and pushed to it.
What are execution environments?
Under the previous major version of Ansible Automation Platform, jobs and playbooks were run with bubblewrap to isolate the process. They also took advantage of Python virtual environments. However, managing these virtual environments and module dependencies was challenging and labor-intensive. EEs are the answer to this.
EEs are prebuilt containers that are made to run Ansible playbooks. These replace using Python virtual environments as the standard way of using different versions of Python and Python packages. Ansible’s Automation controller takes advantage of these environments to scale and run job templates as well. They solve the issue of, it works for me, maintaining different environments across all nodes, and other problems that arose from the previous solution. They also double as a simplified developmental version of the Automation controller for testing a job template when using the same container as the controller.
What is inside the execution environment?
The execution environment is made up of a few things, as shown in the following diagram:
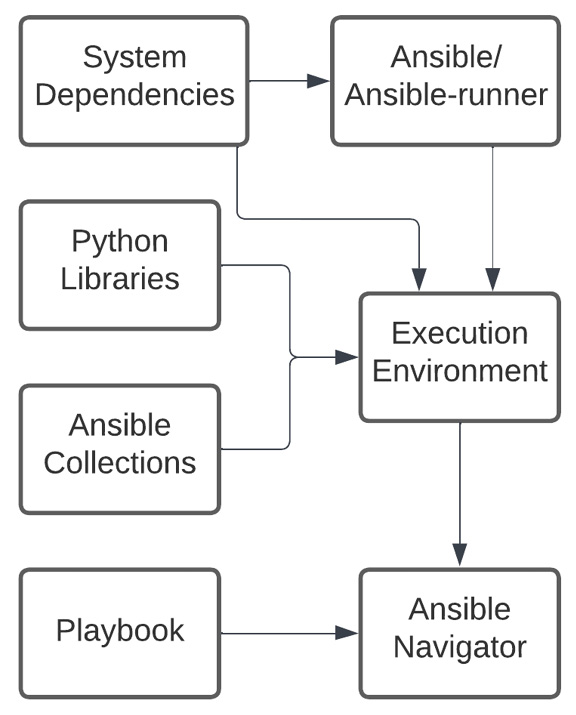
Figure 8.1 – Execution environment pieces
An execution environment contains the following pieces:
- Ansible: An installation of ansible-core – that is, the base version of Ansible without collections.
- Ansible Runner: A tool used to invoke Ansible and consume its results.
- System Dependencies: System dependencies installed by dnf.
- Python Libraries: Python libraries installed with pip.
- Ansible Collections: Collections installed from a requirements file.
The execution environment container image is then spun up as a container by either the Automation controller or Ansible Navigator. After this, the playbook or project directory and other pertinent information are copied over and Ansible is run.
Seeing what is in a specific execution environment
Each EE can be different, and it can be difficult to tell what pieces are inside them at a glance. The ansible-navigator tool has built-in functions that allow users to explore what each EE contains.
To get a particular image from Automation hub, follow these steps:
- Navigate to Automation hub.
- Click Execution Environments.
- Select an execution environment from the list, such as ee-supported-rhel8.
- Use the podman pull command from the on-screen instructions to make a local copy of the container:
$ podman pull ah.node/ee-supported-rhel8:latest
Ansible Navigator has a specific function that allows it to inspect container images currently on the local machine.
- To explore a given EE image, run the $ ansible-navigator images command:
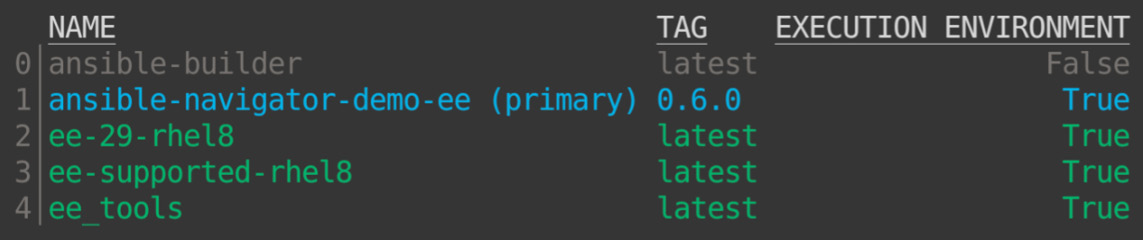
Figure 8.2 – ansible-navigator image list
- Select an image from the list by pressing the number that relates to the respective image, as shown in the preceding screenshot.
- Choose one of the following options to explore more of a given image:
- Image information: General information about the container image
- General information: Information about the operating system and Python version that is inside the image
- Ansible version and collections: The version of Ansible that’s been installed, and the names and versions of the collections that have been installed
- Python packages: The names and versions of the Python packages that have been installed
- Operating system packages: The names and versions of the system packages that have been installed
- Everything: A YAML representation of every option mentioned previously
Now that you know how to look inside EEs, the next step is to use them.
How to use execution environments
Ansible Navigator allows an execution environment to be run from the command line. The following demo.yml playbook is available in the ch01 folder:
//demo.yml
---
- name: Demo Playbook
  hosts: localhost
  gather_facts: false
  tasks:
    - debug:
        msg: Hello world
...
To run this playbook in an EE, use the ansible-navigator run demo.yml -m stdout command. It should output a Hello world message. Using the –ee or –eei option, the EE can be specified. This allows the user to use the same EE that was used in the controller for testing and development:
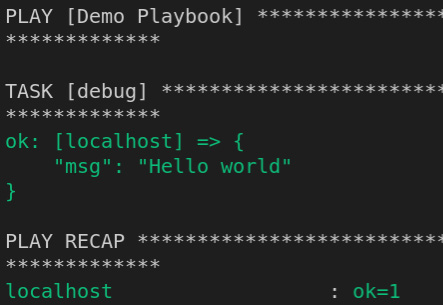
Figure 8.3 – ansible-navigator demo playbook
Inside the Automation controller, all jobs are run in an EE. When a playbook runs, a project or inventory is synced, or an ad hoc command is considered as a job.
Running a simple job in an execution environment
EEs are used for project updates and running jobs. To test an EE using ad hoc commands in the automation controller, follow these steps:
- Navigate to the Automation controller.
- Navigate to Inventories, choose an inventory, and select the Host tab.
- Select a host using the checkboxes on the left-hand side.
- Click Run Command, as shown in the following screenshot:
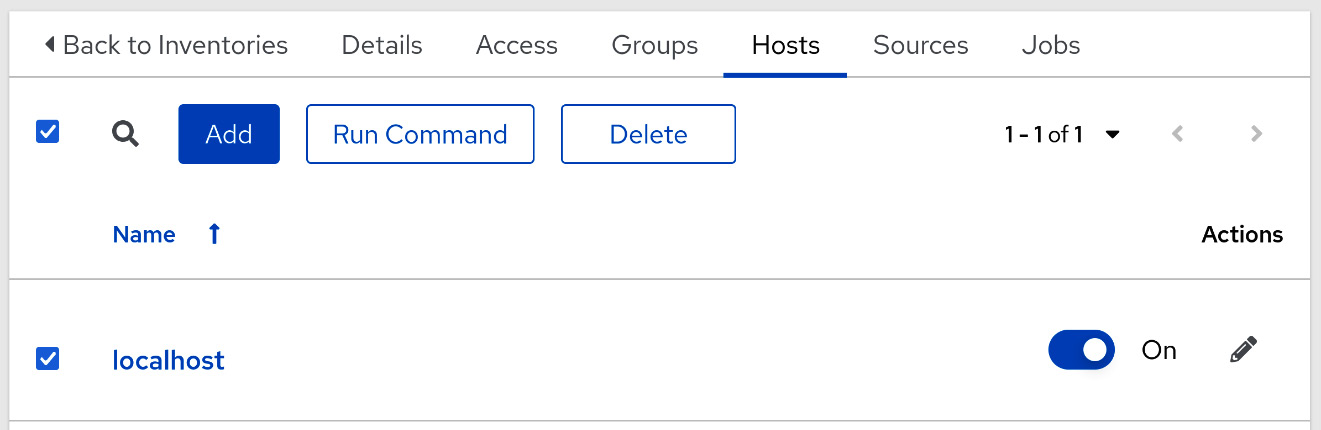
Figure 8.4 – Selecting a host for running an ad hoc command
- Choose a module to use. It is recommended to use setup for demonstration purposes. Click Next.
- Select an EE to use, such as Automation Hub Default execution environment. Click Next.
- Choose a credential to use and click Next.
- Click Launch. The output should look as follows:
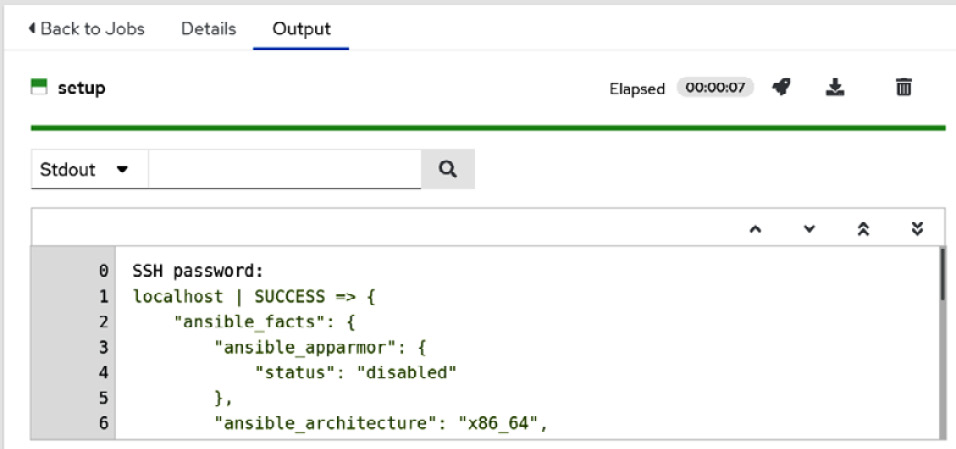
Figure 8.5 – Job output for the ad hoc setup command
Now that we’ve learned what can be found in EEs and how to use the default EEs, the next step is to create them.
Creating and modifying your execution environments
The EEs that come with Ansible Automation Platform can perform most general tasks, though some collections have different Python or system requirements that aren’t included in a base container image.
To allow anyone to create an EE, the Ansible Builder tool was introduced. This tool takes a definition file and creates an EE.
Creating a definition file
The definition file is made up of four sections, as follows:
- Base section: This is where the base variables are set.
- Build arguments section: This is where the build arguments are set.
- Dependencies section: This is where definitions for dependencies are set.
- Build steps section: This is where additional build arguments are set.
To follow along, a base execution file has been created in this chapter’s files:
//base/base_execution_enviroment.yml
---
version: 1
build_arg_defaults:
  EE_BASE_IMAGE: 'ah.node/ee-minimal-rhel8:latest'
  ANSIBLE_GALAXY_CLI_COLLECTION_OPTS: “-v”
dependencies:
  galaxy: requirements.yml
  python: requirements.txt
  system: bindep
additional_build_steps:
  prepend: |
    RUN whoami
    RUN cat /etc/os-release
  append:
    - RUN echo This is a post-install command!
This file is a good reference file and will be used in the upcoming examples. The first section to review is the base section.
Base section
The base section contains two parts:
- The version, which sets the version of the ansible-builder definition. At the time of writing, the only option is 1. However, it is a good practice to keep it so that you know what version it is compatible with in the future:
version: 1
- The second field, ansible_config, which provides the path to an Ansible configuration file. This is useful for connecting to a private Automation hub. An example file to connect to Automation hub can be found in this book’s GitHub repository and is called ch08/ansible.cfg:
ansible_config: 'ansible.cfg'
With the base section covered, the next step is the build arguments section.
The build arguments section
This section goes over the build arguments to use:
- The first variable is the base image to use. It is recommended to use the minimal EE file from Automation hub to build a new EE:
build_arg_defaults:
EE_BASE_IMAGE: 'ah.node/ee-minimal-rhel8:latest'
- The second variable specifies the ansible-galaxy options to use. This can be skipped, but if you’re diagnosing problems with connecting to Automation hub or collections, it can be helpful to add the –v verbosity option. –c can also be used to set the verify SSL option to false. To invoke these options use the following variable:
ANSIBLE_GALAXY_CLI_COLLECTION_OPTS: “-v”
- The last variable is the builder image to use. This is the image that is used for compiling tasks. It may be useful to set this behind a firewall and point the builder at another registry. If this is not an issue, just use the default and do not include this variable:
EE_BUILDER_IMAGE: ansible-builder-rhel8:latest
With the build arguments section covered, the next section covers how to add dependencies to the EE.
Dependencies section
The next section is the dependencies section. It contains the files that the builder refers to so that they can be added to the final execution environment:
dependencies:
Galaxy is a standard galaxy requirements file that includes a list of roles and collections to install. Each of the collections can also contain galaxy, Python, and bindep requirements that have been added to the container:
  galaxy: requirements.yml
  python: requirements.txt
  system: bindep.txt
Each of these is covered in more detail, the first being the galaxy dependencies.
Galaxy dependencies
The galaxy requirements file is in the following format and allows roles and collections to be added:
//base/requirements.yml
---
collections:
  - name: redhat_cop.ah_configuration
  - name: redhat_cop.controller_configuration
The collections can also supply their own Python dependencies. Any custom Python modules needed are covered in the next section.
Python dependencies
The Python requirements file is simple and based on the pip freeze command:
//base/requirements.txt
pytz  # for schedule_rrule lookup plugin
python-dateutil>=2.7.0  # schedule_rrule
awxkit  # For import and export modules
System dependencies
The system requirements must be installed using yum or dnf:
//base/bindep
python38-requests [platform:centos-8 platform:rhel-8]
python38-pyyaml [platform:centos-8 platform:rhel-8]
With dependencies covered the next section goes into the build step arguments that can be added to the container build process.
Build steps section
The last section is one for additional build steps. These are set to run before and after the execution environment is built:
//base/base_execution_enviroment.yml
additional_build_steps:
Both of these can take multi-line strings, as shown here:
  prepend: |
    RUN whoami
    RUN cat /etc/hosts
They can also take a list of commands, as shown here:
  append:
    - RUN echo This is a post-install command!
To add files to a container, place them in the same directory that’s in the context folder. These can be added either with prepend or append. For example, you can use the following command to copy a Kerberos definition file from the context folder to the container:
- COPY krb5.conf /etc/krb5.conf
With the definition file created, the next step is to use it to build the EE.
Creating the execution environment
The definition file is the blueprint for building the execution environment. The ansible-builder command takes that blueprint, grabs all the pieces, and puts things together. An important build argument is the container name. By default, it is ansible-execution-env:latest. The –t command will name the resulting container.
Use the following command to use builder:
$ ansible-builder build -f base_execution_enviroment.yml -t base_ee
This will result in a container image being produced. To see the list of container images, run the following command:
$ podman image list
The image should be listed under localhost/base_ee if you named it with the previous command.
To push the new EE to Automation hub, follow these steps:
- Retag the image with the remote registry in the name. You can also rename the image here:
$ podman tag localhost/base_ee ah.node/base_ee
- Push the new image to Automation hub:
$ podman push --tls-verify=false ah.node/base_ee
These steps can be repeated and set to update EEs as needed, add more dependencies, or add anything additional to the custom EE as needed. The next section will explore creating EEs with roles and converting virtual Python environments into EEs.
Using roles to create execution environments
The command line is the way to use Ansible Builder, and there are roles to help build execution environments using Configuration as Code (CaC). This section will cover two roles from redhat_cop.ee_utilities. The first is the ee_builder role, which is built to take inputs and build out an execution environment. The second role is virtualenv_migrate, which is built to convert a Python virtual environment from a legacy Ansible Tower installation into an EE using the ee_builder role.
Creating an execution environment using the builder role
This role is useful for creating a CI/CD utility that can update execution environments when change is required. This is important as Red Hat releases regular updates for the base EE images, and it can also be used to add to an EE over time. Using CaC to define and create the EE makes managing it easy.
The ee_builder role takes the following variables. They are the variable equivalents of the sections from the execution definition file:
- builder_dir: The directory that will store all the build and context files
- ee_registry_dest: The path or URL where the image will be pushed
- ee_registry_username: The username to use when authenticating to remote registries
- ee_registry_password: The password to use when authenticating to remote registries
- ee_image_push: Bool; whether to push to the registry or not
The EE definitions are set in a list under the ee_list variable:
- name: Name of the EE image to create. This can include the tag for the container.
- bindep: The variable list to provide the bindep requirements if you're using variables
- python: The variable list to provide Python requirements.
- collections: The variable list to provide galaxy requirements if using variables, in ansible-galaxy list form.
- prepend: Additional build arguments in list form.
- append: Additional build arguments in list form.
The following excerpt shows how to use the role and variables that are included in this chapter’s GitHub repository:
- These variables set where you can build, as well as the authentication to push the created EE to Automation hub:
/roles/ee_builder_base.yml
---
vars:
builder_dir: /tmp/builder_base
ee_registry_dest: ah.node/
ee_list:
Each item in the ee_list describes a single EE.
- name can contain a tag so that versioning can be applied:
name: custom_ee:1.10
- bindep is the same as in the file, just in list form:
bindep:
- python38-requests [platform:centos-8 platform:rhel-8]
- python38-pyyaml [platform:centos-8 platform:rhel-8]
- python is a list and can contain versions:
python:
- pytz # for schedule_rrule lookup plugin
- python-dateutil>=2.7.0 # schedule_rrule
- awxkit # For import and export modules
- collections can also take a version (this is optional):
ee_collections:
- name: awx.awx
- name: redhat_cop.controller_configuration
version: 2.1.0
- name: redhat_cop.ah_configuration
- The prepend and append options can create list forms if needed:
prepend:
- RUN whoami
- RUN cat /etc/os-release
append:
- RUN echo This is a post-install command!
- roles can be invoked to create an EE and push it to Automation hub:
roles:
- redhat_cop.ee_utilities.ee_builder
Using what’s in this playbook, you can implement a CI/CD to adjust or update an EE over time.
You can also use the ee_builder role in tandem with the other role in the ee_utils collection to convert Python virtual environments into EEs.
Converting Python virtual environments from older Tower installations
Some places may still be using an older version of Ansible Automation Platform; that is, Tower. Tower uses Python virtual environments to manage Python modules. A role was created to facilitate migration from one to the other.
The virtualenv_migrate role takes the following variables. These are the variable equivalents of the sections in the execution definition file:
- venv_migrate_default_ee_url: The URL and container name of the EE to use as a base to compare the Python virtual environment.
- ee_registry_username: The username to use when authenticating to the remote registry.
- ee_registry_password: The password to use when authenticating to the remote registry.
- CUSTOM_VENV_PATHS: The Ansible Tower setting the role uses to look for virtual environments. This is set in Tower, not the role.
The role is built to be run as the host that Ansible has access to. This can be done with an inventory file. An inventory has been created in this chapter’s GitHub repository that can be used for this purpose:
//roles/inventory.ini
---
[tower]
Tower.node
[tower:vars]
ansible_become=yes
ansible_user=excalibrax
ansible_become_password=password
A playbook has also been created in this chapter’s GitHub repository that contains these two roles:
//roles/ee_venv_migrate.yml
For the role itself, only a simple variable needs to be set for the EE to compare it to:
venv_migrate_default_ee_url: ah.node/ee-minimal-rhel8:latest
Note that the variable specifies the registry, the EE name, and the tag to use.
With that set, the role can be invoked:
    - name: Include venv_migrate role
      include_role:
        name: redhat_cop.ee_utilities.virtualenv_migrate
A second playbook in the same file has been set to target localhost. This is where the builder is invoked. Because it’s the same role as in the previous section, they are the same inputs. However, it uses the Python dependencies from the virtual environments for migration purposes. It is assumed that additional collections would be added to this.
The following variables can be used:
    venv_migrate_default_ee_url: ah.node/ee-minimal-rhel8:latest
    ee_registry_dest: ah.node/
    ee_bindep: []
    ee_collections:
      - name: awx.awx
      - name: redhat_cop.controller_configuration
      - name: redhat_cop.ah_configuration
To grab the variable from the first host in the Tower group, use the following code:
    - set_fact:
         venv_migrate_ee_python: “{{ hostvars[groups['tower'][0]]['venv_migrate_ee_python'] }}”
With all the variables set, the role can be invoked:
    - name: Create EEs
      include_tasks: create_ee.yml
Migrating from the older version of Tower to EEs can be a pain, depending on the number of environments that were previously used. It can be useful to export this information as a file for future reference, or so that it can be converted into CI/CD format:
    - name: Export python virtual enviroment list to file
      copy:
        content: “{{ venv_migrate_ee_python | to_nice_yaml( width=50, explicit_start=True, explicit_end=True) }}”
        dest: venv_migrate_ee_python.yaml
Using these two roles should make migrating and creating execution environments easy.
Summary
In this chapter, we looked at EEs in detail, including what goes into them, how to define them, and the tools that can be used to create them. This book heavily pushes CaC for managing everything, and that cannot be more true for EEs. During the first half of 2022, Red Hat was publishing updates to the EEs for Ansible Automation Platform every few weeks. To keep up with security and bugfix updates, it is almost mandatory to put EE creation into an automated process to keep up with the changes.
The next chapter will focus on Automation hub. This is a repository for collections and EEs. Here, you will learn how to add these and manage Automation hub.