
2
Installing Ansible Automation Platform
There are a few different ways to install Ansible Automation Platform (AAP). The two most popular are installing them on machines (either physical or virtual) or an OpenShift cluster. In addition, there are upstream options for installing the latest bleeding-edge versions of the Automation controller and Automation hub.
In this chapter, we will cover the following topics:
- Planning an installation on a machine
- Installing Galaxy NG on a machine
- Backing up and restoring the installation
- Issues that can arise when using the installer
Technical requirements
This chapter will go over the platform and methods used in this book. The code referenced in this chapter is available at https://github.com/PacktPublishing/Demystifying-Ansible-Automation-Platform/tree/main/ch02. It is assumed that you have Ansible installed to run the code provided.
In addition, it is assumed that you have either one to five virtual machines or physical machines that have Red Hat Enterprise Linux (RHEL) installed to install the different parts of AAP. These servers are required to follow the instructions provided, and it is highly recommended to at least follow one of the methods from either this chapter or Chapter 3, Installing Ansible Automation Platform on OpenShift, to complete the rest of the chapters in this book.
Getting a trial version of Ansible Automation Platform
A trial version of AAP can be obtained with a Red Hat Developer account. To get a Developer account, register at developers.redhat.com. After registering for a Developer account, navigate to https://developers.redhat.com/products/ansible/getting-started and download the installer to start your trial subscription. Once the subscription is activated, it will populate a subscription at access.redhat.com/management/subscriptions. This subscription license will be needed later in this chapter, and in Chapter 4, Configuring Settings and Authentication, when we set up an Automation controller. This is not needed if you choose to use AWX and Galaxy NG.
Planning an installation on a machine
There are two ways to install AAP. The first involves using servers, with the latter taking advantage of OpenShift clusters. The server can be installed using physical machines or any form of virtual machine (VM). Generally, it is recommended to use a virtual machine of some kind, be it a cloud instance, something on OpenStack, or even a VM that is running on your laptop. It is assumed you know how to create these instances, as their creation and maintenance are well beyond the scope of this book. For simplicity, the term node will be used to describe a virtual machine instance.
At a minimum, the Ansible Automation controller requires a single node. That node will host the database, the control plane, and the execution portion. The same thing can be said for Automation hub. It can be installed separately on a single node, hosting both the hub and the database it uses. Both the Automation controller and Automation hub must be installed on separate nodes as they both have a web interface. Single-node deployments of each are not recommended, but when creating a development environment, something that isn’t used in production, or something as a proof of concept, they are still valid deployments. An optimum minimal deployment for an enterprise would look like this:

Figure 2.1 – Ansible Automation Platform minimal deployment
It is recommended to not use the option where the database and the service are on the same node. This leads to problems if you want to grow the deployment by adding more Automation controllers or Automation hub nodes. This minimal design allows for expansion and growth as needed.
The distinct types of nodes
In the past, Ansible Tower required a minimum of one or three nodes so that it would have a quorum when using RabbitMQ. However, newer versions of the controller do not have this requirement. A new feature called the automation mesh was introduced with the introduction of AAP 2.1. This allows for the separation of the control plane and the execution parts of the controller. It also allows for execution nodes to be on-premises, in the cloud, or even on the edge.
The separation of the control and execution planes adds options for deployments. It is recommended to have at least two to three control nodes, and as many execution nodes as needed to accommodate your peak number of jobs. Another option is to use instance groups to allow execution on an OpenShift deployment, an option that will be discussed in Chapter 3, Installing Ansible Automation Platform on OpenShift, which allows users and organizations to specify where they want to run their jobs and allows for hybrid server/OpenShift capacity to be used.
There are eight types of nodes in AAP deployment:
- control node: This only provides the web GUI and API
- execution node: This only executes jobs
- hybrid node: This combines a control and execution node
- hop node: Also known as a jump host, this node does not execute jobs but routes traffic to other nodes
- database node: This hosts the PostgreSQL database
- automation hub node: This hosts the pulp files and the GUI and API
- sso_node: This hosts the Red Hat Single Sign-On (SSO) server
- catalog_node: This hosts the Automation services catalog server
The minimum requirements are as follows. A service node is any type of control, database, execution, or hybrid node.

Table 2.1 – Ansible Automation Platform node requirements
These are the minimum requirements, though more CPU cores and RAM can always be added. In practice, production deployments run three nodes with 16, 32, or more CPUs and memory ranging from 128 GB to 300 GB per node. For databases, 150 GB of disk space is recommended, but it can vary in size, depending on how many jobs and events are used each month. Every deployment will be different, so it is best to monitor what your cluster is using and adjust appropriately.
Sizing requirements depend on the number of hosts and the number of jobs run each day per host. There are a few factors that play into this. Any given instance can be restrained by memory or CPU-bound capacity. This capacity determines how many forks can be run concurrently.
Capacity is determined by the following factors:
- Memory-bound capacity:
- (instance memory – 2,048)/memory per fork (set to 100)
- Example: (16,384-2,048)/100 = 143.36
- CPU-bound capacity:
- CPU cores * 4 = CPU capacity
- Example: 4*4 =16
This determines how many jobs can run at a time concurrently. By default, the instances are bound by memory. If you have automation running where there are a lot of jobs running, more memory or CPUs might be needed.
As a general rule of thumb, the following equations can be used to determine rough sizing recommendations:
- Forks needed = (hosts * jobs per day per host * jobs duration for one host) / work hours
Example: (2,000 hosts * 2 jobs * .15 duration) / 10 work hours = 60 forks
- Memory needed = (( Forks * memory per fork) +2,048 * nodes in an instance group) / 1,024
Example: ((60 forks * 100 memory per fork) + 2,048 * 4 instances)/1,024 = 14 GB
- CPUs needed = Forks needed by forks per CPU core
Example: 60/4 = 15
If automation is spread to use more hours in a day and is scheduled, this can reduce the number of resources needed. The Automation controller will also monitor and queue jobs if it hits a capacity limit. It is best to monitor usage and adjust resources according to the needs of the business.
Another thing to take into account is the amount of disk space needed in the database. The following should be taken into account:
- Inventory storage is roughly 200 MB for 1,000 hosts. This accounts for the inventory and facts stored about the hosts.
- Database size for jobs = hosts * jobs per day per host * tasks per playbook (events) * days to store (120) day default setting) * event size / 1,024.
Example: (2,000 * 2 jobs per day * 30 tasks *120 day retention * 2 Kb) / 1,024 = 28,125 MB.
The days to store job events can be changed in the Cleanup Job Schedule management job on the Automation controller.
The Red Hat certified collections, community collections, and published collections and execution environment images should be well under 1 GB of the database’s size.
Adding all of these together yields (28,125 Job data +400 facts+1,024 hub)/1,024 = 28.85 GB for the database.
The database should have a minimum of 1,500 input/output operations per second (IOPS) as well. The recommended size for the database machine is also 4 CPUs and 16 GB of RAM, but this should be monitored for bottlenecks under peak performance.
These are all theoretical and recommended resources for determining the initial size of a deployment. It is always recommended to use logging software to keep track of CPU, memory, and disk usage to determine whether you’ve over or under-estimated the actual usage in your deployment. The next section will go into detail about the automation mesh, which links instances together.
Automation mesh
With a combination of control, hop, and execution nodes, it is possible to set up what is referred to as a mesh of controller nodes. This allows for connections in disparate networks to use a combination of hop nodes and execution nodes.
The following diagram shows how to use a hop node with execution nodes in disparate networks:

Figure 2.2 – Ansible Automation controller using hop and execution nodes
For firewall purposes, the following ports need to be opened for services:

Table 2.2 – Ansible Automation controller ports required
Non-peered execution nodes are those that are not peered back to the main cluster. Execution nodes in the main cluster will still need access to the PostgreSQL port. For reference, this means those in the Ansible Automation controller group in Figure 2.2 need access, while the execution nodes in the data center, edge, and the cloud do not need a connection to the PostgreSQL server.
Hop nodes are specifically designed to require minimal ports open for use. They are used to manage or access devices in another security zone and require only a single port for the receptor to be open for communication.
In the Installation methods section, you will learn how to designate peers and hop nodes to implement the automation mesh.
High availability
Many users want high availability and load balancing for the services. A consideration for the Automation controller is that it is much more resource-dependent than its counterparts, which are Automation hub and the database. Databases can also be set up to be highly available to the services. However, PostgreSQL high availability can take on many forms and configurations. Each form depends on what priority you want to take in terms of availability. For this reason, we will discuss the node configurations for AAP to use an external database, though the discussion will not cover how to set one up outside the installer or how to configure high availability.
For the Automation controller, two to three hybrid nodes are recommended with a load balancer for a single point of access to the web GUI. For Automation hub, one to two nodes are recommended, with another load balancer to access it. As discussed previously, more nodes may need to be added, depending on the amount of capacity needed. Between the Automation controller and Automation hub, a single database is required, but this can also be split into separate database nodes. The following diagram illustrates a deployment with separate database nodes:

Figure 2.3 – Ansible Automation Platform recommended deployment
A high availability Automation hub requires a shared filesystem between the nodes. This can be achieved by using the following steps on all Automation hub nodes.
This can be done in many ways, though using NFS is the most common. To set up the shared filesystem, follow these steps:
- When using a firewall, add a zone for the firewall using the following commands:
$ sudo firewall-cmd --zone=public --add-service=nfs
$ sudo firewall-cmd --zone=public --add-service=mountd
$ sudo firewall-cmd --zone=public --add-service=rpc-bind
- Reload and check that the firewall is enabled:
$ sudo firewall-cmd –reload
$ sudo firewall-cmd --get-services
Once the firewall has been taken care of, make sure that the var/lib/pulp directory exists across all Automation hub nodes and enable the NFS share.
- Make sure that the /var/lib/pulp directory exists by running the following command:
$ sudo mkdir /var/lib/pulp
- Enable the NFS share:
$ sudo mount -t nfs4 <nfs_share_ip_address>:/ /var/lib/pulp
- Ensure that the filesystem was mounted:
$ df -h
Without this preparation step, the installer will fail when doing a multinode Automation hub installation.
Installation methods
This book will go over several methods of installing and maintaining pieces of AAP. The installers and applications themselves are built so that they can be configured and installed using just the tools Red Hat gives you. However, this book is guided toward defining all deployments with Configuration as Code (CAC) using machine-readable YAML definition files, and taking advantage of the provided roles and modules. The infrastructure can be tweaked, modified, maintained, and recreated by updating or using these files. If you are installing the upstream AWX component of AAP, please refer to Chapter 3, Installing Ansible Automation Platform on OpenShift.
Important Note
If you are using a VM, then make a snapshot of the VM before proceeding. The installer is very resilient, but it never hurts to have a backup to revert to.
In addition, if you’re upgrading an existing version of AAP, run a backup before running the installer. Backing up the installation will be covered later in this chapter.
Before we start with the installation, we need to download the installer ZIP file. This is available for AAP 2 and above at https://access.redhat.com/downloads/content/480 and for 3.8.x at https://releases.ansible.com/ansible-tower/. Use the tar –xvf command on the downloaded file.
A base installer provides a blank inventory file. At the time of writing, the following is populated. The first section is the node groups and nodes to install the Automation controller on. The base install file assumes only the Automation controller has been installed on a single node, which also contains both the controller and the database:
default_inventory.ini
[automationcontroller]
localhostansible_connection=local
[automationcontroller:vars]
peers=execution_nodes
[execution_nodes]
[automationhub]
Note that the database node is blank. If this is left blank, the database will be installed on the automationcontroller node:
[database]
[servicescatalog_workers]
[sso]
[all:vars]
An admin password must be set; however, a default password is not supplied:
admin_password=''
pg_host=''
pg_port=''
pg_database='awx'
pg_username='awx'
pg_password=''
More variables are included in the blank inventory of the installer if you are only using a single-node Automation controller installation. These variables will be referenced in the next section.
The Ansible groups in the preceding INI inventory file are required when installing those specific services. For example, if the controller hosts group contains no nodes, then the installer will not install any controller nodes. It also contains the required variables for the installer. A breakdown of these variables is shown in the following tables.
Controller values
These are the base variables for the controller. Database variables must also be set:

Table 2.3 – Ansible Automation controller base variables
PostgreSQL database values
These are the variables for the controller’s PostgreSQL database. These are required for both Automation hub and the Automation controller:

Table 2.4 – Ansible Automation controller PostgreSQL variables
Container registry values
The following variables are used to point to an external container registry. The default option is to authenticate and pull from the official Red Hat registry, but the default values can be changed to point to another registry if needed. This can be useful if the AAP is installed behind a firewall:

Table 2.5 – Ansible Automation container registry variables
Automation hub values
The following values are set for Automation hub, including the attached database. If the database host is the same as the controller database, set the same host value:

Table 2.6 – Ansible Automation hub variables
SSO values
The following are passwords used for the Single Sign-On (SSO) server node:

Table 2.7 – Ansible Automation single sign-on variables
Service Catalog values
The following table shows the values set for the Service Catalog, including the attached database. If the database host is the same as the controller database, set the same host value:
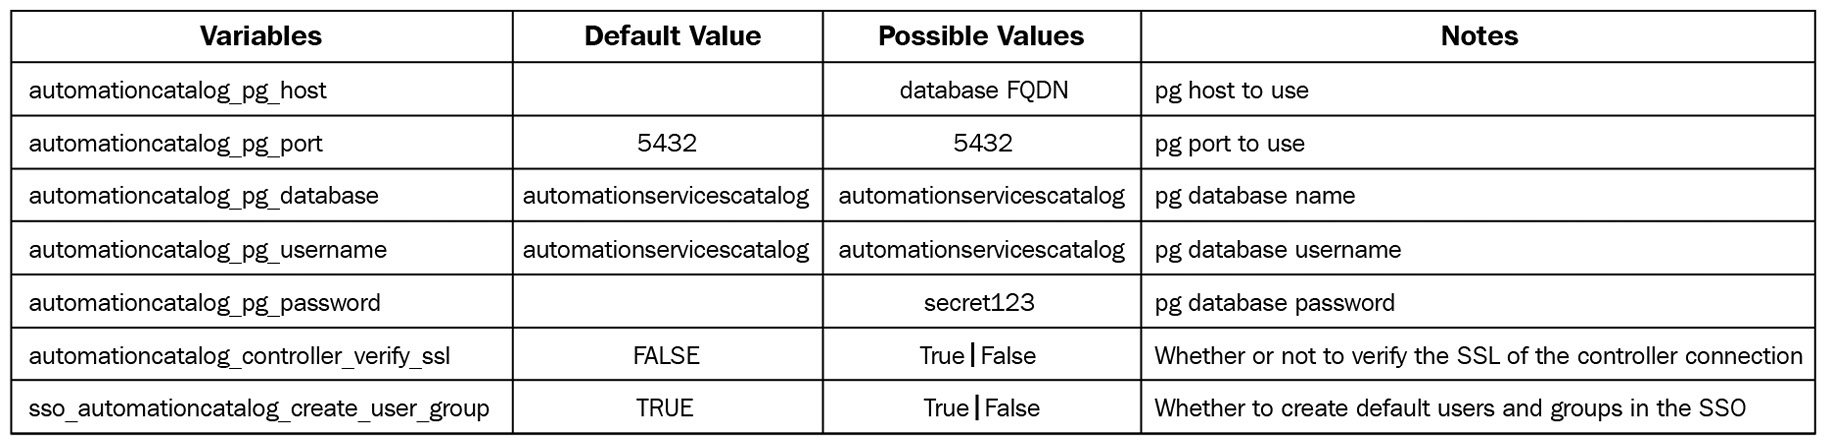
Table 2.8 – Ansible Automation Service Catalog variables
There are around 100 variables that can be overwritten when installing AAP; the ones shown in the preceding tables are the most common. To discover more, look in the installer and peruse the roles for the default variables that are contained inside collections/ansible_collections/ansible/automation_platform_installer/roles. Specifically, look at the <role>/defaults/main.yml file for each role’s variables that can be overwritten.
Each of these variables is set in the inventory file of the installer. Once set, the installer can be invoked with the./setup.sh command. The output of the installer will be set to a log file in the ansible-automation-platform-setup folder. If any problems arise, investigate the log. Often, a specific variable will be missing, or an option in a specific task or module. Use the task name and grep –rnw 'task name' to find where in the roles the error is occurring to try and troubleshoot.
These are the basics for installing AAP. However, some tools have been written to ease this process – specifically, the redhat_cop.aap_utilities collection. This was built to download the installer file, extract it, create the inventory file from variables, and then run the setup. This requires an offline token to be generated, which you can do at https://access.redhat.com/management/api/. Here is a sample playbook for invoking the roles:
aap_installation_basic.yml
---
- name: Playbook to install the AAP Platform
  hosts: localhost
  connection: local
  vars:
    aap_setup_down_offline_token: password123
    aap_setup_working_dir: /home/username/Documents/aap_lab_prep
    aap_setup_down_type: setup
  vars_files:
    - inventory_vars/variables.yml
  roles:
    - redhat_cop.aap_utilities.aap_setup_download
    - redhat_cop.aap_utilities.aap_setup_prepare
    - redhat_cop.aap_utilities.aap_setup_install
...
Important Note
Back up your inventory file or variable reference! If you need to upgrade, back up, or restore the installation, the inventory file is key in that process.
One thing to notice is that a variable file was included in this playbook. A lot of variables are used in the installation, so to keep things clear, a separate variable file was used in the inventory_vars directory. The full file can be found in this book’s GitHub repository (inventory_vars/variables.yml). Excerpts from the variable file are referenced as follows. The first top-level variable, aap_setup_prep_inv_nodes, covers each inventory group and a node in that group.
After each host, additional variables can be included for that particular host.
In this example, the variable is servicecatalog_controller_name:
aap_setup_prep_inv_nodes:
  automationcontroller:
    controller.node:
  database:
    database
The following top-level variable, aap_setup_prep_inv_vars, covers all the other variables for the installer:
aap_setup_prep_inv_vars:
The following top-level variable is a dictionary of dictionaries. The first level key (automationcontroller) is the inventory group name, while the second level key (peers) is the variable name with the value (execution_nodes):
  automationcontroller:
    peers: execution_nodes
    node_type: hybrid
  execution_nodes:
    node_type: execution
All the variables after this are global:
all:
The following variables are the base variables needed for installation, which are set as dictionary-value pairs. The installation variables from Tables 2.3-2.8 are used here:
    admin_password: 'secret123'
    pg_host: 'database'
    pg_port: '5432'
    pg_database: 'awx'
    pg_username: 'awx'
    pg_password: 'secret123'
    pg_sslmode: 'prefer'  # set to 'verify-full' for client-side enforced SSL
    registry_url: 'registry.redhat.io'
    receptor_listener_port: 27199
...
Note that the secrets are separate as they are built to be loaded in from a vaulted variable file or could be included inline with a vaulted variable. There are also host vars listed on the second line that can be added, such as servicescatalog_controller_name.
This configuration will install services on five nodes, as shown in the following diagram, with the full suite of automation services. The following diagram shows how these nodes interact. The key thing is that the SSO services integrate with Automation hub and the Automation controller’s LDAP, and the Automation controller and Automation hub use the database. Removing the Ansible group from the installer will skip setting up that particular node:
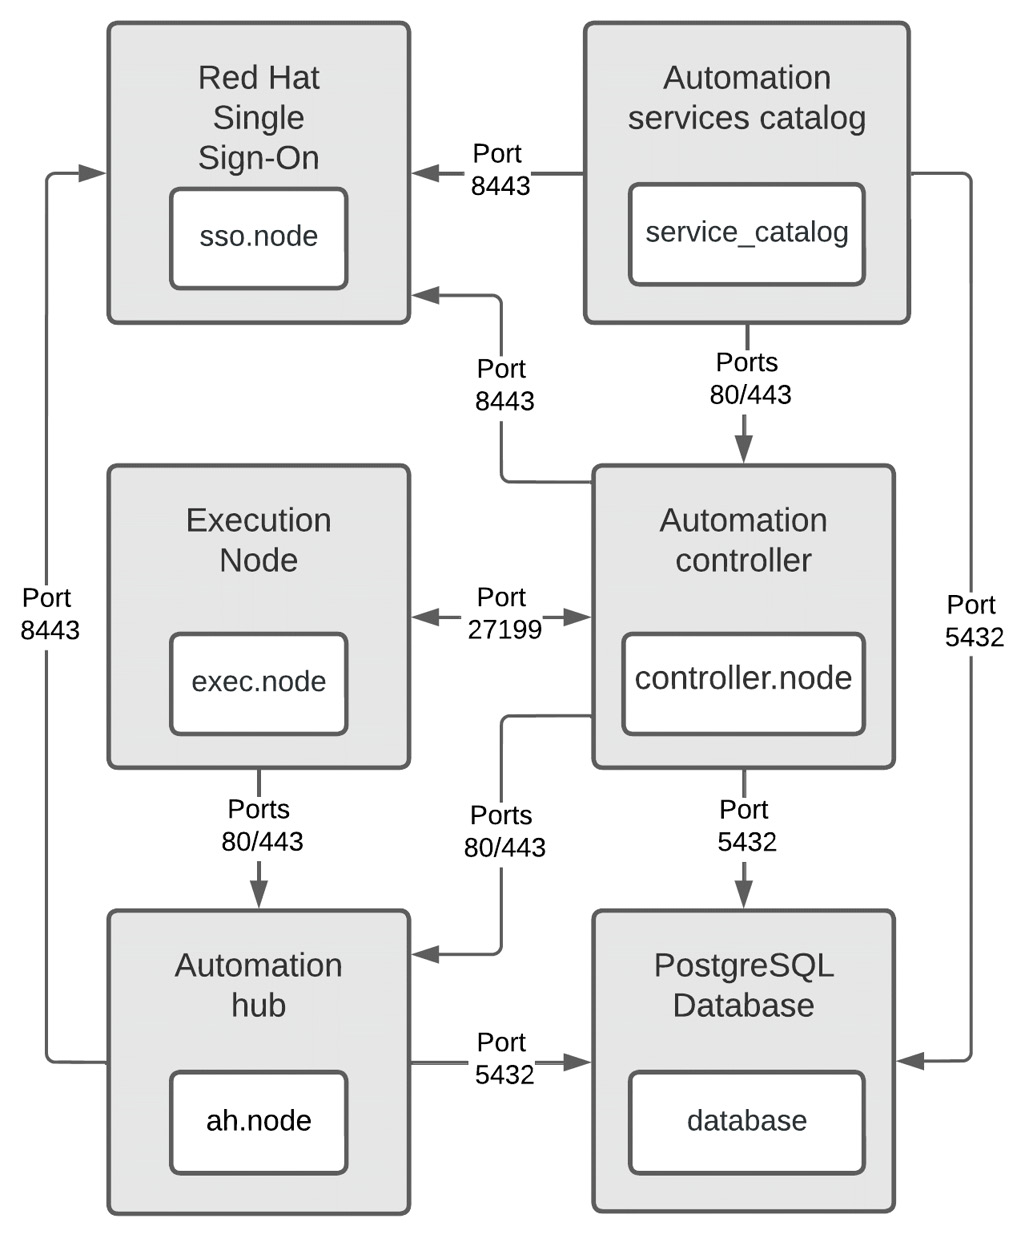
Figure 2.4 – Ansible Automation Platform Enterprise with all six services and their interactions
In addition, there is a variable called generate_dot_file that will generate a Graphviz notation file of the nodes in your inventory. For example, with a controller node and an execution node, it will generate the following file:
ch02/graphdot
strict digraph "" {
    rankdir = TB
    node [shape=box];
    subgraph cluster_0 {
        graph [label="Control Nodes", type=solid];
        {
            rank = same;
            "controller.node";
        }
    }
    "exec.node";
    "controller.node" -> "exec.node";
}
This file, when rendered on a GraphDot editor, such as http://magjac.com/graphviz-visual-editor/, will generate a graphical representation of the nodes:
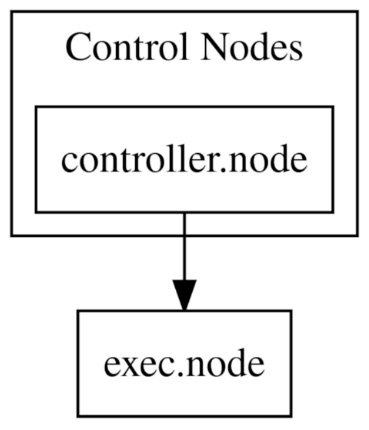
Figure 2.5 – GraphDot representation of nodes, as generated by the AAP installer
Setting variables for the automation mesh and node types
Automation mesh and node types are set with variables in the inventory file. The mesh is a replacement for isolated nodes from the previous 3.x version of Ansible Tower. Communication is determined by what nodes peer to each other. This allows for hop nodes and nodes in disparate networks. An example of remote nodes with and without a hop node is shown in the following diagram:
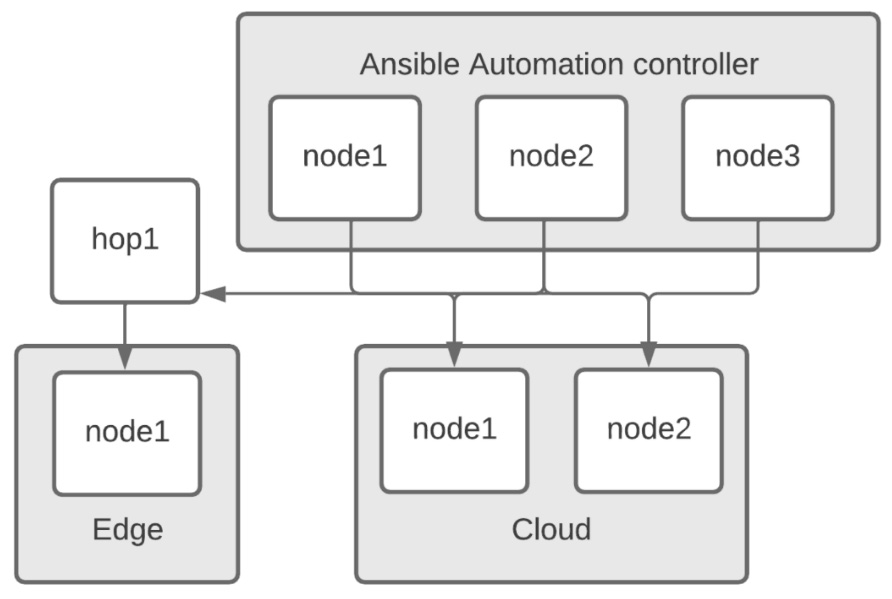
Figure 2.6 – Node representation for the Automation controller mesh
This installer takes the peers and node_types variables from the inventory and uses them to create a mesh. The node type determines what is installed on each node. By default, nodes in the execution_nodes group are execution nodes. The following snippet from the inventory file can be used to create the mesh shown in the preceding diagram:
mesh_snippet.ini
[automationcontroller]
node1
node2
node3
[automationcontroller:vars]
peers=hop1
node_type=control
[execution_nodes]
cloud1
cloud2
edge1
[hop_nodes]
hop1 node_type=hop peers=automationcontroller
[cloud_nodes]
cloud1
cloud2
[edge_nodes]
edge1 peers=hop_nodes
The automation mesh and node types can be customized to be as complicated or as simple as defined. Network requirements may require peers to be defined. It is up to the administrator to determine what is needed. Table 2.2 will help you determine what is needed.
Important Note
As discussed previously, non-peered execution nodes require access to the PostgreSQL database. In this example, those are the cloud and the Ansible Automation controller group nodes. The edge node does not need to have a route to the PostgreSQL database.
Installing Galaxy NG on a machine
Galaxy NG is the upstream version of Automation hub. Its main purpose is to be an on-premises Ansible Galaxy (https://galaxy.ansible.com/) and to be a registry for container images. The GUI is kept in a separate repository as it is not required. It is based on pulp for its services. The latest instructions for installation can be found here: https://github.com/ansible/galaxy_ng/wiki/Development-Setup. The instructions to set up the development environment are as follows:
Clone the repository:
- Run the following commands to clone the galaxy_ng repository and then change to the newly created directory:
$ git clone https://github.com/ansible/galaxy_ng.git
$ cd galaxy_ng
- Use autocomplete on git checkout to find the highest release number:
$ git checkout (TAB)
The following is an example:
$ git checkout v4.2.0
- Repeat this for the Galaxy NG UI:
$ git clone https://github.com/ansible/ansible-hub-ui.git
$ cd ansible-hub-ui
$ git checkout v4.4.1
Create the compose environment file:
- Here, the ANSIBLE_HUB_UI_PATH variable is the absolute path to the place you cloned the UI repository. It can be the relative path, but you have to double-check that it is correct compared to what’s in the dev/docker-compose.yml file:
cat <<EOT >> galaxy_ng/.compose.env
COMPOSE_PROFILE=standalone
DEV_SOURCE_PATH='galaxy_ng'
ANSIBLE_HUB_UI_PATH='/home/user/ansible-hub-ui/'
EOT
Assuming you are in /home/user/, the directory’s structure should look like this:
├── galaxy_ng
│ ├── repository files
│ └── .compose.env
├── ansible-hub-ui
└── repository files
Run the following commands:
- Change directories to the galaxy_ng folder:
$ cd galaxy_ng
- Build a Docker image:
$ ./compose build
- Start the database and Redis services:
$ ./compose up -d postgres redis
- Run migrations:
$ ./compose run --rm api manage migrate
- Start the services:
$ ./compose up –d
Once everything has run, the instance will be available at http://localhost:8002.
This is the base setup for Galaxy NG.
If there is an issue with finding the default password, use the ./compose run --rm api manage createsuperuser command. This will prompt you to enter the information to create a superuser.
There are a few installation options for Galaxy NG:
- With a GUI, as demonstrated in the previous steps
- Without a GUI
- With a key cloak server
- Building with specific upstream branches
The development link at the beginning of this section provides a rundown of how to customize the installation for those options.
Backing up and restoring the installation
Backup, restore, and secret key redistribution are additional options you have with the installer script. Backup and restore are straightforward since they are ways to back up and restore an existing installation. Always make sure that the installer running the backup or restore matches the version installed. Secret key redistribution is done to update the secret key that’s used to encrypt secrets and the database if needed. The backup does a full database backup, while also backing up many relevant files on nodes. With a full backup and a brand new set of machines, it should be possible to fully restore the installation.
Backing up
The backup process requires the inventory file, which works much like the installer. The backup will act on the Automation controller, Automation hub, and the database. In addition to the database, the secret key, custom projects, and configuration files are also held in the backup. A backup should be done before any update is done to a new version.
A backup can be run with the following command:
$ ./setup.sh -i inventory –b
In addition, there is a role in the controller utilities that will recreate the inventory file and do the necessary backups:
- redhat_cop.aap_utilities.backup
Using a playbook like this on a scheduled basis will allow you to do regularly scheduled backups. If you wish to only restore Automation hub or the Automation controller alone, then only include the Ansible inventory groups to back up in the inventory file – specifically, the nodes and the database. By omitting the machines from the inventory file, the backup will not know about those nodes, and won’t perform a backup. This is useful for backing up the Automation controller and Automation hub separately, to be able to restore them separately as well.
Secret key redistribution
The secret key is important as it is used to encrypt the automation secrets. If it has been compromised, or, as the security policy dictates, it has to be changed periodically, then this can be achieved with the installer as well.
By using the installer with the –k option, a new secret key will be recreated and redistributed to the instances that need it. This inventory file should be the same as the one from the backup. First, back up the instances, and then use the following command to run it:
$ ./setup.sh -i inventory –k
More information about this can be found here: https://docs.ansible.com/automation-controller/4.0.0/html/administration/secret_handling.html.
Restore
The restore works by restoring the data to a freshly installed or already working AAP. This means that the installer needs to be run before the restore can be done. The command to run a restore is as follows:
$ ./setup.sh -e 'restore_backup_file=/path/to/nondefault/location' -r
Just like backups, there is a role for doing a restore:
- redhat_cop.aap_utilities.restore
This role uses the same variables from the installation step to create the inventory file and uses the restore_location variable to specify a backup file to restore. It is not recommended to automatically kick off the restore, but having a playbook available to run a restore when required is recommended.
Issues that can arise when using the installer
The installers are built to be idempotent so that they can be run multiple times, and always be left with a complete install. However, there will be times when errors occur during installation, leaving things with a partial install. Therefore, when upgrading an installation from one version to another, the best practice is to back up the current installation.
In addition, there are times when it may not seem worth the time to diagnose the problem. So, using VMs in some form allows the user to create snapshots of a clean installation of the operating system before installation.
On every installation, the Ansible playbook output is saved to setup.log in the same folder where you ran ./setup.sh. When an error occurs, you will see an output similar to the following:
cat setup.log
TASK [ansible.automation_platform_installer.repo_management : Enable Automation Platform rhsm repository] ***
fatal: [controller.node]: FAILED! => {"changed": true, "cmd": ["subscription-manager", "repos", "--enable", "ansible-automation-platform-2.1-for-rhel-8-x86_64-rpms"], "delta": "0:17:28.792791", "end": "2022-01-22 22:28:11.196175", "msg": "non-zero return code", "rc": 70, "start": "2022-01-22 22:10:42.403384", "stderr": "Network error, unable to connect to server. Please see /var/log/rhsm/rhsm.log for more information.", "stderr_lines": ["Network error, unable to connect to server. Please see /var/log/rhsm/rhsm.log for more information."], "stdout": "", "stdout_lines": []}
...ignoring
There are two ways to find out which Ansible task failed and, hopefully, find out why it failed.
The first is to use grep and find what file the task was in. In this case, grep -rnw 'Enable Automation Platform rhsm repository' would give the following response:
collections/ansible_collections/ansible/automation_platform_installer/roles/repo_management/tasks/setup.yml:34:- name: Enable Automation Platform rhsm repository
setup.log:489:TASK [ansible.automation_platform_installer.repo_management : Enable Automation Platform rhsm repository] ***
By examining the file in the collection/roles folder, you can find what the issue is with yum. In this case, there was a connection issue in the network causing the problem, and the installation had to be restarted after that was fixed.
Important Tip
I use this method weekly to find a wide variety of things in Ansible – from tasks to variables, to anything inside a file.
The grep -rnw 'Enable Automation Platform rhsm repository' command’s options are as follows:

Table 2.9 – The grep command’s options
By matching the entire task phrase, recursively, and getting the line number, it is fairly easy to find all instances of the search term.
For the most part, the errors in the installation are straightforward when examining the task. With the installer covering so many different services, it is impossible to cover all the issues that may occur. However, the tools in the previous section should prove invaluable in pinpointing any issues that arise.
Summary
In this chapter, you learned how to install many different aspects of AAP. This chapter may seem a bit daunting if you try to do everything. The most important piece to install is the Automation controller.
In the next chapter, you will learn how to install the Ansible Automation controller and Automation hub on Kubernetes or OpenShift. If you are using the virtual machine installation, which we covered in this chapter, then you can skip Chapter 3, Installing Ansible Automation Platform on OpenShift. However, it is recommended that you read this and the next chapter to understand the differences between machine and containerized installations.
Once the necessary pieces have been installed, whether you are running a controller or AWX, Automation hub, or Galaxy NG, interacting with them is much the same. If you plan to skip the next chapter, then Chapter 4, Configuring Settings and Authentication, goes into the details of setting up authentication and other settings.