
4
Configuring Settings and Authentication
Once an Automation controller and hub are installed, they need to be configured for authentication. This chapter will focus on authentication and the creation of users and groups. The Automation controller itself allows for the creation of users, teams, and organizations for basic purposes, but for an enterprise with a large number of users, tying it into an external system such as Lightweight Directory Access Protocol (LDAP) is much more flexible, and easier to scale. In addition, there are settings within the Automation controller that can be set that modify its behavior.
This chapter will cover two main subjects. The first is configuring Automation controller settings. This section will cover how to register the Automation controller with a subscription manifest, and the process of updating Automation controller settings. The second section will cover the authentication configuration of the Automation controller and hub using the Red Hat Single Sign-On (RH-SSO) server. This includes getting values from a Windows Active Directory (AD) server, configuring the SSO server for Security Assertion Markup Language (SAML), setting up Automation hub administrators with SSO, and integrating the Automation controller with SSO. The SSO server is the focus for authentication as it is the central place to allow authentication for the whole Automation Platform.
We will cover the following topics in this chapter:
- Configuring Automation controller settings
- Configuring the RH-SSO server SAML
- Integrating LDAP with Microsoft AD
- Adding users and teams to the Automation controller without an identity provider (IdP)
- Adding users and groups to the Automation hub without an IdP
Technical requirements
This chapter will go over the platform and methods used in this book. All code referenced in this chapter is available at https://github.com/PacktPublishing/Demystifying-the-Ansible-Automation-Platform/tree/main/ch04.
It is assumed that you have Ansible installed in order to run the code provided. In addition, it is assumed that both an Automation controller and hub have been installed, This chapter will also cover pairing the SSO server with the hub and controller, though that part is optional.
Getting a trial version of Ansible Automation Platform
A trial version of Ansible Automation Platform can be obtained with a Red Hat developer account. To get a developer account, register at https://developers.redhat.com/. After registering for a developer account, navigate to https://www.redhat.com/en/technologies/management/ansible/try-it. This will populate a subscription at https://access.redhat.com/management/subscriptions. This will be needed post installation when first setting up an Automation controller.
Configuring Automation controller settings
Automation controller settings are where the access controls are stored in the controller. However, before a controller can be accessed, a subscription must be added. This section will cover how to go through registration and change settings inside of the controller. The section after that will go into detail about authentication settings.
Registering the Automation controller with a subscription manifest
When an Automation controller is first accessed, it asks the user to activate a subscription. This can be done with either a manifest file from the Red Hat website, from a Satellite installation, or using the user’s Red Hat username and password. The registration page looks like this:
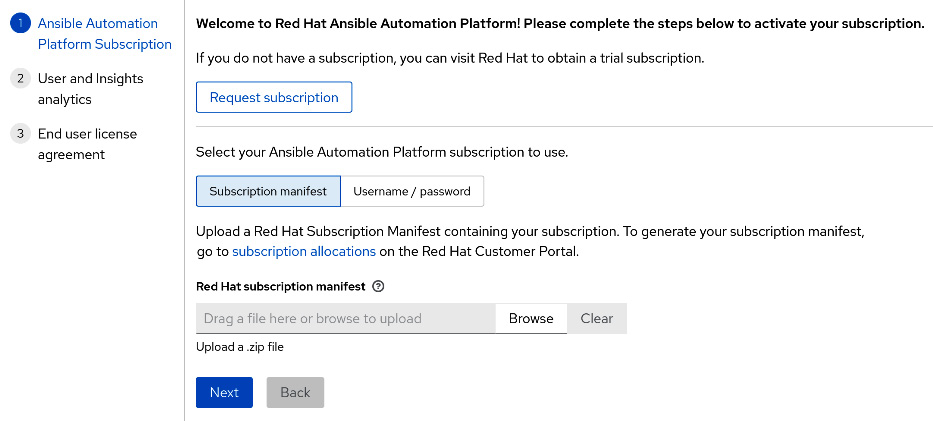
Figure 4.1 – Automation controller registration
Using a username and password for this process will present the user with a selection of subscriptions to choose from. However, if a subscription is being split between multiple servers, or there is a network issue between the Ansible controller and Red Hat servers or Satellite servers, then a manifest file is a way to provide a subscription. Instructions on obtaining a manifest file can be found at https://docs.ansible.com/automation-controller/latest/html/userguide/import_license.html#obtain-sub-manifest.
This manifest file can then be uploaded to the web graphical user interface (GUI) of the Automation controller. It’s also possible to use modules and roles to push the manifest to the controller. We’ll now look at some examples of how to do this.
Here’s how to update the manifest using the ansible.controller module:
// license/aap_license_module.yml
---
- name: Update manifest to controller
  hosts: localhost
  connection: local
  gather_facts: false
  collections:
    - ansible.controller
  tasks:
    - name: Push Manifest
      ansible.controller.license:
        manifest: manifest_file.zip
        force: true
        controller_host: https://controller.node
        controller_username: admin
        controller_password: secret123
        validate_certs: false
Using this module is good for running one-off updates of the license to the Automation controller. However, with the goal of configuration as code (CaC), it is usually preferable to create a variable file with the license location that is invoked, which can be consumed by the redhat_cop.controller_configuration role. The use of the configuration file is illustrated here:
settings/config/license.yml
---
    controller_license:
      manifest_file: manifest_file.zip
      force: true
The role can then be invoked using this code:
//settings/aap_settings_role.yml
  pre_tasks:
    - name: Include vars from configs directory
      include_vars:
        dir: ./configs  roles:
    - redhat_cop.controller_configuration.license
These methods can be used to create Automation controller instances using scripts and pipelines.
Updating Automation controller settings
Automation controller settings dictate how authentication is handled and provide global options for jobs and logging, along with various system settings. As of the time of writing, including all authorization fields, there are around 250 settings that can be set. Generally, these do not need to be changed, but there are circumstances in which this is required.
For example, if using an F5 load balancer, the remote host header setting needs to be updated to this:
REMOTE_HOST_HEADERS = ['HTTP_X_FORWARDED_FOR', 'REMOTE_ADDR', 'REMOTE_HOST']
Another two popular settings to change are shown here:
   "CUSTOM_LOGIN_INFO": "",
   "CUSTOM_LOGO": "",
These two settings will change the text and logo used on the landing page of the Automation controller. The text is commonly changed to include a friendly greeting or legal warning about unauthorized use. For note, the logo would point to an image hosted somewhere the controller can resolve.
The next sections will focus on how to update settings for the Automation controller using modules and a predefined role.
Changing Automation controller settings using controller modules
To make a one-off change to a task in a playbook for settings, it is best to use a module. Here’s how to do this using the ansible.controller module:
// settings/aap_settings_module.yml
---
   - name: Change settings
     ansible.controller.settings:
       settings:
         SESSION_COOKIE_AGE: 3600
         CUSTOM_LOGIN_INFO: "Welcome to the Automation Controller"
Changing Automation controller settings using redhat_cop roles
Predefined configuration files are the ideal way to use a role. The configuration file for settings has the following format:
// settings/config/settings.yml
---
controller_settings:
  settings:
    SESSION_COOKIE_AGE: 3600
    CUSTOM_LOGIN_INFO: "Welcome to the Automation Controller"
…
To invoke a role in a playbook and include the files in the configuration chapter, use the following Ansible tasks:
// settings/aap_settings_role.yml
  pre_tasks:
    - name: Include vars from configs directory
      include_vars:
        dir: ./configs
        ignore_files: [controller_config.yml.template]
        extensions: ["yml"]
      tags:
        - always
  roles:
    - redhat_cop.controller_configuration.license
    - redhat_cop.controller_configuration.settings
It is assumed that in later portions of this chapter, one of these three methods will be used to push the settings to the controller for configuring authentication.
Important Note
ALLOW_OAUTH2_FOR_EXTERNAL_USERS may need to be set to true for some users accounts to be used for authentication in redhat_cop and ansible.controller roles and modules if using external authentication methods later in this chapter.
The most important settings for the Automation controller are those used to configure authentication. The rest of the chapter will go over different methods for how to do this.
Configuring the RH-SSO server SAML
This section will cover the configuration of adding an LDAP server to the RH-SSO server and then linking the SSO server to the Automation controller. As of Ansible Automation Platform 2.1.1, the installer will automatically install, configure, and integrate the SSO server with the Automation hub, but not the Automation controller. An alternative to setting up the initial realm can be found here: https://www.ansible.com/blog/red-hat-single-sign-on-integration-with-ansible-tower. However, it is recommended to use the installer.
Getting values from a Windows AD server
Many users have Windows AD systems that are tied into Ansible Automation Platform. Some common values need to be obtained in order to integrate the two systems. First is the LDAP server itself, which is the domain server. Normally, this is how you would obtain the server’s name:
Ldap://Servername
But if that is not working, use the Windows search bar, type ADSIedit to open that program, click Action | Connect to…, and the server path should be displayed.
The next piece needed is the Users and Bind distinguished name (DN). Most LDAP systems do not allow for anonymous access, so the bind DN is the DN to authenticate as. Normally, these are similar as they are both user accounts. Because an administrator account is needed to authenticate for the bind DN, the command-line interface (CLI) command to use on the Windows server is dsquery user –name Administrator.
That should output the bind DN of all users in the LDAP tree, as follows:
CN=Administrator,CN=Users,DC=ansible,DC=lcl
Taking out the CN=Administrator portion gives us the Users DN, as shown here:
CN=Users,DC=ansible,DC=lcl
Finally, there is the organizational unit (OU) that is used to import user groups, which is the OU in the domain component, as shown here:
OU=Ansible,DC=ansible,DC=lcl
These values are needed later to connect either the Ansible controller or the RH-SSO server to the AD server.
Configuring the RH-SSO server
The RH-SSO server is an option to use with the Automation controller. It is the only method to integrate LDAP and other outside authentication services with the Automation hub. It allows for authentication integration with SAML, LDAP, GitLab, Google, Microsoft, and a host of other services. More information can be found at https://access.redhat.com/documentation/en-us/red_hat_single_sign-on/.
To connect an LDAP server to an SSO server, the following steps are taken:
- Navigate to the SSO server web page. This is normally found at https://servername:8443/.
- Log in with the username and password used during installation, which is a username of admin and the variable value from the installer of sso_console_admin_password.
- Navigate to the Administration console | User Federation | Add provider | LDAP.
- Set the following options. Most of these do not need to be changed, but these are the ones that need to be set for AD:

Figure 4.2 – User federation settings
This is how it should look in the form:

Figure 4.3 – SSO LDAP settings
- Click the Test Connection and Test Authentication buttons to verify that the SSO server can both connect and authenticate to the LDAP server.
- Click Save to finalize the configuration.
To map groups to roles, continue from the previous screen and do the following:
- Navigate to Mappers | Create.
- Name the mapper, and choose the role-ldap-mapper option.
- In the LDAP Roles DN field, insert the OU to map for groups—for example, OU=Ansible,DC=ansible,DC=lcl.
- Click Save.
- It should look like this in the form:
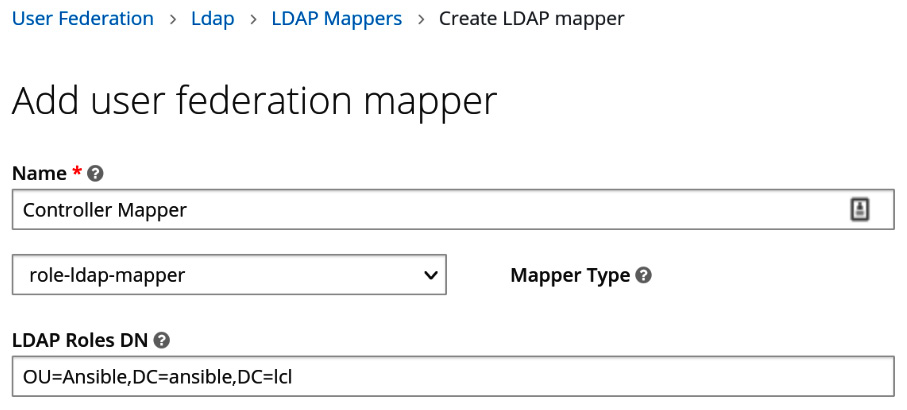
Figure 4.4 – User federation mapping
Now that user federations have been created, a client profile needs to be created for the controller. This includes mapping values the RH-SSO server has imported from LDAP and mapping them to specific values for the Automation controller. Here’s how to do this:
- Navigate to Clients | Create.
- Fill in a client identifier (ID) with a unique name to identify the client, preferably something to do with the controller.
- Select Client Protocol as SAML, then click Save.
- Fill in the form with the values shown here:

Figure 4.5 – Client creation variables
- When completed, the fields in the form should look like this (this is a reduced view of the screen, and unused fields have been omitted):

Figure 4.6 – SSO client settings
- Click Save.
- Navigate to Mappers.
- Create a mapper for each of the following configurations: user_name, last_name, email, user_permanentID, and first_name, as shown in the following table. Click Save after creating each mapped entry:
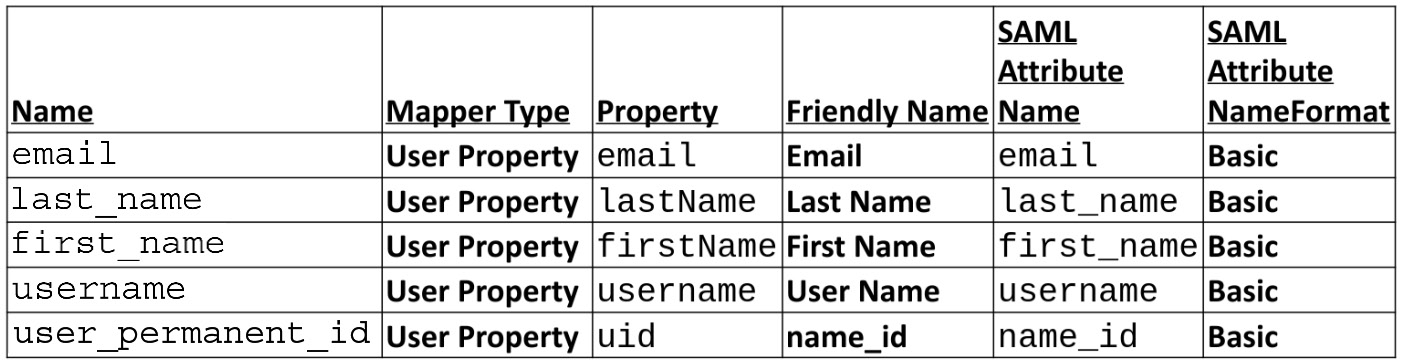
Figure 4.7 – Client mapper variables
Important Note
firstName and lastName are case-sensitive, and they map to the RH-SSO user property.
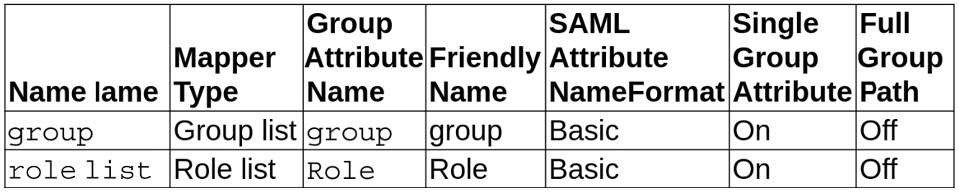
Figure 4.8 – Client mapper group and role variables
All of these fields map values from SAML to the Automation controller. This concludes the configuration of the SSO server.
Setting Automation hub administrators with RH-SSO
Setting administrators for the Automation hub in the RH-SSO server is done through role mapping. To give a user or group this role mapping, follow the next steps:
- Navigate to the ansible-automation-platform realm in the SSO client.
- Navigate to the Manage section on the left-hand side and choose Users or Groups.
- Click either the ID of the user or, if using a group, click the name of the group, and click Edit.
- Navigate to Role Mappings.
- Using the drop-down menu of Client Roles, select automation-hub.
- Click hubadmin from the Available Roles field, then click Add selected.
This is how it should look in the form. Once again, some fields have been omitted:

Figure 4.9 – SSO role mapping
This concludes configuring the SSO server. The next step is to configure the Automation controller to interact with the SSO server. These configurations need to be done on both services to complete the process.
Integrating the Automation controller with RH-SSO
Now that the RH-SSO server is configured, it can now act as an IdP of the Automation controller. During the installation process, a Rivest-Shamir-Adleman (RSA) key and certificate were created. These will need to be retrieved for use.
In order to get the key and certificate, proceed as follows:
- On the SSO server, navigate to Realm Settings | Keys.
- Click on Public key and Certificate and save the values.
On the Automation controller in the GUI at Settings | SAML Settings, there are values to be set. This can also be done via the application programming interface (API) modules and roles, as discussed earlier in this chapter in the Configuring Automation controller settings and Updating Automation controller settings sections. The following table shows how to translate GUI fields to their API values:
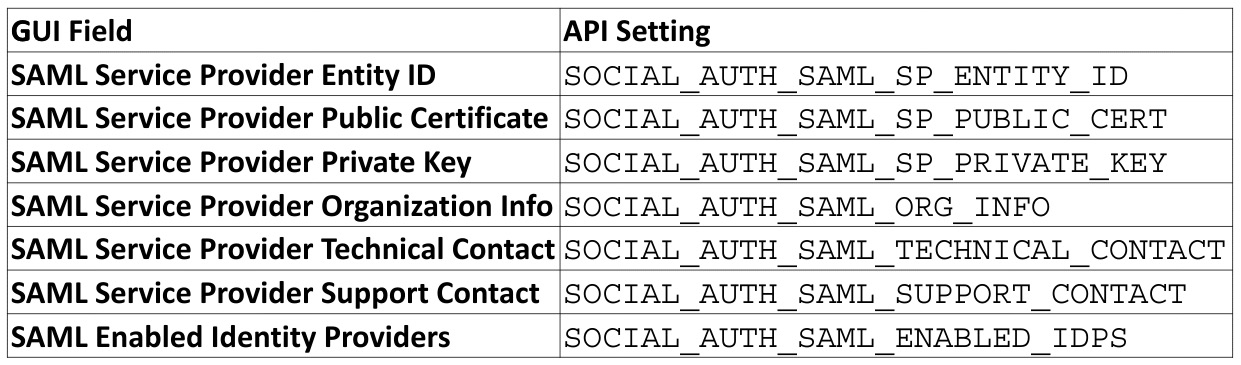
Figure 4.10 – GUI to API field equivalents
The variables set for the Automation controller should be self-explanatory. However, here are some details about the upcoming variables:
- The entity ID must much that set in the client ID previously set.
- RH-SSO is a visual marker and is not tied to the Domain Name System (DNS) or a configuration.
- The Technical Contacts information must be filled out, but this can be any valid name and email.
- The entity ID and Uniform Resource Locator (URL) from IdPs must be the realm created earlier. ansible-automation-platform is the realm created with the installer.
- The attr_* value should match the mapped values previously set.
- For these three values, use the values for the certificate and key from the beginning of this section:
- SOCIAL_AUTH_SAML_SP_PUBLIC_CERT
- SOCIAL_AUTH_SAML_SP_PRIVATE_KEY
- x509cert
Insert the certificate/key where it says Key/Cert Value.
Important Note
The x509cert variable just shown is a string and must be kept as a string. Using multiline with newline characters or a list of strings breaks things in the API as it expects a string.
The settings for integrating with the RH-SSO server are shown in the following file:
// sso/saml/settings.yml
---
controller_settings:
 settings:
The following code sets the certificates and authorization to the SSO server:
   SOCIAL_AUTH_SAML_SP_ENTITY_ID: controller.node
   SOCIAL_AUTH_SAML_SP_PUBLIC_CERT:
   SOCIAL_AUTH_SAML_SP_PRIVATE_KEY:
In addition, this code links to an account:
   SOCIAL_AUTH_SAML_ORG_INFO:
     en-US:
       displayname: RHSSO
       url: https://sso.node:8443
       name: rsa-generated
   SOCIAL_AUTH_SAML_TECHNICAL_CONTACT:
     givenName: Person
     emailAddress: [email protected]
   SOCIAL_AUTH_SAML_SUPPORT_CONTACT:
     givenName: Person
     emailAddress: [email protected]
These are the settings for the SAML IdP:
   SOCIAL_AUTH_SAML_ENABLED_IDPS:
     RHSSO:
       entity_id: https://sso.node:8443/auth/realms/ansible-automation-platform
       attr_user_permanent_id: name_id
       attr_email: email
       attr_username: username
       attr_groups: groups
       url: https://sso.node:8443/auth/realms/ansible-automation-platform/protocol/saml
       x509cert: "-----BEGIN CERTIFICATE-----CERTVALUE-----END CERTIFICATE-----"
       attr_last_name: last_name
       attr_first_name: first_name
…
Once these settings are applied, log out of the Automation controller and click the person icon below the blue Log In button, circled in red in the following screenshot:
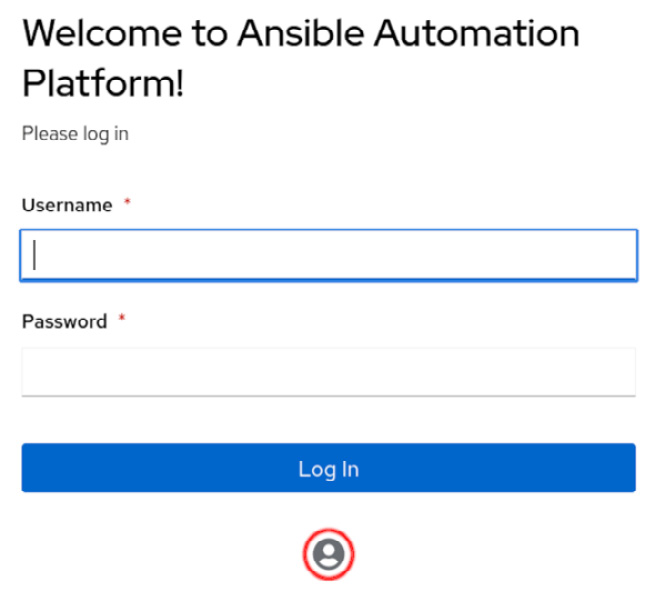
Figure 4.11 – Automation controller SSO button
Not every integration with the SSO server goes successfully, so the next section will cover a few options to diagnose issues that arise when integrating SAML.
Troubleshooting the SAML configuration
It can be difficult to diagnose issues with SAML authentication, but if you encounter any errors, the first place to look is server.log. This can be in a variety of places in a traditional SSO installation; however, for an Ansible Automation Platform installation, the default location is /opt/rh/rh-sso7/root/usr/share/keycloak/standalone/log/server.log.
Another useful tool is a SAML browser extension. For Firefox, there are two extensions to choose from. SAML Message Decoder will show the last SAML event, while SAML-tracer will show all events and show the Extensible Markup Language (XML) passed to the Automation controller.
SAML is not the only option to use with the SSO server—it is also possible to use LDAP to integrate with services such as Microsoft AD. The next section will cover using LDAP instead of SAML for enterprise authentication.
Integrating LDAP with Microsoft AD
LDAP integration is possible without the SSO server. The Automation controller will refer directly to the LDAP server. To configure it in the GUI, navigate to Settings | LDAP authentication. There are multiple tabs for LDAP as the controller can be configured to communicate with up to five different profiles.
A key point is the values to use; at the top of the previous section is a reference on how to get values to connect to an AD server. Those same values will be reused here.
As before, it is possible to configure these settings through the GUI, API, modules, and roles. There are instructions on how to use each earlier in this chapter.
Next, we look at the values used in an LDAP configuration. Each section also contains settings for the recommended basic setup for the same Microsoft AD server from the SSO section.
Automation controller LDAP bind and user variables
The following variables set bind and user settings for the controller:
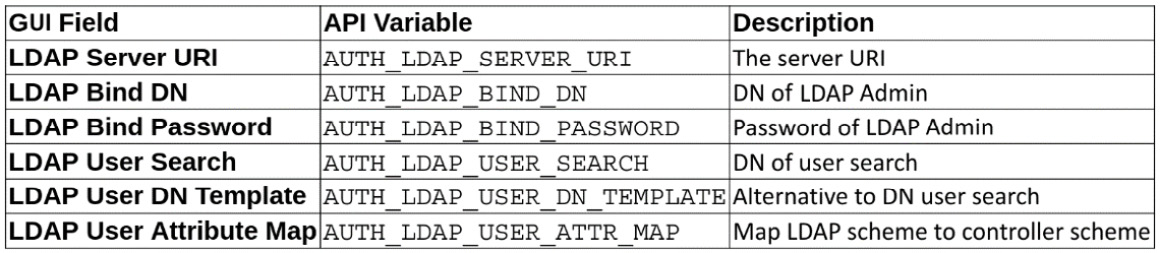
Figure 4.12 – Automation controller base LDAP variables
These are used in settings in the following format:
// ldap/aap_settings.yml
---
controller_settings:
 settings:
   AUTH_LDAP_SERVER_URI: LDAP://server2022.ansible.lcl
   AUTH_LDAP_BIND_DN: CN=Administrator,CN=Users,DC=ansible,DC=lcl
   AUTH_LDAP_BIND_PASSWORD: "$encrypted$"
   AUTH_LDAP_USER_SEARCH:
   - CN=Users,DC=ansible,DC=lcl
   - SCOPE_SUBTREE
   - "(sAMAccountName=%(user)s)"
   AUTH_LDAP_USER_DN_TEMPLATE:
   AUTH_LDAP_USER_ATTR_MAP:
     first_name: givenName
     last_name: sn
     email: mail
...
Automation controller LDAP group variables
The following variables set group settings for the controller:
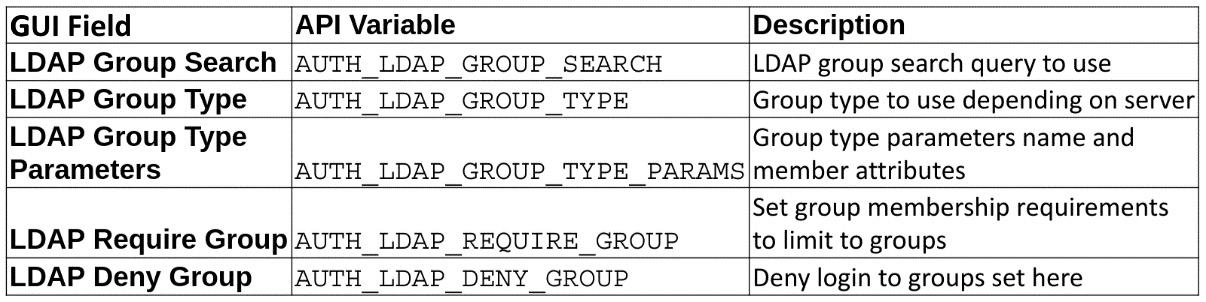
Figure 4.13 – Automation controller LDAP group variables
These are used in settings in the following format:
// ldap/aap_settings.yml
---
   AUTH_LDAP_GROUP_SEARCH:
   - CN=Users,DC=ansible,DC=lcl
   - SCOPE_SUBTREE
   - "(objectClass=group)"
   AUTH_LDAP_GROUP_TYPE: MemberDNGroupType
   AUTH_LDAP_GROUP_TYPE_PARAMS:
     member_attr: member
     name_attr: cn
   AUTH_LDAP_REQUIRE_GROUP:
   AUTH_LDAP_DENY_GROUP:
...
Automation controller LDAP miscellaneous variables
The following variables set the remaining LDAP settings for the controller:

Figure 4.14 – Automation controller LDAP miscellaneous variables
These are used in settings in the following format:
// ldap/aap_settings.yml
---
   AUTH_LDAP_USER_FLAGS_BY_GROUP:
     is_superuser:
     - CN=ansible_admin,CN=Users,DC=ansible,DC=lcl
   AUTH_LDAP_ORGANIZATION_MAP:
     Default:
       users:
       - CN=ansible,CN=Users,DC=ansible,DC=lcl
       - CN=ansible_admin,CN=Users,DC=ansible,DC=lcl
       admins: CN=ansible_admin,CN=Users,DC=ansible,DC=lcl
       remove_admins: true
...
And these are the settings for the team map:
// ldap/aap_settings.yml
---
   AUTH_LDAP_TEAM_MAP:
     LDAP Engineering:
       organization: LDAP Organization
       remove: true
       users: cn=engineering,ou=groups,DC=ansible,DC=lcl
     LDAP IT:
       organization: LDAP Organization
       remove: true
       users: cn=it,ou=groups,DC=ansible,DC=lcl
     LDAP Sales:
       organization: LDAP Organization
       remove: true
       users: cn=sales,ou=groups,DC=ansible,DC=lcl
...
Additional information and references can be found here:
https://docs.ansible.com/ansible-tower/latest/html/administration/ldap_auth.html
Troubleshooting
A useful tool to get information about authenticating LDAP is the ldapsearch tool. This uses the bind DN account and password with the –D option, and then will perform a search with the –b reference, as follows:
ldapsearch -x -H ldap://server2022.ansible.lcl -D " CN=Administrator,CN=Users,DC=ansible,DC=lcl " -w Password123 -b "cn=Users,dc=ansible,dc=lcl"
This is used to get information back from the LDAP server to identify the information being returned for users, groups, and other objects.
In addition, there are two settings to set to get more information from the tower logs. The first is in /etc/tower/conf.d/ldap.py. If the file does not exist, create it, and add the following line of code:
LOGGING['handlers']['tower_warnings']['level'] = 'DEBUG'
After making this change, run the automation-controller-service restart command on the controller command line.
There is also a Automation controller setting located in the GUI. Navigate to Settings | Logging settings | Edit | Logging Aggregator Level Threshold and change this level to DEBUG. This can also be set as a setting via either the API, a module, or a role as LOG_AGGREGATOR_LEVEL='DEBUG".
After these changes have been made, refer to the logs in /var/log/tower/tower.log.
Setting up other authentication methods
There are many other options for authentication available through either the Automation controller or the RH-SSO server. The general idea is the same, and it is best to consult a specific guide to do so. Unfortunately, because there are over a dozen methods, the most popular SAML and LDAP options were chosen for examples. More guidance can be found here: https://docs.ansible.com/ansible-tower/latest/html/administration/ent_auth.html.
There are instances where users and teams may need to be added manually to the Automation controller outside of an enterprise authentication system. The next section will go over how to add teams and users directly to the Automation controller.
Adding users and teams to the Automation controller without an IdP
The Automation controller is also able to have teams and users directly added to the system. With a development system or a small user base, this can be preferable to using an external authentication provider.
The following fields are used to define a user:
- username—Username for the user.
- password—Password for the user.
- email—Email address of the user.
- first_name—First name of the user.
- last_name—Last name of the user.
- is_superuser—Is an administrator.
- is_system_auditor—Is an administrator.
- update_secrets—True will always change the password if the user specifies the password, even if the API gives $encrypted$ for the password. False will only set the password if other values change too.
- groups—Groups user belongs to.
- append—Whether to append or replace the group list provided (modules and roles only).
- is_superuser—Is an administrator.
The following fields are used to define a team:
- name—Name for the team
- new_name—Role/module field to change the team name
- description—Description of the team
- organization—The organization the team belongs to
Adding users can be done in the GUI through the following steps:
- Navigate to the controller via Dashboard | Users | Add.
- Fill in the relevant fields—Username, Password, User Type, and Organization are required.
- Click Save.
For teams, the process is similar:
- Navigate to the controller via Dashboard | Teams | Add.
- Fill in the relevant fields—Name and Organization are required.
- Click Save | Access | Add.
- Click Save | Access | Add | Users.
- Select the users you wish to add to the team.
- Click Next.
- Choose which role to grant those users: Admin, Member, or Read.
- Click Save.
Repeat as needed till all users and teams are added.
To use the module method, the following playbook would be used:
// controller/create_user_groups_module.yml
This is best for doing singular tasks to add users as a one-off task.
The user module invocation creates a superuser and sets their email, as follows:
   - name: Create user
     ansible.controller.user:
       username: joe_123
       password: password123
       email: [email protected]
       superuser: yes
Next, the team module creates a team in the default organization, like so:
   - name: Create team
     ansible.controller.team:
       name: Joes
       description: All the Joes
       organization: Default
This will use the role module to add the user to the team as a member, as follows:
   - name: Add jdoe to the member role of My Team
     ansible.controller.role:
       user: joe_123
       target_team: Joes
       role: member
...
Here’s an example of using a configuration file to configure users and groups:
//controller/config/user_groups.yml
---
An account for the administrator joe_123 is created, as illustrated in the following code snippet:
   controller_user_accounts:
     - user: joe_123
       is_superuser: false
       password: password123
A Joes team is created in the default organization, as follows:
   controller_teams:
     - name: Joes
       organization: Default
The following code will add the user to the team as a member:
   controller_roles:
     - user:  joe_123
       team: Joes
       role: member
Use the roles of users, teams, and roles to apply the configuration to the controller, as follows:
//controller/config/user_groups.yml
  pre_tasks:
    - name: Include vars from configs directory
      include_vars:
        dir: ./configs roles:
   - redhat_cop.controller_configuration.users
   - redhat_cop.controller_configuration.teams
   - redhat_cop.controller_configuration.roles
...
Users and teams that are added to the Automation controller do not cross over to the Automation hub. The process for adding users and teams to the Automation hub is different from that of the controller. The next section will cover how to add those users and teams.
Adding users and groups to the Automation hub without an IdP
The Automation hub can create its own users and groups on its own; however, it is built to use those set in the RH-SSO server. It is recommended to use the same methods discussed earlier to add IdPs to the SSO server. Users and groups cannot be created with the GUI; however, the module and role methods can be used to add them.
The following fields are used to define a user:
- username—Username for the user
- password—Password for the user
- groups—Groups user belongs to
- append—Whether to append or replace the group list provided (modules and roles only)
- first_name—First name of the user
- last_name—Last name of the user
- email—Email address of the user
- is_superuser—Is an administrator
The following fields are used to define a group:
- name—Username for the group
- permissions—Username for the group
User and groups can be added with modules. The following code snippet is an excerpt from the chapter’s code repository:
// hub/create_user_groups_module.yml
---
The following task creates a group with the name Joes:
   - name: Create group
     redhat_cop.ah_configuration.ah_group:
       name: Joes
       state: present
This task adds permissions to the Joes group using the ah_group_perm module, like so:
   - name: Add group permissions
     redhat_cop.ah_configuration.ah_group_perm:
       name: Joes
       perms:
         - change_collectionremote
         - view_collectionremote
The ah_user module then creates an administrator for the Joes group, like so:
   - name: Create User
     redhat_cop.ah_configuration. ah_user:
       username: joe123
       password: 123456789
       groups:
         - Joes

...
The recommended way is to use roles.
CaC is still the recommended way to maintain configuration in the Automation hub by using a file to store information about a list of users and groups, as illustrated here:
//hub/configs/user_groups.yml
---
The following code creates an ah_groups group with a few permissions:
     - name: Joes
       perms:
         - change_collectionremote
         - view_collectionremote
The following code creates an administrator that belongs to the Joes group:
   ah_users:
     - username: joe123
       password: 123456789
       groups:
         - Joes
       is_superuser: true
...
This excerpt from the playbook imports the variable file from the configs directory and invokes ah_configuration roles that then apply the configuration:
//hub/create_user_groups_roles.yml
  pre_tasks:
    - name: Include vars from configs directory
      include_vars:
        dir: ./configs roles:
   - redhat_cop.ah_configuration.group
   - redhat_cop.ah_configuration.user
...
This should allow for the creation of accounts outside of authentication providers if needed, as well as promoting any users that need to be system administrators. More information about roles and permissions for users and teams can be found in Chapter 6, Configuring Role-Based Access Control.
Summary
This chapter covered how to integrate various methods of enterprise authentication and managing users and teams within the Automation controller and Automation hub. The enterprise authentication method sets up basic organizations but does not do anything more. Armed with how to configure settings, authentication providers, users, and groups on Ansible Automation Platform, it’s time for the next step.
The next chapter will go over setting up the basics in the Automation controller and Automation hub. The basics include creating organizations and credentials, importing and exporting configuration in the controller, and adding content to the Automation hub.