Chapter 2: Creating the Illusion: Get Rolling With the Basic Principles of 2D Classic Animation
What exactly is animation? From animated basic GIFs to large motion graphics movies, we can find animations in almost every single online piece. But, why is animation so important? Because by adding animations and micro-animations to our websites and apps, it will help us to communicate with our users in so many ways. It will attract attention, increase user engagement, communicate feedback, help us lead the user and the user behavior, and enrich the user experience (UX).
In this chapter, we will focus on 2D classic animation and its 12 principles. We will first start by briefly reviewing the history and foundations of animation and the different techniques used to create an illusion.
Once we've seen that, we will learn the 12 principles of animation, which will help us to make our animations look more realistic. We will also learn how to set everything up with just a pencil and paper, from illustrating our first concept to creating our own storybook, to make our animations understandable.
Then, we will learn the different aspects that we will implement later on apply in After Effects (AE), such as keyframes, movement, transforms, timing, and ease.
By the end of this chapter, you will be able to differentiate between the different techniques used to create 2D animations. You will also understand the 12 principles to make your animations look real and will also know about the main features that we are going to be using in AE.
In this chapter we are going to cover the following topics:
- History and foundations of 2D animation
- The 12 principles of 2D animation
- Frames, keyframes, and inbetweens to define the main important moments of our animation
- Moving our icon from point A to point B
- Using ease, timing, and the timeline to create more realistic animations
- Sketching our first icon – from concept to storyboarding
Technical requirements
To go through this chapter, you need the following:
- Pencil
- Paper
Illustration skills are not mandatory! If you don't know or don't want to draw your own icon, we will give you the files to download; however, we highly recommend you get a paper and a pencil and have some fun drawing ?.
Introduction to 2D animation
So, what is animation? Animation is the faculty to bring to life something that doesn't have it. When we talk about classic 2D animation, we are referring to a series of still images, drawn separately and slightly tweaked from one another; when combined, they produce the illusion of movement.
From prehistoric times, we can find references to animation that are are almost as old as humans. If we go back to 35,000 years ago when humans used to live in caves, we find figures of drawn animals with several legs, which was their way of representing the idea of movement.

Figure 2.1 – Eight legs to show motion
Ancient Egyptians and Greeks used to draw separate images with little tweaked arms or legs to give the impression of moving figures as well. So, we can say animation has been used forever and in every culture.

Figure 2.2 – Representation of the Ancient Egyptian goddess Isis in the columns of a temple, and Ancient Greek decorated pot with images of movement
Let's move a little bit closer in time. In 1640, Athanasius Kircher created the magic lantern, which was the first artifact that projected some moving images onto a wall. He did this by drawing different separate illustrations on a pane of glass and moving it at a fixed speed, giving the impression of a moving image:

Figure 2.3 – Magic lantern by Athanasius Kircher
Besides all this, in 1824, Peter Mark Roget sort of discovered the persistence of vision, and we say sort of as this wasn't the first time that this topic was mentioned. Persistence of vision means that, for a while, our eyes retain every single image that we have just seen, and this is what allows the illusion of movement. Worded another way, in the human mind, multiple images blend into a single moving one.
From then on, other optical artifacts came out, such as the thaumatrope, phenakistoscope, zoetrope, praxinoscope, and flip book, all in charge of creating the illusion of movement to the human eye.
In 1906, Thomas Edison and the New York newspaper cartoonist James Stuart Blackton (who met back in 1896 when James Stuart Blackton interviewed Thomas Edison) released the first animated picture to the public, using stop-motion photography. It was called Humorous Phases of Funny Faces.

Figure 2.4 – Sequence of the first-ever animated movie, Humorous Phases of Funny Faces
But, the first hand-drawn animated film and the first considered animated cartoon film was Fantasmagorie by Emile Cohl, which premiered in Paris in 1908.
A few years went by, and in 1928, with the arrival of Walt Disney, Mickey Mouse made his first appearance in Steamboat Willie, the first-ever released cartoon with sound, which was created using cell animation. Every single frame was drawn onto celluloid and photographed with a multipaned camera. The background was placed in a different layer and Walt Disney managed to create a comical but realistic movement. It is also known to be the first cartoon with sync sound.
In 1937, Disney released the first-ever long animated film, Snow White and the Seven Dwarfs, which started the golden age of classic 2D animation.
Besides Disney, some other animation studios started to appear: Max Fleischer with Popeye shorts and Felix the Cat (1919), who was considered the first animated movie star and the first to be merchandised; Warner Bros with Looney Tunes, Merrie Melodies, and Bugs Bunny; and MGM with Tom and Jerry.
After the Second World War, things changed. With the arrival of TV, studios started creating TV cartoons using limited animation techniques to save time, effort, and money, of course, and to be able to produce cartoons en masse.
In 1960, the first-ever prime-time animated series appeared, The Flintstones by Hanna-Barbera. The same studio produced The Yogi Bear Show and Scooby-Doo, Where Are You!, among others.
Japanimation, or anime as we call it these days, was becoming very popular at the same time in Japan. It was based on limited animation techniques and focused on aesthetics, applying zooms and elaborate backgrounds to create ambiance.
In 1979, a young George Lucas founded the Lucasfilm computer division, the same company that Steve Jobs bought in 1986 and renamed Pixar.
By that time, computer-generated imagery (CGI) was becoming more popular, and in 1995, one of the main moments in animation history happened. Pixar's Toy Story was released. Other big computer animation companies emerged, including DreamWorks and Illumination Entertainment.
But, the animation scene doesn't just revolve around Disney or Pixar. There are so many artists and studios out there that deserve a whole chapter: Studio Ghibli, Aardman, and Laika Studios, to name just a few.
So, now that we've got a few insights about animation history, let's move on to the next section to learn the 12 principles of 2D animation that will help us make our animations look real.
The 12 principles of 2D animation
Animating an object, a character, or a type is not an easy thing to do, but with a few tips and techniques, it can become much easier and will make our animations look more realistic and trustable.
The 12 principles of animation is a concept that was introduced by Disney animators Ollie Johnston and Frank Thomas, in their 1981 book The Illusion of Life. They were some of the people involved in creating Disney's animation style, and the idea behind these 12 principles was to produce more realistic animations and to create the illusion that these characters acted based on the laws of physics.
We could say that The Illusion of Life has become the sacred book for any animator, designer, artist, or any other person interested in creating animations around the world. Of course, this book was written a long time ago but still, each principle is vital to the process and can be applied to the digital process of animation. Let's not waste any more time, and move on to see what these 12 principles are.
Squash and stretch
The principle of squash and stretch adds the idea of weight and flexibility to the animation. In the following example, you can see how the bouncing ball stretches and squashes while keeping the same volume in all of the stages:

Figure 2.5 – Squash and stretch bouncing ball example
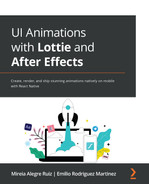
Anticipation
We use anticipation in order to prepare the audience for an action that is about to happen. We can use it for physical and non-physical actions. For example, imagine you are about to kick a ball; the first thing you will do before kicking it is to move your foot back. This movement is the anticipation of the action.
A non-physical action, for example, would be when a character looks to one side of the screen before another character comes in. By looking to the side, we are anticipating the action of the other character coming in as well.
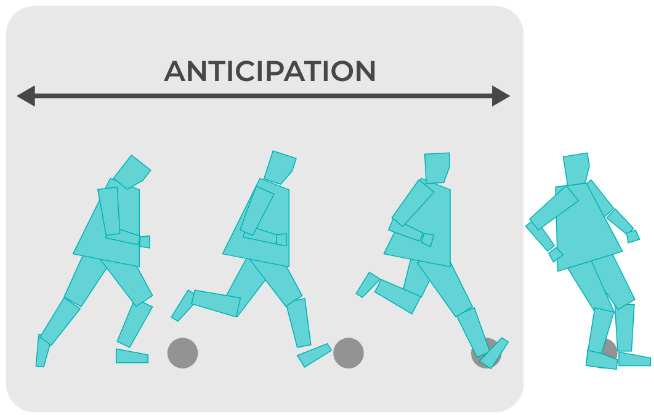
Figure 2.6 – Football player before kicking a ball anticipation action
Staging
This principle is based on what we call staging in cinema and theater, and it is used to drive the audience's attention to what we want on the screen, whether it is a character or an action. We can focus our viewers' attention by using light and shadow, the position of the character on the screen, and the position and angle of the camera. But, keep in mind that when staging an action or a character, it is important the audience only sees one idea at a time.
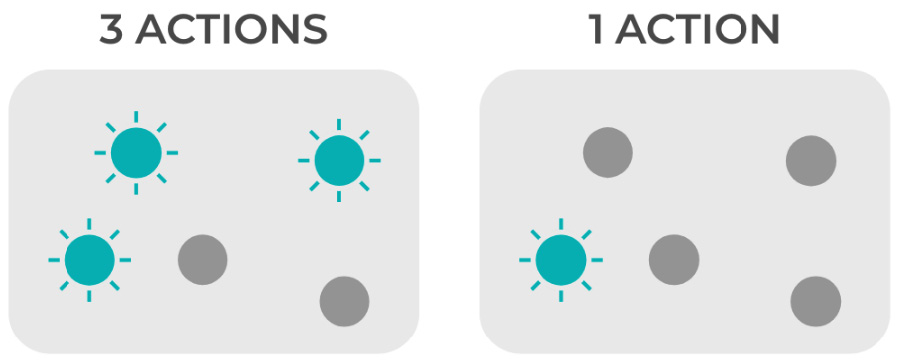
Figure 2.7 – Staging three actions versus one action at the same time
Straight-ahead action and pose-to-pose
There are two different approaches to the process of animation, straight-ahead action and pose-to-pose, and they are usually combined.
In straight-ahead action, scenes are animated frame by frame, one after the other, from beginning to end. This process is used to create more fluid and fresh-looking movements and animations.
Pose-to-pose is where we draw the main moments of the action, or what we also call the keyframes, and it is used when you require more control over the action.
All that said, if we talk about computing animation, pose-to-pose has more advantages as we can plan and draw the main keyframes, while the inbetween frames will be done automatically.

Figure 2.8 – The main three keyframes in a pose-to-pose process animation
Follow through and overlapping action
Both actions are related as they both help to give a more realistic illusion of movement. Follow through is when the action comes to an end. The movement stops but certain elements will still be moving. Imagine a person that stops after running; their clothes, hair, and even skin will keep moving.
Tiny variations of speed and movement of these parts are what will make our animation look even more realistic; that's what we call the overlapping action.

Figure 2.9 – Behavior of the squares after applying the follow through and overlapping principles
Ease in and ease out
When an object or a person moves in the real world, it accelerates at the beginning of the movement and slows down at the end of it. That effect is what we call ease in and ease out in animation, and this is what will make our animations look more believable.
Once you understand how this effect works, it will be very easy to apply in AE, so that's why we will cover it in more depth in the following sections in this chapter.
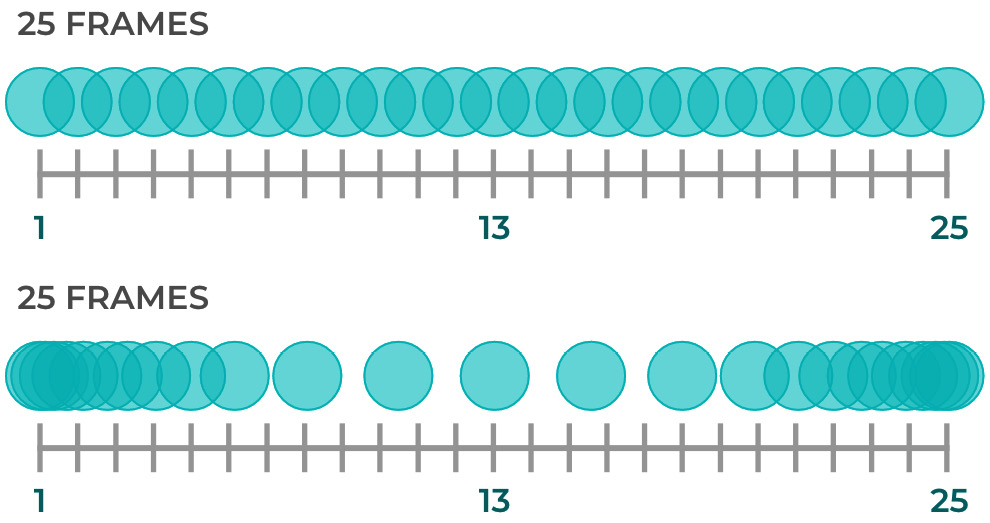
Figure 2.10 – Animation without ease versus animation with ease in and out
Arcs
Almost everything in the world moves in arched movements, for example, when we throw an object, this moves in a parabolic trajectory. If we don't take the arc principle into consideration, our animations will look rigid and will lack expression.
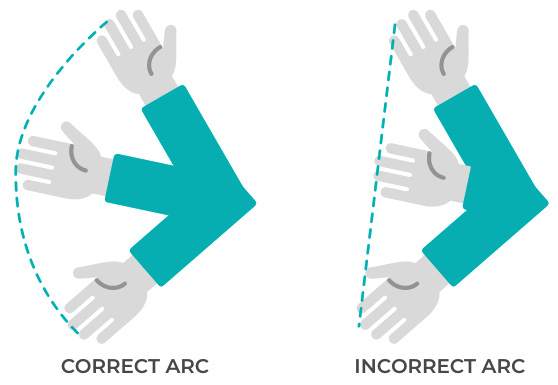
Figure 2.11 – Example of an arched and a straight keyframes animation
Secondary action
Every single movement added to the main action is called a secondary action, but don't get confused with follow through and overlapping actions. Secondary actions are basically small movements or gestures to support the main action of the character and are used to add more personality to the animated character itself.
Let's give you an example. Imagine our character, let's name them Max, is eating a sandwich. We could represent that in two different ways:
- Without secondary action: If we don't add any secondary actions to Max, he will just open and close his mouth to eat the sandwich. No blinking eyes, no eyebrow movement added, just Max's mouth and the sandwich are changing here (as seen in the following figure). That looks weird, right? Also, from looking at our storyboard, could you tell whether the sandwich tastes good or bad? Is Max enjoying it? We can't say.
- With secondary action: Now, let's add some secondary action here. For example, Max is going to lick his lips before eating the sandwich, will close his eyes with the first bite of the sandwich, and finally, he is going to smile.
Can you see the difference? By looking at the storyboard, we can tell Max is excited about eating the sandwich (licking his lips), is taking the time to taste it properly (closing his eyes while having a bite), and finally, is enjoying it. We could say for sure the sandwich tastes good (because he is smiling). All these small actions that help us understand the main action are called secondary actions.

Figure 2.12 – No secondary action versus secondary action storyboards
Timing
Timing refers to the drawings or frames that we need to represent actions and it can be used to establish weight, emotions, and scale. We are going to get deeper into that in the following sections, but let's have a quick look at this simple example: imagine you have two balls, the same size but different weights.
Let's say one is made of wood and the other one of iron. Which one is going to take longer, or in other words, which one is going to take more frames, to move if we hit them? Exactly! The iron ball is heavier and takes more time to speed up, so it will move slower and travel for a shorter distance when we hit it.

Figure 2.13 – Timing of an iron and a wooden ball
Exaggeration
In animation, sometimes more is less. Exaggeration can lead us to create deeper and more trustable characters. But, how do we do that? By exaggerating our characters or objects' movements and emotions; if our character is happy, let's make them happier, if they are angry, let's make them angrier, and so on. However, let's always try to keep a balance, otherwise, our animations will look surreal.

Figure 2.14 – Exaggeration principle. Example of a real versus exaggerated pile of cubes falling action
Solid drawing
Solid drawing means giving our character some sort of 3D look by giving it volume and weight through drawing, shadow, perspective, and balance. Also, we have to avoid making symmetrical characters (or mirrored), and instead, let's try to have left and right sides in different positions.
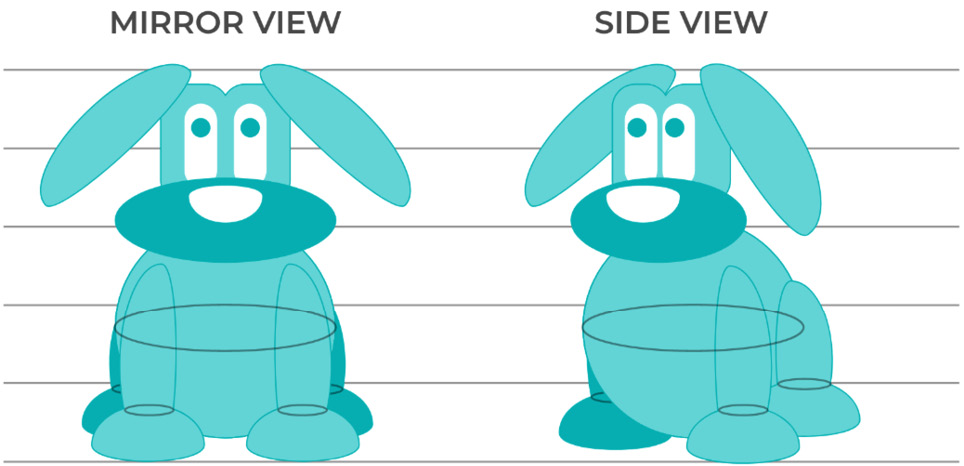
Figure 2.15 – Mirror view versus side view
Appeal
Appeal (or what is called charisma in real live acting) is a feature any single character needs to have in order to keep the audience interested. However, the appeal doesn't mean the character has to be good-looking; it goes far beyond that. They need to be interesting. For example, if we want our character to be more innocent, we will use rounded and big shapes for the face and eyes, or instead, if we want our character to be a villain, we are going to use sharper shapes and triangular faces.

Figure 2.16 – Appeal examples
And that's our overview of the 12 animation principles. So now that you know how to make animations look more believable and engaging, we will go deeper into some of the principles we've just been through but more oriented to computer animation.
Frames, keyframes, and inbetweens
Animation comes from the Latin word animātiō, which means the act of giving life. It is the simulation of movement created by the sequence of several drawings, one placed after the other, that when played all together, allows us to see the magic happening. However, this movement doesn't exist, and it's based on the persistence of vision we talked about earlier in this chapter.
Frames
In computer animation, these sequential drawings are called frames, so every single drawing needed to create the illusion of movement is a frame itself. And not only that, but frames will also determine the duration and the quality of our animation. So, imagine we want to move an object from point A to B in 1 second. We can choose the number of frames we want to use, but let's see the difference. Let's move a ball from point A to B in 1 second using the following number of frames:
- Option 1: 25 frames
- Option 2: 5 frames
Can you figure out what the difference will be?
In option 1, our eye will see 25 frames happening in 1 second instead of the 5 frames our eyes will catch in option 2. The result will be that option 1 will be much smoother than option 2.
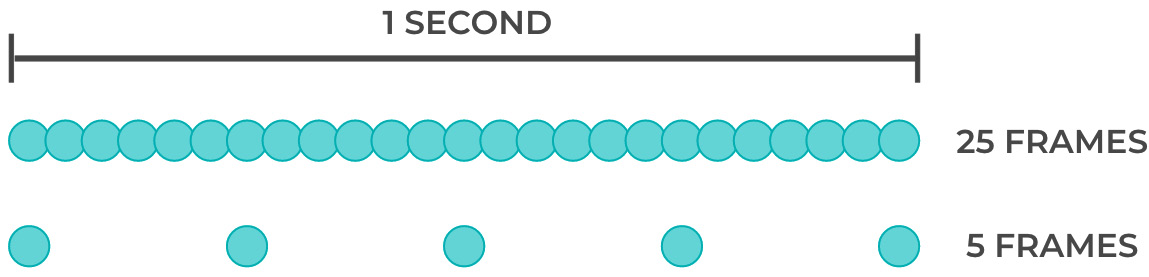
Figure 2.17 – A 1-second animation composed of 25 frames versus 5 frames
However, do we need that number of frames for this kind of animation? That depends, and here is where we would talk about frame rate. But, let's leave that new concept for now; we will talk about it once we get to setting up our movie in AE in Chapter 4, Move It! Animating Our First Lottie With After Effects.
So, back to our frames; what about keyframes?
Keyframes
Keyframes are the most important frames in the action; the simpler the animation is, the fewer keyframes we are going to need. We normally place the keyframe when there is a change in the action. For example, in Figure 2.18, the starting and ending positions of a movement are keyframes, and unless we want to make the ball jump in the middle, we won't need any more keyframes to set up our animation:

Figure 2.18 – Starting and ending keyframes of a linear movement
Instead, in Figure 2.19, we are going to need an extra frame in the middle, right in the place where the position of the ball is going to change, like an inflection point:

Figure 2.19 – The three keyframes of a bouncing ball
Inbetweens
But, what happens then to the other frames? We call them inbetweens, and these are the frames that we need in order to create the movement from keyframe 1 to keyframe 2. These inbetween frames are not defining our animation but are making it look smooth.
In classic 2D animation, someone is in charge of drawing all these inbetween frames one by one by hand; in computer animation, the tool or software we are using will probably do that for us and we call that tweening.

Figure 2.20 – In-between frames in a five-frame action
AE is one of these tools that will do the inbetween frames for us, so we can focus on nailing the keyframes. In AE, we can apply different parameters to these keyframes to change their aspects, such as color, position, size, rotation, zoom, or placement. These can be changed from one keyframe to another without the need for us to create them one by one between frames, which is amazing as this saves us a lot of effort and time. In Chapter 4, Move It! Animating Our First Lottie With After Effects, we will learn how to work with any of the mentioned parameters.
So, in these examples, we've just seen how frames, keyframes, and inbetweens work. We've learned how to represent a linear and a bouncing ball animation. Great! However, if we placed these frames in our AE document and ran it, the animation would look weird and would lack realism, and do you know why?
Sure you do! We are missing important principles we've talked about earlier in this chapter, but do you remember which ones? We are talking about timing and ease. So, let's move on to discovering these two concepts more in-depth and see how we can make our animations look more believable.
Timeline, timing, and ease
In the last section, we understood how frames work; now, let's see how we place them in time and space so our animations gain this real feeling. I'm putting these three concepts together as I think it is hard to talk about one without the others.
Timeline
So, first of all, let's talk about the timeline, and let's focus on linear movement. Now that we have determined our two keyframes and inbetweens, let's see how to place them in time. How do we do that? We place our frames in a timeline.
A timeline is a line divided by the number of frames we want our animation to be, so here is where frame rate appears again. If we decide we want a frame rate of 25, we will have 25 frames per second drawn in our timeline, so if we have a 2-second animation, we will have 50 frames in our timeline. No worries if all these concepts sound a little bit abstract; we know that if you have never been involved in animation, it can be hard to understand, and that's why we will be covering these in the next chapters as well.

Figure 2.21 – Diagram of frame rate
Let's go back to our simple five-frame animation for now. What we've first done has been to draw the five frames, keeping the same space in between them, as in Figure 2.22. As we mentioned earlier, if we ran this in AE it would look awkward as the ball is missing acceleration and is not slowing down. So, what should we do? Right, we need to check the timing of each frame and add some ease.

Figure 2.22 – Linear movement
Timing and ease
As we mentioned earlier, if we ran our animation in AE, it would look awkward as the ball is missing the feeling of acceleration and slowing down. In computer animation, we call that ease. Ease in for accelerating and ease out for slowing down. Of course, in AE we can press a button and do this automatically but we first need to understand how it works in order to know what we are doing, right?
So, if we had to represent this in our five-frame animation, we would move the second and the fourth frame closer to the extremes in order to represent acceleration and slow down the sense of motion, as in Figure 2.23:
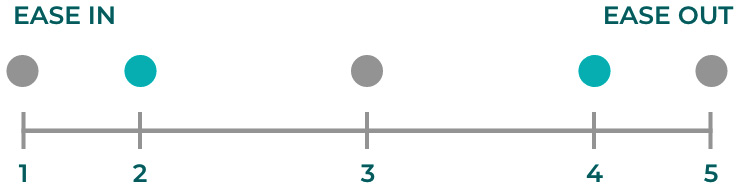
Figure 2.23 – Representation of ease in and out in our five-frame timeline
We will go back to this once we talk about AE and its features, but we think it is very important for you to understand the concepts before moving on.
So, now that you have learned the basics about the timeline, timing, and ease, let's start having some fun and move on to the next section. Let's create our first icon!
Drawing our icon
We know that in these last sections we've been going through so much history and theory. You've learned lots of new words and concepts, but it is very important to us that you first learn the foundation of classic animation before starting to jump into tools to animate. Because tools are just that... tools. Of course, they are fantastic and will save us loads of time and effort, but first, we need to plan our animation in our head to get it out! So, go grab a piece of paper and a pencil and start having some fun!
So, let's imagine we are already animators; of course, we are! And we just had a meeting with our client. Let's say our client sells T-shirts through their own app; however, when payments are done, nothing comes up on the screen, so users keep getting confused as they are not sure whether the purchase has been successfully made, and it's using up a lot of customer care resources.
So, what do you think will be the best solution for the user to understand what happens after the purchase? What do you think… something such as having a confirmation screen at the end of the purchase flow? Something simple, just an icon and a short copy?
Figure 2.24 – Confirmation screen wireframe
Cool! So we've got our idea and sketched our wireframe; of course, we could leave it as it is, add a bit of color, use the right font, and voilá, hand it to the technical team, but come on, let's do something more fun. In the end, the customer is spending money on our client's app, so let's make them feel rewarded.
Let's think about the icon; the icon must translate to the user that the purchase has been made, so we have to communicate positiveness. A smiley face, a thumbs up, or a check would do the job, but let's keep in mind that we want to reuse this icon in some other places so it shouldn't be too specific. Something more general that can be used any time an action has been made successfully.
So, I would go with the check option. It is simple, and when we see it, we know right away the action has been accomplished. Great! We know what we want, so let's sketch it out.

Figure 2.25 – Different styles of check
Don't worry too much about getting started on blank paper; just let yourself flow, otherwise, there are plenty of places that can give you inspiration. Just type check icon online, go to images, and there will be plenty of examples for you to get inspired. Also, if you don't feel like drawing it yourself, there are a few websites out there where you can download already made vector icons, such as https://www.flaticon.com/ or https://www.freepik.com/.
Right, we've got our icon sketched, what should be the next step of the process? Let's get creative; let's think about movement and how we want our icon to move, so let's storyboard it.
Storyboarding
Cool! We've talked to our client, we understood the problem and the users' worries and needs, and came up with an idea. We decided to add a new screen at the end of the process with a check icon to emphasize the idea that the purchase has been made. We've sketched our icon, we know what we want, and now what? Are we going to open AE? Not yet!
It is true we've got our icon sketched and ready to illustrate so we could jump to any vector illustration tool, but do we know what we want our icon to do? For example, how is the icon going to appear on the new screen? From transparent to opaque? From small to big? From left to right? We have to make all these decisions in order to be ready to start setting everything up in AE.
Of course, you could decide this on the go, especially if we are talking about a simple animation, but we want to show you the right process to follow, so if you have a more complicated animation, you'll know how to proceed.
This is where storyboarding comes into the picture. A storyboard takes place in the pre-production phase and it will help us to decide/preview how our yet-still icon is going to come to life! So, let's think about how we want our icon to behave through actions and transitions.
Always keep in mind that the purpose of a storyboard is to present the idea, such as when we've first sketched out our icon; we know what we want and how we want it before getting into much detail, so no need for high-fidelity storyboard drawings. Let's just do it by hand or using an illustration tool and a simple vector, whatever you feel more comfortable with. You'll agree, doing it that way will save a lot of time that we can then invest into making our animation smooth in AE.
So, going back to our icon, I'm thinking out loud here:
- I'd like that when the user accesses the screen, the icon is not there at first sight.
- Then, the icon appears in the middle of the screen.
- It comes up from small to big and from transparent to opaque.
- Once the icon gets big enough, some sparks come out of it.
- The check icon draws once the white bubble gets bigger.
- The sparks move away from the icon.
- The sparks go from opaque to transparent and disappear.
Cool, we've got that clear in our head, now let's try to translate it into our storyboard. But how do we do that? Let's draw it!

Figure 2.26 – Check icon storyboard
You will agree with me, it is one thing having the idea in our head, and another thing translating it into words, and finally, everything makes sense when we do a quick sketch and storyboard it. That is when the magic starts to happen and we are ready to move forward to start using the tools.
Summary
So, looking back in this chapter, we've been through a lot of stuff, looking back in history from ancient times to nowadays. We've learned the 12 principles of animation. We met our client, heard about their problem, and came up with a solution. We went from ideation to sketching to actually being ready to start animating our own icon, being sure that we are clear about what we want and how we want it thanks to the storyboard.
We are a step away from having our icon up and running! But, let's go step by step... I invite you to move on to the next chapter to learn about the AE environment before we jump to the second part of the book, where we will start animating our check icon. So, see you in the next chapter!