
Chapter 6: Formatting Slides, Charts, and Graphic Elements
In Microsoft PowerPoint 2021, you can easily add slides to a presentation and use the predefined options to give slides a particular look and feel. In this chapter, you'll learn how to set up a presentation, order a sequence of slides, apply a presentation theme and slide layout, and reuse slides.
Additionally, you will learn how to manipulate slide elements using the Auto Fix feature, insert an agenda, and work with charts to make data much easier to present and explain, thus adding to the impact of a presentation. We will also investigate the new drawing features, learn how to create and insert captions inside a video, and explore the various playback options for audio and video.
In this chapter, the following topics will be covered:
- Setting up slides and applying layouts
- Working with text, shapes, and objects
- Modifying charts
- Applying and modifying themes
- Inserting audio and video
Let's get started!
Technical requirements
In the previous edition of this book, you learned the necessary skills to manipulate your way around the PowerPoint environment. As this edition recaps some of these skills, you can treat these topics as a refresher that focuses on the new Office 2021 environment and the new features it has to offer.
The examples that will be used in this chapter can be accessed from GitHub at https://github.com/PacktPublishing/Learn-Microsoft-Office-2021-Second-Edition.
Setting up slides and applying layouts
In this section, you will learn how to add, remove, and duplicate slides, insert an outline, reuse saved slides, and apply layouts.
Adding new slides
To learn how to add new slides, follow these steps:
- We will use the presentation named City Berlin Design.pptx for this example.
- Position your mouse pointer in between two slides of the presentation:
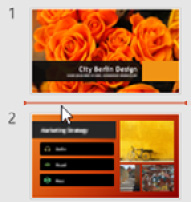
Figure 6.1 – Position your mouse pointer between two slides and then press Enter on the keyboard
- Press Enter on the keyboard to create a new slide. In this example, the new title and content slide type are inserted, by default, between Slides 1 and 3. If you wish to specify the slide layout before inserting the slide, click on Insert | New Slide from the Slides group. This will populate a list of available slide layouts to choose from:
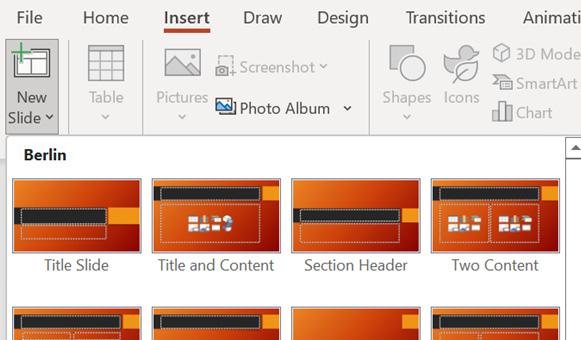
Figure 6.2 – The New Slide drop-down list
Now that you have the skills to insert new slides, we will learn how to duplicate slides.
Duplicating selected slides
The difference between duplicating slides and using the copy command is that the duplication method does not send the item into the clipboard memory. In comparison, the copy command does send the slide to the clipboard, ready to be inserted elsewhere. To learn how to duplicate selected slides, perform the following steps:
- Select a slide from the left-hand side of the presentation to copy.
- Navigate to Home | New Slide | Duplicate Selected Slides (at the bottom of the menu). An exact duplicate of the slide will appear.
- Select a slide to duplicate. Then, right-click on the slide and choose Duplicate from the shortcut menu. Alternatively, use the Ctrl + D shortcut to duplicate a slide.
Deleting multiple slides simultaneously
To delete a single slide, simply select the slide and press the Delete key on the keyboard. To select slides in a presentation to delete, use your Ctrl key to select slides in the Slides Pane using the mouse pointer; alternatively, you can select slides that are non-contiguous. Press Delete on the keyboard to remove the selected slides.
If you delete some slides by mistake, you can bring them back by using the Undo Delete Slide (or pressing Ctrl + Z) icon from the Quick Access toolbar.
We can copy slides to other presentations, too. Let's visit this option in the next section.
Copying non-contiguous slides to other presentations
Copying slides that are not next to each other is possible by using Ctrl + C. Select the slides using the Ctrl + click method, then right-click on the slide and choose Copy. Navigate to the destination slide presentation or create a new presentation and then place your mouse pointer where you would like to paste the slides. The last action is to right-click and choose Paste to insert the slides into the new presentation.
In the next section, we will learn how to insert outlines from Word 2021 to PowerPoint 2021.
Inserting an outline
In this section, we will learn how to insert an outline from a previously typed Word document:
Note
It is not possible to insert images, shapes, or any artistic features in the Outline view.
- Open the Safest Solution-Benefits.pptx presentation for this example.
- Navigate to Home | New Slide | Slides from Outline…:
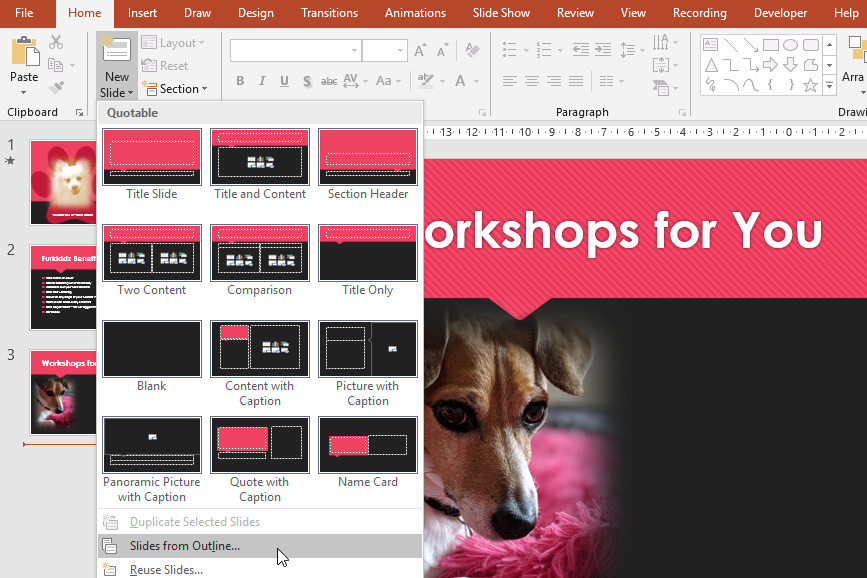
Figure 6.3 – Inserting slides from a Word outline
- Browse to locate the outline (Outline.docx) to insert it into the presentation. The file extension can be .rtf (Rich Text Format), .docx (Microsoft Word document), or .txt (text file format).
- Click on Insert.
- The outline will be inserted into PowerPoint, thus splitting the information across multiple slides. Format the information as required.
- In the next section, we will learn how to insert agendas into PowerPoint using the export method.
Inserting an agenda
- In addition to inserting an outline into PowerPoint, Office 365 has the ability to export a Word document agenda into PowerPoint slides directly. Let's take a look at this wonderful feature. When performing this action, make sure that the files are saved to OneDrive.
- For this example, we will use the Agenda SSG.docx file.
- Click on File | Export | Export to PowerPoint presentation (preview).
- The Export to presentation screen will open. Here, you will browse to select a design template to apply to the new presentation. Once you are done, click on Export:
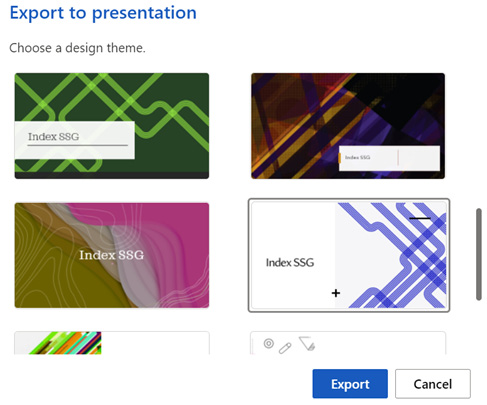
Figure 6.4 – Exporting to the presentation screen
- The presentation will run through the steps automatically to create a presentation:
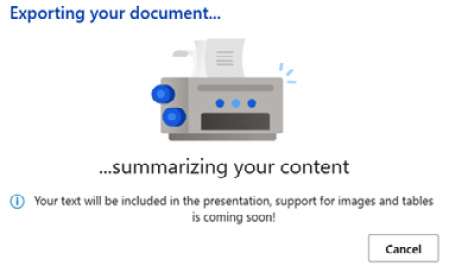
Figure 6.5 – Exporting to the presentation screen
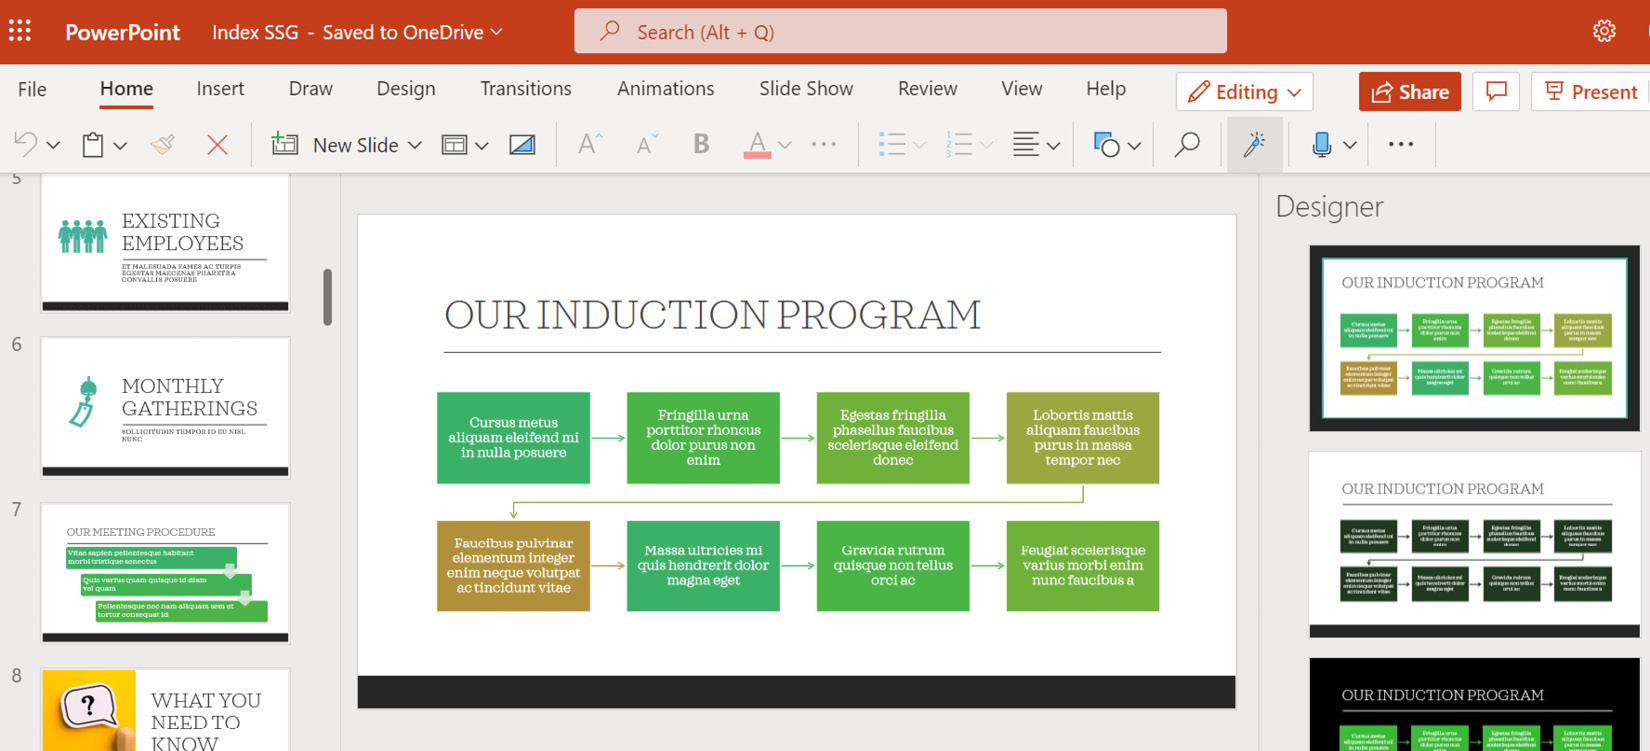
Figure 6.6 – The agenda as shown in PowerPoint
- This is a great way to quickly create a presentation with all of the text neatly presented on individual slides. The presentation is automatically saved with the same name as the Word document.
In the next section, we will learn how to use slides, including the theme (if required) from an existing presentation in another presentation.
Reusing presentation slides
Using slides from an already created presentation saves a lot of time, especially if the presentation you are creating is going to consist of numerous slides that you can reuse from another presentation. Perform the following steps:
- Open a new presentation, called Safest Solution-Benefits.pptx.
- Go to Home | New Slide | Reuse Slides… (at the bottom of the menu).
- A Reuse Slides pane will open on the right-hand side of the PowerPoint environment.
- Click on the Browse button to access the folders on your computer.
- Choose Browse File… to open another presentation in the Reuse Slides pane – to follow along with this example, use the City Berlin Design.pptx presentation. Once selected, the file will open on the right-hand side of the PowerPoint screen as a Reuse Slides Task pane:
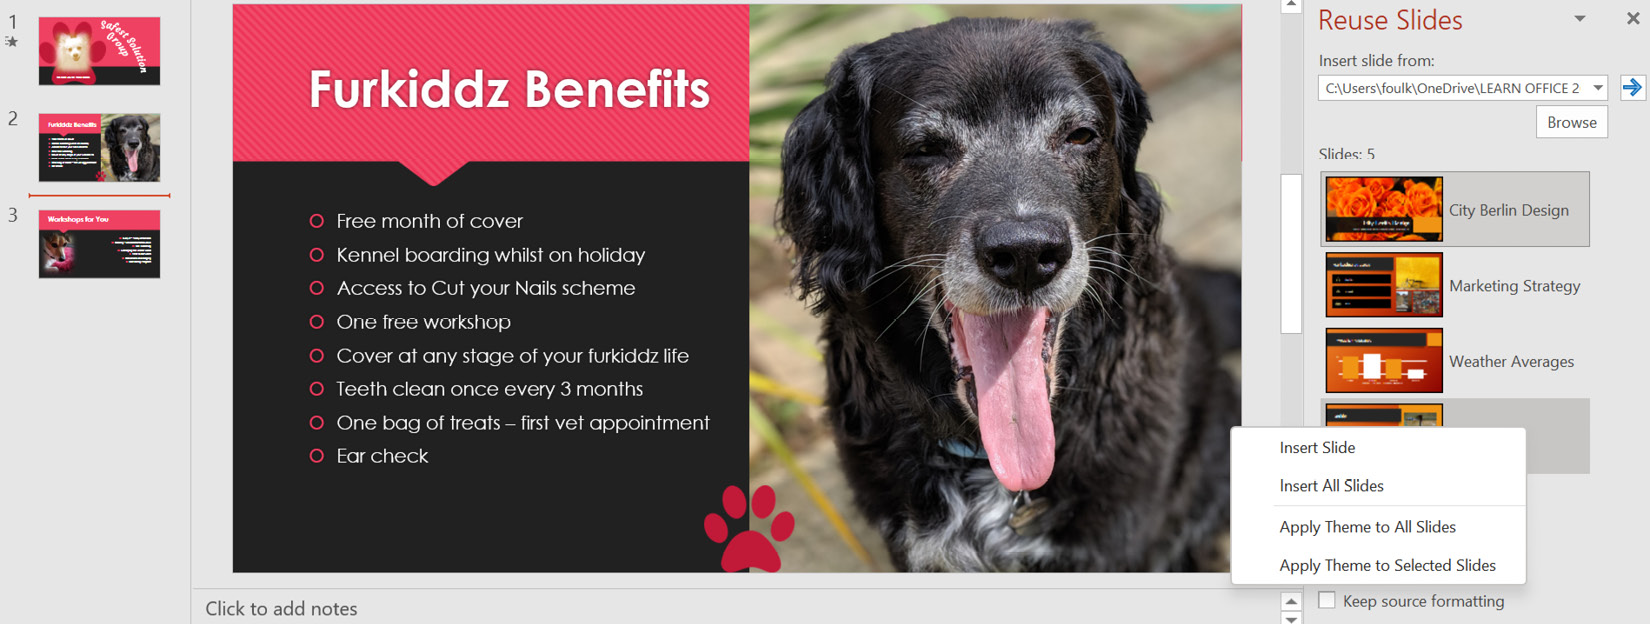
Figure 6.7 – The Reuse Slides pane on the right-hand side of the window, displaying the right-click options and Keep source formatting option
- Before we insert a slide from the browsed presentation, we must click on a slide in the existing presentation to indicate where we would like to insert the new slide.
- To insert a slide beneath the selected slide, click to select a slide from the Reuse Slides pane. The slide will be inserted into the existing presentation beneath the selected slide.
- Notice that the inserted slide takes on the theme from the existing presentation. If you wish to keep the formatting of the selected slide and not merge it with the existing slide presentation theme, click on the Keep source formatting checkbox at the bottom of the Reuse Slides pane (refer to the previous screenshot).
With that, you have learned how to combine slides from other presentations into an existing or new presentation. Additionally, you have learned how to access the option to keep the formatting of the inserted slides as-is. Now, we will look at the different types of layouts available within PowerPoint 2021.
Applying slide layouts
A slide layout is a predefined slide that contains formatting options (such as fonts, paragraphs, styles, and more) and placeholders (these are the textboxes that you type text on a slide into) that are positioned for you on the slide by default. In addition, a slide layout could contain placeholders for images, charts, SmartArt, and header and footer placeholders. These layouts make it easier and faster to construct a presentation without the hassle of you having to build a blank slide from scratch. You can create custom layouts or choose from the 15 different slide layouts in PowerPoint 2021.
When creating a new presentation in PowerPoint, the first slide is based on the Title Slide layout. Every new slide that's inserted after that is based on the Title and Content Slide layout.
Changing slide layouts
Often, when you insert a slide, a certain layout is applied automatically. You can change the layout before you add content or after content is inserted into the slide. Additionally, the Layout option is very useful when copying slides from other presentations into a new or existing presentation, as it refreshes the layout and fixes any common slide design, background, or font issues.
To change a slide layout, click on the slide you wish to change the layout of in the presentation. Then, click on the Home | Layout icon. Choose the desired layout from the list provided.
Working with text, shapes, and objects
In our previous edition of this book, Learn Microsoft Office 2019, we learned the basic skills to copy, paste, and duplicate within a presentation. After working through this section, you will be able to copy, move, and paste text, insert and format lists, and add headers and footers to a presentation. Additionally, you will gain an understanding of how to apply and modify a theme.
Let's recap how to use lists in the next section.
Inserting and formatting lists
How you would like to insert and format lists on slides in PowerPoint is a personal preference. Either insert the text first and then apply the list or apply the list and then enter the text:
- Open the presentation called ProductGrpSSG.pptx.
- Locate the slide that contains the text you wish to apply a bullet or numbered list to. Then, select the text.
- Choose your desired option from the Paragraph group by clicking on either the bullet icon or the numbers icon.
- To change the bullet or number type, click on the drop-down arrow next to the bullet or numbering icon.
- Select Bullets and Numbering from the bottom of the list.
- A dialog box will open, offering various options that you can choose from to customize the numbered or bulleted list:
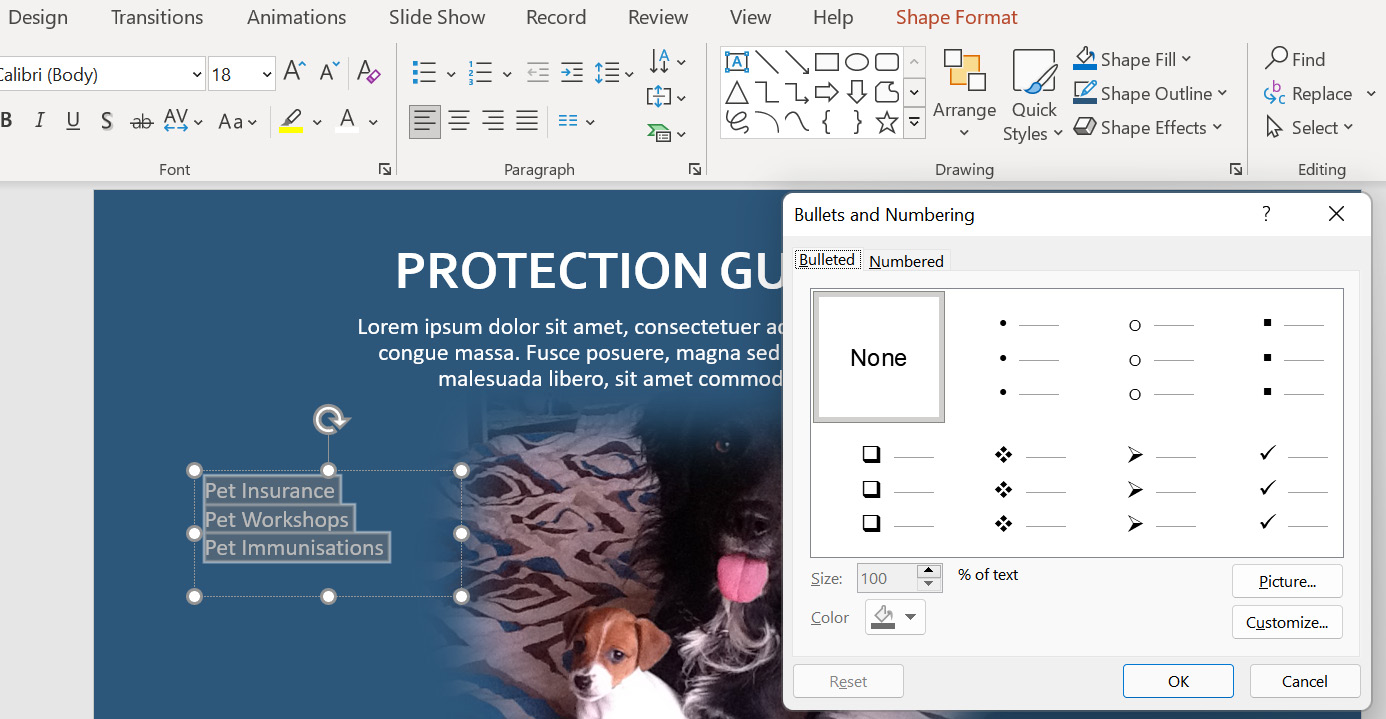
Figure 6.8 – The Bullets and Numbering dialog box
- You can change the color of the bullet or the number using the Color fill bucket.
- The Customize... button is also available if you need to browse for a different symbol from the huge range available.
- Adjust the spin controls of the % of text area (Size:). If you are using symbols as a bullet, then this option works really well to maximize the symbol.
- Change the bullet to a picture of your choice by clicking on the Picture… button and selecting a source in order to insert a bullet. Note that there is also a new Stock Images feature where you can access a huge range of exciting new graphics to use:

Figure 6.9 – The Insert Pictures dialog box showing new options that are available in Office 2021
- Once you have selected a picture, it will appear as a bullet type in the Bullets and Numbering dialog box. Note that the numbering option works in the same way as the bullet icon.
- If you wish to number items from a specific starting number point, use the Start At: position to control this.
- To change the distance between the number or bullet and the text, first, select the text, then use the indent markers along the ribbon to increase (or decrease) the distance between the number and the text. If the ruler is not visible on the screen, click on View | Ruler to display it:

Figure 6.10 – Use the indent markers along the ribbon to increase the distance between the number and the text
With that, we have inserted bullet lists and numbered lists and learned how to customize them. Now, we will learn how to set up slide headers and footers.
Adding headers and footers to slides
As discussed in the previous edition book, the footer is the area at the bottom of the slide. It has been constructed by way of placeholders that contain information that's repeated on every slide in the presentation. The header or footer accepts information such as custom text, dates and times, and the slide number. Headers and footers can be applied to Notes and Handouts. The Notes and Handouts tab can be seen in the following screenshot, just on the right-hand side of the Slide tab:
- Open an existing presentation. For this example, we will use the Safest Solutions-Benefit.pptx presentation.
- Click on the Insert tab, and select Header and Footer from the Text group.
- In the Header and Footer dialog box, select the option that best suits your presentation:

Figure 6.11 – The Header and Footer dialog box
- Select the Slide tab at the top of the dialog box to view the options to include on the slides.
- Click on the Date and time checkbox and choose whether to add a static fixed date or whether you want this to Update automatically (this option will update the date to the current date every time the presentation is opened).
- You can include a Slide number setting and also a static Footer setting. This option is located just under the Fixed date option.
- Sometimes, we might want to exclude a header from the title slide of the presentation. Select this option by clicking on the checkbox provided to activate it.
- Please note that at the bottom of the dialog box, you can choose whether to Apply changes to the current slide or whether to choose Apply to All to commit the changes to the entire presentation. Also, note that there is no header section on the Slides tab.
- The Notes and Handouts tab contains many of the same options as the Slide tab, but it includes a Header section so that you can create a static custom header for only setting notes and handouts.
Formatting textboxes
In this section, you will learn how to format textboxes by adding, manipulating, and applying styles and effects to them.
A textbox is a shape that is drawn onto a presentation slide that you can type text into. The Text Box feature is located in the Insert tab, under the Text group:

Figure 6.12 – Insert | Text Box
Draw a textbox onto the slide by holding down the left mouse button and dragging it to the desired size. Alternatively, you can simply click on the slide's background.
Once a textbox has been inserted into a slide, use the Shape Format tab to apply shapes, styles, text styles, text effects, and text alignment options:

Figure 6.13 – The Shape Format tab
Now that you are familiar with the Shape Format tab inside the ribbon, let's focus on some of the groups and features within the tab.
Applying a theme fill color
To learn how to apply a theme fill color, follow these steps:
- Click on the textbox to apply a fill color.
- Click on Shape Format | Shape Fill (or Shape Outline, Shape Effects, or Shape Styles) and select a theme from the drop-down list:
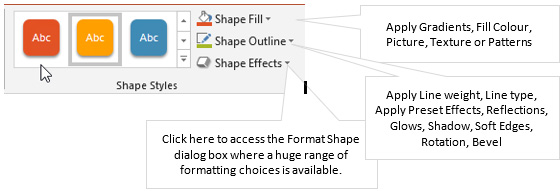
Figure 6.14 – The Shape Format tab to select a textbox shape style
- Now, click on a color or visit the More Fill Colors… option to access the color wheel or the Custom color area to set a specific Hue color (this is a new feature within Office 2021).
- To remove a fill color from a textbox, click on the shape and then select No Fill from the Shape Fill drop-down list.
Note
The Eyedropper tool is fantastic for picking up a color from a specific theme on a particular slide and using that specific color by applying it to the background of the textbox. To use the eyedropper, select the textbox, visit the Shape Fill drop-down list, and select Eyedropper. Use the dropper to click on a specific color outside of the textbox that you want to apply to the background of the textbox.
Gradients are a blend of color progressions that you can apply to objects within Office 2021. Applying a gradient uses the same method as previous versions of Office.
Applying a gradient
To apply a gradient, follow these steps:
- Click on the shape to apply the gradient color.
- Choose Gradient from the Shape Fill drop-down list.
- Click on More Gradients… at the bottom of the submenu to access the Format Shape pane on the right-hand side of the PowerPoint window. Here, you can choose your own gradient blends using the Gradient stops setting to apply color progression or choose from Preset gradients. Simply click on a gradient stop, then choose a Color setting. Click on the color wheel to add further gradient stops or drag gradient stops off the color wheel to remove them:

Figure 6.15 – The gradient color options in the Format Shape pane on the right-hand side of the window
Applying a picture
To apply a picture follow these steps:
- Right-click on the textbox or the shape to apply a picture background.
- From the shortcut menu, choose Format Shape.
- The Format Shape pane will populate on the right-hand side of the slide. Select Picture or texture Fill.
- Choose either Insert… or Clipboard from the Picture source heading. The Insert Pictures dialog box will appear with options to select from a range of sources if you chose the Insert… option. Note the Stock Images option here, as it is a new feature in Office 2021. This is discussed in detail in Chapter 3, Styles, Referencing, and Media.
- When we insert a shape, a Format Shape tab appears at the top of the PowerPoint environment. The options are a little less complex in Office 2021 than in previous versions. When we insert pictures on a slide or inside a shape, we will notice another tab appear on the ribbon. This tab is named Graphics Format and is available so that you can format the picture within the shape:

Figure 6.16 – The Graphics Format tab appears next to the Shape Format tab when inserting a picture
The new Sketched lines types are available in Office 2021. These line types are extremely beneficial for PowerPoint users, as you can now add that creative flair to your shapes.
Changing the outline color and weight
To change the outline color and weight, follow these steps:
- Select the textbox, locate the Drawing Tools contextual menu, and click on the Format tab.
- Click on Shape Style | Shape Outline in order to select a line color.
- If the theme or standard colors are not what you are looking for, select More Outline Colors… to choose a custom color or select one from the color wheel.
- If the default weight of the line is not thick enough, use the Weight option from the Shape Outline drop-down list to change it.
- Use the Sketched lines option to jazz up your PowerPoint presentation:

Figure 6.17 – The Sketched line types in Office 2021
- Click on the Dashes option to display different line styles to apply to the textbox.
- To remove an outline from a shape, select the shape and click on the No Outline option from the Shape Outline drop-down list.
Note
We now have access to Hex colors in Office 2021. Click on Shape Format | Shape Outline | More Outline Colors… | Custom to add a Hex color code into the field provided. This option is discussed in the Coloring using Hex values section of Chapter 3, Styles, Referencing, and Media . Office 2021 has the addition of Sketched Shape Outlines – this option is also covered in Chapter 3 of this book.
The next topic is very useful, especially when using the Selection pane. Let's investigate it next.
Arranging objects
By the end of this section, you will be confident with arranging, grouping, and rotating objects, as well as being able to use the Selection pane to locate hidden objects. We will also recap how to resize and reset objects.
There are numerous Arrange options available from the Picture Format tab. To access these options, follow these steps:
- Select a picture on a slide in your presentation. For this example, we will use the Safest Solution-Objects.pptx presentation.
- There are many Arrange options that you can use to order, group, and position objects on slides. You can access the Arrange options using any one of the following methods:
- The first is accessible via the Drawing group in the Home tab.
- The second is accessible via the Picture Format tab at the very top of the PowerPoint ribbon once an object has been selected.
- The third is accessible via right-clicking on an object, after which the shortcut menu will appear for you to choose from the Arrange options.
Now we will learn how to use the Arrange options.
Sending an object forward or backward
- Click on the picture you wish to bring to the front of the textbox.
- Click on the Picture Format | Bring Forward option to access the drop-down menu, then select Bring to Front. Alternatively, right-click on the shape and choose Bring to Front from the shortcut menu:
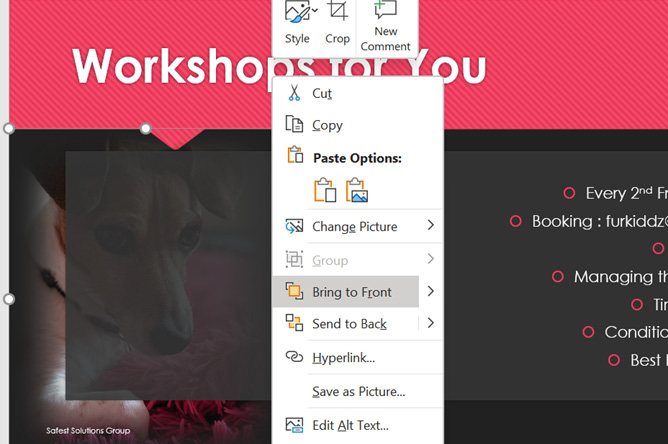
Figure 6.18 – Right-clicking on a picture to access Bring to Front
Figure 6.19 – The picture is now in front of the textbox
When working with pictures, you will access the Arrange group from the Picture Format tab to make any formatting amendments, and for shapes, you will access the Shapes Format tab to change arrange options.
Flipping objects

Figure 6.20 – The picture has been flipped horizontally
- Experiment with the other rotations or click on More Rotation Options… to access the dialog box.
Rotating objects
- Click on the picture you wish to rotate. The rotate icon will appear at the top center of the object and is identified by a circular arrow:

Figure 6.21 – The rotation handle icon
- Place the mouse pointer on the circular arrow, and while holding the left mouse button down, drag the position to rotate the object.
Another method would be to click on Picture Format | Rotate Objects | More Rotation Options…. This will open the Picture Format pane on the right-hand side of the window where you can manually enter a specific degree of rotation. Simply type the required degree of rotation into the text area that is provided next to the Rotation heading.
In the next topic, we will look at a new feature named Auto Fix.
Aligning objects
Although it is really easy to align objects using the drag and drop method when positioning elements using the mouse, the align feature is available for this purpose and allows the user to create professional-looking documents. There is nothing worse than looking at objects on a slide presentation that are uneven or slightly off in terms of their positioning. In the previous edition of our book, Learn Microsoft Office 2019, we looked at ways to align objects. In this topic, we will introduce Auto Fix.
Aligning objects using Auto Fix
PowerPoint can be quite time-consuming in terms of formatting, especially if you are a perfectionist. The new feature, Auto Fix, in PowerPoint for the web, is very efficient for aligning elements. Perform the following steps:
- Open the presentation called Safest Solution-Align.pptx.
- Click to select Slide 4 of the presentation. Select the objects to align by placing the mouse pointer on the slide background. Then, while holding down the mouse pointer, drag the cursor over the objects you would like to align:

Figure 6.22 – The drag method to select objects on a slide
Note
The Shift + click or Ctrl + click method is the alternative here. Additionally, you can use the Select Objects option, located in the Home tab, which is inside the Editing group.
- Right-click on the border of one of the selected objects. Then, click to select Auto Fix from the drop-down menu provided:

Figure 6.23 – Right-clicking on the selected objects on a slide presents the Auto Fix option
- The objects are now horizontally and vertically aligned on the slide. The Auto Fix option will align objects even if they are stacked below each other.
Aligning objects to the top
If you do not see the Auto Fix feature when you right-click, it could be that this is still being rolled out to your Office 2021 desktop platform. To align objects using the desktop, follow these steps:
- Open the presentation called Safest Solution-Align.pptx.
- Select the objects to align while holding down the Shift or Ctrl key. You can also use the Select Objects option, located in the Home tab, which is inside the Editing group.
- Click on the Graphics Format | Align drop-down list. Then, select Align Top:
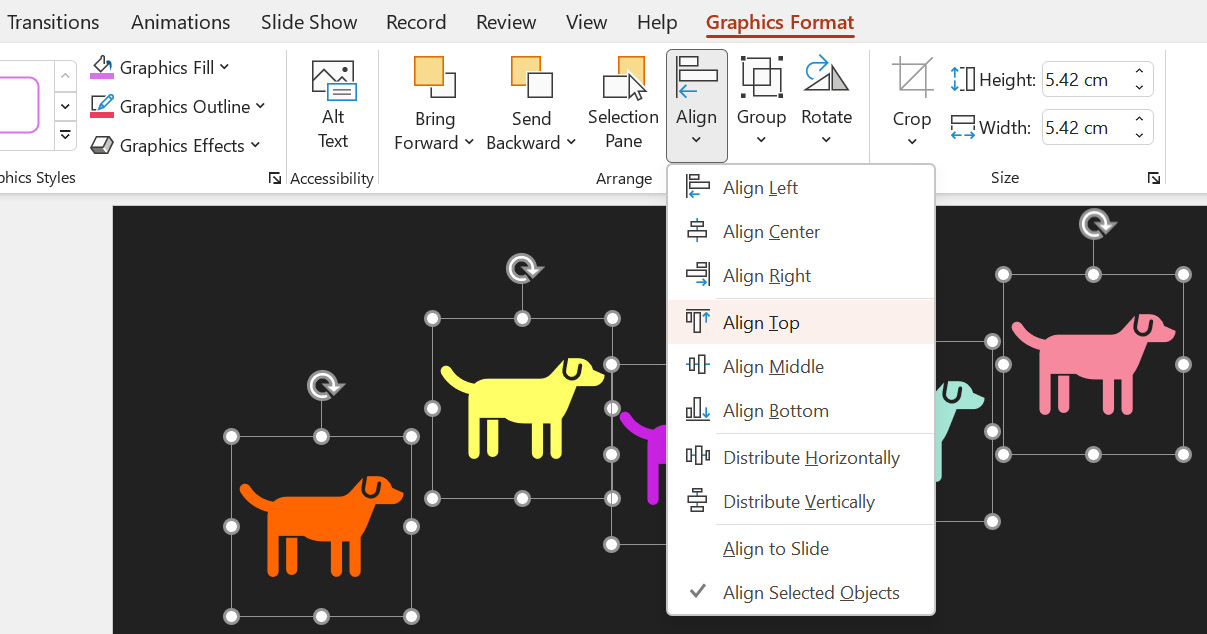
Figure 6.24 – The Align options located in the Graphics Format tab
- Once the objects have been aligned to the top, you will notice that the gaps between each object are of different sizes. The Distribute Horizontally icon from the Align drop-down list is perfect for fixing this. Pay attention to the change in the distribution of the shapes.
If you are having problems lining up objects, use the View | Gridlines icon to guide you. Now, let's look at how the Selection pane can help you.
Using the Selection pane
This feature is absolutely brilliant when working with numerous objects that overlap. Sometimes, you won't be able to see all the elements on a slide, and often, elements are hidden from view. I use this extensively when working with Microsoft PowerPoint animations, as it allows me to move elements up and down and rename the elements so that the order of the elements makes more sense when working with the diagram. Additionally, you can hide or unhide elements from view. Follow these steps:
- We will use the presentation named Safest Solution-Selection.pptx.
- Select an object and click on the Graphics Format tab to access the Selection Pane option.
- Note that the Selection pane is now visible on the right-hand side of the PowerPoint environment:
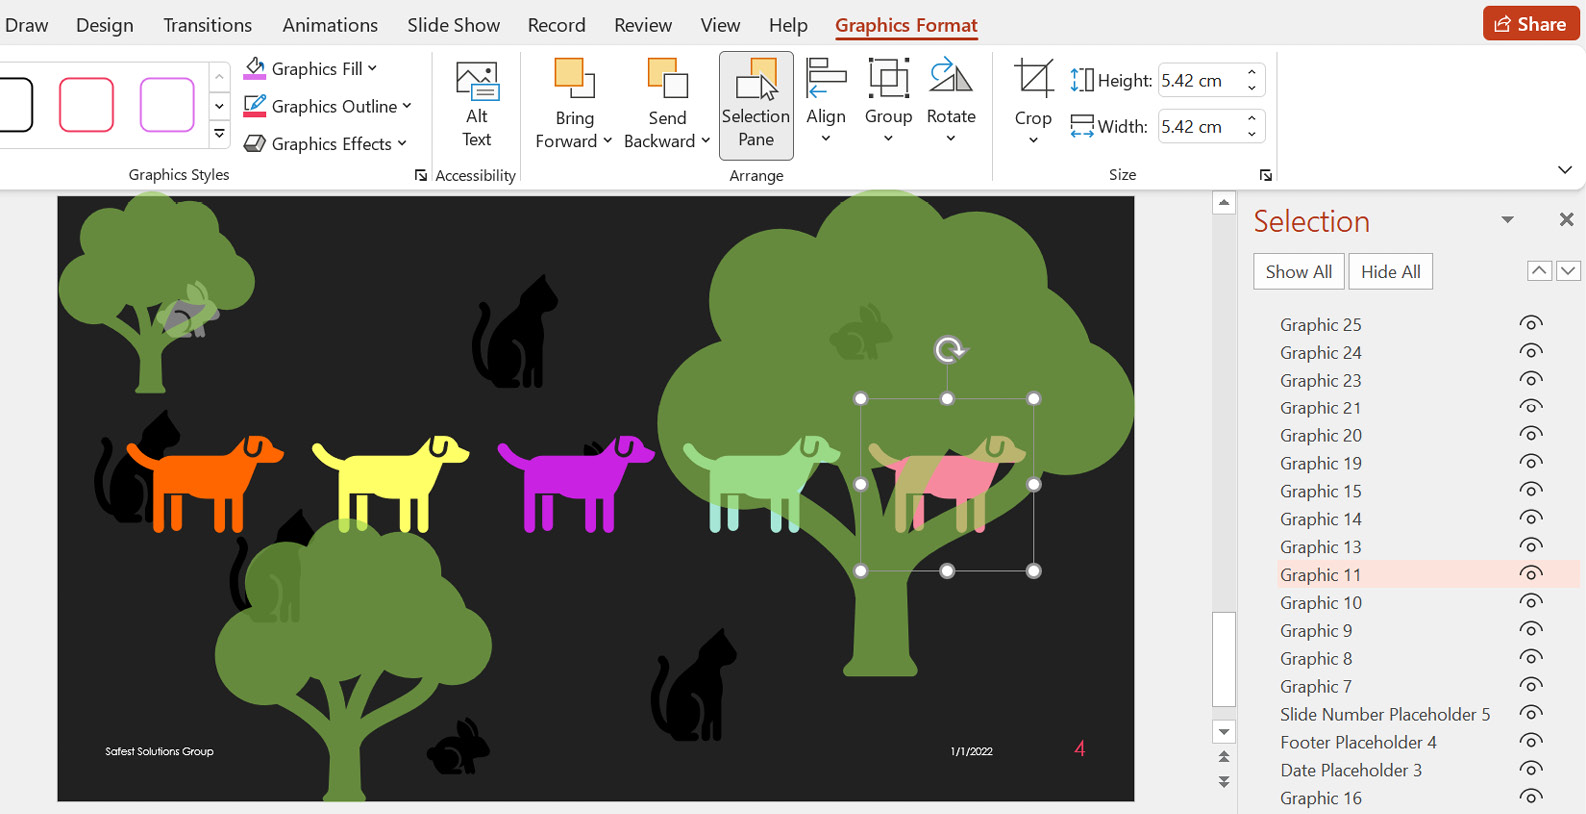
Figure 6.25 – The Selection pane on the right-hand side of the window
- Each object is an item in the pane. To use the pane, click on an object listed in the pane – the object will be selected on the slide.
Note
To rename an object listed on the pane, simply click on the name of the object twice and type the new name into the textbox provided to replace the current name. To hide an object, use the eye icon on the right-hand side of the pane.
- Click again to make the object visible. This feature is great for objects that overlap so that you don't have to move your whole document around to access the shape and make a change!
- The Selection pane can also be used to select objects.
- Use the Selection pane to rename the dogs, in order, from DOG1 to DOG5.
- Hold down the Ctrl key on the keyboard while selecting DOG1 through DOG5:
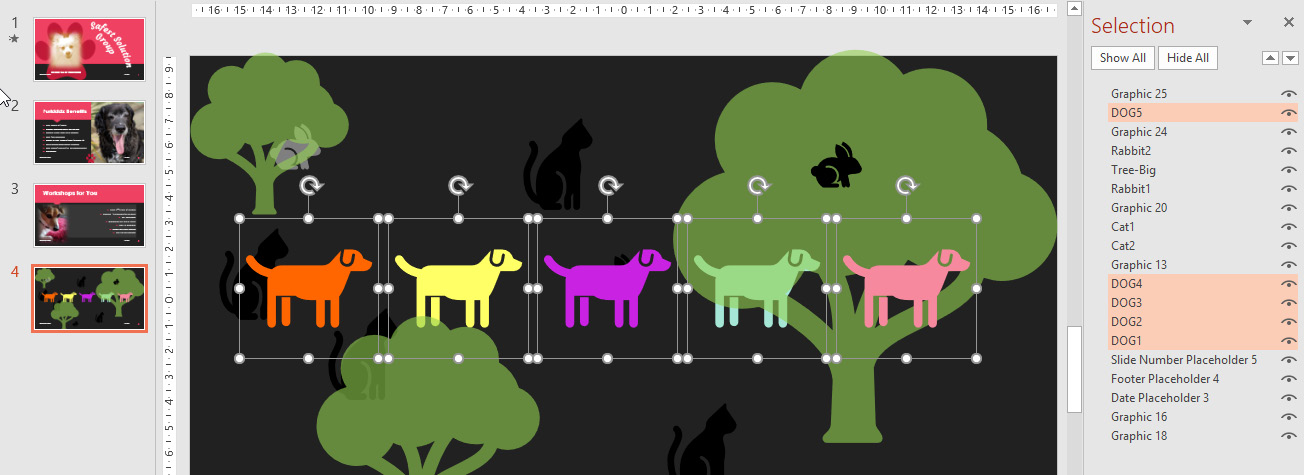
Figure 6.26 – The Selection pane showing the renamed dog shapes
Tip
To close the Selection pane, click on the Selection Pane icon from the ribbon or the close icon on the right-hand side of the pane.
So, we have learned how to work with the Selection pane. In the next section, we will concentrate on grouping elements on a slide.
Grouping objects
Grouping objects together creates one object. This might be the way to go if you are moving objects or working with multiple objects on one slide. Instead of formatting each object separately, you can group them and then apply formatting. When objects relevant to each other are grouped together, they can be moved together from one position in the document to another without repeating the step for each part of the drawing. For example, you would be able to group labels on a picture so that they stay intact when moving to another location in the presentation. Perform the following steps:
- Use the Selection pane, as per the previous example, to select the objects on a slide. Alternatively, select the objects that you wish to combine into one object. To do this, click on the first object and hold down the Shift or Ctrl key on the keyboard. Move your mouse pointer to the second object, making sure that the Shift key (or the Ctrl key) is still depressed. Then, click on each object to add it to the group.
- To form a group, click on the Graphic Format tab and select the Group icon drop-down list. The object will become one movable object.
- To ungroup objects, select the grouped object, then simply navigate back to the Group option and select Ungroup.
I am sure you learned how to resize objects prior to this new edition book, but we will recap this topic here as the tab names have changed slightly.
Resizing objects
To learn how to resize objects, follow these steps:
- Select the object to resize by clicking on it. Place your left mouse pointer on the sizing handle. Hold down the left mouse button and drag toward the center of the image to make it smaller and to keep the proportion of the image intact. Alternatively, drag outward to make the object bigger.
- The ribbon is another method that can be used if you wish to enter specific widths and heights for objects. Select the object by clicking on it. Notice that the Graphic Format tab or the Picture Format tab is now visible, depending on the object type (for example, picture, shape, or chart) that you are resizing. Locate the Size group and enter the width and height measurements as desired. The object will adjust on the slide as you enter the new measurements.
Tip
Take note of the Lock aspect ratio checkbox. This is very important if the object's height and width settings must change in relation to one another and not separately.
Resetting objects
The reset option removes all changes in terms of size, effects, rotation, and scaling and brings the object back to its original size. Follow these steps:
- Select the object to reset.
- In the Picture Format tab, select the Reset Picture option (when dealing with pictures).
- Click on Reset Picture to remove all formatting changes and select Reset Picture & Size to remove any formatting and size changes.
In the next section, you will learn how to create tables using a range of methods, and you will discover how to apply table styles. Additionally, you will be able to master chart modifications by learning how to switch elements; edit elements such as data labels, data tables, legends, and chart titles; and add objects.
Modifying charts
We use charts to make information more appealing, as well as clearer and easier to read. As you might have gathered, a chart is a graphical representation of worksheet information. Within Office 2021, the interface is so much clearer and more defined, and elements that you normally would apply to charts manually are included on the ribbon. So, everything is at your fingertips.
Getting used to chart terminology is ever so easy; you simply click on elements to amend them, and the element is highlighted on the chart. Chart terminologies were addressed in our previous book, Learn Microsoft Office 2019, along with chart creation and working with tables, so we will not address them here.
As tab names are a little different in 2021, let's run through how to add Data labels as an example. The process to modify charts is the same for most elements you add in the new version of Office.
Data labels
To make a chart more understandable and easier to read for the user, we can add data labels. Although a chart layout can be selected using the Chart Styles group within the ribbon, there will be times when you need to add or remove elements from a chart manually. Use the data shown in the following screenshot to construct a Clustered Column chart on a new blank slide in PowerPoint 2021:
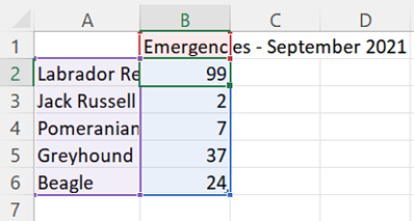
Figure 6.27 – Selected data on the worksheet
To apply data labels to the preceding chart, follow these steps:
- Select the chart by clicking on it.
- From the Chart Elements option (the + icon) on the right-hand side of the chart, select Data Labels. Alternatively, use the Chart Design tab to locate Add Chart Element (the first icon on the ribbon). Then, locate Data Labels from the drop-down list:

Figure 6.28 – A clustered column chart showing different methods of adding Data Labels
- Once you have selected Data Labels, use the black arrow to open further options to customize the data label. The chart will update immediately.
- Click on one of the data labels on the chart once (this will select all of the data labels). To select just one of the data labels, click again.
- To make formatting changes to the labels, visit the Format tab and apply the formatting options as required.
- Name the chart SSEmergencies.pptx.
Let's use the same steps to add a data table.
Adding a data table
A data table refers to how data is represented according to the worksheet data that was used to create the chart. Once inserted, the data table forms part of the chart so that it is visually more appealing when printed or displayed onscreen. Remember that there are lots of quick layout chart options, including data tables. Follow these steps:
- Select the chart to add data labels.
- Click on the Add Chart Element icon from the Chart Design tab ribbon:
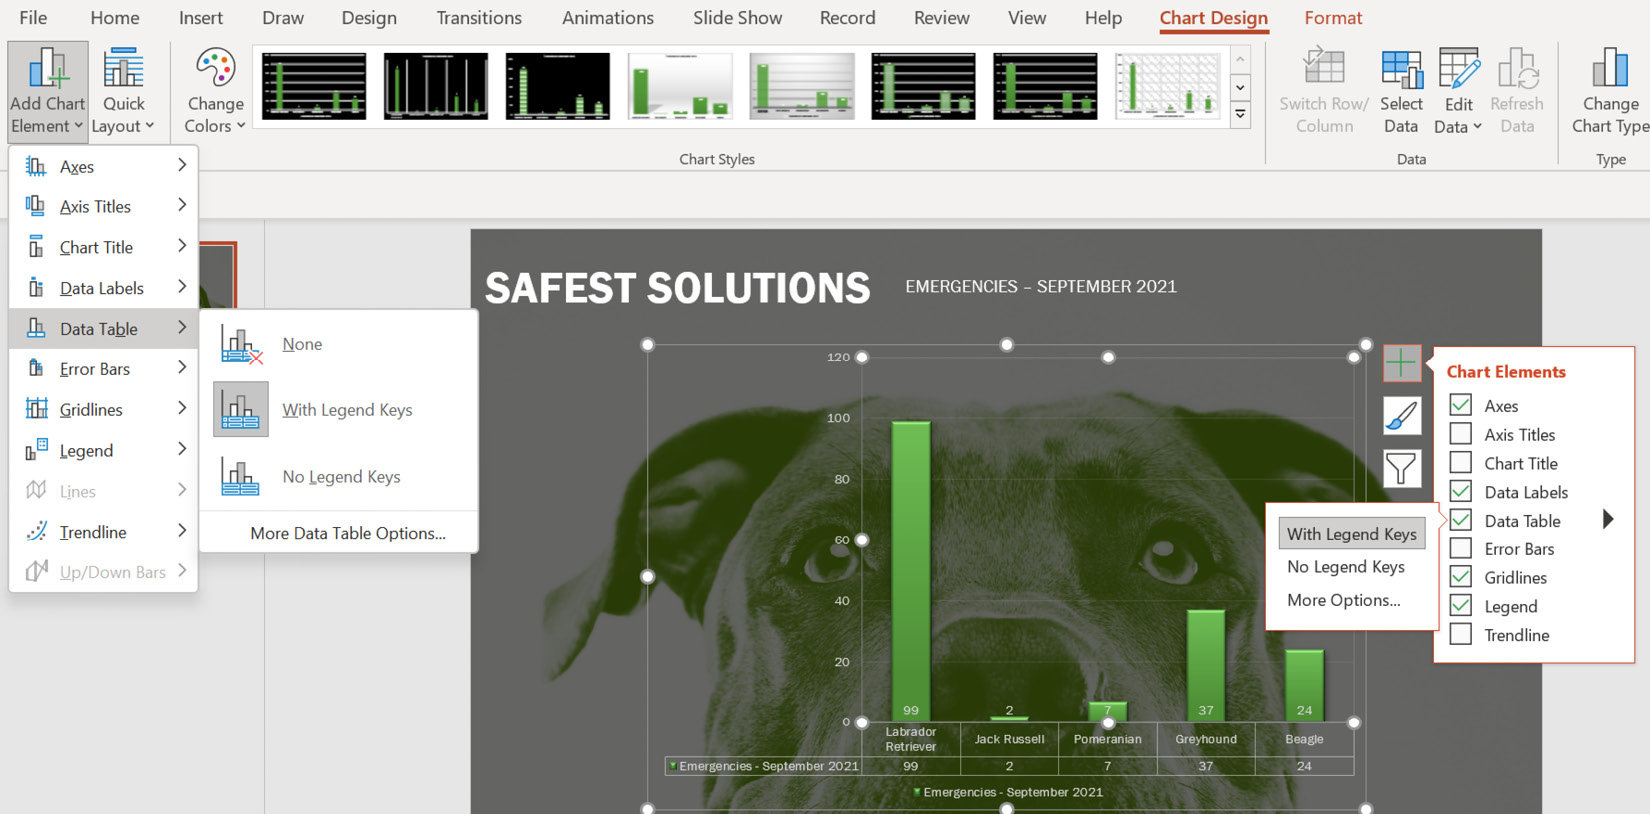
Figure 6.29 – The Data Table option
- Locate Data Table from the list provided. From the drop-down list, choose an option to apply to the chart.
- To add any other elements, such as chart Legend, use the same method as earlier.
Adding objects to a chart
Objects such as images and illustrations (shapes, pictures, icons, WordArt, text, and more) are added to the chart's background using the Insert tab. There are a couple of new features in Office 2021 under the Stock Images… option. As this feature is referenced throughout this book, we will not go through all the options here. Once inserted, the objects are formatted using the same methods we use to edit in Word or Excel 2021. These elements can also be animated to create focus when presenting them:
- To add an object to the chart, locate the Insert tab from the PowerPoint ribbon. Here, we can select from a variety of choices (the Images, Illustrations, Add-ins, Links, Text, Symbols, and Media groups):

Figure 6.30 – The Insert tab on the ribbon displaying variety of object groups
- Let's insert the sixth Sticker, using the Stock Images… | Stickers option:
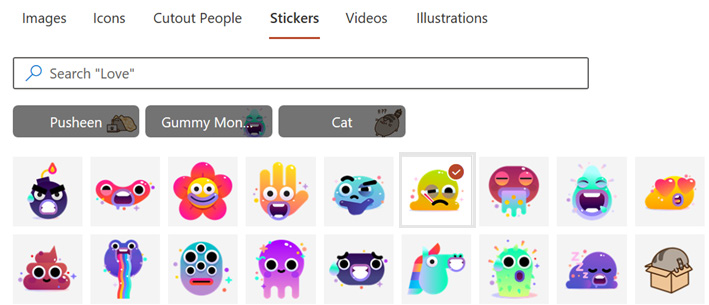
Figure 6.31 – A list of available stickers from the Stock Images option
- Click on Insert to add the object to the slide. Then, resize and reposition to the top of the Labrador Retriever column.
- Next, insert a document icon, and amend the Graphics Fill setting to white. Add an arrow shape and format as in the next screenshot. Lastly, add a text box to include the text Please send through report asap. Change the fill color using the Eyedropper tool, picking the color of the column:
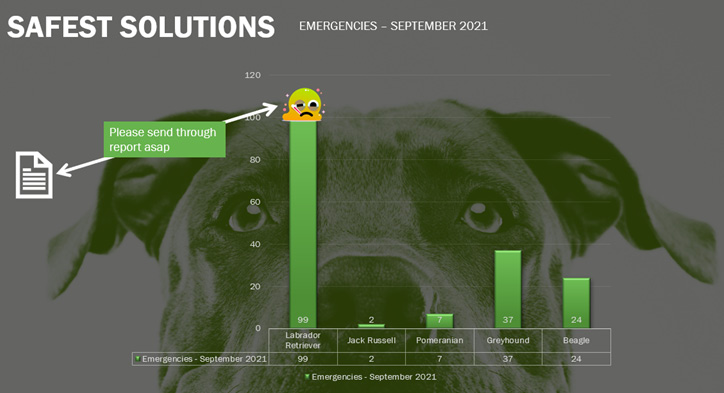
Figure 6.32 – The finished chart including the customized objects
Now that we have learned how to amend charts in Office 2021, we will revisit Themes in PowerPoint 2021.
Applying and modifying themes
A theme is a collection of fonts, colors, and effects that are saved as a name in the theme gallery. Predefined themes are available from the Themes group on the Design tab. If you wish to customize a theme, use the options from the Variants group.
In my experience, it is always easier to decide on a theme before adding all of your content to it. Applying a completely new theme design, or changing a design theme once your presentation is complete, can cause a few complications, with you having to redo certain formatting elements. Follow these steps:
- Open the presentation called Safest Solutions-Themes.pptx.
- Click on Design | More…:

Figure 6.33 – The More drop-down list in the Themes group
- Select a theme to apply to the presentation, or visit Browse for Themes… to visit the explorer view to locate themes that are stored on the computer. After choosing the Mesh theme, this particular design theme has caused the first slide's main title to distort somewhat as the elements are now trying to fit into the new design theme that's been applied. The formatting of the title and slide elements will need to be amended so that it looks more presentable.
- Notice that themes also have Variants, which are displayed just to the right-hand side of the chosen design theme on the ribbon.
- We are also able to format the background of a slide using the Customize group (alternatively, right-click on a slide background and select Format Background… to change the background properties).
- Save the presentation to keep the design changes.
In the previous section, we learned how to apply a design theme to all slides in the presentation. Next, we will look at how to apply a theme to specific slides in the presentation.
Applying a theme to selected slides
- Select the slides in the presentation that you would like to update with a new theme.
- Click on Design | Themes.
- Locate a theme to apply to the selected presentation slides.
- Right-click on the selected theme and choose Apply to Selected Slides from the shortcut menu:
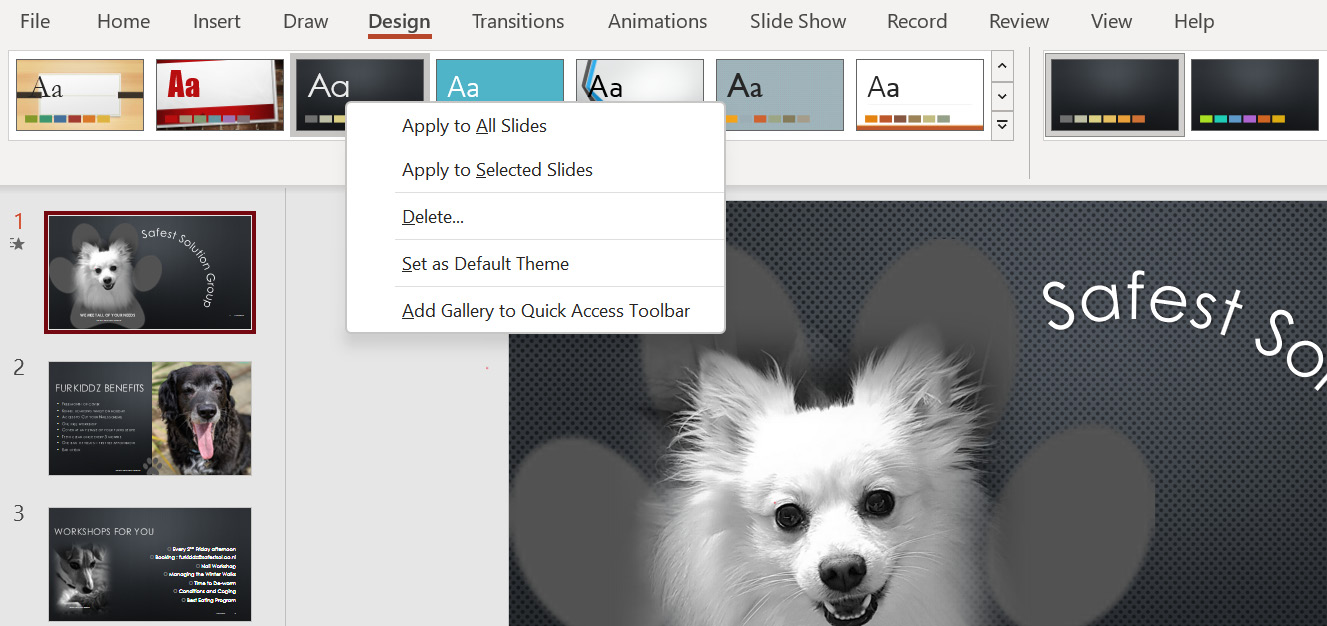
Figure 6.34 – The Design Theme options in the right-click shortcut menu
Once you have spent some time creating a presentation, you might want to save the design elements of the presentation so that it becomes part of the Theme | More options and, therefore, available to other presentations. Let's learn how to create a customized theme.
Creating your own custom theme
- For this example, we will use the previous presentation. If you have not been following along with the previous steps, open the presentation named Safest Solution- SavedThemes.pptx.
- This presentation has a theme applied, along with customizations to its elements. To save the customized theme as your new theme, click on Save Current Theme…, which is located at the bottom of the More drop-down list:
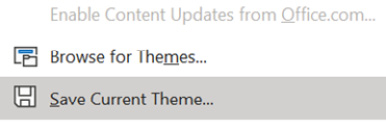
Figure 6.35 – The More drop-down list option to Save Current Theme…
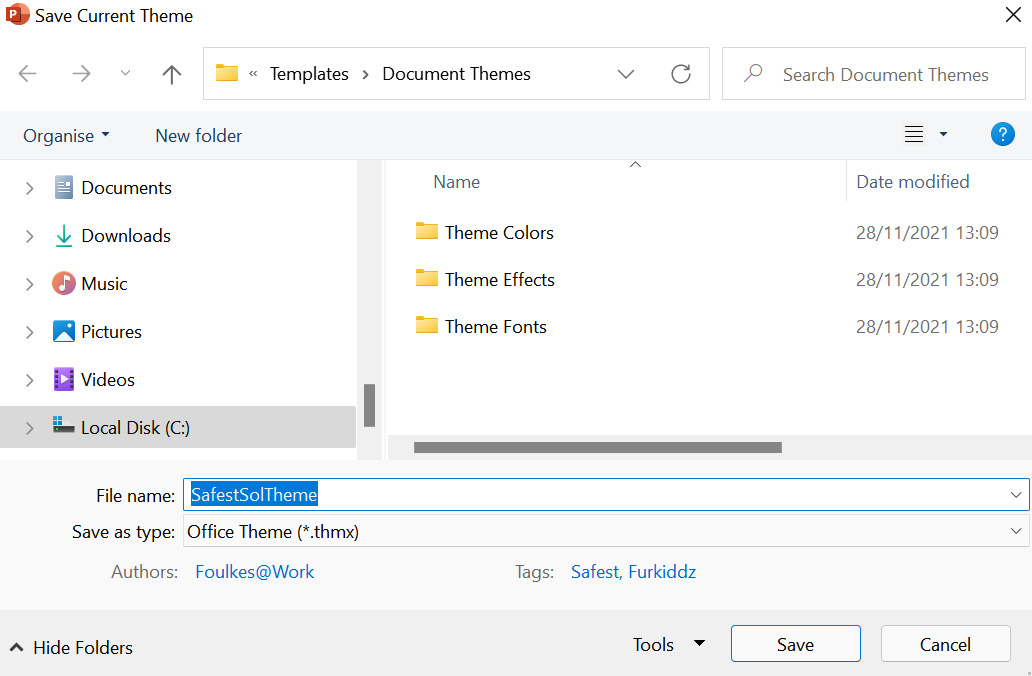
Figure 6.36 – The Document Themes folder on a local computer
- Enter a filename into the text area provided (note that the filename extension for themes is .thmx and they are automatically saved to the TemplatesDocument Themes folder).
- Click on Save. The new theme, called SafestSolTheme, will be added to the Custom list in the theme gallery:
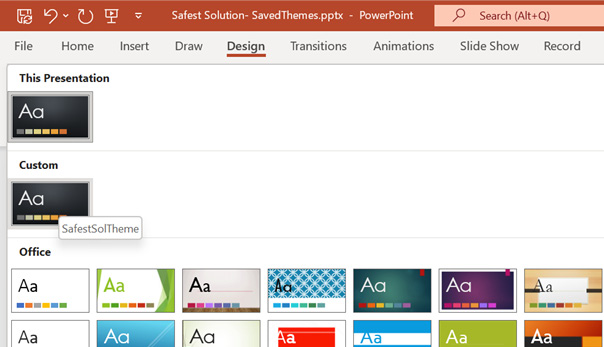
Figure 6.37 – Custom Theme, named SafestSolTheme, displayed in the Design Theme group
Note
Themes you no longer require can be removed from the theme gallery. To delete a theme, click on Design, select the theme, and then right-click and select Delete.
The last topic of this chapter will go through the video and audio capabilities of Office 2021 as there are a few updates to previous versions.
Inserting audio and video
In this section, you will become proficient with adding video and audio content to a presentation. Additionally, you will learn how to modify the content and playback options to suit your presentation's requirements.
Before we look at editing video and audio content, first, we will learn how to insert a video clip.
Inserting a video clip
- Open the presentation called VideoAudioContent.pptx.
- We will insert a video on Slide 3.
- Click on Insert | Video from the Media group at the end of the ribbon.
- You can insert a video from an online source, the new Stock Videos option, or from a location on your computer:
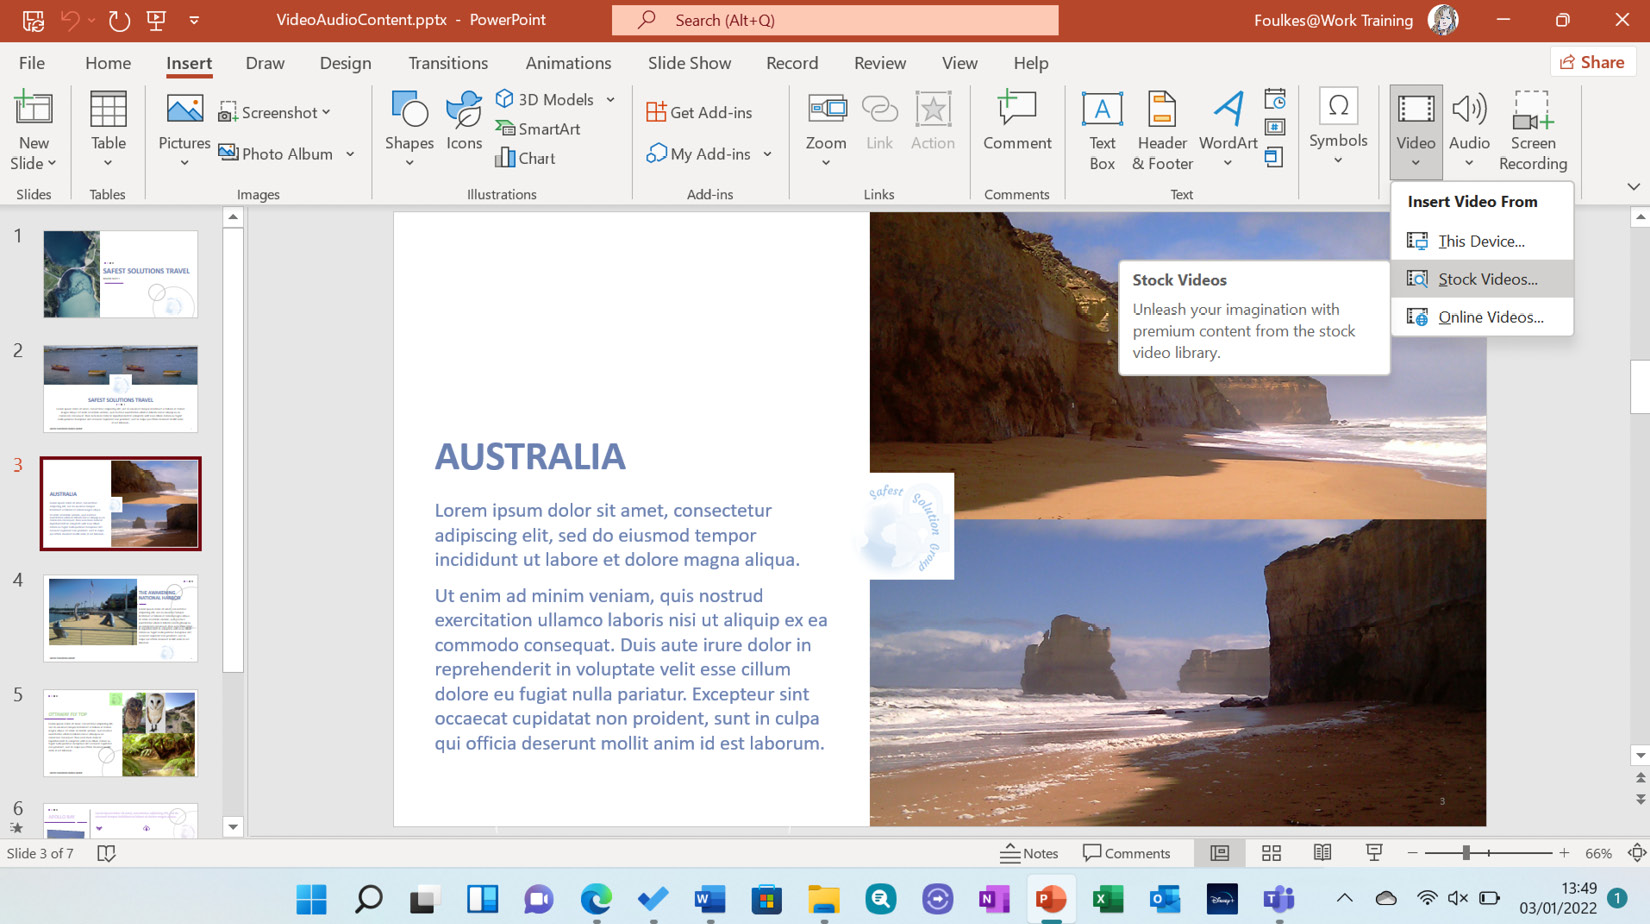
Figure 6.38 – The Insert Video from option in the Insert tab
- Locate the video called AUS1.AVI and double-click to insert it onto the slide.
- The video will appear on the slide. Note that a range of options are now available on the Video Format and Playback tabs so that you can edit and play back the video content:
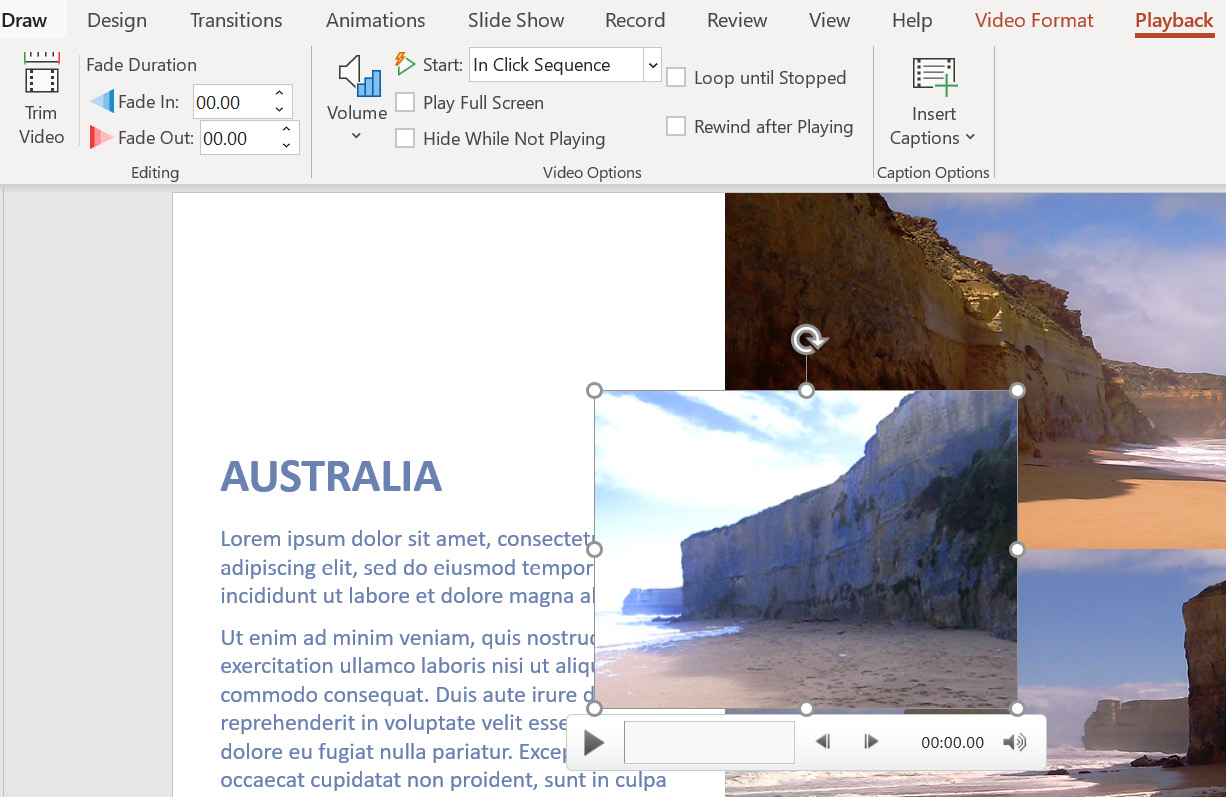
Figure 6.39 – The Playback and Video Format tabs appear after inserting or clicking on the video content
Note that formatting a video is the same as formatting any other content on a slide.
Applying styles to video content
- Make sure the video is selected on Slide 3.
- Locate the Video Styles group from the Video Format tab.
- Click on the More... icon to see all the available styles. Select a style to apply to the video.
- Changing the size of a video is the same as resizing any object within PowerPoint. We will now concentrate on the audio aspect.
Applying a style to an audio clip
- Using the presentation from the previous example, click on Slide 2.
- Click on the Insert tab and choose the Audio icon from the Media group.
- Select Record Audio, as you do not have an audio recording:
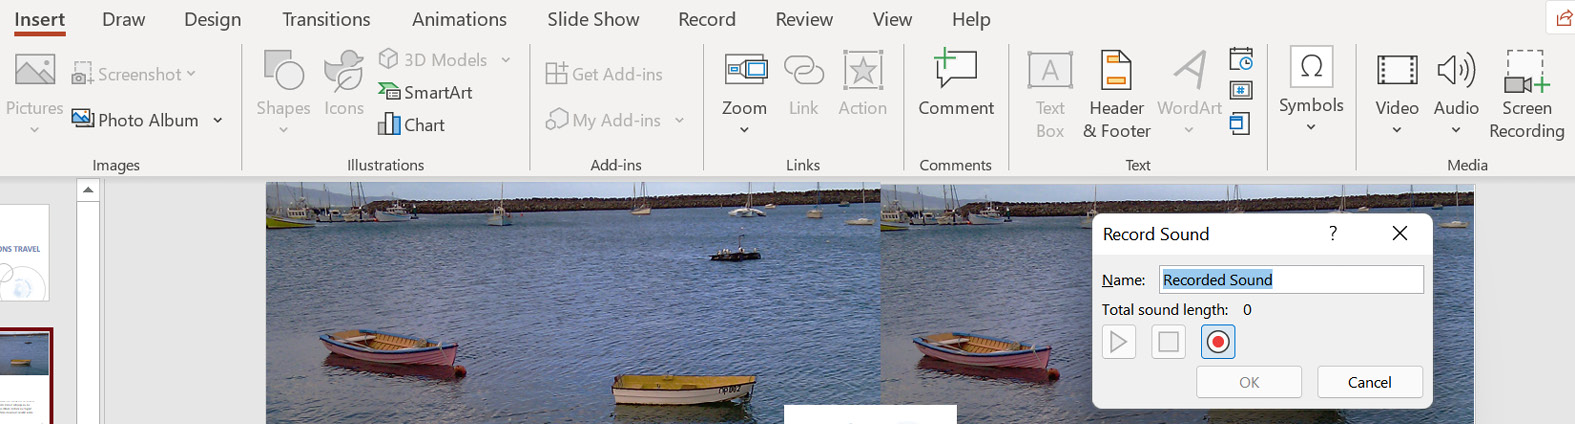
Figure 6.40 – Inserting or recording an audio clip using the Insert | Audio option
- Name the recording, then click on the Record icon to begin recording (the red dot icon).
- Click on the Stop recording icon when complete (the blue square). Click on the OK icon to insert the audio onto the slide:
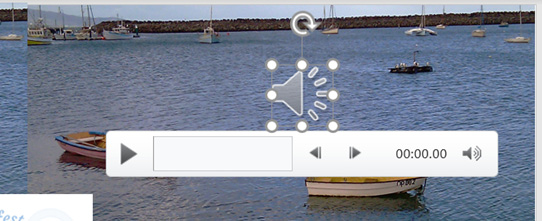
Figure 6.41 – The inserted audio clip on the slide
- The audio icon can be resized and repositioned using the same methods we discussed previously. On the Playback tab, you will see the Audio Styles icons. Here, you can choose to remove a style or play the audio in the background while presenting the slide show.
Adjusting the playback options
The video playback options are located on the Video Format tab, and the audio options are available on the Audio Format tab. Make sure you have clicked on the video or audio first before you complete any of the following tasks:
- To start the video (or audio) with a mouse click when clicking on the video icon, select When Clicked On from the Start: option.
- To start the video automatically when the slide is displayed on the screen, click on Automatically.
- In Click Sequence means that the video will play in the order it appears among all the other animated elements on the slide. Normally, this is the default option.
- To hide the video icon so that it does not show on the slide show while presenting, click on Hide During Show. Be careful of this option if you have the Start: option set to On Click. This is because you won't see the icon and be able to click on it to play the video. Only use this option for automatic playback:
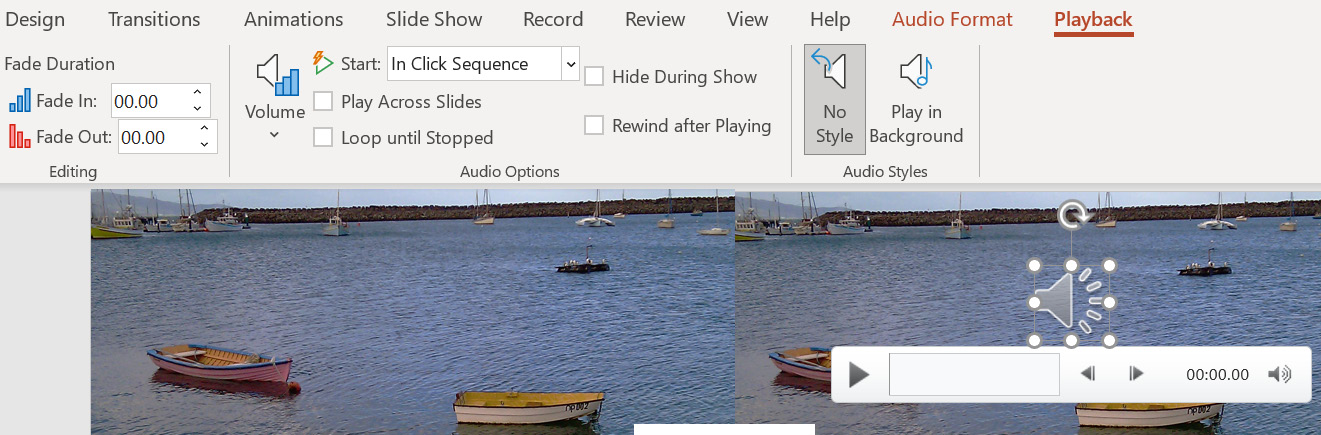
Figure 6.42 – The audio options are set via the Playback tab
- To play a video continuously in a presentation, click on the Loop until Stopped checkbox. This is great to use if, for instance, you're presenting at a show and the presentation must keep on playing for many visitors walking by a marketing stand.
- The Rewind after Playing options will set the video to the start position once it's finished playing.
- The Play Across Slides checkbox or Play in Background option will play the video over the entire slide presentation.
- The Volume setting allows you to adjust the sound level, as well as mute the video.
- The Trim feature is a valuable tool when you need to remove content from a video or audio clip. Simply drag the green and/or red markers to edit the Start Time and End Time settings:

Figure 6.43 – Trimming audio and video content with PowerPoint 2021
- Bookmarks are another feature that can aid you when needing to jump to a certain spot along the timeline when presenting. Often, the entire video or audio content is not relevant; this way, you can control which content is shown at the time of presenting. To add a bookmark, simply click on the video (or audio) timeline to select the time you need to insert the mark. Then, select Playback | Add Bookmark. A yellow dot is inserted at the marked position on the timeline. Repeat the process to add further bookmarks. Click on Slide Show | From Current Slide to see the bookmarks while presenting. Click to navigate directly to the desired bookmark along the timeline.
Another useful feature within the Playback tab is the ability to add captions to your video file. Let's investigate this next.
Inserting captions
If you need to add captions to videos within PowerPoint, you can use the Playback | Insert Captions command to locate the relevant captions file on the local computer. Often, we would create these video text descriptions within a video application, such as Camtasia or Captivate, prior to inserting the video content elsewhere. If your video has no sound or you would like to add text to the video, then this option is perfect!
Creating the closed caption file
As mentioned earlier, captions are usually added when the video is compiled, but if not, we can use Notepad on our computer to create a caption file. To learn how to create a caption file, please refer to https://support.microsoft.com/en-us/office/create-closed-captions-for-a-video-b1cfb30f-5b00-4435-beeb-2a25e115024b. Once complete, your caption file will look similar to the following screenshot:
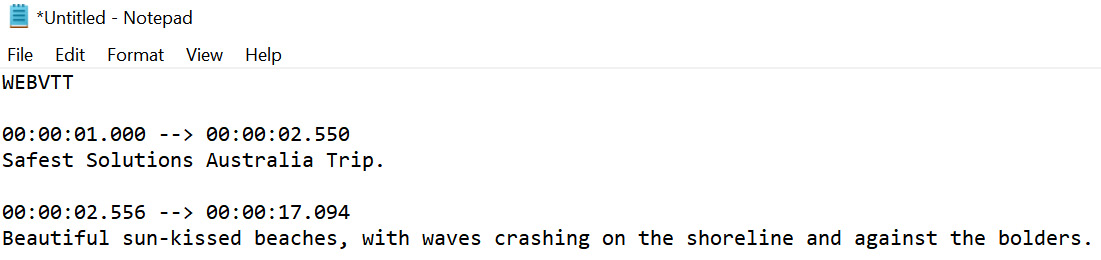
Figure 6.44 – A closed captions Notepad file
Ensure that the Notepad file is saved using the . vtt closed captions file extension. Add the .en before the file extension to indicate that the file is an English closed caption file:

Figure 6.45 – The file-naming convention for caption files in Notepad
Once this is complete, you will need to add the .vtt file to the video.
Inserting the closed caption file
Insert the caption file (VideoCaptionsSSG.en.vtt) by visiting Playback | Insert Captions:

Figure 6.46 – The Insert Captions option to add closed captions to the video, as seen in the timeline
Once the captions have been inserted, they will become part of the video timeline.
Lastly, let's look at the export options for videos. This feature was introduced in Office 2019, and the only difference in Office 2021 is that the tab name has changed from Recording to Record.
You can record video, audio, and inking within a slide presentation, then export the video at 4K resolution, all available from the Record tab, as illustrated in the following screenshot. Note that the new feature, Record | Record, is discussed in greater detail in Chapter 7, Photo Albums, Sections, and Show Tools:
- Open the presentation to export as a video. Click on Record | Export to Video:

Figure 6.47 – The Record tab in PowerPoint 2021, showing the Export to Video option
- Click on Full HD (1080p) to see the list of options available.
- Choose the Ultra HD (4K) option to save the video as ultra-high quality and in the largest file format:

Figure 6.48 – The Ultra HD (4K) option
- Click on Create Video to complete the process. The presentation will be exported to the location chosen.
Well done! You have mastered a huge range of skills in this chapter.
Summary
This chapter has equipped you with the necessary skills to manipulate PowerPoint 2021 slides, apply and create themes, reuse slides, and work with textboxes and charts. You are now proficient in how to apply styles and manipulate slide elements using the Auto Fix feature. You have gained an understanding of how to insert an agenda and arrange and manipulate objects. Additionally, you know how to add and customize video and audio content on slides within a presentation. You have mastered the new drawing features, learned how to create and insert captions onto a video, and explored the playback options for audio and video.
In the next chapter, you will learn how to create stunning photo albums and learn how to define presentation sections and motion effects. Additionally, we will run through how to create a presentation and add animations, transitions, and slide timings to it. You will learn about the new Record feature and work with Presenter View. There is also a section on new features such as setting the reading order, and how to rehearse presentations using a body language and speaker coach. The new inking feature is also addressed in the following chapter. You will become a master with the advanced morph technique.