
Chapter 3: Styles, Referencing, and Media
In this chapter, we will touch on making enhancements to existing features and learn how to become more comfortable when working with styles by refining the layout. After that, we will cover some tips and tricks. Building on your existing knowledge from the previous chapters is key to this chapter, where we will troubleshoot more than one table of contents within a document and look at cross-referencing. A section on working with media content and drawing elements will also be provided.
The following topics will be covered in this chapter:
- Managing the styles environment
- Word referencing features
- Creating media and drawing elements
Technical requirements
To complete this chapter, you should be able to work with and create styles. Knowledge of the basics related to inserting and generating a table of contents, as well as working with graphical elements, is encouraged – these features were dealt with in detail in the first edition of this book.
The examples for this chapter can be found at the following GitHub URL: https://github.com/PacktPublishing/Learn-Microsoft-Office-2021-Second-Edition.
Managing the styles environment
In the previous edition of this book, Learn Microsoft Office 2019, we learned how to create and edit styles. In this section, we will build on our skillset by looking at ways to manage the Word environment so that we can work with styles more efficiently.
To set the Style pane, we need to be in the Draft or Outline view. Let's do this so that we can see the Style pane.
Viewing a document in the Draft view
By default, a document will open in the Print Layout view. We can change the view to the Draft view when we need to see any additional marks in the document and when we would like to view document styles (marks such as paragraph markers, spaces, and tabs). When working in the Draft view, we won't able to see any images, only text.
If you would like to follow the steps provided in the next section to view a document in the Draft view and add the Style pane, open the Butterfly Agreement.docx file. Click the View tab, then select Draft from the Views group.
Once the document is in Draft view, we can add the Style pane.
Adding the Style pane
When we work with long documents that contain several built-in or custom styles, it is sometimes necessary to see the style names that already exist in lines or paragraphs in the document. This is especially relevant when you're receiving documents from outside your organization as you may need to make amends, but then continue using the same style set throughout the document to maintain uniformity. Adding the Style pane to the left-hand side of the document window allows you to see all the styles that have been applied to a document:
- Click the File tab.
- Select Options.
- Click the Advanced category from the left-hand side of the dialog box.
- Scroll down until you locate the Display heading.
- Locate the Style area pane width in Draft and Outline views: option.
- Enter 2cm into the space provided:

Figure 3.1 – The Word Options dialog box displaying the Style pane's width in the Draft and Outline views
- Click OK at the bottom of the dialog box to confirm your selection.
- To the left-hand side of the document window (in the margin area to the left-hand side of the document), you will now see the Styles pane. This pane contains all of the styles that have been applied throughout the document:

Figure 3.2 – The Styles pane's width of 2 cm to the left-hand side of the document window
- Now that we have the Styles pane on the left, we can add it to the right of the document window. This way, you can see all the existing styles on the left and all the available style sets to the right.
- Click the More button to the right of the Styles group on the Home tab:

Figure 3.3 – Using the More button to launch the Styles pane
- Double-click the Styles pane's header area to dock the Styles pane to the right-hand side of the Word document:
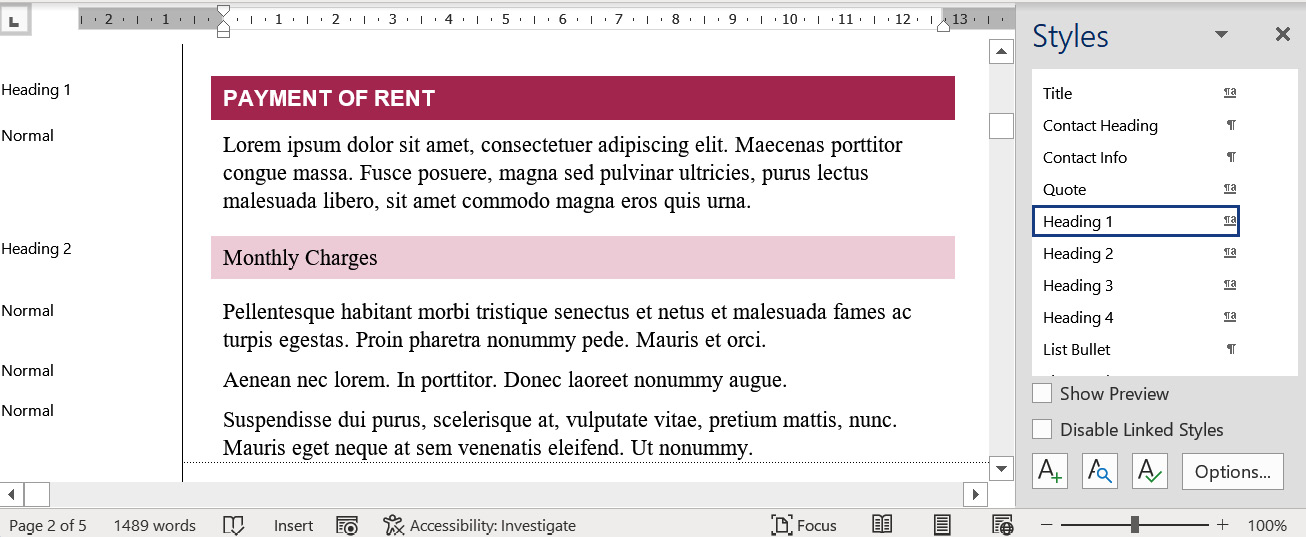
Figure 3.4 – The Styles area width pane and the Styles pane
- Now, you have the perfect styles arrangement. Working in the Draft view with both panes available lets you do the following:
- See styles at a glance that have already been applied to different headings, paragraphs, lines, and numbering throughout the document. This can be seen on the left-hand side.
- Copy styles from one part of the document to another using the Format Painter button.
- Select parts of the document and visually see the style that's been applied in the right pane.
- Apply new styles to selected paragraphs using the right pane.
- Add the Show/Hide button (via the Paragraph group on the Home tab) to display spaces, tabs, indents, and paragraph markers throughout the document.
- Have quick access to create new styles, modify existing styles, or update existing styles.
Now that you can arrange your environment more efficiently when working with styles, let's learn how to keep styles intact when sharing outside our organization, for instance.
Making sure styles are not updated
When we have a set of styles that have been customized for a company brand, we may need to "protect" those styles from being updated if the document is shared with other parties.
In the previous edition of this book, we learned how to create, modify, and update styles. When we create a set of styles that can be applied to our organization, we want these styles to remain intact, even if we send the document for review to others outside of our organization. This could be a lengthy contract or agreement that has been formatted using our specific company style set.
Once you have applied styles to a document, you need to ensure the document template does not allow your styles to be automatically updated. Let's learn how to do this:
- To follow these steps, make sure the Butterfly Agreement.docx file is open.
- Apply styles to the document, where applicable, then ensure that the document has been saved. Once you are ready to share the document with others, click the Developer tab of the ribbon.
Note
If the Developer tab is not visible, click the drop-down list at the end of the Quick Access Toolbar (QAT), then select More Commands…. Navigate to the Customize Ribbon category on the left. On the right-hand side of the window, make sure that the Developer option is selected. Click OK to confirm this. The Developer tab should now be visible on the ribbon.
- Remove the tick from the default Automatically update document styles option that's located on the Templates tab:

Figure 3.5 – The Automatically update document styles option needs to be off to preserve styles in a document
- Click OK to confirm this, then save the document to update it.
Now, you can feel confident when you're sharing documents that have a specific style set you wish to keep intact. The document will be returned to you without any changes being made to your brand style set.
In the next section, we will learn how to create multiple tables of contents (ToCs) in one document.
Referencing features using Word 2021
In this section we will go through the steps to add multiple Table of Contents to a Word document.
Working with multiple ToCs
When you're working with a long document that contains two or more sections, you may want to add a ToC per section. In the previous edition of this book, we learned how to create a ToC using Microsoft Word 2019. To insert a ToC in the previous edition, we visited the References tab, then selected the Table of Contents button to access the available options:

Figure 3.6 – Steps to generate a table of contents from the Reference tab in Word 2021
In this section, we will build on this skill.
To add multiple ToCs to a document, follow these steps:
- Open a document that contains multiple sections. We will be using the BestBean Coffee Plan TOC.docx file here. Open this document if you wish to follow along.
- This document consists of two sections – BestBean Coffee Business Plan and BestBean Coffee Startup Costs. We would like to add a ToC for each of these sections within the same document.
- Before we use this method to add the ToCs to the document, it is important to note that the document headings are formatted using Heading 1 style. Format your headings to the Heading 1 style. You can change the format of the Heading 1 style to suit your font attributes before or after you have applied the style. This was explained in the first edition of this book, Learn Microsoft Office 2019.
- Locate the first section heading (INTRODUCTION) that you wish to add to the first ToC page. Click before the heading.
- Visit the Insert tab, then click the Explore QuickParts button. From the drop-down list, click Field…:

Figure 3.7 – Adding the f switch using the Explore QuickParts button to access the Field... options
- In the dialog box that populates, we will add the f switch, which will allow us to create multiple ToCs in a single document.
- Click on TC from the Field names: list.
- In the Text entry: field, enter the name of the first heading for the first ToC.
Check the Field options checkboxes so that the TC entry in doc with multiple tables option is enabled and Outline level: is set to 1. Selecting 1 here will format the ToC using the TOC1 style:

Figure 3.8 – Field properties for a ToC entry
- Click OK to confirm this.
- To see the ToC's field code to the left of the INTRODUCTION heading in the document, click on the Show/Hide button on the Home tab.
- You will see the field code in the document. This code consists of the f switch, as mentioned previously.
- We need to amend this code slightly so that we add an identifier to the f switch. By amending the code, we can identify which ToC we are assigning the relevant headings to.
- Click to the right of the letter f, add a space, and type a. The identifier does not need to be any specific letter; it can be any identifier you wish:

Figure 3.9 – The f switch code added before the first heading
- Now, we need to copy the code for this particular f switch identifier to the other headings in this section. This way, those marked with the same identifier will be pulled through to the same table of contents.
- Select the ToC code, then copy the code and paste it before the next heading you wish to include in the section's ToC:
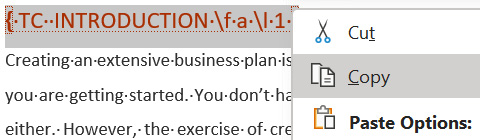
Figure 3.10 - Copying the ToC code
- Repeat this for all the headings you wish to include in the first section's ToC, changing the name of the heading's text each time.
Note
Remember that you need to change the heading's name for each of the ToC headings in the code. The heading text needs to be in inverted commas. This should happen automatically. If not, add the inverted commas when you change each heading name in the ToC's field code.
- Once you have copied the code to all the headings, click where you would like the first section's ToC to be placed inside the document.
- Click the References tab, then click the Table of Contents button.
- Select Custom Table of Contents… from the list provided.
- Click the Options… button.
- At the bottom of the Table of Contents Options dialog box, ensure that Table entry fields is selected. Outline levels should be unchecked:

Figure 3.11 – Table of Contents Options detailing the Table entry fields option
- Click OK to confirm this.
- The ToC field code will be inserted into the document, but the table headings won't be pulled through yet. The code states that No table of contents fields found.
- Press Alt + F9 to update the code.
- The identifier reference needs to be added so that it can pull the correct headings into the ToC. Type a after the f switch, as shown in the following screenshot:
Figure 13.12 – The f switch code displaying the addition of the a identifier
- Press Alt + F9 to update the ToC code. The first section's ToC will appear. If you make any changes in the document at some point, remember to update the ToC again by right-clicking and selecting Update Field. The shortcut key to update a ToC is F9:

Figure 3.13 – The ToC when changes are made
- You will need to repeat these steps to populate the second ToC in the second section of the document. Start by copying the code to the separate headings in the second section of the document. Then, remember to add a different f switch identifier for the second TOC and change the headings in the code so that they match the relevant headings throughout.
Now that you can generate multiple ToC within a Word document, let's learn about the new Table of Contents feature for Word for the web.
The Table of Contents feature in Word for the web
The ability to create a ToC is a great additional feature for Word for the web users. To create a ToC online, position your cursor inside the document where you would like the ToC to be situated. Then, follow these steps:
- Click the Reference tab.
- Select Table of Contents. Then, from the drop-down list, choose Insert Table of Contents:

Figure 3.14 – The Table of Contents feature in Word for the web
- The ToC will be generated automatically based on the heading styles within the document:
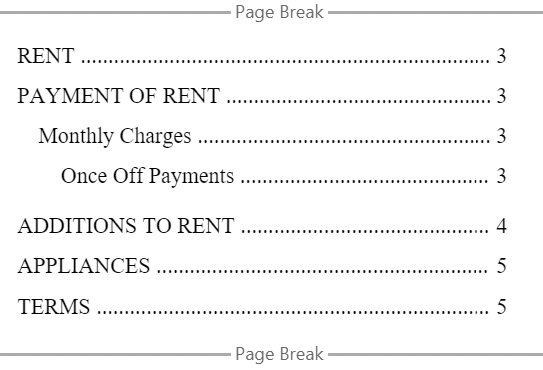
Figure 3.15 – Table of Contents on Word for the web
- We can update or remove the ToC using the buttons that are available in the Table of Contents drop-down list.
This section concentrated on just one method of creating multiple ToCs in a single document. There are a few methods you can apply to achieve the same result, but I find this method the most logical. In the next section, we will focus on generating cross-references.
Creating cross-references
In this section, we will learn about cross-references and how to insert them into a document. A cross-reference is created when we need to expand on a particular part of a document by denoting a link somewhere else in the document. Cross-references are often used in legal documents, where we click to navigate to another part of the document to expand on a particular clause, for example. We can create cross-references to headings, numbered items, tables, footnotes, and endnotes, to name a few. Follow these steps to create a cross-reference:
- Open the document that you would like to insert a cross-reference into. If you want to follow along, open the Safest Solutions Plan.docx file.
- Navigate to the bottom of page 1 and locate the sentence Please refer to point for more information and the car allowance policy.
- As we would like to insert a cross-reference to the point on the car allowance policy mentioned in this sentence, we need to click in-between the words point and for.
- Click on the Insert tab, then select Cross-reference from the Links group.
- In the Cross-reference dialog box that populates, make sure that Reference type: is set to Numbered item and Insert reference to: is set to Paragraph number (full context).
- Click on the CAR ALLOWANCE / COMPANY CAR numbered item to make sure it's selected for the For which numbered item: option.
This ensures that the number of the CAR ALLOWANCE / COMPANY CAR item's location is inserted where your cursor is in the sentence. The user can then click on the numbered item referenced in the sentence to jump directly to that link for more information:

Figure 3.16 – The Cross-reference dialog box detailing various options
If a link that you have inserted a cross-reference for changes location, when you're amending the document, you do not need to redo the cross-reference. Use the Ctrl + A shortcut to select the entire document, then press F9 to update the references. You can also right-click on an existing cross-reference, then choose Update Field.
If, however, the reference no longer exists in the document, you will need to update the reference by manually reinserting the cross-reference.
If the reference cannot be located in the document, it should display Error! Reference source not found.:

Figure 3.17 – Cross-reference error text in the document
Tip
Use the Find tool to locate all the instances of the word error once you have applied cross-referencing to your document. This method will alert you to the cross-references that need attention throughout the document.
- Once the cross-reference has been inserted, Ctrl + click to move to the reference item in the document.
Now that you know how to apply multiple ToCs to one document and can generate and update cross-references, let's look at some new drawings and media elements.
Creating media and drawing elements
Several enhancements have been made to the media and drawing elements within Word 2021. These features extend to the PowerPoint, Excel, and Outlook interfaces too, and they lean toward improving your document's presentation when you're creating design elements. This means you don't have to look outside the Office environment for inspiration.
Stock Images
Stock Images is now available as an extra option from within the Pictures drop-down list. Normally, we would only be able to upload images from our local device or online. This feature is really exciting as it contains the following categories:
- Images
- Icons
- Cutout People
- Stickers
- Illustrations
The new Stock Images feature is available in Word, Excel, PowerPoint, and Outlook 2021's standalone and online applications. Let's take a look:
- In your document, click where you would like to insert a stock image. For this example, we will be working on the ColorfulTabs.docx file.
- Go to the Insert tab and click Pictures to access the drop-down list.
- Select Stock Images…:

Figure 3.18 – The Pictures drop-down list displaying the Stock Images… option
- Select a category from the top of the dialog box:

Figure 3.19 – The Stock Images… option displaying the available categories
- Click on a picture to select it. If you would like to insert more than one picture, simply select the pictures you wish to include by clicking on them. The number of pictures you've chosen will be displayed in brackets within the Insert button:

Figure 3.20 – The Stickers category displaying the number of pictures that have been selected within the Insert button
- Click on Insert (2) to add the chosen pictures to the document.
- Move the pictures to place them in the document, and then resize or format them as necessary.
The Cutout People picture category is extremely useful for e-learning assets as you can create engaging learning materials via Word, Excel, Outlook, and PowerPoint. In the next section, we will look a little closer at color shades when working with elements in Word 2021.
Coloring using Hex values
Previously, we could only use the RGB or HSL color models to enter specific color shades in the Custom colors dialog box. We can now type in Hex codes when applying color to objects, shapes, lines, or text. A hex code is a combination of six numbers or letters and is prefixed with the # symbol (hashtag). An example of a Hex code is #8A2BE2. There are lots of websites on the internet that can help you convert RGB into Hex codes, and vice versa, to find that perfect shade you require. Follow these steps:
- Open the document that contains the elements you wish to change. For this example, we will be working with the ColorfulTabs.docx file.
- Select an image, shape, or text to alter its color. We would like to change the color of the circle shape at the top-left corner of the second page of the document.
- Double-click to select the circle.
- The Shape Format tab will appear at the end of the ribbon.
- Select the Shape Fill drop-down arrow, which can be located via the Shape Styles group.
- Click on More Fill Colors…:
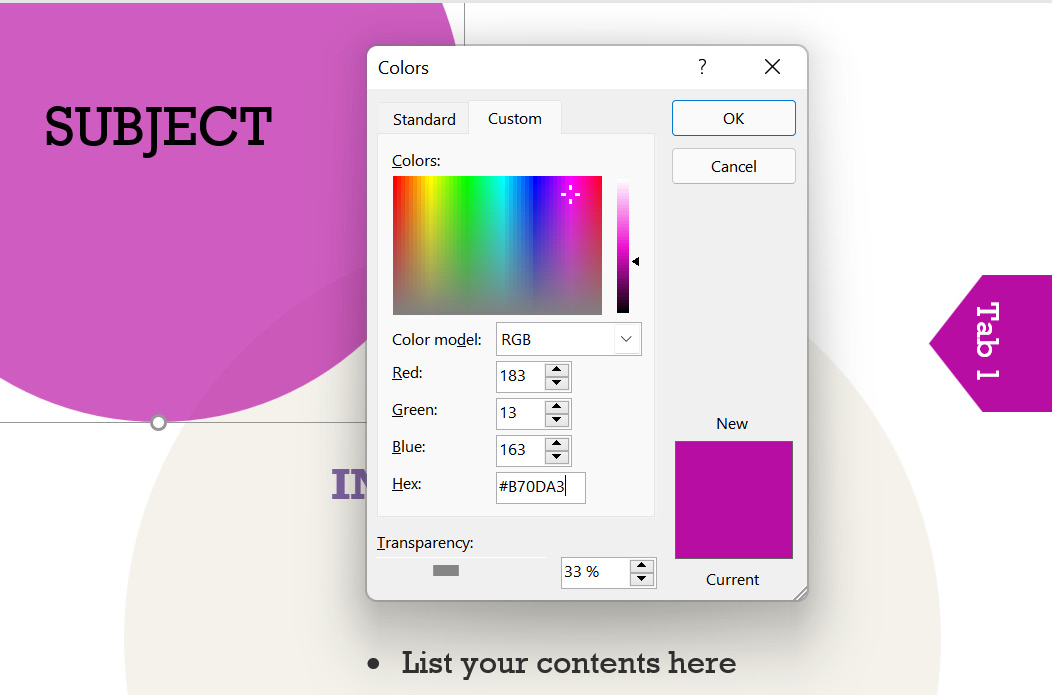
Figure 3.21 – The Hex: option is now visible on the Custom Colors palette
- The Colors dialog box will populate. At the bottom of the dialog box, you will notice a new option named Hex:.
- Type in the Hex code you wish to format your shape with by replacing any text that's already been entered into the area provided to the right of Hex: text. For this example, we will use Hex code #8A2BE2.
- Click OK to confirm this. Now, your shape will be a new bright color.
- We have learned a new skill to apply different shades of color to elements within Word. Let's have some fun on the next topic looking at ways to jazz up our drawing shapes.
Applying sketched style outlines
The sketched style outlines are one of my favorite new features. They can be found by going to the Shape Styles group of the Shape Format contextual menu. Instead of inserting computer-drawn perfect straight-lined shapes, you can now insert shapes and turn them into fun and engaging graphics.
The following screenshot shows an example of a standard straight-lined rectangle that we would normally insert into a document. Below the straight-lined rectangle are examples of the three new sketched style outlines – that is, curved, freehand, and scribble:

Figure 3.22 – Representation of the standard rectangle and the three new sketched line styles – curved, freehand, and scribble
Now that you are familiar with the names of the new sketched shape styles, let's apply them:
- Open a Microsoft Word 2021 desktop document.
- Click the Insert tab, then locate the Illustrations group.
- Select the Shapes option, then choose a shape from the categories listed.
- A cross-hair (+) will now appear as your cursor.
- Click inside the document and drag with your cursor until you have drawn the shape size you require. Release your cursor to view the shape.
- Double-click the outside border of the shape to select it.
- Notice that the Shape Format tab has appeared at the end of the existing tabs of the ribbon:

Figure 3.23 - New Sketched style options in Word, PowerPoint, and Excel 2021 (desktop)
- While the shape is still selected, locate the Shape Styles group.
- Select the Shape Outline option.
- From the drop-down list, select Sketched. Then, navigate to the right, where you will see the three new sketched shape styles. Select from curved, freehand, or scribble.
Note
Sketched line options are available in the Word, Excel, and PowerPoint 2021 desktop versions.
Summary
This chapter built on the previous edition's skills and introduced some of the new features of Office 2021. We focused on ways to manage the styles environment to make amending long documents an easy task and keeping styles intact when working with external collaborators. You now know how to apply more than one ToC to a document and be more creative with shapes, color shades, and stock images.
In the next chapter, we will revisit some of the features that were explained in the previous edition of this book, along with updates that can be applied to the Office 2021 interface, and learn about new features. Here, you will learn how to construct a form using the content controls and generate an online form within Word desktop, as well as online, to collect information from others. We will also recap on headers and footers in a document, revisit tracking and the Compare and Combine tools, and learn how to automate processes when using Word 2021.