
Chapter 7: Photo Albums, Sections, and Show Tools
Slide show presentation tools allow you to control all aspects of a slide show, ensuring that you can show your audience just the right content at the right time.
We will learn how to create stunning photo albums with captions, and learn how to define presentation sections and motion effects. We will also run through animations, transitions, and how to control slide timings and playback of audio narration. We will learn about the new Record feature, work with Presenter View, and cover a topic on the new feature to set reading order and to rehearse presentations using body language and Presenter Coach (Speaker Coach).
The new inking feature is also addressed and you will become a master with the advanced morphing technique. Included is a section on master slides, where we check the consistency throughout a presentation, and options for hiding or showing specific slides when we're delivering a presentation.
The following topics are covered in this chapter:
- Creating and modifying photo albums
- Working with presentation sections
- Applying animations and transitions
- Using hyperlinks, actions, and comments
- Exploring slide show options and custom shows
- Using master slides and hiding slides
Technical requirements
Prior knowledge to aid you in mastering this chapter would be the ability to work with different slide layouts; create and format elements such as textboxes, charts, and tables; and insert video and audio content. The examples used in this chapter are accessible from the following GitHub URL: https://github.com/PacktPublishing/Learn-Microsoft-Office-2021-Second-Edition.
Creating and modifying photo albums
In this section, you will learn how to create, organize, and format a photo album using PowerPoint 2021. This feature allows you to add a collection of photographs to a presentation and set format options all in one go. It is a really efficient process that is perfect when creating presentations predominantly based on images, or for personal online photo album memories to which video, animations, transitions, audio, and other PowerPoint 2021 elements can be added to enhance the end product:
- Open PowerPoint 2021 and create a new blank presentation.
- To construct a photo album, click on the Insert | Photo Album | New Photo Album… option.

Figure 7.1 – The New Photo Album… option from the Insert tab
- In the Photo Album dialog box that populates, locate the content you would like to insert as a photo album.
- Click on the File/Disk… icon to browse and locate pictures on your computer. It is important to note that storing pictures in one single location/folder would be an advantage prior to creating the album, as well as having a descriptive filename for each picture so that locating, rearranging, and formatting pictures is trouble-free.
- Select the pictures using either the Ctrl + click method to select individual pictures, or select multiple files in one go using the Shift + click method; or, use Ctrl and the A key to select all the files in the folder. We will use the images within the PHOTOALBUM folder for this example.
- The pictures are added to the Pictures in album window, located in the center of the dialog box. You will see from the following screenshot that the pictures are numbered and the picture names are displayed in the window for ease of use:
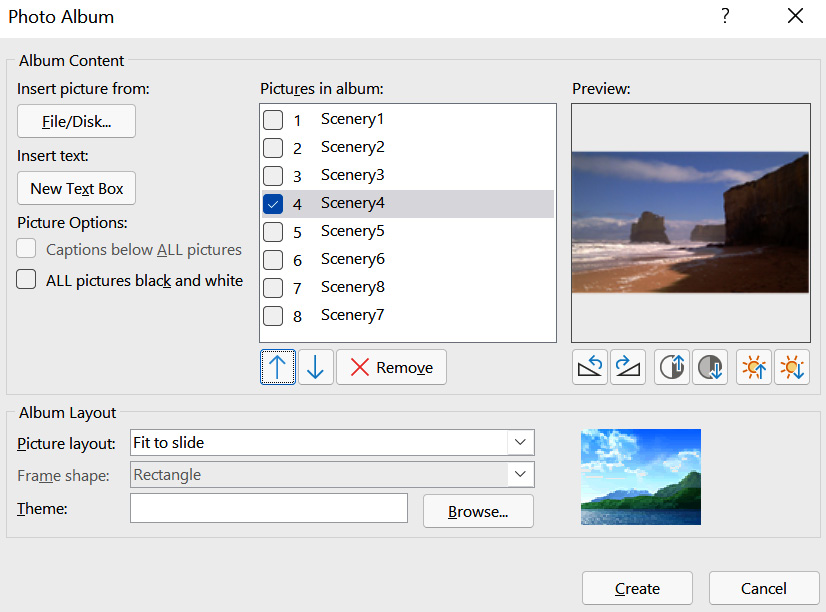
Figure 7.2 – Numbered pictures as well as filenames showing in the Pictures in album area
- There are numerous formatting options to consider before you click on the Create icon at the bottom of the dialog box. In this instance, we will go ahead and create the album, and then revisit each individual formatting option, so that you are familiar with the options and become comfortable working with photo albums in PowerPoint. An example photo album can be seen in the following screenshot:
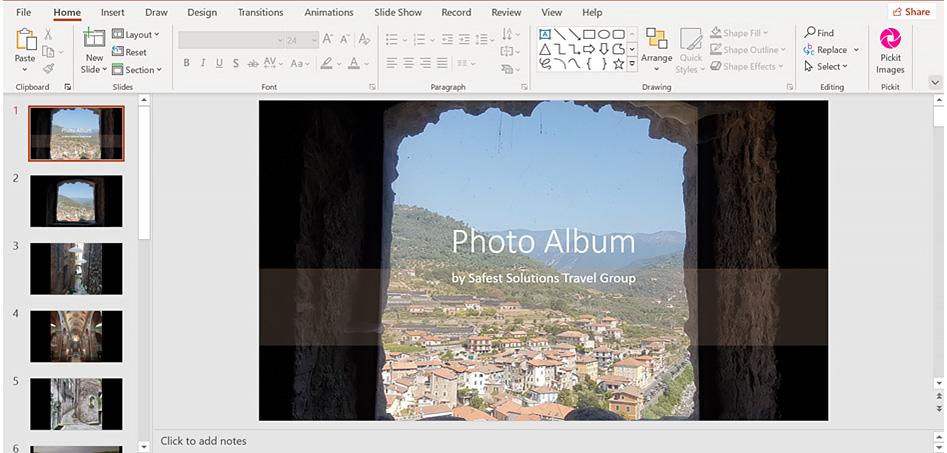
Figure 7.3 – Photo Album created with the amended first slide
- Each picture is displayed on an individual slide as the default layout was set to Fit to slide.
- Notice that the photo album is created as an entirely new presentation and is not part of the existing blank new presentation you started off with.
- Save the photo album as SSG-PhotoAlbum.pptx.
In the following table, we will list the features we can customize when creating Photo Albums in PowerPoint 2021. In the previous edition book, Learn Microsoft Office 2019, we addressed these customizations in detail.
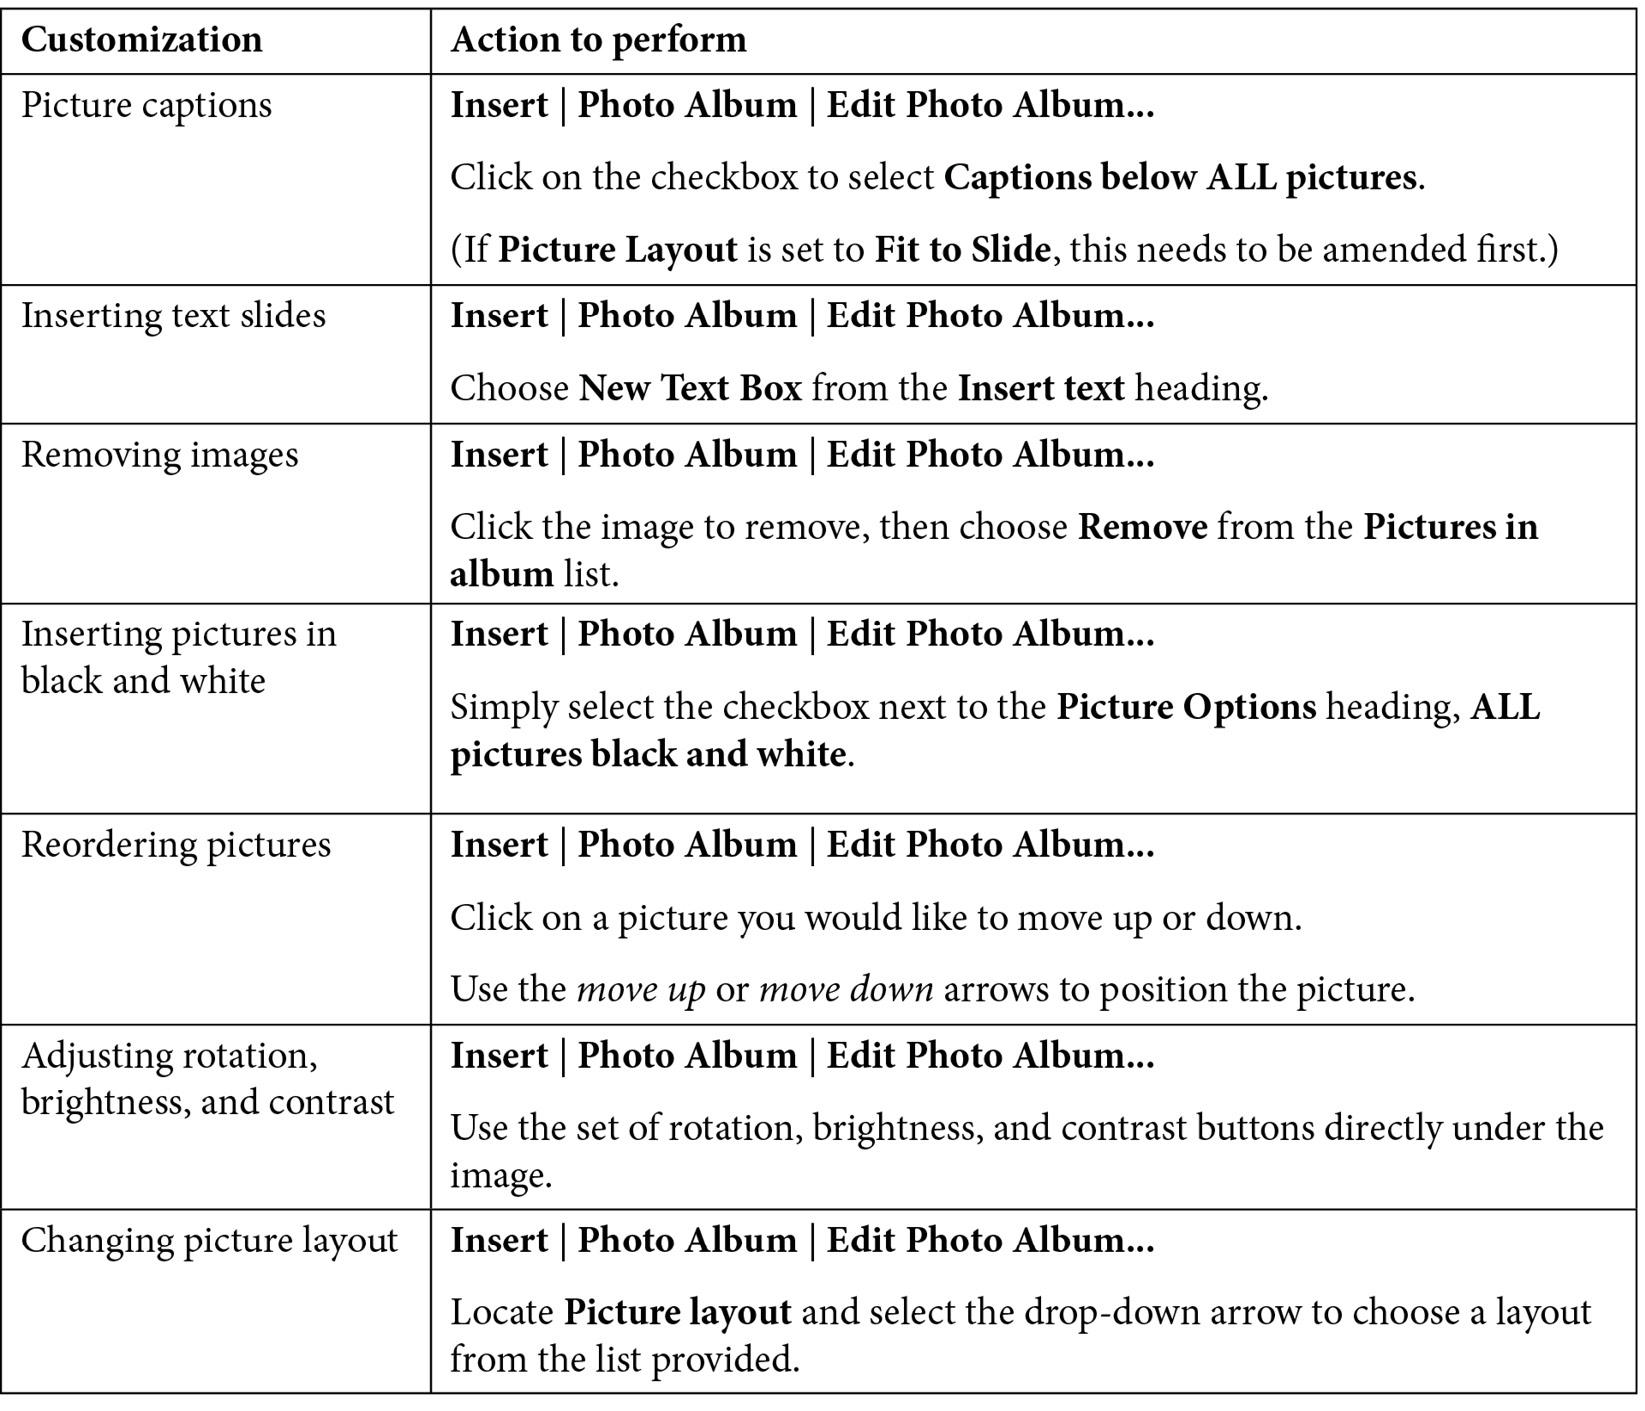
Table 1.1 – Photo Album customization options
A great feature to add to a photo album would be to compile an audio narration on each slide. Select a slide to record audio, then click Insert | Audio | Record Audio…. Alternatively, you can use the new Record | Record feature to record narrations throughout the presentation. This feature was discussed in an earlier chapter.
Now that you have mastered photo albums, let's add to your skillset by learning how to cluster slides together into sections.
Working with presentation sections
In this topic, you will learn to understand why we would use sections in PowerPoint. We will create, rename, and remove sections in a presentation.
Formatting sections
If you are scrolling through a huge presentation or applying finishing touches, it can be extremely frustrating to locate slides to format or edit. The Sections feature allows you to organize your presentation into categories so that finding slides for a particular category is effortless.
In addition, if working on a presentation with multiple contributors, you can assign sections to different people. Reordering slides or viewing a presentation in the Slide Sorter view with sections applied is a breeze:
- To add a section, you can be in the Normal or Slide Sorter view. For this example, we will be using the SSG-Sections.pptx presentation.
- The feature is accessible by right-clicking in between slides and choosing Add Section. The option is also accessible from Home | Section | Add Section.
- Once you have inserted a section, an arrow will appear just above the slide entitled Untitled Section, and the Rename Section dialog box will populate.
- Type a new name for the section into the Section name text placeholder. For this example, we will use the text Introduction and click on Rename, as illustrated in the following screenshot:

Figure 7.4 – Renaming a section
- Repeat the process to create sections for dogs, rabbits, and birds.
- The created sections are displayed in Slide Pane, but can also be viewed much more clearly in the Slide Sorter view due to the sections showing the slide thumbnails.
- Sections can be collapsed or expanded using either the collapse or expand arrow to the left of a section name. To collapse or expand all sections in a presentation, click on the Sections icon located on the Slides group, and select Collapse All or Expand All.
- To rename a section, right-click on the section name, and then choose Rename Section from the shortcut list provided.
- To move sections within a presentation, right-click on the section name, and then choose Move Section Up or Move Section Down.
- If you want to remove a section, simply right-click on the section name and choose Remove Section.
Visit the Easy linking section in this chapter to learn how to create a thumbnail link from a section within the slide deck. The next section will equip you with the skills to add animation to your slide deck.
Applying animations and transitions
In this section, we will recap adding an animation to multiple objects on a slide and use Animation Pane to configure, set triggers, modify transitions, and look at the advanced morphing technique. Animation types have not been updated within PowerPoint 2021.
As we already know, animations can be applied to pictures, charts, tables, SmartArt graphics, shapes, clip art, and many other objects in PowerPoint. We must always remember that animations can be extremely distracting if applied to many objects of the same slide. No more than 20% of your slide content should be animated.
Using Animation Pane
Animation Pane provides access to animation start options, timing, and effect options, as well as the ability to remove animations from objects. These options are explained throughout this chapter using other methods, so we will concentrate on each individually, in those sections.
Setting up advanced animations
You can apply more than one animation to a single object on a slide, as follows:
- Select an object on a slide that already has an animation applied.
- Click on the Add Animation icon located in the Advanced Animation group. Remember that applying another animation to an already animated object using the normal animation effect options will replace the animation. The Add Animation feature allows you to add more than one animation to a single object.
- Select an animation from the drop-down list provided.
- The animation is applied to the object and becomes the second animation applied, as illustrated in the following screenshot:

Figure 7.5 – Adding animation using the advanced Animation group
- Preview the animation. The first animation will play, followed by the second animation.
- To preview animations automatically, click on the Preview icon to the very left of the Animation ribbon, and then select AutoPreview from the drop-down list. Every time you apply an animation or animation effect option, the preview will automatically play the changes without having to click on the Preview icon each time.
Setting animation timing
Animation timing can be set by using either Animation Pane or the Timing group. Animation Pane is a great way to visualize changes to these options.
Setting start options
In the petal example that we have been working with, the petals have the same animation effect applied and when previewed, the animations all happen at the same time. Let's change the start options so that each petal appears independently.
- Select an object to set when you would like an animation effect to start. We will now change the start options so that each petal plays after the previous petal, and so on. Let's get started by selecting the first petal on slide 1.
- Locate the Timing group on the Animation tab.
- Use the Start drop-down list to set how the animation should begin.
- For this example, we will set the petals to start after each other, using the After Previous start option.
- Continue to do the same to each petal of the flower, this time using Animation Pane.
- Select the next petal, and then click on the Animation Pane option from the Advanced Animation group.
- Click on the arrow to the right of a group and select Start After Previous. Notice that the visual representation here is easier to follow due to the yellow thumbnails that appear next to each animated group, as can be seen in the following screenshot:
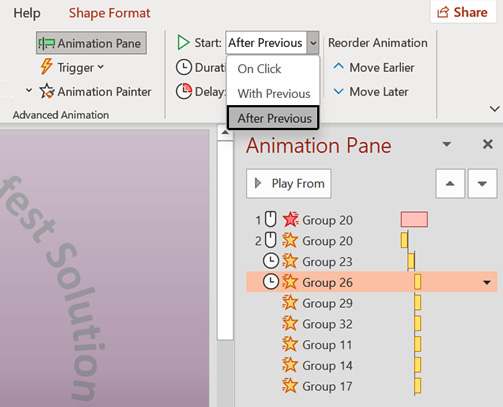
Figure 7.6 – Animation Pane showing petal animations
- Repeat this process until all the petals have been set with the Start After Previous option.
- Preview the animation when complete.
Selecting delay or duration options
Setting a delay on an animation effect means that you will essentially pause an animation for a period of time before it should start playing. If you would like an animation to play for a certain amount of time, then you need to set the duration of the animation. You can do this in the following way:
- Select an object on a slide that has an animation effect applied. For this example, we will select the center of the flower and apply the Grow & Turn animation effect, and then set a delay.
- Locate the Timing group on the Animation tab.
- Use the Duration text area to set the animation duration, or the Delay text area for the number of seconds the animation must wait until it starts.
- Launch Animation Pane by selecting the appropriate icon from the Advanced Animation group.
- Click on the arrow to the right of the animated object in Animation Pane.
- From the drop-down list, select Timing…, as illustrated in the following screenshot:

Figure 7.7 – Setting Timing… from Animation Pane
- Set the delay options in the Effect dialog box.
- Click on the OK command when complete and commit to the changes made, and then play the animation. The center of the flower should play 3 seconds after the previous animation has ended, as illustrated in the following screenshot:
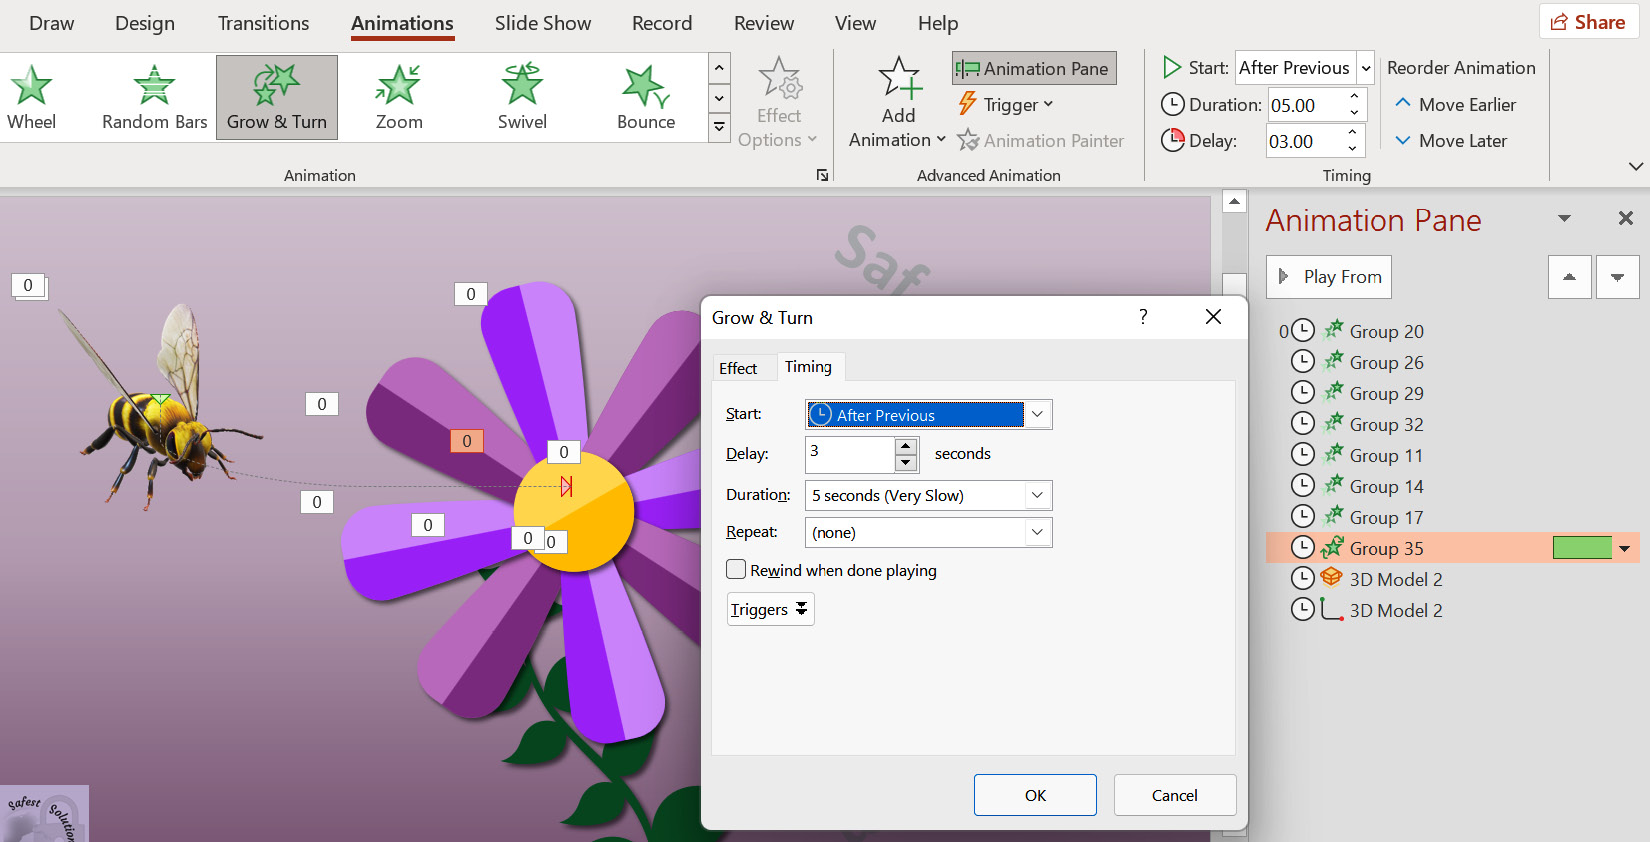
Figure 7.8 – Working within the Timing dialog box to set animation-delay
Now that we have recapped animations using PowerPoint 2021, let's look at how we work with 3D models and cube animations.
Working with 3D models and cube animations
3D models allow the insertion of objects from online and offline sources that can be viewed in 3D (by rotating to view all angles of the object). Cube animations are animations solely for any 3D model you insert into PowerPoint, and will only be accessible after inserting and selecting a 3D object on a PowerPoint slide. PowerPoint 2021 includes the new Stock 3D Models feature.
Inserting a 3D model
- Click on the Insert tab.
- Locate the 3D Models icon from the Illustrations group.
- Click on the 3D Models icon, or choose an option from the drop-down list provided.
- Click to select Stock 3D Models....
- Type a search keyword—for instance, bee—into the area provided, or select from the comprehensive list of categories displayed.
- Click on the 3D model to select it, and then choose Insert (1) at the bottom of the search box, as illustrated in the following screenshot:
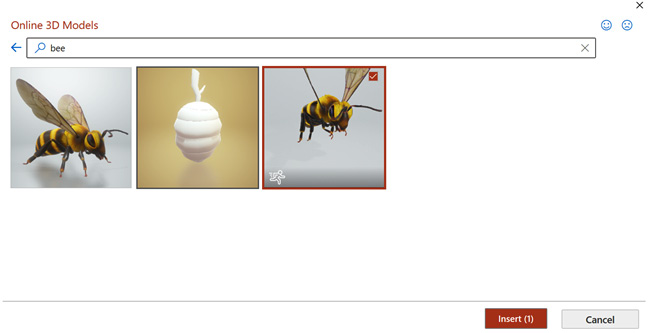
Figure 7.9 – Selecting the bee from Stock 3D Models
- The 3D model is placed directly onto the slide, and you are then given the opportunity to explore the 3D Model tools from the 3D Model tab, as well as its ribbon options. Notice that models within PowerPoint 2021 insert with existing animation. There are numerous model positions available under the 3D Model Views group, as can be seen in the following screenshot:

Figure 7.10 – 3D Model animations
- Select an appropriate view for your slide.
Animating a 3D model
In addition to the bee flapping wings, as per the previous example, you can animate the model using the default animations available, or select from the 3D cube animation options:
- Make sure the 3D model is selected.
- Click on the Animations tab.
- Notice that the Animation group offers 3D model animation types, and Effect Options for each, as highlighted in the following screenshot:

Figure 7.11 – Stock 3D model of the bee highlighting the Scene animation options, as well as Effect Options
- The animation types in PowerPoint 2021 also include Scene 1, Scene 2, and Scene 3 (as per the bee example), which have dropped in after inserting the stock 3D model of the bee. Experiment with these new animation types, and apply any timing or effect options.
- Use the different scenes within the Animation options or select a motion path of your choice to apply to the bee as a second animation to create movement. Experiment with moving the endpoint of the animation to land in the center of the flower.
- Preview the animation and save the presentation when complete.
Attaching sound to an animation
- Select an object on a slide to add sound to. In this case, we will use the bee.
- To add an enhancement such as sound, click on the Effect Options… icon from the drop-down arrow next to the animation effect of the selected object in Animation Pane.
- From the Effect Options dialog box, locate the Sound text area directly below the Enhancements heading.

Figure 7.12 – Sound effects
- Click the drop-down arrow to view and select from the sounds available.
- Alternatively, choose Other Sound… at the bottom of the list to collect a sound saved on your computer.
- Click on OK to confirm.
- Play the animation to test it.
Setting triggers and adding bookmarks
The Triggers option is also available from the Advanced Animation group. This feature is useful if you need to create an action on click of a certain element on a slide, such as when audio starts playing an animation must start and continue for the duration. You can set up some creative actions within PowerPoint by setting up a bookmark to highlight a certain part of a video, for instance, and then use a trigger to action an animation when the video lands on the bookmark.
For this example, let's first set up the Bookmark so that we can action the bee animation when the bookmark is reached in the video:
- Click on Insert | Video | Stock Videos… and locate the leaves video.
- Re-arrange the objects on the slide so that the video becomes the background, and the bee and flower animations are placed in front of the video.
- Select the video, then play the video until you decide at which point on the timeline you would like the bee to animate. We have selected 00:04:02. Click on Playback | Add Bookmark. You will now see a yellow dot along the timeline, indicating the bookmark.
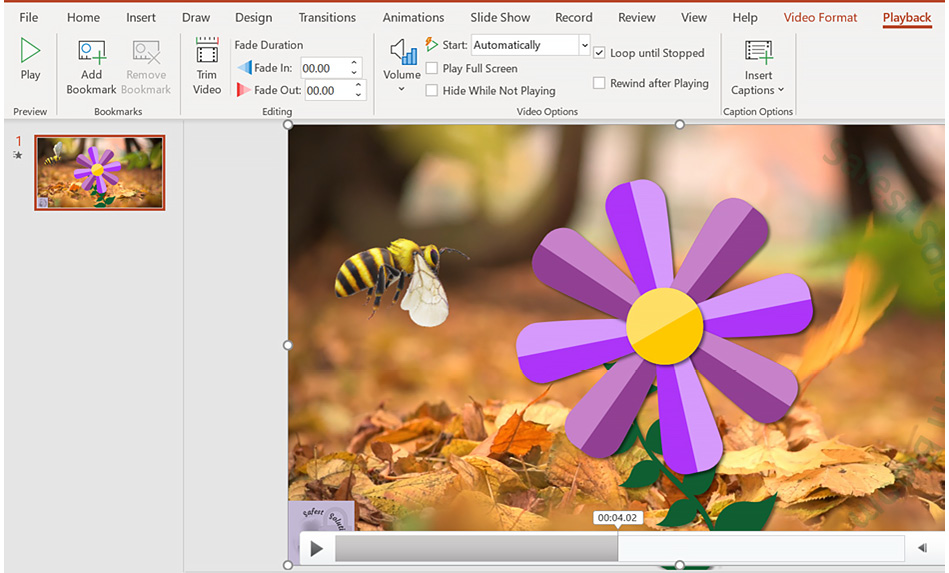
Figure 7.13 – Setting a bookmark along the video timeline
We are now ready to set the trigger:
- Select the object to set the action on.
- Click on Trigger, then select either On Click of or On Bookmark. For the On Bookmark feature to be active, you must have set up the bookmark on an object prior to the previous instructions. From the sub-menu, select the bookmark, namely Bookmark 1, within the video on which to action the bee.

Figure 7.14 – Adding a trigger to a bookmark
- Play the slide show or preview the animation, and make any adjustments if necessary.
We can also use the Animation Painter to pick up applied animations and apply them to other objects on the slide. Let's see how this is achieved.
Using the Animation Painter features
The Animation Painter feature is much the same as the Format Painter icon from within the Office programs. It allows you to copy animations from one object and apply them to another object. Single-clicking on the Animation Painter icon enables you to copy the animation from one object to another object. Just like the Format Painter, double-clicking on the Animation Painter icon enables you to copy the animation from one object to multiple objects:
- We will use the SSG-Planner.pptx presentation to demonstrate this example.
- Select an object on the slide and apply an animation to it. For this example, select the textbox on slide 1 and apply the following attributes:
- Select the Float In animation effect.
- Set the animation to Dim to another blue color after the animation, and then choose the By word option from the Animate text drop-down list, applying a 20% delay between words. This process can be seen in the following screenshot:
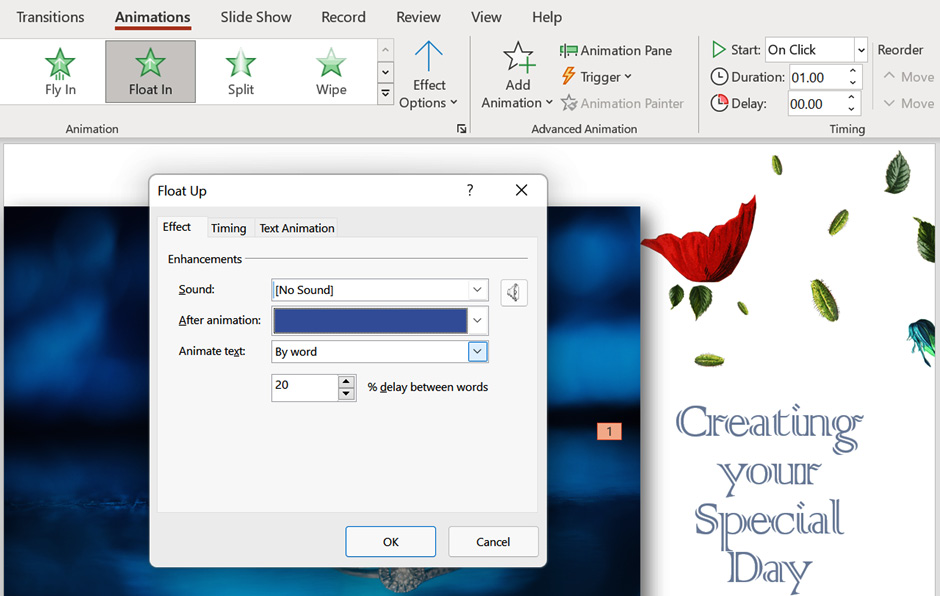
Figure 7.15 – Float In animation with customized effect options
- Make sure the textbox is selected on slide 1, and then single-click on the Animation Painter icon located on the Animations tab (in the Advanced Animation group) to copy once to another object, or double-click to copy multiple objects.
- The Painter icon will appear as the mouse pointer.
- Click on another object to paste the animation to it—we will copy the animation to all the textboxes throughout the presentation slides.
- The object that now contains the animation will indicate this by displaying the animation number positioned in the top-left corner of the object, and Animation Pane will update to reflect the new object animation.
- Press the Animation Painter icon to stop pasting the animation, or press the Esc key on the keyboard.
Reordering animations
Often, you may need to reorder animations, especially if you have a number of objects with multiple animations and effect options. At times, this could get a bit confusing, and a little editing would need to take place before you arrive at the perfect set of animation orders. The best way to achieve this is to use Animation Pane to drag and drop elements, moving them up or down in order. This was discussed at length in our previous edition book, Learn Microsoft Office 2019.
Now that we have mastered everything we need to know about animations, we will learn how to work with transitions.
Working with transitions
A transition is a motion effect that happens when the presentation moves from one slide to another. Remember that less is more and that too many animations and effects lead to a distracting presentation for an audience. Try to focus on the point of each slide.
Just like animations, transitions also have further effects and settings to customize after a transition has been selected. As we already know from the previous book, transitions fall under the following categories: Subtle, Exciting, and Dynamic Content. In our previous edition book, we concentrated on how to add transitions, include sound, and use the new Morph feature – in this edition, we will learn to add the advanced morph technique.
We have looked at timing under the Animations topic, for which the method is identical. Let's recap the Advanced Slide feature here.
Setting manual or automatic time advance options
Advancing slides manually (that is, on a mouse click) is set by default in a presentation. The slide will advance on the mouse click and play for the duration of the timing set (if any). You would then need to mouse-click again for the next slide to advance on screen, and so on. The Advance option is set under the Advanced Slide heading of the Timing group.
To change this option to automatically advance after a set number of seconds, do the following:
- Select the slide that contains the transition effect.
- From the Timing group, remove the tick next to the On Mouse Click option.
- Click on the checkbox next to the After heading, as illustrated in the following screenshot:

Figure 7.16 – Setting Advance options on slide transitions
- In the After text area, enter (in seconds) the time the slide should take to advance to the next slide. If you do not want to add additional seconds, leave the timing at 0 but ensure that the After setting is active.
We have already mastered the Morph transition effect in the previous edition book. In the next topic, we will learn to apply the Morph feature using a different technique.
Advanced morphing technique
As we learned from our previous edition book, Learn Microsoft Office 2019, the Morph transition transforms objects across slides and can be applied to WordArt, SmartArt, text, graphics, and shapes, but not charts. After you have applied the Morph transition, you can set various effects for objects, characters, or words.
In this example, we create an advanced morph using the Selection pane. Let's see how this is achieved here:
- Open the presentation named AdvMorphTransition.pptx.
- There are two slides in this presentation. The first slide contains a ring image to the top-left of the slide. Slide 2 contains the same image but it is resized and repositioned.
Note
The images do not need to be the same. You can have a ring shape on the first slide and a square on the other.
- Select the ring image on the first slide.
- Click on Graphics Format | Selection Pane. The Selection pane will populate to the right-hand side of the slide.
- While the ring image is selected on the slide, the relevant element in the Selection pane is highlighted automatically.
- Click on Graphic 7 (in this example), and rename it as !!ring. Note that you can add any name you like, but it must have the two exclamation points as a prefix.
- Press Enter to confirm.
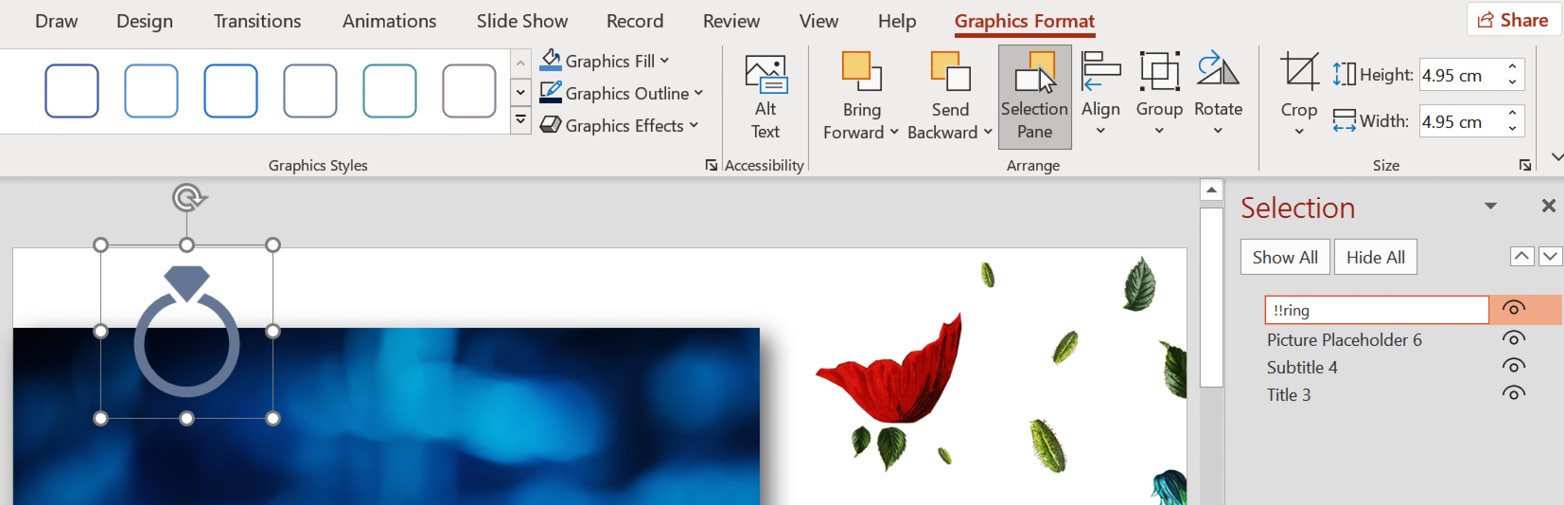
Figure 7.17 – Editing the name of the image using the Selection pane
- Now, select the ring on slide 2 and rename Graphic 6 as exactly the same name, !!ring.
- Lastly, apply the Morph transition on slide 2. Make sure slide 2 is selected, then visit Transitions | Morph.
- The effect will play on the slide. Launch the slide show from the beginning to see it in action.
Along with being able to set animations and transitions, we can add other actions and links to presentations.
Using hyperlinks, actions, and comments
In the previous edition book, we learned how to work with links. As this feature is exactly the same in terms of process, we will only concentrate on how to add Easy linking in this edition.
Easy linking
Easy linking is such a great tool when working with sections in PowerPoint. It allows you to drag a section heading onto another slide, which in turn creates a thumbnail of the first slide of the section with a link to that slide:
- Open the Zoom.pptx presentation.
- Note that there is an OUR PRODUCTS section heading just above slide 3.
- Click on slide 2 (we will create the link on this slide to demonstrate).
- Position the mouse pointer over the OUR PRODUCTS section heading and, while keeping the mouse depressed, drag the heading to slide 2, as illustrated in the following screenshot:

Figure 7.18 – Easy linking feature
- The link is created on slide 2 along with the thumbnail of slide 3.
- Resize or reposition the thumbnail on the slide as required, as illustrated in the following screenshot:

Figure 7.19 – Easy linking thumbnail on the slide
- Click on Slide Show and select From Current Slide to test the link.
Note
To remove a hyperlink, select the object or text that has a hyperlink applied, and right-click and choose Remove Hyperlink from the shortcut menu.
Editing a hyperlink
- Select the text or object that contains a hyperlink.
- Right-click and choose Edit Hyperlink… from the shortcut menu.
- The Edit Hyperlink dialog box appears. Make the change to the hyperlink.
- Click on OK to apply changes to the hyperlink.
Adding actions
You might be asking yourself what the difference is between hyperlinks and actions in PowerPoint. Hyperlinks are mainly used for navigation only. Actions can do the same things as hyperlinks but have many more options, and can be set up by hovering the mouse over an object, or by means of a mouse click:
- Click on an object to select it (we will use the Actions.pptx presentation for this example).
- Go to Insert | Links | Action.
- Select the Mouse Over tab.
- Choose the option that best suits your presentation. You will notice that you can hyperlink to Custom Shows and many more options from the Action Settings dialog box.
- Click on OK at the bottom of the dialog box to commit the changes.
- To remove an action, visit the Action Settings dialog box and select the None radio button at the top of the dialog box.
Using Zoom
The Zoom feature allows the creation of interactive links to a section summary, a section zoom, or a slide zoom. It is a quick way to insert links, essentially to move efficiently from one part of the presentation to another really quickly:
- Open a presentation or create a new one (we will use the Zoom.pptx presentation for this example). Create sections through the presentation, where necessary.
- Go to Insert | Zoom.
- You have a choice of three Zoom options (Summary Zoom, Section Zoom, or Slide Zoom).

Figure 7.20 – Zoom options
- Let's investigate the Summary Zoom option. For this feature to work, you will need to select the beginning slide for each of the sections you created, and then click on the Insert icon at the bottom of the dialog box to create the Summary Zoom slide with section links, as illustrated in the following screenshot:

Figure 7.21 – Selecting the first section slide, then clicking on Insert
The Summary Zoom slide is created with linked thumbnails to the first slide of each section. The Section Zoom option inserts a link to a section or sections on a thumbnail that, when presenting, will zoom to the corresponding section.
The Slide Zoom option is very similar to the Easy linking option. To follow along with the next example, open the presentation named City Berlin Design.pptx:
- Add a new slide to the presentation on which you would like to insert slide thumbnails to perform the Slide Zoom.
- Visit Insert | Zoom | Slide Zoom then simply choose slides to insert as thumbnails – we have selected slides 3, 4, and 5.
- Click the Insert button to add the thumbnails to the slide, then rearrange the thumbnails on the slide.
- When presenting, you simply click on the thumbnail to zoom to it, then click with the mouse button to see the next Zoom effect and slide in the presentation.
As previously discussed within the PowerPoint and Word chapters of this book, the Draw tab has had a revamp in this latest version. We will briefly revisit the option in the next topic.
Inking feature
If you draw with a pen, mouse pointer, or your finger on a touch-enabled device, PowerPoint will convert the drawing to shape automatically with the inking feature. Simply draw onto the slide background and watch the magic happen. When writing any math problems with a pen, mouse pointer, or finger, the writing will be converted to math symbols and will subsequently open up the Math Tools, Structures, and Symbols groups. Note that you can use different Drawing Tools to draw with ink on slides within the presentation:
- Click on the Draw tab on the ribbon, and then select Ink to Shape from the Content group, as illustrated in the following screenshot:

Figure 7.22 – Draw tab within PowerPoint 2021
- Draw onto the slide using the mouse pointer, or use a touch pen or your finger to draw a shape if you have a touch-enabled device. The drawing is immediately converted to a shape. After drawing text, select the text, and click Ink to Shape.
It is important to be skilled with different methods to present your slide content. Visit the next topic to learn more.
Exploring slide show options and custom shows
In this topic, you will learn how to set up a slide show using various options. The Loop continuously option is perfect for those conference marketing scenarios when you would like the show to run continuously on a monitor, and the Presenter View is great as you can view your speaker notes on your device while presenting to an audience.
You will be shown how to show all or specific slides in a presentation, as well as adjust slide timings and set slides to use these timings when presenting. The benefits of custom slide shows will be explained here.
Setting up a slide show
- Click on the Slide Show tab on the ribbon.
- Select the Set Up Slide Show icon.
- In the dialog box, select Show type as Presented by a speaker (full screen), as illustrated in the screenshot after the following information box:
Note
This is normally full screen, but there are other options, including Browsed at a kiosk, which is used when running business presentations without the presenter being in attendance, and without the option to skip slides. Once you have set up kiosk mode, rehearse slide timings by advancing to the next slide to set a time limit in order to cover the slide content for viewing. This is to make sure that the audience walking by is able to digest all the content on each slide.

Figure 7.23 – Set Up Show dialog box in PowerPoint 2021
- Under the Show options heading, select the Loop continuously until 'Esc' option if you are going to be repeating your slide show repetitively for a walk-by audience. Note that you also have the Show with or Show without narration options.
- From the Show slides heading, select which slides will need to be in the slide show while presenting the slide show to an audience.
If any custom shows are available in this presentation, they would display in the Custom Show drop-down list.
- The Advance slides category is very important—make sure that you select Using timings, if present so that you do not have to click your way through a presentation when presenting to an audience.
- Set Advance slides to Manually if you need to pause (or be in control) throughout the presentation while presenting to an audience.
Let's look at the Narration options in the next topic.
Playing narrations
If you have used narrations and recorded them using the Record Slide Show option from the Record tab options, you would need to make sure that when playing back to an audience, the relevant options are selected. These are located on the Slide Show tab ribbon, as illustrated in the following screenshot:

Figure 7.24 – Play Narrations feature in PowerPoint
- From the Slide Show tab (under the Set Up group), make sure that the Play Narrations checkbox is selected.
- Also, make sure that the option under the Set Up Show dialog box for Show without narration is not selected.
Let's see how we would set up Presenter View in the next topic.
Setting up the Presenter View
The Presenter View enables you to view speaker notes while presenting to an audience. The audience views the presentation on the main monitor, and the presenter views the presentation with access to speaker notes on another monitor. The Presenter View enables the presentation to be viewed on multiple monitors. In the Presenter View, you can also decide to darken or lighten the screen for the audience—for example, during a break or when a question-and-answer-type session is in progress:
- Open the presentation to set up viewing on multiple monitors. We will continue with the presentation from the previous topic.
- Insert speaker notes to help you with presenting to the audience. To help you, click on a slide to add speaker notes, and then click on the Notes icon on the status bar to activate the Notes section below the slide. Type the following note: Welcome to our presentation on Safest Solutions Group Travels. We hope to entice you to explore more of our wonderful trips on offer, including the appropriate cover for your journey.
- Click on Slide Show | Setup Slide Show.
- Locate the Use Presenter View checkbox, and then click to select it. If you have multiple monitors connected, the feature will automatically detect the primary and secondary monitors. Note that the Use Presenter View option is also present from the Monitors group on the Slide Show ribbon.
Often, we will need to make sure that timings are correct prior to presenting. Visit the next topic to learn how to set these up.
Setting up timings
You can rehearse your presentation to accommodate your slide advance timings. We will learn how to set the timings and set up the environment to use the timings. Make sure that the Using timings, if present option is selected if the presentation you are setting up has advanced slide timings selected throughout the presentation:
- Firstly, set the slide timings using the Advance Slide option on the Transitions tab
- Go to the Slide Show tab and select the Set Up Show icon to launch the dialog box.
- Under the Advance slides heading, make sure that Using timings, if present is selected. This option is illustrated in a previous screenshot under Setting up a slide show.
- Click on OK to commit the changes.
Let's learn how to set up media controls on a slide.
Showing media controls
The media controls are the icons that appear below the audio or video content inserted into the presentation:
- Click on the Slide Show tab on the ribbon.
- Locate the Set Up group.
- Make sure that the checkbox for Show Media Controls is selected, otherwise, the control buttons will not show when the presentation is being shown to an audience.
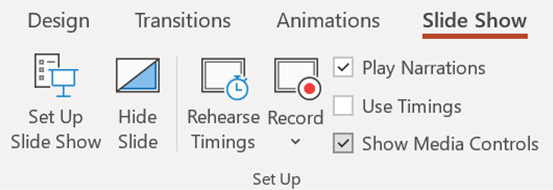
Figure 7.25 – Setting up media controls
Now that we are able to set timings and media controls, let's visit the Custom Slide Show options.
Creating a custom slide show
The Custom Slide Show feature in PowerPoint is extremely useful when you need to create several different shows within one PowerPoint presentation. Not all slides apply to all audiences, so different categories of slides can be sent to a custom show and named as such so that you can present just the right content for a particular audience, without having different presentations for different audiences/content:
- To create a custom show, click on the Slide Show tab on the ribbon.
- Click on the Custom Slide Show icon.
- Choose Custom Shows…, as illustrated in the following screenshot:

Figure 7.26 – Custom Slide Show option
- Click on the New… icon.
- Name the slide show by typing text into the Define Custom Show dialog box.
- Click to select slides to add to the custom show.
- Use the Add>> icon to move the slides to the right side of the dialog box, to be included in the new custom show. Click on OK when done. Note, it's very important to make sure that slides are included in a specific order (especially if preparing for an international computer examination).
- The new custom show will appear in the Custom Shows dialog box.
- To make changes, click on the Edit… icon.
- To delete the custom show, click on the Remove icon.
- To display the show, click on the Show icon.
- Click on Close when done.
- The new custom show will be visible when clicking on the Custom Slide Show icon on the Slide Show tab.
If viewing a presentation using a screen reader, you now have the ability to set the order. We will learn about this new option in the next topic.
Setting the reading order
While using a screen reader, you are now able to set the order of how the slide elements appear on the screen:
- Visit Review | Check Accessibility, then select the Reading Order Pane option from the drop-down list. The Reading Order pane will open to the left-hand side of the PowerPoint window.

Figure 7.27 – Setting the Reading Order when viewing on a screen reader
- Select the order you wish the elements to appear when viewing the presentation on a screen reader.
Along with the ability to set the reading order, we can now rehearse a presentation with help from a coach.
Rehearsing with Presenter Coach
The Rehearse with Coach tool is a new feature that is available on the desktop, web, and iPad versions of Microsoft Office 2021. The Coach incorporates artificial intelligence listening to you while you run through your presentation. After selecting Slide Show | Rehearse with Coach, click the Start Rehearsing button to the right-hand side of the slide. It will address talking speed, pitch, sensitive phrases, repetitive word fluency like "uhm", and detect whether you are reading from the slide. Once you press Esc on the keyboard, the tool will provide informative feedback for each of the topics mentioned in a Rehearsal Report.

Figure 7.28 – Rehearse with Coach features new to PowerPoint 2021
Using Body language with Presenter Coach
The Body language option provides feedback on video presentations prior to sharing with an audience. Let's see how this is achieved:
- Click on the Slide Show | Rehearse with Coach | Body language button to activate the option.
- Click the Rehearse with Coach button again to start checking the presentation.
- The presentation opens in Slide Show view. Click the Start Rehearsing button to the right of the slide.

Figure 7.29 – Rehearse with Presenter coach in Slide Show view
- Do a run-through of the presentation as you would when presenting to an audience. The Rehearse with Coach option will check body language/sound and alert you with a "beep" sound and provide feedback beneath the video image to the right-bottom corner of the slide:
- When too close to the camera, the coach will prompt you and provide feedback to move further away from the screen. It will indicate when you have the correct spot for presenting too!
- If you remove or adjust your glasses whilst presenting, swipe your hand through your hair, or scratch your face, the coach will provide feedback.
- When moving your head to the side, thereby removing eye contact with the audience, you will also be notified.

Figure 7.30 – Rehearse with Coach body language options
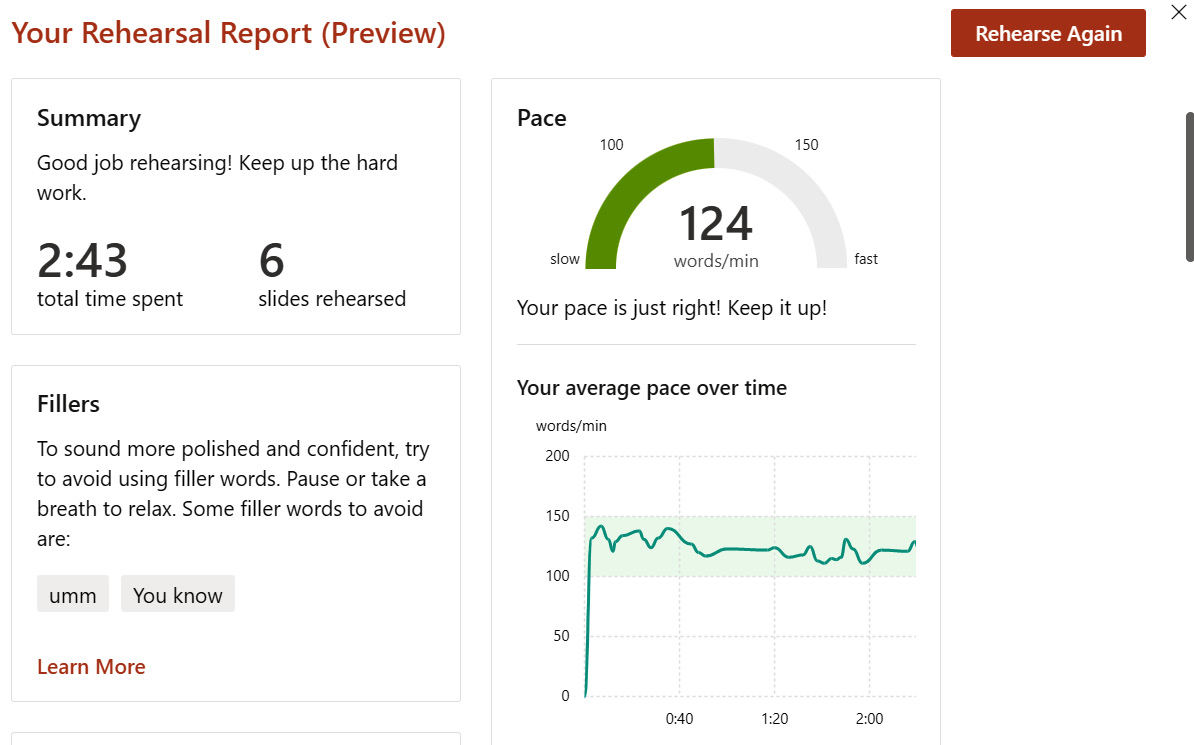
Figure 7.31 – Rehearsal Report
- You will need to scroll down the report to access more feedback.
- The summary will give feedback and take images of where things went wrong in the presentation, such as Eye contact, Clear view, and Distance. You will notice that it provides snippets of the video where you went wrong whilst presenting; visit the Body Language section for this feedback.

Figure 7.32 – Rehearse with Coach generated report
Overall, this is a great tool to aid the presenter in preparation to provide the best experience for the audience on the receiving end. We can now also record a presentation including our narration in the new version. Let's learn this in the next topic.
Recording a presentation
Narrating slides is possible using the new recording features within the Office 2021 platform. We can annotate the slide and record those actions too:
- Open the presentation named SSG-SetupSlideShow.pptx.
- Click Slide Show | Record | From Beginning… to record narration from the beginning of the presentation.
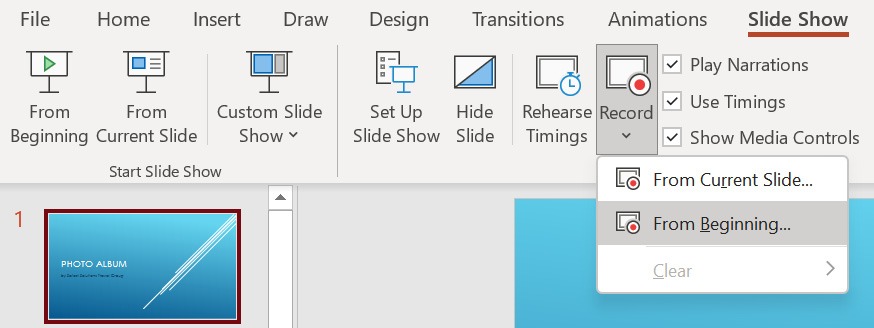
Figure 7.33 – Record button to add narration to a slide presentation
- If your camera is enabled, you will see the video at the bottom-right of the slide. Use the Record button to start recording the voiceover. Click Stop to end narration, and Replay to recap what you have recorded. The Notes button top-center is beneficial when you would like to read slide notes to narrate.

Figure 7.34 – The narration screen in PowerPoint 2021
- Click the Record button, then speak to record your voice. If you are reading from slide notes, the note drop-down will not record that action, only what you read from the notes.
- Any annotations you draw on the slide will record. So, if you draw a circle around a heading using the drawing tools, for example, the circle will play as animation as drawn onto the slide.
- You can record each slide separately, then use the Replay button to hear the narration and to see if all the annotations work correctly or record from one slide to the other.
- Move to the next slide by clicking on the forward arrow to the right of the slide. There is a laser pointer button at the bottom of the screen, along with the drawing tools, and microphone and camera buttons at the end.
- When you are finished narrating the presentation, click the Stop button. Any elements added to the presentation during narration will appear on the presentation slides. Click on Slide Show | From Beginning… to view the slide show.
We hope that you have enjoyed all these new features that aid efficiency and create engaging presentations. The last topic in this chapter is revisiting master slides and omitting certain slides when presenting.
Using master slides and hiding slides
In this topic, you will learn to create, modify, and format a master slide, and be able to hide or show certain slides when delivering a presentation.
Creating master slides
The slide master stores information such as logos, styles, and fonts, which the user can set as a default for all slides in the presentation. For instance, a company logo could be set in a certain position on the slide with certain attributes. When placed on the slide master, all slides within the presentation—and any new slide inserted in the presentation—will display the logo in the same position with the same attributes.
Any elements placed onto the slide master will not be editable when creating the presentation unless the user is familiar with editing master slides or has been given permission to do so. Editing master slides for different presentation slide layouts is extremely popular when companies wish to lock down branding for all stationery within a business:
- For this example, we will create a new presentation based on the Quotable theme.
- Click to select View | Slide Master. The slide master view is now displayed on the screen.
- Depending on the theme and the slides you have within the presentation, you will be presented with different slide layouts and masters, but you should see a slide master and then different layout masters beneath that in Slide Pane.
- Note that you can also create master slides for handouts and notes, as well as many other master slide layout types.
- Once you have activated the slide master, the Slide Master ribbon will open up with a lot of different options for you to use to customize your master slides, as can be seen in the following screenshot:

Figure 7.35 – Slide Master tab showing options within PowerPoint 2021
- We will insert a picture onto the slide background. Make sure that the picture is visible on all masters—if not, copy and paste to the various slide masters visible in Slide Pane.
- Click on the Insert tab, and then choose Pictures.
- Locate the picture on your computer and insert it onto the slide master, where appropriate. For this example, we will use SafestSolutionsLogo.png.
- Switch back to the Slide view to see whether the master has updated the slides in the presentation—notice that you are unable to select the picture, and all picture editing will need to happen in the Slide Master view.
- Click on the View tab and choose Normal.
- Click on the View tab and select Slide Master to return to master editing mode.
- Adjust the fonts, styles, colors, and effects, and add any text—such as footers—that you would like to appear on all slides as a master. We will update the font for the main titles to the Courgette font.
- Click on the Close Master View icon at the end of the ribbon to view the changes to the presentation.
- Experiment with the options available on the Slide Master tab to create the perfect presentation master for your requirements.
Hiding slides
At times, certain slides in the final presentation might not be suitable for the presentation audience. It is possible to hide slides in Slide Pane or in Slide Sorter View:
- Right-click on a slide to hide it.
- From the shortcut menu choose Hide Slide, or click on the Slide Show tab and choose Hide Slide, or use the Slide Sorter view to hide a slide. The former option is illustrated in the following screenshot:
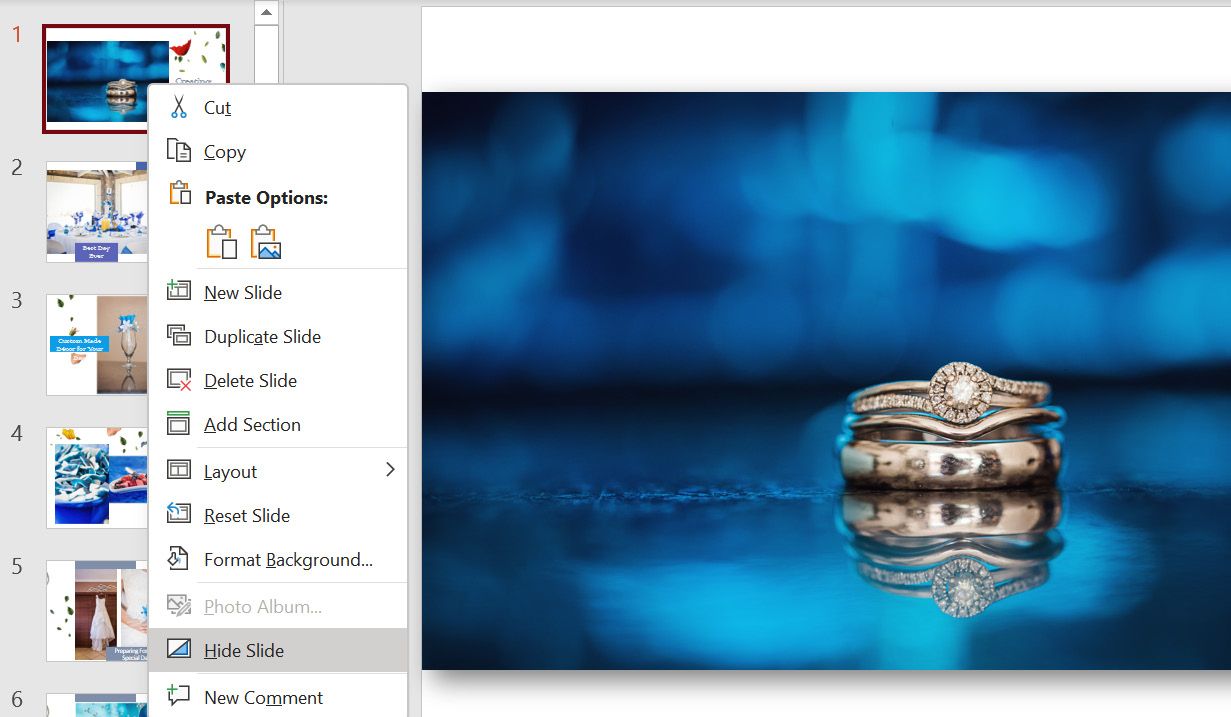
Figure 7.36 – Hide Slide option on the right-click menu
- An icon identifies hidden slides; this is located in the top-left corner of the slide (in Slide Sorter and Slide view).
- To unhide a slide, simply click on the Hide Slide icon again.
Summary
We have learned an abundance of skills in this detailed chapter, enabling the creation and modification of photo albums, and the ability to set up sections to create a presentation order and to hide slides, when appropriate. We have mastered the relevant presentation motions, effects, timing, transitions, and animations, and how they work with the final presentation output with the slide show options. Driving consistency with the use of slide masters to conserve company branding and productivity when creating presentations has been another important achievement in this chapter.
In the next chapter, we will focus on useful design and presentation principles to consider when creating professional presentations.
The following chapters will cover principles of presentation design, using clear messages and persuading an audience, as well as techniques to implement when adding visual impact.